Explain me complete prism cover test
Reading File
Finding Sources
Finding Sources
Reading File
Finding Sources
Reading File
Reading File
Finding Sources
Loading Image
Loading Image
Loading Image
Reading File
I now have comprehensive information from Kanski's Clinical Ophthalmology and the Wills Eye Manual. Let me compile the complete explanation.
Prism Cover Test — Complete Guide
What Is the Prism Cover Test?
The prism cover test (PCT) is the gold standard for measuring the angle of ocular deviation in strabismus. It combines the alternate cover test with neutralizing prisms to quantify both heterophorias and heterotropias. It measures the total deviation (latent + manifest components) because it fully disrupts fusion.
Prerequisite: The Cover Tests
Before the PCT, two simpler cover tests must be performed first.
1. Cover–Uncover Test (Detects Heterotropia)
- The examiner covers one eye and watches the uncovered fellow eye for movement.
- If the uncovered eye moves to take up fixation → heterotropia is present.
- Adduction of the uncovered eye → exotropia; abduction → esotropia.
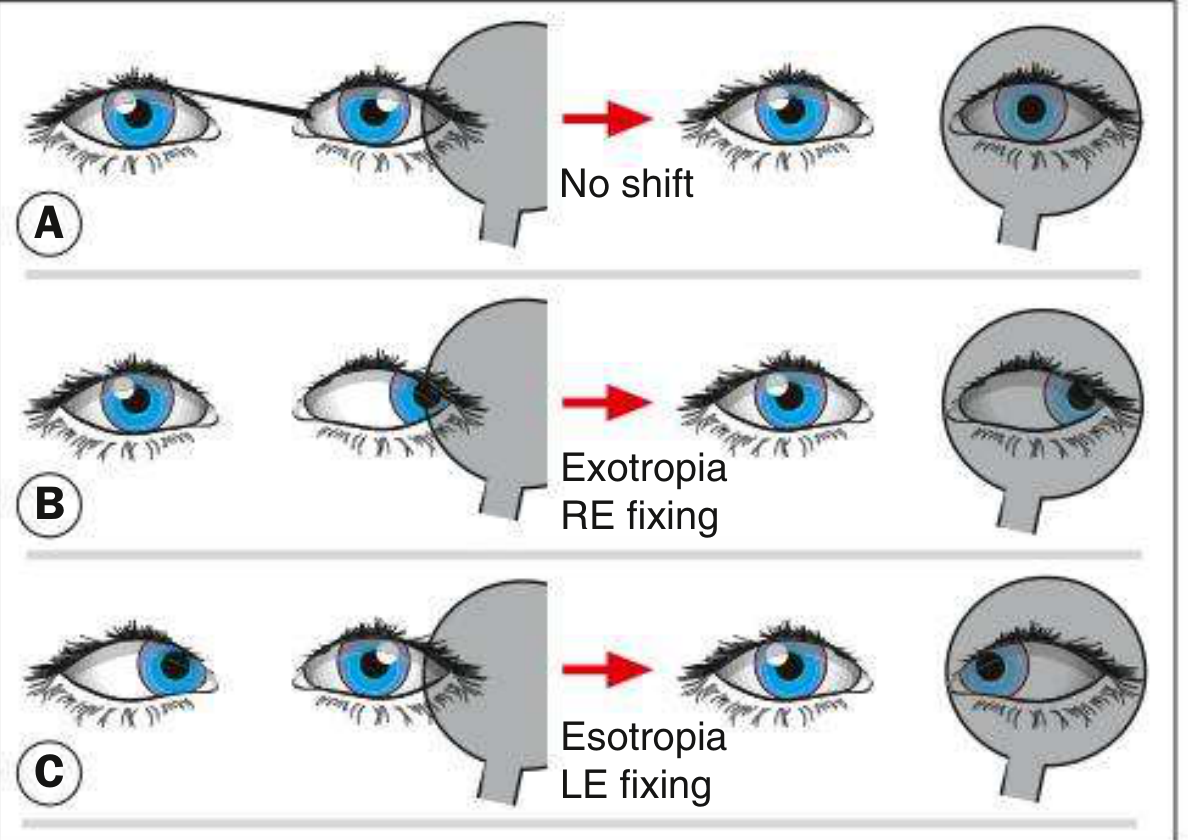
2. Uncover Test (Detects Heterophoria)
- After uncovering an eye, watch the previously covered eye for movement as fusion is restored.
- If it moves to regain alignment → heterophoria is present.
- Adduction on uncovering → exophoria; abduction → esophoria.

3. Alternate Cover Test
- The occluder is shifted repeatedly from eye to eye (every 2 seconds), fully dissociating fusion.
- Reveals the total deviation (phoria + tropia combined) by preventing recovery between covers.
- A well-compensated heterophoria may decompensate to a manifest deviation during this test.
- This step establishes the direction and approximate size of the deviation before prisms are introduced.
The Prism Cover Test: Step-by-Step

Setup & Fixation Targets
| Condition | Fixation Target |
|---|---|
| Distance deviation | Distant target (6 m) in primary position |
| Near deviation | Near accommodative target (~1/3 m) |
| Intermittent exotropia | Far distance fixation target |
| Incomitant squint | Eight diagnostic positions of gaze |
Procedure
Step 1 — Perform the alternate cover test to confirm the direction of deviation and its approximate magnitude.
Step 2 — Place a prism in front of one eye (either eye can be used; typically the eye with poorer vision or the deviating eye):
- Base direction is opposite to the direction of deviation (i.e., the apex points in the direction of the deviation).
| Type of Deviation | Prism Base Direction |
|---|---|
| Convergent squint (esotropia) | Base-OUT |
| Divergent squint (exotropia) | Base-IN |
| Right hypertropia | Base-DOWN before right eye |
| Left hypertropia | Base-UP before left eye |
Step 3 — Continue alternate covering while holding the prism. Watch the amplitude of refixation movement.
Step 4 — Increase prism strength progressively (using a prism bar — a series of prisms of increasing dioptric power mounted together). As the prism power approaches the angle of deviation, the refixation movement gets smaller.
Step 5 — Find the endpoint:
- No movement is seen when the prism neutralises the deviation.
- To ensure the maximum angle: increase the prism further until movement reverses direction (point of reversal), then reduce back to the neutral value.
- The prism strength at neutralisation = the angle of deviation in prism dioptres (Δ).
Point of reversal: When the prism is slightly over-correcting, the eye that was previously moving one direction will now move the opposite direction — this confirms you have passed the neutral point and helps bracket the true value.
Key Principles
Prism Optics
A prism bends light toward its base. The eye behind the prism must rotate toward the apex to fixate — this counteracts and neutralises the deviation.
What Is Measured
- Full total deviation (latent phoria + manifest tropia), because fusion is broken by alternately covering.
- Unlike the cover-uncover test, the PCT does not separately measure phoria vs. tropia — it gives the total.
Units
- Deviation measured in prism dioptres (Δ); 1Δ = displacement of 1 cm at 1 m distance.
- Roughly: 2Δ ≈ 1° of deviation.
Positions of Gaze Tested
| Position | Purpose |
|---|---|
| Primary position (distance + near) | Baseline measurement |
| Right gaze, left gaze | Horizontal comitance |
| Upgaze, downgaze | Vertical comitance |
| Head tilt right, head tilt left | Superior oblique assessment (Bielschowsky) |
For gaze positions, the patient's head is turned away from the target while the patient maintains fixation on it. E.g., right gaze is measured by turning the head left.
Measurements are taken with and without glasses in the primary position.
Limitations
| Limitation | Explanation |
|---|---|
| Requires fixation | Cannot be performed accurately in patients with very poor vision or nystagmus |
| Does not separate phoria from tropia | Only gives total deviation |
| Eccentric fixation | Results may be inaccurate if the deviating eye uses eccentric fixation |
| Examiner skill | Alternate covering speed and consistency affects accuracy |
Clinical Uses
- Quantifying strabismus before and after surgical correction
- Monitoring amblyopia treatment
- Diagnosing incomitant deviations (angle varies with gaze) — particularly useful in paralytic squint and restrictive strabismus
- Assessing vertical deviations and cyclodeviations (with appropriate prism orientation)
Sources:
- Kanski's Clinical Ophthalmology: A Systematic Approach, 10th ed., pp. 742–743
- The Wills Eye Manual, Office and Emergency Room Diagnosis and Treatment, p. 1112
Explain me complete krimsky test
Finding Sources
Finding Sources
Reading File
Reading File
Finding Sources
Loading Image
Finding Sources
Loading Image
Loading Image
Loading Image
I now have all the content and images needed. Here is the complete explanation:
Krimsky Test — Complete Guide
Background & Concept
The Krimsky test is a modified Hirschberg test that uses prisms to more accurately quantify the angle of a manifest strabismus (heterotropia). It is an objective test — it does not require the patient's verbal response — making it particularly valuable in:
- Young or uncooperative children
- Patients with poor vision in the deviating eye
- Patients who cannot perform the cover test (nystagmus, inability to fixate)
- Cases of eccentric fixation where the cover test may be unreliable
Prerequisite: The Hirschberg Test
The Krimsky test builds directly on the Hirschberg test, so understanding it first is essential.
Hirschberg Test
A pen torch is shone into both eyes from arm's length. The patient fixates the light:
- The corneal light reflex will be centred in the pupil of the fixating eye.
- In a squinting eye, the reflex is decentred, displaced in the direction opposite to the deviation.
Rough angle estimation from reflex position:
| Reflex Position (deviating eye) | Approximate Angle |
|---|---|
| Near centre of pupil | ~5° (10Δ) |
| Inner/temporal pupil border | ~10–15° (20–30Δ) |
| Mid-iris | ~25–30° (50–60Δ) |
| Limbus | ~45° (90Δ) |
Rule: 1 mm of displacement ≈ 7°; 1° ≈ 2 prism dioptres (Δ)
The Hirschberg test gives only a rough estimate because of parallax errors and variation in pupil size.
The Krimsky Test
Principle
Rather than neutralising the deviation by moving the deviating eye (as in a cover test), the Krimsky test neutralises the deviation optically by displacing the image seen by the fixating eye using a prism. The prism shifts the corneal reflex of the fixating eye until both reflexes are symmetrical — at that point, the prism power equals the angle of deviation.
Key distinction from the prism reflection test:
- Krimsky test → prism placed in front of the fixating eye
- Prism reflection test → prism placed in front of the deviating eye
The Krimsky test is preferred because placing the prism before the fixating eye reduces the parallax problem, making it more accurate and more commonly used.
Step-by-Step Procedure
Step 1 — Hirschberg assessment first
Shine a pen torch at arm's length and observe both corneal reflexes. Note:
- Which eye is fixating (reflex centred in pupil)
- Which eye is deviating (reflex decentred)
- Direction of deviation
Step 2 — Determine prism base direction
Place a prism in front of the fixating eye with the base oriented in the direction of the deviation:
| Type of Deviation | Base Direction (in front of fixating eye) |
|---|---|
| Esotropia (convergent) | Base-OUT |
| Exotropia (divergent) | Base-IN |
| Hypertropia (upward) | Base-DOWN |
| Hypotropia (downward) | Base-UP |
Step 3 — Increase prism strength progressively
Using a prism bar or loose prisms, increase prism power while continuing to shine the light and observe the corneal reflexes.
Step 4 — Endpoint
The endpoint is reached when the corneal light reflexes are symmetrical (both centred equally in their respective pupils).
The strength of the prism at this point = the angle of deviation in prism dioptres (Δ).
Illustration
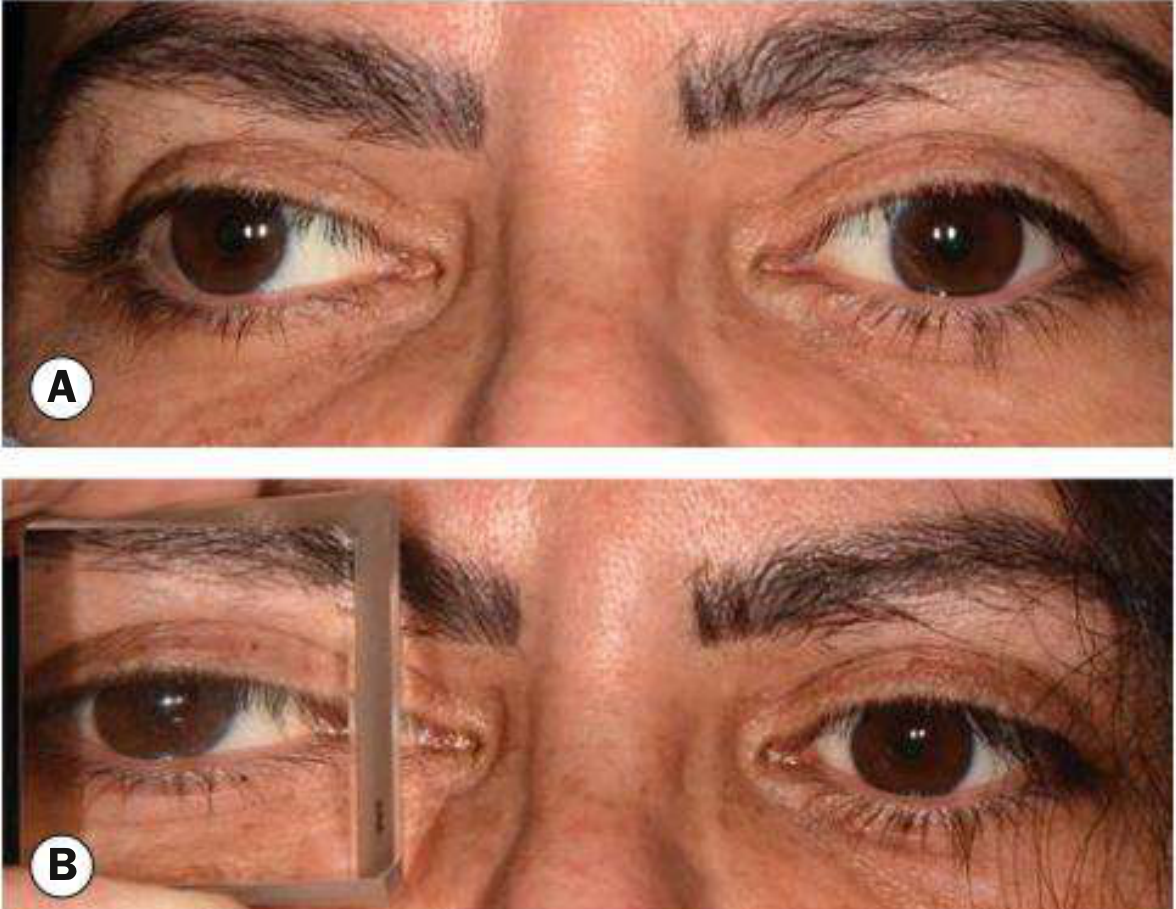
Fig. 18.31 — Krimsky test. (A) Right exotropia: the corneal reflex in the right eye is displaced nasally. (B) A large base-in prism is placed in front of the fixating (left) eye — the corneal light reflexes are now symmetrical. (Courtesy of M. Parulekar)
Note in image B: the prism is held in front of the left (fixing) eye. The reflex in the right (deviating) eye shifts to the centre once the correct prism power is found.
Clinical Examples
Example 1: Right Esotropia
- Right corneal reflex is displaced temporally
- Place prism base-out in front of the fixing left eye
- Increase power until both reflexes are centred
Example 2: Left Exotropia
- Left corneal reflex is displaced nasally
- Place prism base-in in front of the fixing right eye
- Increase until reflexes are symmetrical
Example 3: Right Hypertropia
- Right corneal reflex is displaced downward
- Place prism base-down in front of the fixing left eye
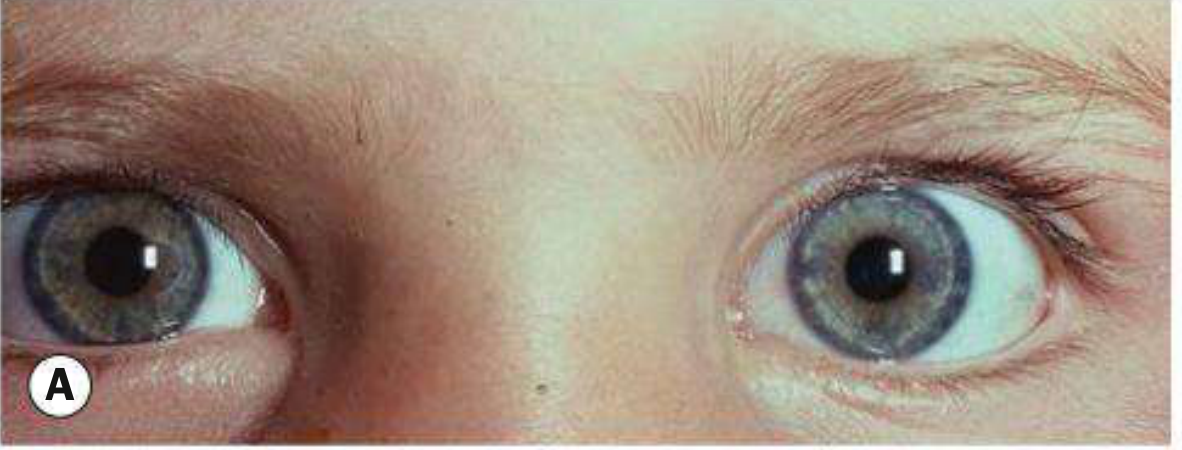
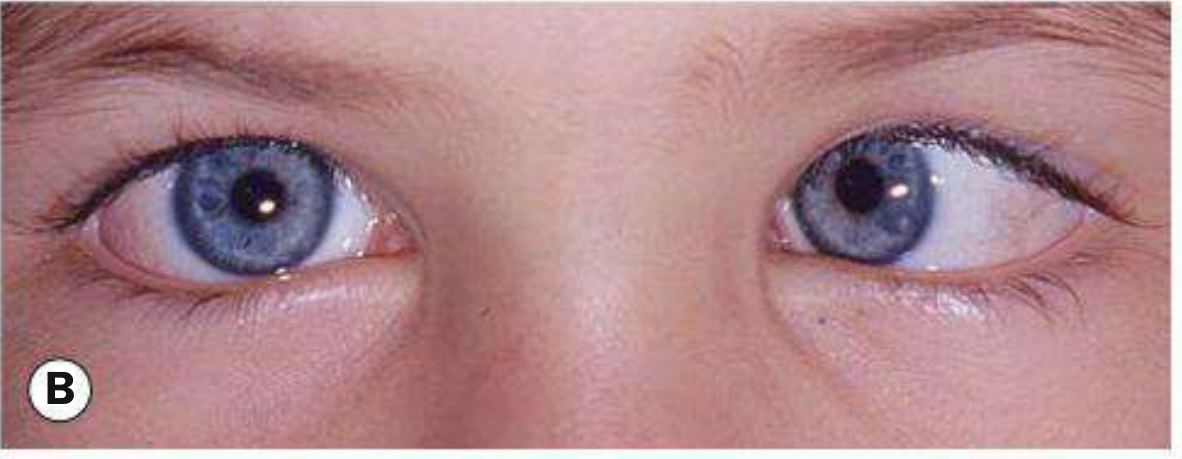
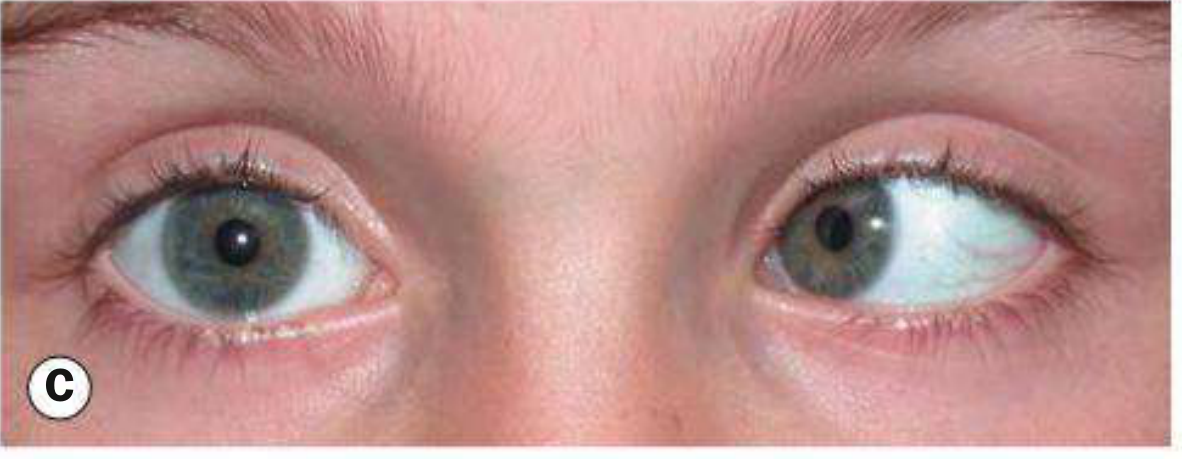
What Normal Corneal Reflexes Look Like
These photos show the spectrum of Hirschberg findings that precede Krimsky testing:
Advantages & Limitations
| Feature | Detail |
|---|---|
| Objective | No verbal response from patient needed |
| Useful in poor vision | Does not require fixation from the deviating eye |
| Useful in children | Quick, does not require cooperation beyond fixating a light |
| Reduces parallax | Prism on fixating eye avoids the parallax error of the prism reflection test |
| Only detects manifest deviation | Cannot detect heterophoria (latent deviation) — fusion is not disrupted |
| Less accurate than PCT | Not as precise as the prism cover test for cooperative patients |
| Eccentric fixation | Can give false readings if the fixating eye itself has eccentric fixation |
| Angle Kappa effect | Positive or negative angle kappa can make the reflex appear off-centre even without strabismus |
Krimsky vs. Prism Cover Test — When to Use Which
| Situation | Preferred Test |
|---|---|
| Cooperative patient, good vision both eyes | Prism Cover Test (more accurate) |
| Young child, uncooperative | Krimsky Test |
| Poor vision / dense amblyopia in one eye | Krimsky Test |
| Nystagmus | Krimsky Test |
| Need to measure both phoria + tropia | Prism Cover Test |
Source: Kanski's Clinical Ophthalmology: A Systematic Approach, 10th ed., pp. 741–742
This is a shared conversation. Sign in to Orris to start your own chat.