
PT management of barton #
"Barton fracture" physiotherapy rehabilitation
PMID: 37849595
Barton fracture distal radius volar dorsal X-ray
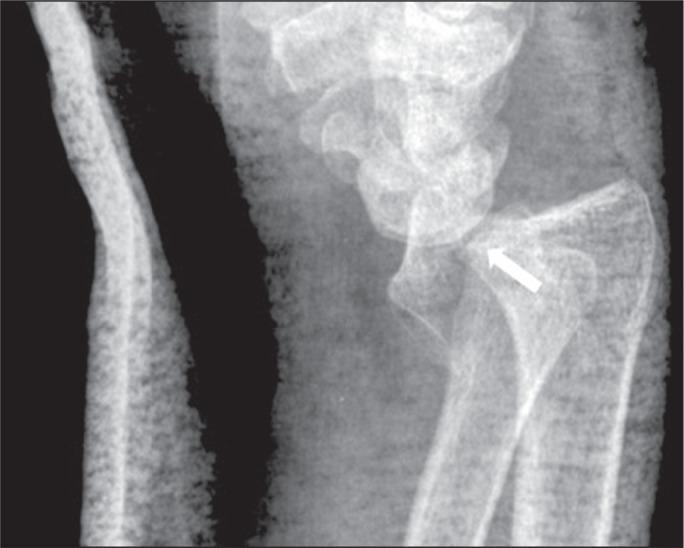
This lateral X-ray of the wrist demonstrates a volar Barton fracture, a specific type of distal radius injury. The diagnostic image clearly shows a partial articular fracture involving the volar rim of the distal radius (indicated by a white arrow), which extends into the radiocarpal joint space. Significant volar dislocation of the carpus is evident, characterized by the displacement of the carpal bones towards the palmar side of the wrist, resulting in a complete loss of normal radiocarpal alignment. Key anatomical landmarks visible include the distal radius, distal ulna, and the proximal carpal row. This injury pattern typically results from high-energy trauma or falls and is clinically significant for its inherent instability, often requiring surgical intervention to restore joint congruence. The image serves as a classic educational example of a volar-type shear fracture-dislocation of the distal radial articular surface.
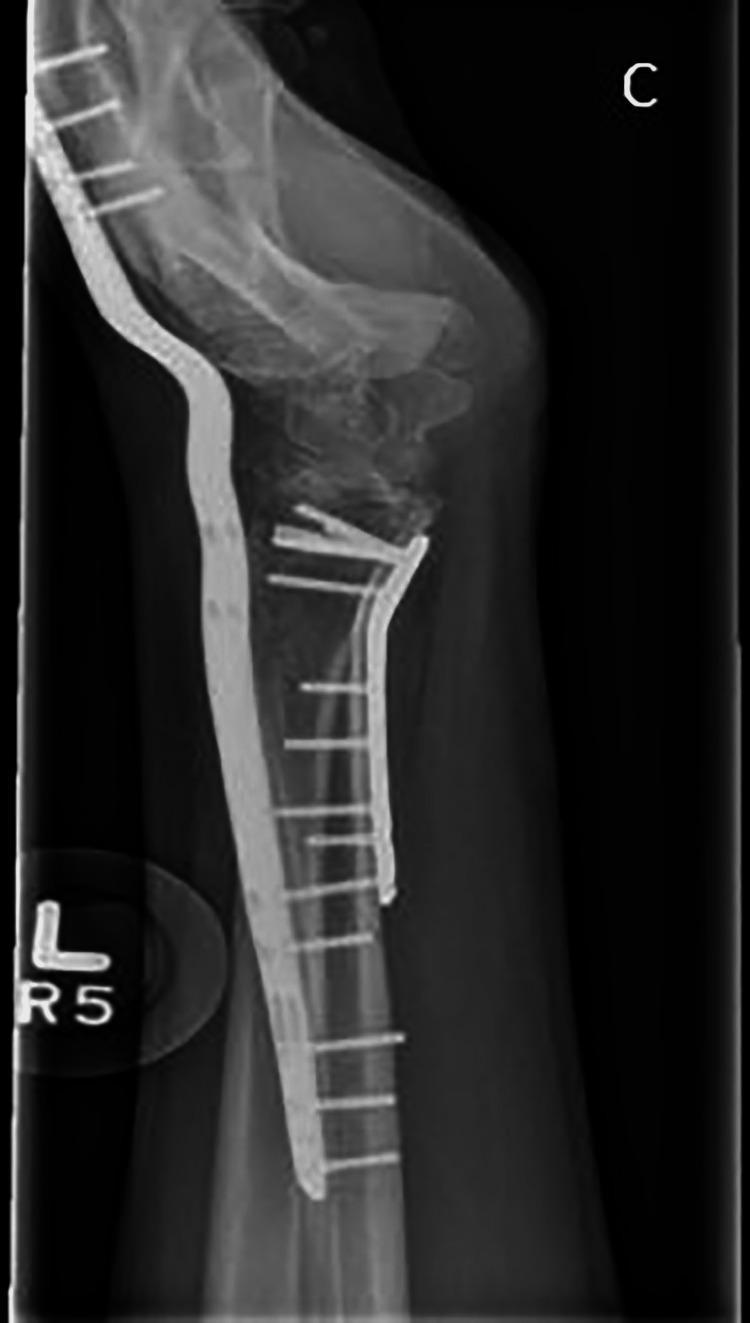
This lateral X-ray radiograph of the left wrist demonstrates post-operative stabilization of a complex distal radius fracture using a dual-plate fixation technique. A volar locking plate is positioned on the anterior aspect of the distal radius, secured with multiple locking screws to maintain articular alignment. Additionally, a long dorsal wrist-spanning plate is visible on the posterior aspect, extending from the radial shaft across the radiocarpal and midcarpal joints to the metacarpals. This spanning hardware acts as an internal fixator to offload the volar fixation and maintain longitudinal traction. The radiograph indicates restored length, rotation, and neutral tilt of the distal radius. The carpal bones, including the lunate and scaphoid, show improved spatial orientation relative to the radial articular surface. This imaging is characteristic of orthopedic management for highly comminuted distal radius fractures or fracture-dislocations where primary volar stability alone is insufficient.
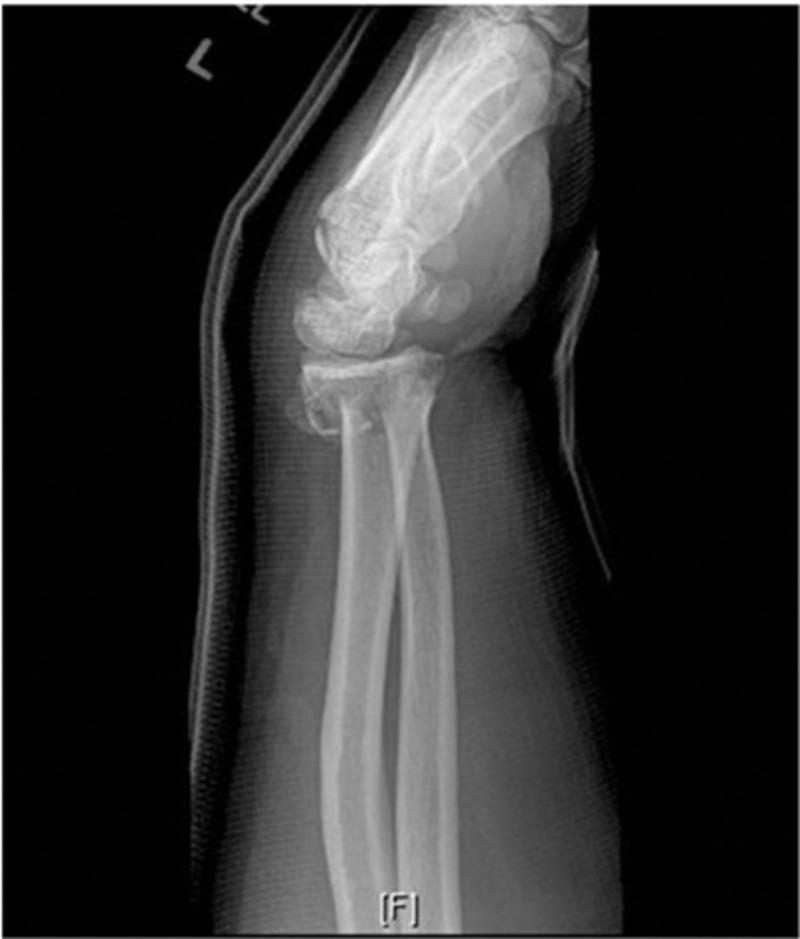
A diagnostic lateral X-ray of the left wrist demonstrating an acute, comminuted fracture of the distal radius. The distal radial fragment exhibits significant dorsal angulation and dorsal displacement, characteristic of a Colles-type injury pattern. There is associated cortical disruption and multi-fragmentary bone involvement at the metaphyseal-diaphyseal junction. Additionally, a displaced fracture of the ulnar styloid process is visible. The radiograph is taken through a dorsal splint or cast material, which is visible as a radiopaque shadow bordering the posterior aspect of the forearm and hand. This image is clinically significant for illustrating common orthopedic trauma following a fall on an outstretched hand (FOOSH), highlighting the loss of normal volar tilt and the resulting dorsal deformity. It serves as a classic educational example of unstable distal radius fractures requiring surgical consideration due to dorsal angulation and comminution.
Physiotherapy Management of Barton's Fracture
What Is a Barton's Fracture?
- Dorsal (classic) Barton's: fracture of the dorsal rim + dorsal carpal subluxation - caused by dorsiflexion and pronation force
- Volar (reverse) Barton's: fracture of the volar rim + volar carpal subluxation - less common, caused by a fall on outstretched hand in supination
- Tintinalli's Emergency Medicine, p. 1848-1849
- Rosen's Emergency Medicine, p. 613
Surgical Management (Context for PT)
PT Management Phases
Phase 1 - Acute/Immobilization Phase (0-2 weeks post-op)
- Edema control: Elevation of the limb above heart level; retrograde massage; compression glove if needed
- Cryotherapy: Ice packs over the cast/splint for 15-20 min, 4-6x/day to reduce pain and swelling
- Finger exercises: Full active range of motion (ROM) of all finger joints (MCP, PIP, DIP) - tendon gliding exercises prevent adhesions
- Thumb ROM: Active flexion/extension and opposition
- Shoulder and elbow: Full ROM exercises to prevent proximal joint stiffness
- Wrist immobilized in the post-operative cast/splint - do NOT mobilize the wrist at this stage
- Patient education: Limb positioning, activity restrictions, signs of complications (numbness, severe swelling)
Phase 2 - Early Mobilization Phase (2-6 weeks post-op)
- Active-assisted ROM (AAROM) and active ROM (AROM):
- Wrist flexion and extension
- Radial and ulnar deviation
- Forearm pronation and supination (critical - often the most restricted movement)
- Gentle mobilization: Grade I-II joint mobilization of radiocarpal and midcarpal joints if stiff
- Tendon gliding exercises: Continued for flexors and extensors
- Scar management (if surgical incision): Scar massage from 3 weeks onward once wound healed; silicone gel/sheet if hypertrophic
- Thermotherapy: Warm soaks/paraffin wax bath before ROM exercises to improve tissue extensibility
- Splinting: Removable wrist splint for protection between exercises; night splinting to maintain ROM
- Neuromuscular re-education: Begin gentle wrist stabilization activities
Phase 3 - Strengthening Phase (6-10 weeks post-op)
- Grip strengthening: Putty exercises, therapeutic squeeze ball - progress resistance gradually
- Pinch strengthening: Lateral (key), tip, and tripod pinch with theraband/putty
- Wrist strengthening: Wrist curls and reverse curls with light resistance (theraband or light dumbbells)
- Forearm rotation strengthening: Pronation/supination with theraband or weighted bar
- Intrinsic muscle exercises: Lumbrical bar exercises, interosseous strengthening
- Proprioception training: Weight-bearing through the wrist on a wobble board or unstable surface (if tolerated and surgeon-cleared)
- Hydrotherapy: Water-based exercises for ROM and early strengthening if available
Phase 4 - Functional Rehabilitation (10-16+ weeks)
- Functional task training: Simulated ADL tasks - writing, dressing, cooking, lifting
- Work hardening / occupation-specific tasks: Based on the patient's occupational demands (e.g., keyboard use for office workers, heavier lifting for manual workers)
- Progressive resistance exercises: Closed kinetic chain exercises through the wrist, push-ups on flat then fisted hand, weight-bearing on knees
- Sport-specific rehabilitation: If athlete - sport-specific drills, ball handling, racquet sports progressions
- Outcome measure reassessment: Upper Extremity Functional Index (UEFI), DASH score, grip dynamometry
Key Outcome Measures Used in PT
| Measure | What It Assesses |
|---|---|
| VAS / NRS | Pain intensity |
| Goniometry | Wrist and forearm ROM |
| Jamar dynamometer | Grip strength |
| Pinch meter | Pinch strength |
| DASH / QuickDASH | Upper limb disability and function |
| UEFI | Upper extremity functional independence |
| PRWE | Patient-rated wrist evaluation |
Common Complications to Monitor During PT
- Carpal tunnel syndrome - median nerve compression from edema or hardware; watch for tingling/numbness in first 3 digits. A 2024 Cureus case report describes use of a robotic hand glove in PT management of CTS secondary to volar Barton's fracture
- CRPS (Complex Regional Pain Syndrome) - burning pain, allodynia, trophic changes; requires early recognition and multidisciplinary management
- Posttraumatic arthritis - especially with incomplete articular reduction; affects long-term ROM
- Tendon adhesions / rupture - extensor pollicis longus rupture is a recognized late complication of distal radius fixation
- Stiffness - forearm rotation and wrist extension are the most common deficits; aggressive but pain-free mobilization is key
- DRUJ (distal radioulnar joint) instability - assess forearm rotation carefully; may need DRUJ splinting
Summary Timeline
| Phase | Weeks | Focus |
|---|---|---|
| Immobilization | 0-2 | Edema, fingers, proximal joints |
| Early mobilization | 2-6 | Wrist/forearm AROM, scar |
| Strengthening | 6-10 | Grip, pinch, resistance |
| Functional rehab | 10-16+ | ADLs, work, sport |
PT management of hip dislocation
"hip dislocation" rehabilitation physiotherapy
hip dislocation posterior anterior types diagram
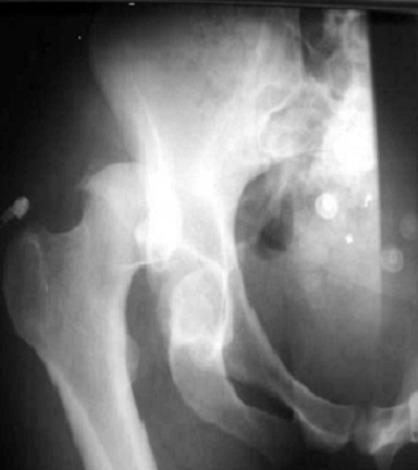
Anterior-posterior (AP) radiograph of the hip demonstrating a posterior hip dislocation and an associated acetabular fracture. The spherical femoral head is displaced superiorly and laterally relative to the acetabulum, indicating loss of articular congruity. A distinct, large bony fragment is visible adjacent to the posterior rim of the acetabulum, characteristic of a posterior wall fracture. This orthopedic emergency showcases a classic fracture-dislocation pattern, where the integrity of the posterior acetabular wall is compromised as the femoral head is forced out of the socket. The image is a critical educational example of pelvic trauma imaging, emphasizing the need for anatomical reduction and assessment of joint stability.
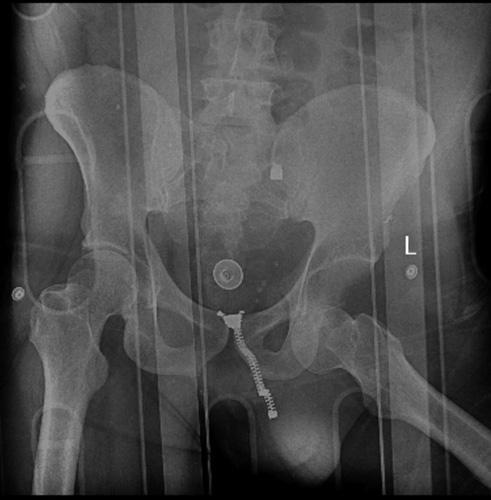
Anterior-posterior (AP) pelvic X-ray demonstrating an inferior dislocation of the left hip (luxatio erecta femoris). The left femoral head is displaced inferiorly and medially relative to the acetabulum, positioned near the obturator foramen. The left femur is abducted, and the femoral shaft is oriented horizontally/superiorly compared to the neutral right femur. In contrast, the right hip joint shows normal articulation with the femoral head centered within the acetabulum. No acute fractures of the pelvic ring, acetabulum, or proximal femurs are visible. Metallic artifacts are present, including a zipper-like structure and circular fasteners (likely from clothing or medical monitoring equipment) overlying the pelvic midline and lateral soft tissues. Vertical radiopaque lines across the image suggest a spinal board or transport device. This image serves as a clinical example of traumatic hip dislocation and its characteristic radiographic appearance.
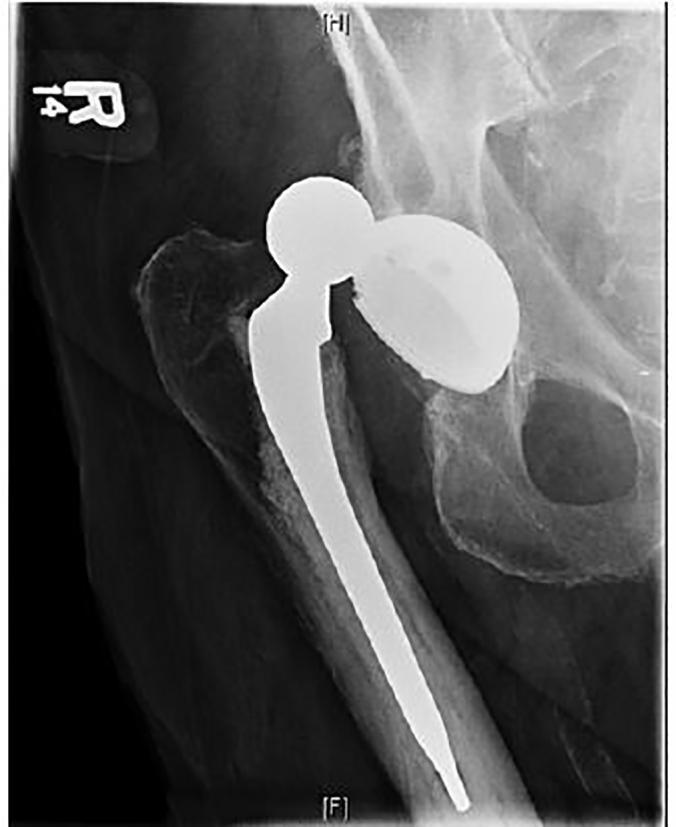
Anterior-posterior (AP) radiograph of the right hip demonstrating a total hip arthroplasty (THA) with superior dislocation. The image shows the radio-dense prosthetic components: a hemispherical acetabular cup seated within the ilium and a femoral component consisting of a metallic stem and a spherical femoral head. The femoral head is positioned entirely outside the acetabular cup, displaced superiorly toward the iliac wing, indicating a complete prosthetic joint dislocation. The femoral stem remains properly seated within the medullary canal of the proximal femur. No acute periprosthetic fractures are immediately evident. This diagnostic image illustrates a common orthopedic complication post-hip replacement, requiring clinical intervention for joint reduction. Anatomical landmarks include the pelvis, specifically the acetabulum and obturator foramen, and the proximal femur with the greater and lesser trochanters.
Physiotherapy Management of Hip Dislocation
Background & Classification
- Tintinalli's Emergency Medicine, p. 1887
- Rockwood & Green's Fractures in Adults 10th ed, p. 2574
Classification (Thompson & Epstein for Posterior)
| Type | Description |
|---|---|
| I | Dislocation ± minor fracture |
| II | Dislocation + single large posterior acetabular rim fracture |
| III | Dislocation + comminuted rim fracture |
| IV | Dislocation + acetabular floor fracture |
| V | Dislocation + femoral head fracture (further sub-classified by Pipkin) |
Emergency Management (Pre-PT Context)
- Closed reduction within 6 hours is critical. AVN risk rises from <10% to ~25% when reduction is delayed beyond 10-15 hours.
- Closed reduction under procedural sedation (Allis maneuver) is standard for posterior dislocations.
- Post-reduction: AP/lateral pelvis X-ray + fine-cut CT hip to confirm congruency and detect occult fractures.
- ORIF is required for irreducible dislocations, associated acetabular fractures, or incongruent reductions.
PT Management: Phase-Based Protocol
Phase 1 - Acute/Bed Rest Phase (Days 0-5 post-reduction)
- Bed rest with hip in safe position - avoid positions that risk re-dislocation (see precautions below)
- Positioning aids: Abduction pillow (especially for anterior dislocations and THA patients) to maintain safe alignment
- Cryotherapy: Ice pack over hip to control post-injury/post-op swelling
- Ankle pumps and calf exercises: Started immediately to prevent DVT
- Isometric exercises: Quadriceps sets, gluteal sets, abdominal bracing - maintain muscle tone without joint stress
- Upper limb exercises: Keep shoulders, elbows, and wrists mobile for crutch preparation
- Patient education: Hip precautions specific to dislocation direction (see below), mobility restrictions, DVT awareness
Phase 2 - Protected Mobilization Phase (Weeks 1-4)
- Weight-bearing status: Typically toe-touch weight-bearing (TTWB) or partial weight-bearing (PWB) with bilateral axillary crutches for 4-6 weeks - surgeon-directed
- Simple dislocation (Type I): may progress to PWB earlier (2-3 weeks)
- Fracture-dislocation or ORIF: often TTWB for 6 weeks
- Gait training with crutches: Correct gait pattern, step-through progression, stair training with rails
- Active-assisted ROM (AAROM): Gentle hip flexion (to 70-90°), extension, and abduction within pain-free range
- Posterior dislocation: avoid hip flexion >90°, internal rotation, adduction (triad of re-dislocation)
- Anterior dislocation: avoid hip extension, external rotation, abduction
- Quadriceps strengthening: Straight leg raises (SLR), short arc quads
- Hip abductor activation: Side-lying clamshells, abductor squeezes (crucial for gait mechanics)
- Proprioceptive exercises: Start in supine/sitting - weight shifts and weight-bearing sense re-education
- Edema management: Elevation, compression stockings, retrograde massage
- Scar management (post-ORIF): Scar massage from 3 weeks once wound healed
Phase 3 - Progressive Strengthening Phase (Weeks 4-8)
- Progress to full weight-bearing (FWB) as tolerated, guided by pain, stability, and radiographic healing - typically around 4-6 weeks for uncomplicated cases
- Wean from crutches progressively: two crutches → one crutch (contralateral side) → walking stick → unaided
- Closed kinetic chain exercises:
- Mini-squats (0-45°)
- Step-ups and step-downs (start with low step)
- Terminal knee extensions
- Wall slides (partial range)
- Hip abductor and external rotator strengthening: Side-lying abduction, resistance band exercises, clamshells with resistance
- Hip extensor strengthening: Prone hip extension, bridging
- Core stability: Transversus abdominis activation, dead bugs, bird-dogs
- Pool therapy (hydrotherapy): Buoyancy-assisted gait, ROM, and strengthening - excellent for this phase if available
- Gait re-education: Correct Trendelenburg gait, normalize cadence and step length; treadmill walking if available
- Balance and proprioception: Single-leg stance (pain-free), wobble board (bilateral weight-bearing), BOSU training (later)
Phase 4 - Functional Rehabilitation (Weeks 8-16+)
- Advanced strengthening: Leg press, lunges, Romanian deadlifts (light), resistance band side-walks
- Plyometric progression (if athlete): Double-leg box jump → single-leg hop progressions
- Sport-specific drills: Change of direction, agility ladders, sport simulation
- Work conditioning: Simulated occupational tasks (e.g., prolonged standing, lifting, stair climbing)
- Progressive aerobic conditioning: Stationary bike (seat height adjusted to stay within ROM limits), elliptical trainer, swimming
- Outcome measure reassessment: Harris Hip Score, Hip disability and Osteoarthritis Outcome Score (HOOS), SF-36
Hip Precautions (Critical for PT)
| Dislocation Type | AVOID |
|---|---|
| Posterior | Hip flexion >90°, adduction past midline, internal rotation (the "posterior hip precautions") |
| Anterior | Hip extension, external rotation, abduction |
- Do not cross legs
- Do not bend forward past 90° at the hip (e.g., picking up from floor, tying shoelaces)
- Do not sit in low chairs or toilet seats - use raised toilet seat
- Pivot on the uninvolved leg, not the injured side
- Sleep with abduction pillow between knees
Complications to Monitor During PT
| Complication | Signs to Watch | Timing |
|---|---|---|
| Avascular necrosis (AVN) | Groin pain, reduced ROM, antalgic gait | 2 months - 2 years post-injury |
| Post-traumatic osteoarthritis | Joint stiffness, activity-related pain | Late (months-years) |
| Sciatic nerve injury | Foot drop, weakness of knee flexion, numbness - occurs in ~10% of posterior dislocations | Immediate |
| Femoral nerve/vessel injury | Sensory loss anterior thigh, reduced femoral pulse - anterior dislocations | Immediate |
| Heterotopic ossification (HO) | Reduced ROM, pain, palpable mass | Weeks-months post-op |
| DVT/PE | Calf swelling, shortness of breath | Acute phase |
| Re-dislocation | Sudden pain, deformity - if precautions breached | Any time in first 3 months |
Outcome Measures
| Tool | Purpose |
|---|---|
| Harris Hip Score | Hip function and pain |
| HOOS (Hip disability & OA Outcome Score) | Patient-reported hip outcomes |
| VAS/NRS | Pain |
| Goniometry | Hip ROM (flexion, extension, ER/IR, abduction) |
| 6-Minute Walk Test | Functional endurance |
| Trendelenburg test | Abductor strength/gait pattern |
| Timed Up and Go (TUG) | Functional mobility and fall risk |
Summary Timeline
| Phase | Timeframe | Key PT Focus |
|---|---|---|
| Acute | Days 0-5 | Isometrics, positioning, patient education |
| Protected mobilization | Weeks 1-4 | TTWB/PWB gait, AAROM within precautions, early strengthening |
| Progressive strengthening | Weeks 4-8 | FWB, CKC exercises, gait normalization |
| Functional rehab | Weeks 8-16+ | Sport/work return, advanced strengthening |
PT management of defemur head #
"femoral head fracture" rehabilitation physiotherapy
Pipkin femoral head fracture classification types
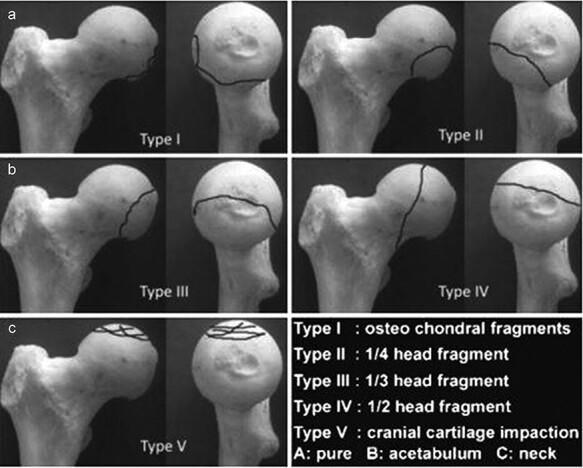
This orthopaedic anatomical diagram illustrates the Chiron classification (2004) for femoral head fractures, shown across five categorized types (Type I to Type V). Each type is presented using a dry bone model of the proximal femur from two perspectives: a lateral/oblique view and a frontal view of the femoral head. Fracture lines are demarcated by solid black lines to indicate the morphology and size of the fracture fragments. Type I displays small osteochondral fragments at the superior-lateral aspect. Type II shows a 1/4 head fragment on the anterior-superior surface. Type III demonstrates a 1/3 head fragment extending from superior to posterior. Type IV depicts a vertical fracture dividing approximately 1/2 of the femoral head. Type V illustrates cranial cartilage impaction with multiple intersecting lines across the superior articular surface. The classification is clinically relevant for orthopedic surgeons and residents for determining the severity of femoral head trauma and informing surgical decisions, such as fragment fixation versus excision based on size and location.
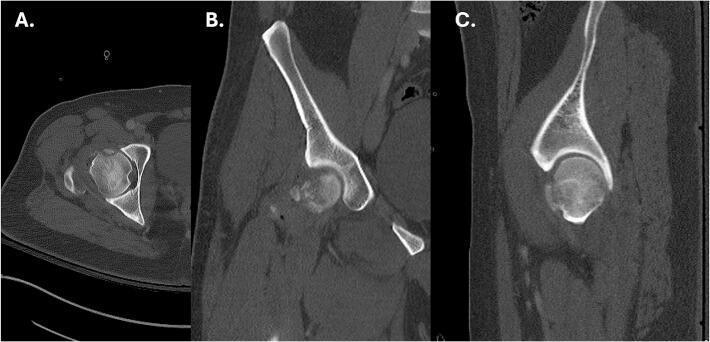
This diagnostic image consists of multiplanar computed tomography (CT) scans of the right hip in axial (A), coronal (B), and sagittal (C) views. The images demonstrate an acute femoral head fracture (Pipkin classification) with associated posterior hip dislocation. In the axial view (A), there is a visible disruption of the anterior-medial cortical margin of the femoral head. The coronal view (B) highlights comminution with small, hyperdense, displaced bone fragments situated within the inferior aspect of the acetabular fossa and hip joint space. The sagittal view (C) confirms cortical irregularity and loss of the normally smooth, spherical contour of the femoral head. These findings are clinically significant for orthopedic trauma assessment, illustrating the intra-articular nature of the fracture and the necessity of evaluating joint congruity following traumatic dislocation. The content is suitable for medical education focusing on musculoskeletal radiology and trauma management.
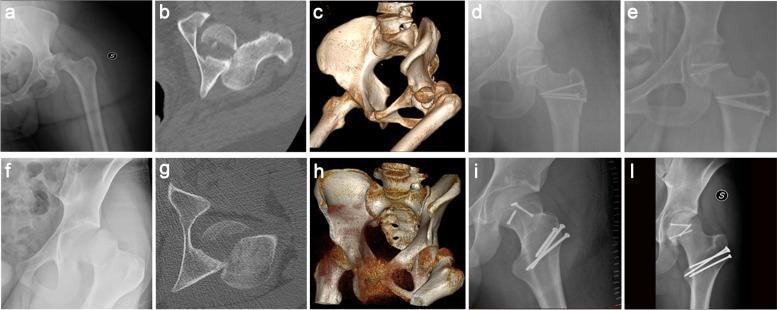
This composite of clinical images illustrates the diagnostic and surgical management of Pipkin type II femoral head fractures in two patients. Panels a-e follow a 33-year-old female, while panels f-l follow a 17-year-old male. The pre-operative imaging includes anteroposterior (AP) hip radiographs (a, f), axial CT scans (b, g), and 3D CT reconstructions (c, h), which clearly demonstrate displaced fractures of the femoral head cephalad to the fovea capitis. The axial CT and 3D views highlight the vertical fracture lines and intra-articular fragment displacement characteristic of Pipkin II injuries. The post-operative AP and lateral radiographs (d, e, i, l) display the results of open reduction and internal fixation (ORIF). Stabilization of the femoral head fragments is achieved using multiple headless compression screws (Herbert screws). Additionally, cortical screws are visible at the greater trochanter, indicating a Ganz trochanteric flip osteotomy used to gain surgical access through a Gibson approach. This sequence provides a comprehensive overview of orthopedic trauma imaging, fracture classification, and internal fixation hardware configuration for hip joint preservation.
Physiotherapy (PT) Management of Femoral Head Fracture (De Femur Head / Pipkin Fracture)
What Is a Femoral Head Fracture?
- Occurs in 35-55% of anterior hip dislocations
- Occurs in 10-16% of posterior hip dislocations
- Often part of polytrauma - coexisting multisystem injuries are the rule
Pipkin Classification (Essential for PT Planning)
| Pipkin Type | Description | Key PT Implication |
|---|---|---|
| I | Fracture below the fovea (non-weight-bearing surface) | May be managed nonoperatively; same PT as pure dislocation |
| II | Fracture above the fovea (weight-bearing surface) | Usually ORIF; longer protected WB, closer monitoring |
| III | Femoral head fracture + associated femoral neck fracture | Worst prognosis; highest AVN risk; THA often required in elderly |
| IV | Femoral head fracture + associated acetabular fracture | Complex ORIF; combined precautions; prolonged rehab |
Surgical Management (PT Context)
| Pipkin Type | Surgical Approach |
|---|---|
| I (small fragment, congruent) | Nonoperative OR ORIF via anterior approach (Smith-Petersen/DAA) |
| II (weight-bearing fragment) | ORIF with headless countersunk lag screws via anterior approach |
| III | THA (elderly) or ORIF femoral neck + head (young) |
| IV | Surgical dislocation (Ganz approach) or Kocher-Langenbeck for posterior wall + ORIF |
PT Management: Phase-Based Protocol
Phase 1 - Acute Phase (Days 0-7)
- Bed rest in safe hip position with abduction pillow (maintains reduction, especially post-posterior approach)
- Cryotherapy: Over dressing/surgical site - 15-20 min every 4-6 hours
- Ankle pumps and calf exercises: Start immediately - DVT prevention is critical in lower limb injuries
- Isometric exercises: Quadriceps sets, gluteal sets, abdominal bracing in bed - activate muscles without stressing the hip
- Breathing exercises and airway clearance: Especially in polytrauma patients on bed rest
- Upper limb exercises: Prepare for crutch walking
- Patient education: Hip precautions (direction-specific), weight-bearing instructions, activity restrictions, warning signs of complications
Phase 2 - Protected Mobilization Phase (Weeks 1-6)
| Pipkin Type / Treatment | Weight-Bearing Status | Duration |
|---|---|---|
| Type I nonoperative | Toe-touch (TTWB) → Partial (PWB) | 4-6 weeks |
| Type I/II ORIF | TTWB with crutches | 6 weeks post-op |
| Type III/IV ORIF | TTWB or non-WB | 8-12 weeks |
| Type III THA (elderly) | PWB from Day 1 with walker | As tolerated |
- Gait training with bilateral axillary crutches: Correct pattern, step-through technique, stairs
- Active-assisted ROM (AAROM) in supine:
- Hip flexion (to 70-80° initially, staying within precautions)
- Hip abduction
- Hip extension
- Avoid posterior dislocation precautions (no flexion >90°, no IR, no adduction) for posterior approaches
- Avoid anterior dislocation precautions (no extension, no ER, no abduction) for anterior approaches
- Straight leg raises (SLR): Quadriceps activation without hip joint loading
- Short arc quads: Maintain knee extensor strength
- Hip abductor activation: Side-lying clamshells - prevent Trendelenburg gait later
- Aquatic therapy (hydrotherapy): Buoyancy-assisted ROM and early gait if wound healed and surgeon-cleared - typically from week 4-6
- Scar management (post-op): Scar massage from ~3 weeks once wound healed; silicone gel for hypertrophic scar
Phase 3 - Progressive Strengthening Phase (Weeks 6-12)
- Progress weight-bearing: Two crutches → one crutch (contralateral) → walking stick → unaided (guided by pain, stability, and healing on imaging)
- Closed kinetic chain (CKC) exercises:
- Mini-squats (0-45°), progressing to deeper squats
- Step-ups and step-downs (low step to high step progression)
- Wall slides
- Terminal knee extensions
- Hip strengthening:
- Hip abductor strengthening (resistance band side-steps, side-lying abduction)
- Hip extensor strengthening (prone hip extension, bridging with progression to single-leg bridge)
- Hip flexor strengthening (seated march with resistance)
- External rotator strengthening (clamshells with resistance, seated ER with band)
- Core and lumbopelvic stability: Transversus abdominis, bird-dogs, dead bugs, plank progressions
- Gait re-education: Normalize step length, cadence, trunk lean; address Trendelenburg sign; treadmill gait training if available
- Balance and proprioception:
- Bilateral stance on foam/wobble board
- Progress to unilateral stance (with support initially)
- Perturbation training
- Stationary cycling: Low resistance, high seat, excellent for ROM and cardiovascular conditioning; typically from 6-8 weeks
Phase 4 - Functional Rehabilitation (Weeks 12-24+)
- Advanced lower limb strengthening: Leg press, lunges, step-up with resistance, resistance band exercises
- Progressive cardiovascular conditioning: Cycling, elliptical trainer, swimming, walking progression
- Work simulation: Specific to occupational demands - prolonged standing, carrying, stair/ladder climbing
- Sport-specific rehabilitation (if applicable): Agility drills, change of direction, plyometric progression (bilateral jump → unilateral hop)
- Sport return criteria (typically 4-6 months):
- Full painless ROM
- Hip abductor/extensor strength ≥85% of contralateral side
- Single-leg balance comparable
- No evidence of AVN on imaging
Hip Precautions After Femoral Head Fracture
| Surgical Approach | AVOID |
|---|---|
| Posterior approach (Kocher-Langenbeck) | Hip flexion >90°, internal rotation, adduction past midline |
| Anterior approach (Smith-Petersen/DAA) | Hip hyperextension, external rotation, abduction |
| Surgical dislocation (Ganz) | Both posterior and rotational precautions until healed |
Key Complications to Monitor During PT
| Complication | Signs | Timing |
|---|---|---|
| Avascular necrosis (AVN) | Groin/buttock pain, progressive ROM loss, antalgic gait | 2 months - 2 years; highest risk in Pipkin III |
| Post-traumatic osteoarthritis | Joint stiffness, activity pain, radiographic joint space narrowing | Long-term (years) |
| Heterotopic ossification (HO) | Sudden loss of ROM, periarticular warmth | 6-12 weeks post-op |
| Sciatic nerve injury | Foot drop, knee flexor weakness, posterior thigh/leg numbness | Immediate/ongoing |
| Femoral neck non-union/AVN | Pain with weight-bearing, failure to progress | Pipkin III specific |
| Re-dislocation | Sudden hip pain + deformity | Any time if precautions breached |
| DVT/PE | Calf pain, leg swelling, dyspnoea | Acute phase |
| CRPS | Burning pain, allodynia, trophic changes | Subacute |
Note on HO prophylaxis: Indomethacin (25 mg TDS × 6 weeks) or low-dose radiotherapy is often prescribed post-surgically; PT must be aware this is running concurrently, and aggressive passive stretching should be avoided if HO is developing.
Outcome Measures
| Tool | Purpose |
|---|---|
| Harris Hip Score (HHS) | Hip pain and function - most widely used |
| HOOS (Hip disability & OA Outcome Score) | Patient-reported hip outcomes |
| mHHS (Modified Harris Hip Score) | Simplified version |
| VAS / NRS | Pain |
| Goniometry | Hip ROM (flexion, extension, ER/IR, abduction/adduction) |
| Dynamometry (handheld) | Hip abductor/extensor strength |
| Trendelenburg test | Functional abductor competence |
| Timed Up and Go (TUG) | Functional mobility |
| 6-Minute Walk Test | Functional endurance |
Summary Timeline
| Phase | Timeframe | Core PT Focus |
|---|---|---|
| Acute | Days 0-7 | Isometrics, ankle pumps, positioning, education |
| Protected mobilization | Weeks 1-6 | TTWB gait, AAROM within precautions, SLR |
| Progressive strengthening | Weeks 6-12 | FWB, CKC, gait normalization, proprioception |
| Functional rehab | Weeks 12-24+ | Work/sport return, advanced loading |