
Fundamental positions exercise therapy theory for test
Reading File
Fundamental positions in exercise therapy refer to the basic body positions used as starting points for therapeutic exercises. There are typically 5 fundamental positions: lying (supine/prone/side), sitting, kneeling, standing, and hanging.
Searching sources...
Finding Sources
Finding Sources
Finding Sources
Finding Sources
Finding Sources
Searching the Web
fundamental positions exercise therapy theory classification lying sitting standing kneeling
Reading Web Page
https://www.slideshare.net/slideshow/fundamental-and-derived…
Reading Web Page
https://www.scribd.com/doc/78619402/Fundamental-and-Derived-…
Here is a comprehensive exam-ready overview of Fundamental Positions in Exercise Therapy Theory:
Fundamental Positions in Exercise Therapy
Starting Position - Definition
"Posture follows movement like a shadow. Every movement begins in posture and ends in posture." - Sherrington
The starting position is the posture from which a movement is initiated. It may be active or passive in character. Equilibrium and stability must be maintained in this position.
Starting positions are of two types:
- Fundamental (Starting) Positions
- Derived Positions
The 5 Fundamental Starting Positions
| # | Position | Abbreviation |
|---|---|---|
| 1 | Standing | St |
| 2 | Kneeling | Kn |
| 3 | Sitting | Sitt |
| 4 | Lying | Ly |
| 5 | Hanging | Hg |
1. STANDING (St)
The most difficult fundamental position to maintain.
Joint Position:
- Heels together and on the same line; toes slightly apart
- Knees together and straight
- Hips extended and slightly laterally rotated
- Pelvis balanced on the femoral heads
- Spine stretched to maximum length
- Vertex thrust upward, eyes level, looking straight forward
- Shoulders down and back
- Arms hang loosely to sides, palms facing inward toward the body
Muscles Working:
- Plantar flexors/dorsiflexors of ankle: balance tibia on the ankle
- Flexors/extensors of knee: keep the knee straight
- Hip extensors and abductors: maintain erect posture
- Trunk extensors + abdominals: stabilize the spine
- Neck muscles: maintain head position
Effects:
- Maximum anti-gravity muscle work
- Best for weight-bearing and balance training
- Promotes proprioception
Uses:
- Gait training
- Balance exercises
- Strengthening lower limb muscles
- Patient feels joy and efficiency during standing exercises
Derived Positions from Standing:
- Walk standing (one foot in front)
- Step standing (one foot on a step)
- Toe standing
- Stride standing (feet apart)
- Lunge position
2. KNEELING (Kn)
Joint Position:
- Body supported on the knees (together or slightly apart)
- Lower leg rests on the floor, feet plantar flexed
- Hips extended
- Pelvis balanced on femoral heads
- Spine stretched to maximum length
- Vertex thrust upward, eyes level
- Shoulders down and back
- Arms hang loosely to the sides, palms inward
Muscles Working:
- Flexors and extensors of knees: balance the femur vertically on the knee
- Hip extensors
- Trunk and spinal muscles
Effects:
- Reduces base of support vs. standing
- Eliminates foot and ankle involvement
- Challenges balance and hip stability
Uses:
- Hip and knee disorders where standing is not possible
- Core stability training
- Strengthening hip extensors and abductors
- When foot/ankle must be protected
Derived Positions from Kneeling:
- Half kneeling (one knee on ground, one foot flat)
- Crook kneeling (sitting back on heels)
- Prone kneeling (on all fours / quadruped)
- Knee lean forward
3. SITTING (Sitt)
Joint Position:
- Weight borne on the ischial tuberosities and thighs
- Hips and knees at approximately 90 degrees
- Feet flat on floor
- Spine erect
- Shoulders down and back
- Eyes level
Muscles Working:
- Hip flexors: maintain flexion
- Trunk extensors and flexors: stabilize the spine
- Less anti-gravity work than standing
Effects:
- Good stability (wide base of support)
- Reduced demand on lower limb anti-gravity muscles
- Allows free movement of upper and lower limbs
Uses:
- Upper limb exercises
- Trunk exercises
- Patients who cannot stand
- Elderly and debilitated patients
Derived Positions from Sitting:
- Long sitting (legs extended, 90° hip flexion)
- Cross sitting / tailor sitting
- Side sitting
- Forward lean sitting
- Crook sitting (feet on floor, knees bent)
- Ride sitting (astride a stool)
4. LYING (Ly)
Three primary variants:
- Crook lying (supine, knees bent, feet flat) - most common
- Prone lying (face down)
- Side lying
Joint Position (Supine/Crook lying):
- Entire body supported by a surface
- Spine in neutral
- Arms at sides
Muscles Working:
- Minimal anti-gravity work
- Trunk muscles work isometrically to stabilize
Effects:
- Minimum muscle effort required
- Maximum relaxation
- Complete elimination of gravity effects (in horizontal)
- Good for passive movements, relaxation, acute conditions
Uses:
- Acute injuries and early post-operative phase
- Relaxation techniques
- Passive and assisted exercises
- Breathing exercises
- Spinal traction
- Patients with poor tolerance for upright posture
Derived Positions from Lying:
- Prone lying
- Side lying
- Crook lying
- Half lying (head and trunk elevated)
- Prone kneeling
5. HANGING (Hg)
Joint Position:
- Body suspended by the hands (or feet in inverted hanging)
- Shoulders fully elevated and flexed
- Arms overhead gripping a bar/rings
- Spine elongated under traction effect
- Lower limbs hang freely
Muscles Working:
- Shoulder girdle muscles (especially shoulder elevators and depressors)
- Grip strength muscles
- Trunk muscles (to prevent excessive swing)
Effects:
- Spinal elongation / decompression
- Shoulder girdle strengthening
- Traction effect on the spine and hips
- Develops grip strength and shoulder stability
Uses:
- Spinal conditions (scoliosis, disc problems)
- Shoulder girdle strengthening
- Gymnastic and remedial exercises
- Grip strength development
Derived Positions from Hanging:
- Reach grasp hanging (wider grip)
- Inverted hanging
- Arm swing hanging
Factors for Selecting a Starting Position
When choosing the appropriate position for a patient, consider:
- Patient's ability - Can they maintain the position?
- Need for stabilization - How much support is required?
- Use of gravity - Is gravity to be assisted, resisted, or eliminated?
- Pain levels - Does the position aggravate or relieve symptoms?
- Intended effects - What therapeutic goal is to be achieved?
- Base of support - Stability vs. challenge
- Muscle work required - Active vs. passive
Summary Comparison Table (Exam-Focused)
| Position | Base of Support | Anti-gravity Work | Stability | Main Use |
|---|---|---|---|---|
| Standing | Small (feet) | Maximum | Least | Gait, balance, lower limb |
| Kneeling | Medium (knees) | Moderate | Moderate | Hip/knee rehab, core |
| Sitting | Large (buttocks + thighs) | Moderate | Good | Upper limb, trunk, elderly |
| Lying | Maximum (whole body) | Minimum | Maximum | Acute, relaxation, passive Rx |
| Hanging | Minimal (hands) | Upper body max | Least | Spine decompression, shoulder |
Key Principles to Remember for Exam
- The 5 fundamentals can be remembered as: S-K-S-L-H (Standing, Kneeling, Sitting, Lying, Hanging)
- Derived positions are modifications of the fundamental five to improve stability, alter leverage, promote relaxation, or isolate muscle groups
- As you progress from Lying → Sitting → Kneeling → Standing: anti-gravity muscle work increases progressively
- Hanging is unique - it uses the body's own weight for traction and overhead muscle work
- Sherrington's principle: every movement starts and ends in posture
Give answer according to attached
Reading File
Running Command
python3 -c " from docx import Document doc = Document('/tmp/workspace/attachments/f7c7862e-89d9-40df-b2a5-19c7a79b1359/Assignment.docx') for p in doc.paragraphs: style = p.style.name if p.style else 'None' if p.text.strip(): print(f'[{style}] {p.text}') "
Now let me search the medical library for all three questions in parallel.
Finding Sources
Finding Sources
Finding Sources
Finding Sources
Finding Sources
Finding Sources
Reading File
Reading File
Reading File
Reading File
I now have strong textbook content. Let me fetch the SC joint diagram and compile the complete answers.
Loading Image
Loading Image
Here are complete, exam-ready answers to all three questions from your assignment:
Assignment - Biomechanics of the Shoulder Complex
Question 1: Biomechanics of Shoulder Abduction (0° to 180°) [10 Marks]
(a) Phases of Shoulder Abduction (2 marks)
Phase 1: 0° to 30° (Setting Phase / GH Phase)
- Movement occurs almost entirely at the glenohumeral (GH) joint.
- The scapula is "setting" - it either remains stationary or rotates very slightly to find a stable position on the thorax.
- Deltoid and supraspinatus are the primary movers.
- The humeral head is kept centered in the glenoid by rotator cuff compressive force.
Phase 2: 30° to 90° (GH + ST Phase)
- Both GH and scapulothoracic (ST) joints contribute.
- For every 3° of total abduction: 2° occurs at GH + 1° at ST (scapulohumeral rhythm begins).
- The scapula rotates upward on the thorax.
- Supraspinatus and deltoid continue to work. Upper and lower trapezius and serratus anterior rotate the scapula.
Phase 3: 90° to 180° (Full Elevation Phase)
- From 90° to 120°: continued GH and scapular upward rotation.
- From 120° to 180°: spinal lateral flexion to the opposite side, plus GH external rotation (to clear the greater tuberosity from the acromion).
- The scapula rotates a total of 60° during full elevation.
- At 180°, the GH joint contributes 120° and the scapulothoracic joint contributes 60°.
(b) Contribution of GH Joint and Scapulothoracic Joint (2 marks)
| Joint | Contribution to 180° of Abduction |
|---|---|
| Glenohumeral (GH) | 120° |
| Scapulothoracic (ST) | 60° |
| Total | 180° |
Glenohumeral Joint:
- A ball-and-socket synovial joint with the greatest range of motion in the body.
- The large spherical head of the humerus articulates with the small, shallow glenoid cavity, allowing wide ROM at the cost of intrinsic bony stability.
- Stability is instead provided by the rotator cuff muscles, glenoid labrum, and joint capsule.
- During abduction, the GH joint allows the humeral head to roll superiorly while simultaneously gliding inferiorly to remain in the glenoid cavity (roll-glide mechanism).
Scapulothoracic Joint:
- A physiological (not true synovial) joint - the scapula glides over the posterior thorax.
- Upward rotation of the scapula elevates the glenoid fossa, keeping it "under" the humeral head during abduction.
- Without scapular rotation, the greater tuberosity would impinge the acromion above 90°.
- The scapula also tips posteriorly and rotates externally on the thorax during elevation.
(c) Scapulohumeral Rhythm and the 2:1 Ratio (2 marks)
Definition:
Scapulohumeral rhythm is the coordinated, synchronous movement between the glenohumeral joint and the scapulothoracic joint during shoulder elevation/abduction.
The 2:1 Ratio:
- For every 3° of shoulder abduction, 2° occurs at the GH joint and 1° occurs at the ST joint.
- This gives a GH:ST ratio of 2:1.
- Over the full 180°:
- GH contributes: 2/3 × 180° = 120°
- ST contributes: 1/3 × 180° = 60°
Importance:
- Maintains the optimal length-tension relationship of the deltoid throughout the range.
- Keeps the glenoid positioned under the humeral head to prevent superior subluxation.
- Prevents subacromial impingement by continuously elevating and rotating the acromion away from the greater tuberosity.
Diagram of Scapulohumeral Rhythm:
(See diagram below - the rotator cuff surrounds the glenohumeral joint, and the scapula rotates in sync with humeral elevation)
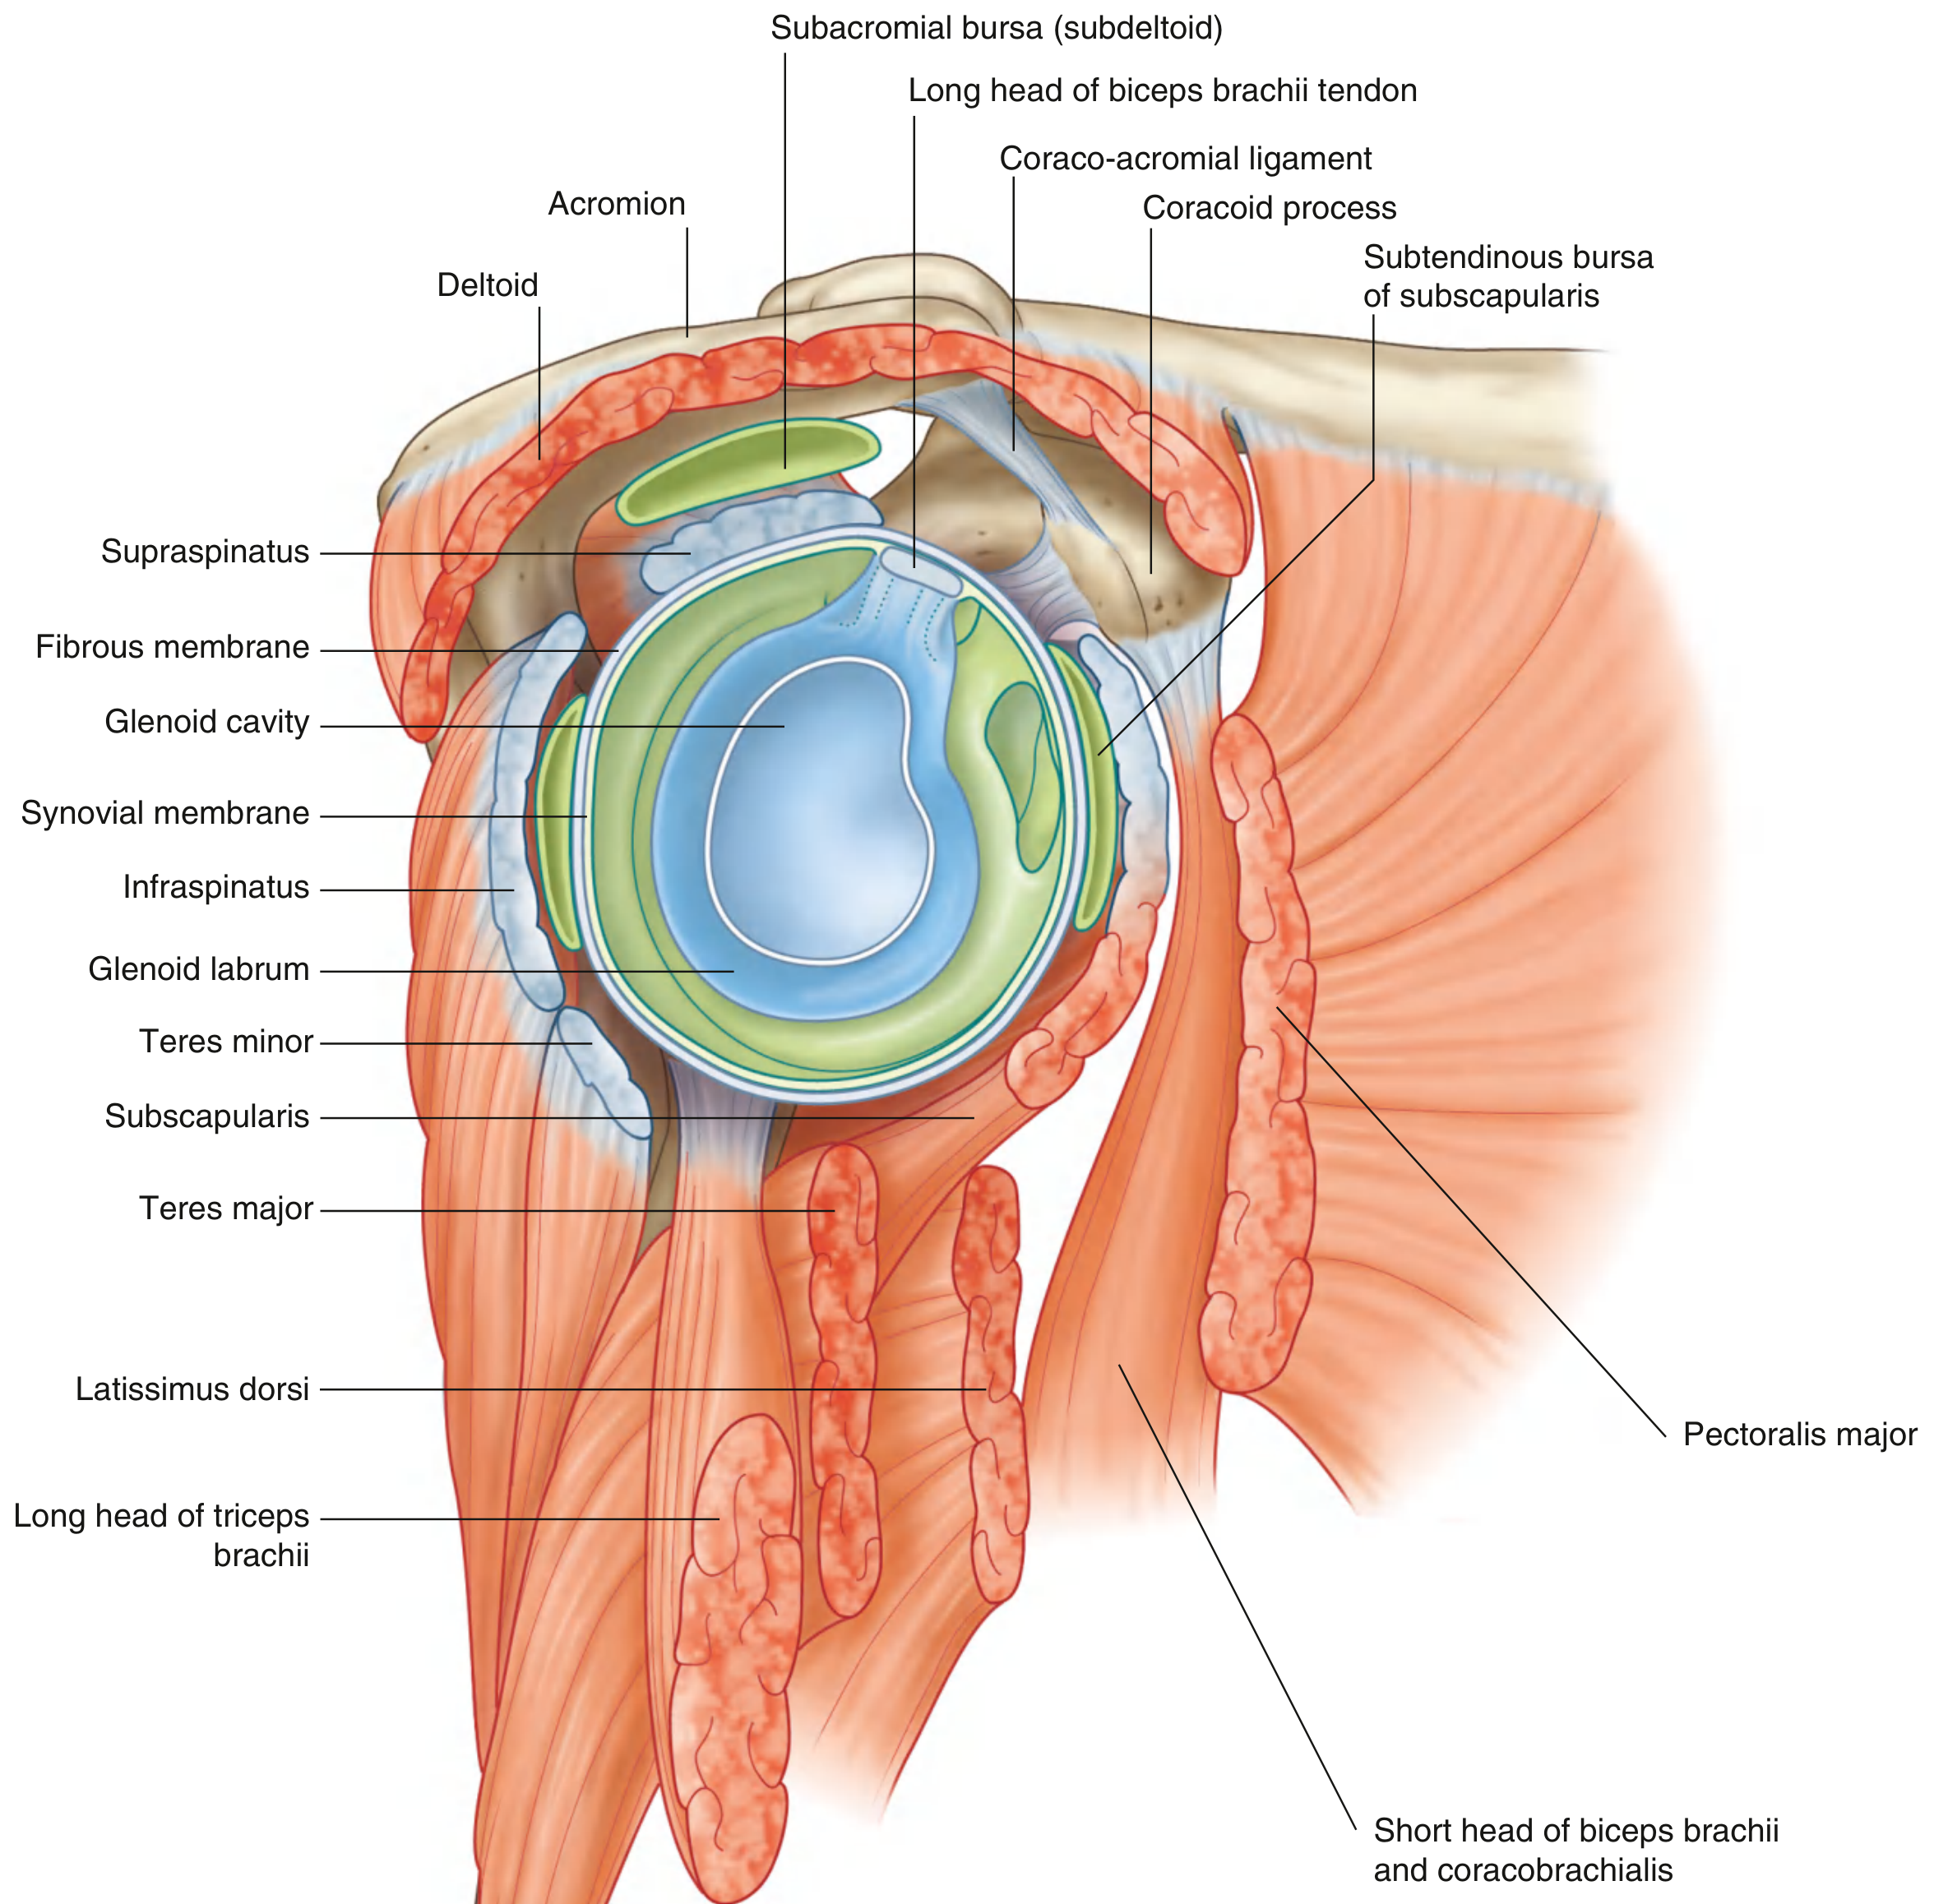
Fig: Lateral view of the glenohumeral joint showing the rotator cuff (supraspinatus, infraspinatus, teres minor, subscapularis), subacromial bursa, and surrounding bony arch (acromion + coracoacromial ligament) - Gray's Anatomy for Students
Scapulohumeral Rhythm Summary (Text Diagram):
Total Abduction = GH (2 parts) + ST (1 part)
0°  ──►  30°  : GH only (scapula setting)
30° ──►  90°  : GH 2° : ST 1° (rhythm begins)
90° ──► 180°  : Continued 2:1 ratio + lateral spinal flexion
Final: GH = 120°, ST = 60°, Total = 180°
(d) Movements at Sternoclavicular and Acromioclavicular Joints (2 marks)
Sternoclavicular (SC) Joint:
During shoulder abduction, the SC joint allows:
- Elevation of the clavicle (25-30°) - occurs during the first 90° of abduction.
- Posterior rotation of the clavicle (up to 50°) - occurs mainly between 90° and 180°, driven by the pull of the coracoclavicular ligament.
- Protraction and retraction of the clavicle during horizontal movements.
The SC joint acts as the only bony attachment of the entire upper limb to the axial skeleton, making it the pivot point for all shoulder girdle movements.
Acromioclavicular (AC) Joint:
- Upward rotation of the scapula - the AC joint allows the scapula to rotate relative to the clavicle, contributing approximately 20° of the total 60° of scapular upward rotation.
- Posterior tipping of the scapula - the scapula tips posteriorly relative to the clavicle.
- Internal/external rotation of the scapula - scapula rotates about an axis perpendicular to the scapular plane.
Together, the SC and AC joints function as a cranked linkage that transmits and amplifies the rotation needed to elevate the scapula fully.
(e) Role of Rotator Cuff Muscles in Shoulder Stability During Abduction (2 marks)
The rotator cuff consists of four muscles: SITS - Supraspinatus, Infraspinatus, Teres minor, Subscapularis.
Their tendons blend with the joint capsule to form a musculotendinous collar around the posterior, superior, and anterior aspects of the glenohumeral joint (as described in Gray's Anatomy for Students).
Roles during abduction:
| Muscle | Role |
|---|---|
| Supraspinatus | Initiates abduction (0-30°); compresses and centers the humeral head in glenoid |
| Infraspinatus + Teres minor | Laterally rotate the humerus (prevents greater tuberosity impingement above 90°); depress and compress the humeral head |
| Subscapularis | Medial rotator; acts as an anterior stabilizer; prevents anterior subluxation |
Key Stabilizing Mechanism:
- The deltoid creates a large superiorly directed force on the humeral head during abduction.
- Without a counterforce, the head would translate superiorly and impinge under the acromion.
- The rotator cuff muscles (especially infraspinatus + subscapularis) create a downward-directed compressive force that keeps the humeral head centered in the glenoid - this is the force couple mechanism.
- The long head of biceps brachii also restricts superior translation of the humeral head.
Clinical note: Rotator cuff tears, especially supraspinatus, disrupt this mechanism, causing the humeral head to ride superiorly and producing impingement and loss of overhead function.
Question 2: Structure and Biomechanics of the Sternoclavicular Joint (5 Marks)
Classification and Type of Joint
- Classification: Synovial joint
- Type: Saddle (sellar) joint - the articular surfaces are reciprocally concave-convex (saddle-shaped)
- It is the only true synovial joint connecting the upper limb to the axial skeleton.
Articular Surfaces
- Medially: The proximal (sternal/medial) end of the clavicle
- Laterally: The clavicular notch of the manubrium of the sternum, together with a small part of the first costal cartilage
- Both surfaces are covered by fibrocartilage (not hyaline cartilage, which is unusual for a synovial joint).
- A complete fibrocartilaginous articular disc divides the joint cavity into two separate compartments.
- The disc prevents medial displacement of the clavicle.
- It also acts as a shock absorber, transmitting forces from the upper limb to the sternum.
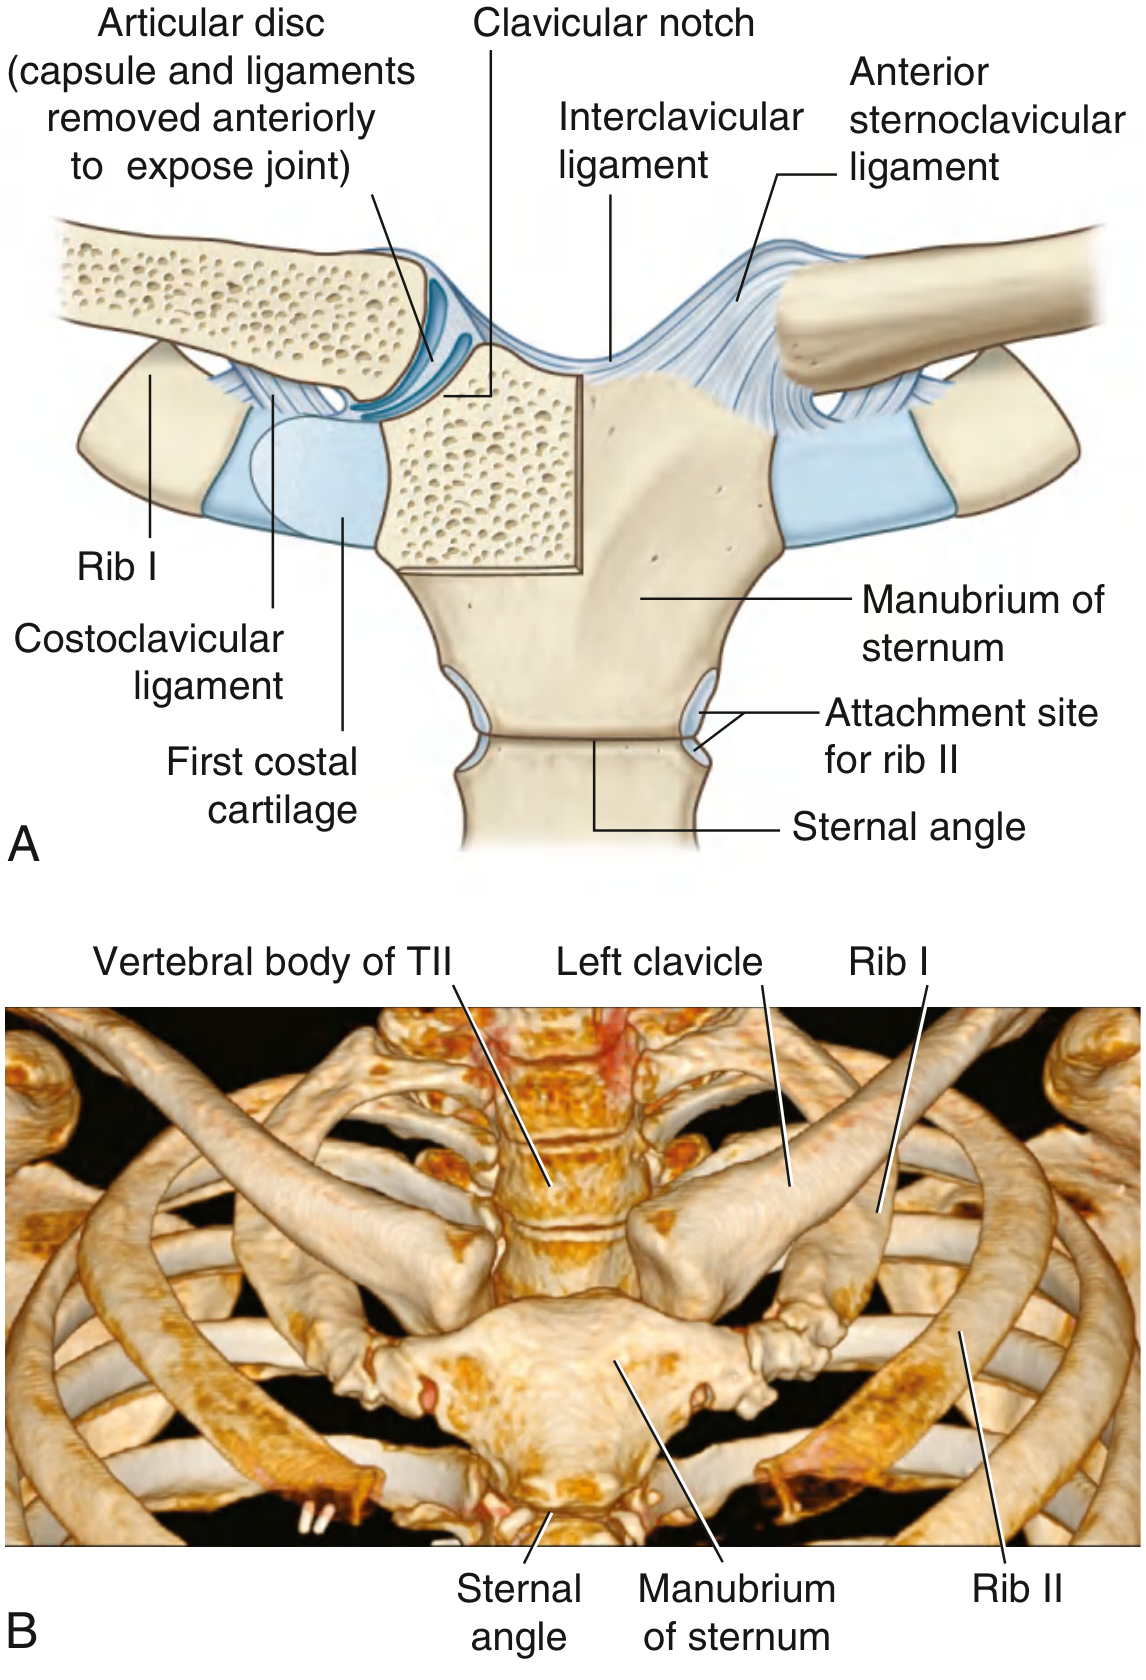
Fig: Sternoclavicular joint showing articular disc, clavicular notch, ligaments and their attachments - Gray's Anatomy for Students
Ligaments Supporting the Joint
| Ligament | Position | Function |
|---|---|---|
| Anterior sternoclavicular ligament | Anterior to joint capsule | Resists anterior displacement of clavicle |
| Posterior sternoclavicular ligament | Posterior to joint capsule | Resists posterior displacement of clavicle |
| Interclavicular ligament | Between both clavicles, across superior sternum | Prevents excessive downward movement of the shoulder; links both SC joints |
| Costoclavicular ligament | Lateral to joint; links proximal clavicle to 1st rib + costal cartilage | The strongest ligament; limits elevation, depression, protraction, and retraction of clavicle; acts as a pivot point for clavicular movements |
Available Movements
The SC joint allows movement of the clavicle in three planes:
-
Elevation - Depression (vertical plane):
- Clavicle elevates ~25-30° (shoulder shrug)
- Clavicle depresses ~5-10°
-
Protraction - Retraction (anteroposterior plane):
- Clavicle protracts ~15-20° (reaching forward)
- Clavicle retracts ~15° (bracing the shoulder back)
-
Axial Rotation (posterior rotation):
- Clavicle rotates posteriorly ~45-50° during full arm elevation
- This rotation is passive - driven by the pull of the coracoclavicular ligament as the scapula rotates upward
Functional Importance During Upper Limb Movements
- The SC joint is the sole bony articulation between the upper limb and the thorax - all forces from the upper limb are transmitted here.
- During shoulder abduction: SC joint elevation allows the scapula to rotate upward; without this movement, full overhead elevation would be impossible.
- The posterior rotation of the clavicle at the SC joint is essential for the last 60° of arm elevation - without it, scapular upward rotation would be restricted.
- In SC joint dislocation or fracture of the clavicle medially, all shoulder girdle mechanics are severely compromised.
- The posterior sternoclavicular dislocation is a medical emergency as the posterior clavicle can compress the trachea, esophagus, and great vessels.
Question 3: Force Couple Mechanism in Shoulder Abduction (5 Marks)
Definition of Force Couple
A force couple is a pair of equal, parallel forces acting in opposite directions on the same body, producing pure rotation without translation.
In biomechanics: two forces separated by a distance, equal in magnitude but opposite in direction, cause a body to rotate about an axis between them.
Muscles Involved
There are two force couples acting during shoulder abduction:
Force Couple 1 - Glenohumeral Level (Humeral Head Centering):
| Force | Muscle | Direction of Pull |
|---|---|---|
| Superior force | Deltoid (middle head) | Upward/superior |
| Inferior force | Rotator cuff (infraspinatus, subscapularis, teres minor) | Downward/inferior + compressive |
Force Couple 2 - Scapulothoracic Level (Scapular Rotation):
| Force | Muscle | Direction of Pull |
|---|---|---|
| Superior force (on spine of scapula) | Upper trapezius | Upward rotation - elevates lateral angle |
| Inferior force (on inferior angle) | Lower trapezius + Serratus anterior | Downward medially + forward |
Mechanism of Action During Shoulder Abduction
At the GH joint:
- The deltoid muscle pulls the humeral head superiorly toward the acromion.
- Simultaneously, the rotator cuff muscles (especially infraspinatus, teres minor, and subscapularis) pull the humeral head inferiorly and compress it into the glenoid.
- These two opposing forces create a net rotational moment - the humerus rotates upward (abducts) without the head translating superiorly out of the glenoid.
- This is like two hands turning a steering wheel in opposite directions - the wheel turns without moving sideways.
At the scapulothoracic joint:
- Upper trapezius pulls the clavicle/acromial end of scapula upward.
- Lower trapezius pulls the spine of scapula medially and downward.
- Serratus anterior pulls the inferior angle of the scapula anterolaterally.
- Together, these three muscles create a rotational couple that upwardly rotates the scapula by 60°, aligning the glenoid upward to remain under the humeral head throughout abduction.
Importance in Maintaining Normal Shoulder Biomechanics
- Prevents subacromial impingement - by keeping the humeral head centered, the subacromial space is preserved.
- Maximizes power of deltoid - without the downward compressive force, deltoid would be mechanically inefficient.
- Allows full 180° of elevation - both GH centering and scapular rotation force couples are required for full range.
- Provides dynamic stability - the rotator cuff force couple replaces the bony stability lacking in the shallow glenoid.
- Protects joint structures - prevents capsular, labral, and rotator cuff injury.
Clinical Significance if the Force Couple is Disrupted
| Disruption | Clinical Consequence |
|---|---|
| Rotator cuff tear (supraspinatus) | Loss of inferior compressive force → humeral head migrates superiorly → impingement syndrome, pain with abduction |
| Full thickness rotator cuff tear | Complete disruption → deltoid cannot effectively abduct (pseudoparalysis) |
| Serratus anterior palsy (long thoracic nerve injury) | Loss of inferior scapular rotation force → winging of scapula, loss of full elevation |
| Trapezius palsy (spinal accessory nerve injury) | Loss of superior scapular force couple → scapula droops, loss of full abduction |
| Rotator cuff tear arthropathy | Chronic superior migration → erosion of humeral head against acromion → severe functional loss |
Practical test: The "drop arm sign" in rotator cuff tears - the patient cannot maintain 90° of abduction against gravity because the GH force couple is broken.
Sources: Gray's Anatomy for Students (9780323934237); Gray's Anatomy for Students - Shoulder Chapter; Therapeutic Exercise Principles
This is a shared conversation. Sign in to Orris to start your own chat.