
Matrices for class 5 cavity restorations for 10 marks. Give me answer like university topper answer including contents amd references
matrices for class 5 cavity restorations dentistry types uses technique
https://codental.uobaghdad.edu.iq/wp-content/uploads/sites/1…
matrix class V cavity cervical restoration dentistry
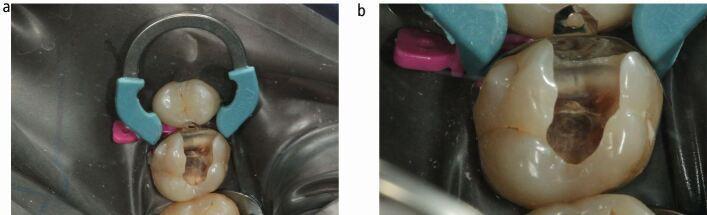
Two intraoral clinical photographs (Figures 7a and 7b) demonstrate the isolation and preparation phase of a direct adhesive restoration on a maxillary left first molar (tooth 26). The operative field is isolated using a grey rubber dam. A large, mesio-occlusal (Class II) cavity preparation is visible on tooth 26, extending deep into the dentin with clean peripheral margins at the amelodentinal junction. An anatomical sectional matrix system (Palodent V3) is in place, consisting of a thin, pre-curved metallic matrix band secured by a nickel-titanium V-ring with light-blue plastic tines. A pink interproximal wedge is positioned between teeth 25 and 26 to achieve tight cervical adaptation of the matrix and facilitate proper proximal contouring. The setup illustrates contemporary restorative techniques aimed at recreating anatomical embrasures and contact points while preventing food impaction. The visual demonstrates the spatial relationship between the prepared cavity, the matrix band, and auxiliary stabilizing components in a clinical operative dentistry setting.
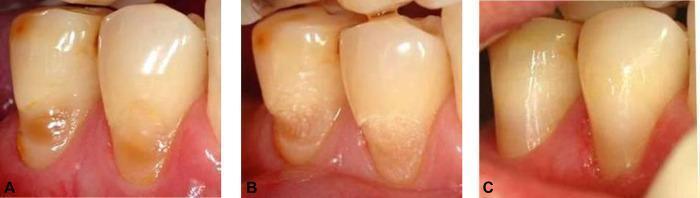
This sequence of clinical intraoral photographs documents the progression of a Class V dental restoration of non-carious cervical lesions (NCCLs) on teeth 44 and 45 (mandibular premolars). (A) The initial state shows wedge-shaped cervical defects near the gingival margin with characteristic yellowish-brown dentin exposure and surface irregularities. (B) Following preparation with an Er,Cr:YSGG laser, the treatment area exhibits a distinctive frosted, whitish-opaque, and roughened texture across the cervical third of the crowns, indicating surface conditioning for improved adhesion. (C) The final image shows the completed restoration using a resin-composite material. The cervical margins are smoothly contoured and the restorative material demonstrates high aesthetic integration with the natural enamel, exhibiting a seamless transition in color and surface gloss. This series serves as an educational example of laser-based cavity preparation and aesthetic direct restoration techniques in conservative dentistry.
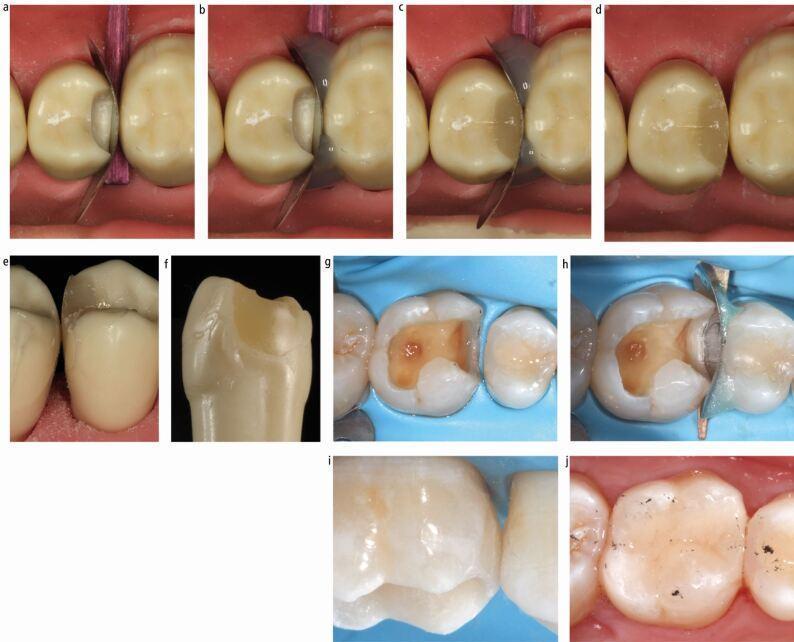
This series of intraoral clinical photographs and benchtop dental models illustrates the stepwise workflow for a Class II posterior composite resin restoration using a sectional matrix system. (g) shows a prepared occluso-distal cavity on a molar with cleared proximal contacts and a blue rubber dam for isolation. (a, b, c, h) demonstrate the adaptation of a pre-contoured, rigid metal sectional matrix. A wooden interproximal wedge is placed cervically to achieve apical seal and dental separation. Passive coronal stabilization is shown in (b, c, h) using a small amount of unbonded, translucent flowable composite resin at the matrix-tooth interface. (d, i, j) display the completed restoration, highlighting the anatomical recreation of the proximal contact area, smooth marginal ridges, and appropriate occlusal emergence profiles. (e, f) provide a lateral view of the finished restoration on a benchtop model, emphasizing the convex proximal contour and lack of cervical overhangs. The sequence serves as an educational guide for achieving predictable proximal contacts in restorative dentistry.
Matrices for Class V Cavity Restorations
Contents
- Introduction
- Definition and Purpose of a Matrix
- Requirements of an Ideal Matrix for Class V Restorations
- Types of Matrices Used in Class V Restorations
- 4.1 Prefabricated Plastic (Transparent/Mylar) Matrix Strips
- 4.2 Window-Type Matrix
- 4.3 Anatomic (Custom-Fabricated) Matrix
- 4.4 Aluminium / Copper Collar Matrix
- 4.5 Cervical Clamp-Retained Matrix
- 4.6 Unica Anterior Matrix System
- Role of Wedges with Class V Matrices
- Technique of Placement
- Advantages and Disadvantages
- Conclusion
- References
1. Introduction
2. Definition and Purpose of a Matrix
- Restores the anatomical contour and form of the cavity wall
- Confines the restorative material within the preparation
- Reduces post-operative finishing time
- Prevents overhangs and flash
- Facilitates proper condensation (for amalgam) or incremental layering (for composite)
- Provides support against condensation forces
3. Requirements of an Ideal Matrix for Class V Restorations
- Adapt closely to the curved cervical contour of the tooth
- Extend adequately beyond the gingival margin without injuring the gingival tissues
- Be rigid enough to resist deformation during material placement, yet flexible for adaptation
- Be transparent (for light-cured composites) to allow adequate polymerization depth
- Not interfere with the bite or cause occlusal disturbance
- Allow sufficient visibility of the operating field
- Be easily placed and removed without disturbing the restoration
- Provide a smooth surface finish to the restoration
4. Types of Matrices Used in Class V Restorations
4.1 Prefabricated Plastic (Transparent/Mylar) Matrix Strips
- Material: Polyester (Mylar) or cellulose acetate, clear/transparent
- Sizes: Available in various widths and lengths; typically 5 mm wide strips are used
- Mechanism: The strip is looped around the cervical area and secured with a finger, wooden wedge, or cervical clamp
- Permits light transmission for light-cured composites
- Produces a smooth surface on the restoration
- Inexpensive and readily available
- Can be trimmed and adapted to tooth contour
- Difficult to stabilize - the strip's flexibility makes it challenging to maintain position
- Cannot be used effectively for large Class V defects
- Poor adaptation to curved cervical surfaces compared to anatomic matrices
- Cannot be used for amalgam restorations
4.2 Window-Type Matrix for Class V Composite
- Design: A matrix frame with a cut-out (window) positioned over the prepared cavity; the surrounding frame adapts to the cervical contour
- The window allows direct access for composite placement and light-curing
- Some designs incorporate a thin flexible flap that presses the composite into the cavity
- Particularly useful in cervical composite restorations where moisture control and access are compromised
- Provides better adaptation to the concave cervical tooth surface than flat Mylar strips
4.3 Anatomic (Custom-Fabricated) Matrix
- A study cast of the defective tooth (with at least one intact adjacent tooth on each side) is prepared
- The defects are restored on the cast to desired contour
- A plastic template (polyvinyl siloxane putty or vacuum-formed acetate sheet) is adapted over the cast
- The template is trimmed to extend at least 1 mm beyond the margins of the defect
- After trimming gingivally, the template serves as the matrix during restoration placement
- Ideal for large, multi-surface cervical defects
- Ensures precise anatomical recreation
- Reduces guesswork in tooth morphology
- Particularly valuable in Class V cases involving several adjacent teeth
- Time-consuming to fabricate
- Requires an additional appointment or lab step
- Higher cost compared to prefabricated matrices
4.4 Aluminium or Copper Collar Matrix
- Material: Thin, malleable aluminium or copper strip
- Mechanism: The strip is adapted around the cervical area of the tooth like a collar and held in place by wedges or a clamp
- Can be burnished against the tooth surface to achieve close adaptation
- Rigid enough to withstand amalgam condensation pressure
- Can be adapted to sub-gingival margins
- Provides a close cervical seal
- Not transparent - cannot be used for light-cured composites
- Requires skill to adapt properly
- Risk of gingival trauma during placement
4.5 Cervical Clamp-Retained Matrix
- Retract and protect the gingival tissue
- Simultaneously hold a matrix strip in position
- Facilitate moisture control and isolation
4.6 Modern Anterior Matrix Systems (e.g., Unica Anterior Matrix)
- Made of malleable alloy that adapts to complex tooth morphology
- Maintains proper cervical contour and emergence profile
- Superior cervical adaptation compared to flat Mylar strips
- Preserves the gingival papilla
- Available in multiple sizes for different tooth dimensions
5. Role of Wedges with Class V Matrices
- Stabilize the plastic matrix strip gingivally
- Adapt the matrix tightly against the gingival margin to prevent material seepage
- Slightly separate the tooth from adjacent teeth if needed
6. Technique of Placement (Prefabricated Plastic Matrix - Standard Technique)
- Isolation of the field with rubber dam or cotton rolls with a cervical retractor
- Selection of an appropriate matrix strip - width should cover at least 1-2 mm beyond each margin
- Adaptation of the strip against the prepared cavity by pressing it firmly against the cervical tooth surface
- Stabilization using the operator's finger, a cervical clamp, or a wedge placed gingivally
- Verification that all margins are covered and no gaps exist at the gingival floor
- Placement of restorative material (composite in increments)
- Light curing through the transparent matrix
- Removal of matrix with a pulling/peeling motion mesio-distally, not gingivally, to avoid fracturing the restoration
- Finishing and polishing
7. Summary Comparison Table
| Matrix Type | Material | Used for | Transparency | Special Feature |
|---|---|---|---|---|
| Mylar/Plastic Strip | Polyester | Composite | Yes | Simple, flexible |
| Window-type | Plastic/acetate | Composite | Yes | Cut-out design |
| Anatomic (custom) | PVS/Acetate | Composite | Yes | Fabricated on study cast |
| Aluminium/Copper Collar | Metal | Amalgam/Composite | No | Sub-gingival adaptation |
| Cervical Clamp (No. 212) | Metal clamp + strip | Composite | With strip | Retraction + matrix in one |
| Unica/Fusion Anterior | Malleable alloy | Anterior composite | Semi | Aesthetic zone ideal |
8. Conclusion
9. References
- Sturdevant CM - Sturdevant's Art and Science of Operative Dentistry, 6th edition. Elsevier Mosby. (Chapter on Class V cavity preparations and restoration)
- Baum L, Phillips RW, Lund MR - Textbook of Operative Dentistry, 3rd edition. WB Saunders.
- Heymann HO, Swift EJ, Ritter AV - Sturdevant's Art and Science of Operative Dentistry, 7th edition. Elsevier, 2019.
- Khera SC, Swift EJ (1988) - Classification and use of matrix systems in direct tooth-colored restorations. Cited in University of Baghdad College of Dentistry: Matrix Systems in Operative Dentistry (lecture notes, Dr. Alaa Jawad, 2023).
- Mithiborwala SN, Chaugule V, Baliga S (2019) - "Choice of Matrix System in Dentistry." Journal of Research in Medical and Dental Science (JRMDS).
- Ghada Atta et al. (2023) - "Anterior Matrix Systems for Composite Restorations: A Review." International Journal of Dentistry, PMC10166279. Available at PubMed Central.
- Mount GJ, Hume WR - Preservation and Restoration of Tooth Structure, 2nd edition. Knowledge Books and Software, 2005.
- Summitt JB, Robbins JW, Schwartz RS - Fundamentals of Operative Dentistry: A Contemporary Approach, 3rd edition. Quintessence Publishing.
Exam Tip for 10 Marks: Structure your answer with a brief introduction defining Class V and the role of a matrix, then classify and describe each matrix type with indications, advantages, and disadvantages. End with a summary comparison table and brief conclusion. Including diagrams or clinical images scores bonus marks.