
operation lights
Searching the Web
Operation Lights military or historical operation
I'm not sure exactly what you're referring to with "operation lights." Could you clarify?
Asking for Preferences
What do you mean by 'operation lights'?
Operating room surgical lights - also called operating lights or surgical luminaires. These are specialized ceiling/wall-mounted lights designed to illuminate the surgical field without casting shadows.
Searching sources...
Reading File
Searching the Web
operating room surgical lights specifications requirements features
Finding Sources
Reading Web Page
https://www.steris.com/healthcare/knowledge-center/surgical-…
Here is a thorough overview of operating room (OR) surgical lights:
Operating Room / Surgical Lights
Surgical lights (also called operating lights or surgical luminaires) are specialized lighting systems that illuminate the operative field so surgeons and perioperative staff can see the surgical site clearly throughout a procedure.
Purpose
- Provide bright, shadow-free illumination over the surgical field
- Allow accurate color discrimination of tissues (differentiating arteries, veins, nerves, fat, and organs)
- Minimize heat generation on the patient and staff
- Maintain sterility around the field
Types by Lamp Technology
| Feature | LED | Halogen/Incandescent |
|---|---|---|
| Brightness (Lux) | Up to 160,000+ lux | Up to 110,000 lux |
| Heat emission | Minimal | High (can cause tissue drying/discomfort) |
| Lifespan | ~50,000 hours | Much shorter |
| Color rendering | Excellent (pure white) | Warm/yellow tint |
| Current standard | Yes - preferred | Being phased out |
LED lights are now the industry standard. They emit pure white light, which lets surgeons accurately assess tissue color and anatomy. New-generation LED systems also offer auto intensity functionality and a uniform beam that eliminates "hot spots" and reduces eye fatigue.
Mounting Configurations
- Ceiling-mounted - Most common in ORs. Fixed or on a ceiling track. May be single or dual head. Offers the widest range of articulation (up to 56+ degrees) for aiming at the operative field.
- Wall-mounted - Less common for surgical lights; more often used with exam lights.
- Floor-standing / mobile - On wheels, can move between rooms. Used more for examinations than major surgeries.
Key Performance Standards
The IES (Illuminating Engineering Society) sets lighting standards for ORs. High-quality surgical lights must meet or exceed:
- Minimum illuminance: 40,000 lux at the surgical field
- Maximum illuminance: Up to 160,000 lux (recommended minimum capability: 100,000 lux)
- Color Rendering Index (CRI): >90 (ideally 95-100) for accurate tissue color perception
- Color Temperature: 3,500 K - 6,700 K (cool white for tissue discrimination)
- Depth of illumination: Good lighting at depth (e.g., inside a body cavity), not just at the surface
OR Lighting Zones
A modern surgical suite is divided into three lighting zones:
- Operating table zone - Primary surgical light, highest intensity required
- Immediate surrounding area - Reduced but sufficient illumination for scrub nurses and assistants
- Periphery (prep and clean-up zone) - General ambient lighting for room preparation and cleaning
Key Design Features
- Shadow management: Multiple light heads arranged to eliminate shadows cast by the surgeon's hands, arms, and instruments
- Adjustable handles / sterile handles: Surgeons and scrub techs can reposition lights during a case without breaking sterility
- Heat management: Deep-red/infrared filtering to reduce tissue desiccation
- Infection control: Sealed, smooth surfaces that can be wiped down between cases
- Dimming and focus control: Adjustable beam diameter (spot vs. flood) for different procedure types
- Backup power: OR lights are on emergency circuits to prevent blackouts during surgery
Dual-Head vs. Single-Head Systems
Most ORs use dual-head systems - a main light and a satellite/secondary light - so that if one head is repositioned or obstructed, the other maintains illumination. This also improves shadow elimination.
Specialized Considerations
- Minimally invasive / endoscopic surgery: Room lights are often dimmed and surgeons rely on the endoscope's internal light source; OR lights serve a secondary role here.
- Neurosurgery / microsurgery: Require exceptionally precise illumination; sometimes supplemented with headlights or microscope-mounted light sources.
- Green LED option: Some systems (like Kenall's MedMaster) offer green LED capability, which enhances visual acuity for the surgical team under certain lighting conditions.
In short, modern OR lights are sophisticated LED systems delivering shadow-free, high-lux, color-accurate illumination across the surgical field, with adjustable intensity, sterile handles, and sealed infection-control surfaces. The STERIS guide to surgical lights and Medik Surgical's comparison guide are good references if you need product-level detail.
Would you like to go deeper on any specific aspect - such as selecting a system, maintenance, infection control requirements, or a particular surgical specialty?
carbolisation of OT lights
Carbolisation refers to the disinfection/cleaning of OT (operation theatre) surfaces and equipment using carbolic acid (phenol) solution - a traditional antiseptic practice common in South Asian hospital settings.
Searching sources...
Finding Sources
Searching the Web
carbolisation of OT lights operation theatre carbolic acid disinfection procedure
Reading Web Page
https://www.linkedin.com/pulse/carbolization-operating-theat…
Here is a focused breakdown of carbolisation of OT lights:
Carbolisation of OT (Operation Theatre) Lights
What is Carbolisation?
Carbolisation is the process of disinfecting OT surfaces and equipment using carbolic acid (phenol) solution. It is a traditional, widely used infection control practice in hospital OTs, particularly in South Asian settings. The term comes from "carbolic acid" - the common name for phenol (C₆H₅OH).
Why OT Lights Specifically?
OT lights (overhead surgical luminaires) are positioned directly above the operative field, making them a high-risk surface for:
- Dust and particle accumulation
- Contamination from aerosolized droplets during procedures
- Splatter from blood or body fluids
Inadequate disinfection of light shades and handles can directly contaminate the sterile field below.
Carbolic Acid Solution Used
| Purpose | Concentration |
|---|---|
| Surface disinfection (light shades, tabletops, almirahs) | 2% phenol |
| General carbolisation / high-level surface disinfection | 5% phenol |
| Terminal cleaning / outbreak situations | Higher concentrations per protocol |
The Government of India OT Sterilization guidelines specify: clean table tops and surfaces like light shades, almirahs, lockers, and trolleys with Phenol (Carbolic acid 2%).
Step-by-Step Procedure for Carbolisation of OT Lights
1. PPE First
- Wear gloves, mask, gown, and eye protection before handling carbolic acid - it is a corrosive chemical that can cause skin burns and mucous membrane irritation.
2. Remove the OT from use
- No procedure should be underway. Lights should be switched off and cooled (hot bulbs can evaporate the solution and irritate airways).
3. Initial cleaning
- Wipe down the light shade / reflector bowl, arm, handles, and canopy with a detergent (soap-water) solution to remove gross organic matter (blood, tissue debris, dust).
- Rinse with clean water to remove detergent residue (residue inactivates phenol).
4. Apply carbolic acid solution
- Use a cloth or spray bottle to apply 2% carbolic acid solution evenly over:
- Light shade/reflector
- Light arm and joints
- Sterile handles (especially high-touch)
- Canopy / ceiling mount surface
5. Contact time
- Allow the solution to remain on the surface for 10-15 minutes for effective disinfection.
6. Wipe / allow to dry
- Wipe off or allow to air-dry. Ensure good ventilation to disperse fumes before the OT is re-occupied.
7. Ventilation
- Fumes from carbolic acid can be irritating - run the OT ventilation/air handling unit and ensure fumes have dissipated before any procedure.
8. Documentation
- Record the date, time, concentration used, and name of the person who performed carbolisation in the OT log/register.
Frequency
| Situation | Frequency |
|---|---|
| Routine / between cases | Wipe light handles with 70% alcohol or 2% phenol |
| Daily (start of day) | Full surface cleaning including light shades with 2% phenol |
| Terminal cleaning (end of day / after contaminated case) | Full carbolisation + aldehyde-based fogging |
| After infectious/contaminated cases | Immediate terminal carbolisation |
| Weekly | Fogging with aldehyde-based spray (carbolisation still done for surfaces) |
Important Precautions for OT Lights
- Do not spray carbolic acid directly onto electrical fittings or bulbs - risk of short circuit or cracking of hot glass.
- Cool the light first - hot surfaces cause rapid evaporation of phenol, increasing fume exposure.
- LED lights - check manufacturer compatibility; some LED housings and lens coatings may be sensitive to strong phenol solutions. In such cases, 70% alcohol wipes are recommended for electronic/sensitive surfaces.
- Carbolic acid is not sporicidal - for spore-forming organisms (e.g., post-Clostridium case), glutaraldehyde or chlorine-based agents are preferred.
Modern Perspective
While carbolisation remains widely practiced in many hospitals, current infection control guidelines (WHO, CDC) increasingly favor:
- Quaternary ammonium compounds for routine surface disinfection
- 0.5-1% sodium hypochlorite for blood/body fluid contamination
- Aldehyde-based fogging for terminal OT disinfection
Carbolic acid (2% phenol) is still considered a valid low-to-intermediate level disinfectant for environmental surfaces like OT lights, especially where cost-effectiveness is a consideration.
In summary, carbolisation of OT lights involves wiping the light shade, arm, and handles with 2% carbolic acid (phenol) solution, maintaining 10-15 min contact time, after prior cleaning with detergent - done daily and after contaminated cases, with proper PPE and ventilation at all times.
diathermy/ cautery machine
Diathermy (electrosurgery/cautery) uses high-frequency alternating current to cut tissue or achieve haemostasis by generating heat at the point of application. It is one of the most commonly used pieces of equipment in any OT.
Searching sources...
Finding Sources
Searching the Web
diathermy cautery machine types monopolar bipolar principles surgical use
Reading File
Reading File
Reading File
Reading File
Reading File
Loading Image
Loading Image
Here is a comprehensive guide to the diathermy / cautery machine sourced from Bailey and Love's Short Practice of Surgery and Pye's Surgical Handicraft:
Diathermy / Cautery Machine (Electrosurgical Unit - ESU)
Principle
An Electrosurgical Unit (ESU) converts mains electrical supply (50-60 Hz) into high-frequency alternating current (500,000 - 3,000,000 Hz). At these frequencies, current generates heat in tissue without stimulating nerves or muscles (which are stimulated only below 10,000 Hz). The concentrated heat at the electrode tip is used to cut or coagulate tissue.
Heat generated depends on: Current density, Resistance of tissue, and Duration of application.
Components of the Diathermy Machine
| Component | Description |
|---|---|
| ESU generator | Converts mains supply to high-frequency AC |
| Active electrode | Diathermy pencil / forceps tip - where the surgical effect occurs |
| Dispersive electrode (patient plate / indifferent electrode) | Large pad applied to patient's thigh or buttock - returns current in monopolar mode |
| Foot pedal / hand switch | Activates cutting or coagulation mode |
| Active cable | Connects generator to active electrode |
| Dispersive cable | Connects patient plate back to generator |
Monopolar vs. Bipolar Diathermy
(a) Monopolar Diathermy
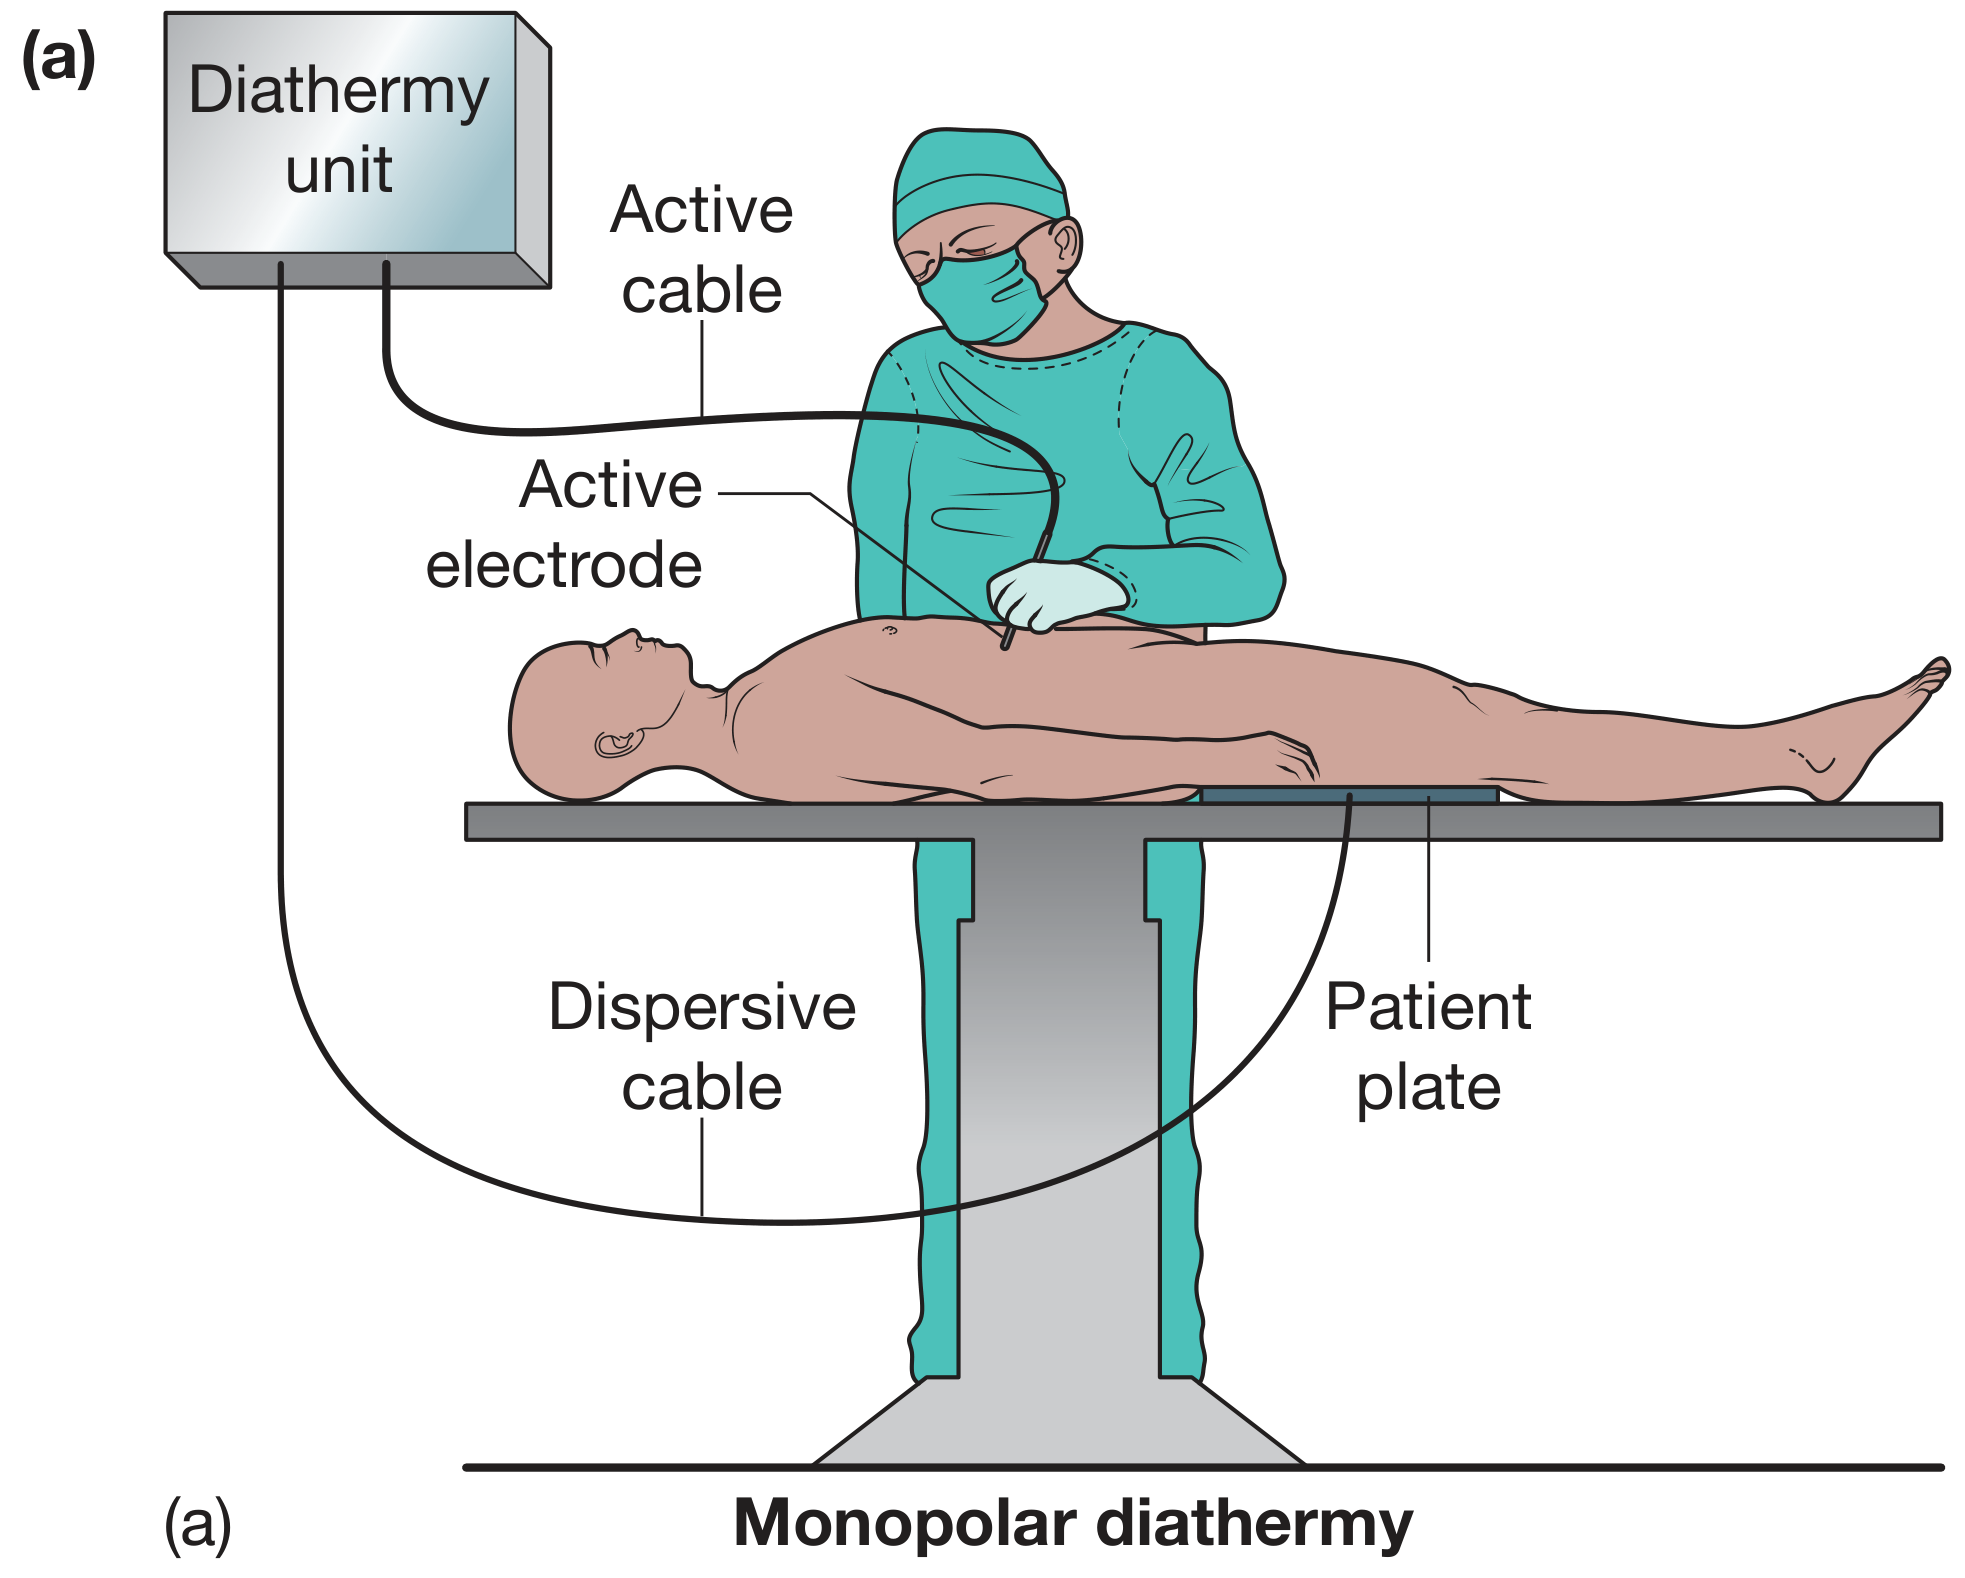
- Current flows from the diathermy pencil (active electrode) → through the patient's body → exits via the large patient plate (dispersive electrode) → back to the generator
- The patient plate is large, so current density there is low - no heat generated at the plate, all heat is at the pencil tip
- Frequency: ~500 kHz; Power: up to 400 W
- Most versatile - used for general surgery, laparoscopy, TURP, etc.
- Requires a patient plate applied to a well-perfused, hair-free skin area (usually thigh/buttock)
(b) Bipolar Diathermy
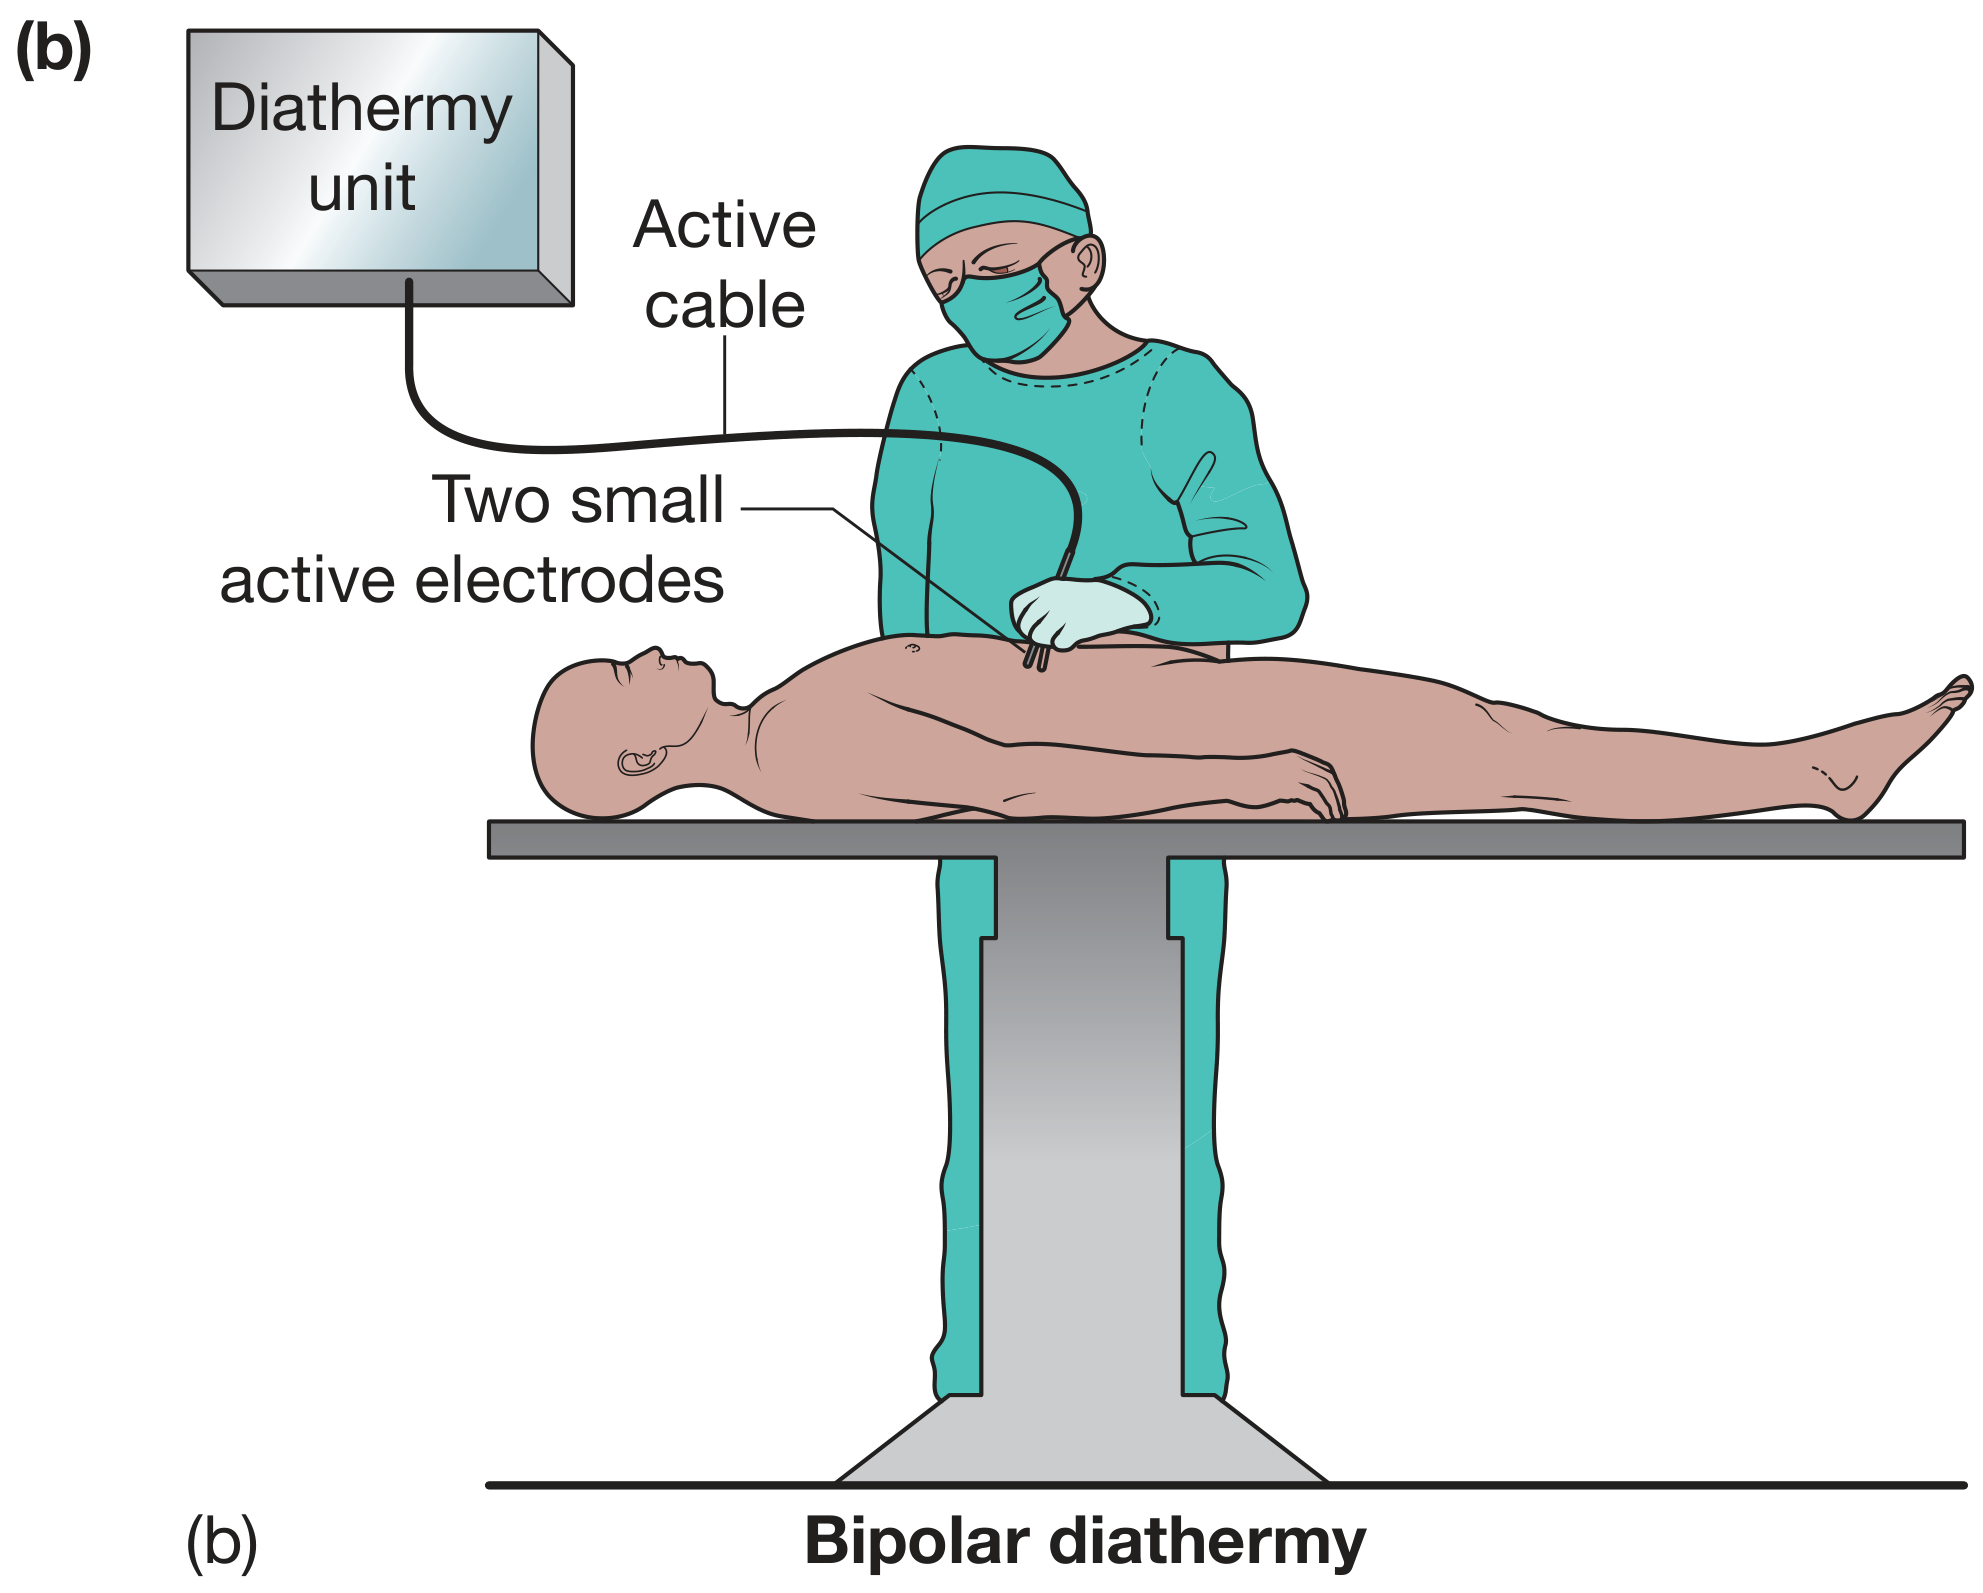
- Current flows only between the two tips of the bipolar forceps - only the tissue grasped between the tips is heated
- No patient plate required
- Frequency: ~600 kHz; Power: up to 120 W
- Safer in sensitive areas - used in neurosurgery, ophthalmology, ENT, and patients with pacemakers/implantable devices
- Cannot be used for cutting - only coagulation/haemostasis
Modes of Diathermy
| Feature | Cutting Mode | Coagulation Mode |
|---|---|---|
| Voltage | Lower | Higher |
| Current pattern | Continuous (on 100% of time) | Interrupted (on only ~6% of time) |
| Tissue effect | Rapid heating → vaporisation → tissue cut | Slow heating → dehydration, protein denaturation → coagulation |
| Lateral spread | Minimal | Extensive |
| Technique | Tip held just above tissue (spark arc) | Tip held just above or minimal contact with tissue |
| Use | Incision and dissection | Haemostasis |
- Blend modes combine cutting and coagulation in varying proportions, useful for dissection with simultaneous haemostasis.
Coagulation - Direct vs. Indirect
- Direct coagulation: active electrode tip touches the bleeding point directly
- Indirect (contact/touch) coagulation: active electrode touches a metal instrument (e.g., artery forceps) which is gripping the bleeding vessel - current flows through the forceps to coagulate the vessel. The surrounding area must be dry and the forceps should hold minimal fat.
Hazards of Diathermy
1. Burns (most common)
- Faulty/improper application of patient plate (inadequate contact area)
- Patient earthed via contact with metal objects (Mayo table, stirrups, anaesthetic screen bar)
- Faulty insulation of diathermy leads
- Accidental activation of diathermy or contact with other metal instruments
- Hole in surgical glove causing finger burns
- Double-gloving helps reduce this risk
2. Channelling
- Current applied to narrow-stalked tissue concentrates ("bottleneck") and damages distant structures
- Classic examples:
- Coagulation of the penis during circumcision in a child
- Coagulation of the spermatic cord when electrode applied to the testis
- Prevention: use bipolar diathermy in such situations
3. Interference with Implantable Electronic Devices
- Diathermy currents can interfere with cardiac pacemakers, ICDs, cochlear implants, gastric stimulators
- Use bipolar diathermy or ultrasonic scalpel; liaise with cardiology and anaesthetics pre-operatively
4. Explosion/Fire
- Sparks can ignite alcohol-based skin prep (especially if allowed to pool), inflammable gases, or drapes
- Invisible flames possible under bright OR lights
5. Electrocution
- Rare with modern machines manufactured to high safety standards
- Requires regular expert servicing
6. Surgical Smoke - Occupational Hazard
- Diathermy smoke contains viral particles, bacteria, carcinogens, and respiratory irritants
- Use smoke evacuation systems or suction devices; universal precautions for all theatre staff
Diathermy in Laparoscopic Surgery - Special Risks
Diathermy burns are more hazardous in laparoscopy due to limited visibility:
- Faulty insulation of laparoscopic instruments
- Direct coupling - contact of active electrode with another metal instrument inside the abdomen while pedal is activated
- Inadvertent pedal activation when tip is outside camera view
- Retained heat in the tip touching bowel after use
- Use insulation-testing devices and active electrode monitoring where available
Advanced Vessel-Sealing Devices
For laparoscopic and complex open surgery, modern alternatives supplement standard diathermy:
- LigaSure / Enseal - combine pressure and bipolar energy to seal vessels up to 7 mm
- Harmonic scalpel (ultrasonic) - uses ultrasonic vibration rather than electrical current; safer near nerves and implants
- Argon beam coagulator - ionised argon gas carries current for superficial coagulation of large areas (liver, spleen)
Safe Electrosurgery Checklist (Bailey & Love)
- Always check diathermy settings before use
- Use the lowest effective current setting
- Be careful when diathermy is used near other metallic instruments
- Use intermittently and for brief spells only
- Use bipolar and advanced vessel-sealing devices where appropriate
- Ensure smoke evacuation systems are in place
Sources: Bailey and Love's Short Practice of Surgery 28th Ed., p.132-134 | Pye's Surgical Handicraft 22nd Ed., p.129
operation table
The operation table (operating table / surgical table) is the central piece of furniture in any OT, designed to support the patient in various positions while giving the surgical team optimal access to the operative site.
Searching sources...
Finding Sources
Searching the Web
operation table OT parts positions types surgical features
Reading File
Reading File
Reading File
Reading File
Reading File
Loading Image
Loading Image
Loading Image
Here is a comprehensive overview of the Operation Table, sourced from Bailey and Love's Short Practice of Surgery:
The Operation Table (Surgical / Operating Table)
What It Is
The operation table is the central piece of equipment in the OT, specifically engineered to:
- Support the patient safely throughout the procedure
- Allow precise positioning for optimal surgical access
- Accommodate attachments (arm boards, stirrups, shoulder supports, etc.)
- Tilt in multiple axes (head-down, head-up, lateral)
- Interface with imaging equipment (radiolucent table top for C-arm use)
Parts / Components of the Operation Table
| Part | Function |
|---|---|
| Table top | Main patient surface; segmented into head, trunk, leg sections; often radiolucent |
| Head section | Adjustable; can be raised, lowered, or removed for head/neck surgery |
| Trunk/body section | Main working area; can be "broken" (angled) for kidney/lateral positions |
| Leg section | Removable or adjustable; splits for lithotomy position |
| Column/pedestal | Central support; houses hydraulic or electric mechanism for height adjustment |
| Base | Wide, stable footprint; must allow surgeon to stand close without obstructions |
| Arm boards | Extend laterally for arm positioning; used for IV access and arm surgery |
| Stirrups / leg holders | Hold legs in lithotomy and Lloyd-Davies positions |
| Shoulder supports | Prevent patient from sliding in steep Trendelenburg |
| Side supports | Prevent lateral roll when table is tilted |
| Safety belt / strap | Placed 5 cm above the knee to secure the patient; never over the abdomen |
| Foot support / footboard | Prevents sliding in reverse Trendelenburg |
Types of Operation Tables
| Type | Use |
|---|---|
| General surgery table | Most versatile; adjustable for all standard positions; most commonly used |
| Orthopaedic/fracture table | Traction attachments, perineal post; used for hip/femur/tibia nailing |
| Neurosurgery table | Special head clamp (Mayfield), prone/sitting accessories |
| Ophthalmic table | Compact, tiltable, with head support |
| Urological table | Radiolucent, integrated stirrups for TURP and cystoscopy |
| Obstetric/gynaecology table | Stirrups, adjustable back rest |
| Cardiac/vascular table | Radiolucent, allows C-arm fluoroscopy throughout the length of the table |
Surgical Positions on the Operation Table
1. Supine (Dorsal Recumbent) - Most Common
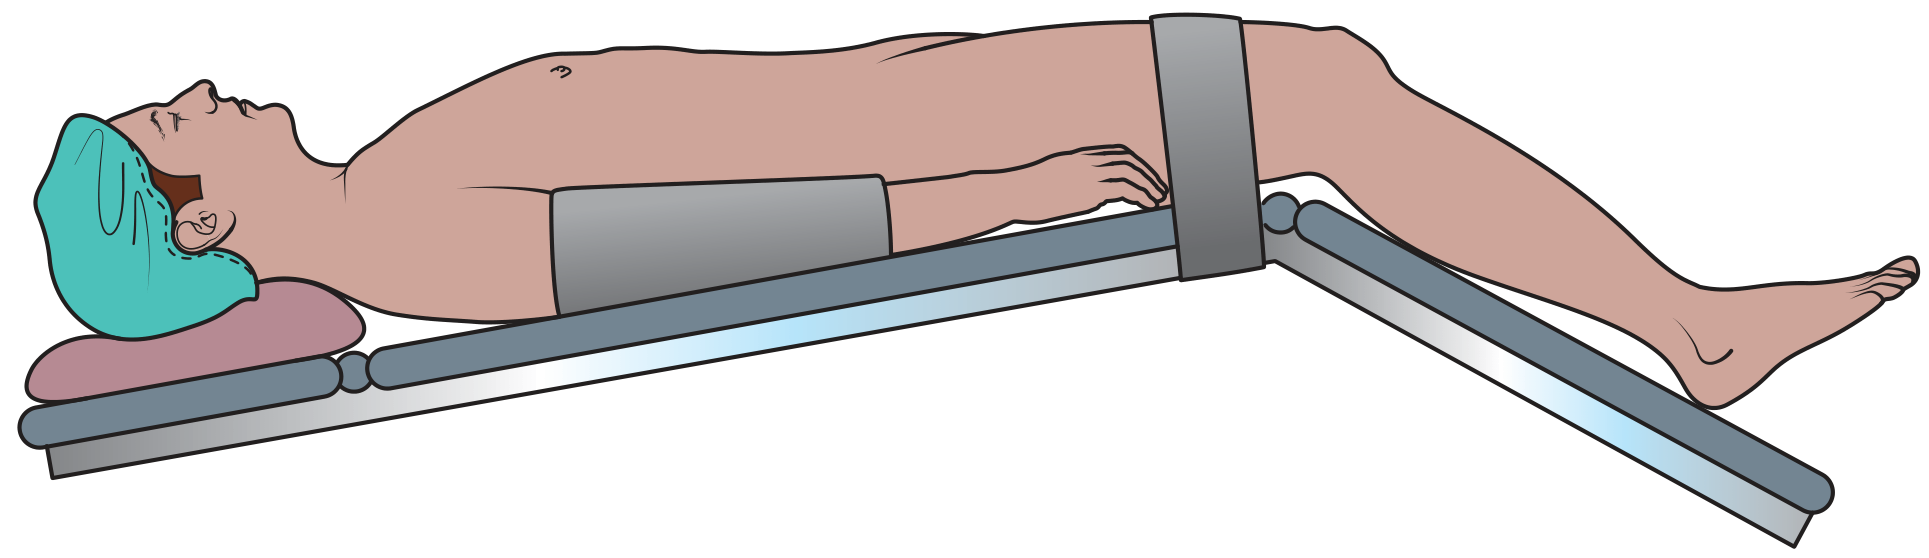
- Patient lies flat on back
- Used for: head, face, neck, chest, abdomen, limb surgery
- Arms placed at side or extended on arm boards (not abducted >90° - risk of brachial plexus injury)
Modifications of supine:
| Modification | Description | Use |
|---|---|---|
| Trendelenburg | Head end tilted down, knees slightly flexed | Pelvic surgery, shock resuscitation, laparoscopic colorectal/pelvic surgery |
| Reverse Trendelenburg | Head end tilted up | Upper abdominal/laparoscopic upper GI surgery; reduces diaphragm pressure |
| Rose's position | Slight neck extension | Head and neck surgery |
| Arm extended | Shoulder/arm abducted | Axillary and breast surgery |
Complications of supine:
- Ulnar, axillary, peroneal and brachial neuropraxia
- Pressure necrosis of heels, sacrum, shoulders, scalp
- Steep Trendelenburg: respiratory compromise, raised ICP, raised intraocular pressure
2. Prone Position
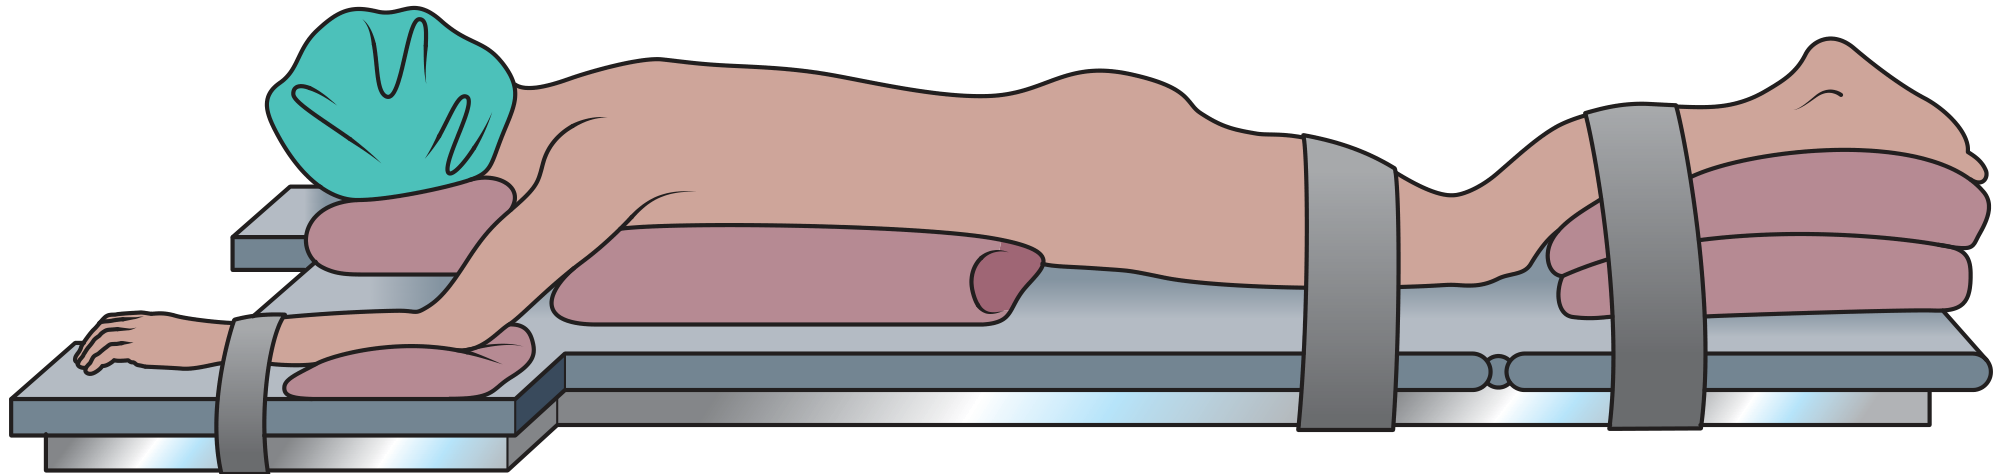
- Patient intubated first, then log-rolled onto the table by at least 4 team members
- Axillary and lateral chest rolls essential to allow chest movement
- Female breasts and male genitalia carefully positioned to avoid compression
- Arms placed by side of head on arm boards (care - risk of shoulder dislocation)
- Toes elevated off table by pads under shins
- Specially designed hollow face pillow accommodates face and ETT
- Used for: spinal surgery, extralevator abdominoperineal excision (rectal cancer)
- Modification: jackknife (Kraske) position - table broken at middle with head and feet hanging down; excellent perineal access
Complications of prone:
- Brachial plexus injury and shoulder dislocation
- Facial trauma; blindness secondary to vascular congestion of the eye
- Pressure necrosis of breasts, external genitalia, bony prominences
- ETT displacement
3. Lateral Position
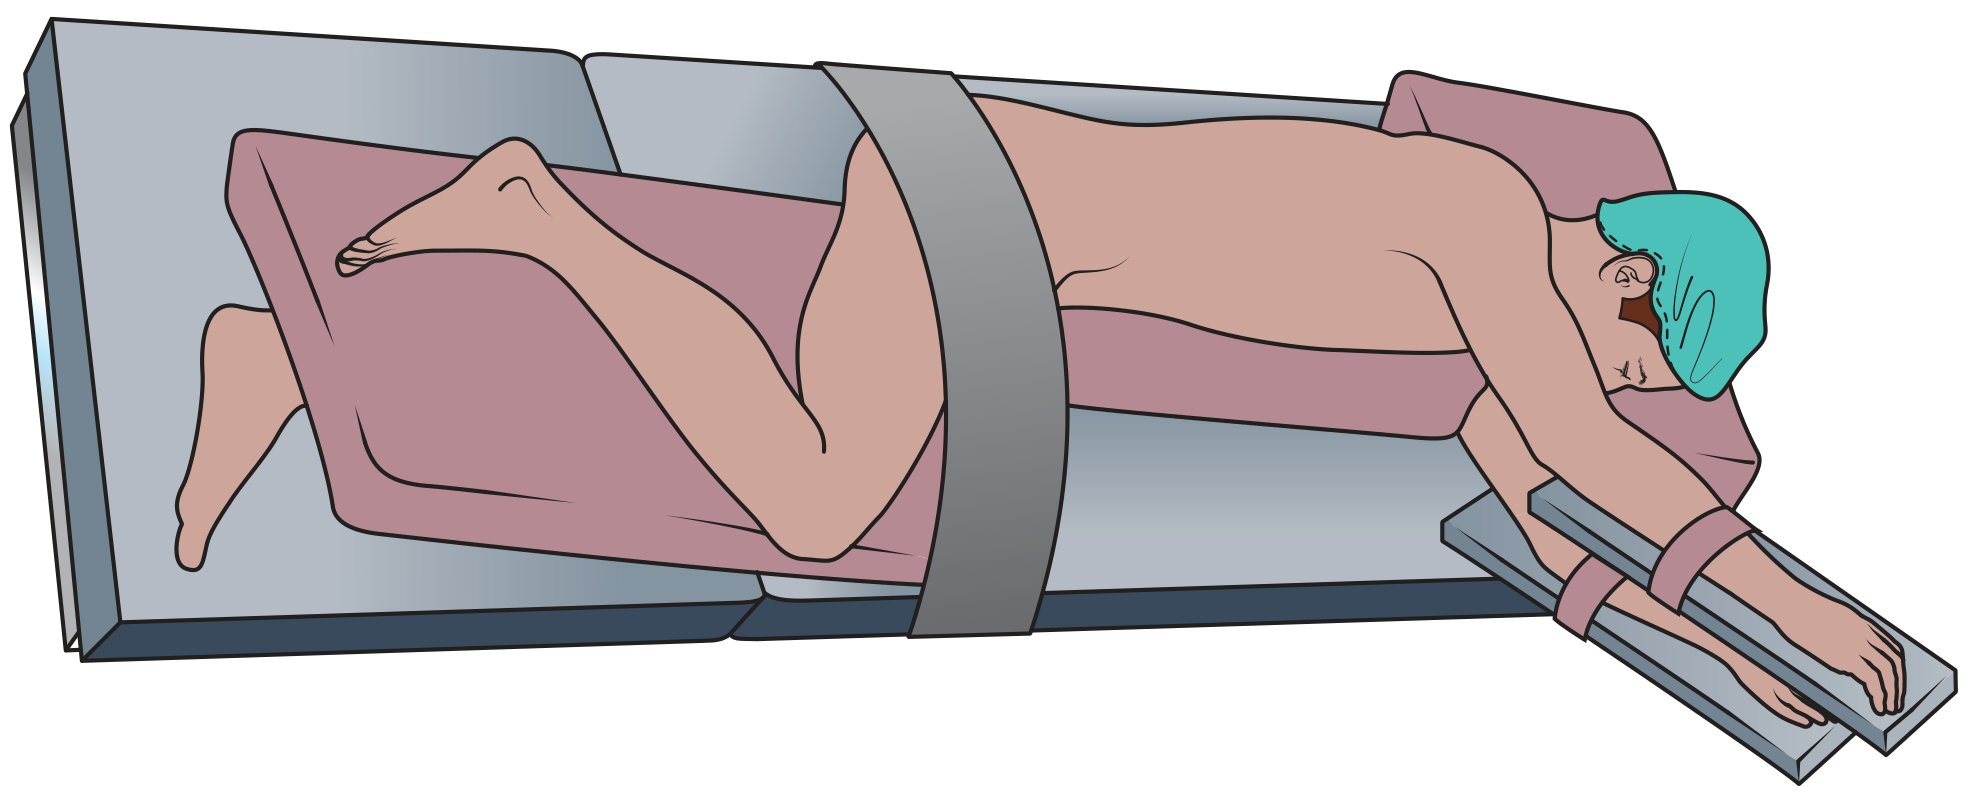
- Patient on left or right side, stabilised with stirrups, straps, and side supports
- Lower leg slightly flexed, pillow between legs, upper leg more flexed
- Arms in stirrups; cervical alignment maintained
- Used for: perianal/pilonidal abscess drainage, lateral thoracotomy, urological/retroperitoneal procedures
- Kidney position: table "broken" (angled) at the middle with patient's flank at the summit - increases distance between costal margin and iliac crest for retroperitoneal/renal access
Complications of lateral:
- Respiratory complications (preferential ventilation of dependent lung)
- Accidental endobronchial intubation migration
- Brachial plexus and ulnar nerve injury
- Corneal abrasions
4. Lithotomy and Lloyd-Davies Position
- Patient supine, legs flexed at hip and knee, placed in stirrups
- Lithotomy: hips flexed to 90°
- Lloyd-Davies: modification with hips minimally flexed to ~15° with 30° head-down tilt
- Used for: gynaecological, perineal, urological, combined abdominoperineal procedures
Key safety rules:
- Both legs placed in stirrups simultaneously (to avoid pelvic torsion injury)
- Fingers must NOT extend past the edge of the table - risk of crush injury / amputation when leg section is replaced
- Legs should not be excessively externally rotated or abducted
- Sequential compression devices useful to prevent DVT in long operations
Complications:
- Venous/arterial insufficiency → limb ischaemia, compartment syndrome, DVT
- Digital amputation at table edge
- Hyperflexion → sciatic nerve damage
- Saphenous and peroneal neuropraxia
Securing the Patient - General Rules
| Accessory | Rule |
|---|---|
| Safety belt | 5 cm above the knee; never over the abdomen |
| Shoulder supports | Required for steep Trendelenburg |
| Side supports | Required when table is tilted laterally |
| Foot support | Required for reverse Trendelenburg |
| Vacuum positioning systems | Conform to body contours; useful alternative to straps |
Pre-positioning Checklist (Bailey & Love)
- Final check of the table and all accessories before patient transfer
- Optimum positioning of laparoscopic stacks, ESU, nursing trolley
- Dispersive (diathermy) leads and underbody heating blankets placed before positioning
- Consider: age, body habitus, joint mobility
- Compromise between ideal surgical position and physiologically safe position when needed
- Anaesthetist coordinates the transfer; calls the count
Objectives of Correct Surgical Positioning
- Facilitate safe anaesthesia and surgery
- Reduce adverse physiological insults
- Optimise surgical exposure and ergonomics
- Maintain the patient's dignity by avoiding unnecessary exposure
Source: Bailey and Love's Short Practice of Surgery 28th Ed., pp. 116-118
This is a shared conversation. Sign in to Orris to start your own chat.