
Diagram of shoulder sling
A clear labeled medical diagram of a shoulder sling showing how it is worn on the human body. The diagram should show: the arm resting in the sling at approximately 90 degrees elbow flexion, the strap going around the neck, the fabric supporting the forearm and wrist, and key labeled parts including: neck strap, forearm support, wrist support, elbow pocket, and body strap or waist tie. The figure should be a front-facing anatomical illustration in a clean medical textbook style with clear labels and arrows pointing to each component.
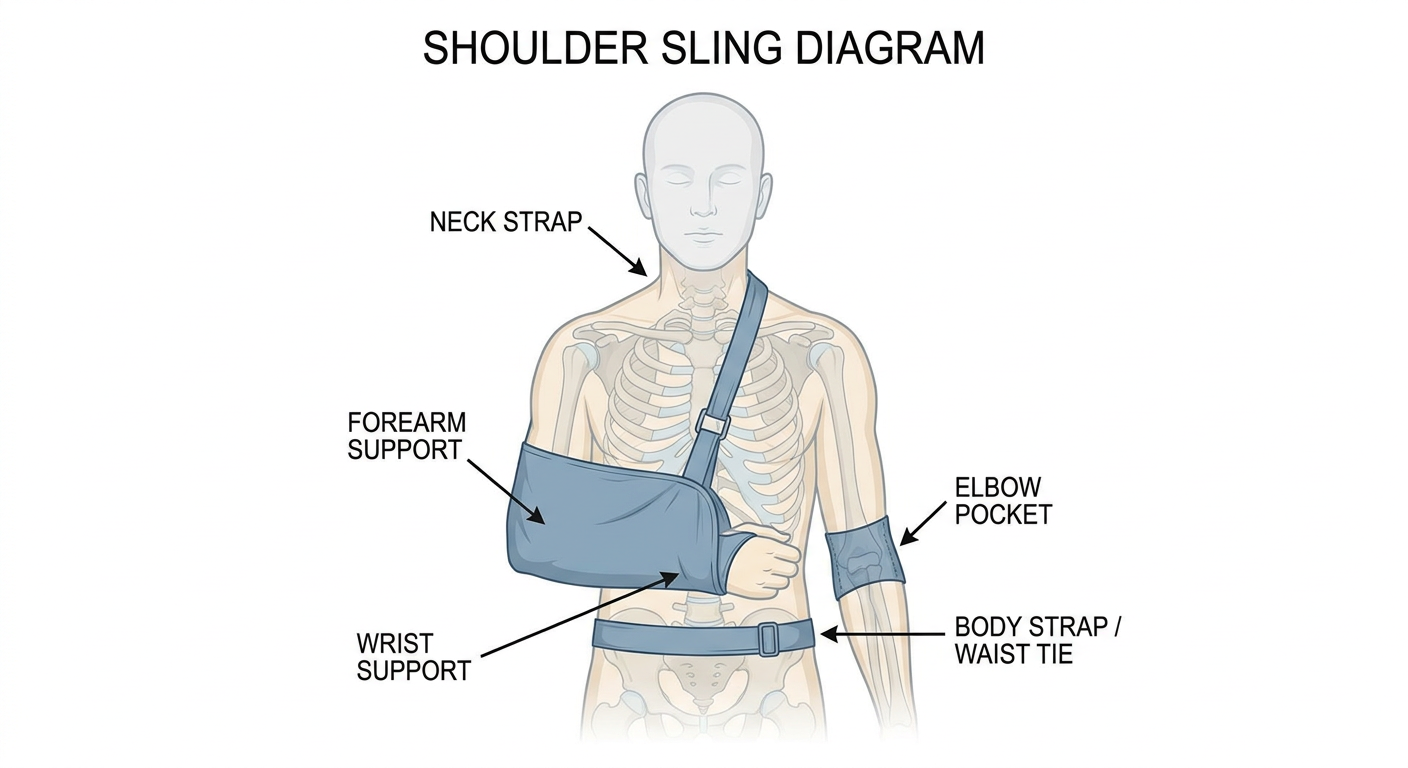
- Neck strap - loops around the neck to bear the weight of the arm
- Forearm support - the main fabric cradle that holds the forearm
- Elbow pocket - the closed end that prevents the elbow from slipping out
- Wrist support - keeps the wrist elevated and in a neutral position
- Body strap / waist tie - optional strap that anchors the sling against the torso to limit movement
Dishram of shoulder immobilizer
A clear labeled medical diagram of a shoulder immobilizer worn on the human body, front-facing anatomical illustration in clean medical textbook style. The shoulder immobilizer should show: the arm held close to the body with elbow at 90 degrees flexion, the main body vest or wrap that goes around the torso, the arm sling component supporting the forearm, and the swath strap that binds the upper arm to the chest wall. Labeled parts with arrows should include: shoulder strap, arm sling pouch, swath or chest strap, elbow support, waist band, and abduction pillow if present. Show how the device restricts both the shoulder and the entire arm against the body, differentiating it from a simple sling.
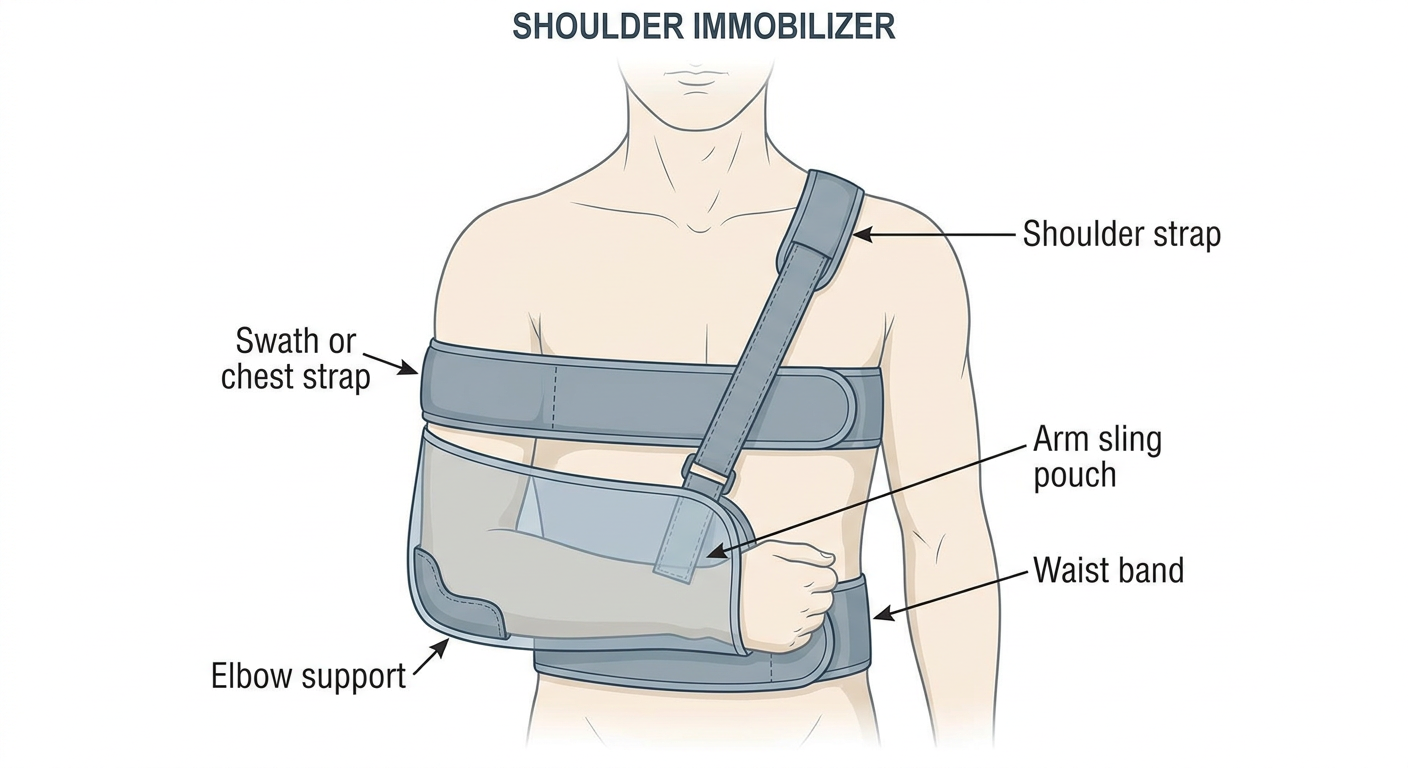
- Shoulder strap - goes over the opposite (unaffected) shoulder to anchor the device
- Arm sling pouch - supports the forearm and wrist at 90 degrees elbow flexion
- Swath / chest strap - the critical feature that distinguishes this from a simple sling; it wraps around the torso and binds the upper arm firmly against the chest wall, preventing shoulder abduction and rotation
- Elbow support - cradles the elbow to prevent it from sliding out
- Waist band - secures the device around the abdomen for added stability
| Feature | Sling | Immobilizer |
|---|---|---|
| Supports forearm | Yes | Yes |
| Restricts upper arm movement | No | Yes (via swath) |
| Prevents shoulder rotation | No | Yes |
| Used after shoulder dislocation / surgery | Less ideal | Preferred |
Shoulder abduction orthosis
A clear labeled medical diagram of a shoulder abduction orthosis (also called airplane splint or shoulder abduction pillow brace) worn on the human body, front-facing and side-view anatomical illustration in clean medical textbook style. The device should show: the arm held away from the body in abduction at approximately 45 to 90 degrees, a firm triangular or wedge-shaped abduction pillow between the upper arm and the torso, a body harness or vest that wraps around the chest, an arm cuff securing the upper arm to the pillow, a forearm trough or support holding the forearm, and a waist strap anchoring the pillow to the body. Labeled arrows pointing to: abduction pillow or wedge, body harness or chest strap, upper arm cuff, forearm support trough, waist strap, shoulder joint position, and degree of abduction angle indicator. Show clearly that the arm is held out to the side away from the body rather than against it.
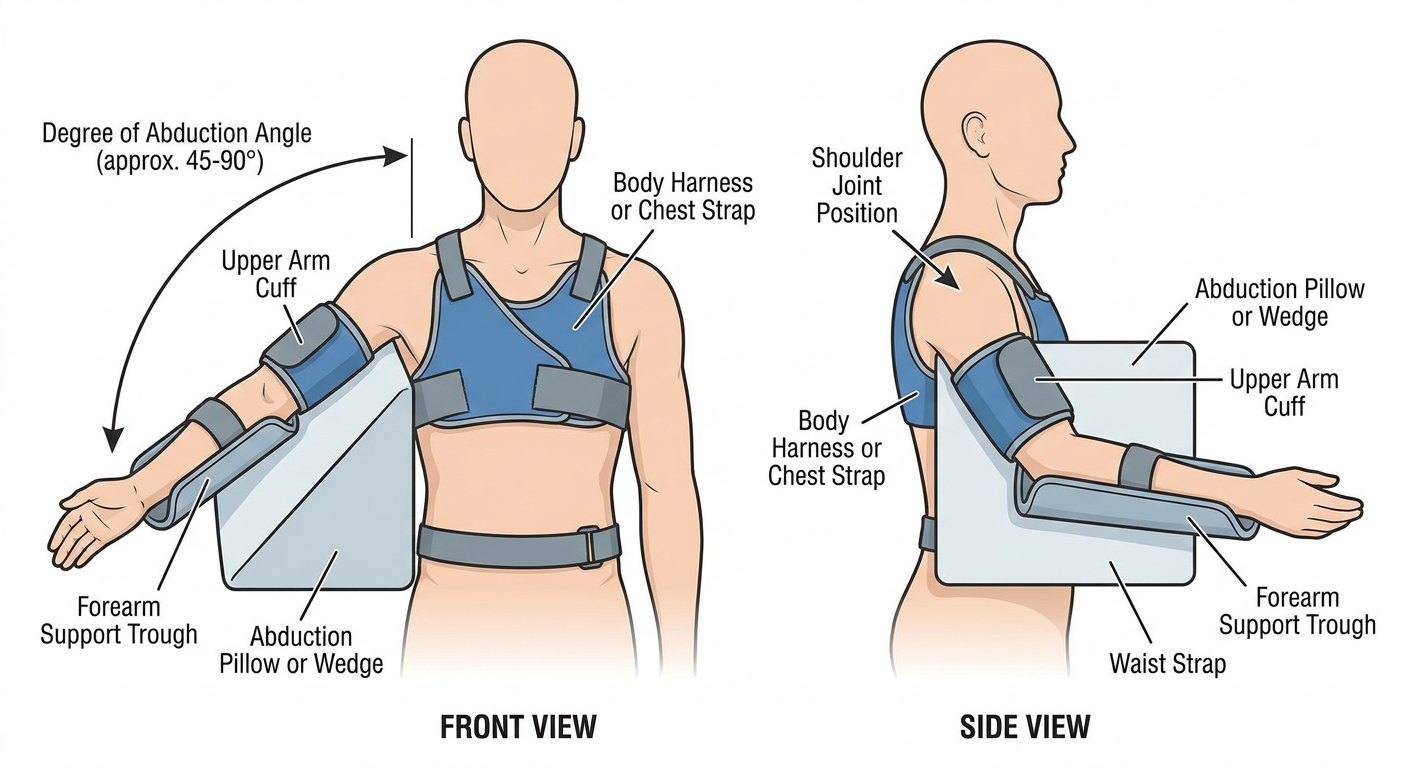
- Abduction pillow / wedge - the firm triangular foam or rigid wedge that holds the arm out away from the body, typically at 45-90 degrees of abduction
- Body harness / chest strap - wraps around the thorax to anchor the entire orthosis to the trunk
- Upper arm cuff - secures the humerus to the abduction pillow and prevents the arm from dropping
- Forearm support trough - cradles the forearm, usually with the elbow at ~90 degrees of flexion
- Waist strap - lower anchor strap around the abdomen to stabilize the pillow and prevent rotation
- Axillary pad - padding in the axilla to prevent pressure sores where the pillow contacts the chest wall
| Feature | Sling | Immobilizer | Abduction Orthosis |
|---|---|---|---|
| Arm position | Adducted (against body) | Adducted (against body) | Abducted (away from body) |
| Shoulder movement | Partially restricted | Fully restricted | Fixed in abduction |
| Bulk / size | Minimal | Moderate | Large |
- Rotator cuff repair (especially massive tears) - reduces tension on the repair
- Axillary nerve or brachial plexus injuries
- Shoulder reconstructions requiring offloading of the repaired structures
- Post-operative immobilization after glenohumeral arthroplasty
Clavicle brace
A clear labeled medical diagram of a clavicle brace (also called a figure-of-eight bandage or clavicle strap) worn on the human body, front-facing and rear-view anatomical illustration in clean medical textbook style. The device shows padded figure-of-eight straps looping around both shoulders and crossing between the shoulder blades at the back, pulling both shoulders back and retracting the scapulae to reduce a clavicle fracture. Labeled arrows pointing to: padded axillary loops, figure-of-eight crossing point at the back between shoulder blades, anterior chest portion, scapular retraction direction arrows, fractured clavicle location highlighted, buckle or velcro adjustment mechanism, and padding over the axilla to prevent neurovascular compression. Show both front and back views side by side with clear anatomical landmarks.
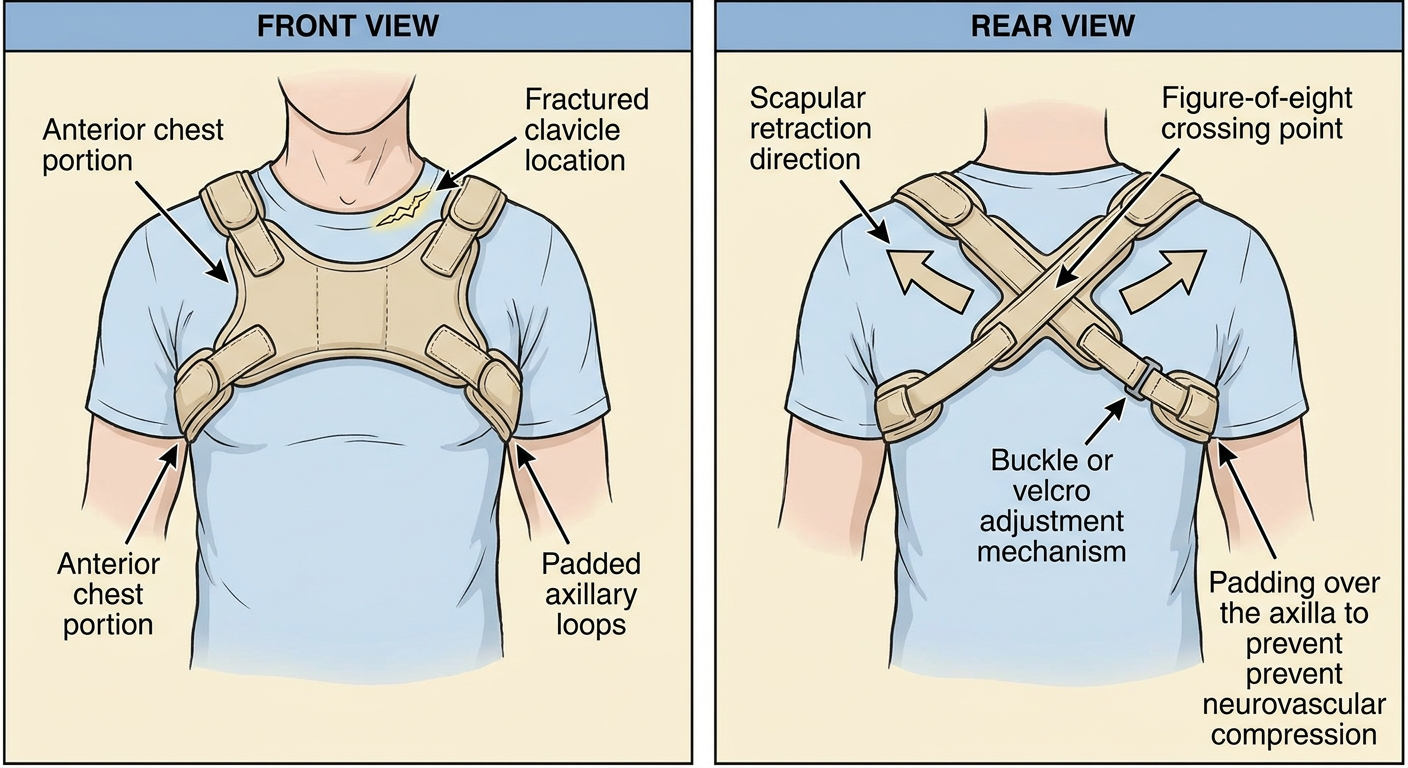
- Padded axillary loops - soft padded rings that encircle each axilla (armpit); the padding is essential to prevent compression of the axillary nerve and brachial plexus
- Figure-of-eight crossing point - the straps cross between the shoulder blades posteriorly, creating the characteristic figure-8 shape
- Buckle / velcro adjustment - allows tightening to maintain shoulder retraction
- Axillary padding - thick padding where the strap contacts the neurovascular bundle in the axilla
- Reduces overriding of the clavicle fracture fragments
- Maintains alignment by countering the deforming muscle forces (sternocleidomastoid pulls medial fragment up; pectoralis major pulls lateral fragment down and forward)
- Midshaft clavicle fractures (most common use)
- Medial clavicle fractures
| Point | Detail |
|---|---|
| Worn duration | Typically 4-6 weeks |
| Fit check | Two fingers should fit under the axillary loop - too tight risks neurovascular compression |
| Complication watch | Axillary nerve palsy, skin breakdown, brachial plexus irritation |
| Evidence | Conservative management with figure-of-eight vs. simple sling shows similar outcomes for most midshaft fractures |
Diagram of humeral fracture brace and elbow orthosis
A clear labeled medical diagram showing two devices side by side: LEFT: a humeral fracture brace (functional humeral brace / Sarmiento brace) on the upper arm - showing a cylindrical clamshell plastic or thermoplastic sleeve wrapping around the entire upper arm from just below the shoulder to just above the elbow, with velcro straps securing it circumferentially, labeled parts including: anterior shell, posterior shell, velcro closure straps, proximal trim line just below axilla, distal trim line just above elbow, and arrow showing hydraulic compression effect on fracture site. RIGHT: an elbow orthosis showing a hinged elbow brace with medial and lateral uprights, a hinge mechanism at the elbow joint axis, upper arm cuff, forearm cuff, range of motion dial or lock, and padding. Labels pointing to: medial upright, lateral upright, elbow hinge with ROM dial, upper arm cuff, forearm cuff, and flexion-extension arc indicator. Both diagrams in clean medical textbook anatomical illustration style with clear arrows and labels.
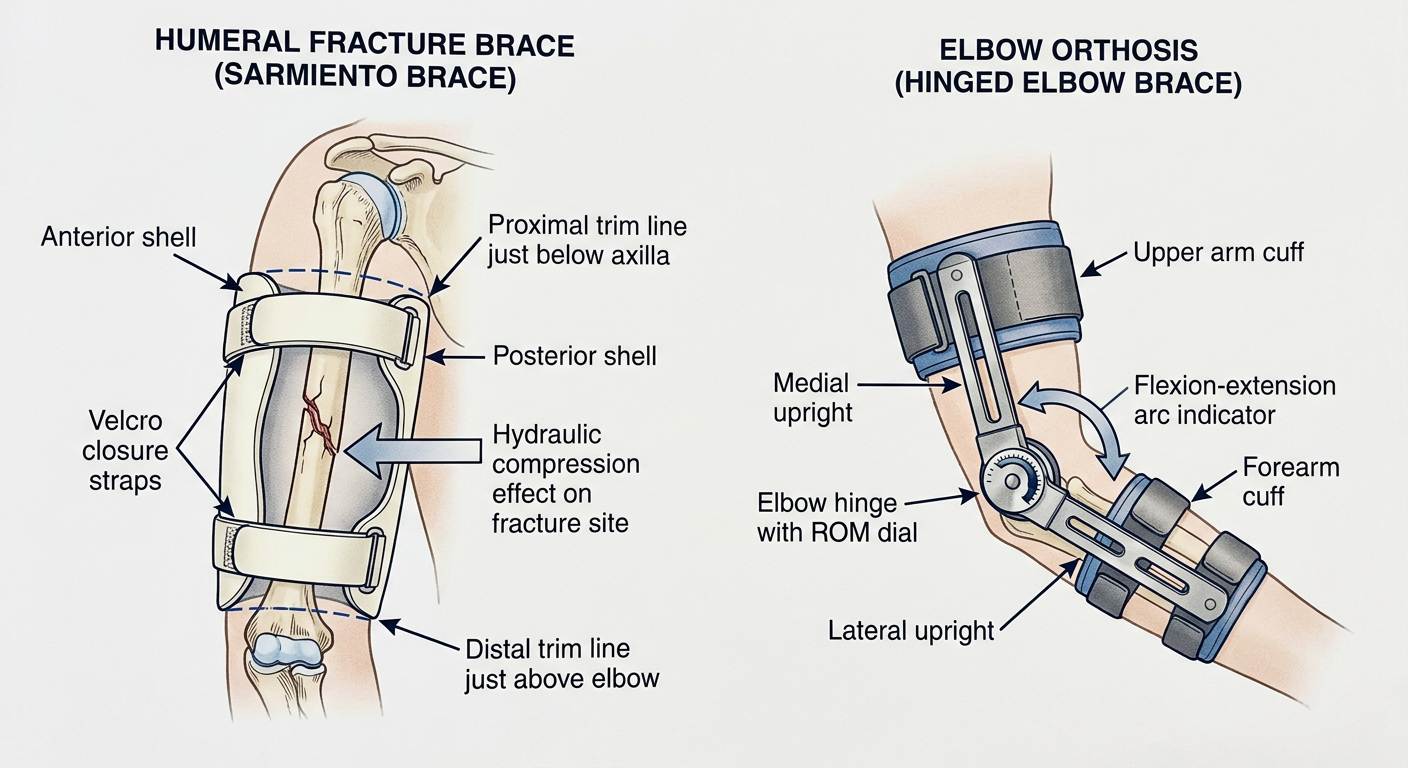
Humeral Fracture Brace (Sarmiento / Functional Humeral Brace)
- Anterior & posterior shells - two clamshell halves of rigid or semi-rigid thermoplastic that encircle the upper arm
- Velcro closure straps - 3-4 straps that allow circumferential tightening as limb swelling decreases over time
- Proximal trim line - sits just below the axilla to avoid restricting shoulder movement
- Distal trim line - ends just above the olecranon to allow full elbow flexion
- Mechanism - works by hydraulic compression of the soft tissue sleeve around the humerus, converting muscle forces into a compressive mold that maintains fracture alignment (not rigid fixation)
Elbow Orthosis
- Medial & lateral uprights - rigid side bars that frame the elbow on both sides
- Elbow hinge with ROM dial - adjustable hinges that can lock the elbow at a set angle or allow a controlled arc of flexion-extension (e.g., 30-130 degrees)
- Upper arm cuff - padded cuff anchoring the orthosis to the humerus
- Forearm cuff - padded cuff anchoring to the forearm/radius-ulna
- Padding - protects olecranon and epicondyles from pressure
| Type | Use |
|---|---|
| Static (locked) | Post-op elbow fracture fixation, contracture correction |
| Hinged (adjustable ROM) | Elbow instability, ligament repair, post-dislocation rehab |
| Extension block | Prevents terminal extension after coronoid/collateral repair |
| Serial static progressive | Gradual stretching of elbow contractures |