
E tep repair
ETEP enhanced view totally extraperitoneal hernia repair technique steps
eTEP extended totally extraperitoneal hernia repair retromuscular crossover maneuver
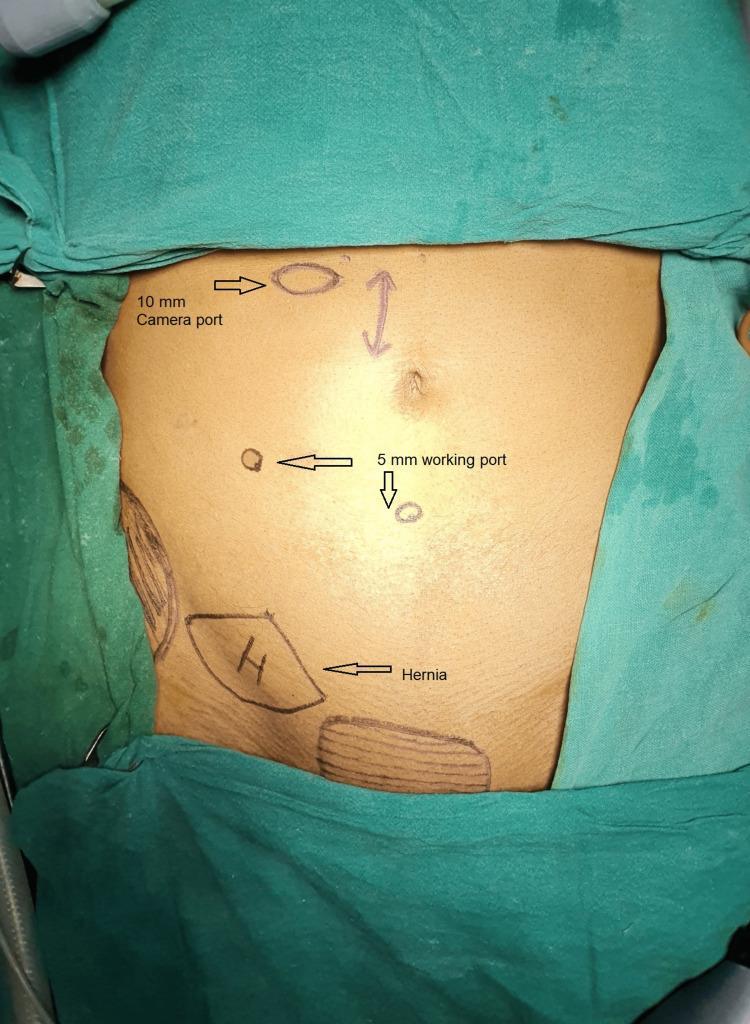
A clinical photograph shows the preoperative abdominal surface markings for an extended totally extraperitoneal (eTEP) hernia repair. The patient is in a supine position, draped with green surgical cloths. Annotated markings on the skin indicate planned laparoscopic port placements: a 10 mm camera port is marked superiorly and slightly lateral to the midline, and two 5 mm working ports are marked in the mid-abdominal region to facilitate triangulation. The umbilicus is identified with a vertical double-headed arrow. In the lower left quadrant (patient's right), a trapezoidal area is labeled 'H' for Hernia, along with anatomical sketches indicating the inguinal region and musculature. This visual serves as a surgical planning guide for the eTEP approach, emphasizing the caudal-to-cranial port configuration used to access the preperitoneal space for inguinal hernia mesh placement without entering the peritoneal cavity.
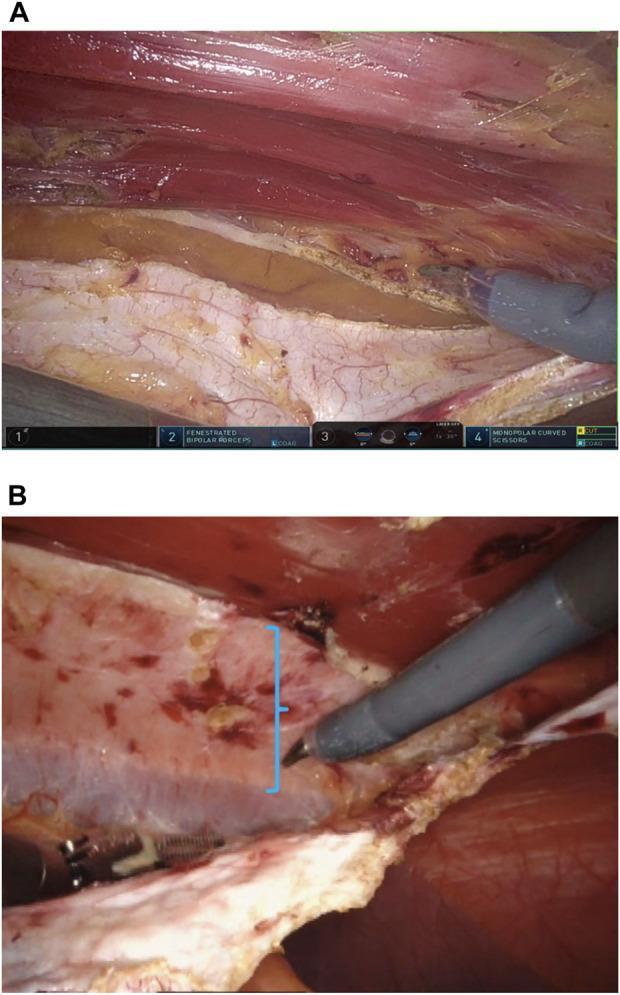
Two-panel intraoperative clinical photograph (A, B) captured during a robotic-assisted abdominal wall hernia repair. Image A demonstrates the crossover maneuver, where the posterior rectus fascia is being incised approximately 0.5–1 cm medial to its junction with the anterior rectus sheath. Visible tissues include the reddish, striated fibers of the rectus muscle and the pale, fibrous posterior rectus sheath. Robotic instrumentation (monopolar curved scissors) is shown performing the dissection to enter the preperitoneal space. Image B highlights a rectus diastasis, indicated by a blue bracket, with visible stretching of the midline fibrous tissue. Shadowing fibers of the contralateral rectus muscle are coming into view as the dissection progresses. The visual demonstrates key surgical steps in retromuscular dissection, including the preservation of the linea alba ventrally and the peritoneum dorsally. The content is intended for surgical education, specifically illustrating the anatomy and technical steps for robotic eTEP (enhanced-view Totally Extraperitoneal) hernia repair and diastasis recti management.
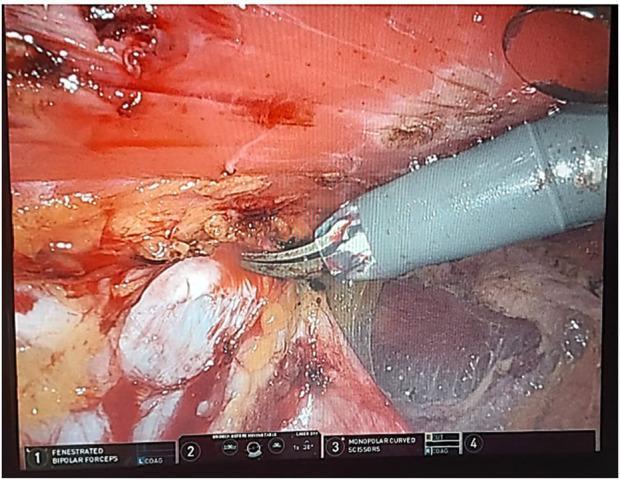
This clinical photograph is an intraoperative endoscopic view from a robotic-assisted surgical procedure, specifically an extended totally extraperitoneal repair (eTEP) for a paraumbilical hernia and rectus diastasis. The image demonstrates a 'cross-over' technique used to dissect and communicate both retrorectus spaces. The surgical field displays varied tissue textures: the upper portion shows striated red muscle tissue with visible small vessels, while the central area reveals white, glistening fascial planes and globular preperitoneal fat. A robotic surgical instrument, identified as monopolar curved scissors, is positioned at the dissection plane to perform sharp and blunt dissection between the retrorectus and preperitoneal spaces. The digital interface at the bottom of the screen provides telemetry for the robotic system, confirming the use of fenestrated bipolar forceps and monopolar curved scissors. This visual highlights the precise tissue handling and clear visualization of anatomical planes required for complex abdominal wall reconstruction.
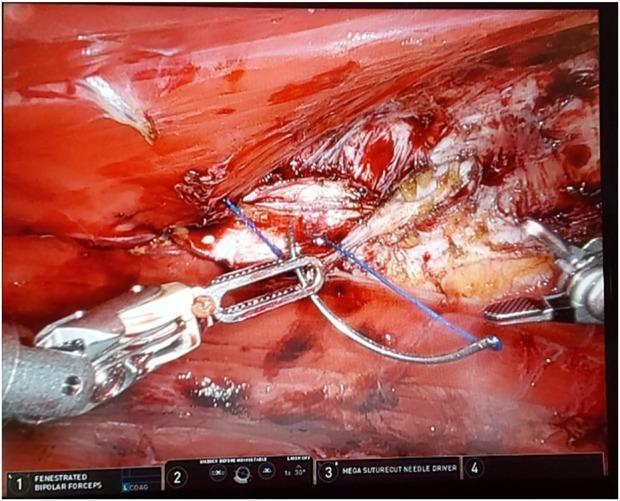
This clinical photograph displays a high-definition intraoperative view of a robotic-assisted surgical procedure, specifically an extended totally extraperitoneal (eTEP) repair for paraumbilical hernia and rectus diastasis. The visual focus is on the apposition of the rectus muscles within the retro-rectus space. The surgical field reveals deep red striated muscle tissue and white-to-translucent connective fascia. Central to the image is the active use of robotic endo-wristed instrumentation: a set of fenestrated bipolar forceps on the left and a mega suturecut needle driver on the right. The needle driver is shown manipulating a curved surgical needle threaded with a blue monofilament suture, demonstrating intracorporeal suturing technique. This image serves as an educational example of robotic hernia repair, highlighting the precision of robotic tools in reconstructing the abdominal wall by bringing the medial edges of the rectus muscles together.
eTEP Repair - Extended/Enhanced-view Totally Extraperitoneal Repair
What Is eTEP?
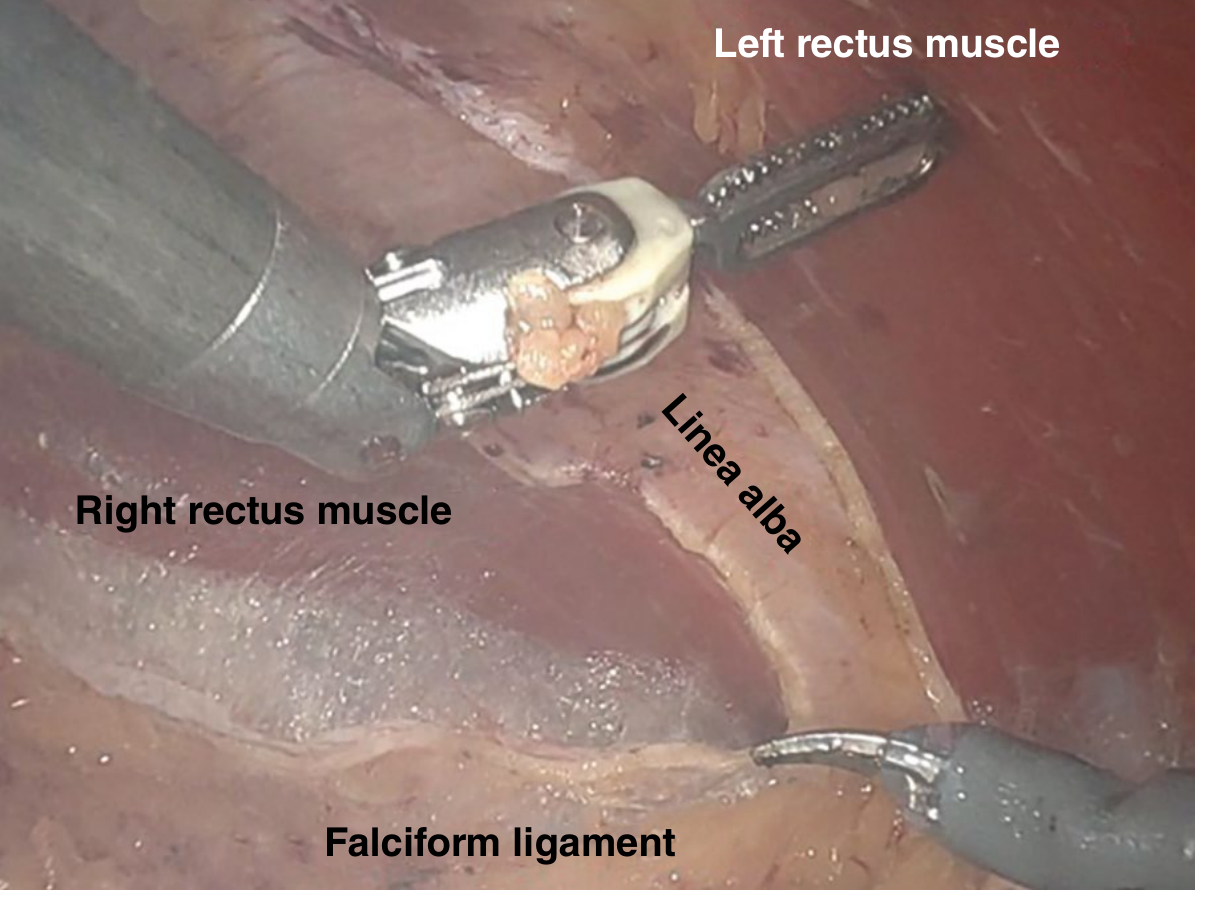
Key Anatomical Concept: The Crossover Maneuver
- Access begins in the ipsilateral retrorectus space (between the rectus muscle and the posterior rectus sheath)
- The posterior rectus sheath is incised ~0.5 cm medial to its junction with the linea alba
- The midline preperitoneal fat (falciform ligament fat superiorly, umbilical fat inferiorly) is cleared from the linea alba
- Dissection crosses the midline to expose and enter the contralateral retrorectus space
- This connects both retrorectus spaces into one large working field
Port Placement (for Inguinal / Ventral Hernia)
- A 12 mm (laparoscopic) or 8 mm (robotic) retromuscular optical port placed in the upper quadrant on the side of the hernia - this is the key innovation vs. conventional TEP
- 2 x 5 mm working ports placed along the midline (umbilicus and midpoint between umbilicus and pubic symphysis)
- Ports typically placed ipsilateral to the hernia, outside the retromuscular space
- Multiple configurations exist depending on defect location (supra/infraumbilical, lateral)
Step-by-Step Operative Technique
1. Entry into the Retrorectus Space
- Optical port advanced through the rectus muscle, stopping just superficial to the posterior rectus sheath
- Retrorectus space developed bluntly (balloon dissector or camera) until working ports can be placed
- Insufflation to 12-15 mmHg
- Lateral neurovascular bundles and linea semilunaris must be preserved
2. Retrorectus Dissection (Ipsilateral)
- Dissect the retrorectus space cranially and caudally
- Identify the linea semilunaris as the lateral limit of retrorectus dissection
- Inferior to the arcuate line: divide the arcuate line to access the preperitoneal space of the lower abdomen/pelvis (critical step for inguinal hernia)
3. The Crossover Maneuver (for Ventral Hernia)
- At the medial edge of the posterior rectus sheath, the linea alba interface is visualized
- Posterior rectus sheath is incised ~0.5 cm from the linea alba
- Adipose tissue from falciform/umbilical ligaments is cleared
- Dissection crosses the midline - the contralateral posterior rectus sheath is identified and incised
- Both retrorectus spaces are now communicating
4. Hernia Reduction and Defect Closure
- Hernia contents are reduced
- Hernia defect is closed with absorbable barbed suture
- Linea alba plication performed if rectus diastasis is present
- Posterior rectus sheaths approximated if tension allows
5. Mesh Placement
- An uncoated polypropylene mesh is placed in the retromuscular space (no peritoneal contact = no need for expensive composite mesh)
- Mesh must overlap all defect edges by ≥5 cm
- Fixed with tackers or sutures; or occasionally unanchored
- Space is deflated under direct vision ensuring mesh lies flat
6. Posterior Layer Closure
- Posterior rectus sheaths are approximated if possible
- Any peritoneal defects must be addressed to prevent intraperitoneal herniation
- Drain placement is optional
eTEP with TAR (Transversus Abdominis Release)
- Incise the posterior lamina of the internal oblique aponeurosis
- Divide the transversus abdominis muscle laterally
- Extends the retromuscular dissection to the retroperitoneal space, reaching the mid-axillary line
- Allows significant medialization of the rectus abdominis for tension-free closure
- The same retromuscular mesh plane is maintained
Advantages of eTEP over Conventional TEP and IPOM
| Feature | eTEP | TEP | IPOM |
|---|---|---|---|
| Working space | Large retrorectus space | Narrow preperitoneal | Peritoneal cavity |
| Peritoneum entered | No | No | Yes |
| Mesh type needed | Uncoated polypropylene | Uncoated | Expensive composite |
| Mesh position | Retromuscular (best integration) | Preperitoneal | Intraperitoneal |
| Hernia defect closure | Yes | Limited | Limited |
| Ergonomics | Good | Cramped | Good |
| Applicability | Inguinal + all ventral/incisional | Inguinal mainly | Ventral/incisional |
Contraindications
- Prior xiphopubic midline incision that disrupts the midline preperitoneal space (makes crossover impossible or unsafe) - transabdominal approach preferred
- Prior colostomy or ileostomy (may damage retromuscular space)
- Loss of domain / conditions where retromuscular space cannot be safely developed
- Preoperative imaging is mandatory to assess feasibility of crossover
Variations of eTEP
- eTEP Rives-Stoppa (eTEP-RS): for midline ventral/incisional hernias
- eTEP-TAR: for large defects requiring component separation
- eTEP Suprapubic Approach (eTEP-SA): ergonomic variant with improved triangulation, designed to overcome limitations of standard eTEP for midline hernias and rectus diastasis
- Robotic eTEP: uses robotic platform for superior intracorporeal suturing and dissection precision
- Sabiston Textbook of Surgery, 21st Ed. - Retrorectus Sublay Repair, pp. 1206-1218
- Current Surgical Therapy, 14th Ed. - Total Extraperitoneal Repair, pp. 2360-2363
- Mulholland & Greenfield's Surgery, 7th Ed. - Robotic-Assisted Ventral Hernia Repair, pp. 4431-4432
- Daes et al. original eTEP description (Surg Endosc 2012)
- Belyansky et al. eTEP for ventral hernia (Surg Endosc 2018)
Transabdominal preperitoneal retrorectus mesh repair
transabdominal preperitoneal retrorectus mesh repair TAPP hernia technique steps
transabdominal retromuscular retrorectus ventral hernia repair mesh placement posterior rectus sheath
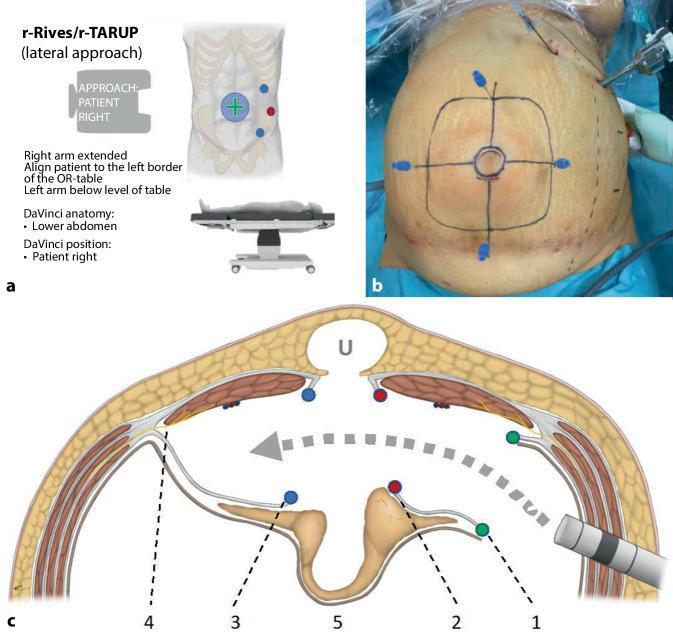
Educational graphic illustrating the surgical planning and anatomy for robotic transabdominal retromuscular umbilical prosthetic hernia repair (r-Rives or r-TARUP) via a left-lateral approach. Figure A shows an infographic detailing patient positioning on the operating table and port placement lateral to the left rectus muscle. Figure B is a clinical photograph of a patient's abdomen under pneumoperitoneum; ink markings delineate the umbilical hernia (central circle) and the anticipated mesh size (outer square). Transparietal needles are inserted at the square's perimeter to guide intra-abdominal preparation. Figure C is a cross-sectional anatomical diagram of the abdominal wall layers (skin, subcutaneous fat, rectus muscles, and posterior rectus sheaths). It maps the surgical dissection path (gray arrow) through the retrorectus space. Key steps are numbered: (1) green dots mark the lateral entry into the left posterior rectus sheath; (2) red dots signify the medial reopening of the sheath near the linea alba; (3) blue dots indicate the entry into the right posterior rectus sheath; (4) identifies lateral nerve preservation zones; (5) shows the mobilized hernia sac and peritoneal bridge. This content serves as a guide for surgical residents and fellows learning complex robotic ventral hernia repair techniques.
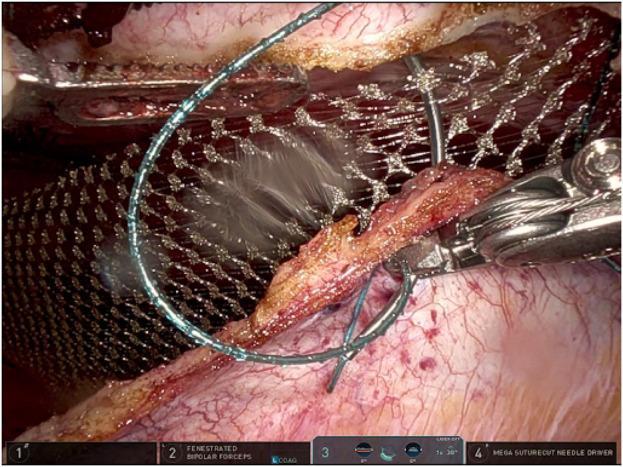
This intraoperative clinical photograph captures a key step in a robotic-assisted ventral hernia repair using the Da Vinci surgical system. The image demonstrates the closure of the ipsilateral posterior rectus sheath (PRS) following retromuscular mesh placement. A robotic needle driver (Mega SutureCut) is seen manipulating a 3-0 absorbable barbed suture, characterized by its thin, light blue appearance and integrated barbs for knotless fixation. The suture is being used in a continuous running fashion to approximate the edges of the PRS. Significantly, the suture line incorporates the edge of a synthetic macroporous mesh, which is visible as a grid-like filament structure positioned in the retrorectus space. This technique secures the mesh at the cranial and caudal borders to prevent migration while simultaneously restoring the peritoneal barrier. The surrounding tissue shows characteristic surgical anatomy, including the vascularized surface of the posterior sheath and the edge of the rectus muscle. This visual is intended for surgical education regarding robotic abdominal wall reconstruction and mesh fixation techniques.
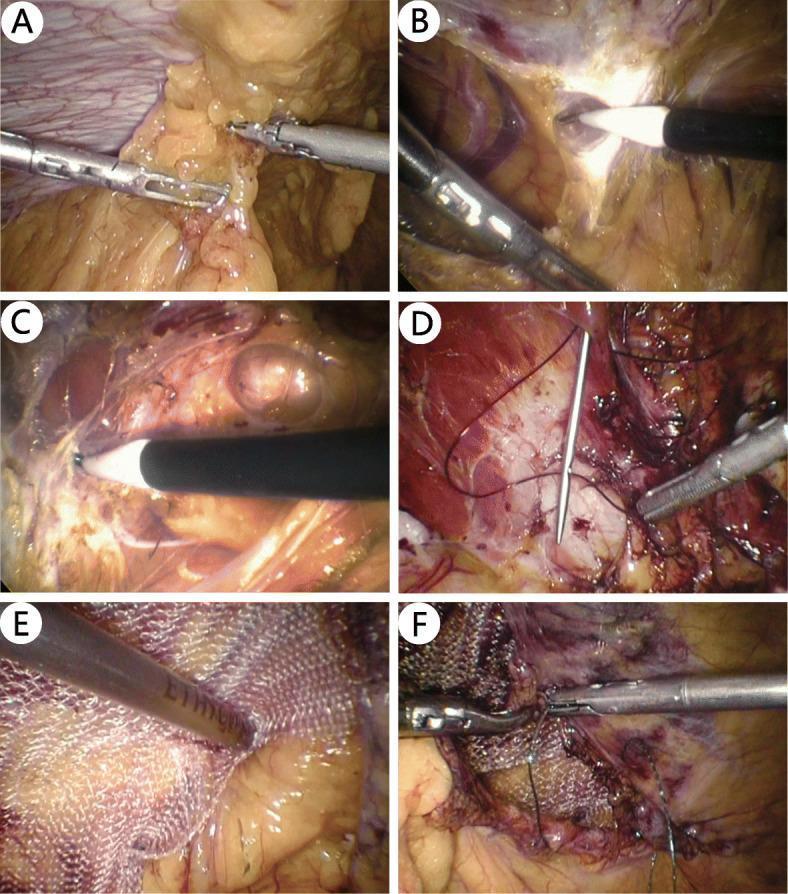
This composite of six laparoscopic images (A-F) illustrates the sequential steps of the Transabdominal Sublay (TAS) procedure for ventral hernia repair. Image A shows initial laparoscopic adhesiolysis using graspers to clear the surgical field. In Image B, the peritoneum and posterior rectus sheath are incised to access the retromuscular plane. Image C demonstrates further blunt dissection of the retromuscular space to create sufficient room for mesh placement. Image D visualizes the closure of the primary hernia defect using a continuous suture technique with a surgical needle. In Image E, a synthetic polypropylene mesh with a characteristic woven texture is introduced and positioned within the dissected sublay space, ensuring adequate overlap of the defect margins. Finally, Image F shows the securing of the mesh and the closure of the peritoneal flap to exclude the mesh from the intraperitoneal cavity. This clinical series serves as an educational guide for surgeons on the laparoscopic transperitoneal approach to extraperitoneal space reinforcement.
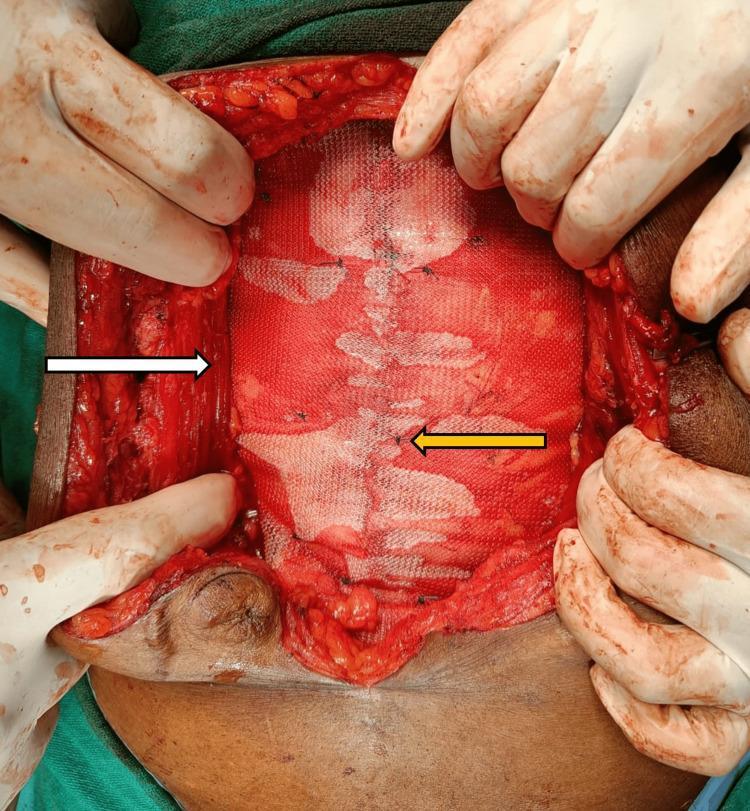
An intraoperative clinical photograph demonstrating the placement of a synthetic mesh during a retrorectus ventral hernia repair (Rives-Stoppa technique). The visual depicts a large, white, microporous polypropylene mesh laid flat in the retrorectus plane. The rectus abdominis muscles are laterally retracted, with a white arrow indicating the medial border of the retracted muscle. The mesh is positioned directly over the posterior rectus sheath, which has been approximated in the midline. A yellow arrow points to interrupted fixation sutures (2-0 Prolene) that secure the mesh to the underlying posterior sheath to prevent migration. The surgical field shows the subcutaneous fat and the margins of the abdominal wall defect. This image serves as an educational example of proper mesh orientation, tension-free placement, and surgical fixation within the submuscular space for complex abdominal wall reconstruction.
Transabdominal Preperitoneal Retrorectus Mesh Repair
Terminology and Context
- Rives-Stoppa repair (open classic)
- Retromuscular sublay repair
- rTAPP (robotic Transabdominal PrePeritoneal repair) - the minimally invasive transabdominal version
- Transabdominal Sublay (TAS) - laparoscopic transabdominal variant
"Mesh placed in the retrorectus position is also known as a retromuscular sublay, or 'Rives-Stoppa' repair... This technique places the mesh deep to the rectus muscle and superficial to posterior sheath, parietal peritoneum, and sometimes hernia sac." - Sabiston Textbook of Surgery
Anatomical Basis
| Boundary | Structure |
|---|---|
| Anterior | Rectus abdominis muscle |
| Posterior | Posterior rectus sheath + parietal peritoneum |
| Medial limit | Linea alba (midline) |
| Lateral limit | Linea semilunaris (semilunar line) |
| Superior extent | Central tendon of diaphragm, past costal margin |
| Inferior extent | Space of Retzius, below pelvic brim |
Open Rives-Stoppa Technique (Gold Standard)
Step 1: Access and Adhesiolysis
- Midline laparotomy, excising prior scar if present
- Lysis of anterior abdominal wall adhesions
- Hernia contents reduced; peritoneal sac dissected to fascial level
- Hernia sac preserved if possible (may be needed for posterior layer closure)
Step 2: Posterior Rectus Sheath Incision
- Posterior sheath opened at its medial attachment to the linea alba on each side of the defect
- Incision made just lateral to the linea alba - do NOT injure the linea alba itself (this would cause recurrence)
- Incisions carried cranially and caudally along the full extent needed
Step 3: Retrorectus Dissection
- Retrorectus space developed laterally toward the semilunar line
- Neurovascular bundles at the lateral rectus border identified and protected
- Dissection carried at least 5 cm above and below the hernia defect
- Superiorly: can extend past costal margin to diaphragm central tendon
- Inferiorly: can extend into space of Retzius below the pelvic brim
Step 4: Posterior Layer Closure
- Holes in the posterior sheath closed with absorbable suture
- Posterior rectus sheaths (and hernia sac if needed) closed with running absorbable suture
- This creates a clean posterior compartment for the mesh
Step 5: Mesh Placement
- Mesh trimmed to fill the entire retrorectus space (not just the defect)
- Positioned flat against the posterior layer - no contact with viscera
- Mesh overlap: minimum 5 cm on all sides of defect; mesh sized to occupy the entire retrorectus space
- Uncoated polypropylene mesh is used (no barrier coating needed - not in contact with bowel)
- Fixation options: interrupted sutures, transfascial sutures, fibrin sealant, or no fixation (surgeon preference)
- For large mesh: fix at costal margin, pubis, Cooper's ligament, and lateral along costal margins
- Closed-suction drains placed in the retrorectus space
Step 6: Anterior Fascial Closure
- Anterior rectus sheaths reapproximated in the midline (slowly absorbable suture)
- Returns rectus muscles to normal anatomical position - improves abdominal wall mechanics
- If tension-free closure not achievable, a TAR or component separation is added
Minimally Invasive Transabdominal Retrorectus Repair (rTAPP / Robotic)
Port Placement
- Lateral port placement (outside rectus sheath) to allow instruments to work on the anterior wall
- Robotic system: lateral ports with robot docked toward the hernia side
- Standard intraabdominal ports for initial laparoscopy
Step-by-Step (Robotic/Laparoscopic Transabdominal)
- Establish pneumoperitoneum and place intraperitoneal ports
- Lysis of adhesions and hernia reduction
- Create peritoneal flap around the hernia defect, aiming for ≥5 cm overlap circumferentially - this is the key step distinguishing rTAPP from IPOM
- Enter retrorectus space: incise the medial attachment of the posterior rectus sheath (same as open technique); develop ipsilateral retrorectus space
- Place opposing ports directly into the dissected retrorectus space if bilateral access is needed
- Develop contralateral retrorectus space
- Close hernia defect intracorporeally with absorbable barbed suture (a major advantage of robotic vs laparoscopic approach - articulating needle drivers)
- Plication of linea alba if rectus diastasis is present
- Place uncoated mesh within the retromuscular space
- Close posterior rectus sheaths - approximate if tension allows; close any peritoneal defects (critical to prevent intraperitoneal herniation)
- Mesh secured with intracorporeal suture rather than tacks (reduces postoperative pain)
Comparison: Transabdominal vs eTEP Retrorectus Repair
| Feature | Transabdominal (rTAPP) | eTEP |
|---|---|---|
| Peritoneum entered | Yes (initially) | No |
| Port entry | Intraperitoneal first | Directly into retrorectus space |
| Access strategy | Peritoneal flap raised, then retrorectus entered | Retrorectus entered directly |
| Crossover maneuver needed | No (ports repositioned) | Yes (key step) |
| Prior xiphopubic incision | Well tolerated | Relative contraindication |
| Adhesiolysis | Possible simultaneously | Not possible (extraperitoneal) |
| Concomitant procedures | Yes (bowel resection, ostomy) | No |
| Learning curve | Moderate | Steeper |
| Mesh type | Uncoated polypropylene | Uncoated polypropylene |
| Best for | Patients with prior laparotomy / damaged midline preperitoneal space | Most ventral/inguinal hernias in suitable anatomy |
When to Add TAR (Transversus Abdominis Release)
- Hernia defect is too wide for tension-free closure of anterior fascia
- More lateral mesh overlap is required
- TAR incises the posterior lamina of the internal oblique, divides the transversus abdominis, and extends dissection to the retroperitoneal space (mid-axillary line)
Mesh Considerations
| Plane | Mesh type | Rationale |
|---|---|---|
| Retrorectus (sublay) | Uncoated lightweight/medium-weight polypropylene | No visceral contact; better integration; lower cost; low infection risk due to large pore size |
| Intraperitoneal (IPOM) | Composite barrier-coated mesh | Needed to prevent adhesions/fistula to bowel |
| Preperitoneal | Uncoated synthetic or biosynthetic | Not in contact with bowel; suitable if retrorectus space unavailable |
"Mesh placed in the retrorectus position... provides a highly vascularized area that supports better mesh integration... Due to the well-vascularized compartment, this approach has the lowest SSI and prosthetic-related complications of any open repair." - Sabiston Textbook of Surgery
Outcomes
- Open Rives-Stoppa: recurrence rates 7-11% in recent studies
- Sublay mesh placement is superior to onlay, inlay (bridge), and underlay in both SSI rates and recurrence rates (meta-analyses)
- Robotic rTAPP: shortened hospital stay vs. open; comparable recurrence data still emerging
- Robotic platform reduces ergonomic injury to surgeon and improves intracorporeal suturing vs. laparoscopic
Complications Specific to Retromuscular Repair
- Interparietal hernia: posterior rectus sheath breakdown allows bowel to herniate between the mesh and skin - a unique complication of this approach
- Seroma: fluid collection in the retrorectus space (drains help); more common than in open repair
- Neurovascular bundle injury: damage to intercostal nerves at linea semilunaris causes denervation/weakness of rectus complex
- Posterior layer defect: incomplete closure allows intraperitoneal herniation through the gap
- Sabiston Textbook of Surgery, 21st Ed. - Mesh Repair / Retrorectus Sublay Repair, pp. 1085-1092, 1204
- Mulholland & Greenfield's Surgery, 7th Ed. - Sublay Prosthetic Technique / Robotic-Assisted VHR, pp. 4304-4420
- Current Surgical Therapy, 14th Ed. - Posterior Component Separation / Technique, pp. 742-760
Diffrence between open rives stoppa and etep
open Rives-Stoppa vs eTEP hernia repair comparison outcomes differences
open Rives Stoppa hernia repair laparotomy retrorectus mesh dissection
An intraoperative clinical photograph demonstrating the placement of a synthetic mesh during a retrorectus ventral hernia repair (Rives-Stoppa technique). The visual depicts a large, white, microporous polypropylene mesh laid flat in the retrorectus plane. The rectus abdominis muscles are laterally retracted, with a white arrow indicating the medial border of the retracted muscle. The mesh is positioned directly over the posterior rectus sheath, which has been approximated in the midline. A yellow arrow points to interrupted fixation sutures (2-0 Prolene) that secure the mesh to the underlying posterior sheath to prevent migration. The surgical field shows the subcutaneous fat and the margins of the abdominal wall defect. This image serves as an educational example of proper mesh orientation, tension-free placement, and surgical fixation within the submuscular space for complex abdominal wall reconstruction.
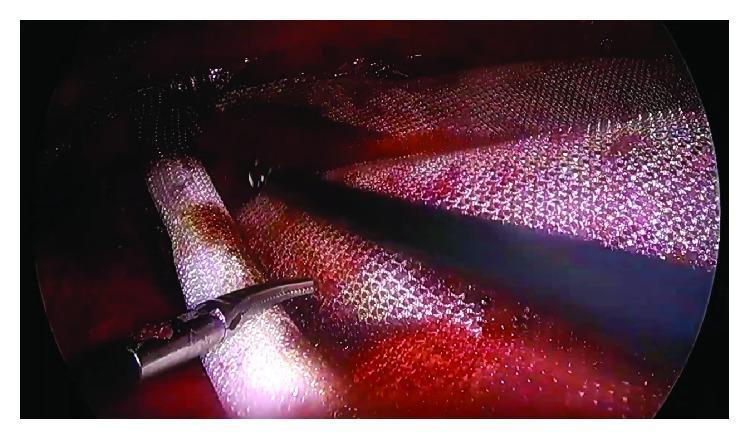
This clinical photograph captures a laparoscopic view during an e-TEP (enhanced-view Totally Extraperitoneal) Rives-Stoppa ventral hernia repair. The image demonstrates the placement and unrolling of a silver-white polypropylene mesh in the retrorectus (retromuscular) space. The mesh exhibits a characteristic woven or knitted grid-like texture with uniform micropores and visible filaments, displaying inherent flexibility as it drapes over the underlying tissues. A metallic laparoscopic grasper is visible in the lower-left foreground, manipulating the mesh. The surgical field reveals reddish, vascularized muscle tissue with a moist, glossy appearance. Shadowing at the center suggests the use of laparoscopic instrumentation within a confined preperitoneal plane. This visual illustrates a critical step in modern abdominal wall reconstruction, emphasizing the importance of proper mesh orientation and wide overlap within the retrorectal space to prevent hernia recurrence.
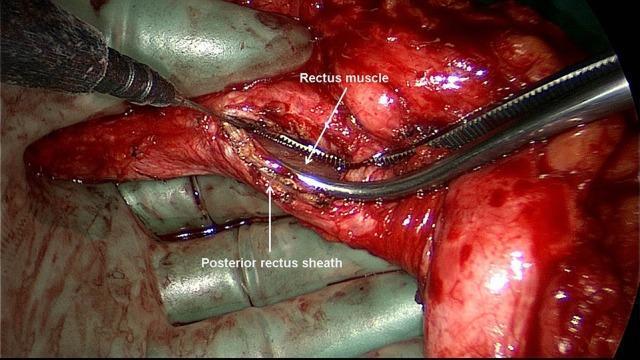
This intraoperative clinical photograph captures a key step in a sublay (Rives-Stoppa) incisional hernia repair. The image demonstrates the dissection of the abdominal wall layers to create a retromuscular space. A linear incision has been made through the posterior rectus sheath near the linea alba, which is held open by surgical instruments to expose the underlying posterior aspect of the rectus abdominis muscle. This specific surgical maneuver is essential for entering the retro-rectus plane, where a prosthetic mesh will eventually be placed. The anatomical structures are clearly labeled: the 'Posterior rectus sheath' is seen as the fascial layer being retracted, and the 'Rectus muscle' is visible within the developed space. The surgical field shows the use of metallic forceps and a dissecting instrument, illustrating the transition from superficial to deep abdominal wall layers. This visual is used to teach medical students and surgical residents the technique of retromuscular plane development and anatomical identification during complex ventral hernia repairs.
Open Rives-Stoppa vs eTEP Repair
The Core Similarity
Side-by-Side Comparison
| Feature | Open Rives-Stoppa | eTEP |
|---|---|---|
| Access | Midline laparotomy | Totally extraperitoneal (no peritoneal entry) |
| Incision | Long midline skin incision | 3-4 small port sites (0.5-1.2 cm) |
| Peritoneal cavity | Entered (open) | Never entered |
| Pneumoperitoneum | Not needed | Preperitoneal CO₂ insufflation (12-15 mmHg) |
| Adhesiolysis | Full open adhesiolysis possible | Not possible (extraperitoneal) |
| Crossover | Done under direct vision with hands | The "crossover maneuver" - key endoscopic step |
| Defect closure | Hand-sewn easily | Intracorporeal suture (robotic better than laparoscopic) |
| Mesh fixation | Transfascial sutures / fibrin / none | Intracorporeal suture / tacks / none |
| Mesh size | Sized to fill entire retrorectus space | Typically larger (median ~450 cm² vs ~150 cm²) |
| Drain | Closed-suction drain routinely placed | Optional |
| Hospital stay | 5-7+ days | 1-2 days (median ~20 hours) |
| Wound infection (SSI) | Higher (large skin incision, flaps) | Very low (no skin flap) |
| Postoperative pain | Significant (laparotomy) | Less (small ports) |
| Seroma | Common; managed with drain | Common; may need aspiration |
| Recurrence (open) | 7-11% modern series | Comparable or lower (emerging data) |
| Learning curve | Straightforward; widely taught | Steep; advanced endoscopic skill required |
| Operative time | Shorter for complex cases | Longer learning curve; similar when experienced |
| Prior laparotomy scar | Well tolerated | Relative contraindication if midline disrupted |
| Complex hernias (large W3) | Gold standard | Feasible with TAR; technically demanding |
| Concomitant procedures | Yes (bowel resection, ostomy) | No (extraperitoneal) |
| Obesity | More wound complications | Better tolerated (no large incision) |
| Cost | Lower (no robotic/laparoscopic equipment) | Higher (equipment, longer OR time) |
Key Differences in Detail
1. Access and Wound
- Surgical site infection (SSI) - risk almost 5x higher than minimally invasive approaches (meta-analysis)
- Wound dehiscence
- Skin necrosis from flap devascularization
- Prolonged wound healing
2. The Crossover Maneuver (eTEP-specific)
3. Defect Closure
- Open: hand-sewn with direct tension assessment - straightforward
- eTEP laparoscopic: technically difficult intracorporeal suturing
- eTEP robotic: articulating needle drivers make this much easier - a key reason robotic eTEP has largely replaced laparoscopic eTEP
4. Mesh Size
5. Handling Complexity
| Scenario | Preferred Approach |
|---|---|
| Large W3 defect (>10 cm) | Open Rives-Stoppa ± TAR |
| Multiple prior laparotomies + dense adhesions | Open Rives-Stoppa |
| Concomitant bowel resection / ostomy reversal | Open Rives-Stoppa |
| Contaminated/infected field | Open ± biologic mesh |
| Prior xiphopubic midline incision | Open (eTEP crossover not safe) |
| Obese patient, primary/incisional hernia <10 cm | eTEP preferred |
| Bilateral inguinal hernia | eTEP (original indication) |
| Rectus diastasis repair | eTEP (excellent visualization) |
| High SSI risk (diabetes, steroids, prior wound infection) | eTEP preferred |
| Surgeon in training / low-volume center | Open Rives-Stoppa |
6. Postoperative Recovery
| Metric | Open | eTEP |
|---|---|---|
| Hospital stay | 5-7 days | 1-2 days |
| Return to work | 4-6 weeks | 1-2 weeks |
| Postoperative pain | Moderate-severe (VAS higher days 1-3) | Mild-moderate (comparable by day 3) |
| Seroma | Common (managed with drain) | Common (aspiration if needed) |
| Wound complications | Higher | Lower |
7. Outcomes (Recurrence)
- Open Rives-Stoppa: recurrence 7-11% in modern series; up to 32% at 10 years in older reports
- eTEP RS: early series show comparable or slightly lower recurrence (e.g., 6.9% vs 10.3% vs IPOM Plus at 6 months - not yet statistically significant)
- Long-term comparative data between open and eTEP are still maturing
8. Unique Complications
| Complication | Open | eTEP |
|---|---|---|
| SSI / wound breakdown | Common | Rare |
| Interparietal hernia | Yes (posterior sheath breakdown) | Yes (same risk) |
| Peritoneal tear | Not applicable | Inadvertent tear requires CO₂ decompression management or conversion |
| Neurovascular injury | Can occur with wide dissection | Same risk at linea semilunaris |
| Conversion | Not applicable | Conversion to open if crossover fails or peritoneal tear unmanageable |
Summary: Which to Choose?
- Large/complex hernias with dense adhesions
- Cases requiring concomitant bowel surgery
- Contaminated fields
- Disrupted midline preperitoneal space (prior xiphopubic scar)
- Centers without advanced laparoscopic/robotic capability
- Small-to-moderate hernias in suitable anatomy
- High-risk wound patients (obese, diabetic, immunosuppressed)
- Bilateral inguinal hernias
- Rectus diastasis
- When minimizing wound morbidity is paramount
"The eTEP approach offers a minimally invasive option with improved outcomes compared to traditional open approaches... The Rives-Stoppa procedure is widely recognized as the gold standard for open ventral hernia repair." - Frontiers Journal of Abdominal Wall Surgery, 2024
- Sabiston Textbook of Surgery, 21st Ed. - Retrorectus Sublay Repair
- Mulholland & Greenfield's Surgery, 7th Ed. - Sublay Prosthetic Technique / Robotic-Assisted VHR
- Current Surgical Therapy, 14th Ed. - Total Extraperitoneal / Rives-Stoppa Repair
- Comparative study: eTEP vs Open Sublay, MDPI 2024
- Comparative RCT: eTEP-RS vs IPOM Plus, PMC 2025
Tep and e tep
TEP vs eTEP hernia repair difference technique comparison
TEP totally extraperitoneal inguinal hernia repair preperitoneal space port placement
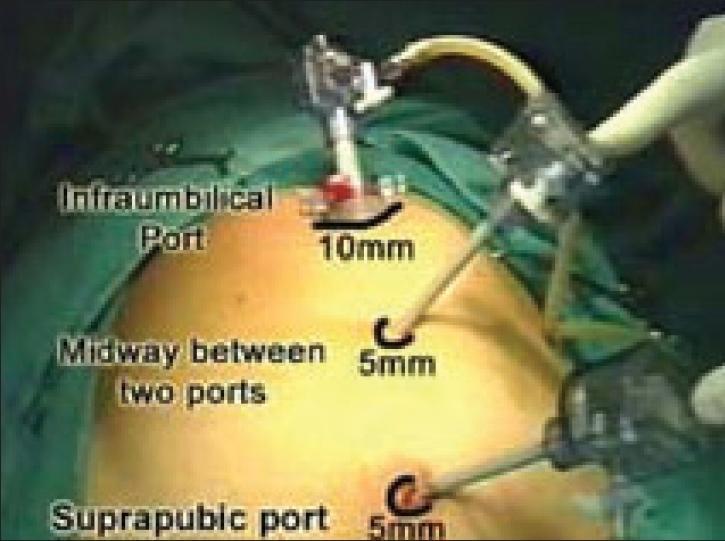
This clinical photograph illustrates the standard laparoscopic port placement for a Totally Extraperitoneal (TEP) inguinal hernia repair. The patient is positioned supine, with the abdomen draped in green surgical sheets. Three trocars are inserted along the midline into the preperitoneal space. The superior port is a 10-mm infraumbilical port, equipped with a valve mechanism and insufflation tubing, typically used for the 30-degree laparoscope. Positioned inferiorly in the midline are two working ports: a 5-mm port placed midway between the umbilical and pubic regions, and a 5-mm suprapubic port located approximately 2–3 cm above the pubic symphysis. The visual demonstrates the vertical triangulation required for instruments to reach the inguinal region. This configuration allows the surgeon to operate within the extraperitoneal plane without entering the peritoneal cavity, minimizing the risk of visceral injury and facilitating mesh placement over the direct, indirect, and femoral hernia sites.
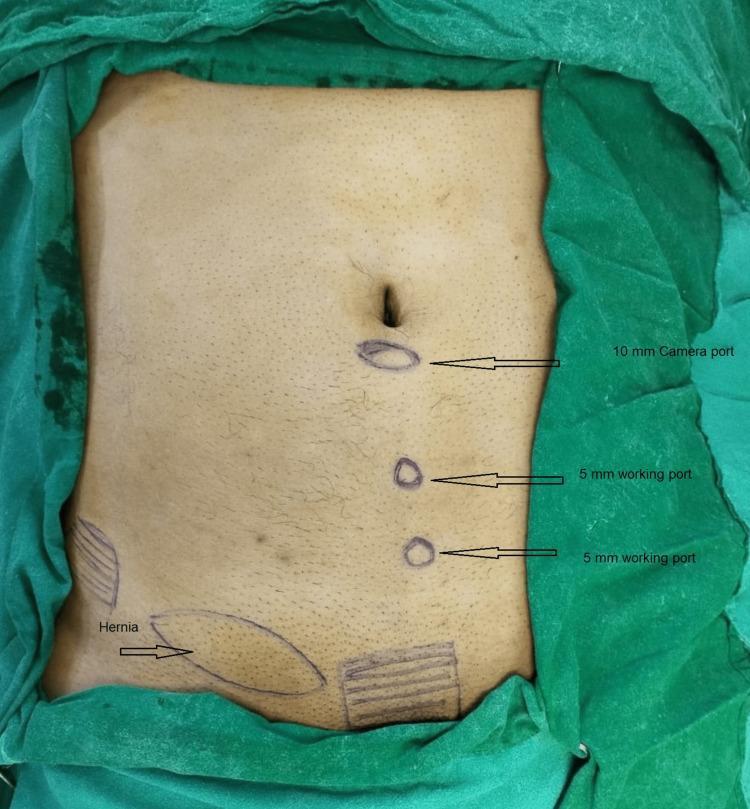
A clinical photograph of a patient's abdomen prepared for a surgical procedure, specifically illustrating the port placement for a classical totally extraperitoneal (TEP) inguinal hernia repair. The image shows surgical markings on the skin within a sterile green drape field. Three primary port locations are arranged vertically along the midline of the abdomen: a 10-mm camera port located just below the umbilicus, followed inferiorly by two 5-mm working ports. On the patient's lower right side (viewer's left), an ovoid marking identifies the location of the 'Hernia'. Additional geometric and hashed markings are visible in the lower abdominal and suprapubic regions, likely representing anatomical landmarks, planned dissection boundaries, or reinforcement zones for mesh placement. This visual is designed to teach the standard midline port configuration used to access the preperitoneal space while avoiding intra-abdominal entry during laparoscopic hernia surgery.
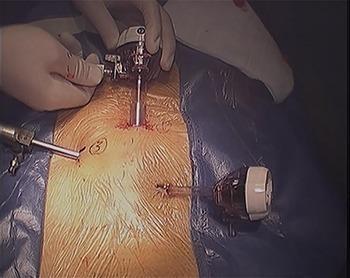
A clinical photograph of the surgical field during a Totally Extraperitoneal (TEP) inguinal hernia repair. The image displays the abdominal region prepped with antiseptic and surrounded by blue sterile drapes. Three laparoscopic cannulas (trocars) are successfully inserted into the preperitoneal space in a triangular configuration. The primary 12-mm observation cannula is positioned superiorly at the subumbilical midline, held by a surgeon's gloved hand. Two smaller operative cannulas are positioned inferiorly and laterally to the midline; the left-sided cannula insertion point is marked with a numeral '3' on the skin. Small, clean transverse incisions are visible at the entry points. This stage of the procedure demonstrates the portal placement necessary for establishing the preperitoneal working space and subsequent endoscopic visualization of the internal inguinal ring for mesh placement or suturing.
eTEP inguinal hernia repair retrorectus port upper quadrant arcuate line division
A clinical photograph shows the preoperative abdominal surface markings for an extended totally extraperitoneal (eTEP) hernia repair. The patient is in a supine position, draped with green surgical cloths. Annotated markings on the skin indicate planned laparoscopic port placements: a 10 mm camera port is marked superiorly and slightly lateral to the midline, and two 5 mm working ports are marked in the mid-abdominal region to facilitate triangulation. The umbilicus is identified with a vertical double-headed arrow. In the lower left quadrant (patient's right), a trapezoidal area is labeled 'H' for Hernia, along with anatomical sketches indicating the inguinal region and musculature. This visual serves as a surgical planning guide for the eTEP approach, emphasizing the caudal-to-cranial port configuration used to access the preperitoneal space for inguinal hernia mesh placement without entering the peritoneal cavity.
This clinical photograph is an intraoperative endoscopic view from a robotic-assisted surgical procedure, specifically an extended totally extraperitoneal repair (eTEP) for a paraumbilical hernia and rectus diastasis. The image demonstrates a 'cross-over' technique used to dissect and communicate both retrorectus spaces. The surgical field displays varied tissue textures: the upper portion shows striated red muscle tissue with visible small vessels, while the central area reveals white, glistening fascial planes and globular preperitoneal fat. A robotic surgical instrument, identified as monopolar curved scissors, is positioned at the dissection plane to perform sharp and blunt dissection between the retrorectus and preperitoneal spaces. The digital interface at the bottom of the screen provides telemetry for the robotic system, confirming the use of fenestrated bipolar forceps and monopolar curved scissors. This visual highlights the precise tissue handling and clear visualization of anatomical planes required for complex abdominal wall reconstruction.
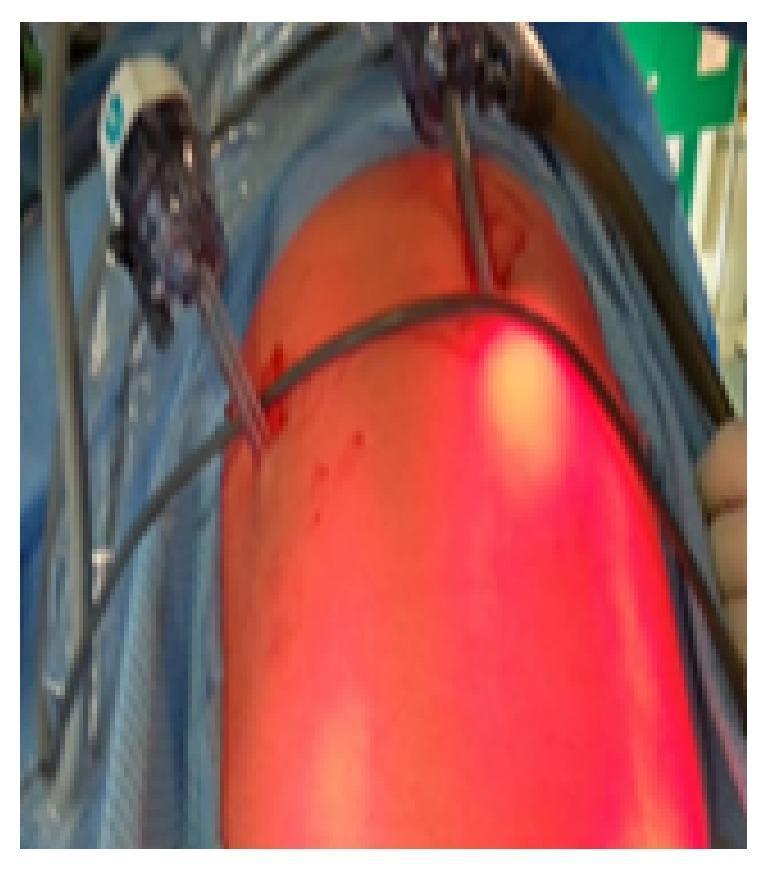
This clinical photograph shows an intraoperative view of a pediatric laparoscopic setup for a right congenital inguinal hernia repair. The patient's abdomen is prepped, draped in blue surgical cloth, and appears distended, indicating the presence of pneumoperitoneum. The surgical technique utilizes a two-port approach. A primary 5 mm umbilical port, featuring a white-capped ENDOPATH XCEL trocar, is seen on the left side of the frame, housing the laparoscope for visualization. A second 5 mm working port is inserted in the upper right quadrant of the abdomen. Both trocars are associated with connected fiber optic or insufflation tubing. The skin around the puncture sites shows minor erythema typical of acute surgical access. This image illustrates the minimally invasive port placement strategy used to evaluate internal rings and facilitate hernial sac neck closure in pediatric surgery.
TEP vs eTEP
The One-Line Difference
"Despite the notable benefits of a minimally-invasive procedure that does not violate the peritoneal cavity, the traditional TEP repair is limited by space constraints... A modification of the conventional TEP was proposed in 2012 that substantially alleviates the difficulties associated with this limitation - known as the eTEP." - Current Surgical Therapy, 14th Ed.
Anatomy That Drives the Difference
- Above the arcuate line: the posterior rectus sheath is present as a tough fascial layer. The retrorectus space here is spacious and easy to work in.
- Below the arcuate line: the posterior rectus sheath is absent. Only the thin, easily torn peritoneum lies behind the rectus. This is the narrow preperitoneal (TEP) space.
Side-by-Side Comparison
| Feature | TEP | eTEP |
|---|---|---|
| First described | McKernan & Laws, 1993 | Daes, 2012 |
| Peritoneal cavity entered | No | No |
| Primary working space | Preperitoneal space (narrow) | Retrorectus space (large) |
| Camera port location | Infraumbilical (12 mm) | Upper quadrant ipsilateral to hernia (12 mm lap / 8 mm robotic) |
| Working port location | Midline (2 × 5 mm) infraumbilical | Midline mid-abdomen (2 × 5 mm) |
| Space development | Balloon dissector or blunt camera in preperitoneal plane | Balloon or camera in retrorectus space, then arcuate line divided |
| Arcuate line | Avoided / not specifically addressed | Divided to connect retrorectus to preperitoneal space |
| Working space size | Small and constrained | Large and comfortable |
| Instrument crowding | Common problem | Greatly reduced |
| Posterior rectus sheath | Not entered (below arcuate line) | Entered and used as working plane |
| Bilateral hernia | More awkward | Easier - bilateral retrorectus space naturally accessible |
| Obesity | Challenging (fat compresses space) | Better tolerated |
| Large inguinal hernias | Difficult | Better visualization |
| Learning curve | Moderate | Shorter than TEP (more space = easier to teach) |
| Peritoneal tear risk | Higher (thin peritoneum always immediately behind) | Lower (working away from peritoneum initially) |
| Conversion to TAPP | More frequent (inadvertent peritoneal tear) | Less frequent |
| Operative time | Shorter once experienced | Slightly longer early; similar once experienced |
| Mesh position | Preperitoneal | Retrorectus (above arcuate) + preperitoneal (below arcuate) |
| Mesh size | Standard (12×15 cm or similar) | Equivalent for inguinal; larger for ventral application |
| Applicability beyond inguinal hernia | Primarily inguinal only | Inguinal + ventral + incisional + lumbar + complex |
TEP - Step-by-Step
Port Placement
- 12 mm infraumbilical camera port: anterior rectus sheath incised just off midline, rectus muscle split, port advanced to just superficial to posterior rectus sheath
- 2 × 5 mm working ports: placed in the midline under direct vision - one midway between umbilicus and pubis, one just above pubic symphysis (≥5 cm from symphysis)
Operative Steps
- Develop preperitoneal space with balloon dissector (or blunt optical port) - inflated to create working room below umbilicus
- Insufflate to 12-15 mmHg
- Identify lateral abdominal wall, dissect avascular filmy tissue anterior to hernia sac (below epigastric vessels - preserve epigastrics)
- Medially: identify and clear Cooper's ligament - avoid venous circle of Bendavid and femoral canal
- Laterally: develop space of Bogros to ASIS
- Identify, reduce, and manage hernia sac - cord lipomas reduced
- For large direct defects (M3): primary closure of transversalis fascia (with caution - nerve entrapment risk)
- Place mesh (typically 12×15 cm or larger lightweight polypropylene) to cover entire myopectineal orifice (MPO)
- Fixation: optional for standard-sized mesh; may be used for large defects - associated with chronic pain risk
- Deflate space under vision to confirm mesh lies flat
Peritoneal Tear Management in TEP
- Small tears: close with sutures, clips, or Endoloops; insert Veress needle for peritoneal decompression
- Large unmanageable tears: convert to TAPP or open
eTEP - Step-by-Step (for Inguinal Hernia)
The Key Innovation - Port Placement
- 12 mm (lap) or 8 mm (robotic) camera port placed in the UPPER QUADRANT on the same side as the hernia - this is the defining difference
- This port enters the retrorectus space above the arcuate line where the posterior sheath is present and resistant to tearing
- 2 × 5 mm working ports placed along the midline at the umbilicus and midway to pubis
Operative Steps
- Enter retrorectus space via upper quadrant port - posterior rectus sheath resists tearing here, providing a safe entry point
- Develop retrorectus space with balloon dissector or camera bluntly - much larger working space established
- Insufflate to ≥12 mmHg
- Dissect caudally within the retrorectus space toward the arcuate line
- Divide the arcuate line - this grants access to the preperitoneal space of the lower abdomen and pelvis
- Identify and reduce the hernia
- Complete preperitoneal dissection: Cooper's ligament, space of Retzius, space of Bogros - same landmarks as TEP
- Place mesh to cover the myopectineal orifice
- Deflate under vision - confirm mesh flat
Why eTEP is an Improvement Over TEP
| TEP Problem | eTEP Solution |
|---|---|
| Narrow preperitoneal space - instruments crowd each other | Large retrorectus space = generous working room |
| Posterior peritoneum immediately behind instruments = easy to tear | Working away from peritoneum initially in retrorectus space |
| Obese patients: fat collapses space | Retrorectus space maintained by fascial walls |
| Large hernias: difficult sac dissection in confined space | Better visualization with more working room |
| Bilateral repairs: cumbersome port repositioning | Both retrorectus spaces directly accessible |
| Limited to inguinal hernia | eTEP applicable to ventral/incisional/lumbar hernias too |
What Stays the Same
- Both are totally extraperitoneal - peritoneal cavity is never the working space
- Both use uncoated polypropylene mesh (no composite needed)
- Both cover the entire myopectineal orifice
- Both avoid the risks of intraperitoneal surgery (adhesions, bowel injury)
- Same recurrence rates when performed by experienced surgeons (no significant difference in studies)
- Same anatomical landmarks: Cooper's ligament, epigastric vessels, vas deferens, testicular vessels, iliopubic tract
Clinical Outcomes: TEP vs eTEP
| Outcome | TEP | eTEP | Significance |
|---|---|---|---|
| Operative time (experienced) | Similar | Similar | Not significant |
| Hospital stay | Short | Shorter | Significant |
| Return to work | Similar | Slightly earlier | Significant |
| Peritoneal tear / conversion | Higher | Lower | Significant |
| Postoperative pain | Similar | Similar | Not significant |
| Seroma | More common | Less common | Notable |
| Recurrence | Comparable | Comparable | Not significant |
"eTEP demonstrates significantly shorter operative time and hospital stay, quicker return to work... Both procedures have similar rates of low intra-operative and postoperative complications, indicating comparable safety profiles." - Prospective study, IJSURGERY 2024
"eTEP combines the advantage of both TAPP, in the form of a large working space, and of TEP, by being totally extraperitoneal. eTEP is also easier to learn and teach." - Comparative evaluation, PMC 2023
When to Choose Which
| Patient / Scenario | Preferred |
|---|---|
| Standard unilateral inguinal hernia, experienced TEP surgeon | TEP |
| Bilateral inguinal hernia | eTEP |
| Obese patient | eTEP |
| Large direct or indirect hernia | eTEP |
| Recurrent inguinal hernia (prior open repair) | Either (TEP/eTEP both good) |
| Recurrent hernia after prior TEP | TAPP preferred (space disrupted) |
| Teaching / training setting | eTEP (easier to teach) |
| Ventral + inguinal hernia simultaneously | eTEP (can address both) |
| Limited equipment / basic laparoscopic setup | TEP |
- Current Surgical Therapy, 14th Ed. - Total Extraperitoneal Repair, pp. 2353-2363
- Mulholland & Greenfield's Surgery, 7th Ed. - Laparoscopic Approach, pp. 3829-3843
- Sabiston Textbook of Surgery, 21st Ed. - Retrorectus Sublay Repair
- TEP vs eTEP prospective study, PMC 2025
- Comparative evaluation eTEP vs TEP vs TAPP, PMC 2023