
Tympanoplasty
Reading File
Now let me search the library for tympanoplasty content in parallel:
Finding Sources
Finding Sources
Excellent. I have rich sources. Let me now read the primary tympanoplasty sections in parallel from the top ENT textbooks:
Reading File
Reading File
Reading File
Good content so far. Let me now read the Wullstein classification, graft materials, ossiculoplasty types, cartilage tympanoplasty, and outcomes sections in parallel:
Reading File
Reading File
Reading File
Reading File
Now let me read the graft materials, Wullstein types, cartilage section, and ossiculoplasty from Cummings:
Reading File
Reading File
Finding Sources
Now let me read the OSSICULOPLASTY and Wullstein classification sections, plus fetch the key diagram:
Reading File
Finding Sources
Finding Sources
Reading File
Reading File
Searching PubMed
tympanoplasty outcomes graft success
I now have comprehensive content to compile a thorough response. Let me also read the Wullstein classification figure reference and the ossiculoplasty prostheses section:
Reading File
Reading File
I now have comprehensive information from multiple authoritative sources. Let me compile the full answer.
Tympanoplasty
Definition
Tympanoplasty is a surgical procedure performed to eradicate disease in the middle ear and reconstruct the hearing mechanism, with or without tympanic membrane (TM) grafting. The AAOO (1965) definition remains standard. It was introduced in 1953 by Wullstein, alongside Zöllner, who also described techniques for improving sound conduction after chronic ear disease surgery. The introduction of the operating microscope by both surgeons dramatically improved outcomes.
- Cummings Otolaryngology Head and Neck Surgery, p. 2726
- Shambaugh Surgery of the Ear, p. 390
Wullstein Classification
The original classification is based on: (1) remaining middle ear structures after disease eradication, and (2) how sound is transferred to the oval window while protecting the round window. Today it is primarily used as shorthand in clinical communication.
| Type | Description | Ossicular Status |
|---|---|---|
| Type I | Myringoplasty - TM repair only, normal ossicular chain | All ossicles intact |
| Type II | TM draped over remnant malleus and long process of incus (rarely used today) | Manubrium eroded |
| Type III | TM graft placed directly onto stapes capitulum (columella effect) | Incus absent, stapes superstructure intact |
| Type IV | TM placed directly on/around stapes footplate; round window niche covered | Stapes superstructure absent |
| Type V | TM placed over open oval window; sound transmitted to a fenestrated lateral semicircular canal | Footplate fixed |
Modern variations of Type III include:
- Minor columella (PORP): bone or Partial Ossicular Replacement Prosthesis between capitulum and TM undersurface
- Major columella (TORP): Total Ossicular Replacement Prosthesis from stapes footplate to TM
Preoperative Evaluation
- Detailed history: prior infections, drainage, previous surgery (PE tubes, prior tympanoplasty)
- Otomicroscopic exam: perforation character (central vs. marginal), TM remnant health, atrophic areas, myringosclerosis, ossicular chain assessment
- Perforation >50% of TM has lower success rates
- Audiometric evaluation + tuning fork tests (confirm audiogram)
- Eustachian tube (ET) function: no current test accurately predicts postoperative ET function; the contralateral ear's behaviour after Valsalva/Toynbee is used as a surrogate
- Radiographic evaluation not needed for dry central perforations
Pathophysiology of Hearing Loss
A TM perforation causes hearing loss by reducing the sound pressure differential across the TM, decreasing ossicular coupling. Key points:
- Hearing loss is proportional to perforation size and is frequency dependent (largest losses at low frequencies)
- Loss varies inversely with middle ear air volume (including mastoid)
- Location of perforation does not significantly affect degree of hearing loss (contrary to old teaching)
- Middle ear aeration (minimum ~0.5 mL air) is essential for normal ossicular coupling
- Round window protection from phase cancellation is less critical than previously believed
Surgical Approaches
Three approaches are available, chosen based on perforation size, canal anatomy, and surgeon preference:
1. Transcanal Approach
- Best for small posterior perforations with a large canal
- Avoids mastoid dressing and postauricular morbidity (pain, hematoma, infection)
- Tympanomeatal flap elevated; middle ear explored; graft placed medially
- Fat graft myringoplasty: for small persistent perforations (post-PE tube); can be done under local anesthesia; adipose from ear lobe inserted in dumbbell fashion through perforation
2. Endaural Approach
- More common in Europe
- Useful when limited atticotomy is anticipated concurrently
- Self-retaining retractor can be used
3. Postauricular Approach
- Most commonly used in the United States
- Suitable for all perforation sizes, especially large perforations
- Better angle for anterior TM visualization without canalplasty
- Self-retaining retractors allow bimanual instrumentation
Note on endoscopes: Allow experienced surgeons transcanal access to larger and more anterior perforations that would otherwise require postauricular approach under microscopy.
Graft Materials
Temporalis Fascia
- Gold standard; most widely used
- Harvested from the postauricular area or temporalis muscle
- Used in underlay (medial) or overlay (lateral) technique
Perichondrium
- Harvested from tragus or concha
- Good rigidity; similar success rates to fascia
Cartilage (with perichondrium)
- Indications: Atelectatic ear, revision surgery, perforation >50%, drainage at time of surgery, bilateral perforations, reconstruction after cholesteatoma, eustachian tube dysfunction
- Resistance to retraction/perforation even with ongoing ET dysfunction
- Decreases prosthesis extrusion risk when placed between TM and ossicular prosthesis
- Harvested from tragus (thicker, flatter - better for large perforations) or concha
- Techniques: composite cartilage-perichondrium graft ("island"), palisade array
Fat Graft
- Small lobed fat from earlobe; for small residual perforations
- Used in dumbbell/butterfly fashion; excellent for appropriate cases
Butterfly Cartilage Inlay
- For small-medium central perforations
- No need to elevate tympanomeatal flap
- Scored circumferentially; perforation edges nestled between medial and lateral "wings"
Graft Placement Techniques
Underlay (Medial) Technique
- Graft placed medial to TM remnant and malleus handle
- More common technique
- Requires adequate anterior support to prevent graft migration
Overlay (Lateral) Technique
- Graft placed lateral to malleus/TM remnant
- Higher rate of anterior blunting and epithelial pearl formation (complications)
- Used when medial technique is inadequate (total perforations, anterior marginal perforations)
- Canalplasty often required to remove anterior canal hump
Cartilage Tympanoplasty (Special Considerations)
Cartilage grafts provide structural support for:
- Attic defects
- Posterosuperior retraction pockets
- Atelectatic ear
- Cases with increased failure risk with fascia (revision, large perforation, cholesteatoma)
A cartilage graft beneath the central TM at primary surgery can protect a second-stage ossiculoplasty from extrusion risk. Meta-analysis (PMID: 41495520, 2026) confirms that combining platelet-rich plasma with cartilage tympanoplasty type 1 improves TM perforation closure outcomes.
Ossiculoplasty
Ossiculoplasty reconstructs the middle ear sound-conducting mechanism; can be simultaneous with or staged after tympanoplasty.
Ossicular Defect Classification (Austin-Kartush)
| Type | Malleus (M) | Stapes (S) |
|---|---|---|
| A | Present (+) | Present (+) - most common |
| B | Present (+) | Absent (-) |
| C | Absent (-) | Present (+) |
| D | Absent (-) | Absent (-) |
Prostheses
- PORP (Partial Ossicular Replacement Prosthesis): stapes capitulum to TM; used when stapes superstructure is intact
- TORP (Total Ossicular Replacement Prosthesis): stapes footplate to TM; used when superstructure is absent
- Cartilage interposition between prosthesis platform and TM significantly reduces extrusion risk
- Autograft options: incus (reshaped), cortical bone
TRACS Mnemonic for Ossiculoplasty Principles (Shambaugh)
- T - Tension: appropriate tightness of prosthesis fit; excessive laxity = sound energy loss
- R - Rigidity: prosthesis must be rigid enough to transmit vibrations
- A - Area ratio: preserve the TM-to-footplate area differential
- C - Coupling: ensure intimate contact at all interfaces
- S - Stability: prosthesis must self-stabilize and return to position when displaced
Timing Decisions
Simultaneous ossiculoplasty is reasonable when middle ear anatomy is stable. Staged (delayed) ossiculoplasty is preferred when:
- Middle ear mucosa is thickened, infected, or partially missing (risk of fibrosis displacing prosthesis)
- Active bleeding obscures visualization
- Second-look for cholesteatoma recurrence is planned
- Eustachian tube function is uncertain
A sheet of Silastic/Gelfilm/Epidisc is placed between promontory and TM graft at first stage to prevent adhesions and establish a stable reference plane for prosthesis length at second stage.
Complications
Graft Failure
- Perforation recurrence
- Graft lateralization (migrates away from manubrium - causes CHL; may need revision)
- Graft retraction/atrophy
- Blunting of anterior sulcus (especially with overlay technique)
Epithelial Pearl Formation
- Associated with overlay technique
- Meticulous epithelium removal from TM remnant and canal wall at primary surgery is preventive
- Office treatment: open and debride keratin debris
Ossiculoplasty Failure
- Prosthesis extrusion (most common with allograft prostheses contacting TM directly)
- Misdiagnosis: missing fixed malleus, fractured stapes superstructure, bony incudostapedial disarticulation with preserved soft tissue
- Persistent/recurrent middle ear pathology (ET dysfunction, mucosal disease, fibrosis)
Cholesteatoma
- Recurrent: 14%, Residual: 12% after tympanoplasty with ICW mastoidectomy
- Children: residual 20.5%, recurrent 8.9% (ICW); higher rates overall vs. adults
Outcomes
Overall graft-take success >90%. Negative prognostic factors:
- Eustachian tube dysfunction
- Cholesteatoma or atelectasis
- Previous tympanoplasty failure
- Lateralized TM
- Smoking
Summary data (from Shambaugh, Table 28-1):
| Author | n | Technique | Graft | Graft-Take |
|---|---|---|---|---|
| Vartiainen | 404 | Overlay + underlay | TF | 88% |
| Sheehy | 472 | Overlay | TF | 97% |
| Glasscock | 1,556 | Underlay | TF/homograft | 93% |
| Dornhoffer | 533 | Underlay | Perichondrium/cartilage | 97.6% |
Endoscopic vs. Microscopic Tympanoplasty
A 2024 systematic review and meta-analysis (PMID: 38415937) found no significant difference in graft success rates between endoscopic and microscopic tympanoplasty, with endoscopic technique offering advantages in anterior perforation visualization without retroauricular incision.
Postoperative Care
- Discharge same day (or next morning if nausea/vomiting)
- Mastoid dressing and drain removed day after surgery
- Antibiotic drops at bedtime
- Water precautions; no nose blowing until TM healed (sneezing with open mouth)
- Oral antibiotics if ear was infected at surgery
- First visit: 1 week (remove Merocel wick)
- Second visit: 3-4 weeks (suction residual Gelfoam)
- Hearing improvement noticed in 6-8 weeks
- Audiogram obtained at 4-6 months postoperatively
Pediatric Tympanoplasty
Success rates are somewhat lower in children vs. adults due to:
- More active Eustachian tube dysfunction
- Immune immaturity
- Higher rate of adenoid-related middle ear disease
- Cholesteatoma is more aggressive in children
Most authorities recommend deferring tympanoplasty until age 7-8 years and when the contralateral ear is dry, though some advocate earlier repair.
Sources: Cummings Otolaryngology Head and Neck Surgery (Wullstein, graft techniques, ossiculoplasty); Shambaugh Surgery of the Ear (classification, TRACS, outcomes); Scott-Brown's Otorhinolaryngology (endoscopic tympanoplasty); and recent PubMed evidence (PMIDs 38415937, 41495520)

IMG_2629.jpg
This cimes when i am having high screen time and when i am having nasal allergic episodes
The image shows a red, irritated eye with visible conjunctival blood vessels - this looks like conjunctival hyperemia (red eye), likely from either digital eye strain or allergic conjunctivitis, both of which fit your triggers perfectly.
Searching sources...
analyse_media
Reading File
The AI vision analysis flagged something important - a possible ciliary flush (circumcorneal injection), which is a more serious sign than simple red eye. Let me look this up properly.
Finding Sources
Finding Sources
Reading File
Finding Sources
Finding Sources
Finding Sources
Reading File
Reading File
I now have everything needed to give a thorough and honest answer. Here it is:
What the Image Shows - and Why I Need to Be Honest With You
The vision AI analysis of your photo identified something important: the redness in your eye has a pattern called a ciliary flush (also called circumcorneal or perilimbal injection) - a violaceous/deep-red ring concentrated around the edge of the cornea, with dilated deeper vessels running radially toward the limbus.
This is different from simple allergic conjunctivitis or screen-related eye strain, where the redness tends to be more diffuse and involves only superficial, tortuous conjunctival vessels (not the deeper ones near the cornea).
Why This Pattern Matters
According to Kanski's Clinical Ophthalmology (p. 445):
"Ciliary injection (perilimbal injection, ciliary flush) is circumcorneal conjunctival hyperaemia with a violaceous hue due to involvement of deeper blood vessels and is typically seen in anterior uveitis of acute onset."
A ciliary flush points toward deeper intraocular inflammation, not just surface-level redness. The key differentials are:
| Condition | Key Feature |
|---|---|
| Anterior Uveitis (Iritis) | Ciliary flush + photophobia + deep aching pain + cells/flare on slit lamp |
| Episcleritis | Sectoral or diffuse deep redness, tender to touch |
| Scleritis | Severe boring pain, deep purple hue |
| Acute angle-closure glaucoma | Hazy cornea, mid-dilated pupil, severe pain |
Your triggers (screen time, nasal allergies) do explain eye redness - but not a ciliary flush pattern. Allergic conjunctivitis typically shows:
- Diffuse superficial conjunctival redness (not perilimbal)
- Itching as the dominant symptom
- Chemosis (swelling) and papillae on the inner lids
- No ciliary flush
What You Should Do
Please see an ophthalmologist soon - ideally within 1-2 days, or sooner if you have any of these:
- Eye pain or aching (not just irritation)
- Sensitivity to light (photophobia)
- Blurred vision
- Seeing halos around lights
These would make it more urgent (same-day/ER visit).
The slit-lamp exam is the only way to safely confirm or rule out anterior uveitis, episcleritis, or other deeper causes. If it turns out to be benign (screen fatigue + allergy), that's great - but the ciliary flush pattern in the photo warrants proper evaluation before it's attributed to simple causes.
If It Truly Is Screen + Allergy Related (Once Confirmed by an Eye Doctor)
If a proper exam clears deeper pathology, here is what the Wills Eye Manual (p. 312-313) recommends for allergic conjunctivitis:
Mild: Preservative-free artificial tears 4-8x/day + cool compresses
Moderate: Dual-action antihistamine/mast-cell stabilizer eye drops (once or twice daily):
- Olopatadine 0.1% or 0.2% (OTC)
- Ketotifen 0.025% (OTC)
- Azelastine, bepotastine, or epinastine
Severe: Add mild topical steroid (loteprednol 0.2% or fluorometholone 0.1%) for 1-2 weeks + oral antihistamine (loratadine 10 mg daily)
For screen fatigue specifically (Kanski's, p. 7550):
- Reduce screen time during allergy episodes
- Position screen below eye level (reduces palpebral aperture, decreases evaporation)
- Conscious blinking while on screens
- 20-20-20 rule: every 20 minutes, look 20 feet away for 20 seconds
- Lubricating eye drops (preservative-free preferred)
Bottom line: The photo shows a redness pattern that deserves an in-person eye examination before assuming it is just allergy/screen-related. Please don't ignore it - anterior uveitis in particular can cause permanent damage if left untreated.
The slit lamp exam how to do
Finding Sources
Finding Sources
Finding Sources
Excellent - multiple sources found. Let me read all the key ones in parallel:
Reading File
Reading File
Reading File
Reading File
Reading File
Let me fetch the key diagnostic images from these textbooks:
Loading Image
Loading Image
I have everything needed. Here is a comprehensive explanation:
Slit Lamp Examination - How to Perform
The slit lamp (biomicroscope) provides a highly magnified, binocular, three-dimensional view of the eye's anterior segment. Here is the full technique, step by step.
The Instrument
The slit lamp has:
- Binocular eyepieces (oculars) - for stereoscopic (3D) viewing
- Slit beam light source - width, height, angle, and filter are all adjustable
- Joystick - moves the instrument forward/back (focus) and up/down
- Magnification dial - typically 10x, 16x, 25x
- Chin rest and forehead bar - positions the patient
- Filters: cobalt blue (for fluorescein), red-free (increases vascular contrast)
Step 1 - Patient Positioning
- Both examiner and patient sit on adjustable stools at the same level
- Cover the chin rest with a tissue
- Patient leans forward, forehead against the bar, chin on the rest
- Adjust chin rest height so the patient's lateral canthus aligns with the black line on the vertical bar
- Ask the patient to keep both eyes open and look straight ahead (or at a fixation target)
Step 2 - Initial Setup
- Set oculars to your interpupillary distance
- Start with low magnification (10x) and a diffuse, wide beam for the overview
- Position the light source and eyepieces directly in front (0° angle) for initial survey
- Move the joystick forward until the cornea comes into sharp focus
Step 3 - Systematic Anterior Segment Examination
Examine in order, from outermost to innermost:
1. Lids and Lashes
- Inspect for blepharitis (lid margin crusting/thickening), meibomian gland dysfunction, hordeolum (stye), entropion/ectropion
- Evert the upper lid to inspect for papillae (raised bumps - sign of allergy) or follicles
2. Conjunctiva and Sclera
- Diffuse beam, scan bulbar and palpebral conjunctiva
- Look for: hyperaemia pattern (superficial vs. ciliary/deep), chemosis, papillae, follicles, discharge
- Note if redness is diffuse (conjunctivitis) or perilimbal/circumcorneal = ciliary flush (deeper inflammation - uveitis)
3. Cornea - Use narrow oblique slit beam
This is the most important part of the slit beam technique:
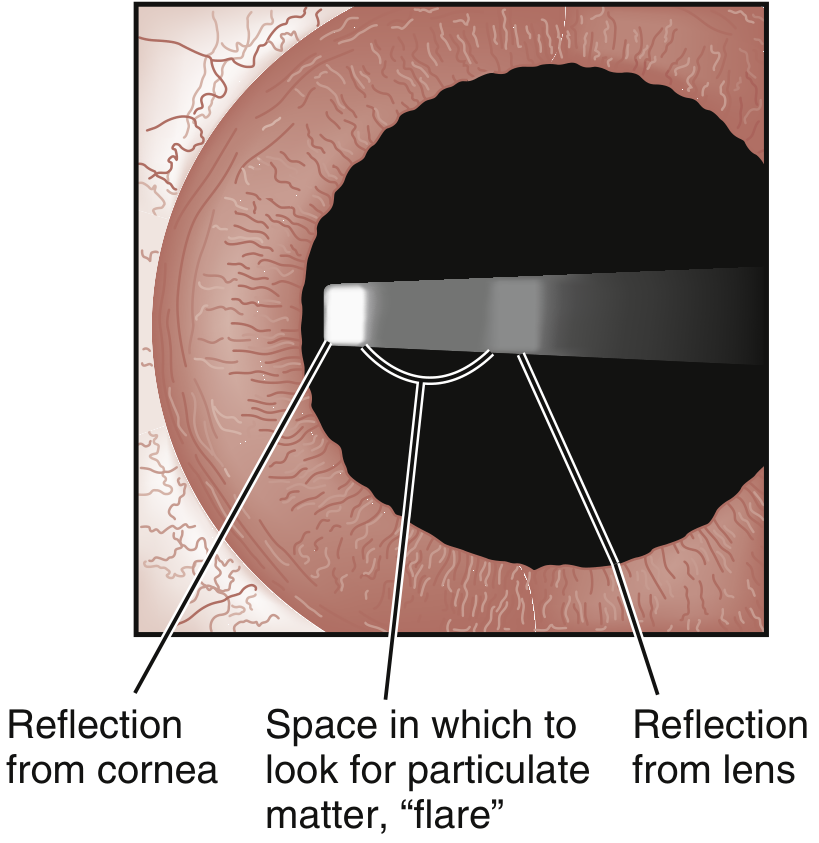
- Angle the light ~45° from the side; narrow the beam to ~1 mm width, full height of cornea
- The beam creates an optical cross-section - you can see the layers of the cornea as a bright slice
- Moving this thin beam across the cornea tells you the depth of any lesion (epithelial, stromal, or endothelial)
- Examine for: abrasions, ulcers, foreign bodies, oedema (haze), scars
- Check endothelium (posterior corneal surface) for keratic precipitates (KPs) - these are white cell deposits, a hallmark of uveitis/iritis
4. Anterior Chamber - The Most Important for Your Case
- Move focus to the space between the cornea and iris, using the dark pupil as a backdrop
- Aim the narrow slit beam at an extreme temporal angle (from the side), across this dark space
- Look for:
| Finding | Significance |
|---|---|
| Cells | White cells drifting slowly in aqueous currents - like snowflakes in headlights = active uveitis/iritis |
| Flare | Hazy, foggy appearance of the beam = protein leak from inflamed vessels = "headlights in fog" = blood-aqueous barrier breakdown |
| Hypopyon | Layer of WBCs settling at the bottom of the anterior chamber |
| Hyphema | Red blood cells in the anterior chamber (trauma) |
Grading cells (SUN Working Group):
- Grade 0: <1 cell in 1×1 mm field
- Grade 0.5+: 1-5 cells
- Grade 1+: 6-15 cells
- Grade 2+: 16-25 cells
- Grade 3+: 26-50 cells
- Grade 4+: >50 cells
5. Iris
- Inspect for tears, synechiae (adhesions between iris and lens = posterior synechiae, a complication of uveitis)
- Note pupil shape and reactivity (miosis = pupillary sphincter spasm in uveitis)
- Spiral muscle fibre disruption = acute angle closure glaucoma
6. Lens
- Aim beam posteriorly through the pupil
- Examine for position, clarity, opacities (cataracts), subluxation
Step 4 - Illumination Techniques
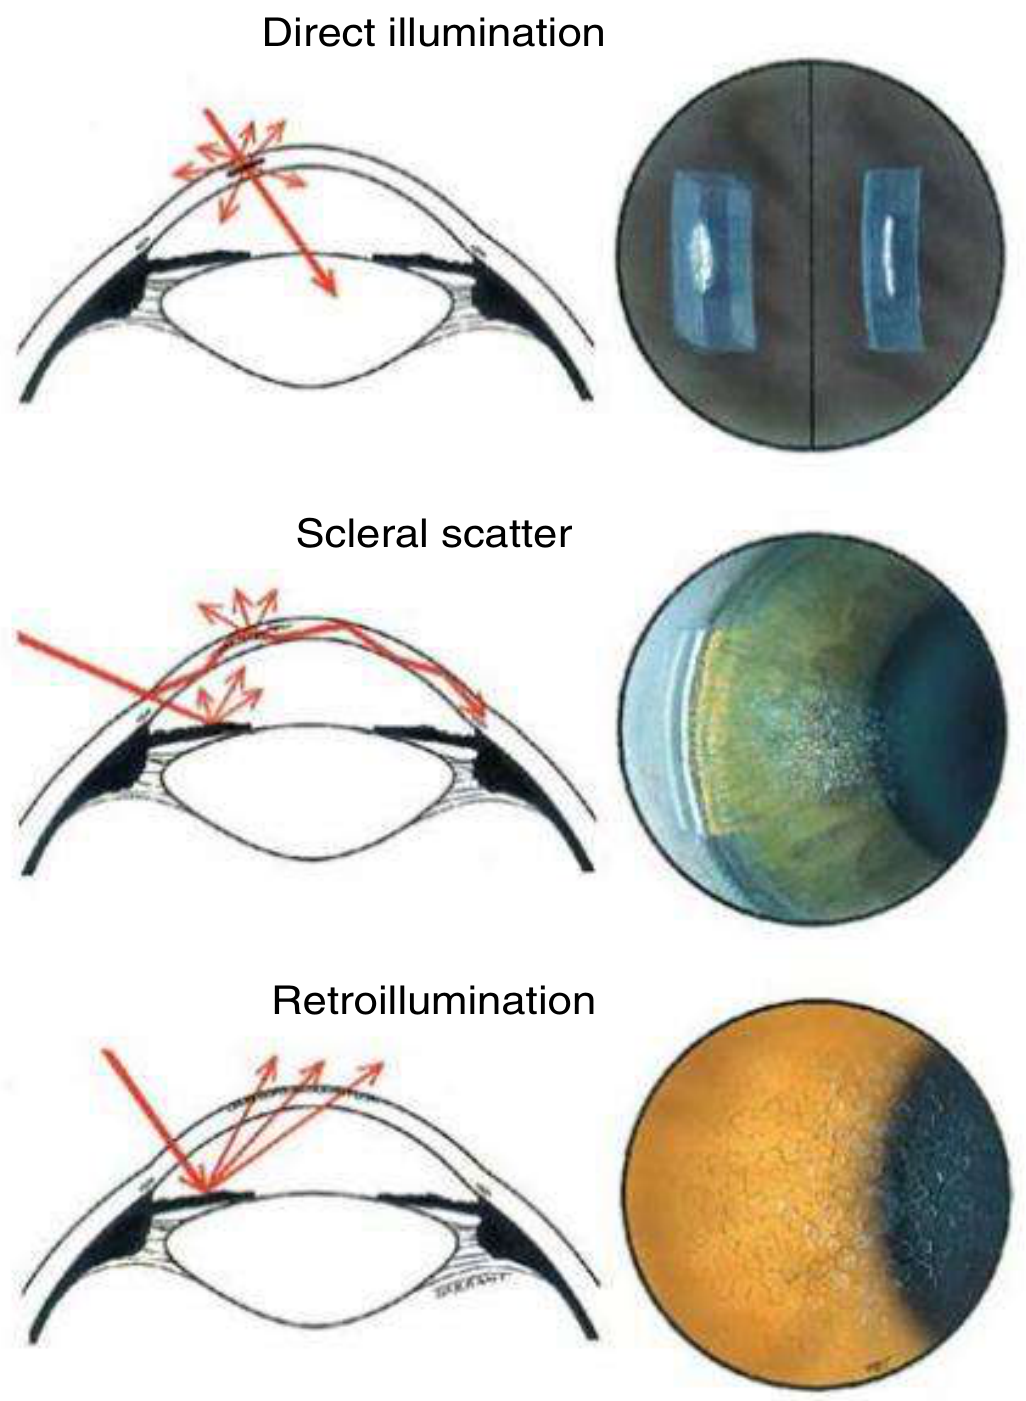
| Technique | How | What It Finds |
|---|---|---|
| Direct illumination (narrow oblique slit) | Beam at 45°, narrow slit across cornea | Depth of lesions, corneal cross-section |
| Scleral scatter | Decenter beam to limbus; microscope focused centrally | Subtle stromal haze, cellular/lipid infiltration |
| Retroillumination | Reflect light from iris or fundus back through cornea | Fine epithelial/endothelial changes, KPs, small blood vessels |
| Specular reflection | Match angle of incidence and reflection | Endothelial cell density, guttata |
| Diffuse broad beam | Wide beam, low magnification | General survey, gross abnormalities |
Step 5 - Special Tests
Fluorescein Staining (with Cobalt Blue Filter)
- Instill fluorescein dye (strip touched to conjunctiva, or drops)
- Switch to cobalt blue filter on the slit lamp
- Fluorescein does not penetrate intact corneal epithelium
- Bright green staining = epithelial defect (abrasion, ulcer, foreign body trauma)
- Seidel's test: leaking fluorescein streaming away from a wound = corneal perforation
Tonometry (Goldmann)
- Mounted on the slit lamp
- Applanates the cornea with a calibrated probe after topical anaesthetic
- Measures intraocular pressure - critical to rule out acute angle-closure glaucoma
What the Ophthalmologist Will Be Looking For in Your Eye
Given your photo, the key things the slit lamp will specifically answer:
- Are there cells or flare in the anterior chamber? - If yes → uveitis/iritis confirmed
- Are there keratic precipitates on the corneal endothelium? - If yes → confirms intraocular inflammation
- Is the cornea clear or hazy? - Hazy cornea + raised IOP = angle-closure glaucoma
- Is it truly ciliary flush or just deep conjunctival injection? - Slit lamp resolves this in seconds
- Pupil shape and reactivity - Irregular pupil or miosis → uveitis
Sources: Kanski's Clinical Ophthalmology 10th ed. (p. 35); Tintinalli's Emergency Medicine (p. 1572); Rosen's Emergency Medicine (p. 218)
This is a shared conversation. Sign in to Orris to start your own chat.