
Dento alveolar abscess for 10 marks
dentoalveolar abscess periapical abscess dental infection diagram
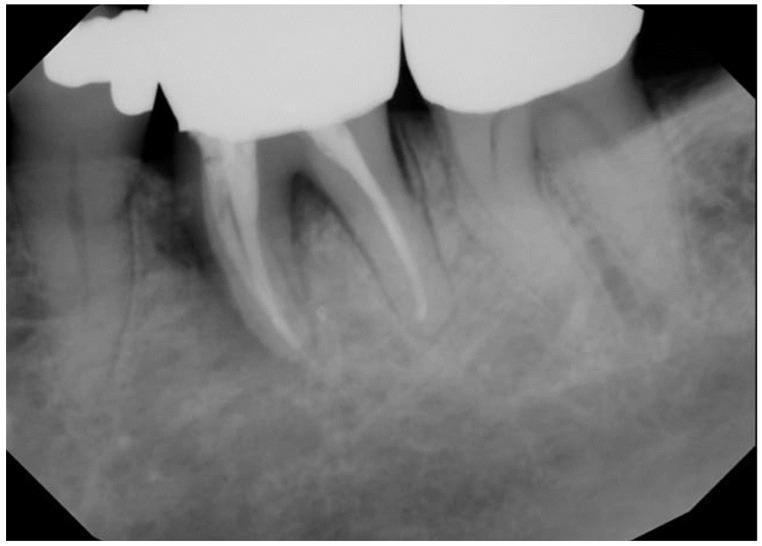
This diagnostic image is a periapical dental radiograph of the posterior mandible in a 69-year-old male with a history of high-dose radiation therapy (70 Gy) for squamous cell carcinoma. The radiograph reveals tooth #19 exhibiting a large, radiopaque dental crown and previous endodontic treatment, evidenced by radiopaque filling material in the root canal system. The surrounding alveolar bone shows generalized radiolucency and a granular, diffuse trabecular pattern, which are radiographic hallmarks of post-radiation bone changes. These findings indicate compromised bone density and vascularity, increasing the risk for osteoradionecrosis (ORN) following invasive procedures. There is evidence of a periapical radiolucency associated with the molar, consistent with the clinical report of a draining abscess. The image serves as an educational example of evaluating dental health and bone integrity in head and neck cancer patients prior to dentoalveolar surgery.
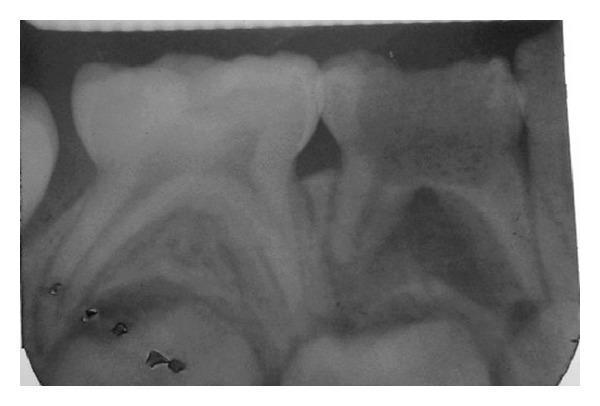
This diagnostic image is an Intraoral Periapical (IOPA) radiograph of the mandibular right molar region in a pediatric patient. The primary focus is on the second primary molar (tooth #84), which exhibits a large, distal radiolucency involving the enamel and dentin, consistent with deep dental caries. Centrally, the pulp chamber appears enlarged and irregular following the removal of a metallic foreign body. Distinctive periapical radiolucency is visible at the root apices, indicative of chronic inflammatory changes such as a dentoalveolar abscess. The surrounding alveolar bone shows signs of rarefaction. The adjacent first primary molar (#83) is visible mesially with a relatively normal crown and root structure. The image serves as an educational example of deep carious lesions, secondary pulpal involvement, and the subsequent periapical bone response in primary dentition. It is relevant for pediatric dentistry and endodontic diagnostic training.
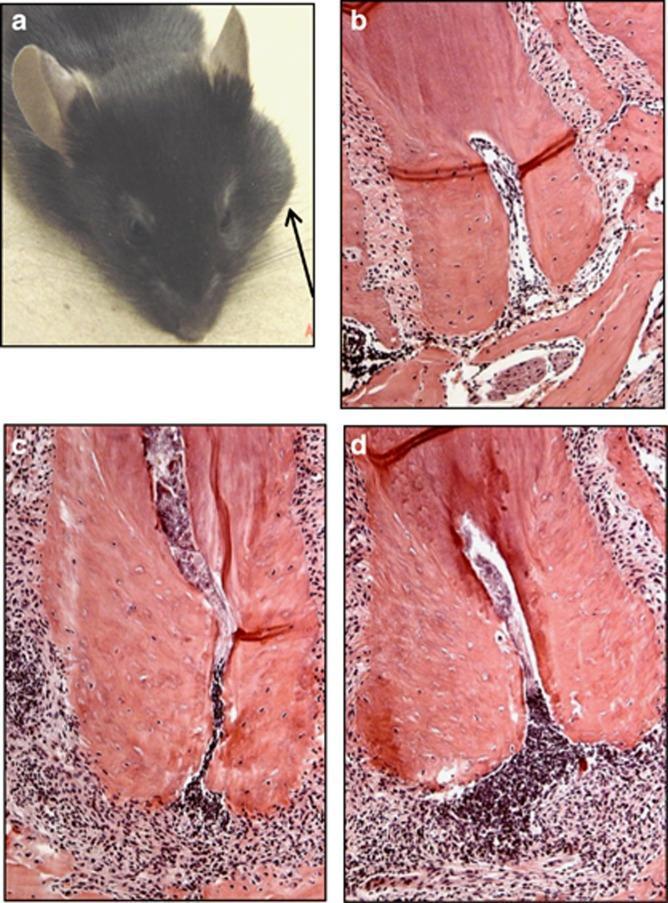
A multi-panel figure illustrating the clinical and histological pathology of dentoalveolar infection in a mouse model. Panel (a) is a clinical photograph of a male mouse showing a prominent orofacial abscess (indicated by an arrow) following infection and treatment with anti-IL-1ʹ/͵ neutralizing antibodies, representing a disseminated infection. Panels (b), (c), and (d) show light microscopy images of paraffin-embedded tissue sections stained with hematoxylin and eosin (H&E) at d200 magnification. Panel (b) depicts an uninfected control with normal dental pulp architecture, close apposition of alveolar bone to the tooth, and absence of inflammatory cells. Panel (c) shows infected dental pulp treated with control IgG, demonstrating pulp necrosis and moderate cellular infiltration. Panel (d) illustrates infected pulp in a mouse treated with anti-IL-1ʹ/͵ antibodies, showing severe pulp necrosis and the most extensive infiltration of inflammatory cells (neutrophils and total leukocytes) in the infrabony area. The figure demonstrates the role of interleukin-1 signaling in localizing dental infections.
Dentoalveolar Abscess (10 Marks)
Definition
Etiology and Pathogenesis
- Dental caries penetrates the enamel and dentine, allowing bacterial invasion of the pulp chamber.
- Pulpitis develops - initially reversible (pain with thermal stimuli), then irreversible (spontaneous, throbbing, persistent pain).
- Pulp necrosis follows as rising pressure occludes blood vessels; anaerobic bacteria colonize the necrotic root canals.
- Bacteria and their toxins exit through the apical foramen, infecting the periapical tissues - causing acute apical periodontitis (tooth tender to percussion).
- Further spread leads to abscess formation with pus accumulating in the periapical alveolar bone.
- Tooth fracture (retrograde infection)
- Periodontal disease (lateral/retrograde canal infection)
- Failed or inadequate root canal treatment
- Pericoronitis (around partially erupted teeth, especially third molars)
Microbiology
- Streptococcus species (especially viridans group)
- Fusobacterium species
- Prevotella and Porphyromonas species
- Actinomyces species
- Bacteroides species (including B. fragilis in severe cases)
Clinical Features
- Severe, throbbing, continuous toothache - poorly localized
- Tenderness on biting or touching the affected tooth
- Swelling of the face/gum adjacent to the tooth
- Erythema and fluctuance of overlying mucosa
- Systemic features: fever, malaise, regional lymphadenopathy
- Tender tooth on percussion
- Intraoral swelling - may point and discharge pus (parulis/gum boil)
- Facial cellulitis in spreading cases
- Trismus if pterygoid muscles involved
Radiology
- Periapical X-ray (IOPA): Well-defined or diffuse periapical radiolucency at the root apex - loss of lamina dura. In acute cases, changes may be minimal early on.
- OPG (Orthopantomogram): Gives a broader view of all teeth and supporting bone.
- CT scan: Used when deep space spread is suspected (determines extent of involvement of fascial spaces).
Spread of Infection
| Origin | Space involved |
|---|---|
| Anterior mandibular teeth | Sublingual / buccal space |
| Mandibular molars | Submandibular space |
| Maxillary teeth | Buccal / infraorbital space |
| Maxillary molars | Buccal space / parapharyngeal |
- Ludwig's angina: Bilateral spread involving submandibular, submental, and sublingual spaces simultaneously - a life-threatening emergency causing tongue elevation and airway compromise.
- Cavernous sinus thrombosis: Rare but serious; maxillary anterior tooth infections spread via ophthalmic veins.
- Mediastinitis: Descending necrotizing infection via parapharyngeal/retropharyngeal spaces.
Management
Definitive (Dental) Treatment
- Root canal treatment (RCT): Debridement and obturation of necrotic root canals - eliminates the source of infection while preserving the tooth.
- Dental extraction: If the tooth is non-restorable; also provides immediate drainage.
- Incision and Drainage (I&D): When fluctuant swelling is accessible - using nerve block anesthesia (avoid local infiltration into infected tissue), stab incision, blunt dissection, and placement of a drain.
Antimicrobials
- Not routinely needed for localized, drainable abscesses - surgical drainage is the primary treatment.
- Antibiotics are indicated for:
- Spreading/diffuse cellulitis
- Systemic signs (fever, malaise)
- Immunocompromised patients
- Inability to drain
- First-line: Amoxicillin (or amoxicillin-clavulanate for broader coverage)
- Penicillin allergy: Metronidazole + Clindamycin
- If abscess cannot be confirmed as drained: prescribe antibiotics even after drainage.
Analgesia
- NSAIDs (ibuprofen) + paracetamol for pain control.
Management of Complications
- Ludwig's angina: Early airway management (consider intubation/tracheostomy), IV antibiotics, surgical drainage by OMF/ENT surgeon, IV access + fluids.
- Deep space infections: CT scan to delineate extent, IV antibiotics, operative drainage.
Chronic Dentoalveolar Abscess
- Often asymptomatic
- Visible as a well-circumscribed periapical radiolucency on X-ray
- May develop into a radicular cyst (most common jaw cyst)
Differential Diagnosis
- Periodontal abscess (arises from the periodontal pocket laterally, not at apex)
- Pericoronitis
- Maxillary sinusitis (can mimic upper molar pain)
- Osteomyelitis of the jaw
- Facial space infections of non-dental origin
Key Points for 10 Marks
| Feature | Detail |
|---|---|
| Cause | Pulp necrosis → apical spread |
| Flora | Polymicrobial, predominantly anaerobic |
| Key symptom | Throbbing pain + tender on percussion |
| X-ray | Periapical radiolucency, loss of lamina dura |
| Treatment | Drainage (I&D or via root canal) ± antibiotics |
| Complication | Ludwig's angina, cavernous sinus thrombosis |
| Chronic form | Periapical granuloma → radicular cyst |
Can u please include contents and then rewrite this
Dentoalveolar Abscess
Contents
- Definition
- Etiology
- Pathogenesis
- Microbiology
- Clinical Features
- Radiological Features
- Spread of Infection
- Management
- Chronic Form
- Differential Diagnosis
- Complications
- Key Summary Table
1. Definition
2. Etiology
- Dental caries - the primary cause; bacterial invasion through enamel and dentine into the pulp
- Tooth fracture - direct bacterial entry into the pulp
- Periodontal disease - retrograde infection via accessory canals
- Failed root canal treatment - residual bacteria at the apex
- Pericoronitis - around partially erupted teeth, especially lower third molars
- Trauma - causing pulp necrosis without visible fracture
3. Pathogenesis
4. Microbiology
- Streptococcus species (viridans group) - most common aerobe
- Fusobacterium nucleatum
- Prevotella and Porphyromonas species
- Actinomyces species
- Bacteroides fragilis - in severe or spreading infections
- Staphylococcal-streptococcal mixed flora - in facial cellulitis
- Actinomyces - cervicofacial actinomycosis with draining sinus tracts
- Mycobacterium tuberculosis - cervical lymphadenopathy (scrofula)
5. Clinical Features
Symptoms
- Severe, throbbing, continuous toothache
- Pain worsened by biting or applying pressure to the tooth
- Localized facial swelling
- Halitosis (foul breath)
- Fever, malaise, and general ill health in spreading infections
- Referred pain to the ear (common with pericoronitis)
- Difficulty opening mouth (trismus) if pterygoid muscles involved
Signs
- Tooth tender on percussion
- Intraoral swelling - soft, fluctuant, erythematous
- A parulis (gum boil) - a pointing abscess that may discharge spontaneously through the gingival mucosa
- Facial swelling and erythema (cellulitis)
- Regional lymphadenopathy (submandibular or cervical)
- Trismus in advanced cases
6. Radiological Features
Periapical X-ray (IOPA) - First-line investigation
- Periapical radiolucency at the root apex - the hallmark finding
- Loss of the lamina dura (the white cortical line normally seen around the root)
- In acute early cases, radiological changes may be minimal or absent as bone destruction takes time
- In chronic cases, a well-circumscribed, rounded radiolucency is seen
OPG (Orthopantomogram)
- Broad overview of all teeth and supporting bone
- Useful to assess adjacent teeth and bone level
CT Scan
- Indicated when deep space spread is suspected
- Delineates the extent of fascial space involvement
- Guides surgical drainage planning
7. Spread of Infection
| Origin of Infection | Space Involved |
|---|---|
| Anterior mandibular teeth | Sublingual space, buccal space |
| Mandibular molar teeth | Submandibular space |
| Maxillary anterior teeth | Infraorbital space, canine space |
| Maxillary molar teeth | Buccal space, parapharyngeal space |
8. Management
A. Definitive Dental Treatment (treat the source)
- Treatment of choice to preserve the tooth
- Mechanical debridement and chemical disinfection of necrotic pulp
- Obturation (filling) of the root canal system
- Eliminates the source of infection while saving the tooth
- Indicated when the tooth is non-restorable
- Provides immediate drainage via the socket
B. Incision and Drainage (I&D)
- Topical anesthesia applied first (20% benzocaine gel, 5% lidocaine gel, or lidocaine-prilocaine-tetracaine combination)
- Nerve block preferred over local infiltration - avoids tracking infection into healthy tissue
- Stab incision at the most dependent point of fluctuance
- Blunt dissection with artery forceps
- Drain placement (corrugated rubber drain)
- Saline rinses to promote drainage
C. Antibiotics
- Infection is spreading (cellulitis, fascial space involvement)
- Systemic features present (fever, malaise, lymphadenopathy)
- Patient is immunocompromised
- Abscess cannot be adequately drained
- Uncertainty whether abscess is of pulpal or periodontal origin
| Situation | Drug |
|---|---|
| First-line (oral) | Amoxicillin 500 mg TDS x 5 days |
| Polymicrobial / spreading | Amoxicillin-clavulanate (co-amoxiclav) |
| Penicillin allergy | Metronidazole + Clindamycin |
| Severe / hospitalized | IV Piperacillin-tazobactam or IV Metronidazole + IV Amoxicillin |
D. Analgesia
- NSAIDs (Ibuprofen 400 mg TDS) - first-line for dental pain
- Paracetamol 1 g QDS - adjunct
- Opioids reserved for severe, uncontrolled pain
E. Dental Follow-up
- Within 24-48 hours for localized cases
- Immediate specialist referral for any signs of deep space spread
9. Chronic Form - Periapical Granuloma
- Usually asymptomatic - discovered incidentally on X-ray
- Appears as a well-circumscribed periapical radiolucency on IOPA
- If epithelium lines the granuloma, it becomes a radicular (periapical) cyst - the most common cyst of the jaws
- Treatment: RCT with or without apicectomy (surgical root-end resection)
10. Differential Diagnosis
| Condition | Distinguishing Feature |
|---|---|
| Periodontal abscess | Arises laterally from the gingival pocket, not at the apex; tooth vital |
| Pericoronitis | Around partially erupted tooth, usually lower third molar |
| Maxillary sinusitis | Upper molar pain; nasal symptoms; multiple upper teeth may be tender |
| Osteomyelitis of the jaw | Diffuse, ill-defined bone destruction; may follow extraction or trauma |
| Parotid abscess | Swelling over parotid region; pus from Stensen duct |
| Salivary calculus/sialadenitis | Swelling related to meals; no dental source |
11. Complications
- Chronic periapical granuloma
- Radicular cyst
- Osteomyelitis of the jaw
- Ludwig's angina - bilateral submandibular, submental, and sublingual space involvement; tongue elevated; life-threatening airway obstruction; managed with early airway control (intubation/tracheostomy), IV antibiotics, and emergency surgical drainage
- Parapharyngeal and retropharyngeal abscess
- Descending necrotizing mediastinitis - rare, very high mortality
- Cavernous sinus thrombosis - maxillary tooth infections spread via ophthalmic veins; presents with periorbital cellulitis, proptosis, meningeal signs, and reduced consciousness
- Septicemia and distant abscesses (brain, lung, liver) - via hematogenous spread
- Lemierre syndrome - septic thrombophlebitis of the internal jugular vein by Fusobacterium necrophorum; septic emboli cause necrotic pulmonary abscesses
12. Key Summary Table
| Feature | Detail |
|---|---|
| Definition | Pus at root apex in alveolar bone |
| Primary cause | Dental caries → pulp necrosis |
| Microbiology | Polymicrobial, predominantly anaerobic |
| Key symptom | Throbbing pain, tender on percussion |
| X-ray finding | Periapical radiolucency, loss of lamina dura |
| Definitive treatment | RCT or extraction + I&D if fluctuant |
| Antibiotics | Only for spreading/systemic infection |
| Dreaded complication | Ludwig's angina - airway emergency |
| Chronic sequela | Periapical granuloma → radicular cyst |
Discuss modern concepts in cavity designs in preparation of gold inlays . Cavity designs for class 2 gold inlays for 25 marks . Give me from contents to references .
modern concepts cavity design preparation gold inlay class 2 operative dentistry
https://kids.kiit.ac.in/pdf/INLAY-FINAL-YEAR.pdf
gold inlay cavity preparation class 2 proximal box occlusal step diagram
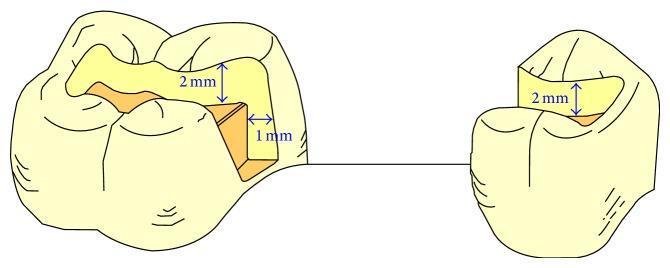
Anatomical diagram of a mandibular first molar and mandibular first premolar illustrating specific cavity preparations for a modified inlay-retained fixed partial denture (IRFPD). The diagram shows the mandibular first molar with a Class II mesial-occlusal cavity preparation and the first premolar with a Class II distal-occlusal preparation. Annotated dimensions indicate an occlusal depth of approximately 2 mm for both teeth and a proximal box depth (shoulder width) of 1 mm in the molar. The preparation design features divergent walls (approximately 6–10°) to create an unretentive form in the occlusal direction, intended to accommodate the metal framework and subsequent composite resin layering. Internal angles are rounded, and the buccolingual width is shown to be approximately 1/3 to 1/2 of the intercuspal distance. This illustration serves as a clinical guide for conservative prosthetic abutment preparation in restorative dentistry and prosthodontics.
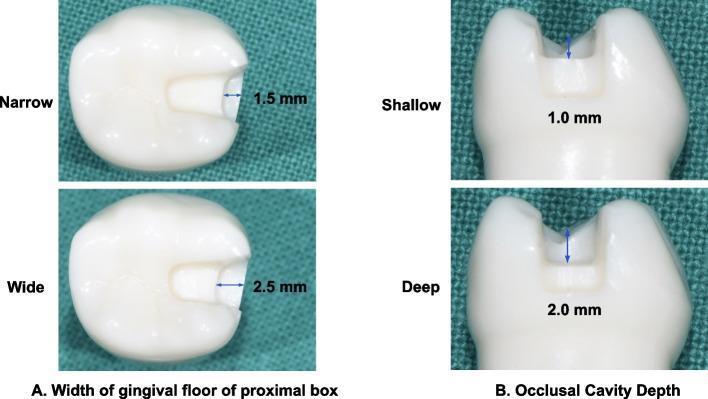
Educational comparison of dental cavity preparation designs for an inlay on mandibular first molars. The image is divided into two sections showing occlusal and proximal views. Section A (left) demonstrates the 'Width of gingival floor of proximal box' in occlusal view, comparing a 'Narrow' preparation (1.5 mm mesio-distal width) with a 'Wide' preparation (2.5 mm mesio-distal width). Section B (right) illustrates 'Occlusal Cavity Depth' in proximal view, comparing a 'Shallow' preparation (1.0 mm depth from the occlusal surface) with a 'Deep' preparation (2.0 mm depth). The visual highlights key variables in restorative dentistry, specifically the mesio-occlusal (MO) proximal box dimensions and the depth of the occlusal isthmus. Precise blue arrows and numerical annotations quantify the anatomical modifications made to the artificial tooth structure. This diagram serves as a reference for clinical dental students and practitioners to understand how cavity dimensions are standardized for biomechanical and digital trueness studies.
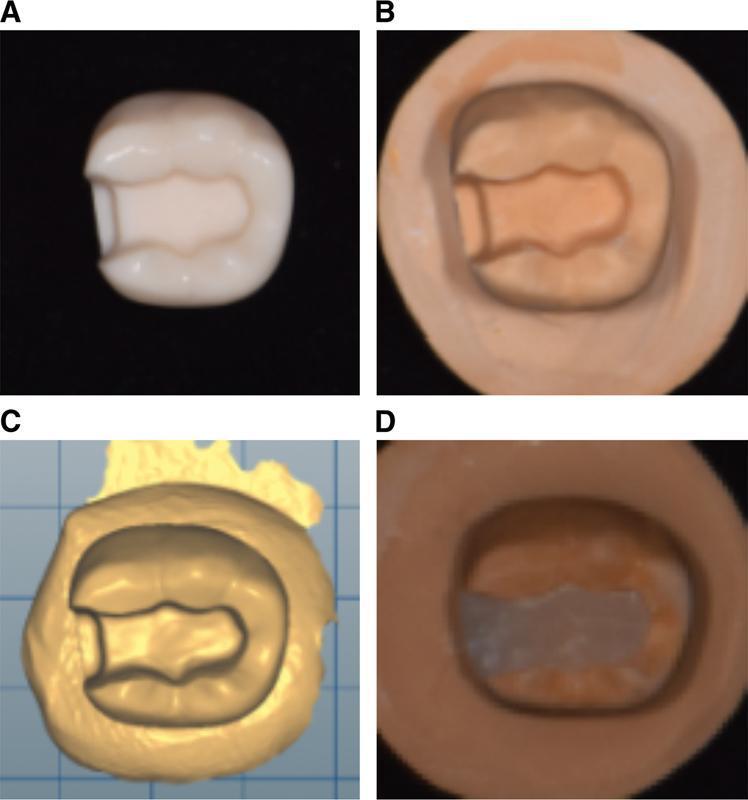
A four-panel figure illustrating the process of dental inlay fabrication and quality assessment. (A) Occlusal view of a mandibular right first molar resin tooth with a Class II mesio-occlusal (MO) inlay cavity preparation. The preparation shows a distinct occlusal box and mesial proximal box with defined margins and internal walls. (B) A master die made of high-strength dental stone, replicating the prepared tooth anatomy in a tan-colored material. (C) A digital 3D model of the master die rendered as a Standard Tessellation Language (STL) file, appearing as a gold-colored surface mesh on a blue grid background. (D) A completed dental inlay specimen fabricated via 3D printing using C&B resin, shown seated within the cavity or on the die for evaluation. This sequence demonstrates a digital-analog workflow in restorative dentistry, focusing on the precision of 3D printing for indirect restorations compared to traditional stone models.
Modern Concepts in Cavity Design in Preparation of Gold Inlays - Cavity Design for Class II Gold Inlays (25 Marks)
Contents
- Introduction and Historical Background
- Definition
- Gold Alloys Used for Inlays - Classification
- Indications
- Contraindications
- Advantages of Gold Inlays
- Disadvantages
- Armamentarium
- Basic Concepts of Cavity Design for Cast Restorations
- Principles of Cavity Design for Gold Inlay
- Modern Concepts in Cavity Design
- Tooth Preparation for Class II Gold Inlay - Step by Step
- A. Initial Preparation - Occlusal Step
- B. Initial Preparation - Proximal Box
- C. Final Preparation - Bevels and Flares
- Types and Functions of Bevels
- Facial and Lingual Flares
- Modifications in Class II Inlay Tooth Preparation
- Modifications of Proximal Cavity Design
- Differences: Gold Inlay vs. Amalgam vs. Direct Gold vs. Ceramic Inlay Preparation
- Complications and Precautions
- Summary
- References
1. Introduction and Historical Background
- 1897 - Dr. Phil Brook was the first to introduce inlays in dentistry. He gave the concept of forming an investment around a wax pattern, eliminating the wax by heat, and filling the resultant mold with a gold alloy.
- 1907 - W.H. Taggart revolutionized restorative dentistry by formally introducing the lost-wax casting technique for cast gold restorations. He recognized that a wax pattern could be cast in gold with precision enough to seat in the prepared cavity with minimal marginal gap.
- G.V. Black established the foundational principles of cavity preparation that formed the basis for all subsequent inlay designs.
- Over the decades, these concepts have evolved - modern philosophy emphasizes conservation of tooth structure, biomechanical soundness, and precision of marginal fit over the older philosophy of "extension for prevention."
2. Definition
- When all cusps are capped - it becomes a Class II Onlay.
3. Gold Alloys Used for Inlays - Classification
According to Sturdevant - 4 Distinct Groups:
- Traditional high-gold alloys - Gold content >75 wt%; Type I, II, III, IV
- Low-gold alloys - Gold content <50 wt%
- Palladium-silver alloys - No gold; palladium-based
- Base metal alloys - Nickel-chromium or cobalt-chromium based
According to ADA Specification No. 5 - Types of Gold Alloys:
| Type | Vickers Hardness (VHN) | Use |
|---|---|---|
| Type I (Soft) | 50-90 | Small inlays with minimal stress |
| Type II (Medium) | 90-120 | Inlays with moderate stress |
| Type III (Hard) | 120-150 | Inlays, onlays, thin copings |
| Type IV (Extra Hard) | >150 | Crowns, bridges, removable partial dentures |
4. Indications
- Large restorations where strength and longevity are paramount
- Dental rehabilitation requiring cast metal alloys
- Diastema closure and occlusal plane correction
- Wide open contacts needing precise proximal contour
- Prosthodontic abutment teeth (FPD/RPD abutments)
- Endodontically treated teeth with weakened cusps
- Teeth at risk for fracture
- Subgingival lesions where precision margin placement is needed
- Adjunct to periodontal therapy (open embrasure form required)
- Cavity width not exceeding 1/3 of the intercuspal distance
- Strong, self-resistant cusps present
- Teeth with minimal or no occlusal facets
5. Contraindications
- Small and shallow cavities (over-preparation required - not justified)
- High plaque or caries indices (poor oral hygiene - secondary caries risk at margins)
- Occlusal disharmony
- Use of dissimilar metals in the same mouth (galvanic corrosion)
- Esthetic concerns (anterior teeth or esthetically sensitive posterior regions)
- Extensive tooth preparation required (onlay or full crown preferred)
- Teeth still undergoing eruption (young patients)
- Patient with bruxism or heavy parafunction (marginal failure risk)
6. Advantages of Gold Inlays
- Biocompatibility - gold is well tolerated by periodontal tissues
- Durability - gold alloy restorations can last 20-30 years or longer
- Precision of fit - marginal gap can be as small as 25-40 microns
- Burnishability - margins can be burnished (adapted) to the tooth after cementation
- Wear resistance - wear rate similar to natural enamel
- Conservative compared to full crown preparation
- Thermal conductivity - does not contribute to secondary caries at margins
- Dimensional stability - no polymerization shrinkage unlike composites
7. Disadvantages
- Poor esthetics (metallic color - not tooth-colored)
- Two appointments required (indirect technique)
- Cost - gold is expensive
- Temporary restoration needed between appointments
- Requires higher operator skill and laboratory cooperation
- Marginal microleakage possible with luting cement dissolution over time
8. Armamentarium
Cutting Instruments:
- Burs:
- Plane-cut tapered fissure carbide bur (No. 271 bur - tip diameter 0.8 mm, neck diameter 2 mm) - primary cutting bur
- No. 169L long tapered fissure bur - for proximal walls
- Pear-shaped bur No. 329 or 330 - for refining internal walls
- Flame-shaped fine-grit diamond bur - for occlusal and gingival bevels
- Round bur - for caries excavation
Hand Instruments:
- Hatchets, hoes, angle formers, chisels - for refining walls and placing bevels
- Gingival margin trimmers - for gingival bevel
- Spoon excavators - for caries removal
Finishing Instruments:
- Thin tapered carbide finishing bur
- Arkansas stone
- Abrasive paper discs (sandpaper discs)
- Rubber cone for polishing
9. Basic Concepts of Cavity Design for Cast Restorations
A. The Circumferential Tie
- Provides a "lap joint" at the margin (gold overlaps enamel)
- Establishes closure at the gold-enamel interface
- Compensates for casting shrinkage
- Allows marginal burnishing
- Margins should terminate on enamel wherever possible
- All margins should be accessible for finishing
- Margins should not be in functional occlusal contact
B. Taper (Draft)
- All walls must converge toward the occlusal surface at an angle of 2-5 degrees per wall (total taper of 4-10 degrees)
- This ensures the casting can be inserted and removed in one path of withdrawal
- Provides retention through wedging action of cement
- Excessive taper reduces retention; insufficient taper prevents seating
C. No Undercuts
- Unlike amalgam preparation, inlay cavities must be completely free of undercuts
- Undercuts would prevent the rigid casting from seating completely
- Any undercuts present are blocked out with base materials (calcium hydroxide, glass ionomer)
D. Cavosurface Angle
- For gold inlay: 130-140 degrees (obtuse angle) - creates the "lap sliding fit joint"
- For amalgam: 90 degrees (butt joint)
- The obtuse cavosurface angle in gold inlays produces acute-angled marginal metal (30-40 degrees of metal at the margin) which:
- Is amenable to finishing and burnishing
- Brings the casting closer to the tooth, reducing the cement film thickness
- Strengthens the marginal seal
10. Principles of Cavity Design for Gold Inlay
1. Outline Form
- Cavity outline placed to include all areas that cannot be adequately cleansed
- Proximal walls must extend just beyond contact area - at least 1 mm clearance from adjacent tooth
- Buccal and lingual walls diverge occlusally to prevent undercuts
- Isthmus width: 1/3 of the intercuspal distance (compared to 1/4 for amalgam)
- "Extension for prevention" - modified by modern concept of minimal extension guided by caries risk
2. Retention Form
- Taper of walls: The converging walls create frictional resistance - governed by degree of taper, total surface area, area under shear, and roughness of tooth surface
- Auxiliary retention features (when taper compromises retention): grooves, slots, internal boxes, skirts, collars, reverse bevels
3. Resistance Form
- Pulpal floor flat - perpendicular to long axis of tooth
- Adequate depth (1.5-2 mm pulpal floor depth)
- No sharp internal line angles - rounded to prevent stress concentration in the casting and voids in the working die
- Axiopulpal line angle must be rounded - to prevent voids in the working die (contrast: in amalgam it is also rounded, but to prevent stress in amalgam)
- Cusps with less than 1.5 mm of remaining tooth structure should be capped (converted to onlay)
4. Convenience Form
- Preparation shaped to allow access and visibility for cavity preparation, impression taking, pattern placement, and cementation
5. Removal of Remaining Carious Dentin and Pulp Protection
- All infected carious dentin removed with excavators or slow-speed round bur
- Pulp protection with calcium hydroxide liner if residual dentin thickness <0.5 mm
- Dentin bonding agents or glass ionomer base may be used in deep preparations
6. Finishing of Enamel Walls and Margins
- All enamel margins beveled and finished
- Unsupported enamel rods removed
- Smooth walls prevent marginal discrepancies in the final casting
11. Modern Concepts in Cavity Design
A. Minimal Invasive (Conservative) Preparation
- The traditional "extension for prevention" principle (extending margins into self-cleansing areas prophylactically) is now replaced by caries-specific removal only
- Margins placed only where caries is present or high risk exists
- Preserves sound tooth structure, maintaining tooth strength
B. Biological Width Consideration
- Gingival margin of proximal box should remain supragingival wherever possible
- Subgingival margins should extend no more than 0.5-1 mm below the gingival crest to preserve biological width and allow impression accuracy
C. Modern Bevel Philosophy
- Traditionally, G.V. Black advocated wide occlusal bevels; modern practice uses more selective and shorter bevels
- Gingival bevel: 0.5-0.75 mm wide at approximately 30 degrees to the gingival floor
- Occlusal bevel: 30-40 degrees, hollow-ground to avoid centric contact, 0.5-1 mm wide
- Purpose: thin gold margins that can be burnished, reducing the cement gap
D. Adhesive Luting Cements (Modern Advance)
- Traditional zinc phosphate cement has been replaced by resin-modified glass ionomer cements and resin cements
- Adhesive cements reduce reliance on purely mechanical retention
- Allow more conservative preparation with less taper
- Reduced risk of marginal microleakage
E. Digital Impressions and CAD/CAM
- Traditional rubber base/polyvinyl siloxane impressions replaced by intraoral digital scanning
- The wax-up and casting process can be supplemented by CAD/CAM milled gold restorations
- Ensures high precision, faster turnaround, and reproducible marginal fit
F. Microscope-Assisted Preparation
- Use of dental operating microscope enables ultra-precise margin preparation
- Allows verification of complete caries removal while preserving maximum sound tissue
G. Pulp Protection Philosophy
- Modern concept: selective caries removal (leaving affected but not infected dentin near the pulp) reduces pulp exposure risk
- Indirect pulp capping with calcium hydroxide or MTA (Mineral Trioxide Aggregate) followed by definitive inlay preparation
12. Tooth Preparation for Class II Gold Inlay - Step by Step
Phase I - Initial Preparation
A. Occlusal Step
- Using the No. 271 plane-cut tapered fissure carbide bur at high speed
- Enter the central fossa with the bur perpendicular to the occlusal surface
- Extend the preparation mesio-distally and bucco-lingually to include all carious pits and fissures
- Depth: Pulpal floor at 1.5-2.0 mm below DEJ (dentinoenamel junction)
- Width: Not to exceed 1/3 of intercuspal distance
- Buccal and lingual walls slightly diverge occlusally (2-5 degree taper per wall)
- All walls should be smooth and continuous
- Pulpal floor must be flat (perpendicular to the long axis of the tooth)
- The occlusal isthmus connects the occlusal step to the proximal box
- Minimum width of 1.5 mm bucco-lingually to provide adequate bulk of metal
- Floor of isthmus at same level as pulpal floor
B. Proximal Box
- Using No. 271 bur, extend from the occlusal step through the marginal ridge toward the proximal surface
- The bur is tilted slightly toward the contact area
- Break through the proximal enamel without touching the adjacent tooth
- Establish a flat gingival floor perpendicular to the long axis of the tooth
- Gingival floor must extend just beyond the proximal contact (at least 0.5-1 mm clearance from adjacent tooth) - verified with dental floss
- Depth of gingival floor: 1.5-2 mm from gingival crest if supragingival, or 0.5 mm below crest if subgingival
- The axial wall is prepared using the No. 271 bur (tip diameter 0.8 mm, neck 2 mm)
- Depth: approximately 1 mm inside DEJ (into dentin)
- The bur is tilted slightly lingually as it is drawn occlusally to create uniform axial wall depth
- This prevents perforation into the pulp
- Walls diverge slightly toward the proximal surface (flared outward)
- Must extend at least 1 mm beyond the adjacent tooth bucco-lingually for access and finishing
- Must be rounded (not sharp) - to prevent voids in the working die and to reduce stress concentration in the final casting
Phase II - Final Preparation
C. Removal of Infected Carious Dentin and Pulp Protection
- Remaining soft carious dentin removed with round bur or spoon excavator at slow speed
- Hard, discolored but firm dentin (affected dentin) may be retained
- Deep excavation: calcium hydroxide liner placed, followed by glass ionomer base
- Build up with autocure resin composite if needed for retention; usually fully removed before cementation
D. Preparation of Bevels and Flares
13. Types and Functions of Bevels
Six Types of Bevels (Based on Shape and Tissue Involvement):
| Type | Description |
|---|---|
| Partial bevel | Involves only the outer portion of the enamel wall |
| Short bevel | Approximately 0.5 mm wide; used at gingival margin |
| Long bevel | Extends across the entire enamel wall; used occlusally |
| Full bevel | Extends from DEJ to the cavosurface - involves entire enamel wall thickness |
| Counter bevel (reverse bevel) | Placed on the external surface of a cusp to strengthen the cusp by capping it with metal |
| Hollow-ground bevel | Concave bevel created by flame-shaped bur on occlusal surfaces; avoids centric occlusal contacts on thin gold margins |
Occlusal Bevel
- Placed along all occlusal margins
- Created with a flame-shaped fine-grit diamond bur or stone
- Angle: 30-40 degrees to the occlusal surface
- Width: 0.5-1 mm
- Must be hollow-ground to avoid placing the margin in centric occlusal contact
- Produces 30-degree marginal gold (amenable to burnishing)
Gingival Bevel
- Placed on the gingival floor of the proximal box
- Angle: approximately 30 degrees to the gingival floor
- Width: 0.5-0.75 mm - definitive and smooth but not too wide
- Created with a thin tapered carbide bur or diamond at slow speed, or gingival margin trimmer
- Purpose: removes unsupported enamel rods at the gingival margin, creates thin metal margin that can be burnished, reduces marginal cement gap
14. Facial and Lingual Flares
Primary Flare (Essential)
- Removes unsupported enamel rods at the facial and lingual walls
- Created using the side of the No. 271 bur or a hatchet
- Provides divergence of walls toward the tooth surface for easy finishing access
Secondary Flare (Additional, When Needed)
- An additional divergence placed on the facial and lingual walls after the primary flare
- Used when:
- Caries extends onto the facial or lingual surface
- Additional retention form needed
- Surface defects or stains present on the facial or lingual surface
- Created with a finishing bur or abrasive disc
- Eliminate unsupported enamel rods (which would fracture and leave a marginal gap)
- Place margin in a self-cleansable, accessible area
- Create acute-angled marginal gold for burnishability
- Provide a secondary retention component
15. Modifications in Class II Inlay Tooth Preparation
A. Auxiliary Groove Extensions (Dovetail)
- Occlusal dovetail extended into the opposite fossa (e.g., mesio-occlusal preparation extended to the distal fossa)
- Creates a mechanical lock against displacement
B. Proximal Groove Retention
- A groove placed in the axio-buccal or axio-lingual line angle of the proximal box using No. 169L bur
- Increases frictional retention
- Groove dimensions: 0.5 mm wide, 0.5 mm deep, parallel to path of withdrawal
C. Slots and Pins
- Used when preparation height is insufficient
- Pin channels drilled into dentin perpendicular to the bur path
D. Skirts and Collars
- Skirt: Extension of the proximal box onto the facial or lingual surface of the tooth
- Collar: A peripheral extension that partially wraps around the tooth
- Used when a cusp needs support but full cusp capping (onlay) is not desired
E. Reverse Bevel (Counter Bevel)
- Placed on the external surface (cusp tip or inclined plane) to cap a weakened cusp
- Creates acute-angled gold on the external surface for finishing
F. Surface Extension Preparation (With Surface Extension)
- When caries or defects extend onto the facial or lingual surface beyond the standard flare
- The preparation is extended to include these surface defects, keeping margins accessible and finishable
16. Modifications of Proximal Cavity Design
| Modification | Indication | Design |
|---|---|---|
| Narrow proximal box | Minimal proximal caries | Mesio-distal width 1.5 mm at gingival floor |
| Wide proximal box | Extensive caries, poor access | Mesio-distal width up to 2.5 mm |
| Box only preparation | Proximal caries without occlusal involvement | No occlusal step; box extends to occlusal embrasure only (rarely used for gold) |
| Abutment preparation | FPD or RPD abutment | Facial, lingual, and gingival margins on proximal surfaces for guiding planes; occlusal outline wide faciolingually to accommodate rest preparation |
| Subgingival extension | Caries below gingival crest | Gingival margin placed 0.5-1 mm below crest; requires gingival retraction and precise impression |
- Increased surface area on facial, lingual, and gingival margins to develop guiding planes
- Occlusal outline widened to accommodate rest seat preparation
- Routine capping of the distolingual cusp to provide resistance form
17. Comparison Tables
Gold Inlay vs. Amalgam Preparation
| Feature | Class II Gold Inlay | Silver Amalgam |
|---|---|---|
| Outline form | Wide; walls diverge occlusally | Narrow; walls converge occlusally |
| Cavity width | 1/3 of intercuspal distance | 1/4 of intercuspal distance |
| Cavosurface angle | 130-140 degrees; lap joint | 90 degrees; butt joint |
| Undercuts | No undercuts allowed | Retentive undercuts placed |
| Internal line angles | Rounded (prevent die voids and casting stress) | Rounded (prevent amalgam fracture) |
| Margins | All margins beveled | No cavosurface bevels |
| Proximal walls | Primary and secondary flares present | Reverse curve at proximal outline |
Gold Inlay vs. Ceramic (Porcelain) Inlay Preparation
| Feature | Gold Inlay | Ceramic Inlay |
|---|---|---|
| Cavosurface angle | 130-140 degrees (obtuse) | 90 degrees (butt joint) |
| Bevel | Bevels on all margins | No bevels (90 degree shoulder) |
| Occlusal depth | 1.5-2 mm | 1.5-2 mm |
| Axial reduction | ~1 mm | 1-1.5 mm |
| Internal line angles | Rounded | Rounded (sharp angles cause ceramic fracture) |
| Burnishability | Margins burnishable | Not burnishable |
| Cusp capping clearance | 1.5-2 mm | 1.5-2 mm, 90 degree cavosurface |
| Finish | Accessible for polishing | Accessible for polishing |
Gold Inlay vs. Direct Gold Preparation
| Feature | Gold Inlay | Direct Gold |
|---|---|---|
| Indication | Large carious lesions | Small, Class I, III, V lesions only |
| Burs used | Plane-cut tapered fissure bur No. 271 | Pear-shaped No. 330 or 329 |
| Retention | Taper, grooves, bevels | Undercuts, sharp line angles |
| Internal line angles | Rounded | Sharp (to resist movement) |
| Undercuts | None | Present (retentive undercuts) |
| Preparation conservatism | Moderate | Maximum |
18. Complications and Precautions
During Preparation:
- Damage to adjacent tooth: Use metal matrix band before proximal box preparation; use No. 271 bur carefully
- Pulp exposure: Maintain 1.5-2 mm pulpal floor depth; use indirect pulp capping if needed
- Fracture of marginal ridge of adjacent tooth: Protect with matrix band; be gentle during proximal access
- Overextension of gingival margin: Will require impression with retraction cord; risks biologic width violation
During Cementation:
- Incomplete seating: Check for voids in working die, air entrapment, inadequate taper
- Post-cementation sensitivity: Use zinc oxide eugenol (ZOE) temporary or ZOE-containing luting cement as desensitizer
- Marginal breakdown: Prevented by adequate bevel width, proper burnishing of margins
Failure of Inlay:
- Secondary caries at margins - due to microleakage of luting cement
- Fracture of marginal ridge - due to under-reduced preparation or heavy occlusal loading
- Fracture of restoration - thin gold (inadequate bulk in isthmus area)
19. Summary
- Taper of all walls (2-5 degrees per wall) for path of withdrawal
- No undercuts - all walls must be free of retentive undercuts
- Beveled margins - all margins beveled to create the lap joint with acute-angled marginal gold
- Flared proximal walls - primary and secondary flares to eliminate unsupported enamel rods
- Rounded internal line angles - to prevent die voids and casting stress
- Flat floors - pulpal and gingival floors flat, perpendicular to long axis
- Adequate bulk - isthmus and axial reduction adequate for structural durability of gold
- Accessible margins - all margins finishable and burnishable after cementation
- Minimal invasive preparation (caries-specific extension)
- Conservative bevel design
- Adhesive luting cements for reduced mechanical retention dependence
- Digital impressions and CAD/CAM fabrication
- Microscope-assisted precision preparation
20. References
-
Sturdevant CM, Sturdevant JR. Art and Science of Operative Dentistry. 7th edition. Elsevier; 2019.
- Primary reference for Class II inlay cavity design, bevel and flare classification, and preparation steps.
-
Marzouk MA, Simonton AL, Gross RD. Operative Dentistry: Modern Theory and Practice. Ishiyaku EuroAmerica; 1985.
- Classification of gold alloys; principles of cavity design for cast restorations.
-
Rosenstiel SF, Land MF, Fujimoto J. Contemporary Fixed Prosthodontics. 5th edition. Elsevier Mosby; 2015.
- Definition of inlay; prosthodontic abutment considerations; modern cementing concepts.
-
Summitt JB, Robbins JW, Schwartz RS. Fundamentals of Operative Dentistry: A Contemporary Approach. 3rd edition. Quintessence; 2006.
- Modern concepts in cavity design; biological width considerations; adhesive cementation.
-
G.V. Black. Operative Dentistry. Medico-Dental Publishing; 1908 (Original edition).
- Historical foundations of outline, retention, resistance, convenience form and finishing principles.
-
Taggart WH. A new and accurate method of making gold inlays. Dental Cosmos. 1907;49:1117-1121.
- Original description of the lost-wax casting technique for gold inlays.
-
Lypka M, Hammoudeh J. Dentoalveolar infections. Oral and Maxillofacial Surgery Clinics of North America. 2011;23(3):415-424.
-
SVDCP Pondicherry Department of Conservative Dentistry. Gold Inlay Cavity Preparation - Lecture Notes. Available at: svdcpondy.ac.in. 2022.
-
KIIT Deemed University. Tooth Preparation for Cast Metal Inlays - Final Year BDS Notes. Available at: kids.kiit.ac.in.
-
Noy principle - cited in Sturdevant's for margin requirements in intracoronal cast restorations.