What is the difference between ipo. And ipom plus

Reading File
Searching the Web

IPOM vs IPOM Plus laparoscopic hernia repair difference

Searching PubMed

IPOM Plus laparoscopic ventral hernia defect closure

Reading Article

PMID: 38319440

Reading Article

PMID: 41995907

Finding Sources
Reading File
I now have comprehensive information. Here is a detailed comparison:

IPOM vs. IPOM Plus - Key Differences

Definitions

FeatureIPOM (Standard)IPOM Plus
Full nameIntraperitoneal Onlay MeshIntraperitoneal Onlay Mesh Plus fascial closure
Defect closureNo - defect is left open ("bridging" repair)Yes - primary fascial/defect closure is performed first
Mesh positionIntraperitoneal, over the open defectIntraperitoneal, over the closed defect
Mesh typeBarrier-coated (composite) mesh required to prevent visceral adhesionSame - barrier-coated composite mesh required
Mesh overlap3-5 cm from defect edges3-5 cm from closed defect edges

The Core Difference

In standard IPOM, the fascial defect is left open and the mesh acts as a "bridge" spanning it - the mesh alone closes the gap. This is simpler and faster.
In IPOM Plus, the fascial defect is sutured/closed laparoscopically first (usually with interrupted or continuous non-absorbable sutures), then the mesh is placed on top as reinforcement. The mesh no longer bridges the gap - it reinforces a primarily repaired wall.

Clinical Outcomes (from evidence)

A 2024 systematic review and meta-analysis (Huang et al., PMID 38319440) of 14 studies (1,585 patients) showed IPOM Plus significantly outperformed standard IPOM in:
  • Recurrence reduced by ~50% (OR 0.51, 95% CI 0.35-0.76)
  • Seroma formation reduced by ~52% (OR 0.48, 95% CI 0.32-0.71)
  • Mesh bulging dramatically reduced (OR 0.08, 95% CI 0.01-0.42)
A 2026 RCT (Kumar et al., PMID 41995907) confirmed IPOM Plus as "a balanced and reliable standard technique" for moderate midline ventral hernias (defect width 3-6 cm).

Why Does Defect Closure Matter?

  • Without closure (standard IPOM), the mesh must withstand the full force of intra-abdominal pressure across the open defect - leading to mesh bulging, pseudorecurrence, and higher true recurrence
  • With closure (IPOM Plus), the abdominal wall functional unit is restored; the mesh provides backup reinforcement rather than sole structural support
  • Seroma formation is reduced because the dead space of the open sac is obliterated by fascial closure
  • Abdominal wall dynamics and contour are better preserved

Trade-offs of IPOM Plus

  • Longer operative time - defect closure adds 15-30 minutes
  • More technically demanding - requires laparoscopic suturing skill
  • Slightly higher early pain - intracorporeal suturing and added manipulation increase nociceptive stimulation
  • Higher cost - more suture material, longer OR time

When Is Standard IPOM Still Used?

  • Very large defects where primary closure is impossible or would create excessive tension
  • Surgeon unfamiliarity with laparoscopic intracorporeal suturing
  • Emergency/contaminated settings where speed matters
  • Historically used for all ventral hernias, but increasingly replaced by IPOM Plus or preperitoneal techniques (eTEP, TAPP)

Modern Context

Both techniques use barrier-coated composite mesh intraperitoneally (Current Surgical Therapy, 14th ed.). The current trend is moving away from standard IPOM toward either IPOM Plus for smaller defects, or entirely extraperitoneal approaches (eTEP-RS, TAPP Plus) to avoid mesh-viscera contact complications altogether - including risk of adhesions, intestinal obstruction, fistula, and chronic pain from intraperitoneal mesh.
In summary: IPOM Plus = IPOM + primary defect closure. That one addition significantly reduces recurrence, seroma, and mesh bulge, making it the preferred approach when laparoscopic defect closure is feasible.

E tep repair for paraumbical hernia

Finding Sources
Searching PubMed

eTEP ventral hernia repair technique outcomes

Searching the Web

eTEP repair paraumbilical hernia technique steps Rives Stoppa

Reading File
Reading File
Reading Article

PMID: 40227366

Reading File
Searching Images

eTEP retromuscular ventral hernia repair laparoscopic technique diagram
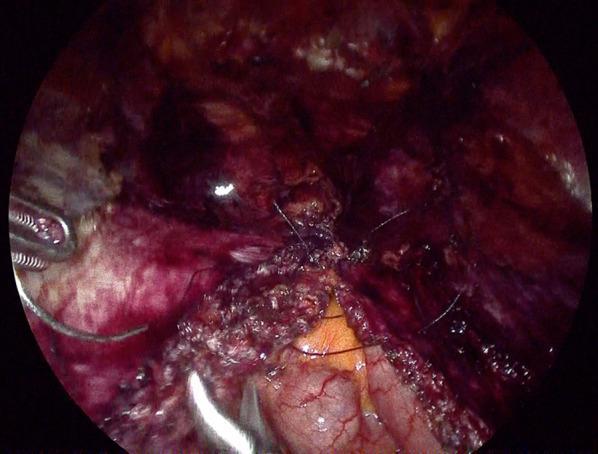
This laparoscopic clinical photograph illustrates an intraoperative view of a posterior layer closure during a ventral hernia repair (VHR). The surgical site shows the approximation of the posterior rectus sheath and peritoneum. The defect has been closed using 3-0 dark-colored multifilament suture material, visible as fine strands across the midline of the repair. The surrounding anatomical environment includes dissected retrorectus and preperitoneal spaces characterized by reddish, vascularized tissue and moist, glistening serosal surfaces. A surgical laparoscopic grasper is visible on the left side of the frame, assisting in tissue manipulation. This image demonstrates a critical step in the enhanced-view totally extraperitoneal (eTEP) technique, where the posterior layer is reconstituted to create a barrier between the abdominal contents and the subsequent mesh reinforcement. The suture technique aims for a tension-free, airtight closure to prevent internal herniation or contact between the mesh and the viscera.
This laparoscopic clinical photograph illustrates an intraoperative view of a posterior layer closure during a ventral hernia repair (VHR). The surgical site shows the approximation of the posterior rectus sheath and peritoneum. The defect has been closed using 3-0 dark-colored multifilament suture material, visible as fine strands across the midline of the repair. The surrounding anatomical environment includes dissected retrorectus and preperitoneal spaces characterized by reddish, vascularized tissue and moist, glistening serosal surfaces. A surgical laparoscopic grasper is visible on the left side of the frame, assisting in tissue manipulation. This image demonstrates a critical step in the enhanced-view totally extraperitoneal (eTEP) technique, where the posterior layer is reconstituted to create a barrier between the abdominal contents and the subsequent mesh reinforcement. The suture technique aims for a tension-free, airtight closure to prevent internal herniation or contact between the mesh and the viscera.

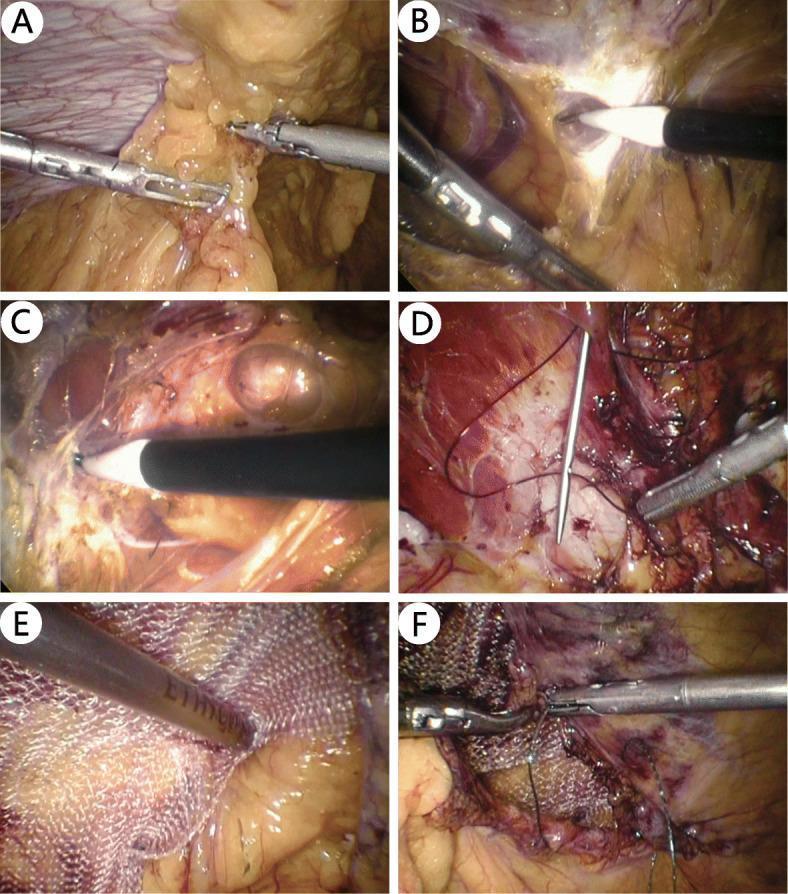
This composite of six laparoscopic images (A-F) illustrates the sequential steps of the Transabdominal Sublay (TAS) procedure for ventral hernia repair. Image A shows initial laparoscopic adhesiolysis using graspers to clear the surgical field. In Image B, the peritoneum and posterior rectus sheath are incised to access the retromuscular plane. Image C demonstrates further blunt dissection of the retromuscular space to create sufficient room for mesh placement. Image D visualizes the closure of the primary hernia defect using a continuous suture technique with a surgical needle. In Image E, a synthetic polypropylene mesh with a characteristic woven texture is introduced and positioned within the dissected sublay space, ensuring adequate overlap of the defect margins. Finally, Image F shows the securing of the mesh and the closure of the peritoneal flap to exclude the mesh from the intraperitoneal cavity. This clinical series serves as an educational guide for surgeons on the laparoscopic transperitoneal approach to extraperitoneal space reinforcement.
This composite of six laparoscopic images (A-F) illustrates the sequential steps of the Transabdominal Sublay (TAS) procedure for ventral hernia repair. Image A shows initial laparoscopic adhesiolysis using graspers to clear the surgical field. In Image B, the peritoneum and posterior rectus sheath are incised to access the retromuscular plane. Image C demonstrates further blunt dissection of the retromuscular space to create sufficient room for mesh placement. Image D visualizes the closure of the primary hernia defect using a continuous suture technique with a surgical needle. In Image E, a synthetic polypropylene mesh with a characteristic woven texture is introduced and positioned within the dissected sublay space, ensuring adequate overlap of the defect margins. Finally, Image F shows the securing of the mesh and the closure of the peritoneal flap to exclude the mesh from the intraperitoneal cavity. This clinical series serves as an educational guide for surgeons on the laparoscopic transperitoneal approach to extraperitoneal space reinforcement.

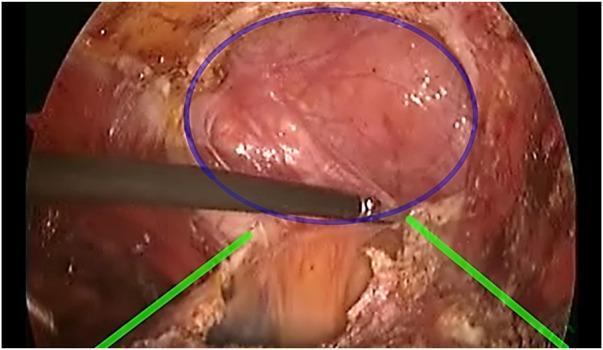
This endoscopic clinical photograph captures an intraoperative view during an Enhanced-View Totally Extraperitoneal (eTEP) ventral hernia repair. The image highlights a central hernia defect within the abdominal wall, demarcated by a blue circular annotation. Within this circle, the hernia sac appears as a translucent, reddish-pink tissue layer. A laparoscopic surgical instrument, a Maryland-style or blunt dissector, is seen performing active dissection at the inferior margin of the defect. Green lines illustrate the cut edges of the posterior rectus sheath, which appears as a more opaque, whitish-fibrous structure compared to the thin peritoneal sac. This visual demonstrates the surgical technique of preserving the hernia sac in continuity with the posterior rectus sheath to facilitate a tension-free closure of the posterior layer in cases with large defects or significant midline separation.

This endoscopic clinical photograph captures an intraoperative view during an Enhanced-View Totally Extraperitoneal (eTEP) ventral hernia repair. The image highlights a central hernia defect within the abdominal wall, demarcated by a blue circular annotation. Within this circle, the hernia sac appears as a translucent, reddish-pink tissue layer. A laparoscopic surgical instrument, a Maryland-style or blunt dissector, is seen performing active dissection at the inferior margin of the defect. Green lines illustrate the cut edges of the posterior rectus sheath, which appears as a more opaque, whitish-fibrous structure compared to the thin peritoneal sac. This visual demonstrates the surgical technique of preserving the hernia sac in continuity with the posterior rectus sheath to facilitate a tension-free closure of the posterior layer in cases with large defects or significant midline separation.

Here is a comprehensive overview of eTEP repair for paraumbilical hernia:

eTEP Repair for Paraumbilical Hernia

What is eTEP?

eTEP (Extended Totally Extraperitoneal) repair is a minimally invasive technique in which the retromuscular/retrorectus plane is accessed without entering the peritoneal cavity. Originally described by Daes in 2012 for inguinal hernias, Belyansky et al. extended it to ventral/paraumbilical hernias in 2017. It is the laparoscopic equivalent of the open Rives-Stoppa repair, and so is also called eTEP-RS (Rives-Stoppa).
The fundamental concept: mesh is placed in the retromuscular plane (between the posterior rectus sheath and the rectus abdominis muscle), which is widely regarded as the optimal anatomical position for durable, well-vascularized mesh integration.

Port Placement

For a paraumbilical hernia:
  • An optical trocar is placed in the upper quadrant (typically left side), directly into the retromuscular space - this is the key innovation of eTEP vs. standard TEP
  • Two 5 mm working ports are placed along the lateral rectus sheath border or midline under direct vision
  • Port placement can be modified based on hernia location and surgeon preference

Step-by-Step Technique

Step 1 - Enter the Retrorectus Space The optical trocar is placed into the upper quadrant retromuscular space (above the umbilicus, ipsilateral side). The retrorectus space is bluntly dissected using the camera or a balloon dissector. Space is insufflated to 12-15 mmHg.
Step 2 - Unilateral Retrorectus Dissection The retrorectus space is developed on one side, lateral to the linea alba. The lateral neurovascular bundles and the linea semilunaris must be identified and preserved.
Step 3 - Crossover This is the defining maneuver of eTEP. The posterior rectus sheath is incised close to the midline (linea alba) to enter the preperitoneal plane, allowing access across the midline to the contralateral retrorectus space. The dissection crosses under the linea alba.
Step 4 - Contralateral Retrorectus Dissection The contralateral posterior sheath is incised to enter and develop the contralateral retrorectus plane. Bilateral retromuscular dissection is carried out laterally to the semilunar line, and at least 5 cm above and below the hernia defect.
Step 5 - Hernia Sac Handling The peritoneum/hernia sac is carefully dissected. For umbilical/paraumbilical hernias, the peritoneum is opened to enter the peritoneal cavity, the contents inspected, and the sac dissected down. The sac can be preserved as part of the posterior layer or divided.
Step 6 - Defect Closure The hernia defect (fascial gap) is closed primarily with intracorporeal sutures - restoring midline anatomy. The posterior rectus sheath/peritoneum is also closed meticulously to form a complete posterior layer that separates the mesh from viscera.
Step 7 - Mesh Placement A large uncoated polypropylene mesh (no barrier coating needed, unlike IPOM) is placed in the retromuscular space with at least 5 cm overlap on all sides. Because the mesh is sandwiched between muscle layers, fixation is usually not required or minimal - the mesh is held in place by the abdominal wall itself.
Step 8 - Closure Anterior fascia is closed. No peritoneal closure needed separately as it was already incorporated in the posterior layer.
eTEP posterior layer closure intraoperative view
Intraoperative eTEP view: posterior rectus sheath closure creating the barrier layer before mesh placement
eTEP hernia defect view
eTEP view of the paraumbilical hernia defect with the posterior sheath edges (green lines) clearly visible

Key Advantages Over IPOM/IPOM Plus

ParameterIPOM PluseTEP
Mesh positionIntraperitonealRetromuscular (extraperitoneal)
Mesh typeBarrier-coated (expensive)Plain polypropylene (cheaper)
Mesh fixationTacks/sutures neededUsually none needed
Visceral contactYesNo
Postoperative painHigherSignificantly lower
Hospital stayLongerShorter
Operative timeShorterLonger (~54 min more)
Adhesion/fistula riskPresentEliminated
Biomechanical positionSuboptimalOptimal (Rives-Stoppa principle)
A 2025 systematic review and meta-analysis by Chuah et al. (PMID 40227366, 12 studies, 868 patients) showed:
  • eTEP had significantly less pain at day 7 (VAS mean difference -3.01, p=0.0007)
  • eTEP had shorter hospital stay (0.65 days less, p=0.001)
  • But IPOM was 53 minutes faster operatively (p<0.0001)
  • No difference in recurrence or complications between the two

When to Use eTEP for Paraumbilical Hernia

Good candidates:
  • Primary paraumbilical hernias (defect 2-6 cm typically)
  • Patients with diastasis recti alongside the hernia - eTEP allows simultaneous repair
  • Patients where chronic pain risk must be minimized
  • When plain mesh is preferred for cost reasons
Relative contraindications/cautions:
  • Prior history of colostomy/ileostomy (disrupts retromuscular space)
  • Surgeons without advanced laparoscopic/retromuscular dissection skills (steep learning curve)
  • Very large defects requiring bilateral TAR (eTEP-TAR is a more complex extension)
  • Prior retromuscular mesh placement

Extension: eTEP-TAR

When the defect is too wide for primary closure without tension, Transversus Abdominis Release (TAR) can be added to eTEP. Since eTEP already develops the same fascial plane, TAR integrates naturally. This is called eTEP-TAR and is used for larger incisional or complex hernias, not typically needed for simple paraumbilical hernias.
In summary, eTEP gives paraumbilical hernia repair the same biomechanical principles as the gold-standard open Rives-Stoppa, through a minimally invasive platform - with less pain and faster recovery, at the cost of a longer and more technically demanding operation. - Mulholland & Greenfield's Surgery, 7e; Current Surgical Therapy, 14e
This is a shared conversation. Sign in to Orris to start your own chat.