

d7ed2e23-681c-48fc-9fb3-1c1b5c95ae9b.jpeg
Explain fracture line
analyse_media
Reading File
Le Fort I Fracture Line - Explained
The image is from Mastering the BDS IVth Year - II and describes the fracture line of Le Fort I fracture. Here is a clear, step-by-step breakdown:
What Is the Fracture Line?
The Le Fort I fracture line is a horizontal line running just above the apices (roots) of the upper teeth. It separates the tooth-bearing portion of the maxilla (the alveolar process + hard palate) from the rest of the facial skeleton - this detached segment is sometimes called the "floating palate."
Pathway of the Fracture Line (Step by Step)
Starting anteriorly and tracing laterally and posteriorly:
-
Starts above the tooth apices - just above the root tips of the upper teeth, running horizontally.
-
Passes the lateral margin of the anterior nasal aperture - the fracture line continues at or near the edge of the piriform (pear-shaped) nasal opening.
-
Runs above the nasal floor - it stays superior to the floor of the nasal cavity.
-
Passes above the canine fossa - the shallow depression on the front of the maxilla, lateral to the canine tooth.
-
Traverses the lateral antral wall - crosses the outer wall of the maxillary sinus (antrum).
-
Goes below the zygomatic buttress - dips downward, passing below the thick bony pillar where the zygoma meets the maxilla.
-
Moves upward and posteriorly across the pterygomaxillary fissure - sweeps upward to reach the gap between the maxilla and the pterygoid plates.
-
Fractures the pterygoid laminae - breaks the pterygoid plates of the sphenoid at the junction of their lower third and upper two-thirds. This is a constant and defining feature of all Le Fort fractures.
-
Medial component (nasal wall) - from the same anterior starting point, the fracture also passes along the lateral wall of the nose, then curves behind the tuberosity of the maxilla to meet the lateral fracture line posteriorly.
Key Features
| Feature | Detail |
|---|---|
| Orientation | Horizontal |
| Segment separated | Tooth-bearing portion (alveolar process + palate) |
| Always involves | Pterygoid laminae fracture |
| Laterality | Typically bilateral; rarely unilateral |
| Nasal septum | Lower one-third is fractured |
| Displacement | Depends on force direction - can be posterior, lateral, or rotational |
Diagram (Fig. 37)
In the skull diagram, Le Fort I (labeled "I") is the lowest line, running just above the teeth. The handwritten note on the image - "Tooth bearing portion" - correctly identifies the segment that gets detached from the rest of the face. The lines labeled II and III represent higher-level Le Fort fractures involving the orbital rims and cheekbones.
In summary: The Le Fort I fracture line cuts horizontally across the lower maxilla, disconnecting the entire tooth-bearing upper jaw from the rest of the skull, with the pterygoid plate fracture being the single most constant feature.
Explain each line . Linewise
Finding Sources
Finding Sources
Reading File
Reading File
Loading Image
Loading Image
Loading Image
Here is a detailed, line-by-line explanation of all three Le Fort fracture lines - with textbook diagrams from Bailey & Love's Surgery (28th Ed).
Le Fort Fractures - Line by Line
Le Fort I - "Horizontal" or "Guerin's Fracture" (Lowest Line)
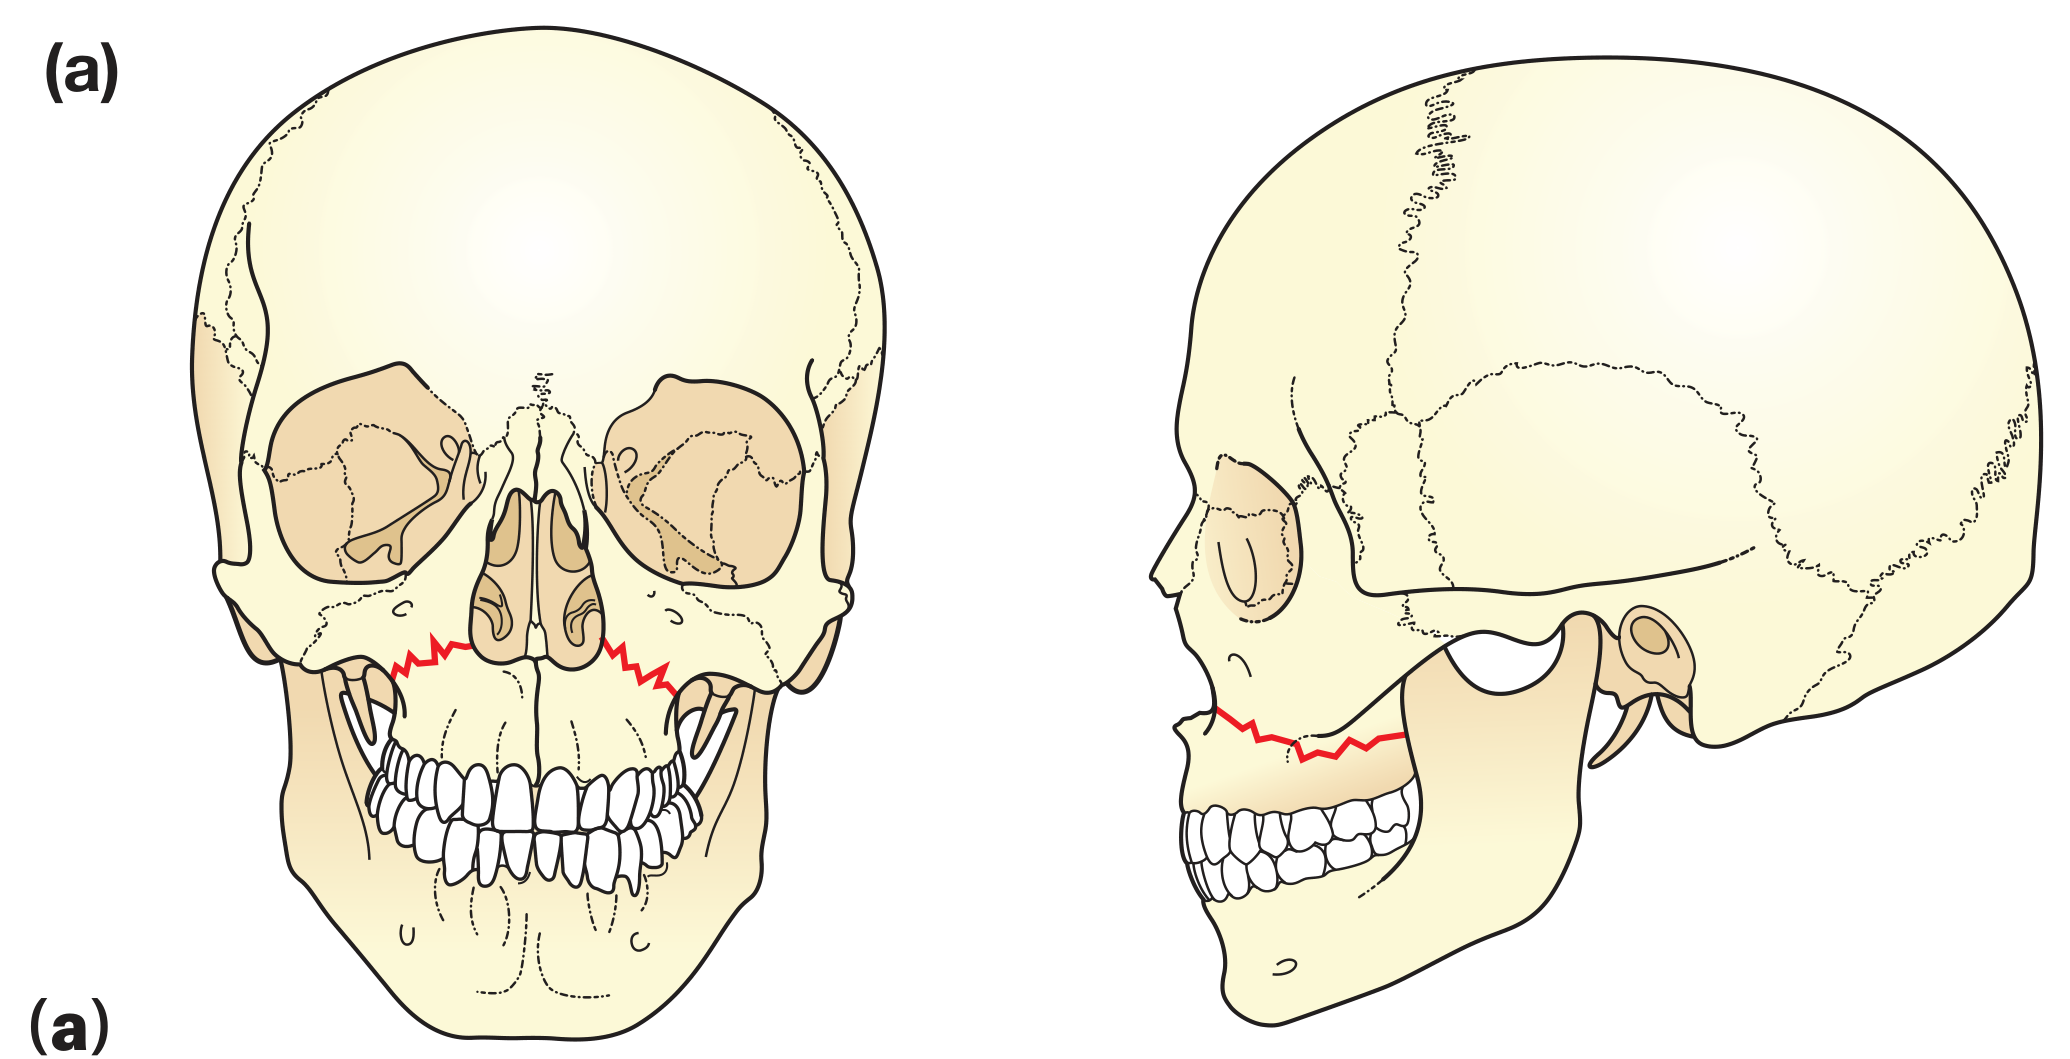
What it separates: The tooth-bearing portion of the maxilla (alveolar process + hard palate) from the rest of the facial skeleton. This floating fragment is called the "floating palate."
Fracture line pathway - sentence by sentence:
| Step | Location | What happens |
|---|---|---|
| 1 | Above apex of teeth | A horizontal line begins just above the root tips of the upper teeth |
| 2 | Lateral margin of anterior nasal aperture (piriform rim) | Line passes at or near the edge of the pear-shaped nasal opening |
| 3 | Nasal floor | Passes above the floor of the nasal cavity |
| 4 | Canine fossa | Passes above the shallow depression on the front of the maxilla |
| 5 | Lateral antral wall | Traverses the outer wall of the maxillary sinus |
| 6 | Zygomatic buttress | Dips down below this bony pillar (the thick strut where zygoma meets maxilla) |
| 7 | Pterygomaxillary fissure | Moves upward and posteriorly to enter this gap between maxilla and pterygoid plates |
| 8 | Pterygoid laminae | Fractures them at the lower third/upper two-thirds junction - constant feature |
| 9 | Nasal wall (medial limb) | From the same starting point, fracture also runs along the lateral nasal wall, behind the tuberosity of maxilla, to meet the lateral line |
Key facts: Always bilateral. Lower 1/3 of nasal septum is fractured. Force applied above the teeth level.
Le Fort II - "Pyramidal Fracture" (Middle Line)
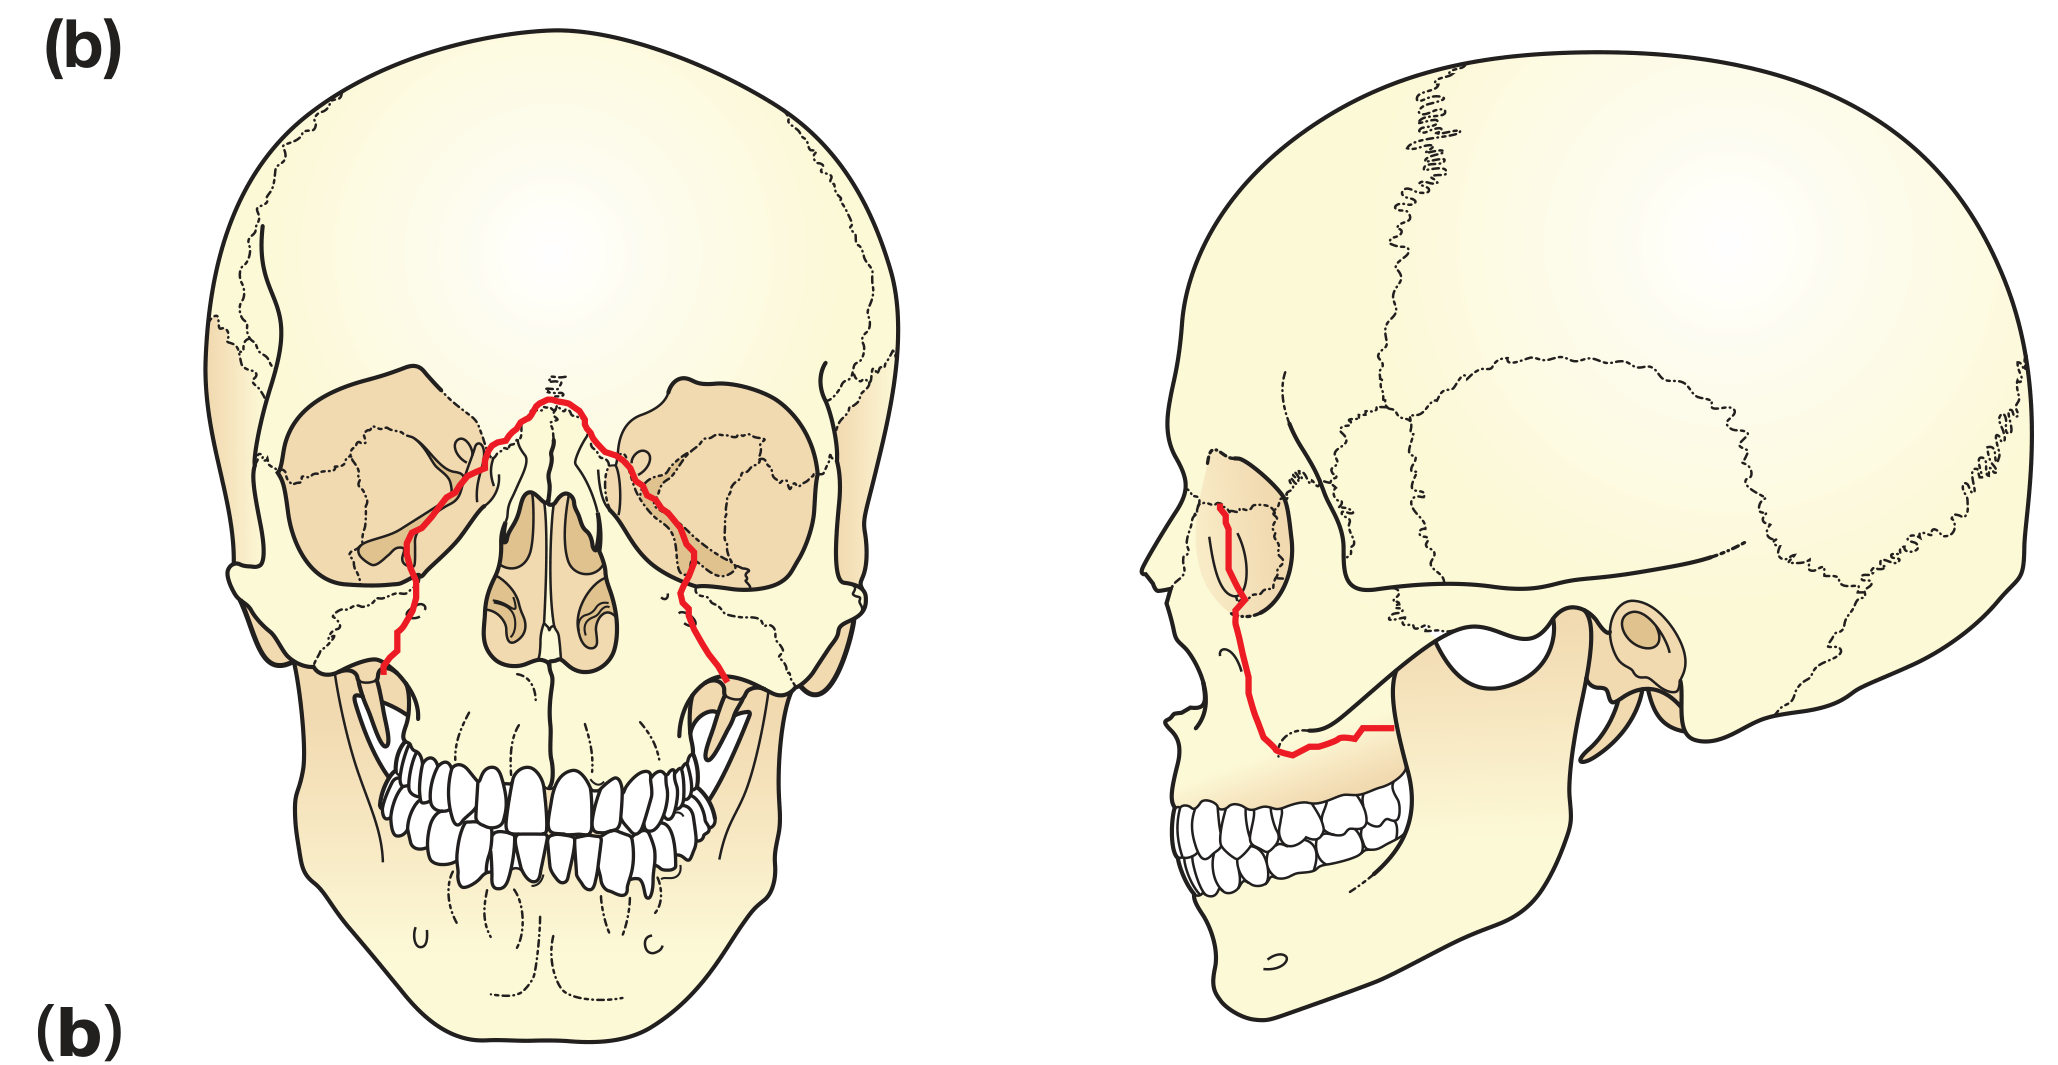
What it separates: The entire central midface block (maxilla + nasal bones + ethmoids) as a pyramid shape from the rest of the skull. The zygoma stays attached to the skull.
Fracture line pathway - sentence by sentence:
| Step | Location | What happens |
|---|---|---|
| 1 | Zygomaticomaxillary buttress | Starts at the junction of the zygomatic and maxillary bones, laterally |
| 2 | Maxillary sinus / anterior wall | Crosses upward across the front wall of the maxillary sinus |
| 3 | Infraorbital rim | Crosses the inferior orbital margin (lower rim of the eye socket) |
| 4 | Infraorbital foramen | Passes near or through this foramen - infraorbital nerve often damaged, causing cheek numbness |
| 5 | Medial orbital wall / lacrimal bone | Runs inward across the lacrimal bone (medial wall of orbit) |
| 6 | Nasofrontal suture / nasal bridge | Crosses the nasal bridge at the top, completing the pyramid apex |
| 7 | Pterygoid laminae (posteriorly) | Fractures the pterygoid plates - constant in ALL Le Fort fractures |
| 8 | Nasal septum | Middle third of nasal septum is involved |
Key facts: Pyramid-shaped block. The zygomatic arch is NOT fractured. Bilateral.
Le Fort III - "Craniofacial Dysjunction" (Highest Line)
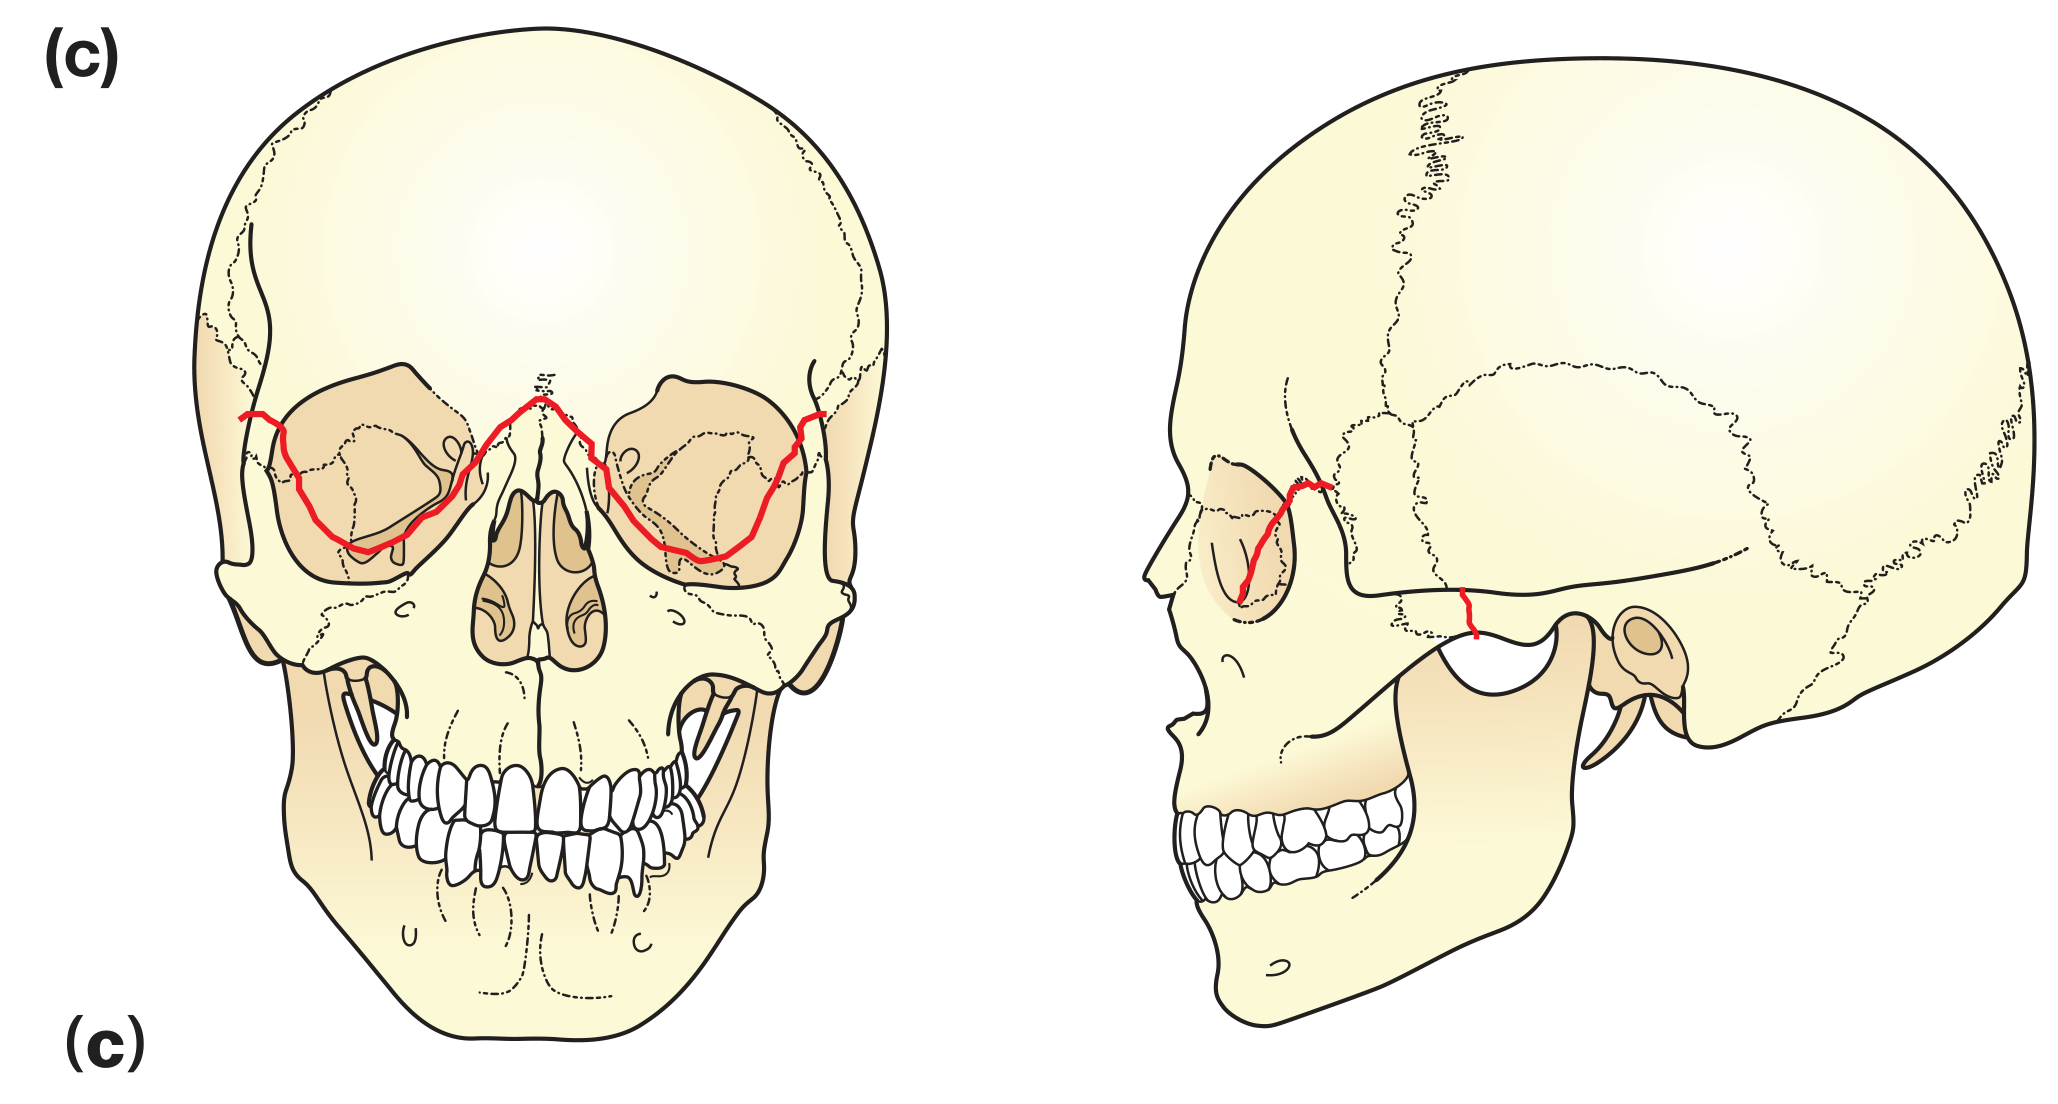
What it separates: The entire midface from the skull base. The whole face "floats" away from the cranium - sometimes called "dish face" deformity.
Fracture line pathway - sentence by sentence:
| Step | Location | What happens |
|---|---|---|
| 1 | Zygomaticofrontal (ZF) suture | Starts at the junction between zygomatic bone and frontal bone (outer corner of orbit) |
| 2 | Lateral orbital wall | Runs inward along the lateral wall of the orbit (greater wing of sphenoid) |
| 3 | Superior orbital fissure | Passes near the superior orbital fissure |
| 4 | Medial orbital wall | Continues across the medial wall of the orbit |
| 5 | Nasofrontal suture / nasal bridge | Crosses the bridge of the nose at the nasofrontal junction |
| 6 | Opposite side (mirror image) | Identical path on the other side - always bilateral |
| 7 | Zygomatic arch | The zygomatic arch is also broken - distinguishes Le Fort III from Le Fort II |
| 8 | Pterygoid laminae (posteriorly) | Fractures all the way back through the pterygomaxillary fissure and pterygoid plates |
Key facts: Most severe of the three. Dish-face deformity, mobile midface, possible CSF rhinorrhoea (cribriform plate involvement), and bilateral zygomatic arch fractures.
Quick Comparison Summary
| Feature | Le Fort I | Le Fort II | Le Fort III |
|---|---|---|---|
| Level | Lowest - just above teeth | Middle - pyramidal | Highest - orbital level |
| Shape | Horizontal | Pyramidal | Horizontal but high |
| Segment detached | Tooth-bearing maxilla (palate) | Central midface pyramid | Entire midface |
| Zygomatic arch | Intact | Intact | Fractured |
| Infraorbital rim | Not involved | Involved | Involved |
| Pterygoid plates | Always fractured | Always fractured | Always fractured |
| Nasal septum | Lower 1/3 | Middle 1/3 | Upper portion |
| Clinical sign | "Floating palate" | "Floating pyramid" | "Dish face" / craniofacial dysjunction |
Common to all three: Pterygoid plate fracture is the single constant landmark in every Le Fort fracture.
- Bailey and Love's Short Practice of Surgery, 28th Ed., p. 433
- Scott-Brown's Otorhinolaryngology Head & Neck Surgery, p. 1243
Traverse meaning
Traverse means to cross or pass through/across something.
In the context of fracture lines:
"Traverses the lateral antral wall"
= The fracture line crosses over / passes through the lateral wall of the maxillary sinus.
Simple examples:
- A road traverses a mountain = the road crosses over the mountain
- The fracture traverses the orbital rim = the fracture line runs across/through the orbital rim
In one word: traverse = cross

467abe61-70b2-4e4d-9465-948d0f538720.jpeg
Explain
analyse_media
The image covers Le Fort II Fracture Line and its Clinical Features. Here is a complete explanation:
Le Fort II Fracture - Full Explanation
Fracture Line (Step by Step)
Refer to the pyramid diagram from the previous response - the fracture line forms a pyramid shape, with the apex at the nasal bridge and the base at the maxillary alveolus.
Step 1 - Frontonasal Suture (Starting Point)
"The fracture line runs below the frontonasal suture from the thin middle area of the nasal bones down on either side."
- Starts just below where the nasal bones meet the frontal bone (the bridge of the nose, near the nasion).
- Runs downward on both sides (bilateral from the start).
- The nasal bones here are thin, so they fracture easily.
Step 2 - Frontal Process of Maxilla + Lacrimal Bones
"Crossing the frontal process of the maxilla and passes anteriorly across the lacrimal bones, immediately anterior to nasolacrimal canal."
- The line crosses the frontal process of the maxilla (the upward extension of the maxilla that forms part of the inner orbital rim).
- Then passes across the lacrimal bones (paper-thin bones forming the inner medial wall of the orbit).
- It goes just in front of (anterior to) the nasolacrimal canal - the duct that drains tears into the nose.
Step 3 - Inferior Orbital Margin
"From this point the fracture line passes downward, forward and laterally crossing the inferior orbital margin, in the region of zygomaticomaxillary suture."
- The fracture turns downward, forward and laterally.
- Crosses the inferior orbital rim (lower edge of the eye socket) - this is a key feature that distinguishes Le Fort II from Le Fort I (which never reaches the orbit).
- Crosses in the area of the zygomaticomaxillary suture (where the cheekbone meets the maxilla).
Step 4 - Infraorbital Foramen
"It may or may not involve the infraorbital foramen."
- The infraorbital foramen is a small opening just below the eye socket where the infraorbital nerve exits.
- If the fracture passes through it, the patient gets numbness of the cheek, upper lip, and upper teeth on that side.
- This involvement is variable - not always present.
Step 5 - Lateral Wall of the Antrum (Maxillary Sinus)
"The fracture line now extends downward and forward and laterally to traverse the lateral wall of the antrum, just medial to the zygomaticomaxillary suture line."
- Fracture descends and crosses the lateral wall of the maxillary sinus (antrum).
- It travels just medial to (inside of) the zygomaticomaxillary suture.
- At this point, the path is similar to Le Fort I below.
Step 6 - Zygomatic Buttress
"As in Le Fort I fracture, this fracture line passes beneath the zygomatic buttress."
- Just like Le Fort I, it dips below the zygomatic buttress (the thick bony pillar at the corner of the maxilla and zygoma).
- This means the zygomatic bone itself is NOT involved - it remains attached to the skull. This is what separates Le Fort II from Le Fort III.
Step 7 - Pterygomaxillary Fissure + Pterygoid Laminae
"But after that, it inclines rather more abruptly than in the former instance, traversing the pterygomaxillary fissure at a higher level and fracturing the pterygoid laminae approximately midway from its base."
- After the zygomatic buttress, the fracture angles upward more steeply than in Le Fort I.
- Traverses the pterygomaxillary fissure at a higher level than Le Fort I.
- Fractures the pterygoid plates at approximately their midpoint (compared to lower third junction in Le Fort I).
- This is the constant posterior landmark - all Le Fort fractures involve the pterygoid plates.
Step 8 - Nasal Septum (Completes the Pyramid)
"Separation of the entire pyramidal block from the base of the skull is completed via the nasal septum."
- The two lateral fracture lines are connected medially by fracture of the nasal septum (middle portion).
- This completes the pyramidal block - the entire central midface is now detached.
Clinical Features of Le Fort II
| Feature | Explanation |
|---|---|
| Moon face / Ballooning | Gross edema of the entire middle third of the face - sets in very quickly after injury |
| Black eye (bilateral) | Circumorbital edema and ecchymosis (bruising) around both eyes - eyelids swell so much, eye examination becomes difficult |
| Subconjunctival hemorrhage | Bleeding under the conjunctiva (white of the eye), but confined to the medial half only - this is a distinguishing sign |
| Flat/depressed nose | Bridge of nose is pushed in - nasal disfigurement |
| Anterior open bite (if impacted) | If the pyramidal fragment is driven backward and upward into the skull base, the face shortens and the front teeth cannot meet |
| Elongated face (if displaced downward) | If the fragment displaces downward and backward, the face becomes longer - "dish face" appearance |
Key Memory Point
Le Fort II = Pyramid
- Apex = nasal bridge (frontonasal suture)
- Sides = pass through lacrimal bones → inferior orbital rim → lateral antral wall
- Base = same as Le Fort I (below zygomatic buttress)
- Always ends posteriorly at the pterygoid plates
The hallmark sign that tells you it is Le Fort II and not Le Fort I = the fracture crosses the inferior orbital rim.
How often a topic should be revised to remember it throughouly
The science behind this is called spaced repetition - reviewing at increasing intervals right before you're about to forget.
The Optimal Revision Schedule
After learning something new:
| Revision | When to do it | Why |
|---|---|---|
| 1st | Same day (within 24 hrs) | Stops rapid initial forgetting |
| 2nd | Day 3 | Reinforces the memory trace |
| 3rd | Day 7 (1 week) | Moves it to medium-term memory |
| 4th | Day 21 (3 weeks) | Strengthens long-term storage |
| 5th | Day 45-60 (1-2 months) | Near-permanent retention |
After 5 revisions at these intervals, most topics stay in long-term memory indefinitely with just occasional review.
The Forgetting Curve (Ebbinghaus)
Without revision:
- After 1 hour - you forget ~50%
- After 1 day - you forget ~70%
- After 1 week - you forget ~90%
Each time you revise, the forgetting curve flattens - you retain more for longer.
Practical Tips for Medical Students
-
Active recall over passive re-reading - close the book and write/say what you remember. This is 3x more effective than re-reading.
-
Use flashcards (Anki) - it automates the spaced repetition schedule for you based on how well you recalled each card.
-
Teach it out loud - explaining a topic (like Le Fort fractures) in your own words is the strongest form of revision.
-
Don't revise what you already know well - spend time on weak areas, not comfortable ones.
-
Interleave topics - mix different subjects in one session instead of doing one topic for hours. It feels harder but retention is better.
For Exams Specifically
- 6+ months out: Learn and do 1st-3rd revisions
- 1 month out: 4th revision of all topics
- 1 week out: Quick 5th pass - focus on weak spots only
- Night before: Only revise things you are shaky on - do NOT cram new material
Bottom line: 5 well-spaced revisions beats 20 cramming sessions every time. The effort per revision also drops sharply - your 5th revision of a topic takes about 10% of the time the 1st one did.
This is a shared conversation. Sign in to Orris to start your own chat.