Details about "Intestinal staplers" - principle, diagram or images, description of all parts, technique of application, indications, complications and other necessary details
Reading File
Finding Sources
Finding Sources
Searching the Web
intestinal surgical staplers principle parts technique application indications complications
Reading File
Finding Sources
Finding Sources
Reading Web Page
intestinal stapler parts principle technique indications complications
Reading File
Reading File
Reading File
Loading Image
Finding Sources
Reading File
Loading Image
Finding Sources
Reading File
Reading File
Loading Image
Loading Image
Loading Image
Finding Sources
Reading File
Finding Sources
Loading Image
Loading Image
I now have a comprehensive set of textbook content and images. Let me compile the full detailed answer.
Intestinal Staplers - Complete Surgical Reference
Historical Background
The surgical stapler for bowel surgery was created in 1908 by Hungarian surgeon Humer Hultl and instrument designer Victor Fischer. Soviet surgeons refined the technology in the 1950s, developing the first circular anastomotic stapler and first reusable devices. US surgeon Mark Ravitch brought this technology from Russia and, with colleague Felicien Steichen, developed the modern instruments in use today. Commercial production in the US followed in the 1960s-70s with interchangeable and disposable cartridges.
Basic Principle
All intestinal staplers operate on the same fundamental mechanism:
- A two-piece system (two jaws or a detachable anvil) clamps the tissue between them
- One jaw carries a reloadable staple cartridge; the opposing jaw (anvil) shapes the staple
- On firing, an I-beam or sliding driver mechanism pushes rows of staples through the tissue
- The staple legs pass through the tissue and bend against the anvil, deforming into a "B" shape - this is the key to hemostatic closure while still allowing tissue perfusion
The "B" shape is critical: it is neither too tight (which would cause ischemia/necrosis) nor too loose (which would cause bleeding or leak). Staple formation pressure is measured in microns.
"B" Shape of a Properly Formed Surgical Staple:
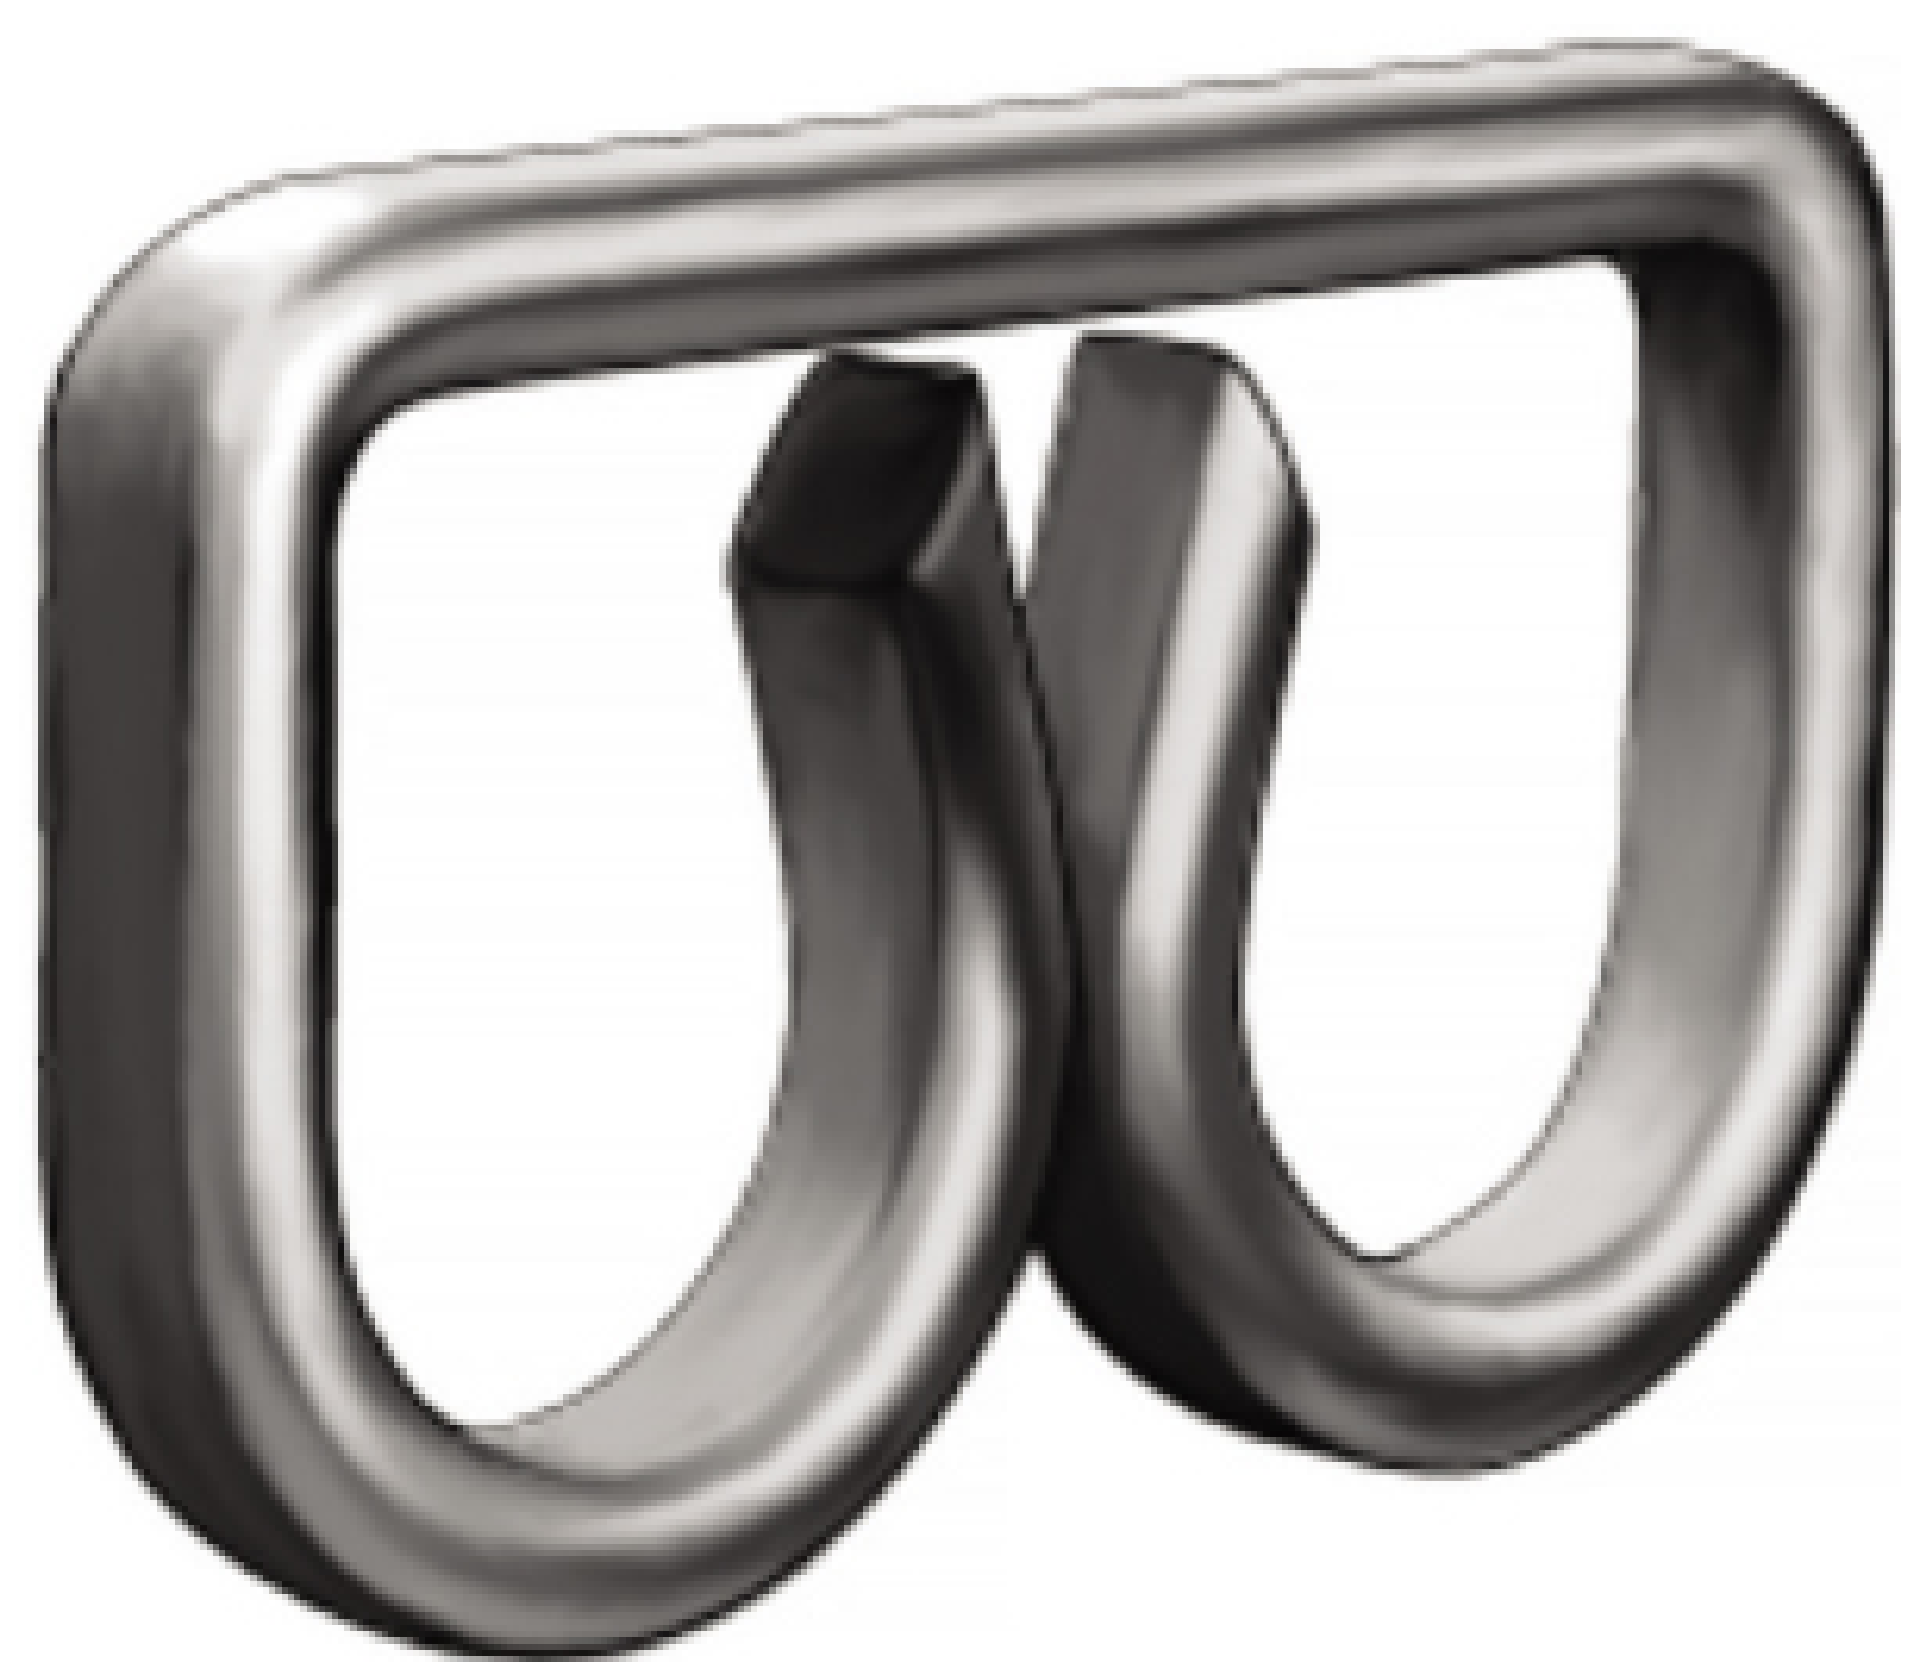
Figure: The "B" configuration allows hemostasis while preserving tissue viability. (Fischer's Mastery of Surgery)
Types of Intestinal Staplers
The three main categories used in intestinal surgery are:
1. Linear Cutting Stapler (GIA - Gastrointestinal Anastomosis)
Principle: Fires two or more rows of staggered staples on each side of a central cutting blade simultaneously - divides AND seals tissue in one motion.
Parts:
| Part | Description |
|---|---|
| Handle | Ergonomic grip; houses the firing mechanism |
| Shaft | Connects handle to the jaws |
| I-beam/Driver | The firing mechanism; advances forward pushing staple drivers upward and carrying the blade |
| Staple cartridge (lower jaw) | Loaded with 2-3 rows of staples in staggered configuration; color-coded by height |
| Anvil (upper jaw) | Fixed opposing jaw; contains the forming pockets that shape staples into "B" |
| Knife/blade | Central blade housed within the cartridge that cuts between staple rows |
| Safety mechanism | Prevents accidental firing |
| Articulating head | Present in laparoscopic versions; allows angulation for positioning |
Staple cartridge color-coding:
- White (2.5 mm open height, closed ~1 mm): vascular tissue, mesentery
- Blue (3.8 mm): standard for small bowel and colon
- Green (4.8 mm): thick tissue (stomach, thickened bowel)
Common sizes: 60, 75, 80 mm jaw lengths. Laparoscopic versions: Endo-GIA (Covidien/Medtronic), Echelon (Ethicon).
2. Linear Non-Cutting Stapler (TA - Thoracoabdominal / Proximate TL)
Principle: Fires rows of staples but has NO cutting blade - staples tissue closed without dividing it. Division is accomplished separately (manually with a scalpel or scissors).
Parts: Similar to GIA but lacks the central cutting mechanism. Has a pin at the distal end that must be engaged prior to firing to prevent tissue from being pushed out. The handle is often at a 90-degree angle to the shaft for better deep pelvic access.
Sizes: 30-90 mm staple lines available, with matching staple height cartridges.
3. Circular (EEA - End-to-End Anastomosis) Stapler
This is a two-piece detachable system specifically designed for end-to-end luminal anastomosis with simultaneous resection of an inner ring of tissue.

Figure: A - EEA circular stapler (curved shaft, handle, anvil at tip). B - Close-up of the stapler head showing the circular double rows of staples arranged around the central cutting ring. (Fischer's Mastery of Surgery)
Parts of the EEA:
| Part | Description |
|---|---|
| Handle | Housing for the firing and approximation mechanism |
| Shaft | May be straight or curved (for transanal insertion) |
| Staple head/cartridge | Circular arrangement of 2 rows of staples on the body of the device |
| Anvil | Detachable mushroom-shaped disc with a central spike; sutured into the proximal bowel with a purse-string suture |
| Center rod/pin | Telescoping pin that connects body to anvil; extends when turning the knob to "open" position |
| Approximation knob | Turning knob that advances or retracts the pin to mate with/separate from the anvil |
| Tissue gap indicator | Green/red indicator shows whether tissue compression is in the correct range |
| Firing trigger/handle squeeze | Deploys the staples and the circular knife simultaneously |
| Circular knife | Cuts the tissue inner to the double staple rings, creating the anastomotic lumen |
Available diameters: 21, 25, 28, 29, 31, 33 mm (note: the resultant inner lumen is up to 10 mm smaller than the device diameter due to the staple ring width)
4. Curved Cutting Stapler (Contour Stapler, Ethicon)
A specialized TA-style device with a slightly curved/bent cartridge to allow better access in the deep pelvis. It fires staples AND cuts in one motion (like GIA), but is shaped for pelvic applications. Has a distal end pin to prevent tissue slippage on firing.
Diagrams and Images
Enterotomy on the antimesenteric side (preparation for side-to-side anastomosis):
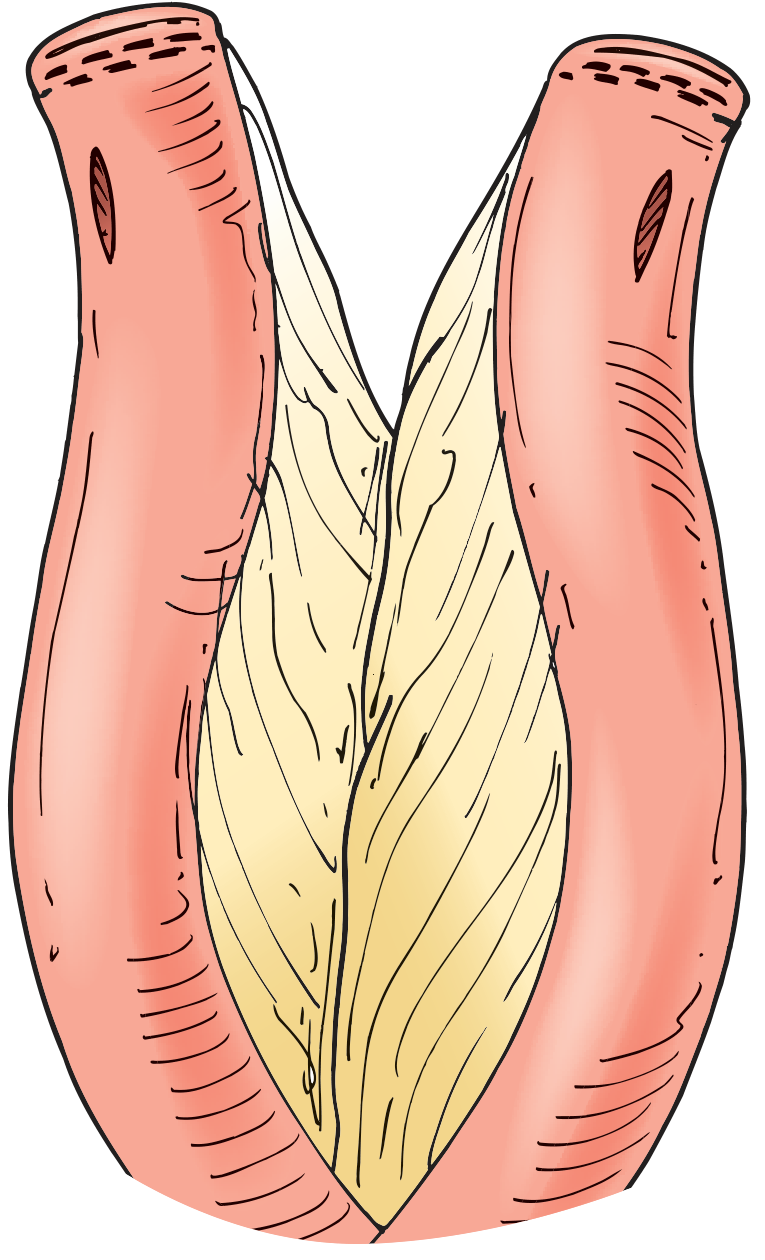
Figure 4.1: Enterotomy created on the antimesenteric side, exposing the mesenteric fat between the two bowel limbs. (Hinman's Atlas of Urologic Surgery / Steichen, Stapling Techniques)
GIA stapler being fired across tissue:
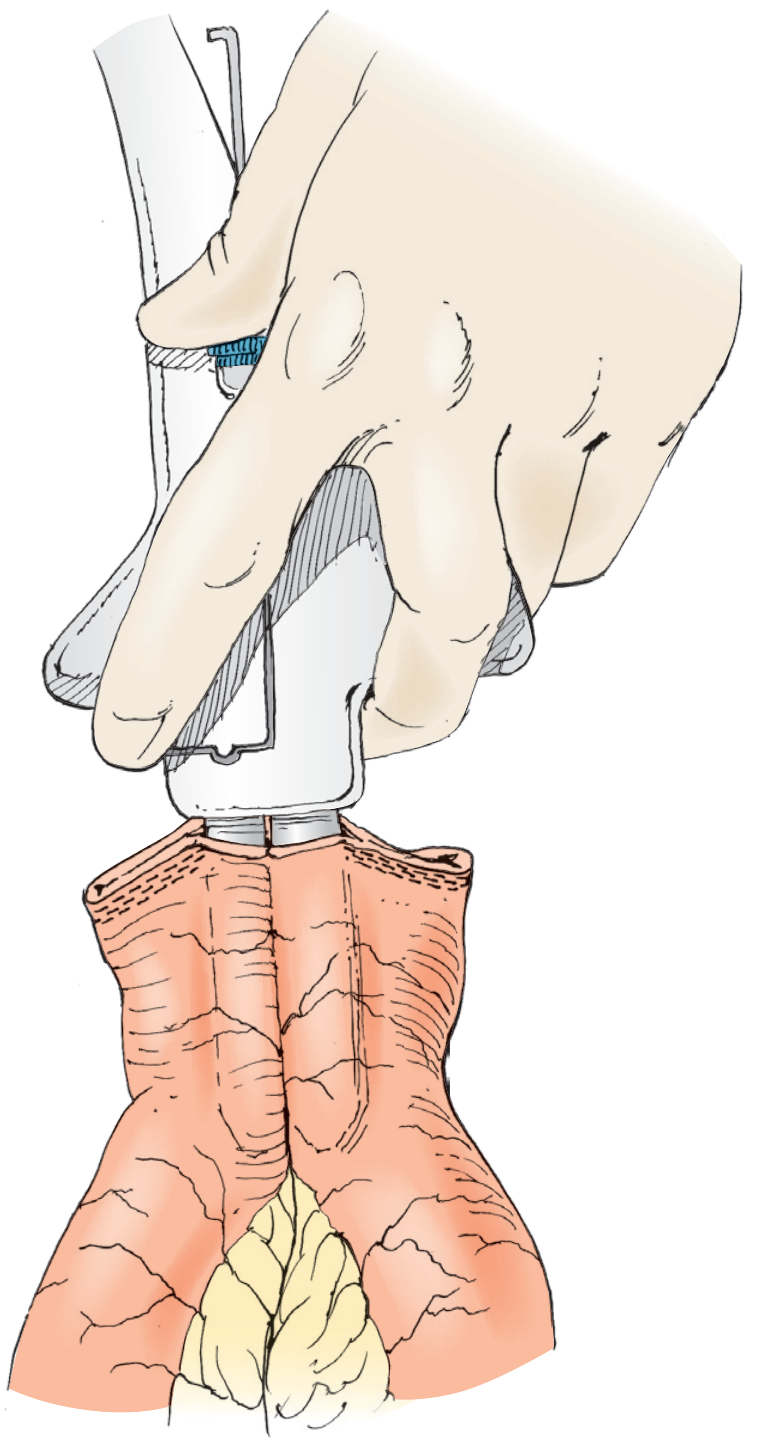
Figure 4.2: The opposing limbs of a GIA stapler placed within the bowel lumens, closed and fired along the antimesenteric border. (Hinman's Atlas / Steichen)
TA stapler closing the common enterotomy below Allis clamps:
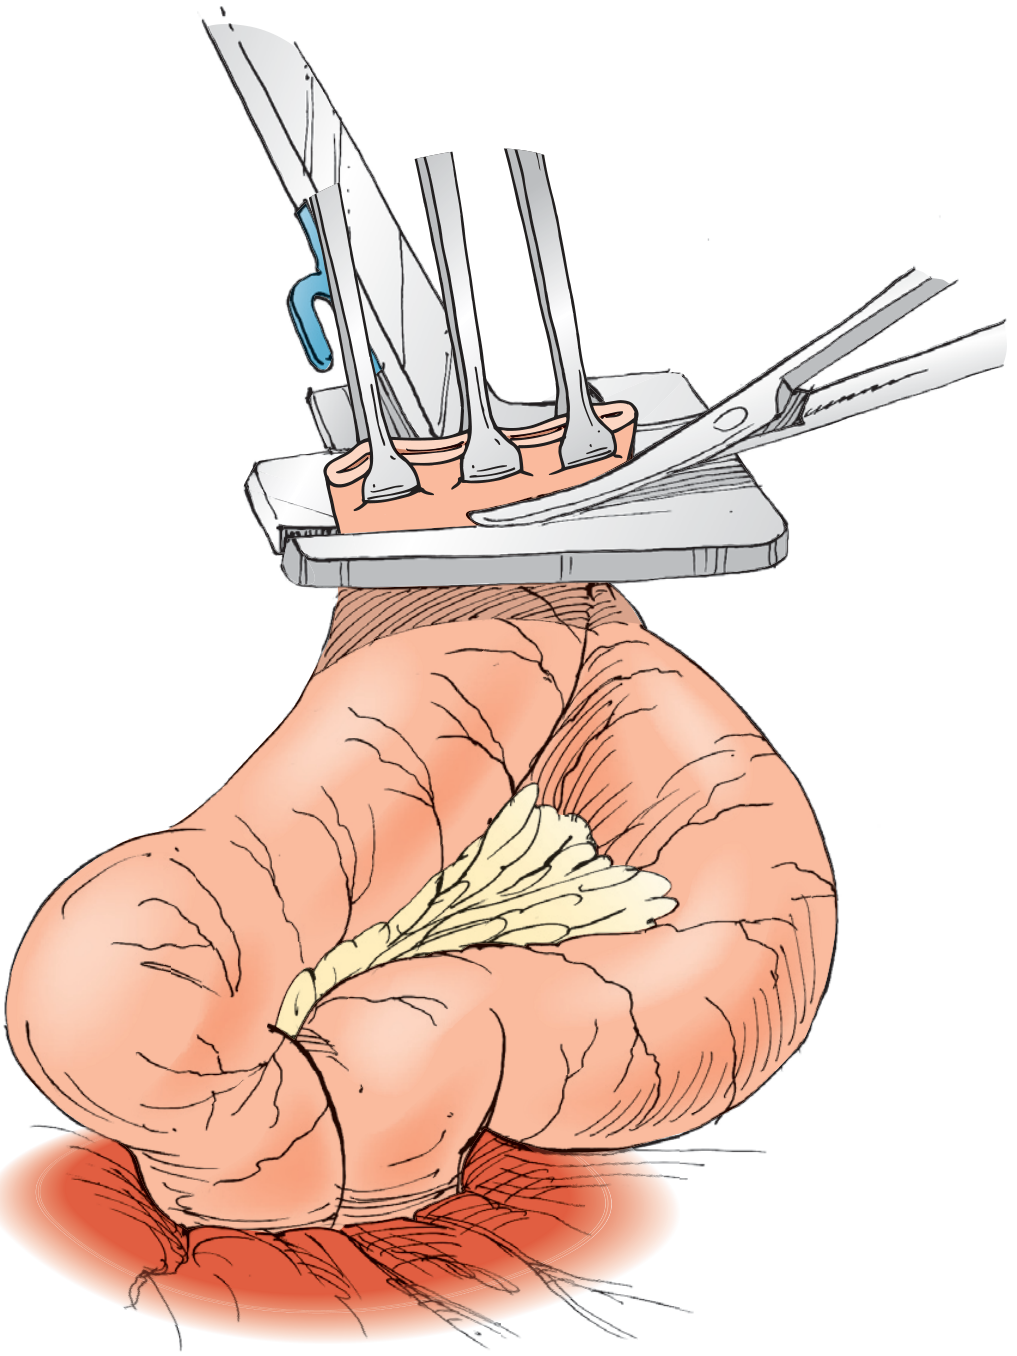
Figure 4.3: A TA stapler or additional GIA load used to close the common enterotomy. (Hinman's Atlas / Steichen)
EEA pin advanced through the rectal stump (colorectal anastomosis):
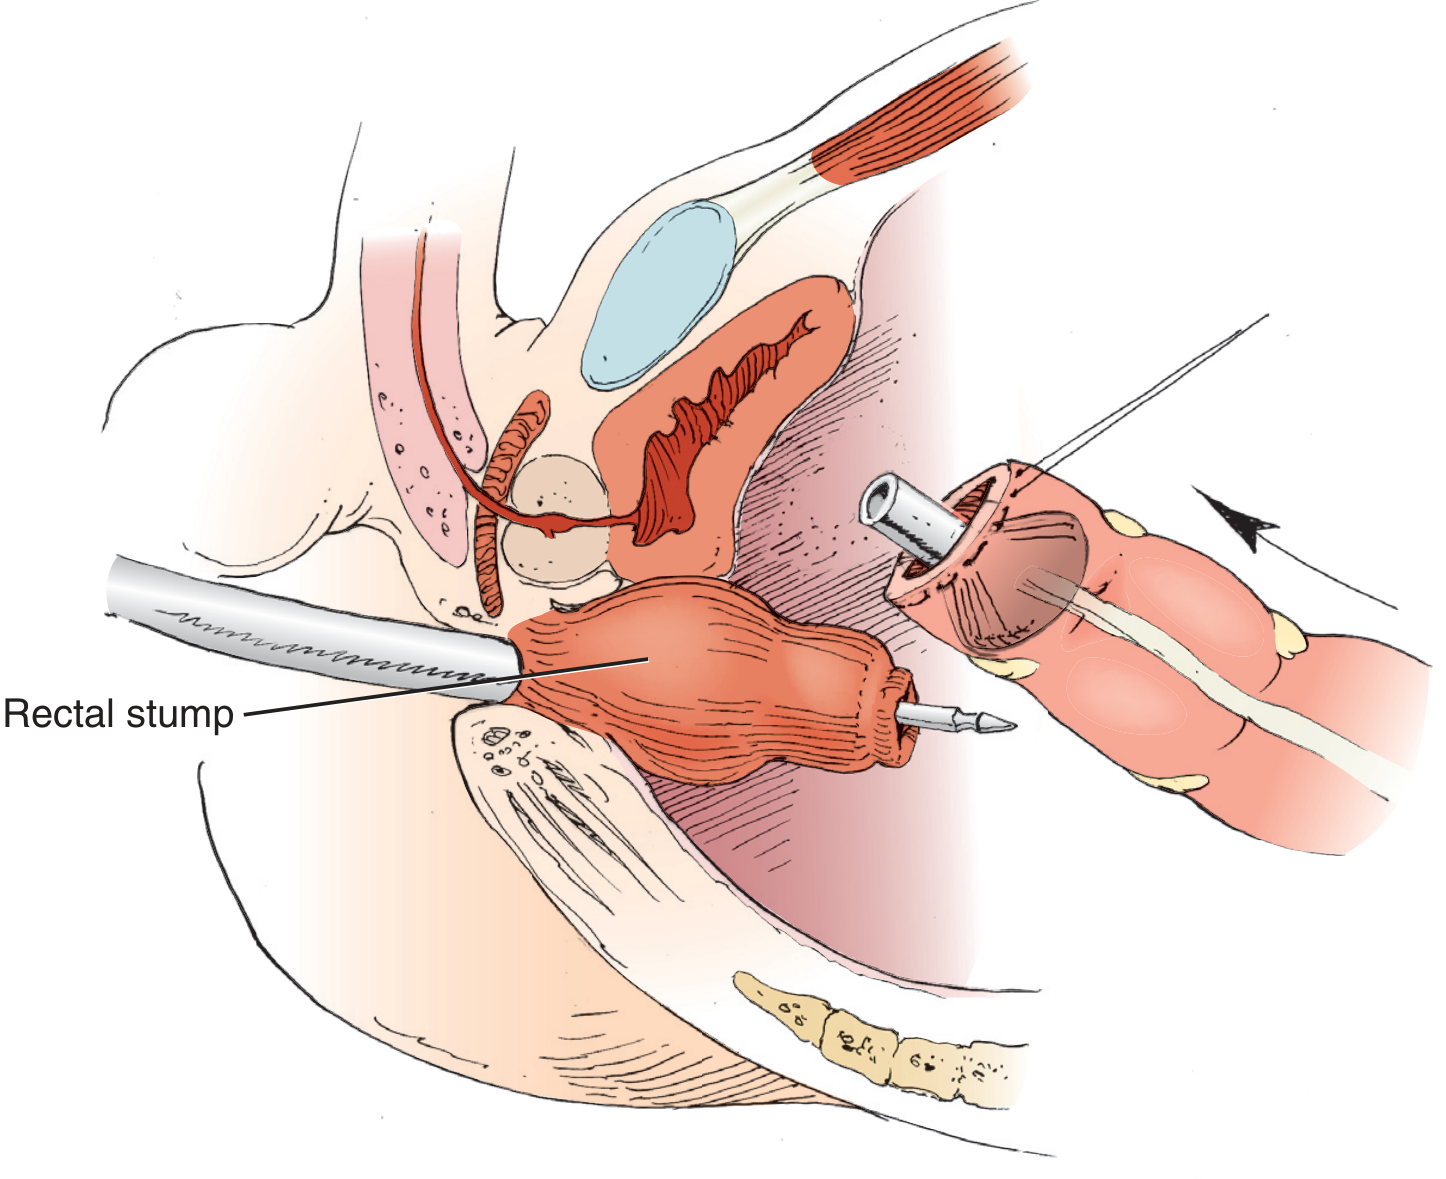
Figure 4.4: EEA stapler inserted transanally into the rectal stump; pin advanced to "open" position; anvil (already purse-string secured in proximal colon) connected to the pin. (Hinman's Atlas / Steichen)
EEA firing sequence - complete colorectal anastomosis (A-E):
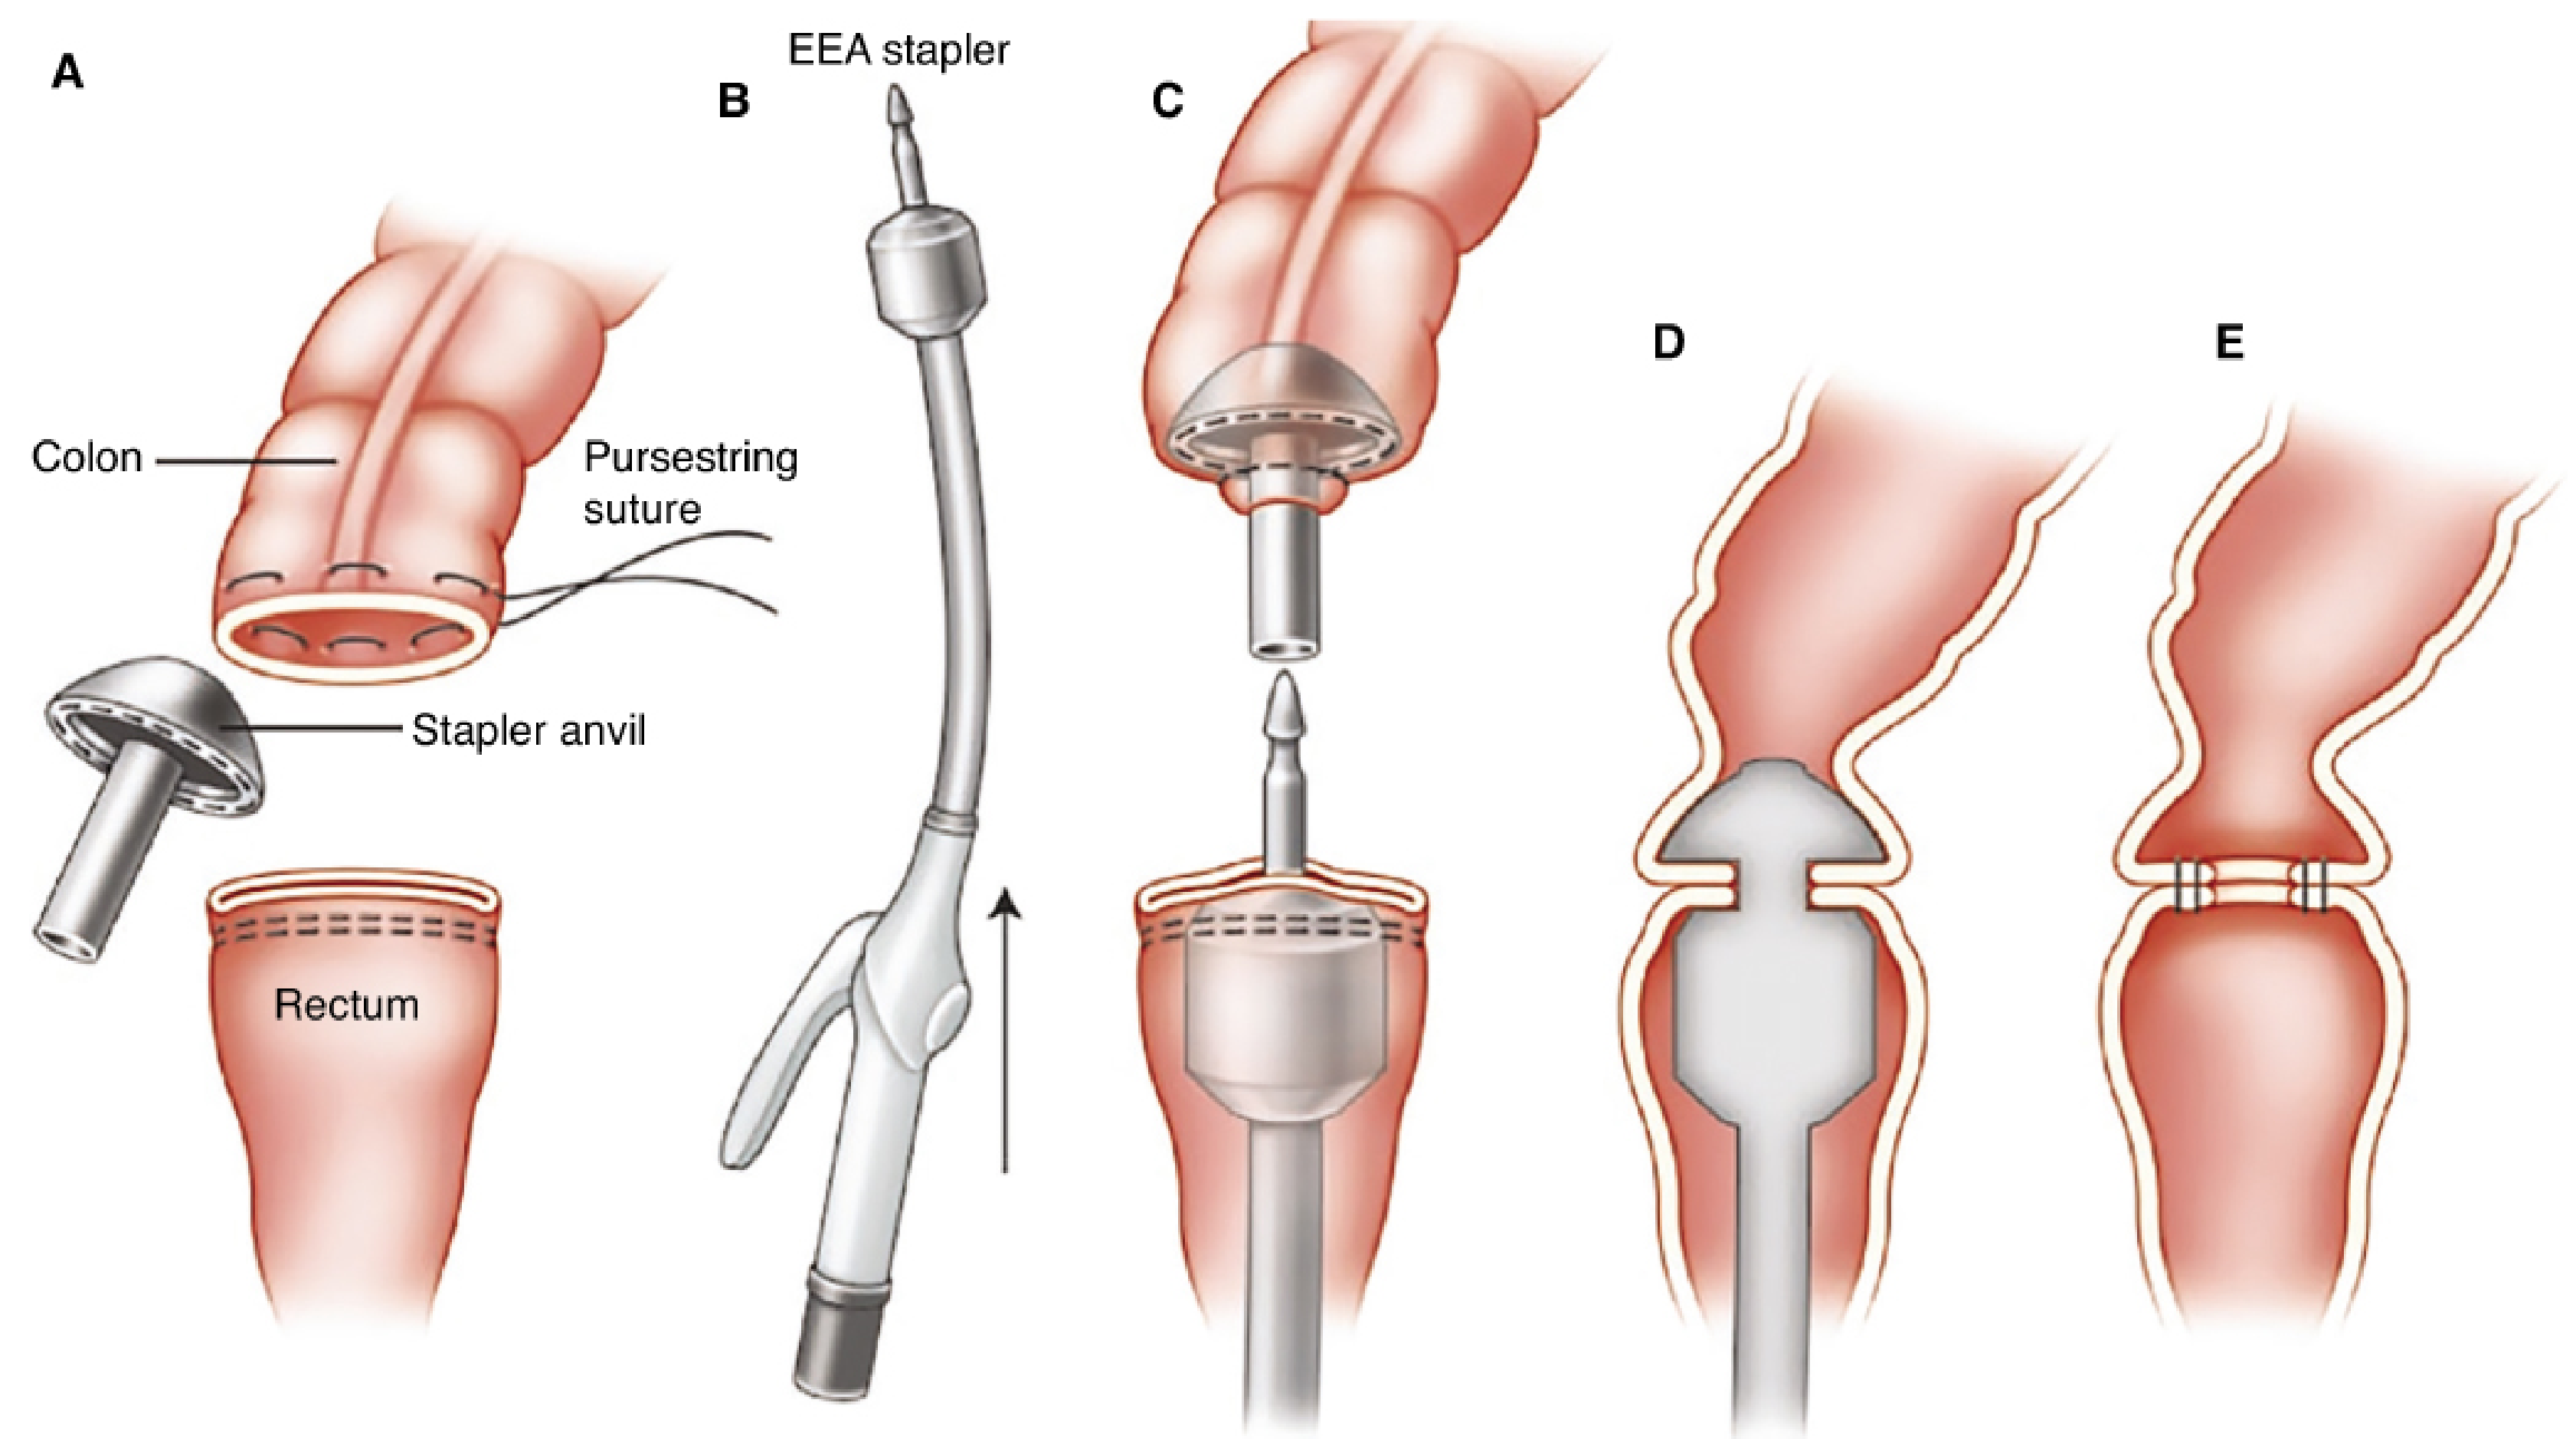
Figure: A - Anvil sutured with purse-string into proximal colon; rectal stump with TA staple line below. B - EEA device introduced transanally, arrow shows direction. C - Pin extended and mated with anvil, approximating both ends. D - Instrument fired (staples + cut in cross-section). E - Final intact colorectal anastomosis. (Fischer's Mastery of Surgery, adapted from ASCRS Manual)
EEA stapler mated and closed in the pelvis:
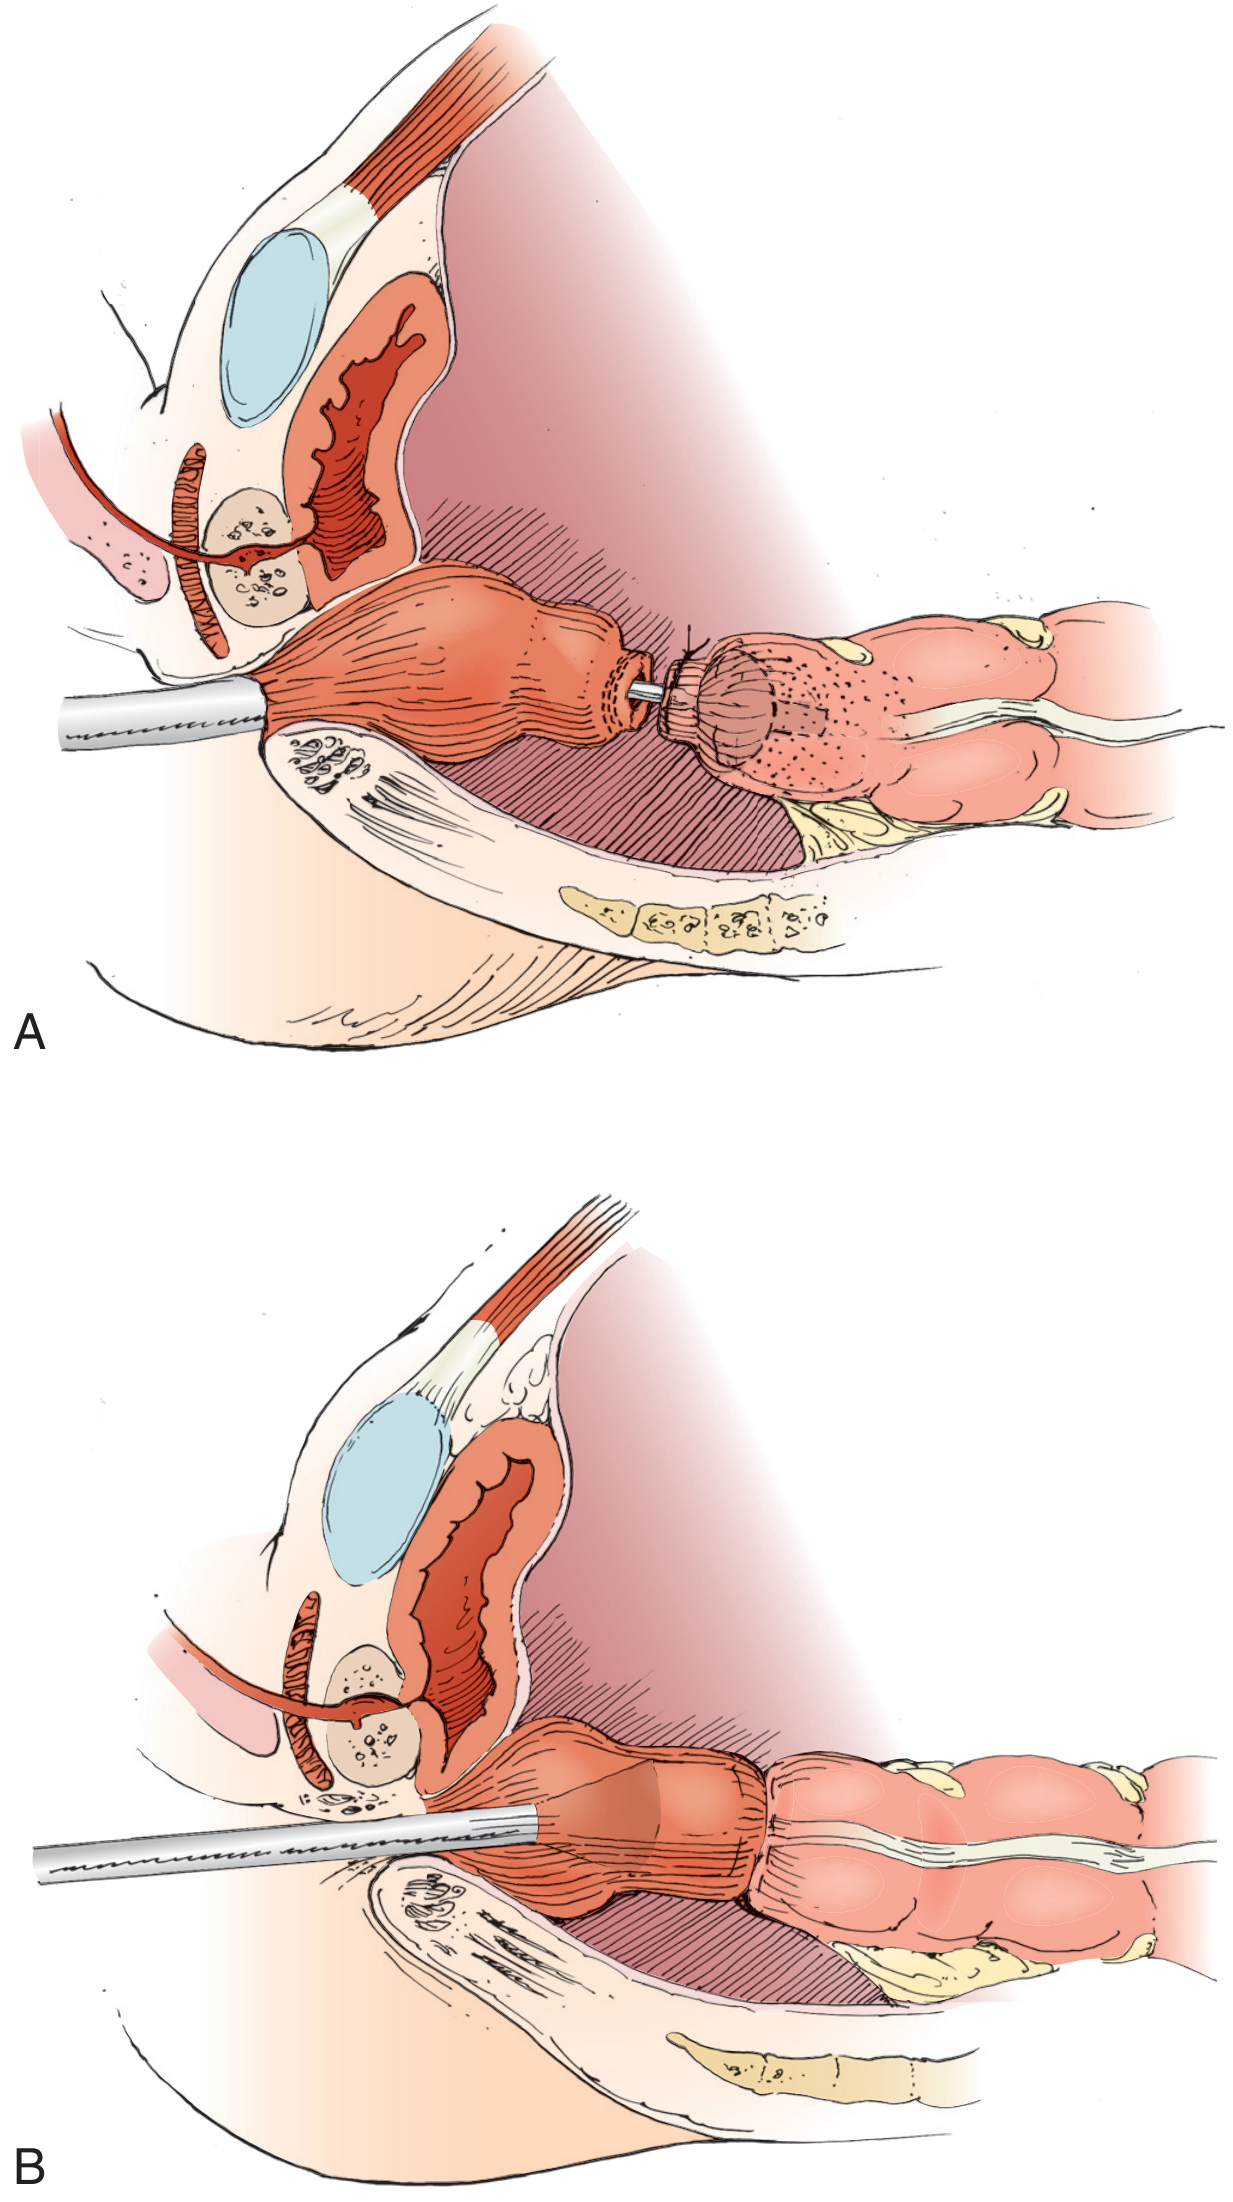
Figure 4.5 (A, B): Mechanism closed by turning the knob; cross-sectional view shows both ends of bowel approximated. (Hinman's Atlas / Steichen)
Techniques of Application
A. Side-to-Side (Functional End-to-End) Anastomosis - GIA Stapler
Used for ileocolic, small bowel-to-bowel, or entero-enteric anastomoses.
- Resect the bowel segment using GIA stapler to divide proximal and distal margins
- Create an enterotomy on the two stapled ends - either by cutting a corner of the staple line, or making a small stab on the antimesenteric side ~1 cm from the staple line
- Insert one jaw of the GIA stapler into each lumen; align the two bowel limbs along the antimesenteric border
- Confirm no mesentery is trapped in the jaws
- Close the jaws and fire - the driver is pushed to the end of its track and back to deploy staples and divide tissue
- Open and remove the stapler; inspect the internal staple line for hemostasis
- Place a crotch stitch at the apex of the common channel to reduce tension at this high-stress point
- Approximate the open enterotomy with Allis clamps, offsetting the two staple lines (avoids a single thick suture line)
- Close the common enterotomy with a second GIA load or a TA stapler fired below the clamps
- Optionally reinforce with interrupted Lembert sutures; close mesentery per preference
B. End-to-End (Double-Staple) Colorectal Anastomosis - EEA Stapler
Used for low anterior resection, coloanal, or ileoanal anastomoses.
- Resect the bowel; fire a TA stapler across the rectum (distal margin)
- Open the proximal colon end; place the EEA anvil into it and secure with a full-thickness purse-string suture (hand-sewn or using a purse-string device)
- Insert the EEA handle/body transanally through the rectum and advance to the top of the rectal stump
- Turn the knob to "open" position - the center pin telescopes out through or beside the TA staple line of the rectal stump
- Mate the pin to the anvil shaft
- Turn the knob to "closed" position - this draws the two ends of bowel together; confirm the tissue indicator is in the green (optimal compression) zone
- Ensure no other bowel loops or tissue are caught in the mechanism
- Fire the instrument - this simultaneously deploys two circular rows of staples and cuts an inner ring of tissue
- Withdraw the device; inspect the two "donuts" (circular tissue specimens) which should both be complete - incomplete donuts indicate a defective anastomosis
- Leak test: rigid or flexible sigmoidoscopy with air/saline insufflation to confirm airtight seal
- Consider diverting loop ileostomy if: positive leak test, prior radiation, malnutrition, steroid use, very low pelvic anastomosis, or technically difficult case
C. Bowel Resection and Closure (TA Stapler)
- Place the TA stapler across the bowel at the desired resection point, ensuring the pin at the distal end is engaged
- Fire the stapler to close the bowel
- Divide the bowel manually (scalpel) just beyond the staple line
- The staple line is typically 30-90 mm in length; multiple applications may be needed for larger structures
Indications
| Procedure | Stapler Type Used |
|---|---|
| Right hemicolectomy with ileocolic anastomosis | GIA (side-to-side) + TA or GIA (closure) |
| Low anterior resection (LAR) | TA (rectal transection) + EEA (colorectal anastomosis) |
| Ileal pouch-anal anastomosis (IPAA / J-pouch) | GIA (pouch formation) + 25 mm EEA (anastomosis) |
| Total colectomy with ileorectal anastomosis | GIA / EEA |
| Hartmann's reversal | EEA |
| Small bowel resection / anastomosis | GIA (side-to-side) |
| STEP procedure (serial transverse enteroplasty) | Linear GIA applied from alternating directions |
| Gastric sleeve / bypass (bariatric) | GIA (stomach division/anastomosis) |
| Esophagojejunostomy | 25 mm EEA |
| Recto-sigmoid resection | EEA (25-29 mm) |
| Meckel's diverticulum excision | GIA across the base |
| Whipple / hepatobiliary resection | GIA for parenchymal and vascular transection |
A key advantage over hand-sewn anastomosis: stapled ileocolic anastomosis after right hemicolectomy has been shown to have a significantly lower leak rate compared to hand-sewn technique. (Goulder 2012, cited in Hinman's Atlas)
Complications
Anastomotic Leak
The most feared complication. Causes include:
- Inadequate blood supply to the anastomosis
- Tension on the anastomosis
- Incomplete donuts after EEA firing (defective staple line)
- Misfired or partially fired stapler
- Wrong tissue thickness for cartridge height selected
- Infection, malnutrition, immunosuppression, radiation
Prevention: ensure good blood supply, no tension, check donuts, perform intraoperative leak test, consider diverting stoma in high-risk cases.
Staple Line Bleeding
- Can be intraluminal (causing GI bleeding) or extraluminal (intra-abdominal hematoma)
- Risk increases if wrong staple height used for tissue thickness (too small = incomplete closure; too large = inadequate compression)
- Treatment: oversewing, clips, fibrin glue application to the staple line
Anastomotic Stricture
- Circular stapler anastomoses are prone to stricture, especially with smaller diameter devices
- Related to ischemia, excessive fibrosis, or oversewing
- The resultant inner lumen of an EEA anastomosis is already up to 10 mm smaller than device diameter
Misfire / Device Malfunction
- Failure to deploy all staples (incomplete staple line)
- Knife failure (staples fired but tissue not cut)
- Cartridge fired without tissue (inadvertent firing)
- Incomplete donut retrieval
Tissue Inclusion Errors
- Mesentery caught in the staple line (GIA) - compromises bowel viability
- Adjacent bowel loops caught in EEA closure mechanism
- Vaginal wall or ureter incorporated (rare but serious)
Bowel Obstruction
- Early: due to hematoma, edema at anastomosis
- Late: anastomotic stricture, adhesions around the staple line
Staple Line Reinforcement (SLR)
Several adjuncts exist to reduce bleeding and leak rates:
- Absorbable synthetic buttress (glycolide or trimethylene carbonate copolymer matrices)
- Biologic buttress (porcine small intestinal submucosa)
- Oversewing the staple line with absorbable sutures
- Fibrin glue / tissue sealants
Note: Evidence on SLR is mixed - some data shows reduced bleeding but no clear benefit (and possibly increased leak rates) when used routinely. Most commonly employed in sleeve gastrectomy. (Fischer's Mastery of Surgery)
Key Technical Pearls
- Always select the appropriate staple height for the tissue thickness - this is one of the most common sources of error
- For the GIA: offset the staple lines when closing the common enterotomy to avoid a bulk junction point
- For the EEA: both donuts must be complete; an incomplete donut mandates direct inspection and reinforcement sutures
- Always perform an intraoperative leak test (air/saline via flexible or rigid scope) for distal colorectal anastomoses
- Laparoscopic/robotic versions (Endo-GIA, Echelon, articulating models) use identical principles but are fired through trocars; articulation assists with deep pelvic or complex angle applications
- Powered staplers are now available and may improve consistency of the firing mechanism
- Never reuse a single-use cartridge; ensure the safety mechanism is off before firing
Comparison: Stapled vs. Hand-Sewn Anastomosis
| Feature | Stapled | Hand-Sewn |
|---|---|---|
| Speed | Faster | Slower |
| Consistency | More uniform | Operator-dependent |
| Ileocolic leak rate | Lower (RCT data) | Higher |
| Colorectal (LAR) | Equivalent outcomes | Technically harder deep in pelvis |
| Anastomotic stricture | Higher (EEA) | Lower |
| Cost | Higher (disposable cartridges) | Lower |
| Deep pelvic anastomosis | Excellent (EEA) | Very difficult |
Sources:
- Hinman's Atlas of Urologic Surgery, Chapter: Intestinal Division and Anastomosis (pp. 55-58) - Cone MM, Geiger TM
- Sabiston Textbook of Surgery (21st ed.), Chapter: Surgical Staplers
- Fischer's Mastery of Surgery (8th ed.), Chapters: Surgical Staplers; Stapler Buttress Materials; Gastrointestinal Leak
Give this details as proper pdf with good tables
Reading File
Reading File
Running Command
Running Command
Writing File
Running Command
Running Command
The PDF was generated successfully at 6.1 MB with all content and images embedded. Here is your download link:
Intestinal Staplers
PDF Document · PDF
What's inside the PDF (9 sections, ~15 pages):
| Section | Content |
|---|---|
| Cover page | Professional dark-blue title cover |
| 1. Introduction | History from 1908 to modern era |
| 2. Basic Principle | "B" shape mechanism with image |
| 3. Types of Staplers | GIA, TA, EEA, Curved — with full parts tables and color-coding table |
| 4. Technique | Step-by-step tables for side-to-side & EEA colorectal anastomosis + 6 surgical diagrams |
| 5. Indications | 14-row table covering all GI procedures |
| 6. Complications | 9-complication table with mechanisms and management + SLR sub-table |
| 7. Stapled vs. Hand-sewn | Direct comparison table |
| 8. Technical Pearls | 11 key operative tips |
| 9. New Technology | 7 modern innovations table + full references |
All pages include a header bar with page number and a footer with source citations.
This is a shared conversation. Sign in to Orris to start your own chat.