
Abg sampling
Reading File
ABG (arterial blood gas) sampling is a procedure where arterial blood is collected - commonly from the radial artery - to measure pH, PaO2, PaCO2, HCO3, and base excess for assessing respiratory and metabolic status.
Searching sources...
Finding Sources
Finding Sources
Reading File
Reading File
Reading File
Reading File
Finding Sources
Finding Sources
Reading File
Finding Sources
Reading File
Reading File
Reading File
I now have comprehensive information to give a thorough answer on ABG sampling. Let me compile this.
Arterial Blood Gas (ABG) Sampling
What is ABG and Why It Matters
ABG analysis is the gold standard for assessing:
- Oxygenation (PaO2)
- Ventilation (PaCO2)
- Acid-base status (pH, HCO3-)
It directly measures pH, arterial PCO2, and arterial PO2; bicarbonate (HCO3-) is then calculated via the Henderson-Hasselbalch equation.
Normal values:
| Parameter | Normal Range |
|---|---|
| pH | 7.35 - 7.45 |
| PaCO2 | 35 - 45 mmHg |
| HCO3- | 21 - 27 mEq/L |
| PaO2 | 80 - 100 mmHg (room air) |
Indications
- Acute respiratory decompensation (hypoxia, hypercapnia)
- Metabolic emergencies (DKA, sepsis, shock)
- Titration of vasoactive drugs (nitroprusside, norepinephrine)
- Perioperative monitoring in major surgery
- Baseline correlation with noninvasive monitors (SpO2, EtCO2) in critically ill patients
- Trauma and post-cardiac arrest resuscitation monitoring
Venous blood gas (VBG) can substitute for most parameters except PO2 - venous pH runs ~0.03 lower and venous PCO2 runs ~5-9 mmHg higher than arterial.
- Roberts and Hedges' Clinical Procedures in Emergency Medicine, p. 461
Site Selection
| Site | Notes |
|---|---|
| Radial artery (preferred) | Superficial, easy to palpate, no adjacent nerve/vein, excellent collateral from ulnar artery |
| Brachial artery | Poor collateral - avoid unless no other option |
| Femoral artery | Avoid for routine sampling; use only when others inaccessible |
| Dorsalis pedis / posterior tibial | Acceptable alternatives |
| Umbilical arteries | Neonates only |
The radial artery is preferred because its superficial location is easy to palpate and puncture, and there are no immediately adjacent nerves or veins that may be injured or accidentally punctured. - Roberts and Hedges, p. 438
Allen Test (Pre-Procedure)
Before radial artery puncture, assess collateral ulnar circulation:
- Ask patient to clench fist; compress both radial and ulnar arteries
- Patient opens hand - palm will blanch
- Release ulnar artery while keeping radial occluded
- Normal (negative): color returns within 5 seconds
- Abnormal (positive): pallor persists >5-15 seconds - suggests inadequate collateral flow - consider alternate site
- Roberts and Hedges' Clinical Procedures in Emergency Medicine, p. 1527-1531
Contraindications
Strict (absolute):
- Inadequate circulation to the limb
- Raynaud's syndrome or Buerger's disease
- Full-thickness burns over the site
Relative:
- Anticoagulation / coagulopathy (caution, not absolute)
- Skin infection at puncture site
- Previous surgery in the area
- Atherosclerosis / inadequate collateral flow
- After thrombolysis (only if data cannot be obtained any other way)
Equipment
For adult percutaneous puncture:
- Pre-heparinized ABG syringe (1000 IU/mL heparin - fill dead space only, collect ~3 mL blood)
- 20-23 gauge needle
- Antiseptic swab + sterile gauze
- Local anesthetic (lidocaine - reduces hyperventilation artifact)
- Ice (if analysis delayed >5 minutes)
For infants/children: 23-gauge butterfly needle (25-gauge in newborns)
Technique (Radial Artery Puncture)
- Explain procedure; obtain consent
- Perform modified Allen test
- Position wrist in supination with slight extension (dorsiflex 30-60°, may use a rolled towel)
- Clean site with antiseptic; allow to dry
- Optional: infiltrate 0.5 mL lidocaine subcutaneously (reduces pain-induced hyperventilation)
- Palpate radial pulse with index/middle finger of non-dominant hand
- Insert needle at 30-45° angle bevel up, aimed at strongest pulse point
- Advance slowly - pulsatile blood flashback confirms arterial entry
- Allow syringe to fill (2-3 mL) - ideally by arterial pressure alone, not aspiration
- Withdraw needle; apply firm pressure for minimum 5 minutes (longer if anticoagulated)
- Expel any air bubbles immediately; cap syringe
- Mix gently to prevent clotting; label and send to lab on ice if delayed
Sample Handling - Critical Errors to Avoid
| Error | Effect on Result |
|---|---|
| Air bubble in syringe | PO2 elevated; PCO2 unchanged |
| Excess heparin | PCO2 lowered; pH unchanged |
| Delayed analysis (>20 min) | PCO2 elevated, pH lowered, PO2 variable |
| Failure to note FiO2 at time of sampling | Misinterpretation of oxygenation |
- Roberts and Hedges' Clinical Procedures in Emergency Medicine, p. 1287
Always record: FiO2, patient position, activity level, and time of sampling alongside the result.
Complications
- Hematoma (most common)
- Arterial thrombosis / embolism
- Vasospasm (can cause device entrapment if cannulated)
- Infection
- Ischemia (especially if collaterals inadequate)
- Arteriovenous fistula
- Pseudoaneurysm
- Compression neuropathy (from hematoma)
- Rarely: compartment syndrome
When ABG Cannot Be Avoided vs. Alternatives
| Scenario | Alternative |
|---|---|
| Monitoring oxygenation | SpO2 (pulse oximetry) - but unreliable on supplemental O2 for detecting hypoventilation |
| Monitoring CO2 | End-tidal CO2 (capnography) |
| pH and PCO2 trending | VBG via central line (venous pH ≈ arterial pH - 0.03) |
| Continuous monitoring | Indwelling arterial catheter with biosensor |
Key caveat: Pulse oximetry loses all ability to detect hypoventilation in patients receiving supplemental oxygen, because the arterial PO2 is pushed far up on the flat portion of the oxyhemoglobin dissociation curve. In these patients, ABG or capnography is essential. - Murray & Nadel's Textbook of Respiratory Medicine, p. 956
Sources: Roberts and Hedges' Clinical Procedures in Emergency Medicine; Murray & Nadel's Textbook of Respiratory Medicine; Tintinalli's Emergency Medicine
Abg sampling pics
Let me pull the images from the textbooks that were referenced in the previous content.
Loading Image
Loading Image
Loading Image
Loading Image
Finding Sources
Loading Image
Loading Image
Here are all the key ABG sampling images from Roberts and Hedges' Clinical Procedures in Emergency Medicine:
1. Radial Artery Anatomy - Site Selection
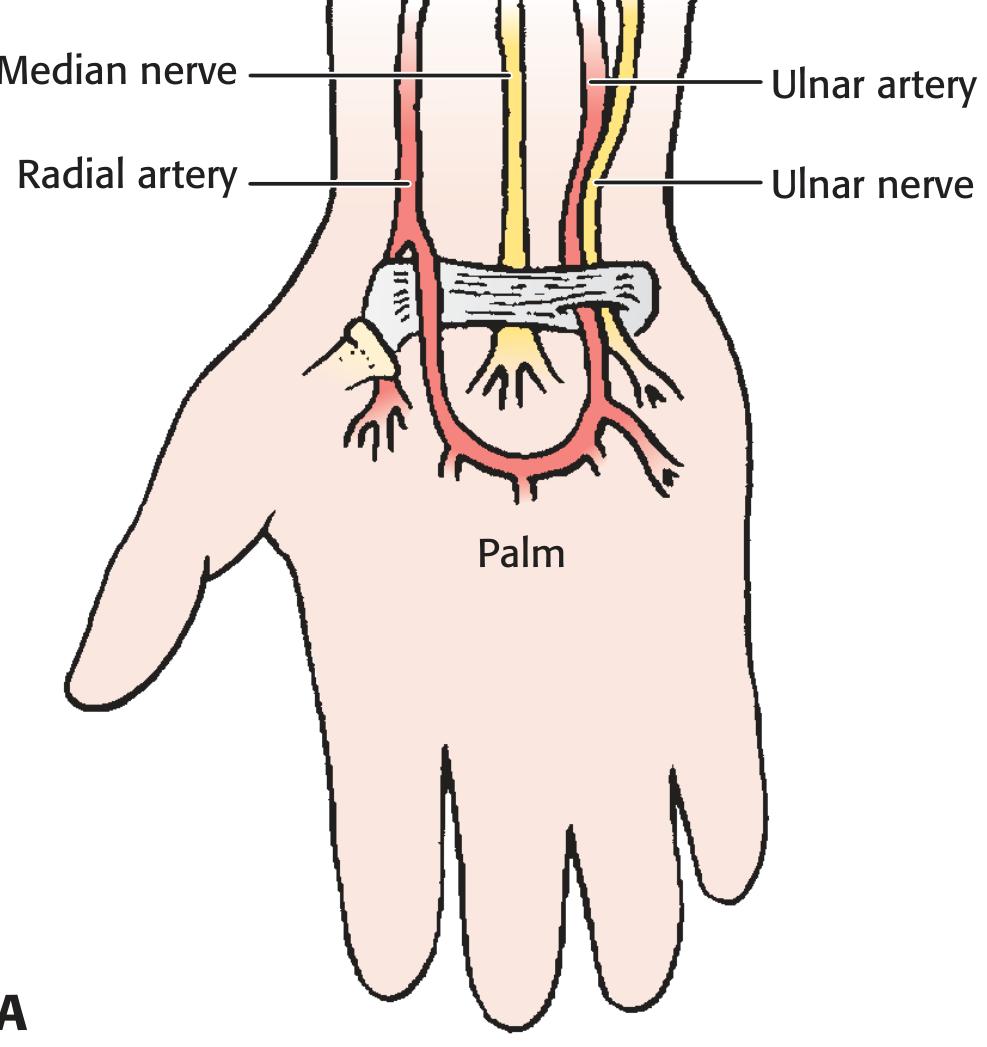
The radial artery is preferred - superficial, no adjacent nerve or vein, and well collateralised by the ulnar artery via the palmar arch.
2. The Allen Test (Pre-Procedure)
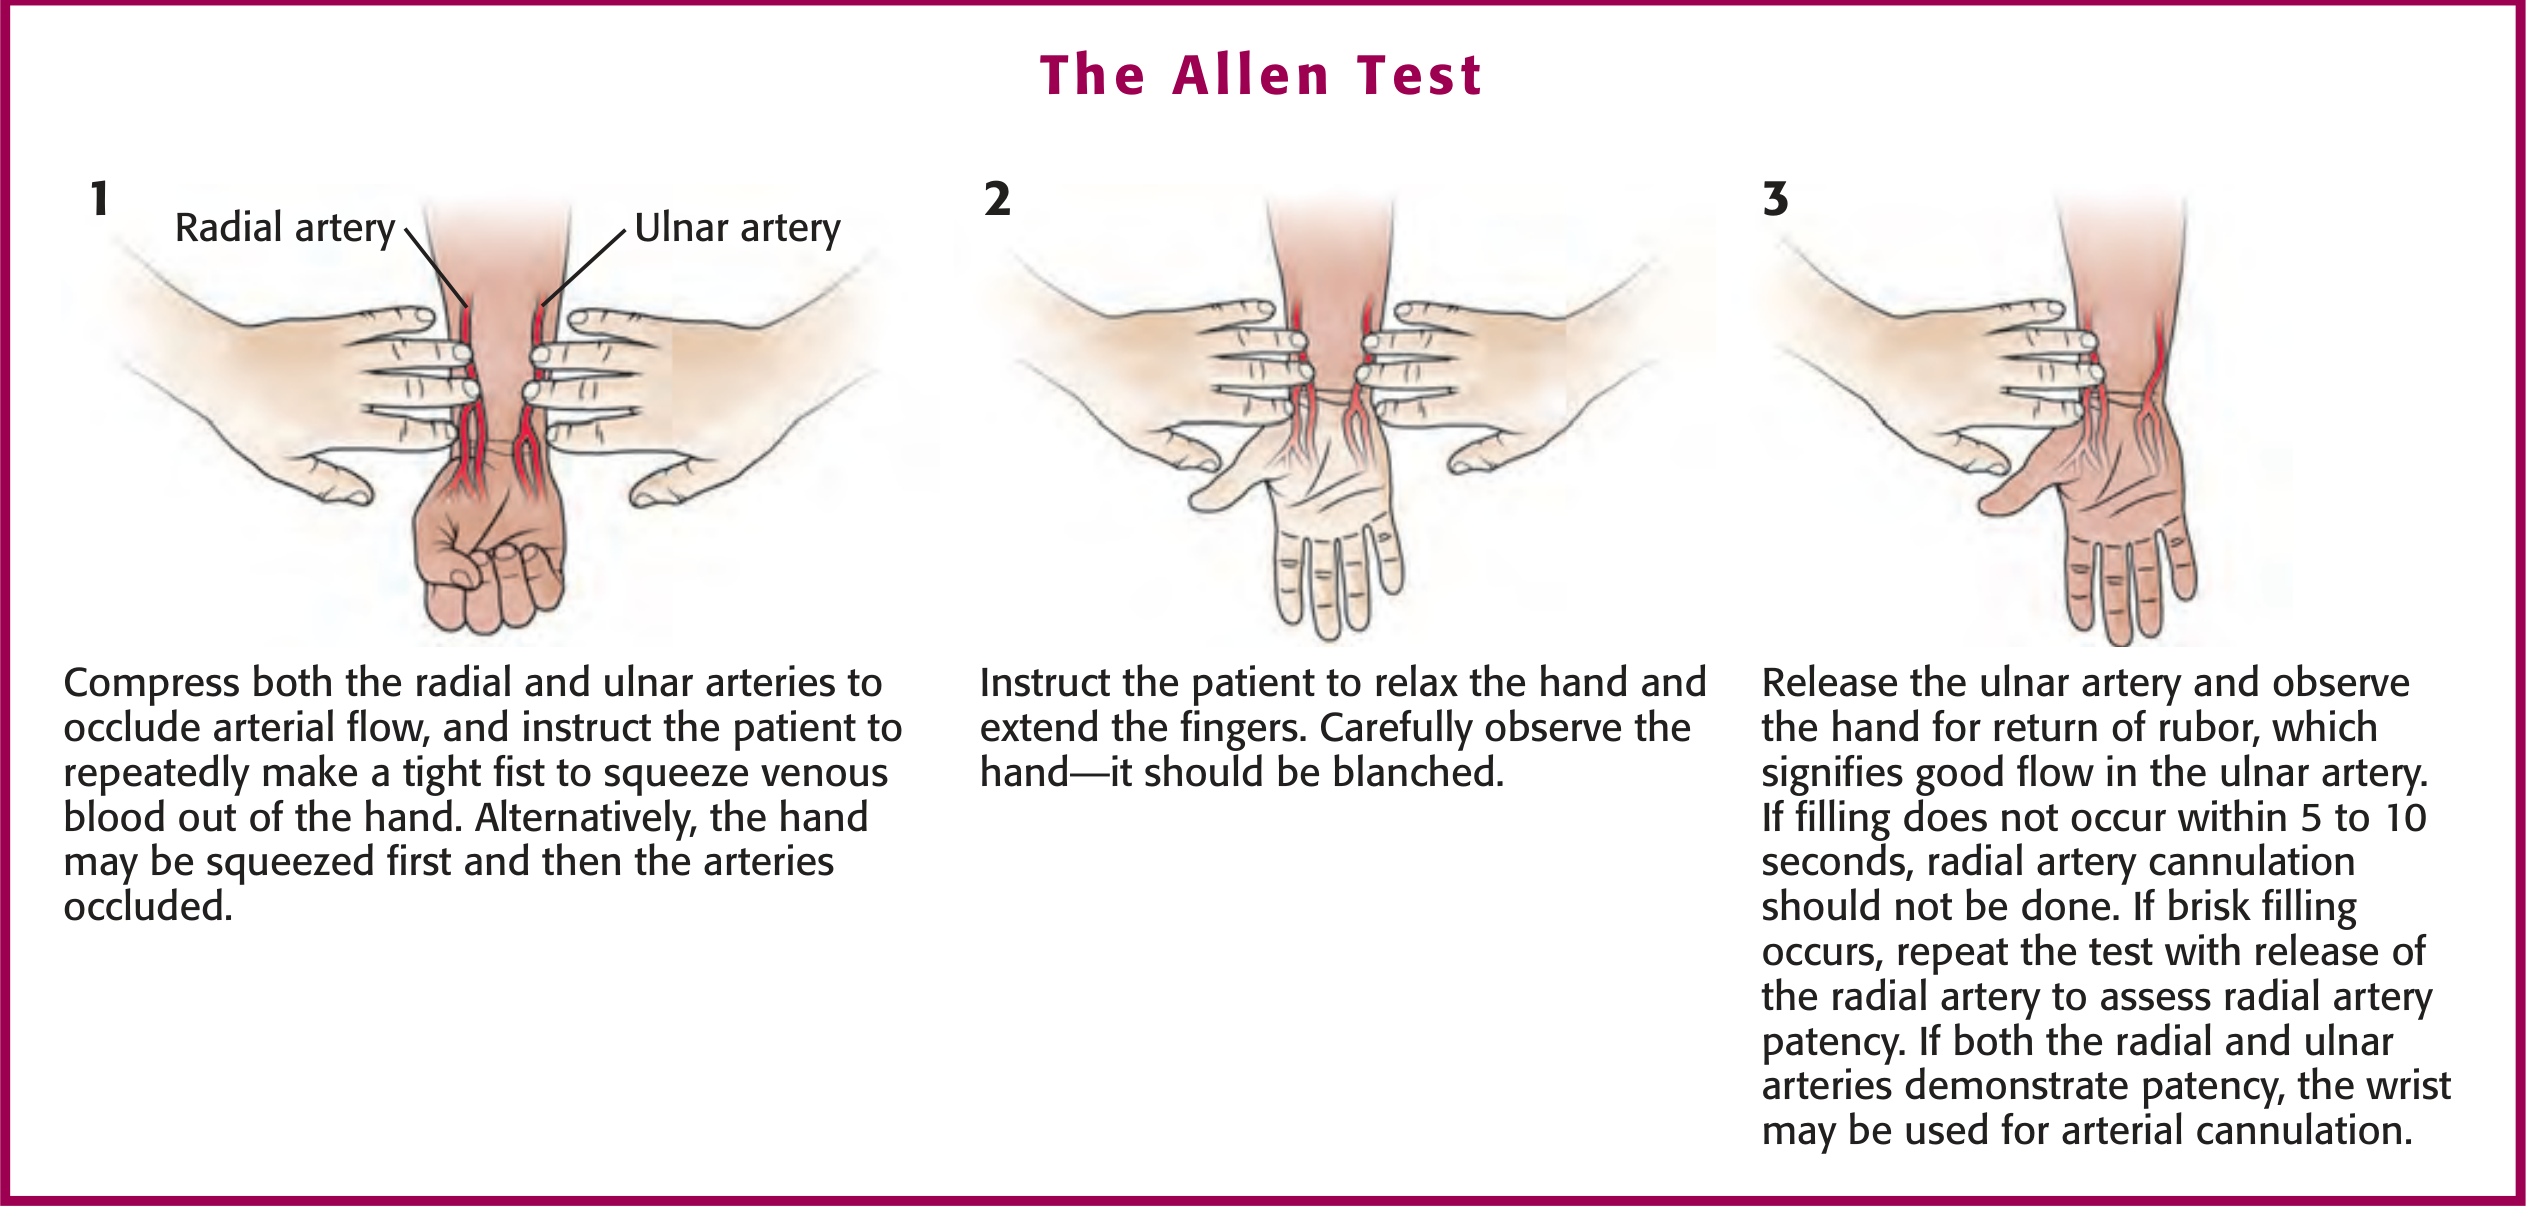
Step 1: Occlude both arteries + fist pump. Step 2: Relax hand - should blanch. Step 3: Release ulnar only - color returns in <5-10 seconds = adequate collateral = safe to proceed.
3. Arterial Puncture Technique (Radial Artery) - Step by Step
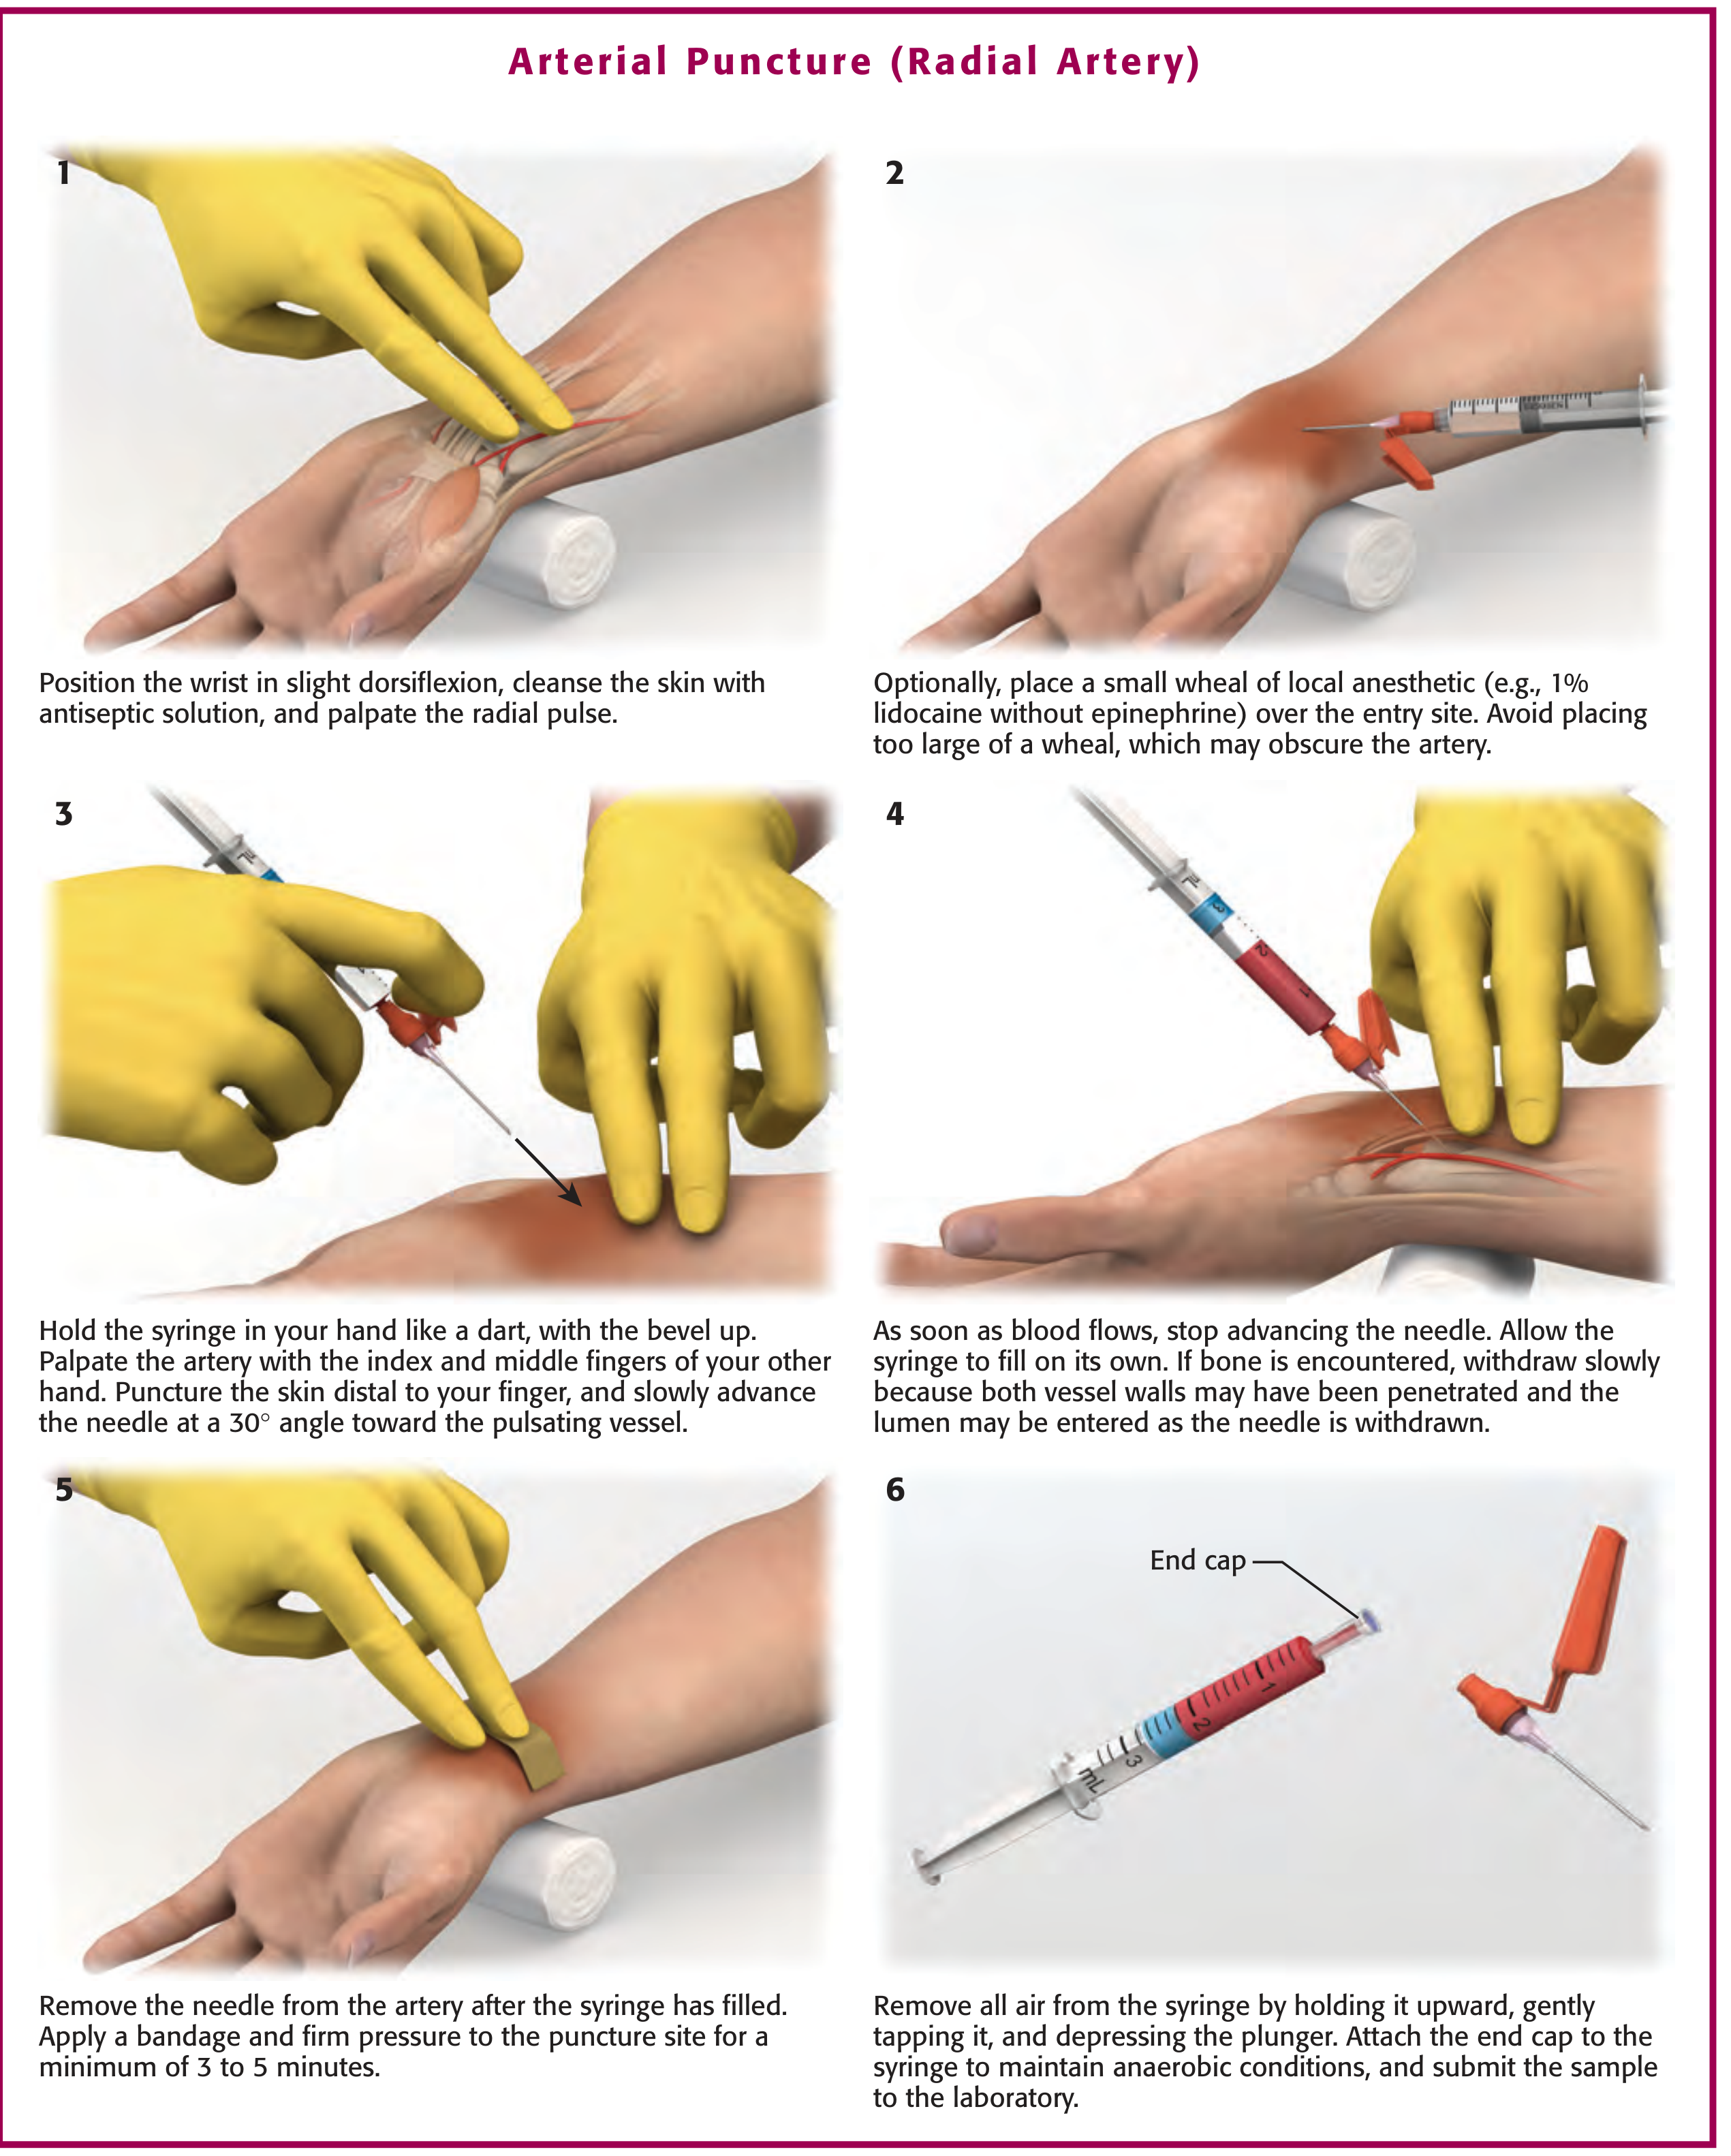
Step 1: Dorsiflex wrist, clean, palpate pulse. Step 2: Optional lidocaine wheal. Step 3: Insert needle bevel-up at 30°. Step 4: Let syringe fill passively from arterial pressure. Step 5: Apply firm pressure 3-5 min. Step 6: Expel air, cap, send on ice.
4. Arterial Cannulation - Guidewire (Seldinger) Technique
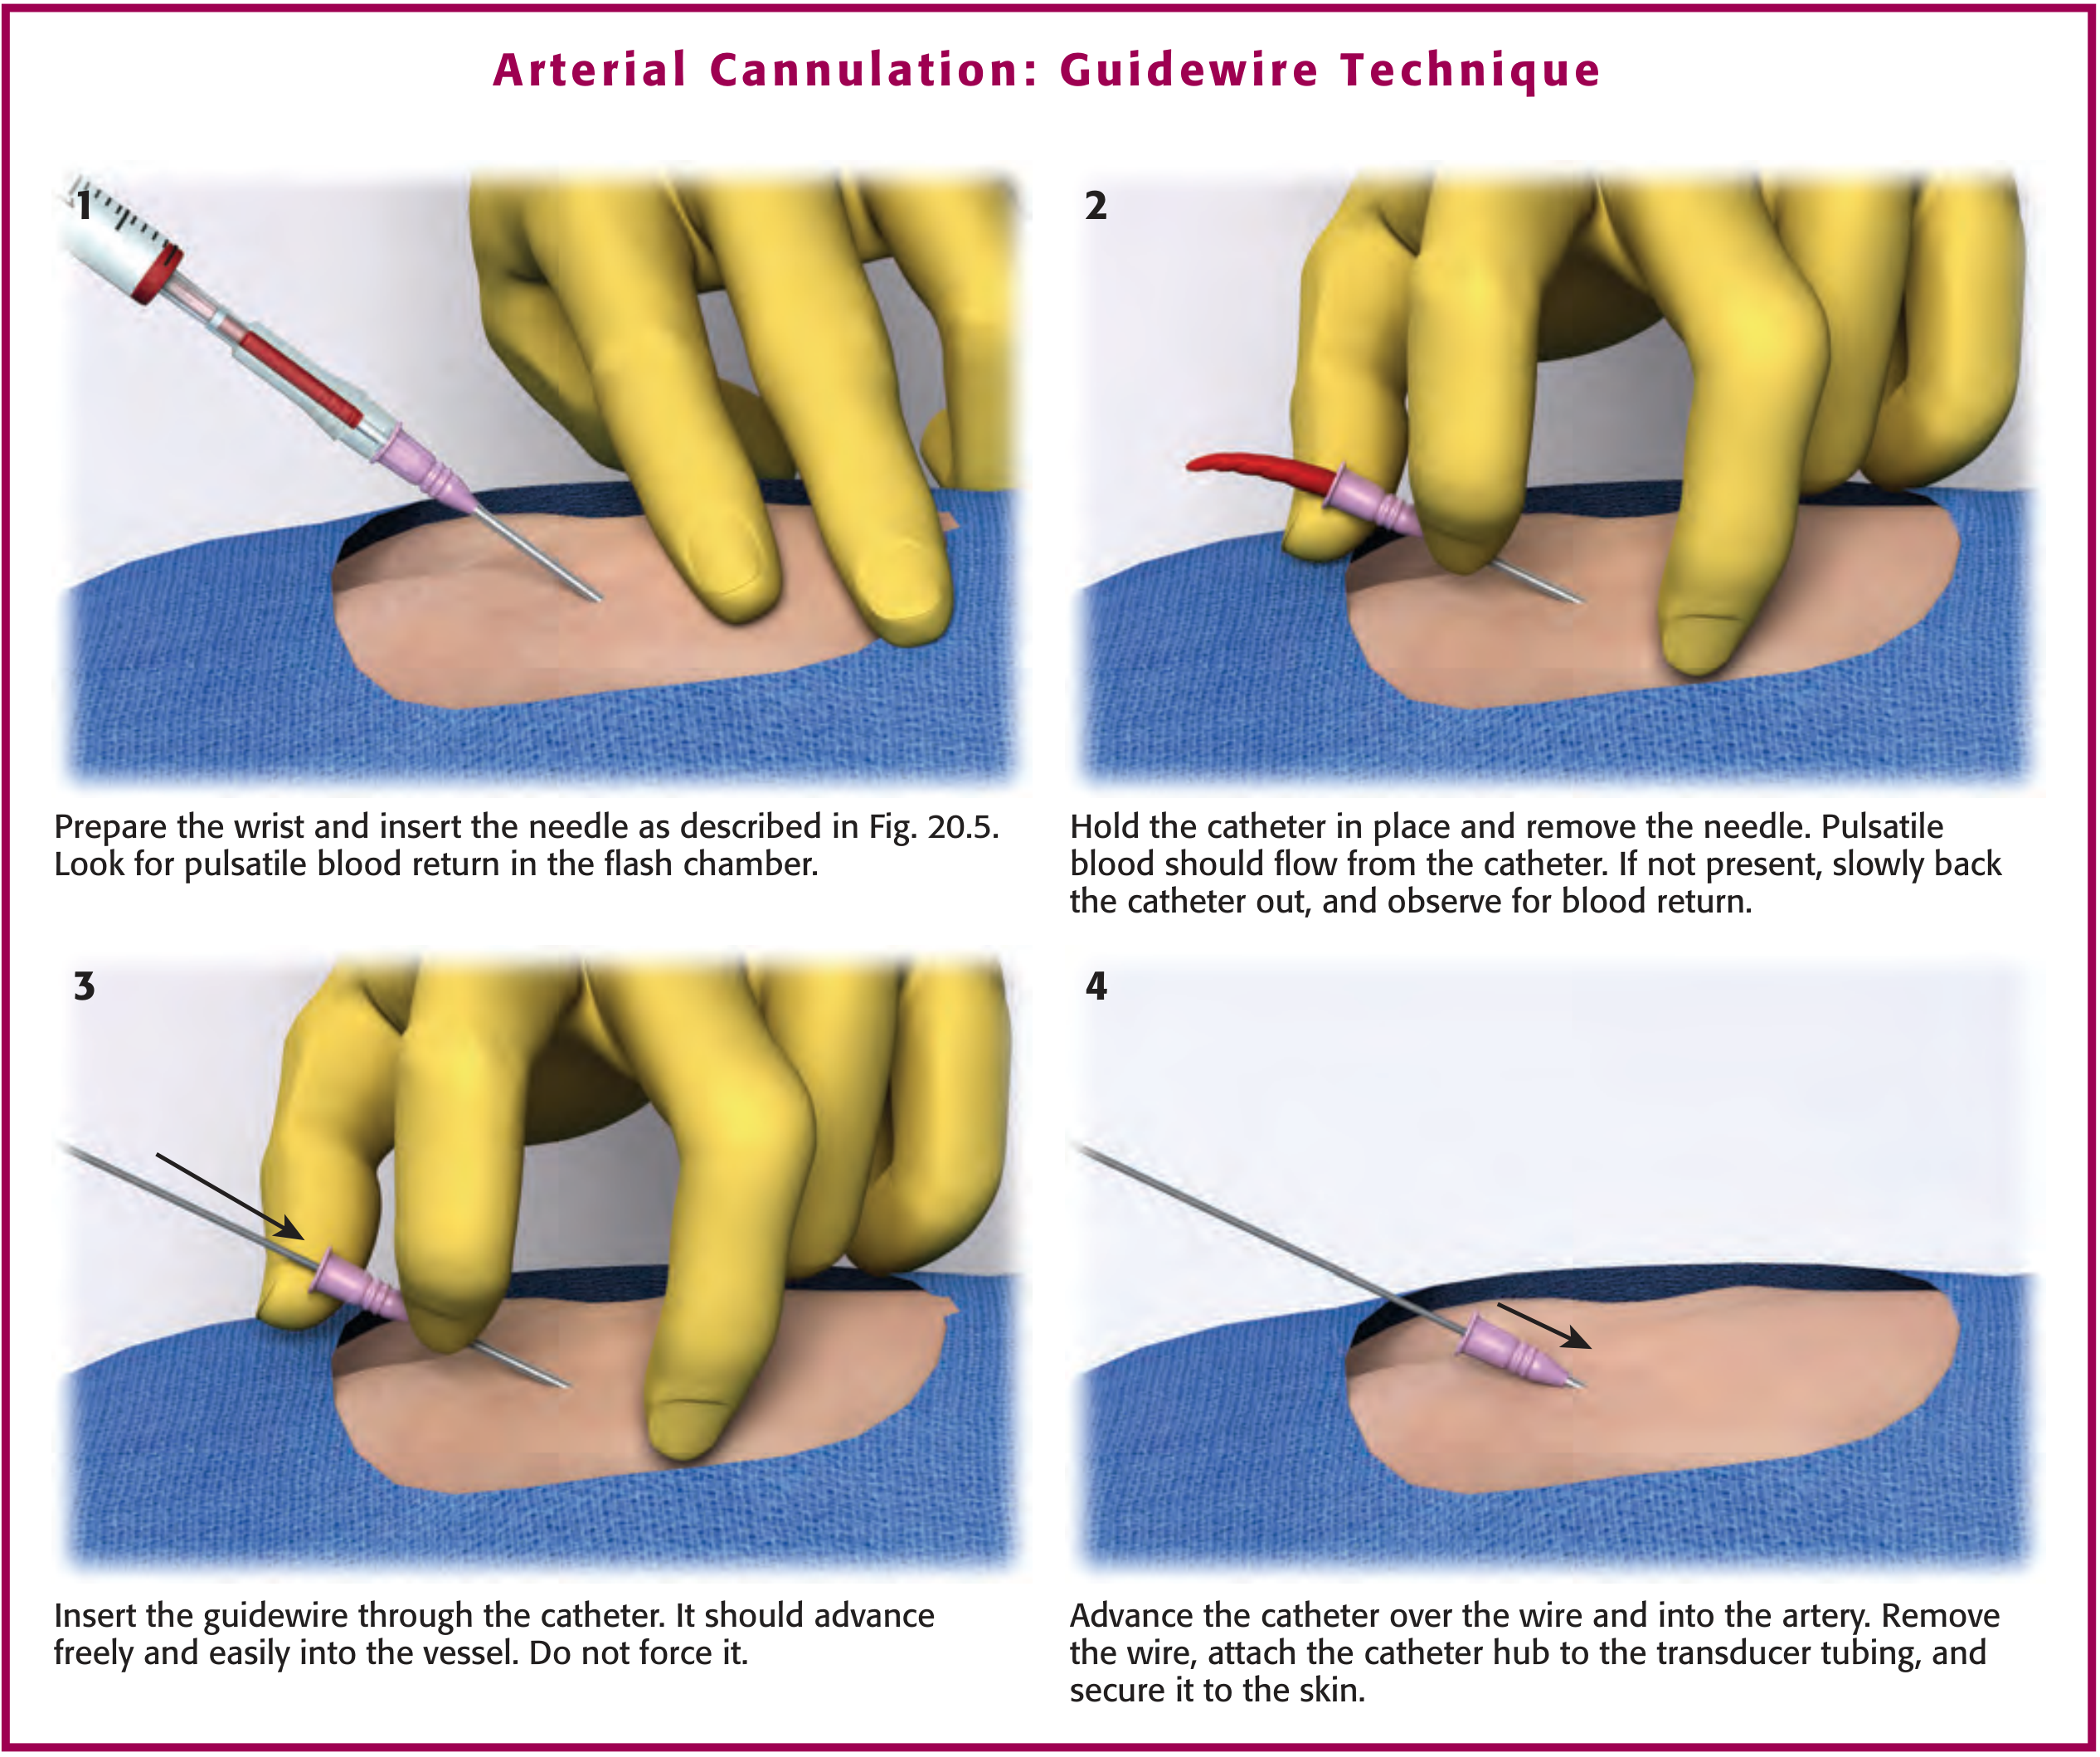
Used when repeated sampling is needed. Step 1: Insert needle, look for pulsatile flashback. Step 2: Remove needle, hold catheter. Step 3: Thread guidewire freely. Step 4: Advance catheter over wire, secure to skin.
5. Arterial Cannulation - Arrow Kit (Commercial Seldinger)
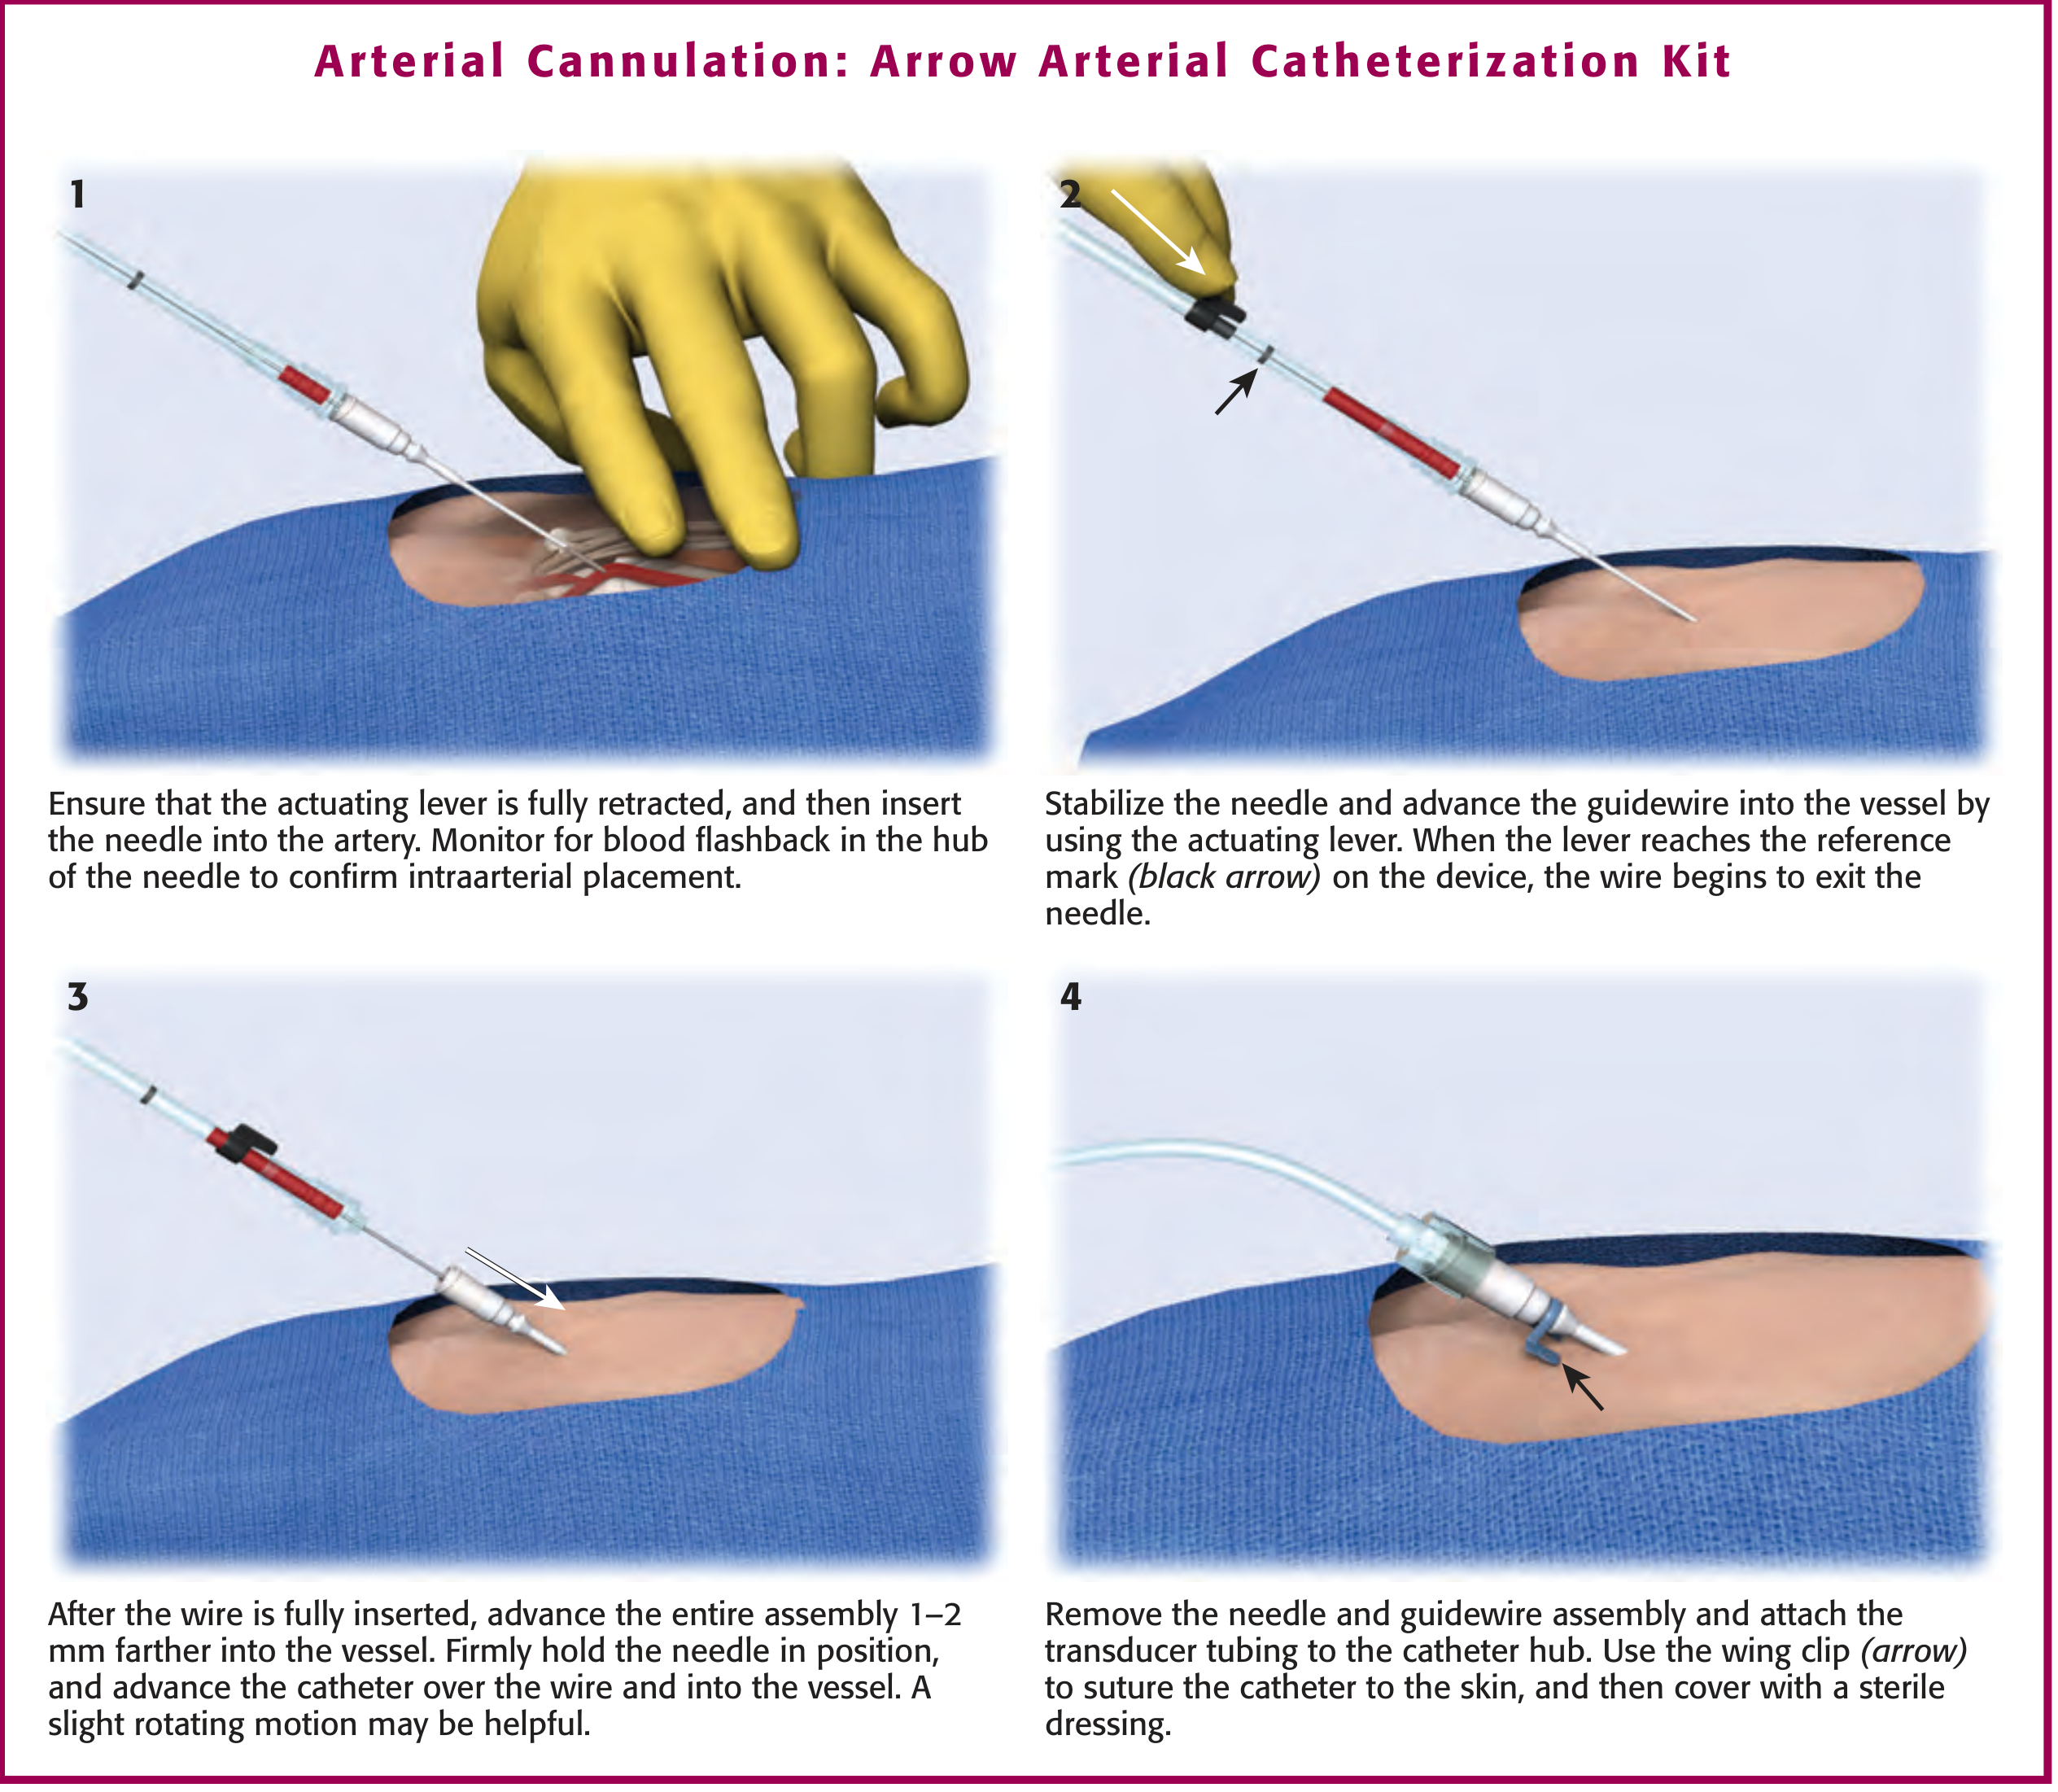
The Arrow kit combines the needle and guidewire into one integrated system - confirm flashback, advance wire via actuating lever, thread catheter, attach transducer tubing.
6. Arterial Pressure Monitoring Setup
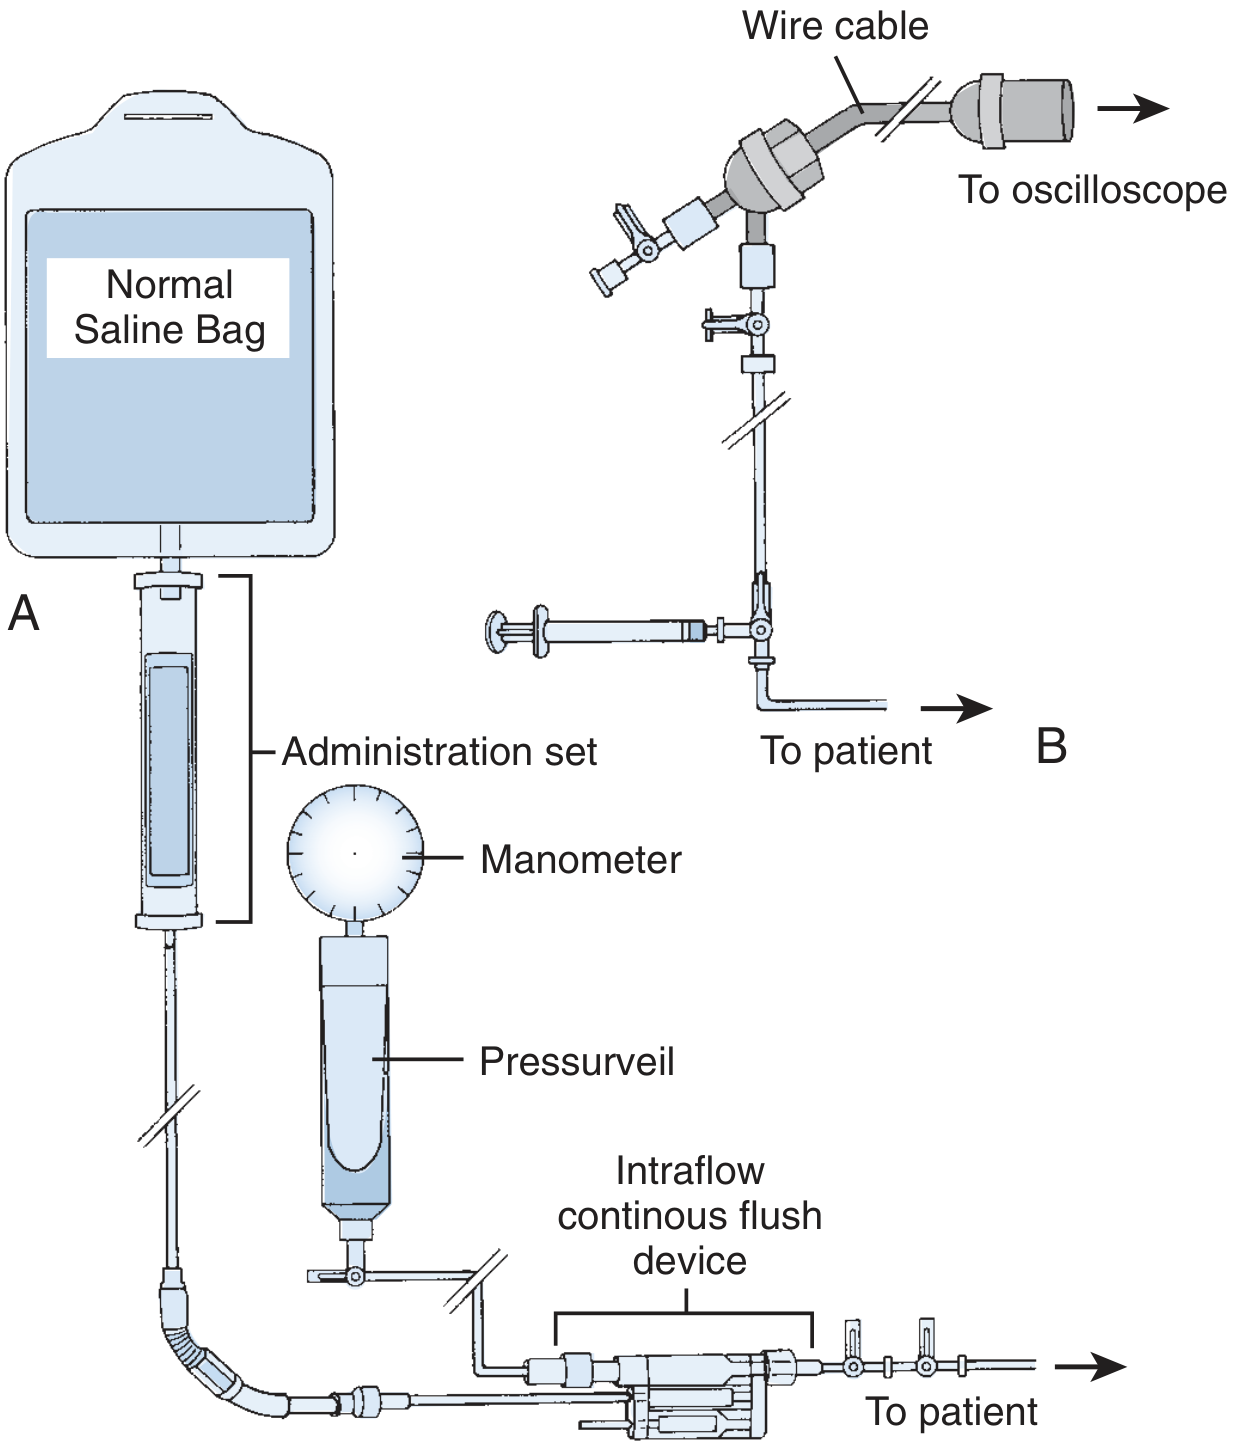
Once cannulated: pressurised saline bag (250-300 mmHg) delivers 3 mL/hr flush via the continuous flush device. Transducer must be kept at the level of the patient's heart.
This is a shared conversation. Sign in to Orris to start your own chat.