
Joint mobilization techniques for physiotherapist physiotherapy coursework for 20 marks can you explain in simple along with topper notes to score full
Joint mobilization techniques
Joint mobilization techniques for physiotherapist physiotherapy coursework for 20 marks can you explain in simple along with topper notes to score full
joint mobilization techniques physiotherapy Maitland Kaltenborn grades complete notes
joint mobilization grades Maitland physiotherapy diagram
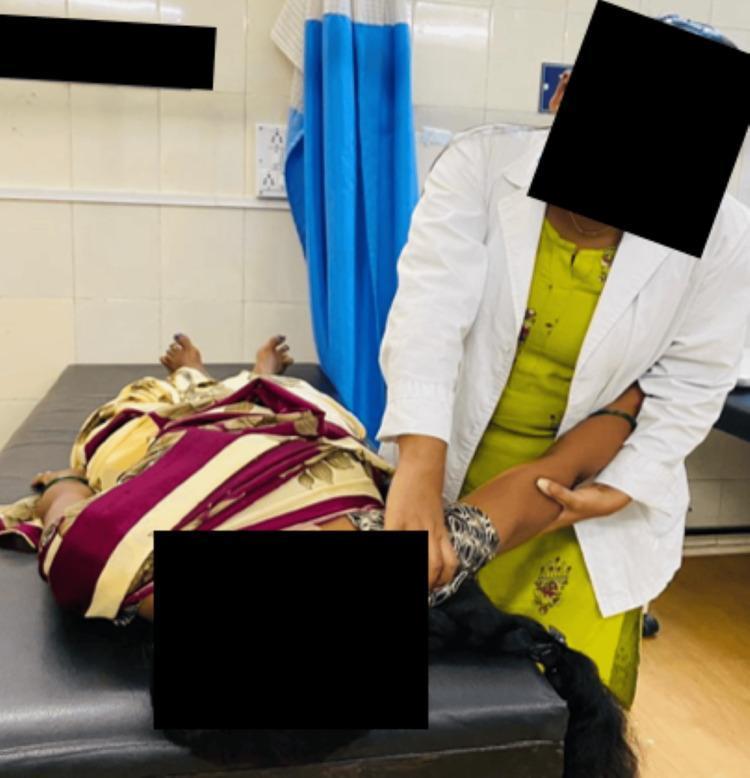
A clinical photograph depicting a manual therapy technique for the shoulder. A patient is positioned supine on a medical treatment plinth, with a physiotherapy practitioner standing at the bedside. The practitioner is performing a Maitland mobilization for the glenohumeral joint, specifically a caudal (inferior) glide in the resting position. One of the practitioner's hands is positioned near the patient's axilla to provide stabilization, while the other hand grasps the proximal humerus to apply a downward force. This orthopedic manual therapy intervention is commonly used in physical rehabilitation to improve range of motion and decrease pain in patients with conditions such as adhesive capsulitis or rotator cuff tears. The setting is a clinical environment with tiled walls and privacy curtains. The image serves as an educational demonstration of therapeutic hand placement and mobilization vectors for the upper extremity.
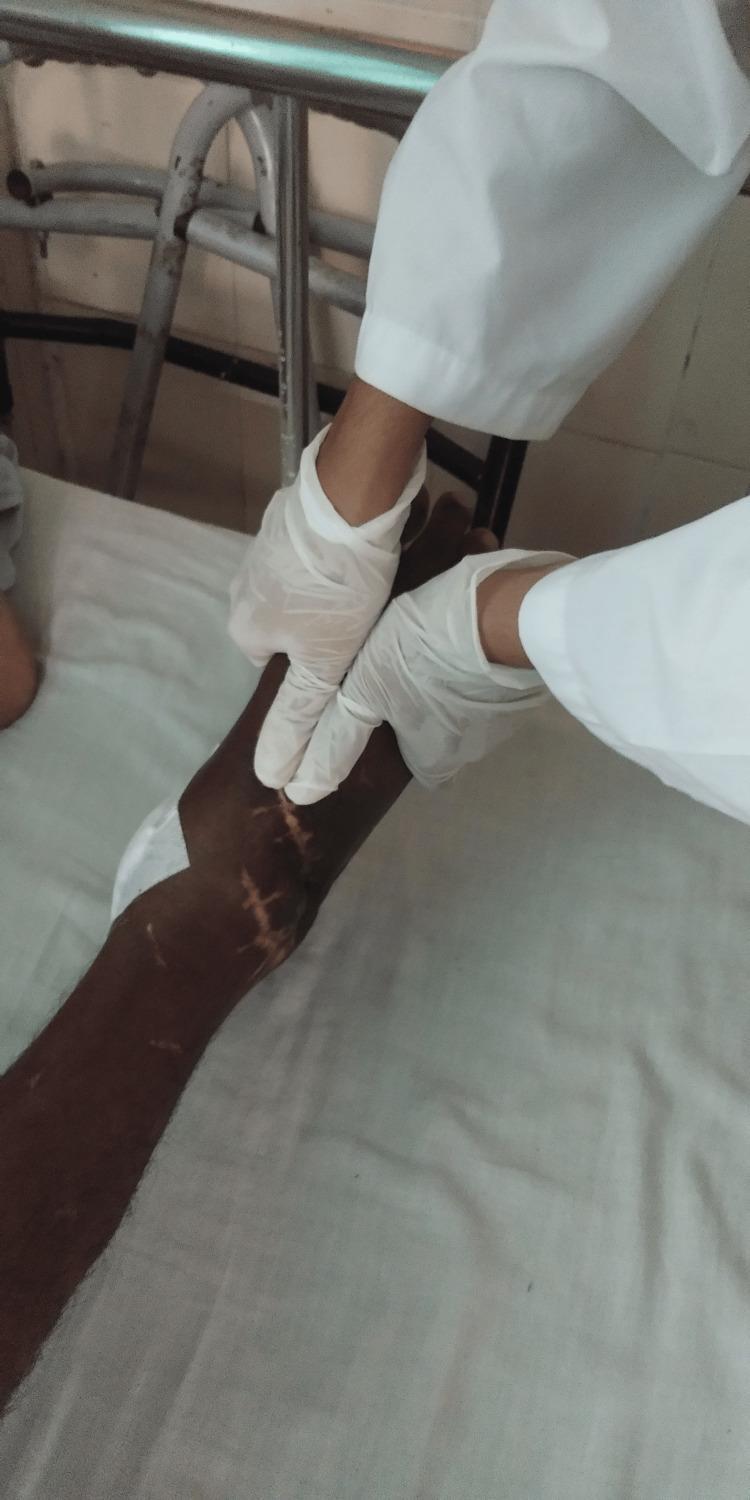
This clinical procedural photograph demonstrates a physical therapist performing Maitland mobilization glides on a patient's right ankle joint. The patient is in a supine position, showing a dark-skinned lower limb with multiple prominent, well-healed surgical scars extending proximally from the anterior and lateral aspects of the ankle, consistent with prior orthopedic intervention for a talus fracture. A white dressing is partially visible near the posterior ankle. The therapist, wearing a white medical gown and sterile white gloves, is shown applying manual force with both hands positioned over the talocrural joint to facilitate joint mobilization. The educational focus of the image is on manual therapy techniques used to increase range of motion and reduce pain in patients with post-traumatic ankle arthritis and equinus deformity. The setting appears to be a clinical rehabilitation or orthopedic ward.
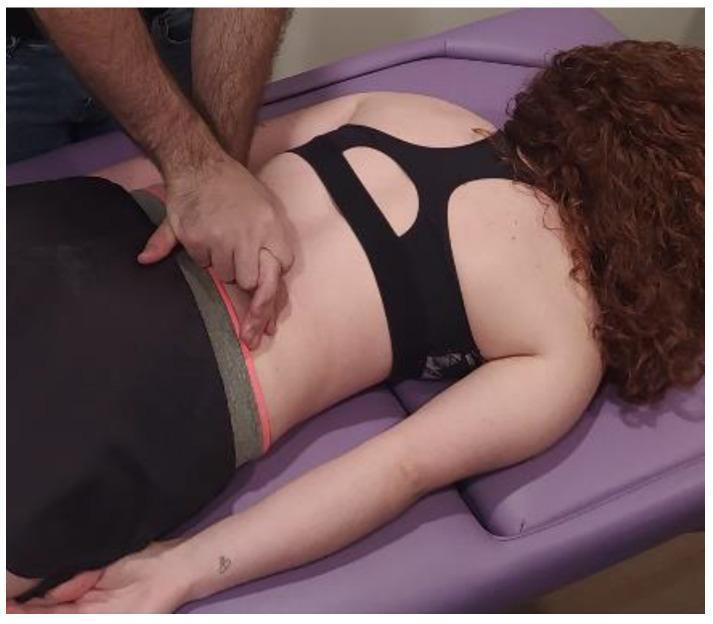
This procedural photograph demonstrates a postero-anterior (PA) joint mobilization of the lumbar spine, specifically utilizing Maitland's technique. The patient is positioned in a prone orientation on a treatment table. A clinician is shown applying manual therapy to the lumbar region. The clinician's right hand uses a reinforced finger-tip contact (index and middle fingers) to apply a focused, downwards force directly over the spinous process of a target lumbar vertebra. The left hand provides stabilization and counter-pressure on the contralateral side of the lower back/iliac crest area. This technique is commonly used in physical therapy and manual medicine to improve joint mobility, assess segmental irritability, and reduce localized spinal pain. The visual emphasizes the specific hand placement and the vector of force required for effective vertebral mobilization in clinical practice.
Joint Mobilization Techniques - Complete 20-Mark Notes
1. DEFINITION
- It involves oscillatory (rhythmic) or sustained movements applied within or at the limit of joint range
- Applied to accessory (joint play) and/or physiological movements
- Considered different from manipulation: mobilization is slow, controlled, and within patient's tolerance; manipulation is a high-velocity, low-amplitude thrust
2. RATIONALE / SCIENTIFIC BASIS
Why Does It Work?
| Mechanism | Explanation |
|---|---|
| Gate Control Theory (Melzack & Wall) | Grades I & II stimulate mechanoreceptors (Types I & II) that inhibit pain signals at spinal cord level |
| Endogenous Opioid Release | Mobilization triggers release of endorphins and enkephalins |
| Capsular Stretch | Grades III & IV physically stretch shortened joint capsule and periarticular structures |
| Synovial Fluid Movement | Improves nutrient diffusion into avascular cartilage |
| Neurophysiological Effect | Inhibits type IV nociceptors, reduces muscle guarding |
3. INDICATIONS
- Painful, hypomobile joints (stiff joint)
- Joint dysfunction due to capsular tightness
- Post-immobilization stiffness
- Osteoarthritis with restricted ROM
- Adhesive capsulitis (frozen shoulder)
- Post-fracture stiffness (once healed)
- Cervical/lumbar spine pain
- Sports injuries
4. CONTRAINDICATIONS
- Malignancy involving the joint
- Active infection / septic arthritis
- Unhealed fracture at the site
- Rheumatoid arthritis with ligamentous instability (e.g., atlantoaxial instability)
- Osteoporosis (severe)
- Vertebrobasilar insufficiency (for cervical spine)
- Joint hypermobility
- Pregnancy (lumbar/sacral)
- Acute inflammatory phase
- Anticoagulant therapy
5. CLASSIFICATION OF JOINT MOBILIZATION SYSTEMS
6. MAITLAND'S GRADING SYSTEM (Most Commonly Tested)
Concept: Movement Diagram
- R1 = First point of resistance felt by therapist
- R2 = End of available range (limit of resistance)
The 5 Grades:
| Grade | Amplitude | Location in Range | Primary Effect |
|---|---|---|---|
| Grade I | Small amplitude | Beginning of range (before R1) | Pain relief (neurophysiological) |
| Grade II | Large amplitude | Mid-range (before R1) | Pain relief (neurophysiological) |
| Grade III | Large amplitude | Reaches R1-R2 (into resistance) | Stretch - ROM improvement |
| Grade IV | Small amplitude | At R2 (end of range, into resistance) | Stretch - ROM improvement |
| Grade V | Small amplitude, High Velocity | End of range | Manipulation (thrust) |
Simple Memory Rule:
"1 & 2 are pain-free (early range), 3 & 4 are in resistance (end range)" "1 & 2 = Pain relief | 3 & 4 = Stiffness"
Clinical Application:
- Pain-dominant patient → Grades I & II (do not provoke resistance)
- Stiffness-dominant patient → Grades III & IV (stretch the capsule)
Maitland also further refines with +/- notation:
- Grade III- = taken to first onset of R1 (barely into resistance)
- Grade III+ = taken to 75% of R1-R2 (deep into resistance)
7. KALTENBORN'S GRADING SYSTEM
Core Concept: Convex-Concave Rule
- When a concave surface moves on a fixed convex surface: glide occurs in same direction as bone movement
- When a convex surface moves on a fixed concave surface: glide occurs in opposite direction to bone movement
The 3 Grades:
| Grade | Description | Purpose |
|---|---|---|
| Grade I (Loosening) | Small amplitude oscillations in the "slack" (loose) zone - no tension in capsule | Reduces pain, used for examination |
| Grade II (Tightening/Slack) | Takes up joint slack until resistance begins - tissues tighten | Reduces pain + initial stretch |
| Grade III (Stretching) | Force applied beyond tissue resistance - actual stretch | Increases ROM, treats hypomobility |
Key Difference from Maitland:
Maitland = Oscillatory (rhythmic movement) Kaltenborn = Sustained (hold and stretch)
8. MULLIGAN'S CONCEPT - MOBILIZATION WITH MOVEMENT (MWM)
Key Principle:
Example:
- Lateral elbow pain (tennis elbow): therapist applies lateral glide at elbow while patient grips
- Restricted shoulder abduction: therapist glides humeral head while patient actively abducts
Rules (PILL Principle):
- Painless - technique must be completely pain-free
- Immediate improvement in range
- Lasting - improvement must persist
- Load bearing position preferred
9. ACCESSORY vs. PHYSIOLOGICAL MOVEMENTS
| Type | Definition | Example |
|---|---|---|
| Physiological | Active or passive movements through normal planes | Knee flexion, shoulder abduction |
| Accessory (Joint Play) | Small movements that cannot be performed actively; essential for normal physiological motion | Posterior glide of tibia on femur, long-axis distraction |
Accessory movements must be restored before full physiological ROM returns - this is the key justification for manual therapy
10. TYPES OF ACCESSORY MOVEMENTS
- Distraction (Traction) - Joint surfaces pulled apart (perpendicular)
- Compression - Joint surfaces pushed together (assessment only)
- Gliding/Sliding - One joint surface slides on another (parallel)
- Rolling - One surface rolls over another
- Spinning - Rotation around a mechanical axis
11. TECHNIQUE PRINCIPLES (HOW TO PERFORM)
- Position - Patient in a comfortable, relaxed position; joint in resting position (position of maximum capsular laxity)
- Stabilization - Proximal bone must be stabilized (by hand or belt)
- Direction - Determined by the convex-concave rule (Kaltenborn)
- Speed - Slow rhythmic oscillations (1 per 1-2 seconds for Maitland)
- Duration - Typically 30-60 seconds per set, 3-5 sets
- Reassessment - Re-evaluate pain and ROM after each set (key feature of Maitland approach)
12. COMPARISON TABLE (HIGH-YIELD FOR EXAMS)
| Feature | Maitland | Kaltenborn | Mulligan |
|---|---|---|---|
| Origin | Australia | Norway/Scandinavia | New Zealand |
| Type of force | Oscillatory (rhythmic) | Sustained (hold) | Glide + active movement |
| No. of Grades | 5 (I-V) | 3 (I-III) | No fixed grading |
| Grade I-II purpose | Pain relief | Pain relief | N/A |
| Grade III-IV purpose | Stretch/ROM | Stretch/ROM | N/A |
| Key concept | Movement diagram (R1, R2) | Convex-concave rule | PILL principle |
| Patient role | Passive | Passive | Active (moves during Rx) |
| Manipulation included? | Yes (Grade V) | No | No |
13. DOCUMENTATION / REASSESSMENT (Topper Point)
- VAS (Visual Analogue Scale) for pain before and after
- Goniometric ROM measurements before and after
- Patient's response during technique
- Technique applied, grade used, duration, number of sets
- Plan for next session
14. SAMPLE EXAM ANSWER STRUCTURE (Topper Strategy)
- Definition (2 marks)
- Mechanism of action (3 marks - Gate theory, opioids, capsular stretch)
- Indications & Contraindications (3 marks)
- Maitland Grading - with table and clinical application (5 marks)
- Kaltenborn Grading - with convex-concave rule (3 marks)
- Mulligan / Other concepts (2 marks)
- Technique principles & Reassessment (2 marks)
QUICK REVISION MNEMONICS
"Small-Large-Large-Small-HVLA" = I, II, III, IV, V "Pain Pain Stretch Stretch Thrust" = purpose of each grade
"Loosen - Tighten - Stretch" = Grades I, II, III
Painless - Immediate - Lasting - Loaded
"Convex goes opposite, Concave goes same" (direction of glide vs. bone movement)
KEY EXAMINER FAVORITE POINTS
- Maitland Grades I & II work via neurophysiological mechanism (Gate Control)
- Maitland Grades III & IV work via mechanical mechanism (capsular stretch)
- Kaltenborn uses translatory (not angular) movements - more biomechanically precise
- Mobilization is NOT manipulation - mobilization is slow, controlled, within patient's range; manipulation is high velocity thrust
- The resting position (loose-packed position) of joint is the starting point for most mobilizations
- Always reassess after each technique - this is Maitland's core philosophy
Joint mobilization techniques for physiotherapist physiotherapy coursework for 20 marks can you explain in simple along with topper notes to score full
JOINT MOBILIZATION TECHNIQUES
Complete Physiotherapy Notes | 20 Marks
1. DEFINITION (2 marks)
- Restore normal range of motion (ROM)
- Reduce pain
- Improve joint mechanics and function
Simple words: The therapist moves your stiff or painful joint using their hands in a careful, graded way to make it move better and hurt less.
| Mobilization | Manipulation | |
|---|---|---|
| Speed | Slow, controlled | High velocity, thrust |
| Patient control | Can stop anytime | Cannot stop |
| Grade | I - IV | Grade V |
| Risk | Lower | Higher |
2. TYPES OF JOINT MOVEMENTS (Foundation concept)
| Type | Definition | Example |
|---|---|---|
| Physiological movements | Movements you can do actively (normal planes) | Knee bending, shoulder lifting |
| Accessory (Joint Play) movements | Small movements you CANNOT do actively but are essential for normal motion | Posterior glide of tibia, joint distraction |
Golden Rule: Accessory movements must be restored first before full physiological ROM can return. This is WHY we do joint mobilization.
Types of Accessory Movements:
- Distraction - joint surfaces pulled apart (↑↑ used)
- Gliding/Sliding - one surface slides on another (↑↑ used)
- Rolling - one surface rolls on another
- Spinning - rotation around a fixed axis
- Compression - surfaces pushed together (diagnostic only)
3. MECHANISM OF ACTION / WHY IT WORKS (3 marks)
| Mechanism | How it works | Which grades |
|---|---|---|
| Gate Control Theory (Melzack & Wall, 1965) | Mobilization stimulates Type I & II mechanoreceptors → inhibit pain signals at spinal cord → pain relief | Grades I & II |
| Endogenous Opioid Release | Triggers release of endorphins and enkephalins naturally | Grades I & II |
| Capsular Stretch (Mechanical) | Physically stretches shortened joint capsule and periarticular structures | Grades III & IV |
| Synovial Fluid Circulation | Improves nutrient flow to avascular cartilage | All grades |
| Inhibition of Nociceptors | Suppresses Type IV pain receptors, reduces muscle guarding | All grades |
Simple memory: Low grades = brain-level pain relief | High grades = physical stretching
4. INDICATIONS AND CONTRAINDICATIONS (3 marks)
Indications (when to use):
- Painful hypomobile (stiff) joints
- Adhesive capsulitis (frozen shoulder)
- Osteoarthritis with restricted ROM
- Post-immobilization/post-fracture stiffness (once healed)
- Cervical and lumbar spine pain
- Sports injuries with joint restriction
- Capsular pattern of restriction
Contraindications:
- Malignancy/cancer at the joint
- Active infection / septic arthritis
- Unhealed fracture
- Severe osteoporosis
- Rheumatoid arthritis with atlantoaxial instability
- Vertebrobasilar insufficiency (cervical spine)
- Acute inflammatory phase
- Joint hypermobility
- Pregnancy (lumbar/sacral)
- Patient on anticoagulants
5. MAITLAND'S GRADING SYSTEM ⭐ (5 marks - Most important)
Key Concepts First:
- R1 = First point of resistance felt by therapist during movement
- R2 = End of available range (maximum resistance/end range)
- Movements are rhythmic oscillations at rate of 1 per 1-2 seconds
THE 5 GRADES:
ROM:   Start ←————————————R1————————→ R2 (End)
         |         |              |       |
        I          II           III      IV
| Grade | Amplitude | Position in Range | Purpose | Patient Type |
|---|---|---|---|---|
| I | Small | Start of range (before R1) | Pain relief | Pain-dominant |
| II | Large | Mid-range (before R1) | Pain relief | Pain-dominant |
| III | Large | Into resistance (R1 → R2) | Stretch / ROM | Stiffness-dominant |
| IV | Small | End of range (at R2) | Stretch / ROM | Stiffness-dominant |
| V | Small, HVLA thrust | End of range | Manipulation | Stiffness (advanced) |
HVLA = High Velocity Low Amplitude
Simple Memory Rule:
🔵 Grades I & II = Pain relief → Work BEFORE resistance (neurophysiological effect) 🔴 Grades III & IV = Stiffness → Work INTO resistance (mechanical stretching) ⚡ Grade V = Manipulation (thrust)
Clinical Decision Making (Maitland):
| Patient Type | Signs | Treatment Grade |
|---|---|---|
| Pain-dominant | Pain before resistance on exam | Grades I & II |
| Stiffness-dominant | Resistance before/with pain | Grades III & IV |
- Check VAS pain score
- Measure ROM with goniometer
- Adjust grade based on response
Maitland's Core Philosophy = REASSESS after every technique
Maitland's Refinements (+/- notation):
- III- = Just to onset of R1
- III+ = 75% into R1-R2 range
- IV+ = Maximum end range stretch
6. KALTENBORN'S GRADING SYSTEM ⭐ (3 marks)
Core Concept: CONVEX-CONCAVE RULE
When CONVEX surface moves on fixed concave → Glide in OPPOSITE direction to bone movement When CONCAVE surface moves on fixed convex → Glide in SAME direction as bone movement
THE 3 GRADES:
| Grade | Name | Description | Purpose |
|---|---|---|---|
| Grade I | Loosening | Small amplitude oscillation in slack/loose zone - no capsular tension | Pain relief, examination |
| Grade II | Tightening | Takes up joint slack until tissues begin to tighten | Pain relief + mild stretch |
| Grade III | Stretching | Force beyond tissue resistance - actual capsular stretch | Increase ROM, treat hypomobility |
Simple analogy: Think of a rope tied between two posts:
- Grade I = Moving rope while it's loose (no tension)
- Grade II = Taking up slack until rope just gets taut
- Grade III = Pulling beyond the tension point to stretch it
Kaltenborn vs. Maitland - Key Difference:
| Maitland | Kaltenborn | |
|---|---|---|
| Movement type | Oscillatory (rhythmic) | Sustained (hold) |
| No. of grades | 5 | 3 |
| Main concept | Movement diagram (R1,R2) | Convex-concave rule |
| Basis | Neurophysiological + mechanical | Biomechanical |
7. MULLIGAN CONCEPT - MWM (2 marks)
Key Principle:
PILL Principle (must memorize):
| Letter | Meaning |
|---|---|
| P | Painless - technique must be completely pain-free |
| I | Immediate improvement in range/function |
| L | Lasting - improvement must persist after treatment |
| L | Loaded/functional position preferred |
Examples:
- Tennis elbow: lateral glide at elbow + patient grips
- Restricted shoulder abduction: humeral head glide + patient abducts
- Ankle stiffness: talar glide + patient squats
Key difference: Patient is ACTIVE in Mulligan - passive in Maitland and Kaltenborn
8. TECHNIQUE PRINCIPLES - HOW TO PERFORM (2 marks)
- Position joint in resting position (loose-packed position = maximum capsular laxity)
- Stabilize the proximal bone (hand, belt, or plinth)
- Direction of force - use convex-concave rule
- Speed - slow, rhythmic oscillations (1 per 1-2 seconds)
- Amplitude - based on grade chosen
- Duration - 30-60 seconds per set, 3-5 sets per session
- Reassess pain and ROM after every set
- Communicate with patient throughout
Common Starting Positions by Joint:
| Joint | Resting Position |
|---|---|
| Shoulder | 55° abduction, 30° horizontal flexion |
| Elbow | 70° flexion, 10° supination |
| Hip | 30° flexion, 30° abduction, slight ER |
| Knee | 25° flexion |
| Ankle | 10° plantarflexion, midway inversion/eversion |
9. COMPARISON TABLE - ALL 3 SYSTEMS (High-yield)
| Feature | Maitland | Kaltenborn | Mulligan |
|---|---|---|---|
| Country | Australia | Norway | New Zealand |
| Movement type | Oscillatory | Sustained | Glide + Active |
| No. of Grades | 5 (I-V) | 3 (I-III) | No grading |
| Pain grades | I & II | I & II | N/A |
| Stretch grades | III & IV | III | N/A |
| Key concept | R1, R2 | Convex-concave | PILL |
| Patient role | Passive | Passive | Active |
| Manipulation | Grade V | No | No |
| Primary use | Spinal + peripheral | Peripheral joints | Peripheral joints |
10. DOCUMENTATION & REASSESSMENT (Topper extra point)
- Joint treated + technique name
- Grade applied + direction of force
- Duration and number of sets
- Pre and post VAS (pain score 0-10)
- Pre and post ROM (goniometer measurement)
- Patient's response
- Plan for next session
MASTER MNEMONICS (Memory Aids)
Maitland Grades Memory:
"Small Large Large Small Thrust" = I, II, III, IV, V "Pain Pain Stretch Stretch Crack" = purpose of each grade
Kaltenborn Memory:
"Loose - Taut - Stretch" = Grades I, II, III
Mulligan Memory:
PILL = Painless, Immediate, Lasting, Loaded
Convex-Concave Rule:
"CONvex = CONtrary (opposite direction)" "CONcave = CONforms (same direction)"
Contraindications Memory (FOMIN):
Fracture (unhealed), Osteoporosis (severe), Malignancy, Infection, Neurological instability
EXAM ANSWER BLUEPRINT FOR 20 MARKS
| Section | Content | Marks |
|---|---|---|
| Definition + types of movements | What is mobilization, accessory vs. physiological | 2 |
| Mechanism of action | Gate theory, opioids, capsular stretch | 3 |
| Indications & Contraindications | List with headings | 3 |
| Maitland System | Grades I-V table + R1/R2 + clinical decision | 5 |
| Kaltenborn System | Grades I-III + convex-concave rule | 3 |
| Mulligan MWM | PILL principle + examples | 2 |
| Technique + Reassessment | Steps + documentation | 2 |
| Total | 20 |
KEY EXAMINER FAVOURITE POINTS (Score Boosters)
- Grades I & II = Neurophysiological (Gate Control) - do NOT cross R1
- Grades III & IV = Mechanical (capsular stretch) - go INTO resistance
- Mobilization ≠ Manipulation - this distinction is always tested
- Resting position of joint is the safest starting point
- Convex-concave rule determines direction of glide
- Maitland's reassessment philosophy - reassess after EVERY technique
- Mulligan technique must be completely painless - if painful, stop
- Kaltenborn uses translatory (linear) forces, not angular
- Joint mobilization works on accessory movements which cannot be done actively
- Always check for contraindications before applying any mobilization
Maitland concept for 20 marks with diagram and flow chart for PhD coursework to score full marks
Maitland concept physiotherapy PhD level movement diagram R1 R2 evidence based research 2020 2025
Maitland movement diagram joint mobilization grades oscillatory physiotherapy
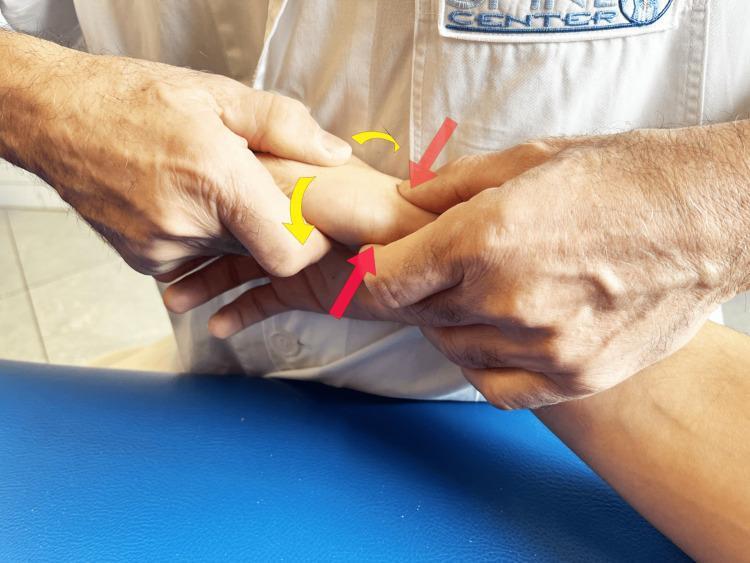
This clinical photograph illustrates a manual therapy technique, specifically Maitland's passive accessory mobilization, applied to the trapeziometacarpal (TMj) joint of the right hand. The patient's forearm is resting in a neutral position on a blue treatment surface. The therapist utilizes a bimanual grip; the right hand stabilizes the patient's wrist and carpal region, while the left hand performs the mobilization. The therapist's left thumb and index finger encircle the base of the first metacarpal. Overlaid graphical indicators clarify the mechanics: straight red arrows demonstrate an anteroposterior (or posterior-anterior) gliding force applied to the basal joint, and curved yellow arrows represent rotational or oscillatory movement components. This procedural image demonstrates a common conservative management approach for rhizarthrosis (trapeziometacarpal osteoarthritis), aimed at reducing pain and improving accessory joint mobility through small-amplitude oscillations.
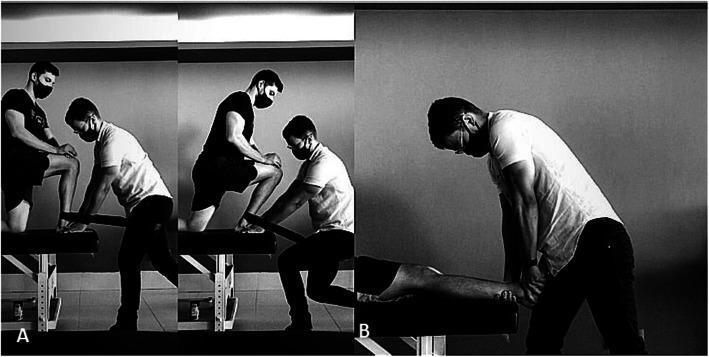
Clinical photographs in two panels demonstrating manual therapy techniques for the ankle joint. Panel A illustrates the Mulligan Mobilization with Movement (MWM) technique for improving ankle dorsiflexion. A patient is shown in a semi-kneeling, weight-bearing position on a treatment table while the physiotherapist applies a manual anteroposterior glide to the talus. Simultaneously, a mobilization belt is positioned around the therapist's waist and the patient's distal tibia/fibula to provide a posteroanterior force during active movement. Panel B demonstrates the Maitland mobilization method. The patient is in a supine (dorsal decubitus) position with the foot extending off the edge of the table. The therapist is applying a passive, oscillatory Grade IV manual pressure in an anteroposterior direction to the talar dome. Both images highlight clinical applications in orthopedic physical therapy for managing range of motion restrictions and joint dysfunction. The subjects are shown wearing face masks, indicating a clinical setting during the COVID-19 pandemic.
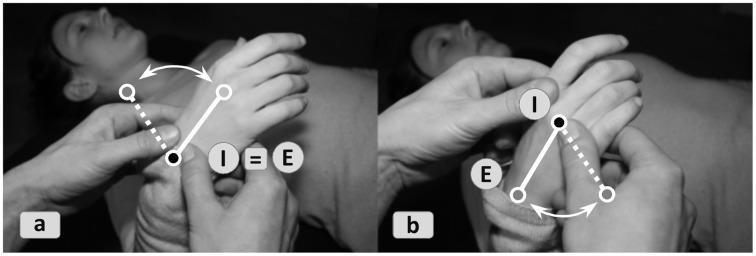
This comparative clinical photograph and educational diagram demonstrates two different manual therapy approaches to wrist joint mobilization: local versus remote cueing. Frame (a) illustrates local mobilization where the practitioner's hands are positioned directly at the wrist joint. Geometrically, this is represented by the formula 'I ≡ E', signifying that the interface (I) and the effector space (E) are identical; the force is applied exactly where the therapeutic movement is intended to occur. Frame (b) depicts remote mobilization utilizing the Feldenkrais Method principle of 'proximal-distal-reversal'. Here, the practitioner manipulates the base joints of the fingers (effector space, E) to induce a change in the organization of the wrist (interface, I). The diagrams use solid and dashed lines with curved arrows to indicate the lever arms and the direction of oscillatory or rotational force applied. This visual aid teaches how different actuation pathways can be used to address the same anatomical joint eigenfunction, allowing for subtle variations in neuromuscular feedback and musculoskeletal organization.
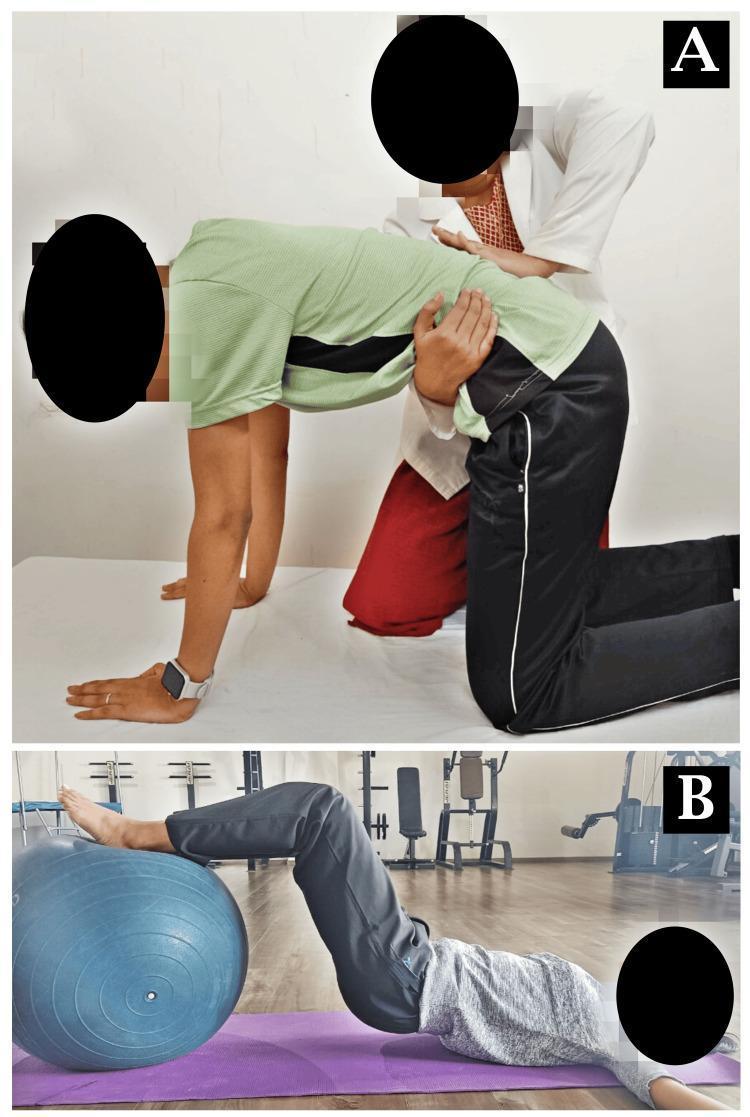
Clinical photograph showing two stages of physiotherapy for sacroiliac joint (SIJ) dysfunction. Panel A demonstrates a manual therapy technique known as mobilization with movement (MWM). A patient is in a quadruped (all-fours) position on a treatment table while a therapist, wearing a white lab coat, applies a manual gliding force to the posterior pelvic/sacroiliac region to facilitate pain-free movement. Panel B illustrates a rehabilitative exercise for core and pelvic stability. The patient is performing a supine bridge on a purple yoga mat with their lower legs and heels resting on a blue Swiss ball (stability ball). This movement combines hip extension and knee flexion to target the gluteal muscles, hamstrings, and lumbopelvic stabilizers. The images serve as educational examples of combined manual and active rehabilitation strategies for managing pelvic girdle pain and improving musculoskeletal function in the lumbosacral region.
Maitland mobilization manual therapy effectiveness systematic review
https://musculoskeletalkey.com/the-maitland-concept-evidence…
THE MAITLAND CONCEPT
PhD Physiotherapy Coursework | 20 Marks
1. HISTORICAL BACKGROUND & ORIGIN (1 mark)
- Cyriax's work on passive movement
- Stoddard's osteopathic principles
- Maitland's own meticulous clinical observations and patient-centered philosophy
PhD-level point: Maitland's concept is NOT merely a set of techniques - it is a comprehensive philosophical framework for clinical reasoning in neuromusculoskeletal (NMS) physiotherapy.
2. DEFINITION OF THE MAITLAND CONCEPT (1 mark)
"A specific way of thinking, continuous evaluation and assessment and the art of manipulative physiotherapy - to know when, how and which techniques to perform, and to adapt these to the individual patient - and a total commitment to the patient." (Hengeveld & Banks, 2014)
- Patient-centered clinical reasoning
- Passive movement examination and treatment
- Continuous reassessment philosophy
- Movement diagram as a clinical communication tool
3. CORE ELEMENTS OF THE MAITLAND CONCEPT (3 marks)
FLOWCHART 1: Four Core Elements
┌─────────────────────────────────────────────────────────┐
│             THE MAITLAND CONCEPT - CORE ELEMENTS        │
└─────────────────────────────────────────────────────────┘
                           │
          ┌────────────────┼────────────────┐
          │                │                │
          ▼                ▼                ▼
  ┌───────────────┐ ┌──────────────┐ ┌─────────────────┐
  │  1. PATIENT-  │ │  2. BRICK    │ │  3. IDENTIFYING │
  │   CENTERED    │ │    WALL      │ │  & MAXIMIZING   │
  │   APPROACH    │ │   ANALOGY    │ │    MOVEMENT     │
  │               │ │  (Clinical   │ │    POTENTIAL    │
  │ • Believe the │ │  Reasoning)  │ │                 │
  │   patient     │ │              │ │ • Active        │
  │ • Active      │ │ Theory ║Clin │ │ • Passive       │
  │   listening   │ │ Science║Prac │ │ • Accessory     │
  │ • Individuali │ │        ║     │ │   movements     │
  │   sed care    │ │ (The   ║Wall)│ │                 │
  └───────────────┘ └──────────────┘ └─────────────────┘
                           │
                           ▼
              ┌────────────────────────┐
              │  4. SCIENCE & ART OF   │
              │      ASSESSMENT        │
              │                        │
              │ • Subjective exam      │
              │ • Physical exam        │
              │ • Movement diagnosis   │
              │ • Reassessment (!!!)   │
              └────────────────────────┘
3A. THE BRICK WALL ANALOGY (PhD Essential)
┌──────────────────────────────────────────────────────────────┐
│                    THE BRICK WALL MODEL                       │
│                                                               │
│  LEFT SIDE (Theory)         │  RIGHT SIDE (Clinical)         │
│  ========================   │  ==========================    │
│  • Biomedical knowledge    ║│  • Patient's symptoms          │
│  • Anatomy / Physiology    ║│  • Signs on examination        │
│  • Pathology               ║│  • Patient's beliefs           │
│  • Research evidence       ║│  • Functional limitations      │
│  • Biomechanics            ║│  • Patient's goals             │
│  • Neuroscience            ║│  • Clinical presentation       │
│                             │                                 │
│           THE WALL = Conscious separation                     │
│           "Do not let theory blind you to                     │
│            what the patient is telling you"                   │
└──────────────────────────────────────────────────────────────┘
- Does NOT let biomedical diagnosis limit physiotherapy assessment
- Treats the patient, not the diagnosis
- Remains open to clinical findings that may contradict theoretical models
- Integrates both sides in clinical decision-making (Banks & Hengeveld, 2010)
4. THE MOVEMENT DIAGRAM (3 marks) ⭐ Most Examined at PhD Level
DIAGRAM 1: The Movement Diagram - Normal Joint
   PAIN/RESISTANCE
        │
   P2   │                                    ╳ L (Limit)
        │                                   /
        │                                  /
        │                                 /
   P1   │                          ╳─────/
        │                         /
        │                        / R1 (First onset of resistance)
        │                       /
   P0   │──────────────────────╳──────────────────────────────
        │                      │                              │
       A│                      │                              │B
       (Start of Range)                               (End of Range)
- Horizontal axis (A to B): Range of motion (A = start, B = end/limit)
- Vertical axis (0 to P2): Intensity of pain, resistance, or spasm
- R1: Point in range where therapist FIRST detects resistance
- R2 / L: Limit of range (end of available motion)
- P1: Point in range where patient FIRST reports pain
- P2: Intensity of pain at the limit
DIAGRAM 2: Movement Diagram - Pain-Dominant Joint
   PAIN/RESISTANCE
        │
   P2   │              ╳L (Limited range - pain stops it early)
        │             /│
        │            / │
   P1   │      ╳────/  │ Pain comes early, before resistance
        │      │
        │      │ P1 early in range - protective
   P0   │──────╳──────────────────────────────────────────────
        A    (early)                                          B
             P1
Clinical implication: Treat with Grades I & II (before resistance, pain-free range)
DIAGRAM 3: Movement Diagram - Stiffness-Dominant Joint
   PAIN/RESISTANCE
        │
   R2   │                               ╳L (Resistance limits range)
        │                              /
        │                             /
        │                  ╳─────────/
        │                  │  Resistance starts R1 and builds
   R1   │        ╳─────────
        │        │ Resistance onset early
   P0   │────────────────────────────────────────────────────
        A                  R1                               B(R2)
Clinical implication: Treat with Grades III & IV (into resistance to stretch capsule)
5. GRADES OF MOVEMENT - DETAILED (4 marks) ⭐
DIAGRAM 4: All Five Grades on the Movement Diagram
━━━━━━━━━━━━━━━━━━━━━━━━━━━━━━━━━━━━━━━━━━━━━━━━━━━━━━━━━━━
                        RANGE OF MOTION
━━━━━━━━━━━━━━━━━━━━━━━━━━━━━━━━━━━━━━━━━━━━━━━━━━━━━━━━━━━

 A ─────────────────── R1 ──────────────────── R2/L ─── B
 │                      │                        │
 │◄──►│                 │                        │       Grade I
 │  (small, early)      │                        │       (small amp, before R1)
 │                      │                        │
 │◄──────────────►│     │                        │       Grade II
 │   (large, before R1) │                        │       (large amp, before R1)
 │                      │                        │
 │              │◄───────────────────────────►│  │       Grade III
 │              (large amp, from R1 into R2)  │  │       (large, INTO resistance)
 │                      │                        │
 │                      │              │◄──────►││       Grade IV
 │                      │              (small)   │       (small, AT end range R2)
 │                      │                        │
 │                      │                        │◄ HVLA  Grade V
 │                      │                        │  Thrust (manipulation)
━━━━━━━━━━━━━━━━━━━━━━━━━━━━━━━━━━━━━━━━━━━━━━━━━━━━━━━━━━━
Detailed Grade Table with Mechanisms:
| Grade | Amplitude | Position | Mechanism | Indication | Speed |
|---|---|---|---|---|---|
| I | Small | Before R1 (early range) | Gate Control + opioid release | Acute pain | 1-2/sec |
| II | Large | Up to R1 (mid range) | Gate Control + opioid release | Subacute pain | 1-2/sec |
| III | Large | R1 to R2 (into resistance) | Mechanical capsular stretch | Stiffness + some pain | 1-2/sec |
| IV | Small | At R2 (end of range) | Mechanical capsular stretch | Stiffness-dominant | 1-2/sec |
| V | Small HVLA | End of range | Cavitation + joint release | Chronic stiffness, facet lock | High velocity |
Grade Refinements (PhD-level):
- III- = Large amplitude to onset of R1 only
- III = Large amplitude to 50% of R1-R2 zone
- III+ = Large amplitude to 75% of R1-R2 zone
- III++ = Large amplitude to maximum R2
DIAGRAM 5: Neurophysiological vs. Mechanical Mechanism
┌────────────────────────────────────────────────────────────┐
│              MECHANISM OF ACTION                           │
├───────────────────────────┬────────────────────────────────┤
│   GRADES I & II           │   GRADES III & IV              │
│   (Neurophysiological)    │   (Mechanical)                 │
├───────────────────────────┼────────────────────────────────┤
│                           │                                │
│  Mechanoreceptor Stim     │  Capsular Stretch              │
│  (Type I & II in capsule) │  (collagen elongation)         │
│         │                 │         │                      │
│         ▼                 │         ▼                      │
│  Dorsal Horn Inhibition   │  Increased Tissue Extensibility│
│  (Gate Control Theory)    │  (viscoelastic deformation)    │
│         │                 │         │                      │
│         ▼                 │         ▼                      │
│  Periaqueductal Gray      │  Reduced Capsular Restriction  │
│  (PAG) Activation         │  (mechanical ROM gain)         │
│         │                 │         │                      │
│         ▼                 │         ▼                      │
│  Endogenous Opioid        │  Improved Arthrokinematics     │
│  Release (Enkephalin)     │  (roll-glide restoration)      │
│         │                 │         │                      │
│         ▼                 │         ▼                      │
│    PAIN RELIEF            │    ROM RESTORATION             │
└───────────────────────────┴────────────────────────────────┘
6. CLINICAL REASONING PROCESS - SINSS (2 marks)
┌─────────────────────────────────────────────────────┐
│                S - I - N - S - S                    │
├──────────┬──────────────────────────────────────────┤
│ S        │ SEVERITY of symptoms                     │
│          │ How bad is the pain? (VAS 0-10)           │
├──────────┼──────────────────────────────────────────┤
│ I        │ IRRITABILITY of condition                │
│          │ How easily provoked? How long to settle?  │
├──────────┼──────────────────────────────────────────┤
│ N        │ NATURE of the condition                  │
│          │ Pathology? Diagnosis? Red flags?          │
├──────────┼──────────────────────────────────────────┤
│ S        │ STAGE of the condition                   │
│          │ Acute / Subacute / Chronic?               │
├──────────┼──────────────────────────────────────────┤
│ S        │ STABILITY of the condition               │
│          │ Getting better, worse, or static?         │
└──────────┴──────────────────────────────────────────┘
SINSS determines the VIGOR of treatment - how aggressive or gentle the mobilization should be.
7. COMPREHENSIVE CLINICAL REASONING FLOWCHART (2 marks)
FLOWCHART 2: Maitland's Clinical Decision-Making Process
┌─────────────────────────────────────────────────────────────┐
│                  SUBJECTIVE EXAMINATION                      │
│   (Body chart, behavior of symptoms, 24hr pattern, history) │
└─────────────────────┬───────────────────────────────────────┘
                      │
                      ▼
┌─────────────────────────────────────────────────────────────┐
│                  SINSS ANALYSIS                             │
│   Severity - Irritability - Nature - Stage - Stability      │
└─────────────────────┬───────────────────────────────────────┘
                      │
                      ▼
┌─────────────────────────────────────────────────────────────┐
│                  PHYSICAL EXAMINATION                       │
│   Active ROM → Passive ROM → Accessory Movement testing     │
│   Palpation → Neurological tests → Special tests            │
└─────────────────────┬───────────────────────────────────────┘
                      │
                      ▼
┌─────────────────────────────────────────────────────────────┐
│               MOVEMENT DIAGRAM CONSTRUCTION                 │
│   Plot pain (P1, P2) and resistance (R1, R2) on diagram     │
└─────────────────────┬───────────────────────────────────────┘
                      │
            ┌─────────┴─────────┐
            │                   │
            ▼                   ▼
   ┌─────────────────┐ ┌─────────────────────┐
   │  PAIN-DOMINANT  │ │ STIFFNESS-DOMINANT  │
   │  (P1 before R1) │ │  (R1 before P1)     │
   └────────┬────────┘ └──────────┬──────────┘
            │                     │
            ▼                     ▼
   ┌─────────────────┐ ┌─────────────────────┐
   │  Grade I or II  │ │  Grade III or IV     │
   │  (before R1)    │ │  (into resistance)   │
   └────────┬────────┘ └──────────┬──────────┘
            │                     │
            └──────────┬──────────┘
                       │
                       ▼
        ┌──────────────────────────┐
        │    APPLY TECHNIQUE       │
        │  (30-60 sec, 3-5 sets)   │
        └──────────────┬───────────┘
                       │
                       ▼
        ┌──────────────────────────┐
        │  IMMEDIATE REASSESSMENT  │◄── CORE MAITLAND PHILOSOPHY
        │  • Pain (VAS)            │
        │  • ROM (goniometer)      │
        │  • Better / Same / Worse │
        └──────────────┬───────────┘
                       │
             ┌─────────┴─────────┐
             │                   │
             ▼                   ▼
      ┌──────────┐        ┌────────────┐
      │ IMPROVED │        │  NO CHANGE │
      │          │        │  or WORSE  │
      │ Continue │        │            │
      │ same Rx  │        │ Modify:    │
      │ or ↑ grade│       │ • Grade    │
      └──────────┘        │ • Direction│
                          │ • Position │
                          │ • Technique│
                          └────────────┘
8. TYPES OF PASSIVE MOVEMENTS IN MAITLAND (1 mark)
                    PASSIVE MOVEMENTS
                          │
          ┌───────────────┴──────────────────┐
          │                                  │
          ▼                                  ▼
  PHYSIOLOGICAL MOVEMENTS          ACCESSORY MOVEMENTS
  (Osteokinematic)                 (Arthrokinematic / Joint Play)
          │                                  │
  ┌───────────────────┐            ┌─────────────────────────┐
  │ • Flexion         │            │ • Distraction (traction) │
  │ • Extension       │            │ • Compression            │
  │ • Abduction       │            │ • Antero-posterior glide │
  │ • Adduction       │            │ • Postero-anterior glide │
  │ • Rotation        │            │ • Lateral glide          │
  │ • Circumduction   │            │ • Medial glide           │
  └───────────────────┘            │ • Long-axis distraction  │
  Can be done actively             └─────────────────────────┘
  by patient                       Cannot be done actively
                                   Essential for normal ROM
9. APPLICATION TO SPINAL vs. PERIPHERAL JOINTS (1 mark)
| Feature | Spinal Joints | Peripheral Joints |
|---|---|---|
| Technique type | PA (postero-anterior) pressures, transverse pressures | Glides, tractions, rotations |
| Key grades | Grade III PA for stiffness | Grade III-IV glides |
| Patient position | Prone/side-lying | Varies by joint |
| Primary reference text | Maitland's Vertebral Manipulation | Maitland's Peripheral Manipulation |
| Common conditions | LBP, cervical spondylosis, facet syndrome | Frozen shoulder, OA knee, ankle stiffness |
10. EVIDENCE BASE (PhD-Level Critical Appraisal - 1 mark)
What the Research Says:
| Level | Evidence |
|---|---|
| Systematic Review | Maitland techniques significantly improve ROM and reduce pain in adhesive capsulitis (Kubuk et al., 2024 - PMID 37559358, Disabil Rehabil) |
| Systematic Review | Thoracic manual therapy (including Maitland) improves shoulder dysfunction outcomes (Yu et al., 2026 - PMID 42068776, Musculoskelet Sci Pract) |
| Neurophysiology | Grades I-II activate PAG, producing descending inhibition via serotonin and norepinephrine pathways (Vicenzino et al.) |
| Biomechanical | Grades III-IV produce viscoelastic creep and plastic deformation in capsular collagen (Threlkeld, 1992) |
| Systematic Review (LBP) | Maitland concept techniques show moderate evidence for short-term pain and disability reduction in LBP (SciELO systematic review, 2021) |
PhD-Level Critical Points:
- Most RCTs have small sample sizes and heterogeneous populations
- Dose-response relationship for mobilization grades is poorly defined
- Therapist skill is a major confounding variable - hard to standardize
- Placebo effect of therapeutic touch is difficult to isolate in manual therapy trials
- Need for high-quality pragmatic trials with individualized Maitland protocols
11. CONTRAINDICATIONS AND PRECAUTIONS (1 mark)
FLOWCHART 3: Safety Screening
         PATIENT PRESENTS FOR MAITLAND MOBILIZATION
                           │
                           ▼
              ┌────────────────────────┐
              │  RED FLAG SCREENING    │
              │  (SINSS - N = Nature)  │
              └────────────┬───────────┘
                           │
              ┌────────────┴────────────┐
              │                         │
              ▼                         ▼
     ┌─────────────────┐      ┌──────────────────────┐
     │  RED FLAGS      │      │   NO RED FLAGS       │
     │  PRESENT?       │      │                      │
     └────────┬────────┘      └──────────┬───────────┘
              │                          │
              ▼                          ▼
     ┌─────────────────┐      ┌──────────────────────┐
     │  ABSOLUTE CONTRA│      │  YELLOW FLAG CHECK   │
     │  • Malignancy   │      │  (Psychosocial)      │
     │  • Fracture     │      └──────────┬───────────┘
     │  • Infection    │                 │
     │  • Severe OP    │                 ▼
     │  • VBI (cervix) │      ┌──────────────────────┐
     │  • RA instab.   │      │  PROCEED WITH        │
     │                 │      │  MAITLAND APPROACH   │
     │  → REFER/STOP   │      │  (Apply SINSS to     │
     └─────────────────┘      │   determine vigor)   │
                              └──────────────────────┘
12. DOCUMENTATION SYSTEM - MAITLAND STYLE (0.5 mark)
Technique notation example:

  ┌─────────────────────────────────────────────────────┐
  │  C5/6  PA ↓↓↓ (Grade III, large amplitude,         │
  │         postero-anterior pressure, C5/6 level)       │
  │                                                       │
  │  Shoulder: Caud. Gl. ↓ IV (Caudal glide, Grade IV)  │
  │                                                       │
  │  Wrist: AP Gl. → III+ (Antero-posterior glide,      │
  │          Grade III+, 75% into resistance)             │
  └─────────────────────────────────────────────────────┘
- Joint + technique + direction + grade
- Pre/post VAS pain score
- Pre/post ROM measurement (goniometer)
- Patient's response (better/same/worse)
- Plan for next session
13. COMPARISON WITH OTHER MANUAL THERAPY CONCEPTS (0.5 mark)
| Feature | Maitland | Mulligan | Kaltenborn | McKenzie |
|---|---|---|---|---|
| Philosophy | Empirical/patient-centered | Positional fault | Biomechanical | Mechanical diagnosis |
| Movement type | Oscillatory passive | Glide + active | Sustained | Active repeated |
| Assessment tool | Movement diagram | PILL rule | End-feel | Directional preference |
| Patient role | Passive | Active | Passive | Active |
| Grades | I-V (5) | None | I-III (3) | N/A |
| Spinal focus | Both | Peripheral+spinal | Peripheral | Spinal |
EXAM ANSWER BLUEPRINT FOR 20 MARKS (PhD Level)
| Section | Content | Marks |
|---|---|---|
| Historical background + definition | Maitland biography, philosophical definition | 2 |
| Core elements | 4 core elements including brick wall analogy (with diagram) | 3 |
| Movement diagram | Full explanation with drawn diagrams (normal, pain, stiffness) | 3 |
| Grades I-V | Full table + amplitude/position/mechanism + diagram on range | 4 |
| SINSS + Clinical reasoning flowchart | Decision-making process | 2 |
| Types of passive movements | Physiological vs. accessory (with diagram) | 1 |
| Evidence base | Research citations, critical appraisal | 1 |
| Contraindications + safety flowchart | Screening algorithm | 1 |
| Documentation + comparison | Notation system, comparison table | 1 |
| Diagrams throughout | Movement diagram, flowcharts, tables | 2 |
| Total | 20 |
MASTER REVISION SUMMARY
┌────────────────────────────────────────────────────────────┐
│            MAITLAND CONCEPT - ONE PAGE SUMMARY             │
├────────────────────────────────────────────────────────────┤
│  CORE PHILOSOPHY:  Treat the patient, not the diagnosis    │
│                    Assess → Treat → Reassess (loop)        │
├────────────────────────────────────────────────────────────┤
│  BRICK WALL:       Theory ║ Clinical findings              │
│                    Do NOT let one blind you to the other   │
├────────────────────────────────────────────────────────────┤
│  MOVEMENT DIAGRAM: A (start) → R1 → R2 (end)              │
│                    Pain (P1, P2) + Resistance plotted      │
├────────────────────────────────────────────────────────────┤
│  GRADES:  I (small, before R1) → Pain relief               │
│           II (large, before R1) → Pain relief              │
│           III (large, into R1-R2) → Stretch                │
│           IV (small, at R2) → Stretch                     │
│           V (HVLA, end range) → Manipulation               │
├────────────────────────────────────────────────────────────┤
│  SINSS:   Severity, Irritability, Nature, Stage, Stability │
│           → Determines VIGOR of treatment                  │
├────────────────────────────────────────────────────────────┤
│  RULE:    Pain before R1 → Grades I/II                     │
│           R1 before pain → Grades III/IV                   │
├────────────────────────────────────────────────────────────┤
│  KEY:     ALWAYS reassess after every technique            │
│           "Fail fast, fail safe, fail often"               │
└────────────────────────────────────────────────────────────┘

PhD TOPPER BONUS POINTS
- Quote Maitland directly: "A technique is the brainchild of ingenuity" - shows primary source knowledge
- Cite the brick wall using Banks & Hengeveld (2014) "Maitland's Peripheral Manipulation" 5th ed.
- Critical appraisal: Acknowledge that while evidence supports Maitland techniques, most trials cannot truly blind therapists - a methodological limitation intrinsic to all manual therapy research
- Neuroplasticity angle: Recent neuroscience suggests mobilization may also induce cortical reorganization and reduce central sensitization - extending beyond the traditional gate control model
- Biopsychosocial integration: The brick wall model aligns with the modern biopsychosocial model of pain (Engel, 1977) - a connection examiners expect PhD students to make
- Reassessment philosophy is Maitland's most clinically significant contribution - without it, technique selection becomes guesswork
- Movement diagram is a unique clinical communication tool that has no parallel in other manual therapy systems - highlight this originality
Cyriax concepts notes for 20 marks
Cyriax concept orthopaedic medicine selective tissue tension capsular pattern end feel deep friction massage complete notes physiotherapy
Cyriax selective tissue tension examination contractile non-contractile physiotherapy diagram
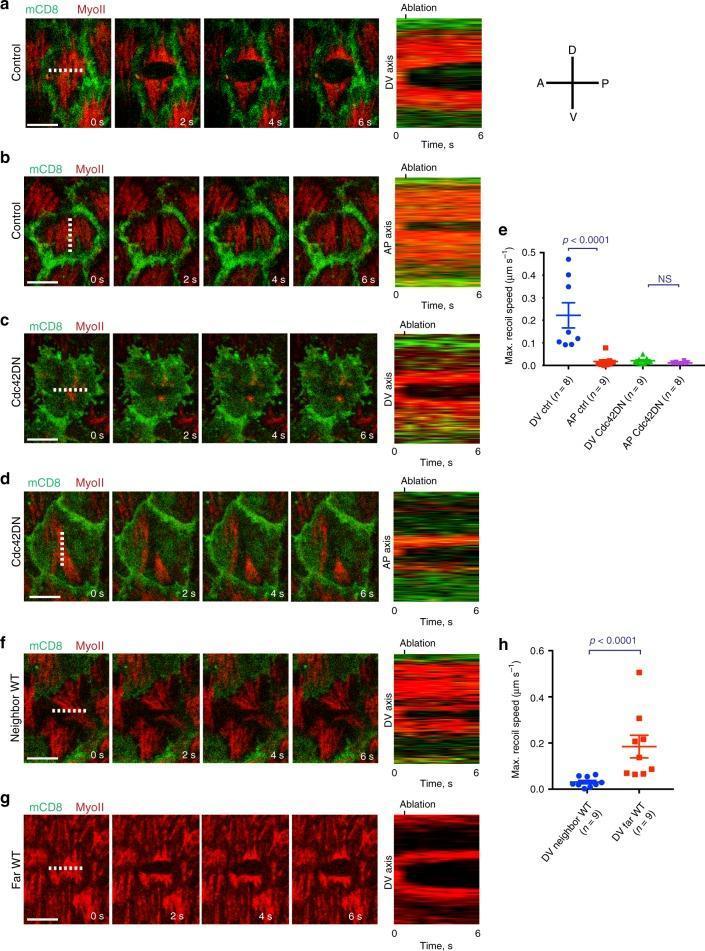
This composite diagnostic and pathophysiology diagram illustrates the role of Cdc42 in regulating cortical tension anisotropy in Drosophila follicle cells. The panel consists of time-lapse fluorescence microscopy series (0s to 6s), kymographs, and quantitative dot plots. Fluorescence images show the distribution of MyoII (red) and mCD8 (green) before and after laser ablation (dashed lines). In control cells (a, b), ablation along the anterior-posterior (AP) axis results in a rapid recoil along the dorsal-ventral (DV) axis, visualized by the significant widening of the gap in kymographs. Conversely, ablation along the DV axis produces minimal AP recoil, demonstrating high tension anisotropy. In Cdc42-dominant negative (Cdc42DN) expressing cells (c, d), MyoII distribution is disorganized, and recoil speed is significantly reduced in both axes, indicating a loss of cortical tension. Quantitative plots (e, h) confirm these findings, showing a statistically significant decrease (p < 0.0001) in maximum recoil speed for Cdc42DN and neighboring wild-type (WT) cells compared to distant WT cells. This demonstrates both cell-autonomous and non-cell-autonomous roles for Cdc42 in establishing the supracellular actomyosin contractile network required for tissue elongation.
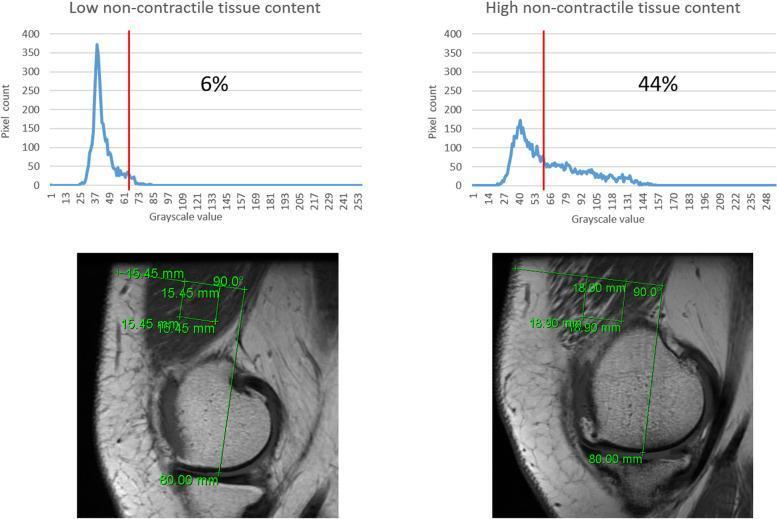
This composite educational graphic illustrates the methodology for quantifying non-contractile tissue within the vastus medialis muscle using T1-weighted magnetic resonance imaging (MRI). The image displays two clinical scenarios: 'Low non-contractile tissue content' and 'High non-contractile tissue content.' Below each sagittal MRI slice of the knee/distal femur, corresponding histograms show pixel distribution based on grayscale values (0–255). A square Region of Interest (ROI) is positioned on each MRI, standardized at 80.00 mm above the joint space. In the low-content example (6%), the histogram shows a sharp peak below the threshold value of 60, indicating dense contractile muscle tissue. In the high-content example (44%), the histogram displays a broader, flattened distribution with more pixels exceeding the 60-grayscale threshold, representing increased intramuscular fat or fibrous infiltration. Green annotations on the MRI indicate precise ROI dimensions (15.45 mm and 18.90 mm) and anatomical positioning. This comparison demonstrates the use of digital image analysis for assessing muscle quality and pathological changes in musculoskeletal radiology.
Gross pathologic examination images illustrating the effects of selective thermal or energy-based treatment on adipose tissue. Image A displays a cross-section of skin and subcutaneous tissue. A black circle highlights the treated zone where the yellowish adipose layer appears condensed, discolored, and more heterogeneous compared to the untreated area (indicated by a long vertical arrow). Image B provides a direct side-by-side comparison labeled 'TREATED' and 'UNTREATED'. The treated section shows a marked reduction in the vertical thickness of the subcutaneous fat layer, which appears more compact and atrophic. In contrast, the untreated section demonstrates a preserved, thicker adipose layer with typical lobular morphology. These images demonstrate local fat diminution and adipose tissue destruction, clinically relevant for procedures involving non-invasive body contouring or lipolysis. The visual evidence supports macroscopic findings of tissue alteration and volume loss following therapeutic energy application.
https://physicaltherapyweb.com/joint-capsular-patterns
Cyriax deep transverse friction massage soft tissue evidence
deep transverse friction massage tendon Cyriax manual therapy technique
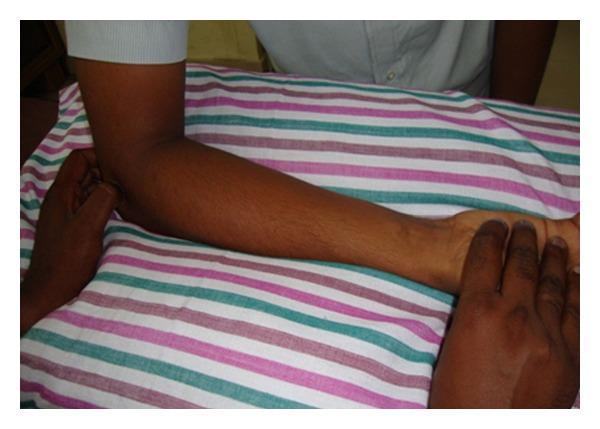
A clinical photograph demonstrating the application of Cyriax physiotherapy, specifically deep transverse friction massage (DTFM) for the management of lateral epicondylitis (tennis elbow). The patient's upper extremity is positioned in approximately 90 degrees of elbow flexion with the forearm fully supinated, resting on a flat surface. A therapist's hands are shown executing the technique: one hand stabilizes the distal forearm and wrist, while the other hand applies localized, deep transverse pressure to the teno-osseous junction at the lateral epicondyle of the humerus. This manual therapy intervention is designed to reduce pain and prepare the extensor carpi radialis brevis tendon for subsequent therapeutic maneuvers, such as Mill's manipulation. The image serves as a pedagogical reference for hand placement and patient positioning in orthopedic physical therapy.
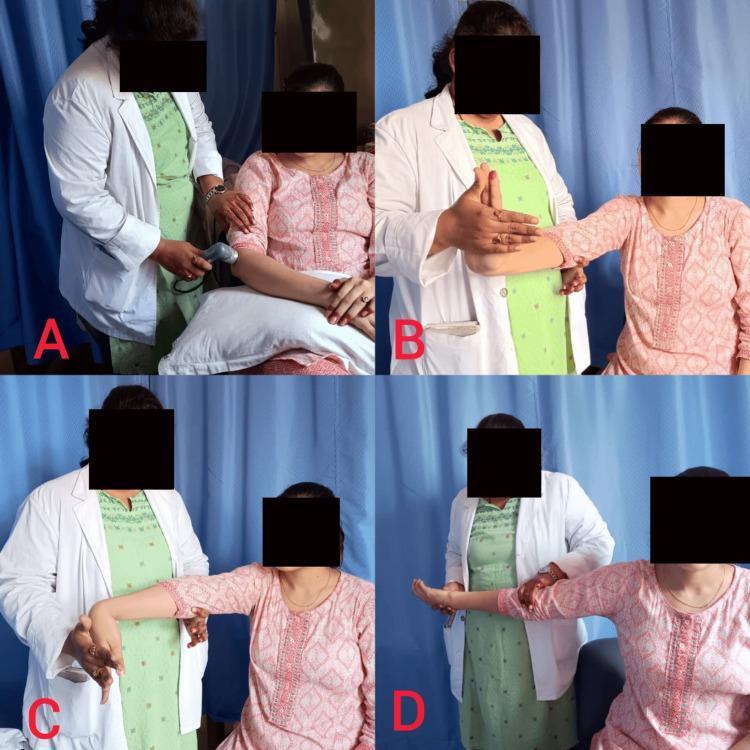
A composite of four clinical photographs (A-D) demonstrating therapeutic interventions for lateral epicondylitis (tennis elbow). Panel A shows the application of therapeutic ultrasound to the lateral aspect of the elbow joint with the arm rested on a pillow. Panels B and C illustrate passive stretching techniques: B shows the clinician extending the patient's wrist while the elbow is extended to stretch the forearm flexors, and C shows the clinician flexing the patient's wrist with the elbow extended to stretch the forearm extensors (common extensor origin). Panel D depicts the application of the Cyriax technique, a form of deep transverse friction massage combined with joint manipulation. In each panel, a clinician in a white coat performs the procedure on a seated patient. These images illustrate physical therapy modalities and manual therapy techniques used in a rehabilitation setting to manage musculoskeletal pain and improve range of motion.
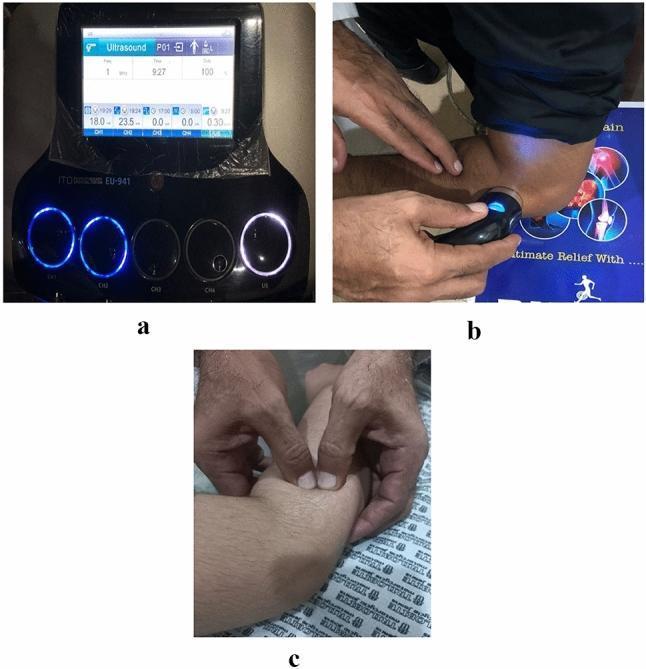
A composite of three panels (a, b, c) illustrating the conservative management of lateral epicondylitis (tennis elbow) through therapeutic ultrasound and manual therapy. Panel (a) shows the digital interface of an ITO-EU 941 ultrasonic therapy device, displaying parameters including a frequency of 1 MHz and 100% duty cycle, with the 'US' operation button illuminated. Panel (b) depicts the clinical application of ultrasound where a therapist holds a round applicator head against the patient's lateral elbow, targeting the common extensor tendon. Panel (c) demonstrates deep tissue friction massage, with the therapist utilizing thumb pads to apply localized, transverse pressure to the lateral humeral epicondyle area. The images collectively showcase the combination of electrophysical modalities and manual soft tissue mobilization used in physical therapy to reduce pain and promote tendon healing in musculoskeletal conditions.
CYRIAX CONCEPT (ORTHOPAEDIC MEDICINE)
Complete Physiotherapy Notes | 20 Marks
- Dr. James Cyriax
1. HISTORICAL BACKGROUND & DEFINITION (1 mark)
Definition:
The Cyriax Concept is a systematic, diagnosis-driven approach to musculoskeletal assessment and treatment, using Selective Tissue Tension Testing (STTT) to identify the exact tissue causing pain, followed by targeted treatment aimed precisely at that tissue.
Three Cardinal Principles:
┌──────────────────────────────────────────────────────┐
│           CYRIAX'S 3 CORE PRINCIPLES                 │
├──────────────────────────────────────────────────────┤
│  1. Every pain has a SOURCE                          │
│     → Differential diagnosis is essential           │
├──────────────────────────────────────────────────────┤
│  2. Treatment must REACH the source                  │
│     → Accurate tissue identification required        │
├──────────────────────────────────────────────────────┤
│  3. Treatment must BENEFIT the source                │
│     → Correct technique must be applied              │
└──────────────────────────────────────────────────────┘
2. TISSUES CLASSIFICATION - CONTRACTILE vs. NON-CONTRACTILE (2 marks)
DIAGRAM 1: Tissue Classification
┌─────────────────────────────────────────────────────────────┐
│               MUSCULOSKELETAL TISSUES                        │
└──────────────────────┬──────────────────────────────────────┘
                       │
          ┌────────────┴────────────────┐
          │                             │
          ▼                             ▼
┌──────────────────────┐     ┌──────────────────────────────┐
│  CONTRACTILE TISSUES │     │   NON-CONTRACTILE (INERT)    │
│                      │     │         TISSUES              │
├──────────────────────┤     ├──────────────────────────────┤
│ • Muscle belly       │     │ • Joint capsule              │
│ • Musculo-tendinous  │     │ • Ligaments                  │
│   junction           │     │ • Bursae                     │
│ • Tendon             │     │ • Articular cartilage        │
│ • Teno-osseous       │     │ • Bone                       │
│   junction           │     │ • Fascia                     │
│ • Muscle attachment  │     │ • Nerve root dura            │
│   (origin/insertion) │     │ • Skin                       │
└──────────────────────┘     └──────────────────────────────┘
         │                                   │
         ▼                                   ▼
  Tested by RESISTED          Tested by PASSIVE movements
  isometric contractions
3. SELECTIVE TISSUE TENSION TESTING (STTT) (3 marks) ⭐
Three Principles of STTT:
- Passive movements test inert (non-contractile) structures
- Capsular patterns differentiate joint conditions from other inert lesions
- Isometric contractions test contractile tissues
FLOWCHART 1: The Complete STTT Examination Process
┌─────────────────────────────────────────────────────────────┐
│               STEP 1: ACTIVE MOVEMENTS (AROM)               │
│   Patient moves the joint actively                          │
│   Purpose: Screens for pain, willingness, coordination      │
│   Tests: BOTH contractile AND inert structures              │
└─────────────────────────────┬───────────────────────────────┘
                              │
                              ▼
┌─────────────────────────────────────────────────────────────┐
│               STEP 2: PASSIVE MOVEMENTS (PROM)              │
│   Therapist moves joint WITHOUT patient effort              │
│   Purpose: Tests INERT (non-contractile) structures ONLY    │
│                                                             │
│   Observe: • Range of motion                               │
│            • Pain behavior (arc of pain?)                   │
│            • End feel (quality at end range)                │
│            • Capsular vs. non-capsular pattern?             │
└─────────────────────────────┬───────────────────────────────┘
                              │
                              ▼
┌─────────────────────────────────────────────────────────────┐
│         STEP 3: RESISTED ISOMETRIC TESTING (RROM)           │
│   Patient resists therapist's force WITHOUT joint movement  │
│   Purpose: Tests CONTRACTILE structures ONLY                │
│                                                             │
│   Key rule: Joint in MID-RANGE / NEUTRAL position          │
│   (eliminates impingement and instability)                  │
│   Patient must exert MAXIMUM effort                         │
└─────────────────────────────┬───────────────────────────────┘
                              │
                              ▼
┌─────────────────────────────────────────────────────────────┐
│               STEP 4: PALPATION                             │
│   Confirms exact site of lesion after steps 1-3             │
│   "Point to the pain with one finger" - Cyriax              │
└─────────────────────────────────────────────────────────────┘
FLOWCHART 2: STTT Interpretation - Diagnosing the Tissue
                   PAIN ON EXAMINATION?
                          │
          ┌───────────────┴───────────────┐
          │                               │
    PASSIVE MOVEMENT                RESISTED TEST
    (PROM) → pain                   (RROM) → pain
          │                               │
          ▼                               ▼
   INERT TISSUE                    CONTRACTILE TISSUE
   involved                        involved
          │                               │
    ┌─────┴──────┐              ┌─────────┴──────────┐
    │            │              │                    │
    ▼            ▼              ▼                    ▼
CAPSULAR    NON-CAPSULAR    STRONG &           WEAK & PAINFUL
PATTERN     PATTERN         PAINFUL            (complete or
    │            │           (Minor tear,      partial lesion)
    ▼            ▼           strain)                │
 Joint       Ligament /                         ▼
 Capsule     Bursa /                       WEAK & PAINLESS
 (OA, RA,   Meniscus /                    (nerve lesion /
 Frozen     Internal                      complete rupture)
 shoulder)  derangement
Resisted Test Interpretation Table:
| Test Result | Interpretation |
|---|---|
| Strong & Painless | Normal - contractile tissue intact |
| Strong & Painful | Minor lesion of contractile tissue (strain) |
| Weak & Painless | Complete rupture OR neurological lesion |
| Weak & Painful | Serious pathology (fracture, neoplasm) |
| All tests painful | Emotional problem / non-organic pain |
| All tests painless | No musculoskeletal lesion at that joint |
4. END FEEL (2 marks) ⭐⭐ Highly Examinable
DIAGRAM 2: Types of End Feel
┌─────────────────────────────────────────────────────────────┐
│                    END FEEL TYPES                           │
├─────────────────────┬───────────────────────────────────────┤
│     NORMAL          │         ABNORMAL                     │
├─────────────────────┼───────────────────────────────────────┤
│                     │                                       │
│ BONE-ON-BONE        │ BONE-ON-BONE (abnormal)               │
│ (Hard/Hard)         │ Too early / unexpected position       │
│ Ex: Elbow extension │ Ex: Loose body in joint               │
│                     │                                       │
├─────────────────────┼───────────────────────────────────────┤
│ SOFT TISSUE         │ SOFT (abnormal)                       │
│ APPROXIMATION       │ Boggy/spongy feel                     │
│ (Soft/soft)         │ Ex: Synovitis, haemarthrosis          │
│ Ex: Knee flexion    │                                       │
│ (calf on thigh)     │                                       │
├─────────────────────┼───────────────────────────────────────┤
│ TISSUE STRETCH      │ FIRM (abnormal early)                 │
│ (Leathery/firm)     │ Capsular fibrosis, muscle spasm       │
│ Ex: Hip ER,         │ Ex: Frozen shoulder, OA               │
│ wrist flexion       │ SPASM end feel: hard, sudden          │
│                     │ stop before end range                 │
├─────────────────────┼───────────────────────────────────────┤
│                     │ EMPTY end feel                        │
│                     │ No resistance felt but patient says   │
│                     │ "stop" due to pain                    │
│                     │ Ex: Acute bursitis, neoplasm          │
│                     │                                       │
│                     │ SPRINGY BLOCK                         │
│                     │ Rebound feel at end range             │
│                     │ Ex: Torn meniscus, intra-articular    │
│                     │ loose body                            │
└─────────────────────┴───────────────────────────────────────┘
Memory: Normal = Bone, Soft Tissue, Stretch | Abnormal = Boggy, Empty, Spasm, Springy
5. CAPSULAR PATTERN (3 marks) ⭐⭐⭐ Most Important Cyriax Concept
Definition:
A capsular pattern is a predictable, proportional limitation of passive ROM occurring when the joint capsule is the primary pathological structure. Each joint has its own fixed ratio of restriction. (Cyriax, 1954; Magee, 2014)
Key Points:
- Indicates intra-articular pathology involving the capsule
- Pattern is consistent regardless of cause (OA, RA, capsulitis)
- NOT equal restriction in all directions - specific RATIO
- Caused by: Osteoarthritis, Rheumatoid arthritis, Adhesive capsulitis, Septic arthritis, Post-immobilization
CAPSULAR PATTERNS BY JOINT (Must Memorize):
| Joint | Capsular Pattern (most → least restricted) |
|---|---|
| Shoulder (GH) | ER > Abduction > IR (3:2:1 ratio) |
| Elbow | Flexion > Extension (loss of full extension) |
| Wrist | Flexion = Extension (equal restriction) |
| Hip | IR > Flexion > Abduction > Extension > ER |
| Knee | Flexion > Extension |
| Ankle (talocrural) | Plantarflexion > Dorsiflexion |
| Cervical spine | Side flex = Rotation > Extension |
| Lumbar spine | Side flex > Extension > Flexion |
| Thumb CMC | Abduction > Extension |
| Fingers (IP) | Flexion > Extension |
Memory for Shoulder: "Every Angry Individual" = ER > Abduction > IR
DIAGRAM 3: Capsular vs. Non-Capsular Pattern
        PASSIVE ROM RESTRICTION FOUND
                    │
         ┌──────────┴──────────────┐
         │                         │
         ▼                         ▼
  Does pattern match         Does NOT match
  expected capsular           expected ratio?
  ratio for that joint?              │
         │                          ▼
         ▼                   NON-CAPSULAR PATTERN
   CAPSULAR PATTERN
         │                    Causes:
   Causes:                   • Ligament sprain
   • Osteoarthritis          • Bursitis
   • Rheumatoid arthritis    • Meniscus tear
   • Adhesive capsulitis     • Muscle contracture
   • Septic arthritis        • Internal derangement
   • Post-immobilization     • Extra-articular adhesion
         │                          │
         ▼                          ▼
   Joint capsule             Specific non-capsular
   is the lesion             structure is lesion
6. TREATMENT MODALITIES IN CYRIAX (4 marks)
┌────────────────────────────────────────────────────────────┐
│              CYRIAX TREATMENT OPTIONS                      │
├────────────────────────────────────────────────────────────┤
│  1. Deep Friction Massage (DFM / DTFM)                    │
│  2. Passive Movements (Mobilization + Manipulation)        │
│  3. Active Movements + Proprioceptive Training             │
│  4. Injections (local anaesthetic/corticosteroid)          │
│  5. Traction                                               │
│  6. Electrotherapy (US, TENS as adjuncts)                 │
└────────────────────────────────────────────────────────────┘
6A. DEEP TRANSVERSE FRICTION MASSAGE (DTFM) - Core Technique (2 marks)
Principles:
- Force applied perpendicular (transverse) to the fiber direction of the affected structure
- Applied with the fingertip/thumb directly on the exact lesion site
- No lubricant used (friction is therapeutic)
- Tissue must be under appropriate tension (neither slack nor fully stretched)
Two Forms:
| Type | Direction | Used For |
|---|---|---|
| Longitudinal | Parallel to fiber direction | Muscle belly injuries |
| Transverse (DTFM) | Perpendicular to fibers | Tendons, ligaments, teno-osseous junctions |
Mechanism of Action:
┌────────────────────────────────────────────────────────────┐
│              HOW DEEP FRICTION MASSAGE WORKS               │
├────────────────────────────────────────────────────────────┤
│  1. TRAUMATIC HYPEREMIA                                    │
│     → Increased local blood flow to promote healing        │
├────────────────────────────────────────────────────────────┤
│  2. FIBER MOBILIZATION                                     │
│     → Breaks down adherent scar tissue / adhesions         │
│     → Separates collagen fibers to restore glide           │
├────────────────────────────────────────────────────────────┤
│  3. PAIN RELIEF (counter-irritation)                      │
│     → Gate control at dorsal horn                          │
│     → Endorphin release                                    │
├────────────────────────────────────────────────────────────┤
│  4. RESTORATION OF MOBILE SCAR                            │
│     → Promotes formation of pliable, functional scar       │
│       rather than restrictive adhesive scar               │
└────────────────────────────────────────────────────────────┘
Technique Parameters:
- Duration: 10-20 minutes per session (Cyriax original)
- Frequency: 2-3 times/week
- Depth: Deep enough to reach the lesion (not superficial stroking)
- Analgesia period: First 1-2 minutes usually painful, then numbness (therapeutic analgesic effect)
- Movement: Skin and therapist's finger move TOGETHER (not rubbing over skin)
6B. CYRIAX PASSIVE MOVEMENTS - Manipulation (1 mark)
| Type | Technique | Indication |
|---|---|---|
| Cervical traction | Long-axis distraction | Disc lesions, nerve root compression |
| Lumbar manipulation | Rotation, rotation-extension | Disc derangement, facet dysfunction |
| Cervical manipulation | AP glide, rotation, lateral flexion | Facet syndrome, cervical spondylosis |
| Peripheral manipulation | Joint-specific techniques | Capsular restriction |
- After DTFM → Full elbow extension + wrist flexion + forearm pronation
- Therapist applies quick jerk into elbow extension
- Tears remaining adhesions at the teno-osseous junction
7. COMPLETE CYRIAX CLINICAL REASONING FLOWCHART (2 marks)
FLOWCHART 3: Full Diagnosis-to-Treatment Algorithm
┌────────────────────────────────────────────────────────────┐
│                  PATIENT PRESENTS WITH PAIN                │
└────────────────────────┬───────────────────────────────────┘
                         │
                         ▼
┌────────────────────────────────────────────────────────────┐
│             SUBJECTIVE EXAMINATION                         │
│  Site / Spread / Onset / 24hr pattern / History            │
│  "Every pain has a source" - locate it precisely           │
└────────────────────────┬───────────────────────────────────┘
                         │
                         ▼
┌────────────────────────────────────────────────────────────┐
│         SELECTIVE TISSUE TENSION TESTING (STTT)            │
│  Step 1: AROM → Step 2: PROM → Step 3: RROM → Palpation   │
└────────────────────────┬───────────────────────────────────┘
                         │
            ┌────────────┴──────────────┐
            │                           │
            ▼                           ▼
   PASSIVE → painful            RESISTED → painful
   (INERT TISSUE)               (CONTRACTILE TISSUE)
            │                           │
    ┌───────┴────────┐          ┌───────┴───────────────┐
    │                │          │                       │
    ▼                ▼          ▼                       ▼
CAPSULAR      NON-CAPSULAR  STRONG+PAINFUL          WEAK+PAINFUL
PATTERN       PATTERN       (Minor lesion)          (Serious patho)
    │              │              │
    ▼              ▼              ▼
  Joint          Specific     Exact tendon/
  capsule        structure    muscle site
  involved       (bursa,      by palpation
    │            ligament)         │
    ▼                │             ▼
MANIPULATION    INJECT /      DEEP TRANSVERSE
(end-range)     REST /        FRICTION MASSAGE
Traction        DTFM          (+ DTFM + Mill's)
8. CYRIAX APPROACH TO DISC LESIONS (1 mark)
Types of Disc Displacement:
| Type | Description | Treatment |
|---|---|---|
| Protrusion | Nucleus pulposus pushes posteriorly intact | Traction, manipulation |
| Prolapse | Nucleus herniates through annulus | Traction in early stages |
| Extrusion | Fragment extruded through posterior longitudinal ligament | Conservative or surgical |
| Sequestration | Free fragment in canal | Surgical |
Cyriax's Sign of Disc Lesion:
- Pain increases with flexion (disc pressure increases)
- Pain decreases with extension (reduces nuclear pressure)
- Pattern of pain: Dermatomal radiation
- Signs of root compression: Pain on SLR, neurological deficit
9. EVIDENCE BASE & CRITICAL APPRAISAL (1 mark)
| Evidence | Finding |
|---|---|
| Selective Tissue Tension reliability | Inter-rater reliability for capsular patterns is moderate (kappa 0.4-0.6); some studies question whether capsular patterns are pathognomonic (Bijl et al., 1998) |
| DTFM for tendinopathy | Limited RCT evidence; some studies show short-term pain relief vs. ultrasound (Brosseau et al., Cochrane) |
| Capsular pattern validity | Patterns for shoulder and knee show fair validity; some joints (hip) have less consistent evidence |
| End feel | Soft and firm end feel have better inter-rater reliability than empty or springy |
| Key limitation | Cyriax concept was developed empirically before modern imaging - some anatomical assumptions have been revised by MRI/ultrasound findings |
Critical PhD point: The concept has been challenged by modern pain science (Moseley, 2003) which questions the tissue-specific, biomedical model. However, STTT remains clinically useful as a systematic screening tool, not an absolute diagnostic instrument.
10. CONTRAINDICATIONS TO CYRIAX TECHNIQUES (0.5 mark)
- Acute inflammation / infection
- Haematoma (acute phase)
- Calcification at the site
- Peripheral vascular disease
- Bony sites (periosteum)
- Active malignancy
- Unhealed fracture
- Severe osteoporosis
- Spinal cord compromise
- Vertebrobasilar insufficiency (cervical)
- Cord signs / upper motor neuron signs
11. COMPARISON WITH OTHER CONCEPTS (0.5 mark)
| Feature | Cyriax | Maitland | McKenzie |
|---|---|---|---|
| Philosophy | Tissue diagnosis | Clinical reasoning | Directional preference |
| Key tool | STTT | Movement diagram | Repeated movements |
| Focus | Contractile vs. inert | Pain vs. stiffness | Derangement/dysfunction |
| Signature technique | DTFM | Oscillatory grades | Extension exercises |
| Soft tissue Rx | DTFM (primary) | Not primary focus | Not primary focus |
| Disc approach | Traction + manipulation | Mobilization grades | Self-correction |
MASTER REVISION SUMMARY
┌──────────────────────────────────────────────────────────┐
│               CYRIAX CONCEPT - QUICK RECAP               │
├──────────────────────────────────────────────────────────┤
│  3 PRINCIPLES:  Source → Reach → Benefit                 │
├──────────────────────────────────────────────────────────┤
│  TISSUES:       Contractile (tested by RROM)             │
│                 Non-contractile (tested by PROM)          │
├──────────────────────────────────────────────────────────┤
│  STTT:          AROM → PROM → RROM → Palpation           │
├──────────────────────────────────────────────────────────┤
│  END FEEL:      Normal: Bone/Soft/Stretch                │
│                 Abnormal: Boggy/Spasm/Empty/Springy       │
├──────────────────────────────────────────────────────────┤
│  CAPSULAR       Shoulder: ER>Abd>IR                      │
│  PATTERNS:      Hip: IR>Flex>Abd                         │
│                 Knee: Flex>Ext                           │
├──────────────────────────────────────────────────────────┤
│  DTFM:         Transverse force, perpendicular to fibers  │
│                Breaks adhesions, traumatic hyperemia      │
│                10-20 min, 2-3x/week, no lubricant        │
├──────────────────────────────────────────────────────────┤
│  RESISTED TEST: Strong+Painful = minor lesion            │
│                 Weak+Painless = rupture/nerve             │
│                 Weak+Painful = serious pathology          │
└──────────────────────────────────────────────────────────┘
EXAM ANSWER BLUEPRINT FOR 20 MARKS
| Section | Content | Marks |
|---|---|---|
| History + 3 principles + definition | Cyriax biography, cardinal rules | 1 |
| Tissue classification + diagram | Contractile vs. non-contractile | 2 |
| STTT - 3 steps + flowchart | AROM, PROM, RROM with interpretation table | 3 |
| End feel - normal & abnormal | Full classification with diagram | 2 |
| Capsular pattern - definition + joint table | All major joint patterns | 3 |
| Capsular vs. non-capsular + diagram | Clinical differentiation flowchart | 1 |
| DTFM - principles, mechanism, technique | Parameters, 4 mechanisms, types | 2 |
| Passive movements / manipulation | Mill's, traction, cervical/lumbar | 1 |
| Clinical reasoning flowchart | Full diagnosis-to-treatment algorithm | 2 |
| Disc lesions | Cyriax disc classification | 1 |
| Evidence + critical appraisal | Reliability, limitations, modern challenges | 1 |
| Comparison table + contraindications | Cyriax vs. Maitland vs. McKenzie | 1 |
| Total | 20 |
TOPPER BONUS POINTS
- Always quote Cyriax directly - "Every pain has a source. Treatment must reach the source." Examiners love primary citations
- Distinguish STTT from other assessments - it is tissue-specific, not joint-specific
- Resisted test in neutral position - this eliminates impingement/instability; an examiner favourite detail
- DTFM produces therapeutic analgesic effect - the initial pain followed by numbness is intentional and diagnostic (confirms correct site)
- "Mobile scar" concept - Cyriax's goal was NOT scar removal but formation of a functional, mobile scar - a nuanced point
- Capsular pattern challenge - mention that Bijl et al. (1998) and subsequent studies have questioned the inter-rater reliability and pathognomonic nature of capsular patterns - shows critical thinking
- Cyriax + Modern Pain Science - link to biopsychosocial model to show awareness that tissue-based models have limitations; demonstrates PhD-level thinking
What are the diagrams need to draw for joint mobilization
DIAGRAMS FOR JOINT MOBILIZATION
Complete Drawing Guide for Physiotherapy Exams
DIAGRAM 1: Maitland's Grade Representation on Range of Motion
        MAITLAND GRADES ON RANGE OF MOTION
        ━━━━━━━━━━━━━━━━━━━━━━━━━━━━━━━━━━

  RESIS-
  TANCE
    │
    │                                          R2
    │                                    ┌─────●  ← End of range
    │                                   /
    │                                  /
    │                                 /
    │                         R1     /
    │                    ┌────●─────/   ← First resistance
    │                   /
    │                  /
    │                 /
    │────────────────────────────────────────────────────
    A                R1                R2              B
  (Start)        (1st resist)     (End range)       (Limit)

  GRADE POSITIONS:
  ┌─────┬──────────────────────────────────────────────┐
  │  I  │ ◄─►  Small, at START (before R1)             │
  │     │  A──►                                        │
  ├─────┼──────────────────────────────────────────────┤
  │ II  │ ◄──────────────►  Large, before R1           │
  │     │  A──────────────►                            │
  ├─────┼──────────────────────────────────────────────┤
  │ III │          ◄───────────────────────►           │
  │     │         R1──────────────────────►R2          │
  │     │  Large amplitude, INTO resistance            │
  ├─────┼──────────────────────────────────────────────┤
  │ IV  │                           ◄───► Small at R2  │
  │     │                          R2◄──►              │
  │     │  Small amplitude, AT end range               │
  ├─────┼──────────────────────────────────────────────┤
  │  V  │                               ↯ HVLA Thrust  │
  │     │                          At/beyond R2        │
  └─────┴──────────────────────────────────────────────┘

  LEGEND:
  R1 = First onset of resistance
  R2 = End range (limit of resistance)
  HVLA = High Velocity Low Amplitude
Draw this in every exam paper on joint mobilization - it gives you 3-4 marks alone.
DIAGRAM 2: Pain-Dominant vs. Stiffness-Dominant Joint
   PAIN-DOMINANT JOINT          STIFFNESS-DOMINANT JOINT
   (Treat: Grades I & II)       (Treat: Grades III & IV)

   P/R                           P/R
    │                             │
  P2│          ●L                R2│                    ●L
    │         /                   │                   /
  P1│    ●───/  Pain comes        │              ────/
    │    │      BEFORE R1         │         ────/
    │    │                        │    ────/ R1 starts early
    │────────────────────         │───────────────────────
    A   P1   R1         B         A    R1              B
         ↑                              ↑
    Pain before                  Resistance before
    resistance                   pain/at same time

   → Use Grades I/II             → Use Grades III/IV
   → Work BEFORE resistance      → Work INTO resistance
DIAGRAM 3: Convex-Concave Rule (Kaltenborn)
    CONCAVE ON CONVEX               CONVEX ON CONCAVE
    (Bone moves = glide SAME        (Bone moves = glide OPPOSITE
     direction)                      direction)

   FIXED                           MOVING (CONVEX)
   CONVEX                         ╭──────────────╮
   SURFACE                       /                \
  ╭──────╮                      /                  \
 /        \    ← BONE          ▼ Bone moves RIGHT   \
/          \      moves RIGHT  ●──────────────────────
\          /                    ← Glide goes LEFT
 ╰──────╯                         (OPPOSITE)
    ↓
  MOVING (CONCAVE) glide ──►
  goes SAME direction as bone

  EXAMPLE:                       EXAMPLE:
  • Fingers flexing               • Shoulder abduction
    (concave base of              (convex humeral head
    phalanx on convex             on concave glenoid)
    metacarpal head)

  Memory:
  ┌─────────────────────────────────────────┐
  │  CONcave = CONforms (SAME direction)    │
  │  CONvex  = CONtrary (OPPOSITE)          │
  └─────────────────────────────────────────┘
DIAGRAM 4: Types of Joint Movements (Arthrokinematics)
      TYPES OF ACCESSORY (ARTHROKINEMATIC) MOVEMENTS

  1. ROLLING            2. GLIDING/SLIDING      3. SPINNING
     ●─────────►           ●─────────────►          ↻
    / roll /              ──────────────           ╭─●─╮
  ─────────────          ──────────────            │ ↺ │
  (like wheel             (like a book              ╰───╯
   rolling)               sliding on table)       (like a
                                                  spinning top)

  4. DISTRACTION          5. COMPRESSION
     ↑                         ↓
     ●                         ●
   ──●──  surfaces            ──●──  surfaces
     ↓    pulled apart          ↑    pushed
     ●                         ●    together
   (therapeutic)             (diagnostic only)

  NOTE: All human joint movements = ROLL + GLIDE happening
        simultaneously in varying proportions
DIAGRAM 5: Physiological vs. Accessory Movement
     PHYSIOLOGICAL               ACCESSORY (JOINT PLAY)
     MOVEMENTS                   MOVEMENTS

     ┌─────────────┐             ┌──────────────────────┐
     │ • Flexion   │             │ • Antero-posterior   │
     │ • Extension │             │   glide              │
     │ • Abduction │             │ • Postero-anterior   │
     │ • Adduction │    vs.      │   glide              │
     │ • Rotation  │             │ • Lateral glide      │
     │             │             │ • Long axis          │
     │ CAN be done │             │   distraction        │
     │   actively  │             │ CANNOT be done       │
     └─────────────┘             │   actively           │
                                 └──────────────────────┘
                                          │
                                          ▼
                                 Essential for NORMAL
                                 physiological ROM
                                 Must be restored first!
DIAGRAM 6: Gate Control Theory (Mechanism of Grades I & II)
       HOW GRADES I & II RELIEVE PAIN
       (Gate Control Theory - Melzack & Wall, 1965)

  JOINT
  MOBILIZATION
  Grades I & II
      │
      ▼
  Stimulates                     Dorsal Horn
  Mechanoreceptors  ─────────►   of Spinal Cord
  (Type I & II)                  ┌──────────────┐
  in joint capsule               │  GATE        │
                                 │  CLOSES  🚪  │
  Pain signals      ─── ✖ ───►  │              │
  BLOCKED                        │  Pain signal │
  (C-fibres)                     │  inhibited   │
                                 └──────┬───────┘
                                        │
                                        ▼
                                   ↑ Enkephalin /
                                   Endorphin release
                                        │
                                        ▼
                                   PAIN RELIEF ✓
DIAGRAM 7: Mechanical Effect of Grades III & IV
    HOW GRADES III & IV RESTORE RANGE OF MOTION

  SHORTENED/THICKENED
  JOINT CAPSULE
       │
       ▼
  Grade III/IV
  Applied INTO resistance
  (R1 → R2 zone)
       │
       ▼
  ┌────────────────────────────────────────────┐
  │  VISCOELASTIC CREEP                        │
  │  Sustained load → slow collagen elongation │
  └────────────────────────────────────────────┘
       │
       ▼
  ┌────────────────────────────────────────────┐
  │  PLASTIC DEFORMATION                       │
  │  Collagen fibers permanently lengthened    │
  └────────────────────────────────────────────┘
       │
       ▼
  ┌────────────────────────────────────────────┐
  │  CAPSULAR EXTENSIBILITY RESTORED           │
  │  → Improved arthrokinematics               │
  │  → Increased ROM                           │
  └────────────────────────────────────────────┘
DIAGRAM 8: Clinical Decision-Making Flowchart
       PATIENT WITH JOINT PAIN / STIFFNESS
                      │
                      ▼
          ┌─────────────────────┐
          │  ASSESS: Is pain    │
          │  or stiffness the   │
          │  PRIMARY complaint? │
          └──────────┬──────────┘
                     │
          ┌──────────┴──────────┐
          │                     │
          ▼                     ▼
    PAIN DOMINANT         STIFFNESS DOMINANT
    (P1 before R1)        (R1 before or = P1)
          │                     │
          ▼                     ▼
    Grade I or II          Grade III or IV
    (before R1)            (into resistance)
          │                     │
          └──────────┬──────────┘
                     │
                     ▼
          ┌─────────────────────┐
          │  APPLY TECHNIQUE    │
          │  30-60 sec, 3-5 sets│
          └──────────┬──────────┘
                     │
                     ▼
          ┌─────────────────────┐
          │    REASSESS NOW     │◄── MAITLAND KEY PRINCIPLE
          │  Pain (VAS 0-10)    │
          │  ROM (goniometer)   │
          └──────────┬──────────┘
                     │
          ┌──────────┴──────────┐
          │                     │
          ▼                     ▼
    IMPROVED ✓            NO CHANGE / WORSE
    Continue or            Change:
    progress grade         • Grade
                           • Direction
                           • Technique
DIAGRAM 9: Resting Position of Major Joints
    JOINT RESTING POSITIONS (Loose-Packed Position)
    Start point for ALL mobilization techniques

    ┌───────────┬──────────────────────────────────────┐
    │  JOINT    │  RESTING POSITION                    │
    ├───────────┼──────────────────────────────────────┤
    │ Shoulder  │ 55° abduction + 30° horizontal flex  │
    │           │                                      │
    │     ╭───╮ │    55°↗  + 30° forward               │
    │    /     \│                                      │
    ├───────────┼──────────────────────────────────────┤
    │ Elbow     │ 70° flexion + 10° supination         │
    │           │       ╮70°                           │
    ├───────────┼──────────────────────────────────────┤
    │ Wrist     │ Neutral (0°) - slight extension      │
    ├───────────┼──────────────────────────────────────┤
    │ Hip       │ 30° flex + 30° abd + slight ER       │
    ├───────────┼──────────────────────────────────────┤
    │ Knee      │ 25° flexion                          │
    │           │      ╮25°                            │
    ├───────────┼──────────────────────────────────────┤
    │ Ankle     │ 10° plantarflexion + midway inv/ever │
    └───────────┴──────────────────────────────────────┘

    WHY resting position?
    → Maximum capsular laxity
    → Joint space maximized
    → Least pain during technique
    → Most comfortable for patient
DIAGRAM 10: Three Mobilization Systems Comparison
    ┌──────────────────────────────────────────────────────┐
    │          THREE MAJOR MOBILIZATION SYSTEMS            │
    ├────────────┬─────────────┬────────────┬─────────────┤
    │  FEATURE   │  MAITLAND   │ KALTENBORN │  MULLIGAN   │
    ├────────────┼─────────────┼────────────┼─────────────┤
    │ Country    │ Australia   │ Norway     │ New Zealand │
    ├────────────┼─────────────┼────────────┼─────────────┤
    │ Movement   │ Oscillatory │ Sustained  │ Glide +     │
    │ type       │ (rhythmic)  │ (hold)     │ Active mvmt │
    ├────────────┼─────────────┼────────────┼─────────────┤
    │ Grades     │ I II III    │ I II III   │ No grades   │
    │            │ IV V (5)    │ (3)        │             │
    ├────────────┼─────────────┼────────────┼─────────────┤
    │ Pain Rx    │ I & II      │ I & II     │ Painless    │
    ├────────────┼─────────────┼────────────┼─────────────┤
    │ Stiff Rx   │ III & IV    │ III        │ III → ROM   │
    ├────────────┼─────────────┼────────────┼─────────────┤
    │ Key tool   │ R1, R2      │ Cvx-Ccv    │ PILL rule   │
    │            │ movement    │ rule       │             │
    │            │ diagram     │            │             │
    ├────────────┼─────────────┼────────────┼─────────────┤
    │ Patient    │ Passive     │ Passive    │ ACTIVE      │
    │ role       │             │            │             │
    └────────────┴─────────────┴────────────┴─────────────┘

    MAITLAND:  A ──►I◄──►II──────────►III───────►IV── R2
    KALTENBORN: A ──►I─────II(slack)──────III(stretch)─ R2
    MULLIGAN:  Therapist glides + Patient actively moves
SUMMARY: Which Diagram to Draw When
| Exam Question | Must Draw |
|---|---|
| Joint mobilization (general) | Diagrams 1, 3, 5, 8 |
| Maitland concept | Diagrams 1, 2, 6, 7, 8 |
| Kaltenborn technique | Diagrams 3, 4 |
| Mulligan / MWM | Diagram 10 + PILL box |
| Mechanism of mobilization | Diagrams 6, 7 |
| Clinical decision making | Diagram 2 + 8 |
| 20-mark full question | All 10 diagrams |
QUICK DRAWING TIPS FOR EXAMS
- Always label R1, R2, A, B on the movement diagram
- Use arrows to show direction of force
- Box your diagrams with a neat border and a title heading
- Add a legend below each diagram
- Draw Grade I & II in one color area (pain zone) and III & IV in another (resistance zone) - examiners love colored diagrams
- Keep diagrams simple - a clear, labeled simple diagram scores more than a messy complex one
- Draw the movement diagram twice - once for normal, once for pain-dominant vs. stiffness-dominant (shows depth of knowledge)
Process of informed consent in clinical research and it's ethical and legal importance
informed consent process clinical research ethical legal importance elements 2023 2025
informed consent clinical research ethics process
informed consent process flowchart clinical research ethics

An educational infographic flowchart detailing the five-stage informed consent process in clinical research. The process is depicted as a linear progression with numbered nodes. Stage 1 (First contact with the study) identifies various recruitment and outreach sources such as social media, health professionals, and patient organizations. Stage 2 (Information) highlights diverse communication methods including videos, comics, and apps. Stage 3 (Discussion and decision making) illustrates the critical choice point between signing consent or refusing participation. Stage 4 (Intervention and follow-up) features a circular feedback loop representing ongoing monitoring, resolution of doubts, and investigator feedback. The final stage, Stage 5 (End of the study), is marked by a red node. A double-headed horizontal arrow spans the bottom of the diagram, labeled 'FEEDBACK THROUGHOUT THE PROCESS,' emphasizing that informed consent is a continuous medical ethics communication paradigm rather than a single event. This graphic serves as a guide for researchers to ensure participant autonomy throughout the lifecycle of a clinical trial.

Summary : This figure presents a shared decision-making algorithm in healthcare, illustrating the integration of informed consent and patient-centered care to achieve collaborative treatment decisions. flowchart: # Nodes : • INFORMED CONSENT (circle): "Clinician provides the best available evidence for treatment options, including the risks & benefits of each option." • PATIENT-CENTERED CARE (circle): "Treatment & care options take into consideration individual values & preferences." • SHARED DECISION-MAKING (circle): "A collaborative decision about treatment or care is documented and shared with relevant stakeholders." # Connectors : • Arrows from INFORMED CONSENT and PATIENT-CENTERED CARE converge downward to SHARED DECISION-MAKING. • No branching or loops; all flow is linear and convergent. # Layout : • INFORMED CONSENT (left, with clinician illustration) and PATIENT-CENTERED CARE (right, with patient illustration) are positioned side-by-side at the top. • Both nodes connect downward to SHARED DECISION-MAKING (bottom center, with handshake illustration). # Analysis : • The figure visually emphasizes that both clinical evidence (informed consent) and patient values (patient-centered care) are essential and must be integrated to achieve shared decision-making in healthcare. • The handshake icon at the bottom symbolizes collaboration and agreement between clinician and patient. • The process is linear and convergent, highlighting the necessity of combining both perspectives for optimal care decisions.
Process of informed consent in clinical research and it's ethical and legal importance
Orthosis notes for 20 marks