
Iv canulation steps in flowchart in details
IV cannulation steps procedure nursing technique
A detailed clinical flowchart showing all steps of IV (intravenous) cannulation procedure. The flowchart should flow top to bottom with arrows connecting each step. Include these sequential steps as labeled boxes: 1. PATIENT IDENTIFICATION & CONSENT - Introduce yourself, verify patient identity (name + DOB), explain procedure, gain informed consent, check allergies (latex, iodine) 2. GATHER EQUIPMENT - IV cannula (appropriate gauge), tourniquet, alcohol swab, gloves, sterile dressing/tegaderm, normal saline flush + syringe, extension set, tape, waste bin, sharps container 3. HAND HYGIENE - Wash hands / use alcohol gel (6-step technique) 4. POSITION PATIENT - Sit/lie comfortably, extend arm on pillow, place protective field under arm 5. SELECT SITE - Inspect and palpate both arms, prefer antecubital fossa / forearm / dorsum of hand, avoid areas of infection, phlebitis, or previous bruising 6. APPLY TOURNIQUET - Place 10-15 cm above chosen site, check distal pulse remains present, ask patient to clench fist 7. RE-ASSESS VEIN - Tap or stroke vein to dilate, confirm straight soft bouncy vein segment at least 1-2 cm long 8. DON GLOVES - Apply non-sterile gloves 9. CLEAN SITE - Wipe skin with 70% alcohol swab in concentric circles, allow 30 seconds to dry completely - DO NOT re-palpate 10. PREPARE CANNULA - Remove from packaging, remove needle cap, do not touch sterile parts, inspect for defects 11. ANCHOR VEIN - Stretch skin distally with non-dominant thumb to stabilize vein 12. WARN PATIENT - "You will feel a sharp scratch now" 13. INSERT NEEDLE - Bevel upwards, 10-30 degree angle, directly above vein 14. ADVANCE INTO VEIN - Watch for flashback of blood in the hub/chamber 15. LOWER ANGLE & ADVANCE - Reduce angle to 10 degrees, advance cannula 2mm further into vein lumen 16. THREAD CANNULA - Slide plastic cannula off needle into vein while withdrawing needle simultaneously; advance to hub 17. RELEASE TOURNIQUET - Apply gentle pressure 3cm above site with finger to prevent blood spillage 18. REMOVE STYLET (NEEDLE) - Withdraw fully, dispose immediately in sharps container 19. CONNECT EXTENSION SET - Attach primed extension set or bung to cannula hub 20. FLUSH WITH SALINE - Aspirate to confirm blood return, then flush with 5-10ml normal saline, check for swelling/pain 21. SECURE CANNULA - Apply sterile transparent dressing (Tegaderm), loop and tape tubing 22. LABEL - Write date, time, gauge, initials on dressing or label 23. PATIENT EDUCATION - Advise patient not to bend arm sharply, report pain/swelling/redness 24. DISPOSE & DECONTAMINATE - Dispose of sharps safely, remove gloves, perform hand hygiene 25. DOCUMENT - Record in patient notes: date, time, site, gauge, flush used, patient tolerance Include decision diamonds for: "Flashback seen?" (Yes -> advance; No -> withdraw slightly or reattempt), "Cannula flushes without resistance?" (Yes -> secure; No -> consider repositioning or new site), "Signs of infiltration/tissuing?" (Yes -> remove and restart at new site; No -> proceed). Use a clean professional medical style with blue header boxes, yellow decision diamonds, green confirmation boxes, and red warning boxes for failure points. Title at top: "IV CANNULATION - STEP-BY-STEP FLOWCHART"
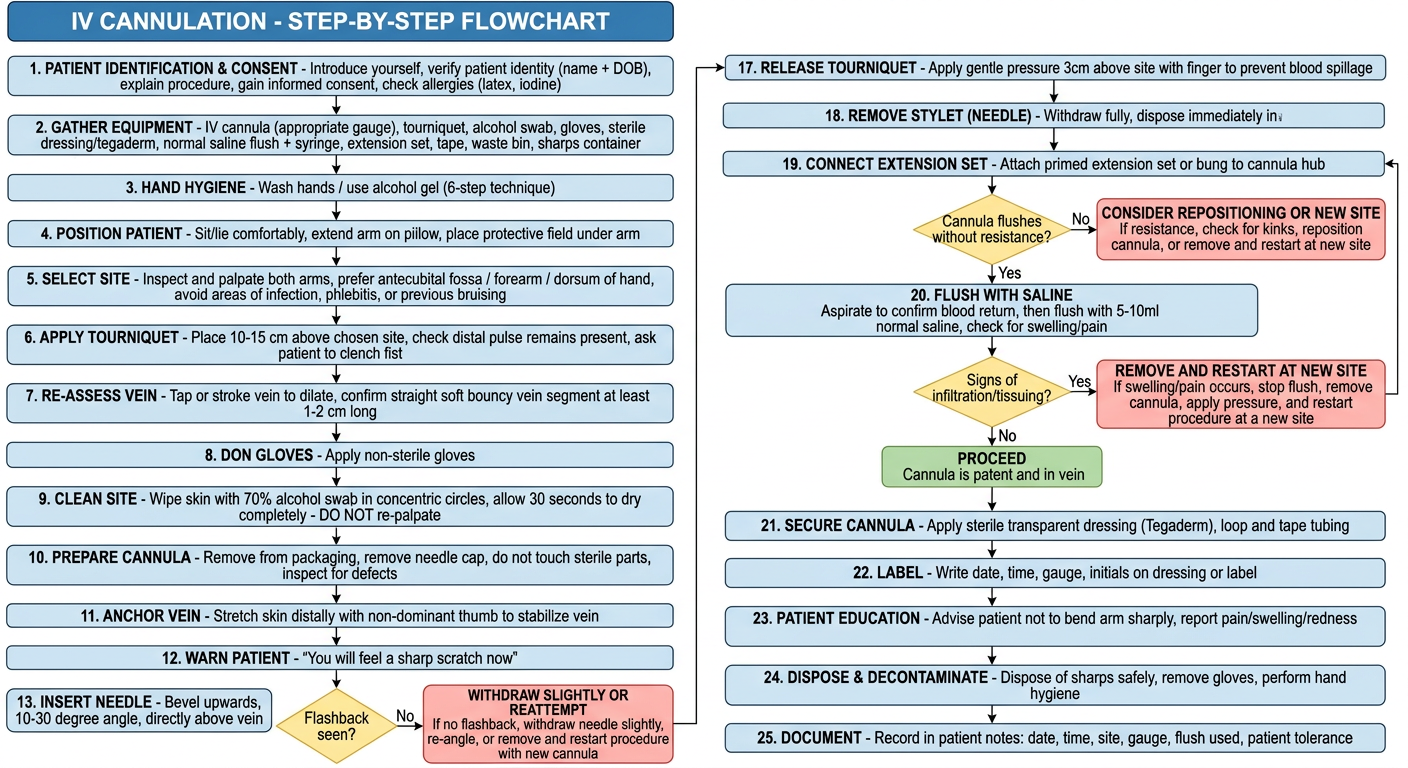
IV Cannulation - Detailed Step-by-Step Guide
PHASE 1: PRE-PROCEDURE
- Introduce yourself (name + role)
- Verify patient identity: full name + date of birth
- Explain the procedure in simple terms ("a small plastic tube will be placed in your vein using a needle")
- Gain verbal/written informed consent
- Check allergies: latex, iodine, adhesive dressings
| Item | Purpose |
|---|---|
| IV cannula (14G-24G, size chosen by clinical need) | Access device |
| Disposable tourniquet | Venous distension |
| 70% isopropyl alcohol wipe | Skin decontamination |
| Non-sterile gloves | Standard precautions |
| Sterile transparent dressing (Tegaderm) | Secure and observe site |
| 10mL syringe + normal saline flush | Confirm patency |
| Extension set/bung | Connect IV lines |
| Tape and label | Secure and date site |
| Sharps container + waste bin | Safe disposal |
- Perform 6-step hand wash or alcohol gel technique (minimum 20 seconds)
PHASE 2: SITE SELECTION
- Sit or lie comfortably
- Extend the arm on a pillow with a protective field underneath
- Apply dry warmth if veins are difficult to find
- Preferred sites (in order): antecubital fossa > forearm (cephalic/basilic) > dorsum of hand
- Look for: straight, soft, bouncy, 1-2cm of straight segment
- Avoid: infected skin, phlebitis, bruised areas, dominant arm (if possible), joints, feet (unless no other option)
- Place 10-15 cm above chosen site
- Confirm distal pulse is still palpable
- Ask patient to clench and unclench fist to engorge veins
- Tap or stroke vein gently to dilate
- Confirm your chosen vein is suitable
PHASE 3: INSERTION
- Wipe with 70% alcohol swab using concentric circles
- Allow 30 seconds to air dry
- Do NOT re-palpate the site after cleaning
- Remove from sterile packaging
- Remove protective needle cap
- Inspect for defects - do not touch the needle
- Use non-dominant thumb to stretch skin 3-4 cm distal to insertion point
- This stabilizes the vein and reduces rolling
- "You will feel a sharp scratch now"
- Bevel facing upward
- Angle: 10-30 degrees to the skin
- Approach directly above the vein
- Advance slowly - watch the flashback chamber
- Blood appearing = needle tip is in the vein
Decision point: Flashback seen?
- YES → proceed to Step 15
- NO → withdraw slightly, re-angle; if unsuccessful, remove, apply pressure, choose new site
- Reduce angle to ~10 degrees
- Advance needle 2mm further so cannula tip fully enters the vein lumen
- Hold needle still and slide the plastic cannula off the needle into the vein
- Advance all the way to the hub - do not force
- Simultaneously withdraw the needle
PHASE 4: POST-INSERTION
- Apply gentle digital pressure ~3cm above the site with the non-dominant finger to occlude the vein
- This prevents blood spillage when the needle is removed
- Withdraw the needle fully in one smooth motion
- Dispose immediately in the sharps container at the point of care
- Attach pre-primed extension set or sterile bung to the cannula hub
- Aspirate gently to confirm blood return
- Flush with 5-10mL normal saline
- Observe for: swelling (infiltration), pain, resistance
Decision point: Cannula flushes freely without pain/swelling?
- YES → secure the cannula
- NO → remove, apply pressure, restart at new site
- Apply sterile transparent dressing over the insertion site
- Loop and tape the extension set without covering the insertion point
- Write on label/dressing: date, time, gauge size, your initials
PHASE 5: POST-PROCEDURE
- Advise patient to avoid bending the arm sharply
- Instruct to report: pain, swelling, redness, burning, or leaking at the site
- Dispose of all clinical waste
- Remove gloves and perform hand hygiene
- Date and time of insertion
- Site and limb used
- Cannula gauge and length
- Flush used and volume
- Patient tolerance
- Any complications
COMMON COMPLICATIONS TO WATCH For
| Complication | Signs | Action |
|---|---|---|
| Infiltration/Tissuing | Swelling, pallor, pain around site | Remove cannula, apply pressure, new site |
| Phlebitis | Redness, warmth, cord-like vein | Remove cannula, warm compress, new site |
| Haematoma | Bruising, swelling | Apply firm pressure 3-5 minutes |
| Infection | Purulent discharge, fever | Remove, culture tip, notify clinician |
| Air embolism | Sudden dyspnoea, chest pain | Left lateral Trendelenburg, O2, emergency call |
Iv canulation steps of iv fluid ,drug ,blood transfusion in flowchart in details
IV cannulation fluid drug blood transfusion administration steps nursing procedure
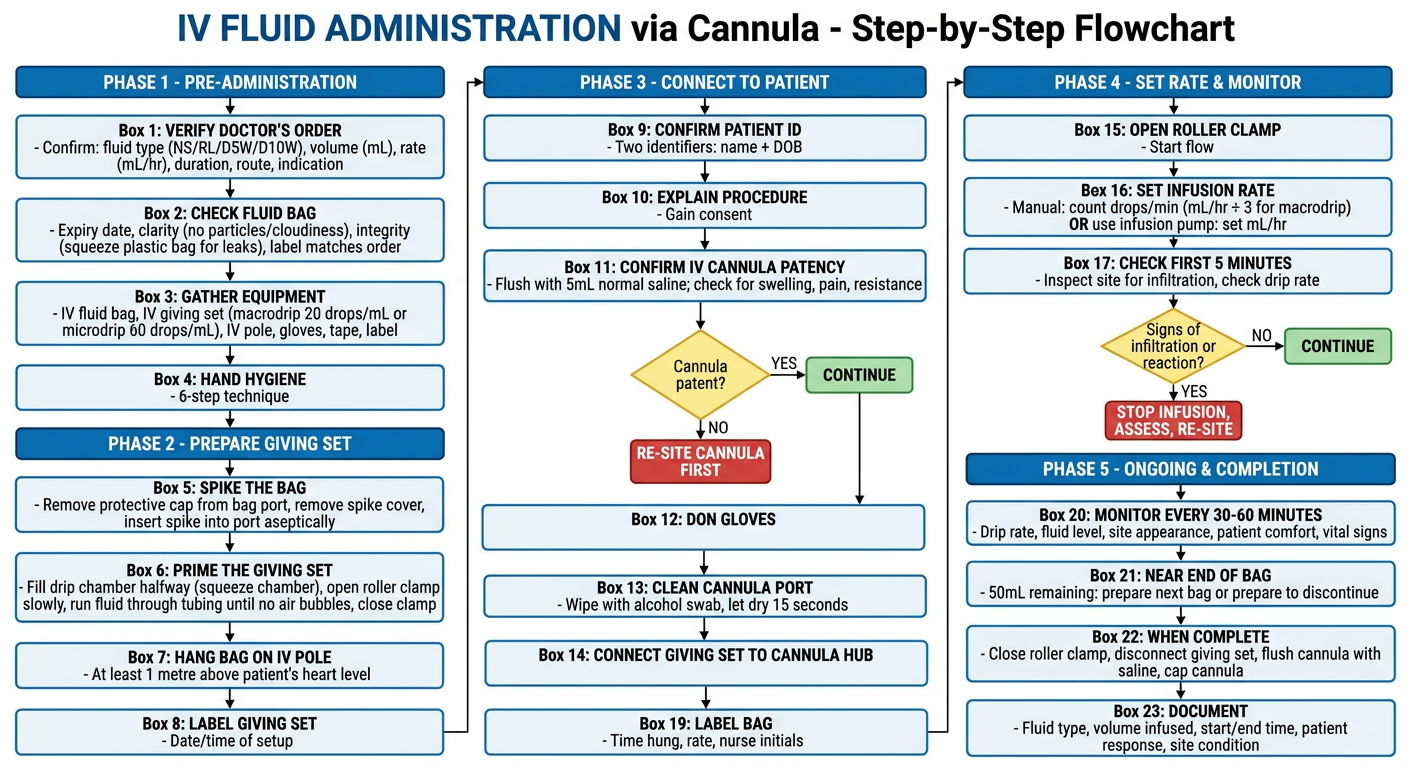
A detailed clinical flowchart titled "IV FLUID ADMINISTRATION via Cannula - Step-by-Step Flowchart". Professional medical style, flowing top to bottom with arrows. Use blue header boxes, white process boxes with blue borders, yellow diamond decision shapes, green confirmation boxes, red failure/stop boxes. PHASE 1 - PRE-ADMINISTRATION (blue header): Box 1: VERIFY DOCTOR'S ORDER - Confirm: fluid type (NS/RL/D5W/D10W), volume (mL), rate (mL/hr), duration, route, indication Box 2: CHECK FLUID BAG - Expiry date, clarity (no particles/cloudiness), integrity (squeeze plastic bag for leaks), label matches order Box 3: GATHER EQUIPMENT - IV fluid bag, IV giving set (macrodrip 20 drops/mL or microdrip 60 drops/mL), IV pole, gloves, tape, label Box 4: HAND HYGIENE - 6-step technique PHASE 2 - PREPARE GIVING SET (blue header): Box 5: SPIKE THE BAG - Remove protective cap from bag port, remove spike cover, insert spike into port aseptically Box 6: PRIME THE GIVING SET - Fill drip chamber halfway (squeeze chamber), open roller clamp slowly, run fluid through tubing until no air bubbles, close clamp Box 7: HANG BAG ON IV POLE - At least 1 metre above patient's heart level Box 8: LABEL GIVING SET - Date/time of setup PHASE 3 - CONNECT TO PATIENT (blue header): Box 9: CONFIRM PATIENT ID - Two identifiers: name + DOB Box 10: EXPLAIN PROCEDURE - Gain consent Box 11: CONFIRM IV CANNULA PATENCY - Flush with 5mL normal saline; check for swelling, pain, resistance Decision diamond: "Cannula patent?" YES → continue | NO → re-site cannula first Box 12: DON GLOVES Box 13: CLEAN CANNULA PORT - Wipe with alcohol swab, let dry 15 seconds Box 14: CONNECT GIVING SET TO CANNULA HUB PHASE 4 - SET RATE & MONITOR (blue header): Box 15: OPEN ROLLER CLAMP - Start flow Box 16: SET INFUSION RATE - Manual: count drops/min (mL/hr ÷ 3 for macrodrip) OR use infusion pump: set mL/hr Box 17: CHECK FIRST 5 MINUTES - Inspect site for infiltration, check drip rate Decision diamond: "Signs of infiltration or reaction?" YES → stop infusion, assess, re-site | NO → continue Box 18: SECURE TUBING - Loop and tape, ensure no tension on cannula Box 19: LABEL BAG - Time hung, rate, nurse initials PHASE 5 - ONGOING & COMPLETION (blue header): Box 20: MONITOR EVERY 30-60 MINUTES - Drip rate, fluid level, site appearance, patient comfort, vital signs Box 21: NEAR END OF BAG - 50mL remaining: prepare next bag or prepare to discontinue Box 22: WHEN COMPLETE - Close roller clamp, disconnect giving set, flush cannula with saline, cap cannula Box 23: DOCUMENT - Fluid type, volume infused, start/end time, patient response, site condition
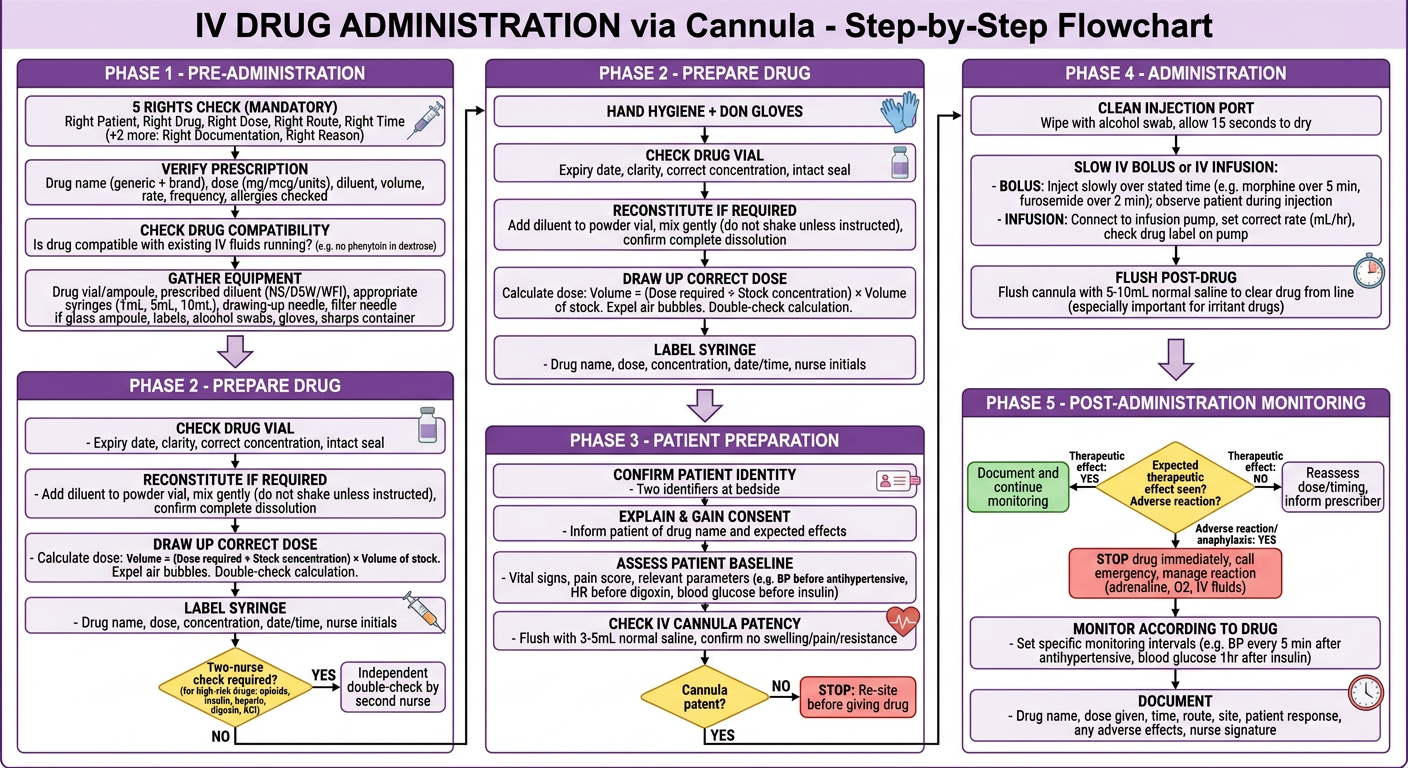
A detailed clinical flowchart titled "IV DRUG ADMINISTRATION via Cannula - Step-by-Step Flowchart". Professional medical style, flowing top to bottom with arrows. Use purple header boxes, white process boxes with purple borders, yellow diamond decision shapes, green confirmation boxes, red stop/warning boxes. PHASE 1 - PRE-ADMINISTRATION (purple header): Box 1: 5 RIGHTS CHECK (MANDATORY) - Right Patient, Right Drug, Right Dose, Right Route, Right Time (+2 more: Right Documentation, Right Reason) Box 2: VERIFY PRESCRIPTION - Drug name (generic + brand), dose (mg/mcg/units), diluent, volume, rate, frequency, allergies checked Box 3: CHECK DRUG COMPATIBILITY - Is drug compatible with existing IV fluids running? (e.g. no phenytoin in dextrose) Box 4: GATHER EQUIPMENT - Drug vial/ampoule, prescribed diluent (NS/D5W/WFI), appropriate syringes (1mL, 5mL, 10mL), drawing-up needle, filter needle if glass ampoule, labels, alcohol swabs, gloves, sharps container PHASE 2 - PREPARE DRUG (purple header): Box 5: HAND HYGIENE + DON GLOVES Box 6: CHECK DRUG VIAL - Expiry date, clarity, correct concentration, intact seal Box 7: RECONSTITUTE IF REQUIRED - Add diluent to powder vial, mix gently (do not shake unless instructed), confirm complete dissolution Box 8: DRAW UP CORRECT DOSE - Calculate dose: Volume = (Dose required ÷ Stock concentration) × Volume of stock. Expel air bubbles. Double-check calculation. Box 9: LABEL SYRINGE - Drug name, dose, concentration, date/time, nurse initials Decision diamond: "Two-nurse check required?" (for high-risk drugs: opioids, insulin, heparin, digoxin, KCl) YES → independent double-check by second nurse | NO → proceed PHASE 3 - PATIENT PREPARATION (purple header): Box 10: CONFIRM PATIENT IDENTITY - Two identifiers at bedside Box 11: EXPLAIN & GAIN CONSENT - Inform patient of drug name and expected effects Box 12: ASSESS PATIENT BASELINE - Vital signs, pain score, relevant parameters (e.g. BP before antihypertensive, HR before digoxin, blood glucose before insulin) Box 13: CHECK IV CANNULA PATENCY - Flush with 3-5mL normal saline, confirm no swelling/pain/resistance Decision diamond: "Cannula patent?" YES → proceed | NO → re-site before giving drug PHASE 4 - ADMINISTRATION (purple header): Box 14: CLEAN INJECTION PORT - Wipe with alcohol swab, allow 15 seconds to dry Box 15: SLOW IV BOLUS or IV INFUSION: - BOLUS: Inject slowly over stated time (e.g. morphine over 5 min, furosemide over 2 min); observe patient during injection - INFUSION: Connect to infusion pump, set correct rate (mL/hr), check drug label on pump Box 16: FLUSH POST-DRUG - Flush cannula with 5-10mL normal saline to clear drug from line (especially important for irritant drugs) PHASE 5 - POST-ADMINISTRATION MONITORING (purple header): Decision diamond: "Expected therapeutic effect seen? Adverse reaction?" - Therapeutic effect: YES → document and continue monitoring | NO → reassess dose/timing, inform prescriber - Adverse reaction/anaphylaxis: YES → STOP drug immediately, call emergency, manage reaction (adrenaline, O2, IV fluids) Box 17: MONITOR ACCORDING TO DRUG - Set specific monitoring intervals (e.g. BP every 5 min after antihypertensive, blood glucose 1hr after insulin) Box 18: DOCUMENT - Drug name, dose given, time, route, site, patient response, any adverse effects, nurse signature
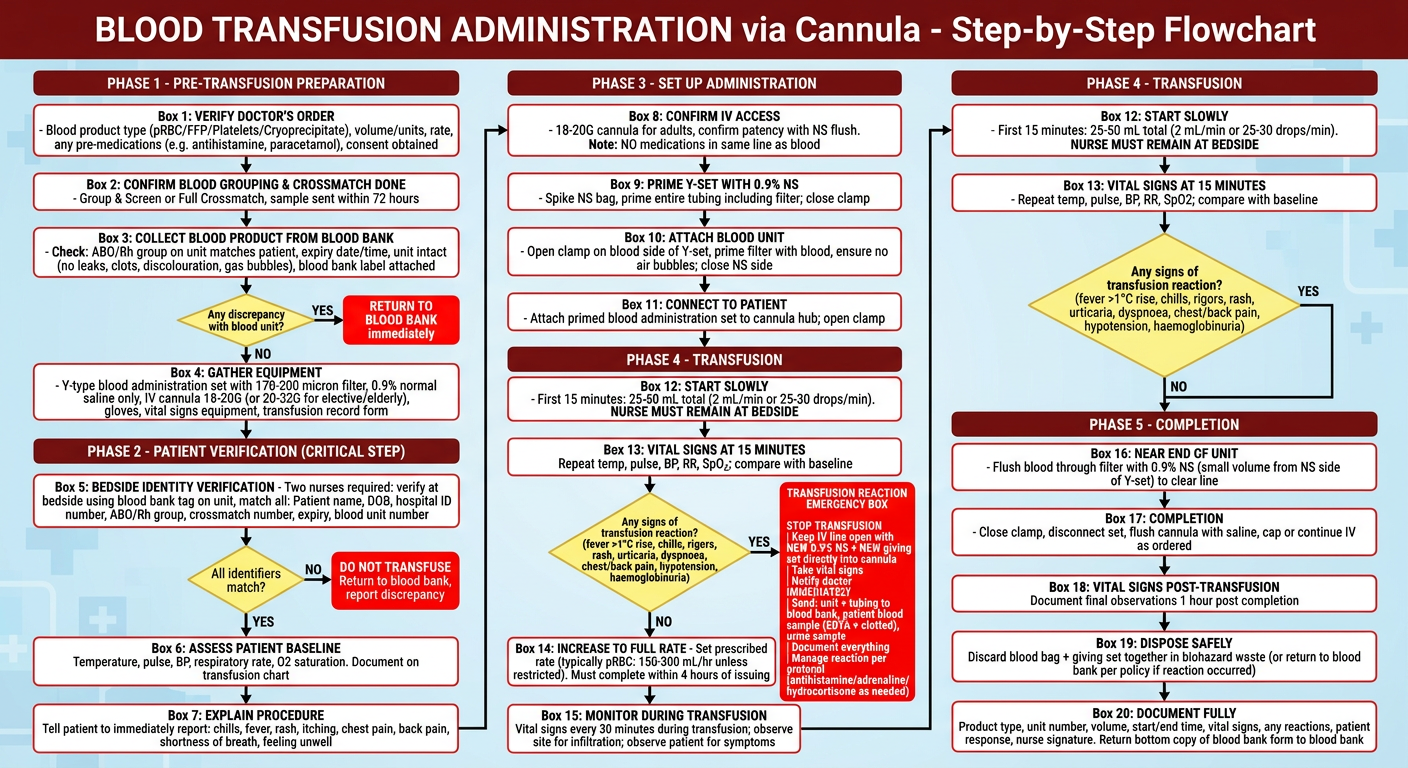
A detailed clinical flowchart titled "BLOOD TRANSFUSION ADMINISTRATION via Cannula - Step-by-Step Flowchart". Professional medical style, flowing top to bottom with arrows. Use dark red header boxes, white process boxes with red borders, yellow diamond decision shapes, green confirmation boxes, bright red emergency stop boxes. PHASE 1 - PRE-TRANSFUSION PREPARATION (dark red header): Box 1: VERIFY DOCTOR'S ORDER - Blood product type (pRBC/FFP/Platelets/Cryoprecipitate), volume/units, rate, any pre-medications (e.g. antihistamine, paracetamol), consent obtained Box 2: CONFIRM BLOOD GROUPING & CROSSMATCH DONE - Group & Screen or Full Crossmatch, sample sent within 72 hours Box 3: COLLECT BLOOD PRODUCT FROM BLOOD BANK - Check: ABO/Rh group on unit matches patient, expiry date/time, unit intact (no leaks, clots, discolouration, gas bubbles), blood bank label attached Decision diamond: "Any discrepancy with blood unit?" YES → RETURN TO BLOOD BANK immediately | NO → proceed within 30 minutes Box 4: GATHER EQUIPMENT - Y-type blood administration set with 170-200 micron filter, 0.9% normal saline only, IV cannula 18-20G (or 20-22G for elective/elderly), gloves, vital signs equipment, transfusion record form PHASE 2 - PATIENT VERIFICATION (CRITICAL STEP) (dark red header): Box 5: BEDSIDE IDENTITY VERIFICATION - Two nurses required: verify at bedside using blood bank tag on unit, match all: Patient name, DOB, hospital ID number, ABO/Rh group, crossmatch number, expiry, blood unit number Decision diamond: "All identifiers match?" YES → proceed | NO → DO NOT TRANSFUSE - Return to blood bank, report discrepancy Box 6: ASSESS PATIENT BASELINE - Temperature, pulse, BP, respiratory rate, O2 saturation. Document on transfusion chart Box 7: EXPLAIN PROCEDURE - Tell patient to immediately report: chills, fever, rash, itching, chest pain, back pain, shortness of breath, feeling unwell PHASE 3 - SET UP ADMINISTRATION (dark red header): Box 8: CONFIRM IV ACCESS - 18-20G cannula for adults, confirm patency with NS flush. Note: NO medications in same line as blood Box 9: PRIME Y-SET WITH 0.9% NS - Spike NS bag, prime entire tubing including filter; close clamp Box 10: ATTACH BLOOD UNIT - Open clamp on blood side of Y-set, prime filter with blood, ensure no air bubbles; close NS side Box 11: CONNECT TO PATIENT - Attach primed blood administration set to cannula hub; open clamp PHASE 4 - TRANSFUSION (dark red header): Box 12: START SLOWLY - First 15 minutes: 25-50 mL total (2 mL/min or 25-30 drops/min). NURSE MUST REMAIN AT BEDSIDE Box 13: VITAL SIGNS AT 15 MINUTES - Repeat temp, pulse, BP, RR, SpO2; compare with baseline Decision diamond: "Any signs of transfusion reaction?" (fever >1°C rise, chills, rigors, rash, urticaria, dyspnoea, chest/back pain, hypotension, haemoglobinuria) YES → EMERGENCY: STOP TRANSFUSION IMMEDIATELY (see reaction box) NO → Increase to prescribed rate TRANSFUSION REACTION EMERGENCY BOX (bright red): STOP TRANSFUSION | Keep IV line open with NEW 0.9% NS + NEW giving set directly into cannula | Take vital signs | Notify doctor IMMEDIATELY | Send: unit + tubing to blood bank, patient blood sample (EDTA + clotted), urine sample | Document everything | Manage reaction per protocol (antihistamine/adrenaline/hydrocortisone as needed) Box 14: INCREASE TO FULL RATE - Set prescribed rate (typically pRBC: 150-300 mL/hr unless restricted). Must complete within 4 hours of issuing Box 15: MONITOR DURING TRANSFUSION - Vital signs every 30 minutes during transfusion; observe site for infiltration; observe patient for symptoms PHASE 5 - COMPLETION (dark red header): Box 16: NEAR END OF UNIT - Flush blood through filter with 0.9% NS (small volume from NS side of Y-set) to clear line Box 17: COMPLETION - Close clamp, disconnect set, flush cannula with saline, cap or continue IV as ordered Box 18: VITAL SIGNS POST-TRANSFUSION - Document final observations 1 hour post completion Box 19: DISPOSE SAFELY - Discard blood bag + giving set together in biohazard waste (or return to blood bank per policy if reaction occurred) Box 20: DOCUMENT FULLY - Product type, unit number, volume, start/end time, vital signs, any reactions, patient response, nurse signature. Return bottom copy of blood bank form to blood bank
1. IV FLUID ADMINISTRATION
2. IV DRUG ADMINISTRATION
3. BLOOD TRANSFUSION ADMINISTRATION
DETAILED WRITTEN GUIDE
PART A: IV FLUID ADMINISTRATION
Phase 1 - Pre-Administration
| Step | Action | Key Points |
|---|---|---|
| 1 | Verify doctor's order | Fluid type, volume, rate (mL/hr), duration |
| 2 | Check fluid bag | Expiry date, clarity (no cloudiness/particles), squeeze bag for leaks, label matches order |
| 3 | Gather equipment | Fluid bag, IV giving set (macrodrip 20 drops/mL or microdrip 60 drops/mL), IV pole, gloves, tape |
| 4 | Hand hygiene | 6-step technique before touching equipment |
Phase 2 - Prime the Giving Set
| Step | Action | Key Points |
|---|---|---|
| 5 | Spike the bag | Remove port cap, insert spike aseptically - do not contaminate tip |
| 6 | Prime the tubing | Squeeze drip chamber halfway full, open clamp slowly, run fluid through until zero air bubbles, then close clamp |
| 7 | Hang bag | At least 1 metre above the patient's heart level |
| 8 | Label giving set | Date and time of setup |
Phase 3 - Connect to Patient
| Step | Action | Key Points |
|---|---|---|
| 9 | Confirm patient identity | Two identifiers: name + DOB |
| 10 | Flush cannula | 5mL normal saline - check for swelling, pain, resistance |
| Decision | Cannula patent? | YES - proceed / NO - re-site cannula first |
| 11 | Clean cannula port | Alcohol swab, allow 15 seconds to dry |
| 12 | Connect giving set | Attach to cannula hub securely |
Phase 4 - Set Rate and Monitor
| Step | Action | Key Points |
|---|---|---|
| 13 | Open clamp and set rate | Manual (drops/min): mL/hr ÷ 3 for macrodrip sets. Pump: enter mL/hr directly |
| 14 | First 5-minute check | Inspect site for infiltration, confirm correct drip rate |
| Decision | Infiltration/reaction? | YES - stop, assess, re-site / NO - continue |
| 15 | Secure tubing | Loop and tape, no tension on cannula |
Phase 5 - Ongoing Monitoring and Completion
- Monitor every 30-60 minutes: drip rate, fluid level, site appearance, patient comfort, vital signs
- At 50mL remaining: prepare next bag or prepare to discontinue
- On completion: close clamp, disconnect, flush cannula with saline, cap port
- Document: fluid type, volume infused, start/end time, patient response, site condition
PART B: IV DRUG ADMINISTRATION
The 7 Rights (Mandatory Check Before Every Drug)
- Right Patient
- Right Drug
- Right Dose
- Right Route
- Right Time
- Right Documentation
- Right Reason
Phase 1 - Prescription Verification
| Step | Action |
|---|---|
| 1 | Verify prescription: drug name, dose, diluent, volume, rate, frequency |
| 2 | Check drug compatibility with existing IV fluids (e.g. phenytoin incompatible with dextrose) |
| 3 | Check patient allergy status |
Phase 2 - Drug Preparation
| Step | Action | Key Points |
|---|---|---|
| 4 | Hand hygiene + gloves | Before handling any drug |
| 5 | Check drug vial | Expiry, clarity, correct concentration, intact seal |
| 6 | Reconstitute if needed | Add correct diluent, mix gently - do not shake (most drugs) |
| 7 | Draw up correct dose | Formula: Volume = (Dose ÷ Stock concentration) × Stock volume. Expel air bubbles. |
| 8 | Label syringe | Drug name, dose, concentration, date/time, initials |
| Decision | Two-nurse check needed? | YES for high-risk drugs: opioids, insulin, heparin, digoxin, KCl, chemotherapy |
Phase 3 - Patient Preparation
| Step | Action |
|---|---|
| 9 | Confirm identity at bedside (2 identifiers) |
| 10 | Explain drug and expected effects, gain consent |
| 11 | Baseline observations relevant to drug (e.g. BP before antihypertensive, HR before digoxin) |
| 12 | Flush and confirm cannula patency |
Phase 4 - Administration
| Method | Procedure |
|---|---|
| IV Bolus | Inject slowly at prescribed rate (e.g. morphine over 5 min, furosemide over 2 min). Remain with patient throughout. |
| IV Infusion | Load syringe driver or infusion pump, set correct rate, label pump with drug name and concentration |
| Post-drug flush | Flush with 5-10mL normal saline to clear drug from line |
Phase 5 - Post-Administration Monitoring
- Therapeutic effect achieved? If not, reassess dose/timing, inform prescriber
- Adverse reaction? - STOP drug, manage reaction, notify doctor (anaphylaxis: adrenaline 0.5mg IM, O2, IV fluids)
- Set drug-specific monitoring: (BP post-antihypertensive, BGL post-insulin, HR post-digoxin)
- Document: drug, dose, time, route, site, patient response, adverse effects, signature
PART C: BLOOD TRANSFUSION ADMINISTRATION
Phase 1 - Pre-Transfusion Preparation
| Step | Action | Key Points |
|---|---|---|
| 1 | Verify order | Product type (pRBC/FFP/Platelets/Cryo), volume, rate, pre-medications, consent |
| 2 | Confirm lab work done | Group & Screen or Full Crossmatch sample sent within 72 hours |
| 3 | Collect from blood bank | Collect and use within 30 minutes. Inspect: ABO/Rh match, expiry, integrity, no clots/gas/discolouration |
| Decision | Any discrepancy? | YES - return to blood bank immediately / NO - proceed |
Phase 2 - Bedside Identity Verification (CRITICAL - Two Nurses Required)
- Patient full name
- Date of birth
- Hospital ID number
- ABO and Rh blood group
- Crossmatch number
- Blood unit number
- Expiry date/time
Decision: Any mismatch? - DO NOT TRANSFUSE. Return to blood bank. Report discrepancy.
| Step | Action |
|---|---|
| 4 | Baseline vital signs: Temperature, Pulse, BP, RR, SpO2 - document on transfusion chart |
| 5 | Educate patient to report: chills, fever, rash, chest/back pain, shortness of breath immediately |
Phase 3 - Equipment and Setup
| Step | Action | Key Points |
|---|---|---|
| 6 | IV access | 18-20G for adults (20-22G for elective/elderly). Only one product per line - NO other drugs in same line |
| 7 | Prime Y-type blood set with 0.9% NS only | Never use dextrose - causes haemolysis |
| 8 | Attach blood unit | Open blood side of Y-set, prime 170-200 micron filter |
| 9 | Connect to patient | Attach to cannula hub |
Phase 4 - Transfusion
| Time | Rate | Action |
|---|---|---|
| First 15 minutes | 25-50mL total (2mL/min) | Nurse remains at bedside |
| At 15 minutes | - | Repeat full vital signs, compare with baseline |
| Decision | Signs of reaction? | YES - EMERGENCY STOP (see below) / NO - increase to prescribed rate |
| Remainder | Prescribed rate (150-300mL/hr typical for pRBC) | Must complete within 4 hours of issue from blood bank |
| Every 30 minutes | - | Repeat vital signs, inspect site, assess patient |
Transfusion Reaction - Emergency Response
- STOP transfusion immediately
- Keep IV open with NEW 0.9% NS + NEW giving set (direct to cannula - do not flush blood through)
- Take full vital signs
- Notify doctor IMMEDIATELY
- Send to blood bank: unit + original tubing, patient EDTA blood sample, clotted blood sample, urine sample
- Manage reaction: antihistamine/hydrocortisone for mild allergic; adrenaline for anaphylaxis; IV fluids for hypotension
- Document everything with exact times
Phase 5 - Completion
| Step | Action |
|---|---|
| 10 | Flush remaining blood through filter using NS side of Y-set |
| 11 | Disconnect, flush cannula with saline, cap |
| 12 | Post-transfusion vital signs at 1 hour |
| 13 | Dispose: blood bag + giving set in biohazard waste (unless reaction - return to blood bank) |
| 14 | Document fully: product type, unit number, volume, start/end time, all vital sign readings, reactions, patient response, nurse signature. Return blood bank form bottom copy to blood bank |
Quick Comparison Summary
| Feature | IV Fluid | IV Drug | Blood Transfusion |
|---|---|---|---|
| Identity check | 1 nurse | 1 nurse (2 for high-risk drugs) | 2 nurses mandatory |
| Filter | Standard giving set | None (unless stated) | Y-type set with 170-200 micron filter |
| Compatible diluent | Depends on fluid | Depends on drug | 0.9% NS only |
| Cannula size | 18-22G | 18-22G | 18-20G (minimum) |
| Rate initiation | As prescribed | As prescribed | SLOW first 15 min (2mL/min) |
| Monitoring | Every 30-60 min | Drug-dependent | Every 30 min + baseline |
| Duration limit | As prescribed | As prescribed | Max 4 hours from blood bank issue |
| Reaction management | Stop, assess | Stop drug, manage | Stop, new NS line, blood bank notification |
Generate a PDF quick reference guide for IV administration complications
ls -la /home/daytona/workspace/ 2>/dev/null || echo "workspace does not exist yet"
mkdir -p /home/daytona/workspace/iv-complications && echo "Directory created"
~/iv-complications/generate_pdf.py
from reportlab.lib.pagesizes import A4
from reportlab.lib import colors
from reportlab.lib.units import mm
from reportlab.platypus import (
SimpleDocTemplate, Paragraph, Spacer, Table, TableStyle,
HRFlowable, KeepTogether
)
from reportlab.lib.styles import getSampleStyleSheet, ParagraphStyle
from reportlab.lib.enums import TA_CENTER, TA_LEFT, TA_JUSTIFY
from reportlab.platypus import PageBreak
OUTPUT = "/home/daytona/workspace/iv-complications/IV_Complications_Quick_Reference.pdf"
# ── Colour palette ────────────────────────────────────────────────
NAVY = colors.HexColor("#1a3557")
TEAL = colors.HexColor("#1a7f8e")
RED = colors.HexColor("#c0392b")
ORANGE = colors.HexColor("#e67e22")
GREEN = colors.HexColor("#1e8449")
PURPLE = colors.HexColor("#6c3483")
DARK_RED = colors.HexColor("#922b21")
LIGHT_BLUE = colors.HexColor("#d6eaf8")
LIGHT_RED = colors.HexColor("#fce4e4")
LIGHT_GRN = colors.HexColor("#d5f5e3")
LIGHT_ORG = colors.HexColor("#fef9e7")
LIGHT_PRP = colors.HexColor("#f5eef8")
LIGHT_GREY = colors.HexColor("#f2f3f4")
WHITE = colors.white
BLACK = colors.HexColor("#1c1c1c")
GOLD = colors.HexColor("#d4ac0d")
doc = SimpleDocTemplate(
OUTPUT,
pagesize=A4,
topMargin=14*mm, bottomMargin=14*mm,
leftMargin=14*mm, rightMargin=14*mm,
)
W = A4[0] - 28*mm # usable width
styles = getSampleStyleSheet()
def S(name, **kw):
return ParagraphStyle(name, **kw)
# Custom styles
TITLE_S = S("Title", fontSize=22, textColor=WHITE, alignment=TA_CENTER,
fontName="Helvetica-Bold", leading=28)
SUBTITLE_S = S("Subtitle", fontSize=11, textColor=colors.HexColor("#d6eaf8"),
alignment=TA_CENTER, fontName="Helvetica", leading=16)
SECTION_S = S("Section", fontSize=12, textColor=WHITE, fontName="Helvetica-Bold",
leading=16, alignment=TA_CENTER)
BODY_S = S("Body", fontSize=8.5, textColor=BLACK, fontName="Helvetica",
leading=13, alignment=TA_JUSTIFY)
BOLD_S = S("Bold", fontSize=8.5, textColor=BLACK, fontName="Helvetica-Bold", leading=13)
SMALL_S = S("Small", fontSize=7.5, textColor=BLACK, fontName="Helvetica", leading=11)
SMALL_BOLD = S("SmallBold", fontSize=7.5, textColor=BLACK, fontName="Helvetica-Bold", leading=11)
WARN_S = S("Warn", fontSize=8, textColor=RED, fontName="Helvetica-Bold", leading=12)
HEAD_S = S("Head", fontSize=9, textColor=WHITE, fontName="Helvetica-Bold",
leading=13, alignment=TA_CENTER)
FOOT_S = S("Foot", fontSize=7, textColor=colors.HexColor("#555555"),
fontName="Helvetica", alignment=TA_CENTER, leading=10)
story = []
# ═══════════════════════════════════════════════════════════════════
# COVER / HEADER BANNER
# ═══════════════════════════════════════════════════════════════════
banner_data = [[Paragraph("IV ADMINISTRATION COMPLICATIONS", TITLE_S)],
[Paragraph("Quick Reference Guide for Nurses & Healthcare Professionals", SUBTITLE_S)]]
banner = Table(banner_data, colWidths=[W])
banner.setStyle(TableStyle([
("BACKGROUND", (0,0), (-1,-1), NAVY),
("TOPPADDING", (0,0), (-1,-1), 10),
("BOTTOMPADDING", (0,0), (-1,-1), 10),
("LEFTPADDING", (0,0), (-1,-1), 8),
("RIGHTPADDING", (0,0), (-1,-1), 8),
("ROUNDEDCORNERS", [6]),
]))
story.append(banner)
story.append(Spacer(1, 4*mm))
# ── Info strip ──────────────────────────────────────────────────
info_data = [[
Paragraph("<b>Scope:</b> Peripheral IV cannula (adult & paediatric)", SMALL_S),
Paragraph("<b>Includes:</b> Local & Systemic complications", SMALL_S),
Paragraph("<b>Emergency actions highlighted in red</b>", WARN_S),
]]
info_tbl = Table(info_data, colWidths=[W*0.38, W*0.38, W*0.24])
info_tbl.setStyle(TableStyle([
("BACKGROUND", (0,0), (-1,-1), LIGHT_BLUE),
("BOX", (0,0), (-1,-1), 0.5, TEAL),
("TOPPADDING", (0,0), (-1,-1), 5),
("BOTTOMPADDING", (0,0), (-1,-1), 5),
("LEFTPADDING", (0,0), (-1,-1), 6),
("RIGHTPADDING", (0,0), (-1,-1), 6),
("VALIGN", (0,0), (-1,-1), "MIDDLE"),
]))
story.append(info_tbl)
story.append(Spacer(1, 5*mm))
# ═══════════════════════════════════════════════════════════════════
# Helper: section header
# ═══════════════════════════════════════════════════════════════════
def section_header(text, color):
tbl = Table([[Paragraph(text, SECTION_S)]], colWidths=[W])
tbl.setStyle(TableStyle([
("BACKGROUND", (0,0), (-1,-1), color),
("TOPPADDING", (0,0), (-1,-1), 6),
("BOTTOMPADDING", (0,0), (-1,-1), 6),
("LEFTPADDING", (0,0), (-1,-1), 8),
("RIGHTPADDING", (0,0), (-1,-1), 8),
]))
return tbl
# Helper: colour-coded complication table
def comp_table(rows, header_color, row_bg):
"""rows = list of [Complication, Signs/Symptoms, Cause, Action]"""
headers = [
Paragraph("COMPLICATION", HEAD_S),
Paragraph("SIGNS & SYMPTOMS", HEAD_S),
Paragraph("CAUSES", HEAD_S),
Paragraph("NURSING ACTION", HEAD_S),
]
col_w = [W*0.18, W*0.28, W*0.22, W*0.32]
data = [headers]
for r in rows:
data.append([Paragraph(r[0], BOLD_S),
Paragraph(r[1], SMALL_S),
Paragraph(r[2], SMALL_S),
Paragraph(r[3], SMALL_S)])
tbl = Table(data, colWidths=col_w, repeatRows=1)
style = [
("BACKGROUND", (0,0), (-1,0), header_color),
("TEXTCOLOR", (0,0), (-1,0), WHITE),
("GRID", (0,0), (-1,-1), 0.4, colors.HexColor("#aaaaaa")),
("VALIGN", (0,0), (-1,-1), "TOP"),
("TOPPADDING", (0,0), (-1,-1), 4),
("BOTTOMPADDING", (0,0), (-1,-1), 4),
("LEFTPADDING", (0,0), (-1,-1), 4),
("RIGHTPADDING", (0,0), (-1,-1), 4),
("ROWBACKGROUNDS", (0,1), (-1,-1), [row_bg, WHITE]),
]
tbl.setStyle(TableStyle(style))
return tbl
# ═══════════════════════════════════════════════════════════════════
# SECTION 1 – LOCAL COMPLICATIONS
# ═══════════════════════════════════════════════════════════════════
story.append(section_header("SECTION 1 — LOCAL / SITE COMPLICATIONS", TEAL))
story.append(Spacer(1, 2*mm))
local_rows = [
[
"Infiltration\n(Non-vesicant)",
"Swelling, puffiness, pallor, coolness around site; slower drip rate; patient reports mild discomfort",
"Cannula tip displaced outside vein; vein perforated; poor fixation",
"STOP infusion immediately. Remove cannula. Elevate limb. Apply warm compress (non-vesicant fluids). Re-site at new location (other arm preferred). Document and reassess hourly.",
],
[
"Extravasation\n(Vesicant drug)",
"Burning, stinging, blistering at site; tissue necrosis may develop; erythema then blanching",
"Vesicant drug (e.g. chemo, vasopressors, hypertonic solutions, Ca gluconate) leaks into tissue",
"<b>EMERGENCY.</b> STOP infusion. Do NOT remove cannula immediately — aspirate residual drug first. Notify doctor/pharmacist urgently. Apply specific antidote if available (e.g. hyaluronidase). Elevate limb. Cold/warm compress per drug protocol. Plastic surgery referral if necrosis suspected. Photograph and document meticulously.",
],
[
"Phlebitis\n(Inflammation)",
"Redness, warmth, pain, swelling along vein track; palpable cord; VIP score ≥2",
"Mechanical (movement), Chemical (irritant drug/osmolarity), Bacterial (poor asepsis). PIVC >72–96 hrs",
"Remove cannula. Apply warm moist compress 3–4×/day. Document VIP score. Insert new cannula at fresh site (opposite arm). Report if score ≥3. Consider IV antibiotics if bacterial phlebitis suspected.",
],
[
"Thrombophlebitis",
"Pain, hardness, erythema along vein; palpable clot/cord; area hot to touch",
"Phlebitis + thrombus formation; prolonged cannulation; endothelial damage",
"Remove cannula immediately. Warm compresses. Elevate limb. Notify doctor. Anti-inflammatory cream (e.g. diclofenac gel) per order. Doppler USS if extensive. Anticoagulation rarely needed for peripheral.",
],
[
"Haematoma",
"Bruising, swelling, discolouration at insertion site; tenderness",
"Vein punctured through-and-through; poor technique; anticoagulated patient",
"Apply firm direct pressure for 3–5 minutes (longer if anticoagulated). Elevate limb. Cold pack first 24 hrs. Warm pack after 24 hrs. Do not attempt re-cannulation at same site. Monitor for compartment syndrome if large.",
],
[
"Local Infection\n/ Site Infection",
"Redness, warmth, purulent discharge at site; induration; fever after 48–72 hrs",
"Breach in aseptic technique; contaminated equipment; prolonged dwell time (>72–96 hrs)",
"Remove cannula. Clean site with antiseptic. Culture purulent discharge and cannula tip. Apply sterile dressing. Notify doctor. Monitor for progression to systemic sepsis. Re-insert at fresh site.",
],
[
"Occlusion\n(Blockage)",
"Slow/absent flow; resistance on flushing; pump alarm; no blood return",
"Kinking of cannula; blood clot in hub; drug precipitation; positional blockage",
"Check for kinks/positional issues first. Attempt gentle flush with 10mL NS using push-pause technique. Do NOT force flush. If persistent — remove and re-site. Never use heparin flush routinely (per evidence-based guidelines).",
],
[
"Nerve Injury",
"Shooting pain, tingling, numbness, paraesthesia at/around insertion site",
"Inadvertent needle contact with nerve during insertion; haematoma pressure on nerve",
"Remove cannula immediately. Assess neurological function of affected area. Document symptoms carefully. Notify doctor. Physiotherapy referral if symptoms persist >24 hrs. Incident report.",
],
]
story.append(comp_table(local_rows, TEAL, LIGHT_BLUE))
story.append(Spacer(1, 4*mm))
# ── VIP Score box ───────────────────────────────────────────────
vip_rows = [
[Paragraph("VIP SCORE (Visual Infusion Phlebitis Scale)", BOLD_S), Paragraph("Action Required", BOLD_S)],
[Paragraph("0 — No symptoms", SMALL_S), Paragraph("Continue cannula. Observe.", SMALL_S)],
[Paragraph("1 — Slight pain or redness near site", SMALL_S), Paragraph("Observe cannula. Document.", SMALL_S)],
[Paragraph("2 — Pain, redness and/or swelling", SMALL_S), Paragraph("Re-site cannula.", SMALL_S)],
[Paragraph("3 — Pain, redness, swelling; palpable cord ≤3cm", SMALL_S), Paragraph("Re-site. Consider treatment.", SMALL_S)],
[Paragraph("4 — Pain, redness, swelling; palpable cord >3cm", SMALL_S), Paragraph("Re-site. Initiate treatment.", SMALL_S)],
[Paragraph("5 — As above + pyrexia, purulent discharge", SMALL_S), Paragraph("<font color='red'><b>Remove. Treat infection. Report.</b></font>", SMALL_S)],
]
vip_tbl = Table(vip_rows, colWidths=[W*0.5, W*0.5])
vip_tbl.setStyle(TableStyle([
("BACKGROUND", (0,0), (-1,0), NAVY),
("TEXTCOLOR", (0,0), (-1,0), WHITE),
("GRID", (0,0), (-1,-1), 0.4, colors.HexColor("#aaaaaa")),
("VALIGN", (0,0), (-1,-1), "MIDDLE"),
("TOPPADDING", (0,0), (-1,-1), 4),
("BOTTOMPADDING", (0,0), (-1,-1), 4),
("LEFTPADDING", (0,0), (-1,-1), 5),
("RIGHTPADDING", (0,0), (-1,-1), 5),
("ROWBACKGROUNDS", (0,1), (-1,-1), [LIGHT_BLUE, WHITE]),
]))
story.append(vip_tbl)
story.append(Spacer(1, 5*mm))
# ═══════════════════════════════════════════════════════════════════
# SECTION 2 – SYSTEMIC COMPLICATIONS
# ═══════════════════════════════════════════════════════════════════
story.append(section_header("SECTION 2 — SYSTEMIC COMPLICATIONS", RED))
story.append(Spacer(1, 2*mm))
systemic_rows = [
[
"Septicaemia\n/ Bloodstream\nInfection (BSI)",
"Fever >38°C or <36°C; rigors; tachycardia; hypotension; confusion; high WCC; positive blood cultures",
"Contaminated IV equipment; poor ANTT; prolonged cannula dwell; immunocompromised patient",
"<b>EMERGENCY.</b> Remove cannula and culture tip. Draw 2 sets of blood cultures from different sites. Commence broad-spectrum IV antibiotics per protocol. Fluid resuscitation. Notify senior doctor. Complete sepsis 6 bundle within 1 hour. ICU referral if septic shock.",
],
[
"Fluid Overload\n(Hypervolaemia)",
"Dyspnoea, orthopnoea; raised JVP; peripheral oedema; crackles on auscultation; hypertension; weight gain",
"Excessive fluid rate; incorrect fluid choice; renal/cardiac failure; inadequate monitoring",
"Slow or stop IV infusion. Sit patient upright. O2 therapy. Notify doctor. IV furosemide as ordered. Strict fluid balance chart. Weigh daily. Cardiac/renal review if recurrent. Review all IV fluid orders.",
],
[
"Air Embolism",
"Sudden dyspnoea; chest pain; hypotension; tachycardia; 'mill-wheel' murmur; cyanosis; loss of consciousness",
"Air entering IV system — during connection/disconnection, empty IV bag, cannula insertion/removal",
"<b>EMERGENCY.</b> Place patient in left lateral Trendelenburg position (air traps in right ventricle, away from pulmonary circulation). High-flow O2 via non-rebreather mask. Call resuscitation team. Do NOT remove IV access. Aspirate air via central line if present. Document time and amount of air estimated.",
],
[
"Speed Shock",
"Flushing, headache, tightness in chest; hypotension; loss of consciousness; cardiac arrest in extreme cases",
"Too-rapid administration of IV drug (especially concentrated bolus); accidental free-flow",
"STOP IV immediately. Assess ABCDE. Call for help. Treat symptomatically per drug antidote/reversal if available. Check infusion pump settings and anti-siphon valves. Incident report. Prevention: always use infusion pump for high-alert medications.",
],
[
"Allergic Reaction\n/ Anaphylaxis",
"Urticaria, pruritus, flushing (mild); bronchospasm, stridor, angioedema, hypotension, loss of consciousness (severe)",
"Drug allergy; latex allergy; blood product reaction; contrast media; solution additives",
"<b>ANAPHYLAXIS EMERGENCY.</b> STOP infusion immediately. Call resuscitation team. Adrenaline (epinephrine) 0.5mg IM (1:1000) into anterolateral thigh. Lay flat, raise legs. High-flow O2. IV fluid bolus (500mL–1L NS rapidly). Chlorphenamine 10mg IV + hydrocortisone 200mg IV. Monitor every 5 min. ICU referral. Complete incident report.",
],
[
"Pulmonary\nEmbolism (PE)",
"Sudden-onset dyspnoea; pleuritic chest pain; haemoptysis; tachycardia; hypoxia; raised D-dimer",
"Thrombophlebitis extending to deep veins; prolonged immobility; hypercoagulable state",
"Stop IV if thrombus related to line. High-flow O2. Urgent medical review. CTPA to confirm. Anticoagulation (LMWH/UFH) as prescribed. Thrombolysis if massive PE with haemodynamic instability. DVT prophylaxis for all admitted patients.",
],
[
"Electrolyte\nImbalance",
"Varies: muscle cramps, weakness (hypo-K); confusion, seizures (hypo-Na); cardiac arrhythmias; tetany (hypo-Ca)",
"Inappropriate IV fluid selection; excessive NS causing hyperchloraemic acidosis; potassium errors",
"Stop infusion. Urgent U&E, blood gas. Notify doctor. Replace electrolytes per protocol (never give KCl IV undiluted — NEVER >40mmol/hr peripheral). Cardiac monitoring if arrhythmia. Re-check levels after replacement.",
],
]
story.append(comp_table(systemic_rows, RED, LIGHT_RED))
story.append(Spacer(1, 5*mm))
# ═══════════════════════════════════════════════════════════════════
# SECTION 3 – BLOOD TRANSFUSION REACTIONS
# ═══════════════════════════════════════════════════════════════════
story.append(section_header("SECTION 3 — BLOOD TRANSFUSION REACTIONS", DARK_RED))
story.append(Spacer(1, 2*mm))
transfusion_rows = [
[
"Acute Haemolytic\nReaction (ABO\nIncompatibility)",
"Fever, chills, rigors within minutes; severe back/flank pain; chest pain; haemoglobinuria (red/brown urine); hypotension; DIC; oliguria",
"ABO incompatible blood transfused — most common cause: patient ID error or blood bank error",
"<b>LIFE-THREATENING EMERGENCY.</b> STOP transfusion immediately. Keep IV open with new NS + new tubing. Call doctor immediately. Send: unit + original tubing, 2× patient blood samples (EDTA + clotted), urine sample to blood bank. Monitor urine output hourly (target >1mL/kg/hr). ICU admission likely.",
],
[
"Febrile\nNon-Haemolytic\nReaction (FNHTR)",
"Temperature rise ≥1°C above baseline; chills; headache; flushing; no haemolysis",
"Cytokines in stored blood; recipient antibodies against donor leucocytes",
"STOP transfusion. Take vital signs. Notify doctor. Rule out haemolytic reaction. If confirmed FNHTR: paracetamol 1g PO. Restart transfusion slowly if doctor approves. Pre-medicate future transfusions with paracetamol. Use leucodepleted blood going forward.",
],
[
"Allergic\nTransfusion\nReaction",
"Urticaria (hives); pruritus (itching); flushing. Severe: bronchospasm, angioedema, hypotension",
"IgE-mediated reaction to donor plasma proteins",
"STOP transfusion. Chlorphenamine 10mg IV (antihistamine). If mild urticaria only and resolves — may restart per doctor's order. If severe (anaphylaxis): adrenaline 0.5mg IM + standard anaphylaxis protocol. Future pre-medication with antihistamine.",
],
[
"TACO\n(Transfusion-\nAssociated\nCirculatory\nOverload)",
"Dyspnoea; hypertension; tachycardia; raised JVP; bilateral crackles; pulmonary oedema within 6 hrs of transfusion",
"Rapid/excessive volume transfused; underlying cardiac/renal impairment",
"STOP or slow transfusion. Sit patient upright. O2. IV furosemide 20–40mg per doctor. Strict fluid balance. Chest X-ray. Consider ECG. High-risk patients: transfuse slowly (1mL/kg/hr), give furosemide between units.",
],
[
"TRALI\n(Transfusion-\nRelated Acute\nLung Injury)",
"Acute hypoxia (SpO2 <90%); bilateral pulmonary infiltrates on CXR; hypotension; fever. Onset within 6 hours of transfusion",
"Donor antibodies (anti-HLA/anti-neutrophil) activate recipient neutrophils, causing non-cardiogenic pulmonary oedema",
"<b>MEDICAL EMERGENCY.</b> STOP transfusion. High-flow O2. Mechanical ventilation may be required. Supportive care (ICU). No diuretics (not fluid overload). Notify blood bank — report unit for investigation. Corticosteroids controversial.",
],
[
"Bacterial\nContamination",
"High fever (>39°C); rigors; severe hypotension; nausea/vomiting within 1–4 hrs (platelets more common than RBCs)",
"Bacterial contamination during collection/processing; improper storage temperature",
"<b>EMERGENCY.</b> STOP transfusion. Broad-spectrum IV antibiotics immediately. Blood cultures × 2 (patient). Send unit to blood bank for culture. Fluid resuscitation. Vasopressors if septic shock. ICU referral. Notify blood bank and transfusion committee urgently.",
],
]
story.append(comp_table(transfusion_rows, DARK_RED, LIGHT_RED))
story.append(Spacer(1, 4*mm))
# ═══════════════════════════════════════════════════════════════════
# SECTION 4 – PREVENTION STRATEGIES
# ═══════════════════════════════════════════════════════════════════
story.append(section_header("SECTION 4 — PREVENTION STRATEGIES", GREEN))
story.append(Spacer(1, 2*mm))
prev_data = [
[Paragraph("PREVENTION STRATEGY", HEAD_S), Paragraph("DETAILS", HEAD_S)],
[
Paragraph("Aseptic Non-Touch Technique (ANTT)", BOLD_S),
Paragraph("Protect all Key-Parts (needle tips, cannula hub, injection ports) and Key-Sites (insertion site). Never touch Key-Parts. Use alcohol swabs on all ports for 15 seconds before access.", SMALL_S)
],
[
Paragraph("Optimal Site Selection", BOLD_S),
Paragraph("Prefer forearm veins over hand. Avoid antecubital for infusions (restricts arm movement, high risk of occlusion). Avoid lower extremities in adults. Avoid sites of infection, phlebitis, or previous bruising.", SMALL_S)
],
[
Paragraph("Correct Cannula Gauge", BOLD_S),
Paragraph("Use the smallest gauge that meets clinical need. Oversized cannula = vein trauma and phlebitis. 20–22G for most adults. 18G for blood transfusion/rapid infusion. 14–16G for trauma/massive haemorrhage.", SMALL_S)
],
[
Paragraph("Dwell Time Monitoring", BOLD_S),
Paragraph("Inspect site every 8–12 hours. Complete VIP score each shift. Replace cannula every 72–96 hours (or per clinical indication). Do not routinely replace if no signs of complications — evidence-based practice (RCT evidence supports clinically-indicated replacement).", SMALL_S)
],
[
Paragraph("Drug Compatibility Checks", BOLD_S),
Paragraph("Check drug compatibility with IV fluid before mixing. Never mix medications in IV bags without pharmacist guidance. Know vesicant vs. non-vesicant drugs. Use dedicated lines for vesicants when possible.", SMALL_S)
],
[
Paragraph("High-Alert Medication Safety", BOLD_S),
Paragraph("Always use infusion pumps for opioids, insulin, heparin, KCl, vasopressors, chemotherapy. Two-nurse independent double-check mandatory. Label all syringes and infusion lines. Anti-siphon valves on pumps.", SMALL_S)
],
[
Paragraph("Blood Product Safety", BOLD_S),
Paragraph("Two-nurse bedside identity check before every transfusion. Use only 0.9% NS with blood products. Transfuse slowly for first 15 minutes. Complete each unit within 4 hours. Never return unused blood to blood bank refrigerator.", SMALL_S)
],
[
Paragraph("Hand Hygiene", BOLD_S),
Paragraph("Perform 6-step hand hygiene before and after every IV access, dressing change, or drug preparation. WHO 'My 5 Moments for Hand Hygiene' applies at every IV interaction.", SMALL_S)
],
]
prev_tbl = Table(prev_data, colWidths=[W*0.28, W*0.72])
prev_tbl.setStyle(TableStyle([
("BACKGROUND", (0,0), (-1,0), GREEN),
("TEXTCOLOR", (0,0), (-1,0), WHITE),
("GRID", (0,0), (-1,-1), 0.4, colors.HexColor("#aaaaaa")),
("VALIGN", (0,0), (-1,-1), "TOP"),
("TOPPADDING", (0,0), (-1,-1), 5),
("BOTTOMPADDING", (0,0), (-1,-1), 5),
("LEFTPADDING", (0,0), (-1,-1), 5),
("RIGHTPADDING", (0,0), (-1,-1), 5),
("ROWBACKGROUNDS", (0,1), (-1,-1), [LIGHT_GRN, WHITE]),
]))
story.append(prev_tbl)
story.append(Spacer(1, 4*mm))
# ═══════════════════════════════════════════════════════════════════
# SECTION 5 – EMERGENCY QUICK REFERENCE CARD
# ═══════════════════════════════════════════════════════════════════
story.append(section_header("SECTION 5 — EMERGENCY QUICK-ACTION CARDS", ORANGE))
story.append(Spacer(1, 2*mm))
def emergency_card(title, steps, color, bg):
rows = [[Paragraph(f"⚑ {title}", S("ch", fontSize=9, textColor=WHITE, fontName="Helvetica-Bold", leading=13))]]
for i, step in enumerate(steps, 1):
rows.append([Paragraph(f"{i}. {step}", SMALL_S)])
tbl = Table(rows, colWidths=[W*0.49])
tbl.setStyle(TableStyle([
("BACKGROUND", (0,0), (-1,0), color),
("BACKGROUND", (0,1), (-1,-1), bg),
("BOX", (0,0), (-1,-1), 1, color),
("TOPPADDING", (0,0), (-1,-1), 4),
("BOTTOMPADDING", (0,0), (-1,-1), 4),
("LEFTPADDING", (0,0), (-1,-1), 5),
("RIGHTPADDING", (0,0), (-1,-1), 5),
]))
return tbl
card1 = emergency_card("ANAPHYLAXIS", [
"STOP infusion immediately",
"Call resuscitation team / 2222",
"Adrenaline 0.5mg IM (1:1000) anterolateral thigh",
"Lay flat, elevate legs",
"High-flow O2 via non-rebreather mask (15L/min)",
"IV access — large bore if not in situ",
"IV NS 500mL–1L rapid bolus",
"Chlorphenamine 10mg IV + Hydrocortisone 200mg IV",
"Monitor every 5 minutes",
"Admit to HDU/ICU",
], RED, LIGHT_RED)
card2 = emergency_card("ACUTE HAEMOLYTIC TRANSFUSION REACTION", [
"STOP transfusion IMMEDIATELY",
"Keep IV open — NEW NS + NEW giving set direct to cannula",
"Call doctor immediately",
"Take full set of vital signs",
"Send: unit + tubing + 2× blood samples + urine to blood bank",
"Maintain urine output >1mL/kg/hr (catheterise if needed)",
"IV fluid resuscitation",
"Monitor for DIC: PT, APTT, fibrinogen, D-dimer",
"ICU referral if haemodynamic instability",
"Complete serious incident report",
], DARK_RED, LIGHT_RED)
card3 = emergency_card("AIR EMBOLISM", [
"STOP infusion — clamp all lines",
"Place in LEFT LATERAL TRENDELENBURG position",
"High-flow O2 (15L/min non-rebreather)",
"Call resuscitation team",
"Do NOT remove IV access",
"Aspirate air via central line if available",
"Monitor SpO2, ECG, BP continuously",
"Hyperbaric O2 may be considered",
"Document estimated air volume and time",
"Complete incident report",
], NAVY, LIGHT_BLUE)
card4 = emergency_card("EXTRAVASATION (VESICANT)", [
"STOP infusion IMMEDIATELY",
"Do NOT remove cannula yet — aspirate residual drug first",
"Estimate volume of drug extravasated",
"Notify doctor and pharmacist urgently",
"Apply specific antidote per drug protocol",
"Elevate the affected limb",
"Cold compress (most vesicants) or warm (vinca alkaloids)",
"Mark the extravasation border with a pen",
"Photograph and document",
"Plastic surgery referral if necrosis developing",
], PURPLE, LIGHT_PRP)
cards_row = [[card1, Spacer(2*mm, 0), card2]]
card_tbl_1 = Table(cards_row, colWidths=[W*0.49, 2*mm, W*0.49])
card_tbl_1.setStyle(TableStyle([("VALIGN", (0,0), (-1,-1), "TOP")]))
story.append(card_tbl_1)
story.append(Spacer(1, 3*mm))
cards_row2 = [[card3, Spacer(2*mm, 0), card4]]
card_tbl_2 = Table(cards_row2, colWidths=[W*0.49, 2*mm, W*0.49])
card_tbl_2.setStyle(TableStyle([("VALIGN", (0,0), (-1,-1), "TOP")]))
story.append(card_tbl_2)
story.append(Spacer(1, 5*mm))
# ═══════════════════════════════════════════════════════════════════
# SECTION 6 – DOCUMENTATION REQUIREMENTS
# ═══════════════════════════════════════════════════════════════════
story.append(section_header("SECTION 6 — DOCUMENTATION REQUIREMENTS", NAVY))
story.append(Spacer(1, 2*mm))
doc_rows = [
[Paragraph("WHEN", HEAD_S), Paragraph("WHAT TO DOCUMENT", HEAD_S), Paragraph("WHERE", HEAD_S)],
[Paragraph("Cannula insertion", BOLD_S),
Paragraph("Date, time, site, gauge, attempts, flush used, patient tolerance", SMALL_S),
Paragraph("Patient chart / cannula dressing label", SMALL_S)],
[Paragraph("Each IV infusion", BOLD_S),
Paragraph("Fluid type, volume, rate, start/end time, site appearance, patient response", SMALL_S),
Paragraph("Fluid balance chart + nursing notes", SMALL_S)],
[Paragraph("IV drug given", BOLD_S),
Paragraph("Drug, dose, time, route, site, response, any adverse effects", SMALL_S),
Paragraph("Medication administration record (MAR)", SMALL_S)],
[Paragraph("Blood transfusion", BOLD_S),
Paragraph("Product, unit number, volume, start/end time, vital signs series, reactions, nurse signature", SMALL_S),
Paragraph("Transfusion chart + return bottom copy to blood bank", SMALL_S)],
[Paragraph("Any complication", BOLD_S),
Paragraph("Complication type, time identified, VIP score, actions taken, doctor notified, outcome", SMALL_S),
Paragraph("Nursing notes + incident reporting system", SMALL_S)],
[Paragraph("Cannula removal", BOLD_S),
Paragraph("Date, time, reason for removal, site condition, cannula tip sent for culture (if infection suspected)", SMALL_S),
Paragraph("Patient chart", SMALL_S)],
]
doc_tbl = Table(doc_rows, colWidths=[W*0.22, W*0.52, W*0.26])
doc_tbl.setStyle(TableStyle([
("BACKGROUND", (0,0), (-1,0), NAVY),
("TEXTCOLOR", (0,0), (-1,0), WHITE),
("GRID", (0,0), (-1,-1), 0.4, colors.HexColor("#aaaaaa")),
("VALIGN", (0,0), (-1,-1), "TOP"),
("TOPPADDING", (0,0), (-1,-1), 5),
("BOTTOMPADDING", (0,0), (-1,-1), 5),
("LEFTPADDING", (0,0), (-1,-1), 5),
("RIGHTPADDING", (0,0), (-1,-1), 5),
("ROWBACKGROUNDS", (0,1), (-1,-1), [LIGHT_BLUE, WHITE]),
]))
story.append(doc_tbl)
story.append(Spacer(1, 4*mm))
# ═══════════════════════════════════════════════════════════════════
# FOOTER
# ═══════════════════════════════════════════════════════════════════
footer_data = [[
Paragraph("This guide is for educational reference only. Always follow your institution's policies and protocols. "
"Clinical decisions must be made in context by qualified healthcare professionals.", FOOT_S),
]]
footer_tbl = Table(footer_data, colWidths=[W])
footer_tbl.setStyle(TableStyle([
("BACKGROUND", (0,0), (-1,-1), LIGHT_GREY),
("BOX", (0,0), (-1,-1), 0.5, colors.HexColor("#999999")),
("TOPPADDING", (0,0), (-1,-1), 6),
("BOTTOMPADDING", (0,0), (-1,-1), 6),
("LEFTPADDING", (0,0), (-1,-1), 8),
("RIGHTPADDING", (0,0), (-1,-1), 8),
]))
story.append(footer_tbl)
# ── Build ──────────────────────────────────────────────────────────
doc.build(story)
print(f"PDF generated: {OUTPUT}")
cd /home/daytona/workspace/iv-complications && python generate_pdf.py 2>&1
~/iv-complications/generate_pdf.py
Successfully replaced 1 instance(s) of the string in '/home/daytona/workspace/iv-complications/generate_pdf.py'
emergency_card function - the inner table width needs to match the outer cell width:~/iv-complications/generate_pdf.py
Successfully replaced 1 instance(s) of the string in '/home/daytona/workspace/iv-complications/generate_pdf.py'
cd /home/daytona/workspace/iv-complications && python generate_pdf.py 2>&1
ls -lh /home/daytona/workspace/iv-complications/IV_Complications_Quick_Reference.pdf
IV Complications Quick Reference
PDF Document · PDF
What's inside the PDF
| Section | Colour | Content |
|---|---|---|
| 1 - Local/Site Complications | Teal | Infiltration, Extravasation, Phlebitis, Thrombophlebitis, Haematoma, Local Infection, Occlusion, Nerve Injury + VIP Score table |
| 2 - Systemic Complications | Red | Septicaemia/BSI, Fluid Overload, Air Embolism, Speed Shock, Anaphylaxis, PE, Electrolyte Imbalance |
| 3 - Blood Transfusion Reactions | Dark Red | AHR (ABO incompatibility), FNHTR, Allergic, TACO, TRALI, Bacterial Contamination |
| 4 - Prevention Strategies | Green | ANTT, site selection, cannula gauge, dwell time, drug compatibility, high-alert meds, hand hygiene |
| 5 - Emergency Quick-Action Cards | Colour-coded | 4 side-by-side cards: Anaphylaxis, Acute Haemolytic Reaction, Air Embolism, Extravasation |
| 6 - Documentation Requirements | Navy | What to record at every stage of IV therapy |