Explain me all slit lamp techniques with detail
Reading File
Finding Sources
Finding Sources
Reading File
Reading File
Reading File
Finding Sources
Reading File
Finding Sources
Finding Sources
Loading Image
Reading File
Searching Images
slit lamp illumination techniques specular reflection optical section
Loading Image
Loading Image
Here is a comprehensive, structured explanation of all slit lamp techniques, drawn from Kanski's Clinical Ophthalmology (10th ed.) and Tintinalli's Emergency Medicine.
Slit Lamp Techniques — Complete Guide
The slit lamp (biomicroscope) combines a binocular microscope with an adjustable light source that can be shaped into a slit of variable width, height, and angle. All clinical techniques are variations in how that light beam is configured and directed. The purpose of any technique is to determine the position, depth, and size of any abnormality in the anterior (and posterior) segment.
Instrument Setup (Common to All Techniques)
- Both patient and examiner sit at the same eye level.
- The chin rest is adjusted so the lateral canthus aligns with the black line on the vertical bar.
- The joystick moves the instrument forward/back (focus) and rotates for vertical positioning.
- The light source arm rotates independently of the eyepieces, allowing variable illumination angles.
- A narrow slit on the structure of interest is the starting point; all other techniques are modifications from there.
1. Diffuse Illumination
Configuration: Wide, low-intensity beam; illumination angle roughly coaxial with the microscope (or slightly off-axis). Beam width is at maximum (fully open).
What it does: Bathes the entire visible anterior segment — lids, conjunctiva, cornea, iris — in a broad, even light, providing a panoramic overview.
Uses:
- Detecting gross abnormalities: lid margin disease, conjunctival injection, chemosis, surface foreign bodies, gross corneal opacity
- Initial survey before using more specific techniques
- Eyelid examination, meibomian gland evaluation
Key point: This is the starting technique — used first on every patient to orient the examiner before switching to more focused methods.
2. Focal / Direct Illumination (Parallelpiped)
Configuration: Beam narrowed to a width of approximately 1–2 mm, directed at 30–45° to the microscope axis. This creates a parallelpiped — a three-dimensional rectangular block of illuminated tissue visible through the eyepieces.
What it does: Illuminates a specific region of tissue with high-contrast, direct light, allowing detailed assessment of the surface and shallow layers.
Uses:
- Corneal epithelium: abrasions, ulcers, edema, foreign bodies
- Corneal stroma: edema, scars, infiltrates, vascularization
- Iris surface: nodules, atrophy, transillumination defects
- Conjunctival and lid lesions
Key point: The "workhorse" technique. Varying the angle between 30° and 60° gives different perspectives on depth.
3. Optical Section (Narrow Slit / Cross-Section)
Configuration: Beam narrowed to the thinnest possible slit (< 0.5 mm), maximally bright, at 45° to the viewing axis. This is an extreme version of direct illumination.
What it does: Creates a cross-sectional "optical cut" through transparent tissues — analogous to slicing the cornea or lens with a beam of light. The anterior and posterior surfaces of the cornea become clearly distinguishable, and the anterior chamber appears as dark space between them.
Uses:
- Locating the depth of a corneal lesion (epithelium, stroma, endothelium, or subepithelial)
- Assessing corneal thickness qualitatively
- Detecting anterior chamber flare and cells (the "headlights in fog" phenomenon) — WBCs and RBCs drifting in aqueous convection currents
- Evaluating the crystalline lens (nuclear vs. cortical vs. subcapsular cataract)
- Identifying Vogt's striae in keratoconus (vertical lines in deep stroma)
Anterior chamber assessment: Focus halfway between corneal endothelium and iris with the pupillary aperture as a dark background — cells and flare become visible in this position.
Depth estimation via Von Hertling (Van Herick) technique: Narrow slit at 60°, placed at the corneal limbus. Compare the gap between corneal optical section and iris surface to the corneal thickness. A gap < ¼ corneal thickness indicates a narrow angle (risk of acute angle-closure glaucoma).

4. Scleral Scatter (Indirect Illumination)
Configuration: The slit beam is decoupled from the microscope — the illumination is directed to the limbus (lateral corneal edge), while the microscope is focused on the central cornea. The beam enters the cornea at the limbus at a low angle.
Mechanism: Light undergoes total internal reflection within the cornea, traveling across the full corneal diameter. Any opacity, scar, or foreign body within the corneal stroma interrupts this internal light guide, scattering light forward and becoming visible as a bright spot against the otherwise dark cornea. The limbal ring glows due to light escape.
Uses:
- Detecting subtle corneal stromal haze that may be invisible with direct illumination
- Edema, cellular infiltrate, lipid deposition, very faint scars
- Contact lens–related complications (faint stromal haze)
- Corneal graft haze assessment
Key point: Highly sensitive for detecting subtle pathology — if the cornea looks hazy under scleral scatter, the stroma is diseased even if direct illumination looks normal.
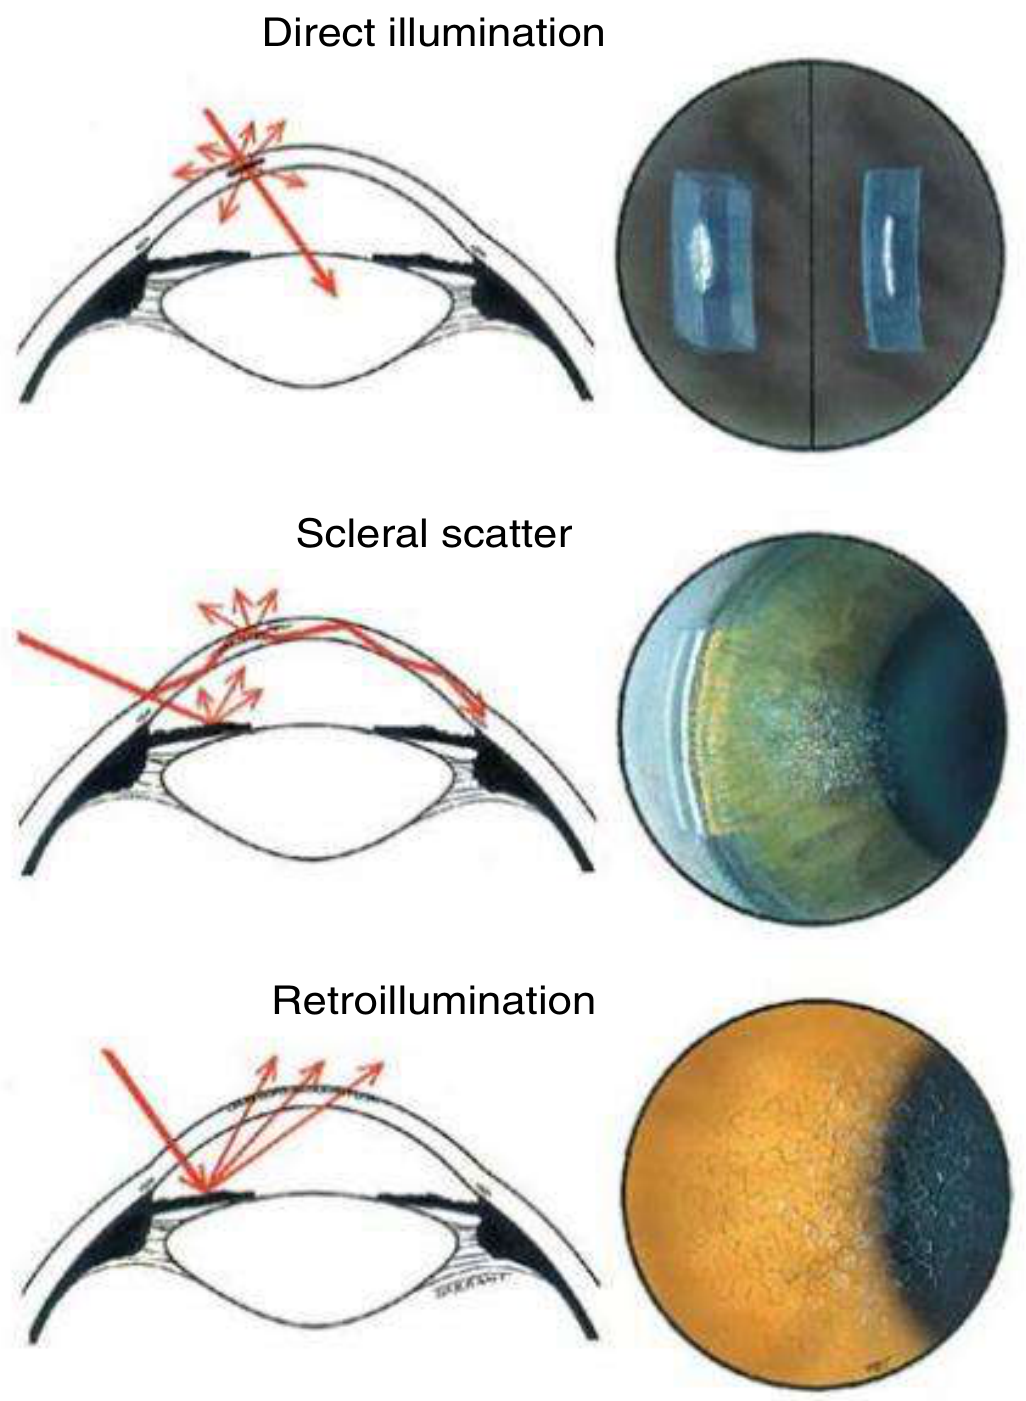
5. Retroillumination
Configuration: Light beam is directed through the pupil to illuminate the iris or fundus (with dilation), and the examiner views the cornea or lens by the reflected light bouncing back from these deeper structures.
There are two forms:
5a. Retroillumination from the Iris
- Beam directed just off-axis, light reflects off the iris back through the cornea
- Illuminates the cornea from behind (orange-red iris glow as background)
5b. Retroillumination from the Fundus
- Requires pupil dilation
- Light reflects off the retina (red reflex), illuminating the lens and cornea from behind
Uses:
- Detecting fine corneal changes: epithelial microcysts, vacuoles, Meesmann's dystrophy
- Endothelial changes: keratic precipitates (KPs), early guttata
- Lens: posterior subcapsular cataract, posterior capsule opacification after cataract surgery
- Small blood vessels, neovascularization
- Iris: transillumination defects (pigment dispersion syndrome)
Key point: Retroillumination makes transparent or translucent structures visible by silhouetting them against the reflected background glow. What is invisible in direct light becomes visible as a dark shadow against the orange/red background.
6. Specular Reflection
Configuration: The angle of incidence of the light beam equals the angle of reflection toward the examiner's eye (like a mirror). The beam is placed at a precise angle (typically 30–45°), and the examiner looks for the specular (mirror-like) reflection from a specific surface.
What it does: The endothelial cells of the cornea form a mosaic that generates a distinctive specular reflection. Individual cells and their borders become visible.
Uses:
- Assessing corneal endothelial cell density (normally ~2,500 cells/mm²)
- Detecting Fuchs endothelial dystrophy (guttata appear as dark "holes" in the mosaic, or bright excrescences)
- Identifying pseudoguttata (reversible cell edema in inflammatory disease)
- Monitoring endothelial cell loss after intraocular surgery or in corneal disease
- Evaluating the tear film: the tear film surface shows its own specular reflection
Key point: The angle is critical — even slight misalignment loses the specular reflection. Best seen at the central cornea where the epithelial surface is most regular.
7. Tangential (Oblique) Illumination
Configuration: The slit beam is placed at a highly oblique angle (60–90° to the viewing axis), creating strong side lighting that casts shadows across surface irregularities.
What it does: Surface contour irregularities cast elongated shadows, making them dramatically more visible than with direct frontal illumination.
Uses:
- Detecting subtle corneal irregularities and surface elevations
- Iris nodules (Koeppe, Busacca nodules)
- Foreign body location
- Subtle anterior chamber depth asymmetry
8. Oscillatory Illumination
Configuration: The slit beam is moved rhythmically from side to side while examining the anterior chamber.
Uses:
- Detecting aqueous flare and cells more confidently — moving the beam makes floating cells more conspicuous
- Differentiating true anterior chamber flare from optical artifacts
Filter Techniques (Used with Any Illumination Mode)
These are modifications applied on top of any illumination technique:
| Filter | Wavelength | Application |
|---|---|---|
| Cobalt blue | ~450 nm | Used with fluorescein to reveal corneal epithelial defects (abrasions, ulcers, dendrites). Injured epithelium takes up fluorescein and fluoresces bright green. Also used to read Goldmann applanation tonometry rings. |
| Red-free (green) filter | ~540 nm | Makes red objects appear black, enhancing contrast. Used to assess corneal and iris vessels, retinal nerve fiber layer hemorrhages, and vessel detail. |
| Yellow filter (Wratten 12) | >495 nm | Blocks blue light from the cobalt beam, used as an alternative to aid fluorescein visualization. |
9. Fluorescein Staining (Cobalt Blue Technique in Practice)
Technique: Fluorescein strip moistened and touched to the inferior fornix, or 1–2 drops of fluorescein solution instilled. Cobalt blue filter is applied to the slit beam.
Uses:
- Corneal epithelial defects (abrasions, ulcers, herpes dendrites)
- Tear film break-up time (TBUT): fluorescein instilled, patient blinks once then doesn't; time until first dark spot appears in the tear film = TBUT (normal ≥10 sec)
- Seidel test: if aqueous leaks through a wound, it will dilute the concentrated fluorescein in a stream, visible as a dark rivulet against the orange background
- Applanation tonometry (Goldmann): two fluorescent semicircles are adjusted to touch at their inner margins, reading IOP from the dial
10. Summary Table
| Technique | Beam Width | Angle | Background Used | Primary Use |
|---|---|---|---|---|
| Diffuse illumination | Maximum (wide) | ~10–20° | — | Initial survey, gross abnormalities |
| Direct focal / parallelpiped | Medium (1–2 mm) | 30–45° | — | Surface/stromal detail |
| Optical section | Minimum (slit) | 45° | Dark | Depth of lesion, flare/cells, AC depth |
| Scleral scatter | Medium | Limbus-directed; scope central | Dark cornea | Subtle stromal haze |
| Retroillumination (iris) | Medium | Off-axis | Iris reflection | Epithelial/endothelial fine changes |
| Retroillumination (fundus) | Medium | Coaxial | Red reflex | Posterior subcapsular cataract, KPs |
| Specular reflection | Medium | Equal incidence/reflection | Specular glare | Endothelial mosaic, guttata |
| Tangential | Narrow | 60–90° | Shadow | Surface contour irregularities |
| Cobalt blue + fluorescein | Any | Any | Fluorescence | Epithelial defects, TBUT, Seidel test |
Practical Examination Sequence
A systematic slit lamp exam follows this order:
- Diffuse — quick overview of lids, conjunctiva, sclera
- Direct focal / parallelpiped — cornea, iris surface
- Narrow slit (optical section) — corneal cross-section, depth assessment
- Scleral scatter — if haze is suspected
- Retroillumination — fine epithelial/endothelial/lens changes
- Specular reflection — endothelial status
- Fluorescein + cobalt blue — epithelial integrity, TBUT, tonometry
- Posterior segment — with 78D/90D lens if needed
Sources: Kanski's Clinical Ophthalmology: A Systematic Approach, 10th ed., Chapter 1 (Slit Lamp Biomicroscopy of the Anterior Segment, pp. 19–21); Tintinalli's Emergency Medicine: A Comprehensive Study Guide, Chapter 241 (Slit Lamp Examination, pp. 1571–1573)
This is a shared conversation. Sign in to Orris to start your own chat.