
Convex concave rule
convex concave rule joint mechanics arthrokinematics
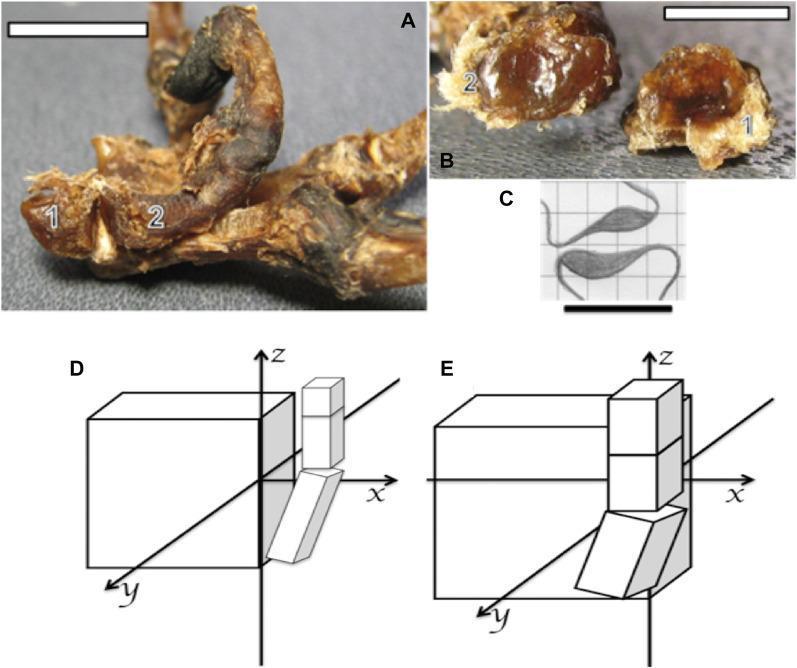
This composite educational resource explores the comparative anatomy of the trapeziometacarpal joint and thumb mobility in primates. Panel (A) and (B) provide clinical photographs of capuchin (Sapajus) hand specimens, identifying the trapezium (1) and metacarpal I (2). Panel (B) highlights the specific articular morphology, where the trapezium (1) presents a convex surface and the metacarpal base (2) presents a concave surface. Panel (C) is a schematic illustration demonstrating the interlocking nature of this saddle joint. Panels (D) and (E) present comparative 3D spatial diagrams of hand mechanics. Diagram (D) illustrates the capuchin hand, showing thumb movement primarily restricted to the z-axis due to a flat carpal arrangement. In contrast, Diagram (E) illustrates the human hand, demonstrating how the anterior position of the trapezium and a curved carpal arch allow the thumb to project above the palmar plane and move across x, y, and z axes. This comparative view illustrates the anatomical basis for true opponency in humans compared to the pseudo-opponency of non-human primates.
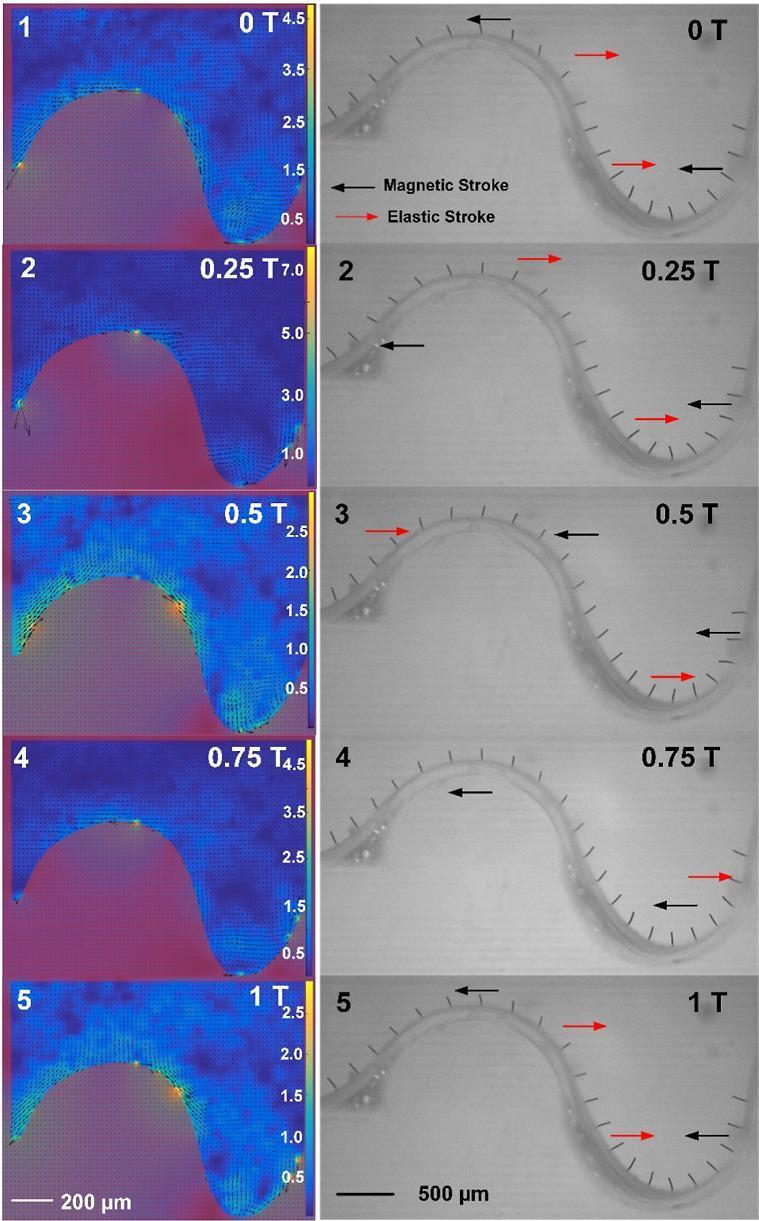
This figure illustrates the fluid mechanics and metachronal coordination of magnetic artificial cilia arrays attached to a curved, S-shaped substrate featuring both convex and concave geometries. The left column presents time-lapse snapshots of fluid velocity distribution over one actuation cycle (T), where color heatmaps represent velocity magnitude (µm/s) and vector arrows indicate flow direction. On the convex surface, magnetic strokes generate a predominantly leftward flow, while on the concave surface, the confinement induces vortex formation, specifically counterclockwise global vortices and propagating clockwise local vortices. The right column displays the corresponding cilium motion, distinguishing between 'magnetic strokes' (black arrows) and 'elastic strokes' (red arrows). The cilia exhibit metachronal coordination—coordinated wave-like movements—where the wave propagation direction depends on surface curvature. This biomedical engineering model demonstrates how surface topography can be used to control fluid transport and metachronal patterns, analogous to biological ciliary systems found in the respiratory tract or fallopian tubes.
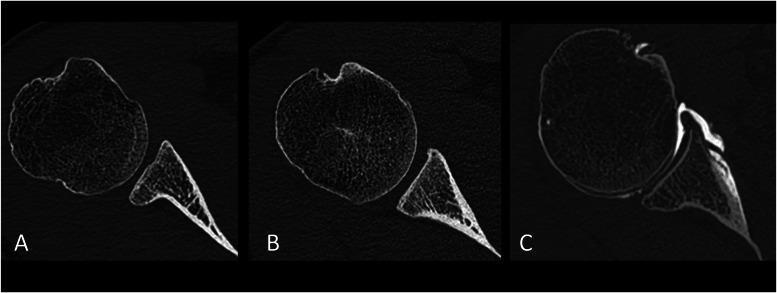
This series of three axial CT images of the shoulder joint illustrates subjective morphological variations of the glenoid articular surface at its mid-level. The images demonstrate the relationship between the center of the glenoid fossa and the anterior and posterior articular rims to classify joint concavity. Image A shows a convex glenoid surface, where the center of the bone bulges outward toward the humeral head. Image B depicts a flat glenoid surface, showing a straight linear relationship where the center is level with the articular rims. Image C displays a standard concave glenoid surface, where the center of the fossa is deeper than the surrounding articular rims. These anatomical variations are clinically significant in the assessment of shoulder stability, shoulder hyperlaxity, and glenoid dysplasia. The images highlight the contrast between normal anatomy (concave) and variations found in patients with clinical hyperlaxity (convex or flat), providing educational insight into glenohumeral joint morphology and its impact on joint biomechanics.
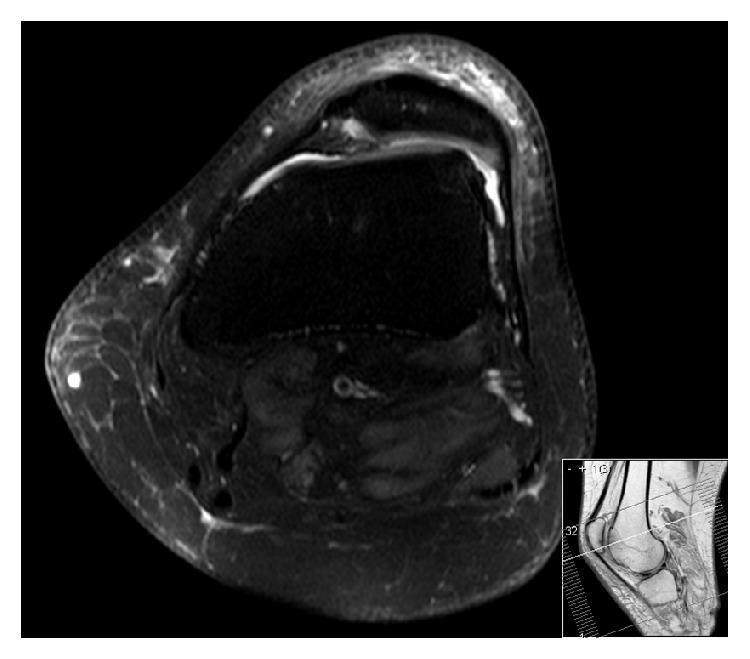
This diagnostic image is an axial T2-weighted MRI of the knee joint with fat suppression, illustrating severe trochlear dysplasia classified as Dejour type C. The primary visual findings include a characteristic convexity of the lateral femoral condyle paired with significant hypoplasia of the medial femoral condyle, resulting in a flat or even convex trochlear surface rather than a normal concave groove. The patella is clearly lateralized and exhibits a lateral tilt relative to the femoral trochlea, indicating patellofemoral instability. High signal intensity fluid is visible within the joint space, and there are signs of chondral thinning and loss along the patellar facets. This image serves as a clinical example for orthopedic and radiological evaluation of recurrent patellar dislocation and developmental anomalies of the knee extensor mechanism.
arthrokinematics roll glide spin joint movement manual therapy
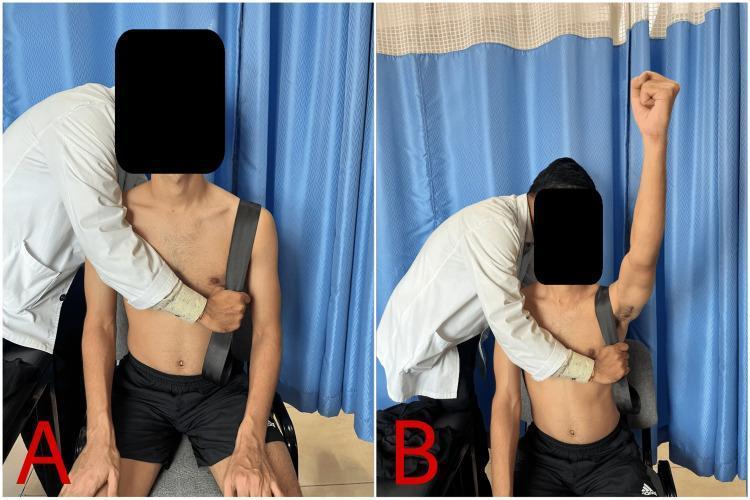
This clinical photograph, divided into two panels (A and B), illustrates a manual therapy technique known as Mulligan's Movement with Mobilization (MWM) for the acromioclavicular (AC) joint. The procedure is performed on a seated patient with a suspected AC joint sprain. A mobilization belt or strap is utilized, passing over the patient's left acromioclavicular joint and anchored around the clinician's hip (out of frame) to apply a sustained inferior-posterior glide to the distal clavicle. Panel A shows the starting position: the clinician, wearing a white coat, stands behind the patient, stabilizing the shoulder girdle and applying the mobilization force. Panel B depicts the dynamic component of the technique, where the patient performs active shoulder flexion (reaching overhead with a clenched fist) while the clinician maintains the therapeutic mobilization glide. This orthopedic intervention is used to restore pain-free range of motion and joint arthrokinematics during shoulder rehabilitation. The images demonstrate the precise hand placement and belt orientation necessary for stabilizing the scapula while mobilizing the AC joint during active movement.
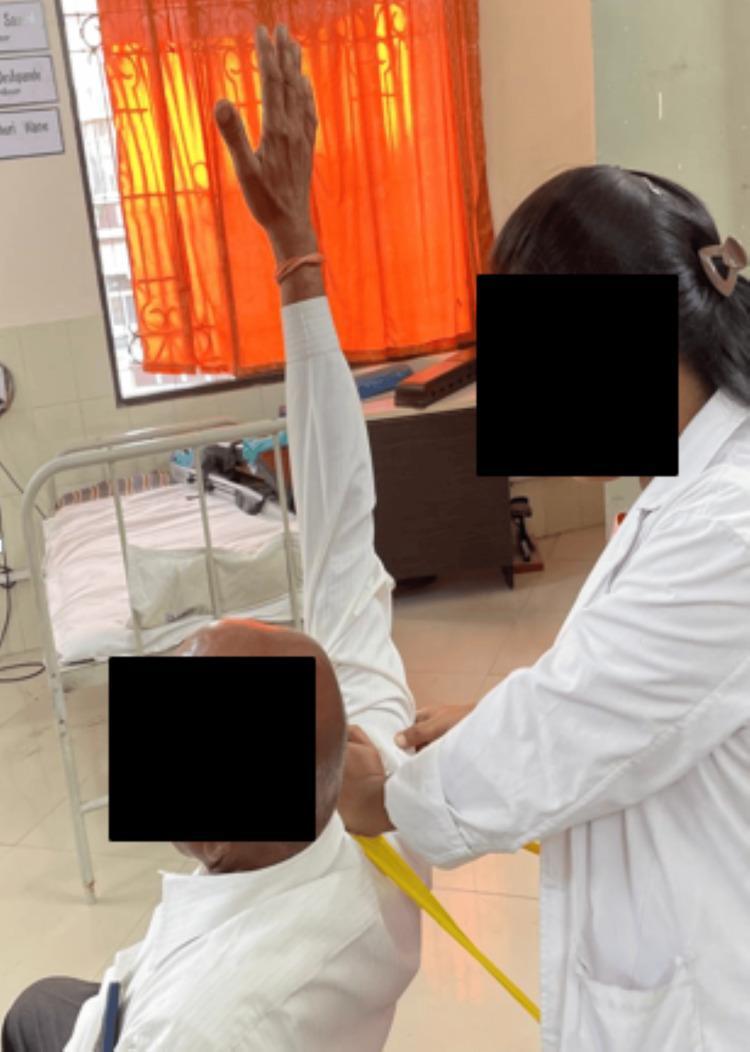
Clinical photograph illustrating a 'Mobilization with Movement' (MWM) technique for shoulder abduction in a patient with rotator cuff pathology. The image shows a healthcare professional in a white coat providing manual assistance to a patient's right shoulder. The patient's arm is elevated in a high degree of abduction. A yellow mobilization belt or resistance band is positioned around the proximal humerus to provide a sustained glide, likely lateral or inferior, aimed at improving joint arthrokinematics during active movement. The setting is a clinical rehabilitation environment, evidenced by a hospital bed with railings and medical signage in the background. This visual demonstrates a common physical therapy intervention used to increase range of motion and reduce pain in patients experiencing shoulder impingement or tendinopathy. The educational focus is on the manual application of orthopedic physical therapy techniques and the use of external aids to facilitate joint mobilization.
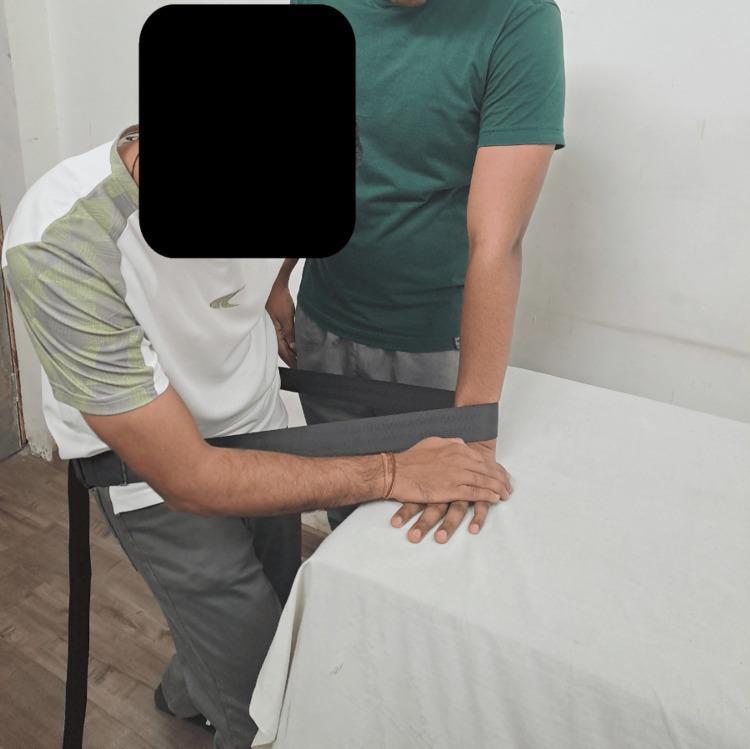
A clinical photograph illustrating a manual therapy technique for the wrist joint, specifically a weight-bearing lateral (ulnar) glide. The image depicts a physical therapist and a patient in a clinical setting. The patient stands with their forearm vertically oriented and the hand resting flat on a treatment table, simulating a weight-bearing position. The therapist is positioned to the left, utilizing a gray Mulligan belt (mobilization belt) looped around their own waist and the patient's distal forearm/wrist. This setup allows the therapist to use their body weight to provide a sustained lateral mobilization force. The therapist's hands are placed over the patient's wrist and hand to stabilize the joint and guide the glide direction. This technique is part of the 'Mobilization with Movement' (MWM) concept, typically used to improve range of motion and reduce pain in patients with musculoskeletal wrist dysfunction. The focus is on the biomechanical alignment and the application of manual force through specialized orthopedic equipment.
The Convex-Concave Rule
Definition
- General Anatomy and Musculoskeletal System, THIEME Atlas, p. 70
The Two Key Principles
Rule A - Convex on Concave
Example: At the glenohumeral joint, during shoulder abduction (arm moves up), the convex humeral head slides inferiorly on the fixed concave glenoid - opposite to the upward arm swing.
Rule B - Concave on Convex
Example: At the hip joint during flexion, the concave acetabulum (on the pelvis) would slide anteriorly just as the leg moves anteriorly. More clinically relevant: at the tibiofemoral joint, the concave tibial plateau glides anteriorly during knee extension - same direction as the leg moving forward.
Arthrokinematic Motions: Roll, Glide, Spin
| Motion | Description |
|---|---|
| Roll | New points on one surface contact new points on the other (like a ball rolling on a flat surface) |
| Glide (Slide) | One point on one surface moves across multiple points on the other surface |
| Spin | Rotation around a mechanical axis; one point contacts one point while the bone rotates |
- Firestein & Kelley's Textbook of Rheumatology, Joint Mechanics
Clinical Application in Manual Therapy
| Joint restriction | Rule | Mobilization glide direction |
|---|---|---|
| Shoulder abduction limited (convex humeral head on concave glenoid) | Convex on concave | Apply inferior glide to the humeral head |
| Knee extension limited (concave tibia on convex femur, open chain) | Concave on convex | Apply anterior glide to the tibia |
| Hip flexion limited (convex femoral head on concave acetabulum) | Convex on concave | Apply posterior glide to femoral head |
- Firestein & Kelley's Textbook of Rheumatology, p. 1308-1314
Why It Matters Clinically
- Joint mobilization: Knowing whether a moving surface is convex or concave tells you which direction to apply a passive accessory glide to open the joint and restore motion
- Rehabilitation: Understanding that a restricted joint may have impaired arthrokinematics guides specific exercise and manual therapy selection
- Pathology: Altered arthrokinematics (e.g., from muscle weakness, capsular tightness) can cause cartilage wear, impingement syndromes, and pain - for example, superior humeral head migration in rotator cuff tears violates the convex-concave rule
Quick Memory Aid
- Convex moves → slide OPPOSITE (C-O: Convex-Opposite)
- Concave moves → slide SAME (C-S: Concave-Same)
Diagram
A clear educational diagram illustrating the Convex-Concave Rule in joint mechanics, split into two panels side by side: LEFT PANEL - "Convex on Concave (Rule A)": Shows a convex bone surface (rounded, like a femoral head) moving on a fixed concave surface (like a socket). A large curved arrow shows the bone swinging/rolling to the RIGHT (angular motion). A smaller arrow at the joint surface shows the slide going to the LEFT (opposite direction). Label: "Convex moves → Slide is OPPOSITE". Example label: "e.g. Glenohumeral joint - arm abducts UP, humeral head glides DOWN (inferior)". RIGHT PANEL - "Concave on Convex (Rule B)": Shows a concave bone surface (curved inward, like the tibial plateau) moving on a fixed convex surface (like the femoral condyle). A large curved arrow shows the concave bone swinging to the RIGHT (angular motion). A smaller arrow at the joint surface shows the slide also going to the RIGHT (same direction). Label: "Concave moves → Slide is SAME direction". Example label: "e.g. Knee extension - tibia swings forward, tibial plateau glides ANTERIOR". Include a title at the top: "The Convex-Concave Rule (Arthrokinematics)". Use clean anatomical illustration style with blue and orange color coding for the two surfaces. Add small memory aid text at the bottom: "Convex = Opposite | Concave = Same"
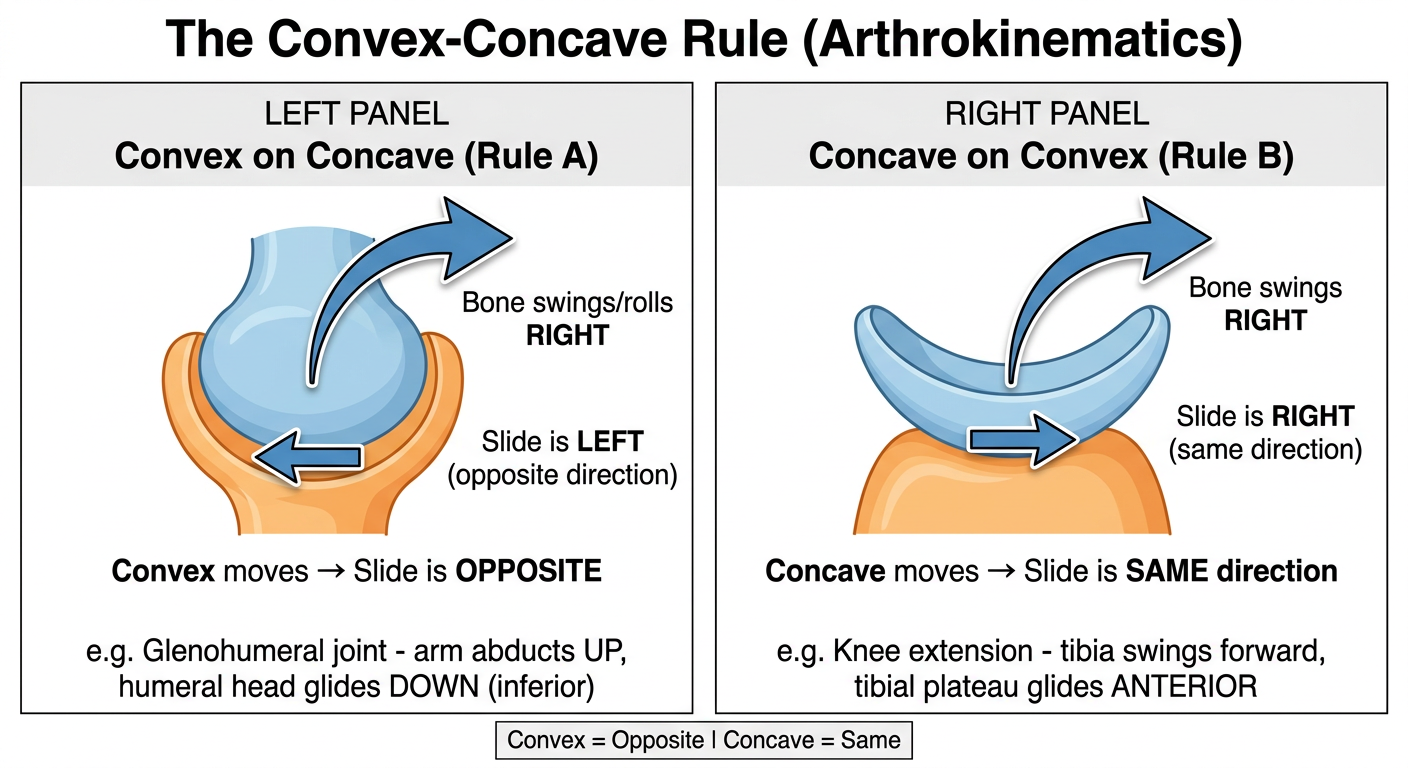
- Left (Convex on Concave): The convex surface swings in one direction, but the contact point slides the opposite way - e.g., the humeral head glides inferiorly as the arm abducts upward.
- Right (Concave on Convex): The concave surface swings and slides in the same direction - e.g., the tibial plateau glides anteriorly as the knee extends forward.
Create a visual guide comparing this rule across common joints (shoulder, hip, knee, elbow)
A detailed, clean educational medical visual guide titled "Convex-Concave Rule: Joint-by-Joint Comparison" showing 4 joints in a 2x2 grid layout. Each joint panel has a small anatomical illustration, a table of key facts, and color-coded arrows. Use a white background with professional medical illustration style. Blue = convex surface, Orange = concave surface. Green arrows = glide direction, Red arrows = bone movement direction. TOP-LEFT PANEL — SHOULDER (Glenohumeral Joint): - Small illustration: rounded humeral head (blue/convex) sitting in shallow glenoid fossa (orange/concave) - Label: "Moving surface: Convex (humeral head)" - Rule: "CONVEX on Concave → Slide OPPOSITE" - Motion box: "Arm ABDUCTS (moves up) → Humeral head glides INFERIOR (down)" - Motion box: "Arm FLEXES (forward) → Humeral head glides POSTERIOR" - Clinical note: "Mobilization for restricted abduction: apply INFERIOR glide" - Color band at top: blue TOP-RIGHT PANEL — HIP JOINT: - Small illustration: round femoral head (blue/convex) fitting into deep acetabulum (orange/concave) - Label: "Moving surface: Convex (femoral head)" - Rule: "CONVEX on Concave → Slide OPPOSITE" - Motion box: "Hip FLEXES (thigh moves forward) → Femoral head glides POSTERIOR" - Motion box: "Hip ABDUCTS (thigh moves out) → Femoral head glides INFERIOR" - Clinical note: "Mobilization for restricted flexion: apply POSTERIOR glide" - Color band at top: blue BOTTOM-LEFT PANEL — KNEE JOINT (Open chain - tibia moves): - Small illustration: flat/concave tibial plateau (orange/concave) on rounded femoral condyles (blue/convex) - Label: "Moving surface: Concave (tibial plateau)" - Rule: "CONCAVE on Convex → Slide SAME direction" - Motion box: "Knee EXTENDS (tibia swings forward) → Tibia glides ANTERIOR" - Motion box: "Knee FLEXES (tibia swings back) → Tibia glides POSTERIOR" - Clinical note: "Mobilization for restricted extension: apply ANTERIOR tibial glide" - Color band at top: orange BOTTOM-RIGHT PANEL — ELBOW JOINT (Humeroulnar): - Small illustration: trochlear notch of ulna (orange/concave) wrapping around trochlea of humerus (blue/convex) - Label: "Moving surface: Concave (ulnar trochlear notch)" - Rule: "CONCAVE on Convex → Slide SAME direction" - Motion box: "Elbow FLEXES (forearm moves toward shoulder) → Ulna glides ANTERIOR" - Motion box: "Elbow EXTENDS (forearm moves away) → Ulna glides POSTERIOR" - Clinical note: "Mobilization for restricted flexion: apply ANTERIOR ulnar glide" - Color band at top: orange At the very bottom, a summary legend bar: BLUE panels = Convex surface moves = Slide is OPPOSITE to bone motion ORANGE panels = Concave surface moves = Slide is SAME as bone motion Memory: "C-O-C-S: Convex-Opposite, Concave-Same"
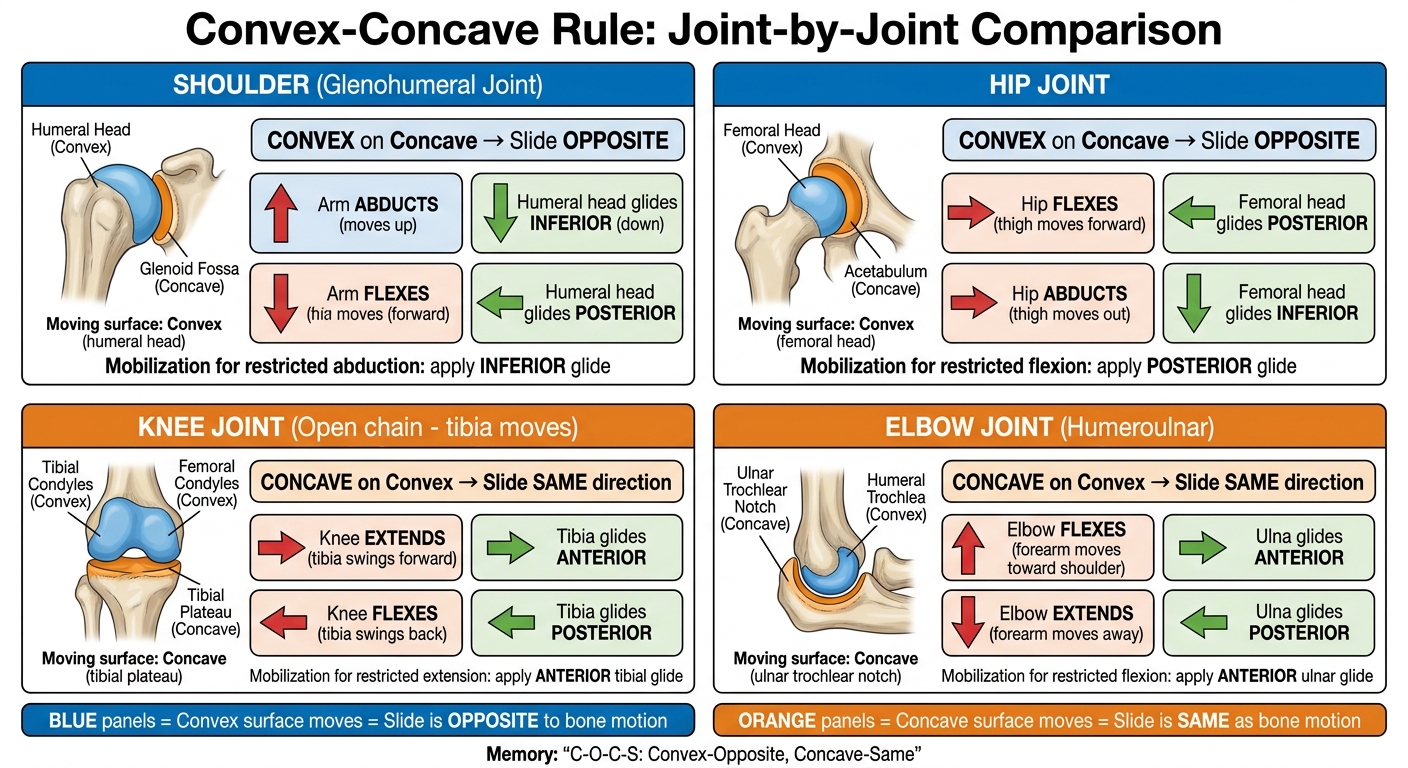
| Joint | Moving Surface | Rule | Key Example |
|---|---|---|---|
| Shoulder | Convex (humeral head) | Slide OPPOSITE | Arm abducts up → humeral head glides DOWN |
| Hip | Convex (femoral head) | Slide OPPOSITE | Hip flexes forward → femoral head glides POSTERIOR |
| Knee | Concave (tibial plateau) | Slide SAME | Knee extends forward → tibia glides ANTERIOR |
| Elbow | Concave (ulnar notch) | Slide SAME | Elbow flexes up → ulna glides ANTERIOR |
- Blue panels = convex surface moves = slide is OPPOSITE
- Orange panels = concave surface moves = slide is SAME