
Management of labour in 2nd stage of labour photos
Reading File
The second stage of labour begins with full cervical dilation (10 cm) and ends with delivery of the baby. Management involves maternal pushing, fetal monitoring, and hands-on delivery techniques.
Searching sources...
Finding Sources
Finding Sources
Finding Sources
Finding Sources
Reading File
Finding Sources
Reading File
Reading File
Reading File
Now let me fetch all the relevant images from this section:
Loading Image
Loading Image
Loading Image
Loading Image
Loading Image
Here is a complete, image-rich guide to Management of the Second Stage of Labour, sourced from Rosen's Emergency Medicine and Textbook of Family Medicine.
Management of Labour: Second Stage
The second stage begins with full cervical dilation (10 cm) and ends with delivery of the infant.
- Duration: median 50 min in nulliparous women; 20 min in multiparous women
- A prolonged second stage raises risk of postpartum hemorrhage, infection, and severe vaginal lacerations
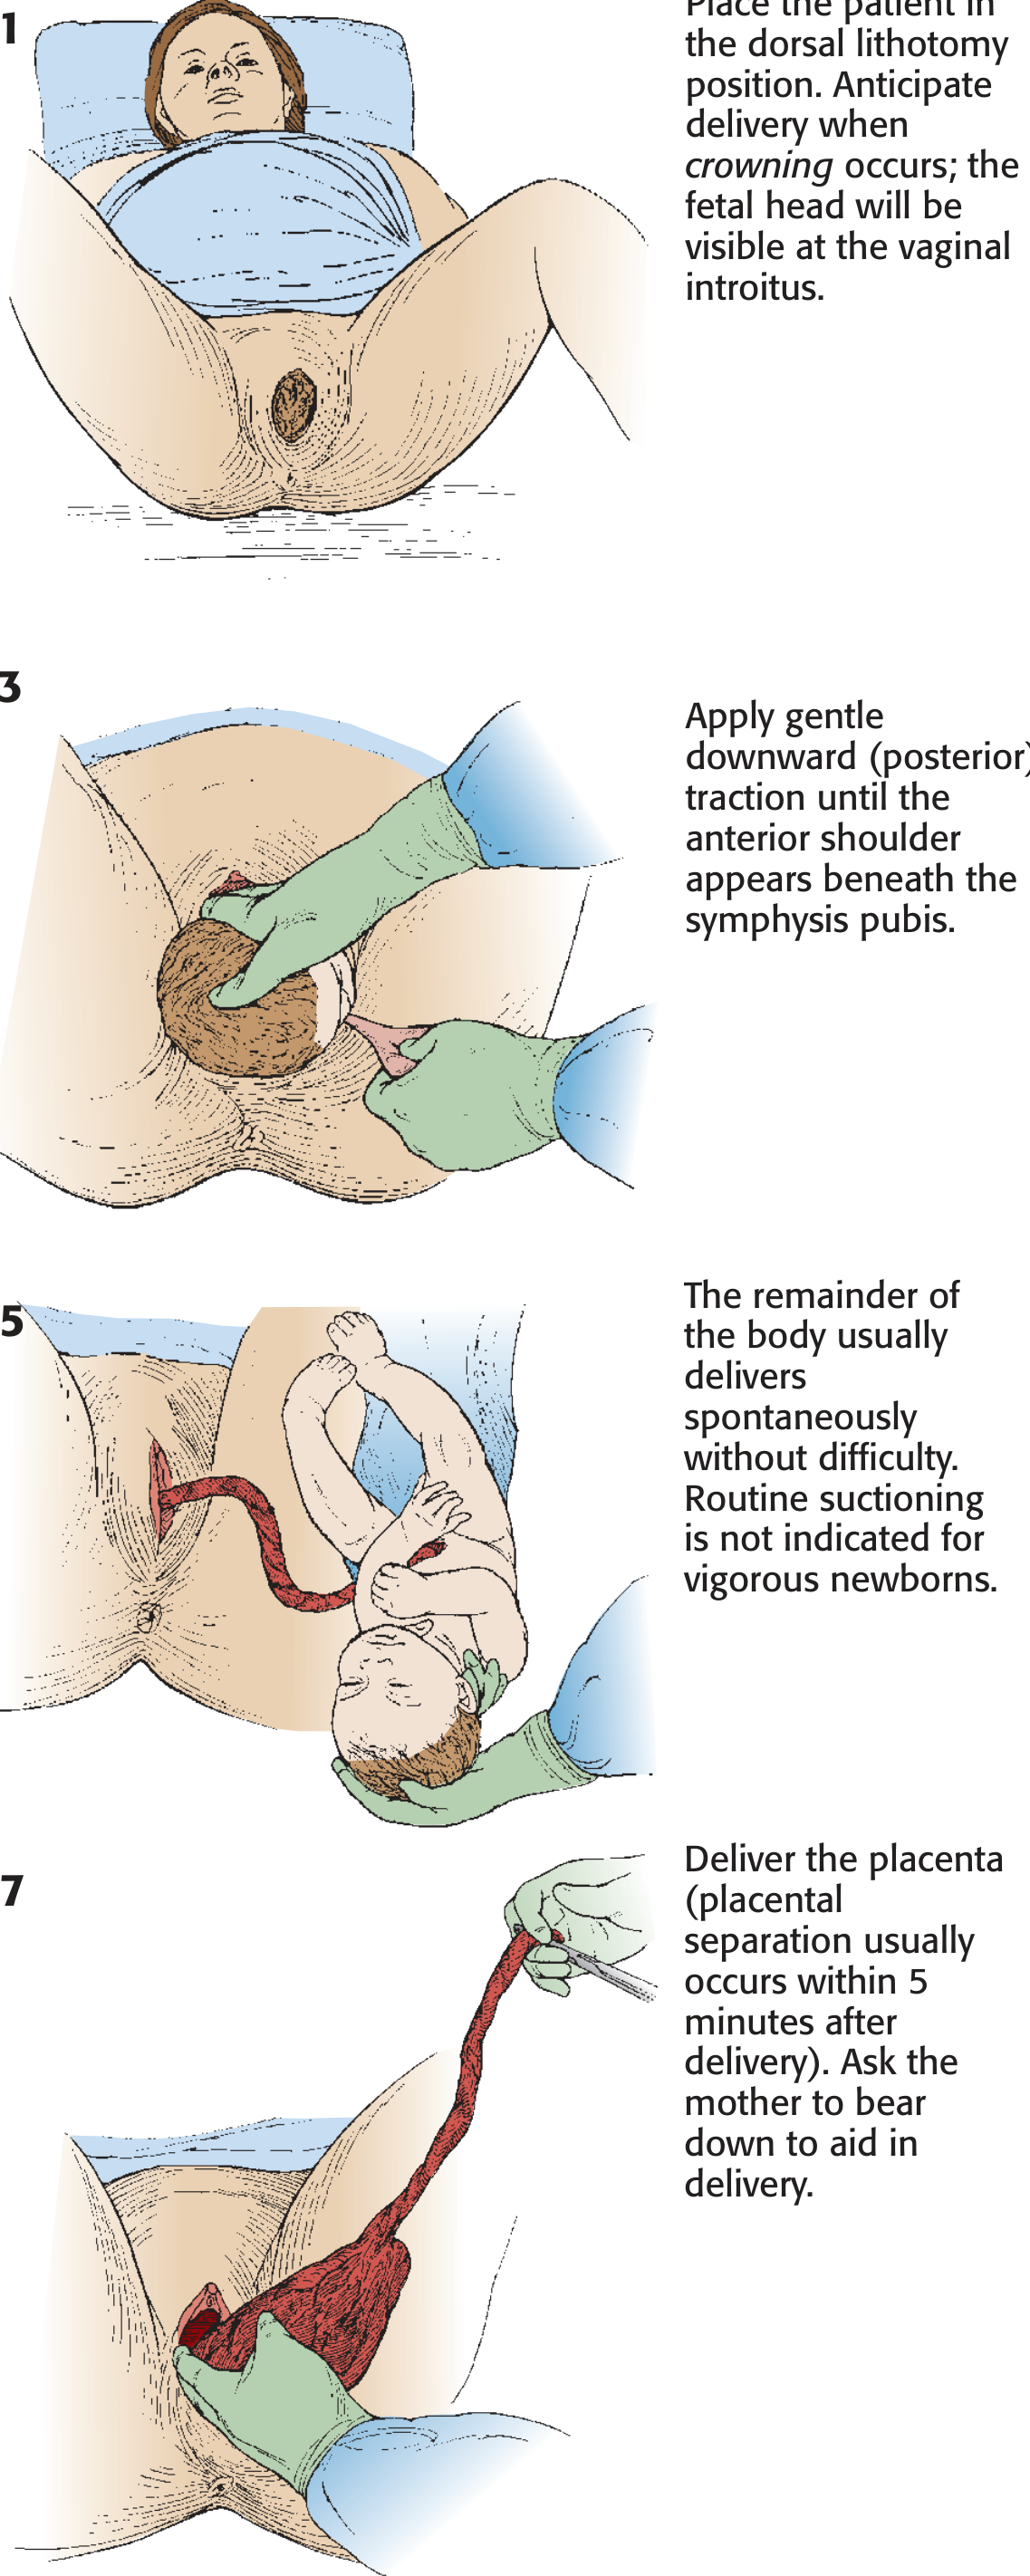
Step 1 - Fetal Assessment Before Delivery
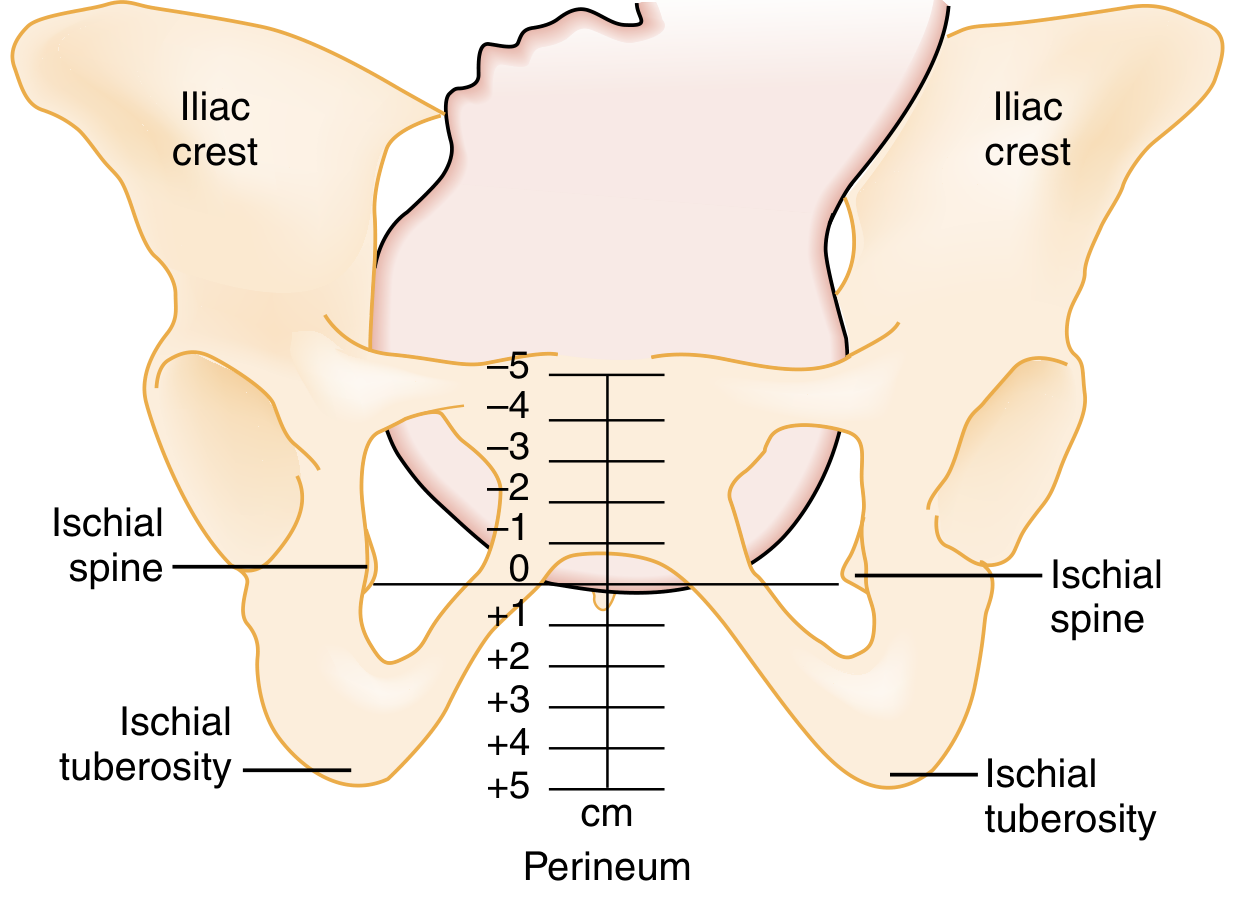
Fetal Stations
The level of the ischial spines = 0 station. Descent is tracked from -5 (high) to +5 (perineum).
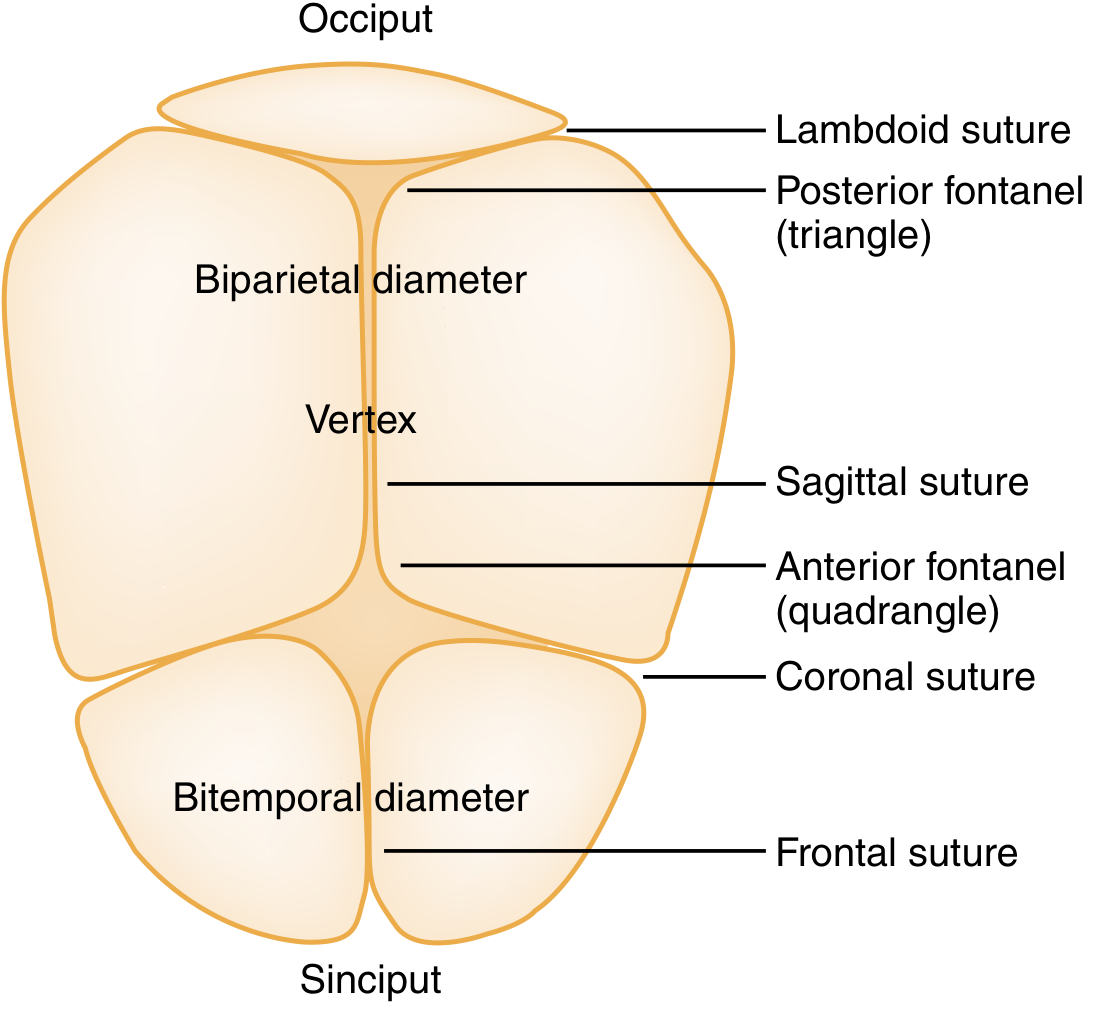
Bony Landmarks of the Fetal Skull
Used to assess position vaginally - identify the sagittal suture, anterior fontanel (quadrangle), and posterior fontanel (triangle) to confirm vertex presentation.
Step 2 - Leopold Maneuvers (Pre-delivery Assessment)
Four sequential maneuvers confirm fetal lie, presentation, position, and engagement before delivery begins.
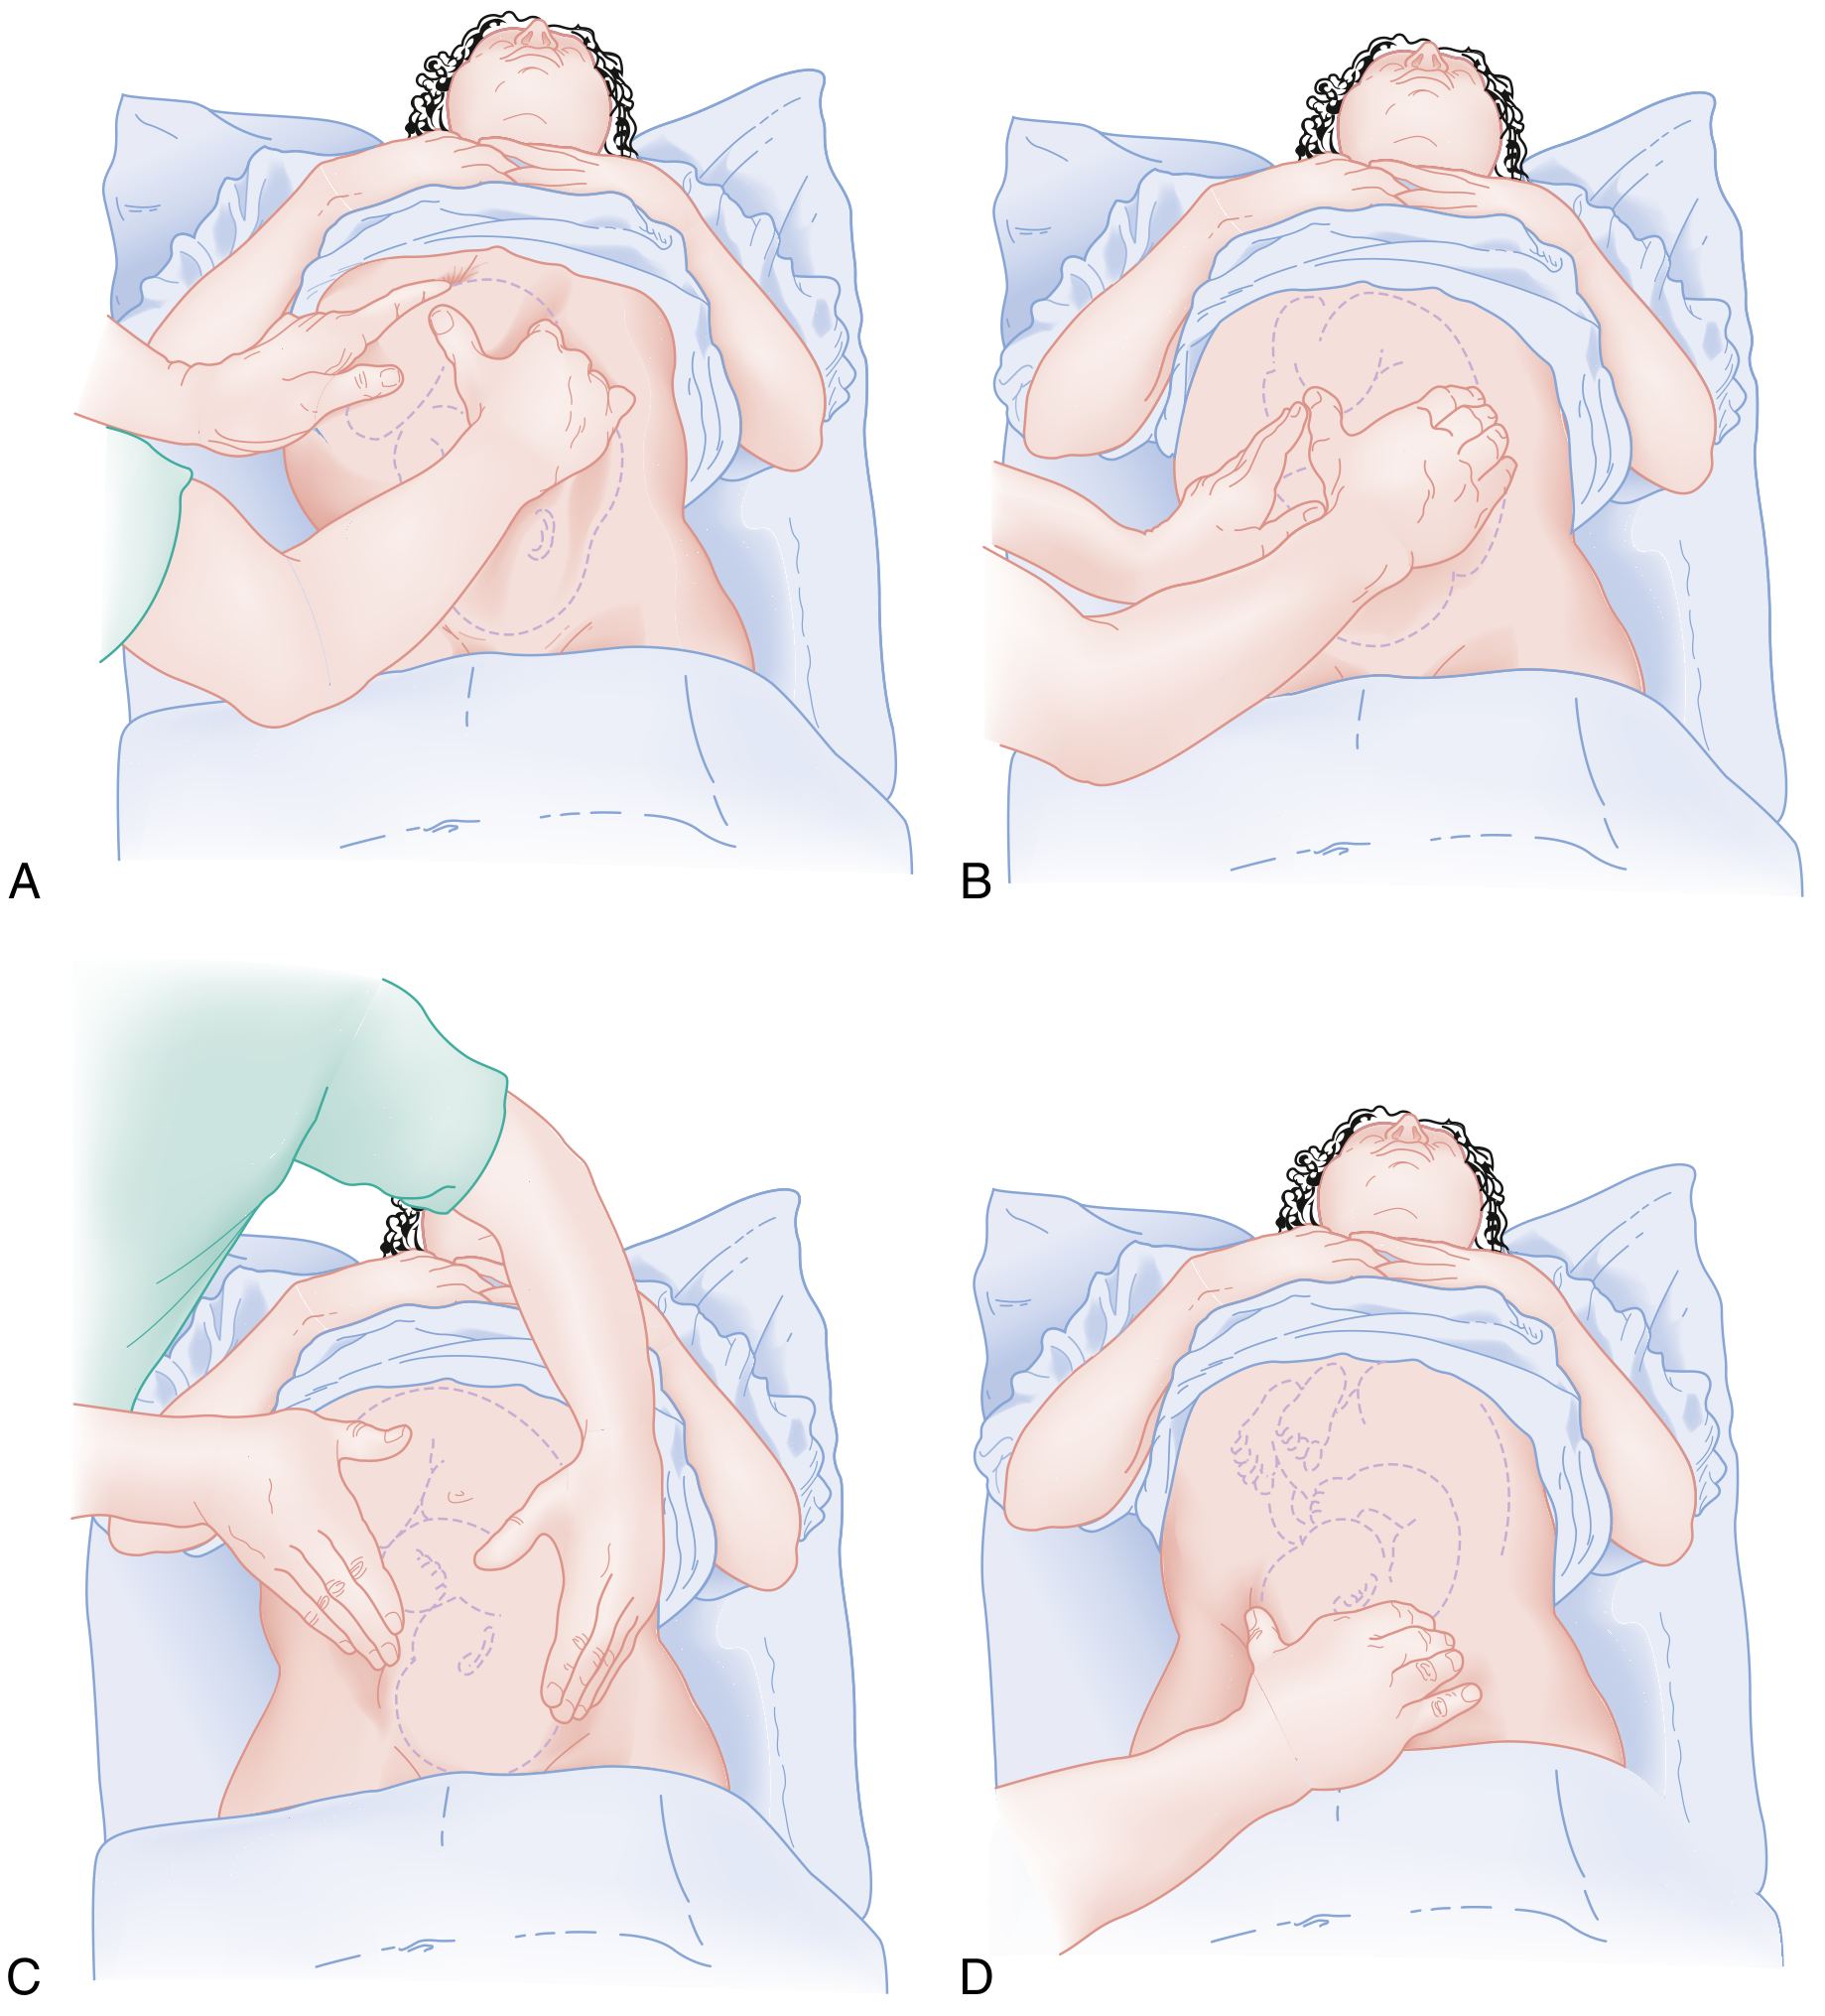
- (A) First maneuver - identifies what occupies the fundus (head vs. breech)
- (B) Second maneuver - locates the fetal back
- (C) Third maneuver - identifies the presenting part at the pelvic inlet
- (D) Fourth maneuver - assesses the cephalic prominence and engagement
Step 3 - Electronic Fetal Monitoring (CTG)
Continue CTG throughout the second stage. Three key deceleration patterns must be recognized:
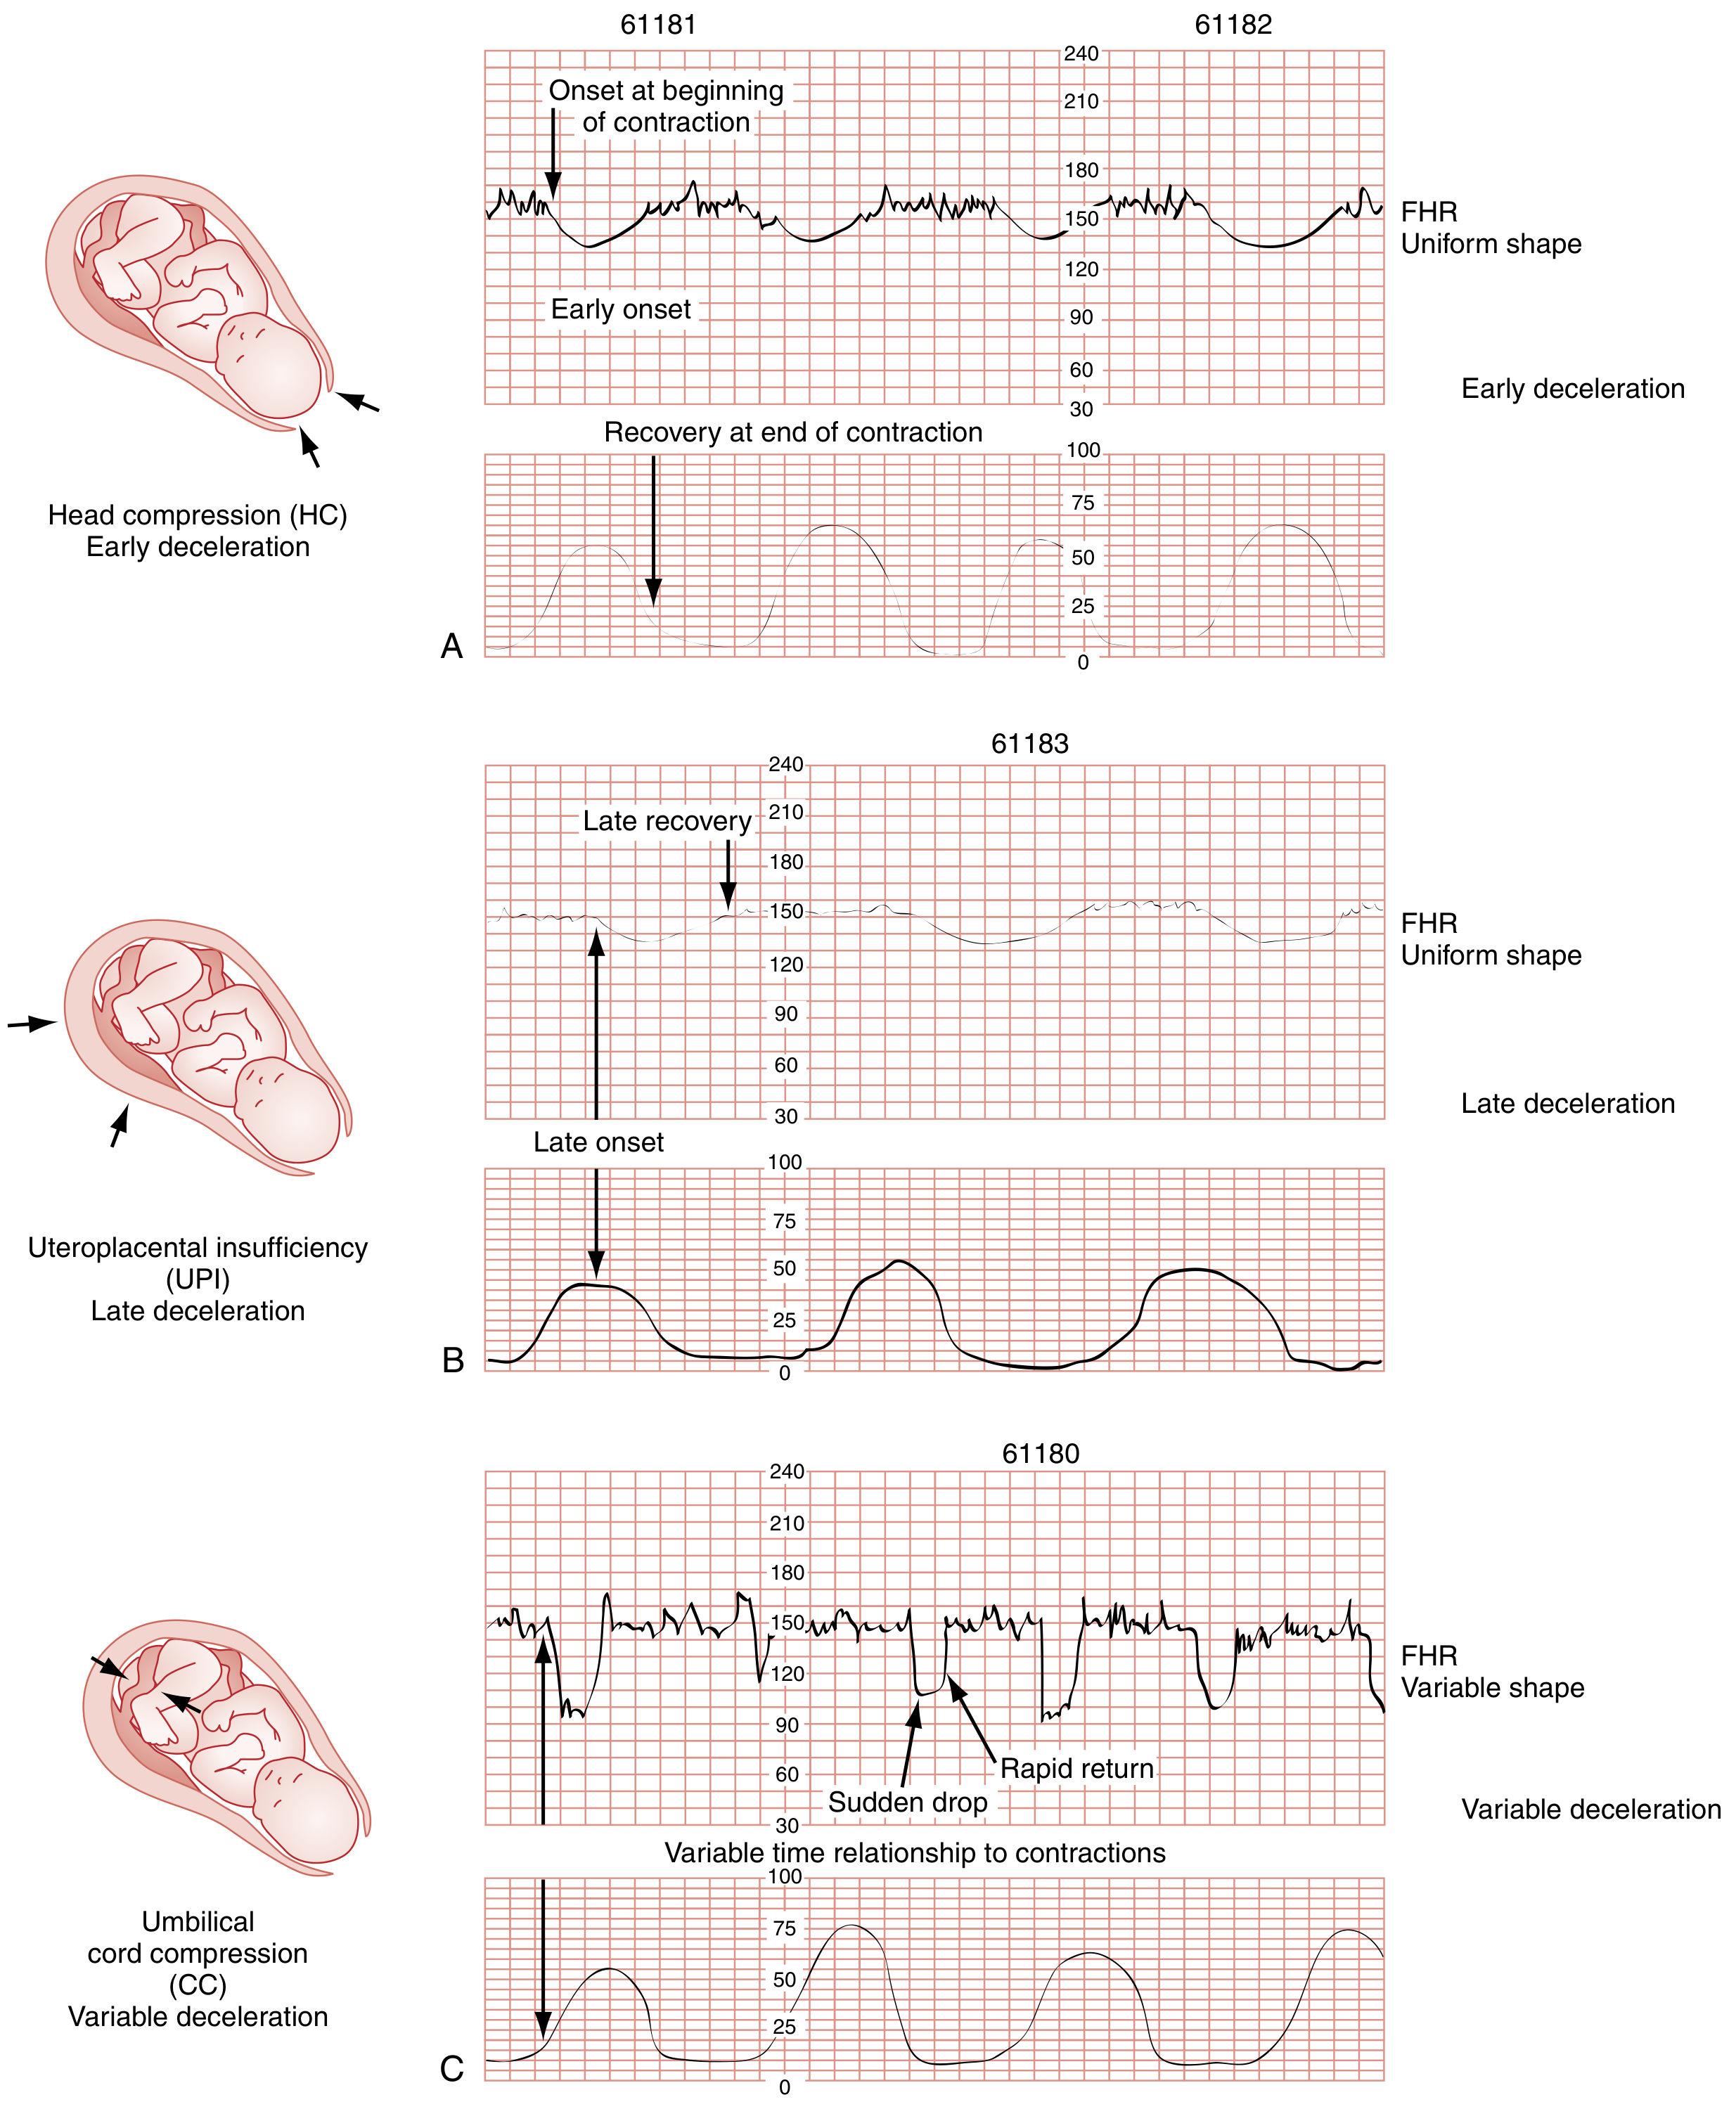
- (A) Early decelerations - uniform shape, coincide with contraction peak; due to head compression - benign
- (B) Late decelerations - recovery after contraction ends (>30 sec lag); due to uteroplacental insufficiency - ominous, consider urgent delivery or cesarean
- (C) Variable decelerations - sudden drop, rapid return, variable timing; due to umbilical cord compression - change maternal position; if persistent, hasten delivery
Normal FHR: 110-160 bpm baseline. Bradycardia <110 bpm; tachycardia >160 bpm.
Step 4 - Preparation for Delivery
- Prepare radiant warmer, towel, scissors, two umbilical clamps (4-5 cm apart), bulb suction, bag-mask device
- Place mother in dorsal lithotomy position (or Sims/left lateral position as alternative)
- Clean and scrub vulva and perineum with sterile water or saline
- Nurse at bedside to coach and reassure
Step 5 - Delivery of the Head
- Coach controlled pushing with each contraction
- At crowning (head stretching the perineum), instruct the mother to pant and not push - this slows head passage and reduces perineal tears
- Modified Ritgen Maneuver: one towel-draped hand supports the perineum and presses gently on the fetal chin; the second hand presses on the occiput to guide the head into slight extension - this presents the smallest diameter through the pelvic outlet
Step 6 - Delivery of the Shoulders
- After head delivery, allow head to rotate toward maternal thigh naturally (restitution)
- Clear fetal face and airway
- Gentle downward traction on head delivers the anterior shoulder
- Upward motion delivers the posterior shoulder
- If shoulder delivery is delayed, consider shoulder dystocia protocol
Step 7 - Cord Clamping and Infant Care
- Keep infant low at the perineum level immediately after delivery to promote placental blood flow to infant
- Clamp cord at two points 4-5 cm apart; proximal clamp 10 cm from infant's abdomen
- Cut cord at least 1 cm from skin (preserves venous access if resuscitation needed)
- Suction nose and mouth
- Transfer infant to warmer; dry and stimulate with towel
- Apgar scores at 1, 5, and 10 minutes
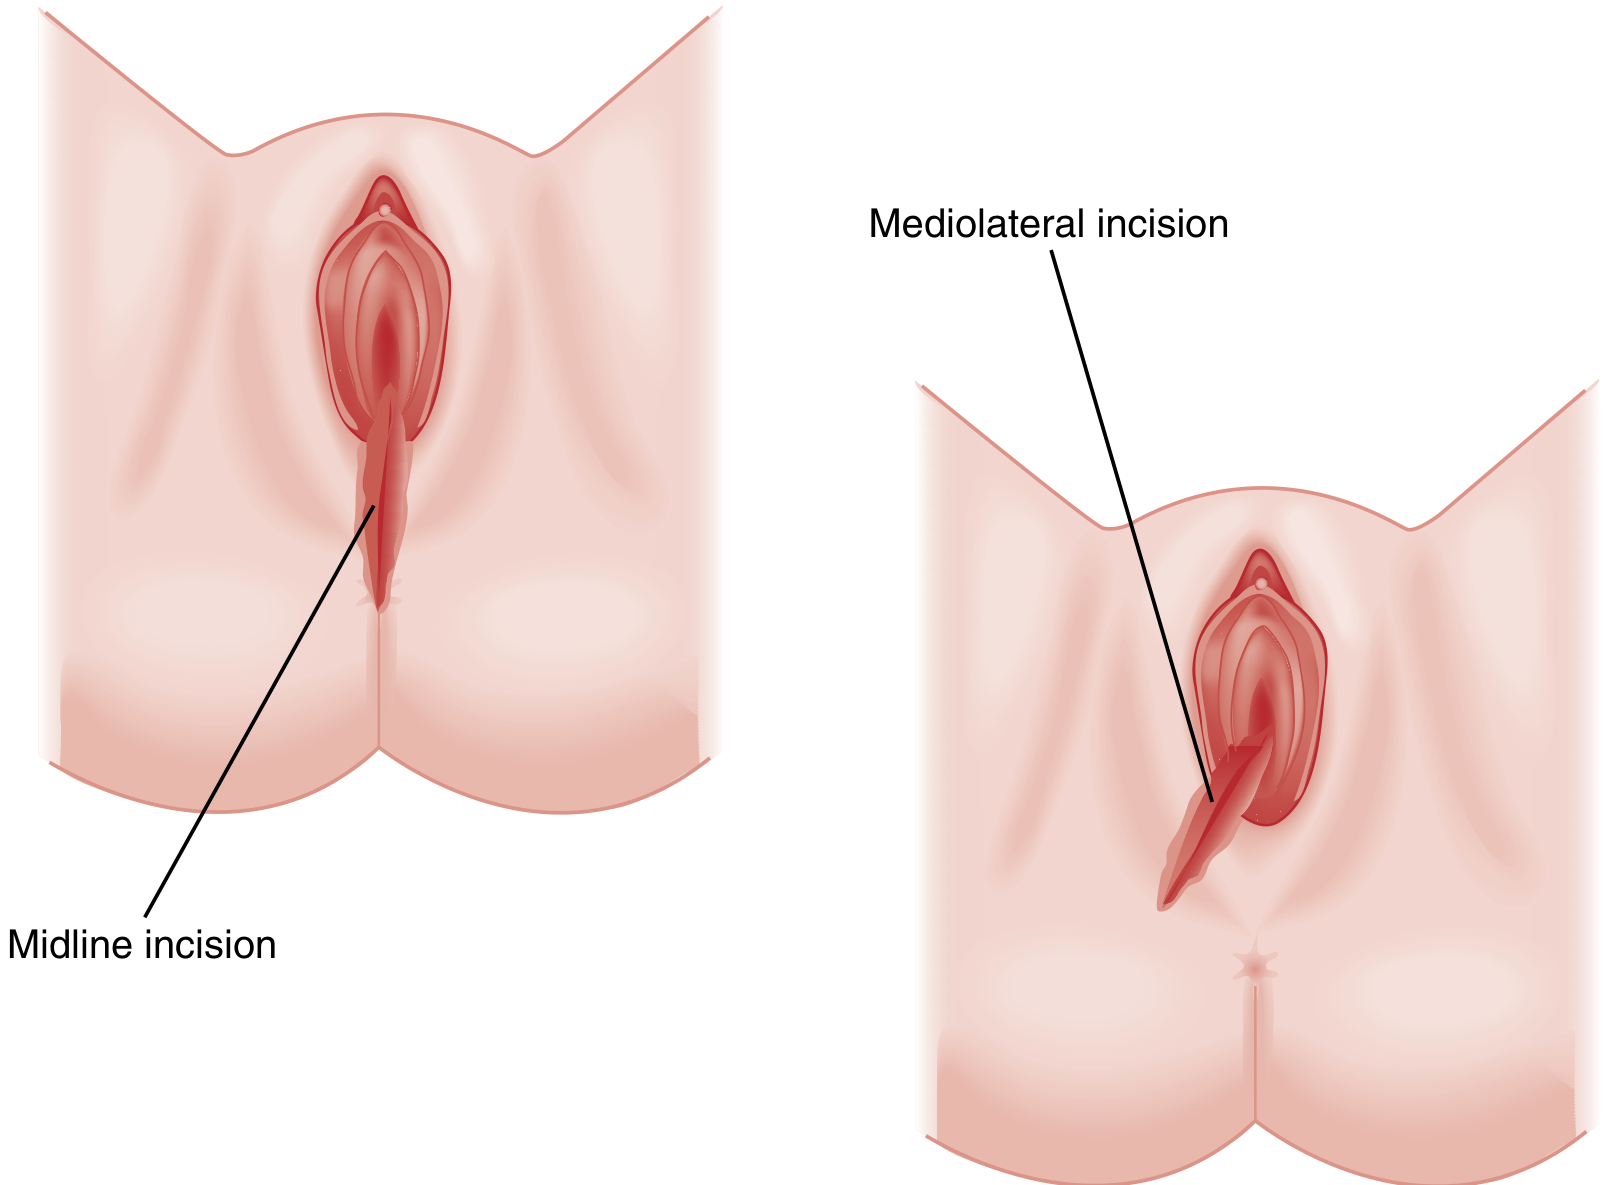
Step 8 - Episiotomy (Only if Indicated)
Routine episiotomy is not recommended. Perform only for specific indications: shoulder dystocia, breech delivery, or imminent severe perineal tear.
- Cut when head is visible during a contraction and introitus opens to 3-4 cm diameter
- Mediolateral incision is preferred over midline to avoid perineal tears extending to the rectum
Summary Table
| Step | Action | Key Point |
|---|---|---|
| Fetal monitoring | CTG throughout | Late decelerations = urgent |
| Positioning | Dorsal lithotomy | Sims position acceptable |
| Crowning | Pant, don't push | Reduces perineal tears |
| Head delivery | Ritgen maneuver | Guides smallest diameter |
| Shoulders | Traction then upward | Watch for shoulder dystocia |
| Cord | Clamp x2, cut | Delayed clamping if stable |
| Episiotomy | Only if indicated | Mediolateral preferred |
Source: Rosen's Emergency Medicine, Fig. 176.3-176.7 | Textbook of Family Medicine 9e
Modified ritgen maneuver
Searching sources...
Finding Sources
Finding Sources
Reading File
Reading File
Reading File
Loading Image
Loading Image
Loading Image
Modified Ritgen Maneuver
The Modified Ritgen Maneuver is a controlled technique for delivering the fetal head during the second stage of labour. Its core purpose is to guide the head into extension so the smallest diameter passes through the pelvic outlet, protecting the maternal perineum from lacerations.
Anatomy of the Maneuver - Two Hands
The maneuver uses both hands simultaneously:
| Hand | Position | Action |
|---|---|---|
| Upper hand (on occiput) | Palm over the fetal occiput | Applies gentle downward pressure to control and slow delivery of the head |
| Lower hand (under perineum) | Draped with a sterile towel; fingers applied through the perineum just in front of the coccyx | Exerts upward pressure on the fetal chin to extend the neck |
Step-by-Step Technique
Step 1 - Wait for crowning
Delivery is anticipated when the fetal head is visible at the vaginal introitus and the introitus dilates to 5 cm or more during a contraction.
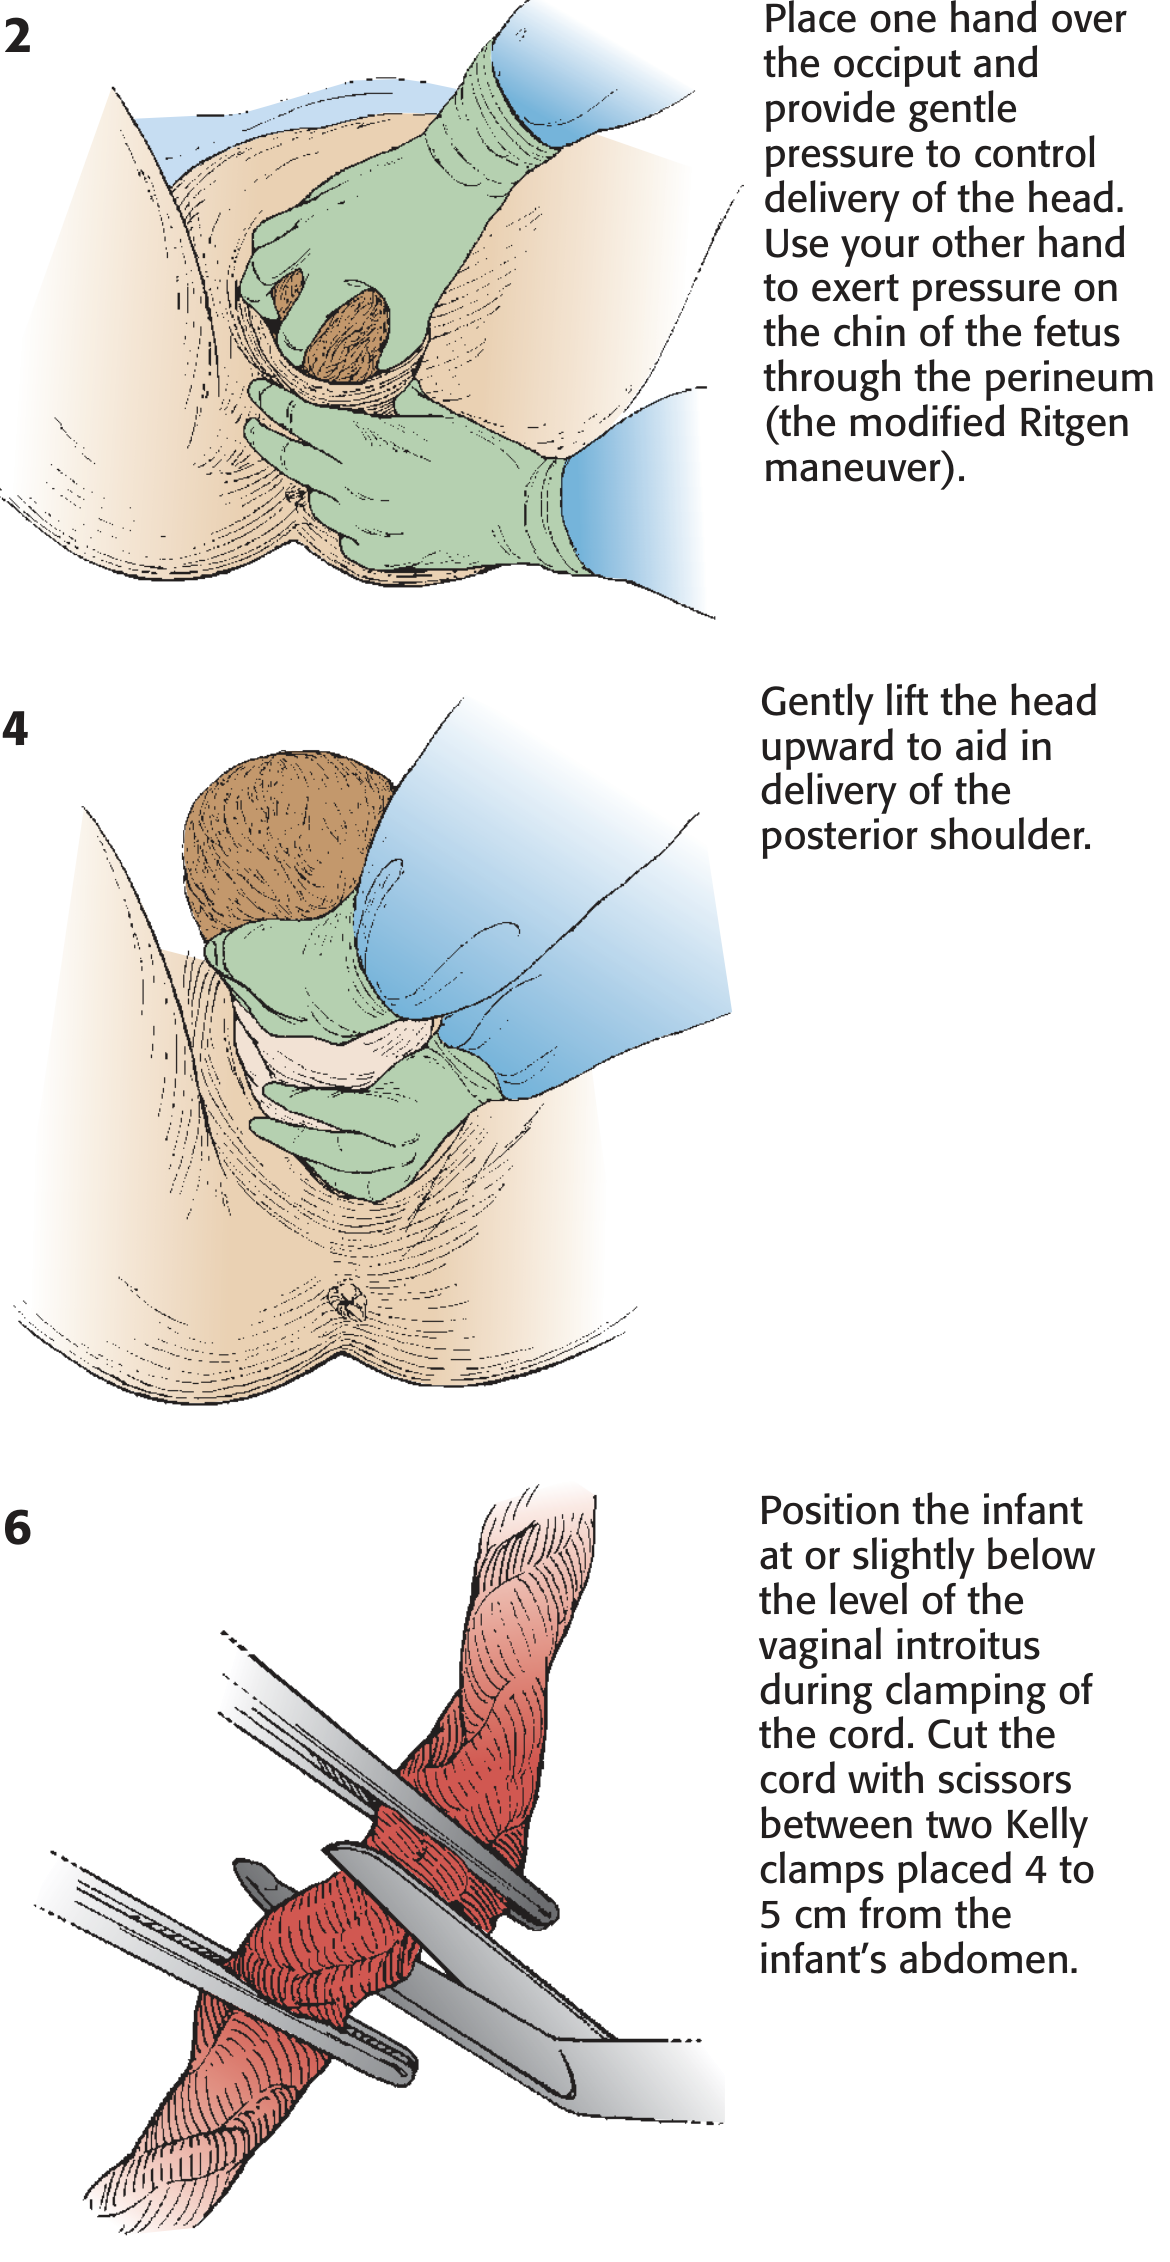
Step 2 - Apply the Modified Ritgen Maneuver
- Place one hand over the occiput and apply gentle pressure to control the rate of head delivery
- With the other hand draped in a sterile towel, reach beneath the perineum (anterior to the coccyx) and gently press upward on the fetal chin
- This combination extends the neck at the correct moment, presenting the suboccipitobregmatic diameter (smallest) through the outlet
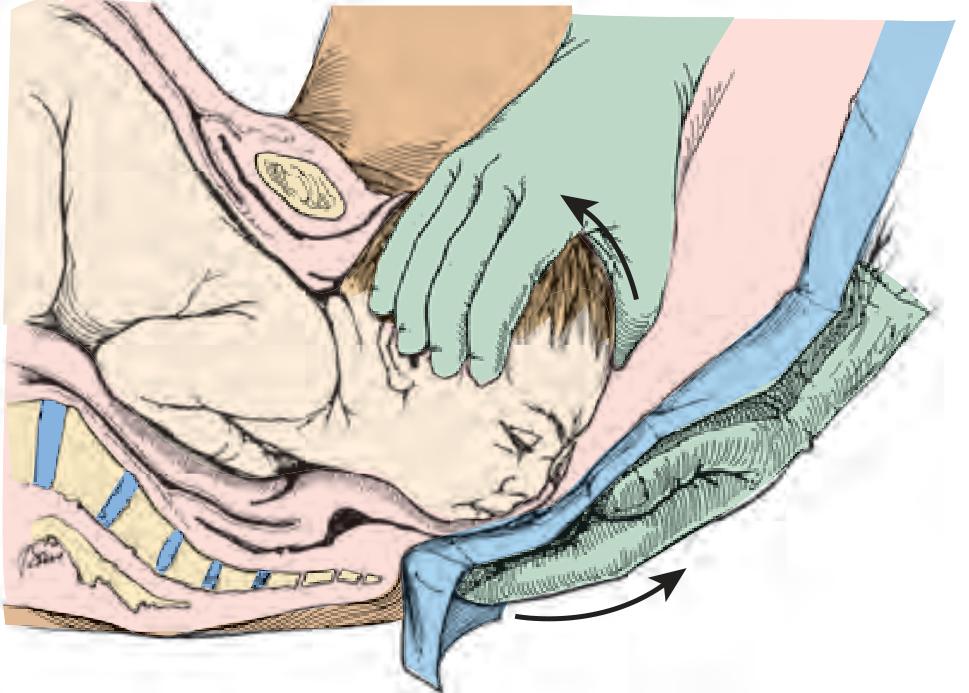
Step 3 - The maneuver in cross-section
The sagittal view shows the two-hand coordination clearly - upper hand controls head descent; lower hand lifts the chin upward and forward through the posterior perineum.
When to Use It
| Indication | Notes |
|---|---|
| Routine controlled delivery | Slows and controls head passage through perineum |
| Fetal distress requiring rapid delivery | Can expedite extension of the head |
| Maternal exhaustion / inadequate pushing | Assists extension when maternal effort is poor (e.g. with regional anaesthesia) |
Caution: In occiput posterior (OP) position, flexion (not extension) should be favoured. Extension in OP can dramatically increase tension on the perineum, raising risk of 3rd or 4th degree laceration.
Why It Works - The Biomechanics
- As the head extends, its presenting diameter increases - uncontrolled extension leads to perineal tearing
- The maneuver allows the clinician to time and control extension, guiding the smallest diameter (suboccipitobregmatic ~9.5 cm) through the outlet
- The sterile towel protects against fecal contamination from the anus
Key Points to Remember
- The lower hand is placed anterior to the coccyx (not over it) to reach the fetal chin
- Always use a sterile towel over the lower hand - prevents anal contamination
- Instruct the mother to pant, not push during crowning - this works synergistically with the maneuver
- The maneuver assists natural extension; avoid forcing the chin to "pop" out suddenly - this tears the perineum
- After head delivery, pass a finger around the neck to check for nuchal cord (occurs in ~20% of deliveries)
Sources: Roberts & Hedges' Clinical Procedures in Emergency Medicine, Fig. 56.10-56.11 | Pfenninger & Fowler's Procedures for Primary Care | Rosen's Emergency Medicine
Modified ritgen maneuver vs Ritgen maneuver
The key difference: the original Ritgen maneuver is performed between contractions, while the modified Ritgen is performed during a contraction. Both use the same two-hand technique but differ in timing and intent.
Searching sources...
Finding Sources
Searching the Web
Ritgen maneuver vs modified Ritgen maneuver difference obstetrics
Finding Sources
Reading Web Page
https://pmc.ncbi.nlm.nih.gov/articles/PMC6400357
Finding Sources
Searching PubMed
Ritgen maneuver modified perineal protection delivery
Finding Sources
Searching PubMed
Ritgen maneuver perineal tear randomized
Reading Article
PMID: 30696316
Reading Article
PMID: 39465967
Here is a detailed comparison of the two maneuvers, synthesized from textbooks and the latest evidence.
Ritgen Maneuver vs. Modified Ritgen Maneuver
Historical Origin
The original Ritgen maneuver was devised by the German obstetrician Moritz Carl Ludwig Wilhelm von Ritgen in the mid-19th century to facilitate and control extension of the fetal head at the end of the second stage of labour. Over the next century and a half, the description changed considerably - today "Ritgen maneuver" can mean several different interventions in different textbooks, leading to significant heterogeneity in published literature.
The Core Comparison
| Feature | Original Ritgen Maneuver | Modified Ritgen Maneuver |
|---|---|---|
| Timing | Performed between contractions (in the interval) | Performed during a uterine contraction (at crowning) |
| Lower hand action | Pulls the fetal chin outward then upward from between the anus and coccyx | Exerts upward pressure on the fetal chin through the posterior perineum, just anterior to the coccyx |
| Upper hand action | Controls the occiput to regulate speed | Applies gentle downward pressure on the occiput to slow delivery |
| Force applied | More active extraction - the chin is pulled to forcibly extend the head | Gentler - assists and controls natural extension without forcing it |
| Purpose | To actively extract the head by promoting extension | To control and slow head delivery, minimising perineal trauma |
| Towel/draping | Not consistently specified | Lower hand draped with sterile towel to avoid anal contamination |
| Contraction use | No (between contractions) | Yes (during contraction / crowning process) |
Hand Position - The Key Anatomical Point
Both maneuvers place the lower hand between the anus and coccyx (posterior perineum), approaching the fetal chin from below through the perineal soft tissue. The direction and force of the chin pressure is what differs.
When Each is Used
| Indication | Maneuver |
|---|---|
| Controlled routine delivery | Modified Ritgen (during contraction) |
| Fetal distress requiring rapid delivery | Modified Ritgen to expedite head extension |
| Inadequate maternal pushing (regional anaesthesia, exhaustion) | Modified Ritgen to assist extension |
| Historically, elective head control | Original Ritgen (between contractions) |
| Occiput posterior position | Neither - favour flexion; extension in OP greatly increases laceration risk |
What the Evidence Shows
The 2020 meta-analysis by Aquino et al. (PMID 30696316) pooled 3 RCTs (1,589 women) and found:
- No significant reduction in severe perineal lacerations (3rd/4th degree) with Ritgen's maneuver (RR 0.69, 95% CI 0.10-4.61)
- Higher postpartum pain in the Ritgen group (RR 1.95, 95% CI 1.13-3.38)
- Conclusion: Ritgen's maneuver during labour is not protective for severe perineal tears and is associated with more postpartum pain
The 2024 Cochrane Review by Dwan et al. (PMID 39465967) - the most current evidence (17 RCTs, 13,695 women) - found low-certainty evidence across most perineal techniques, including hands-on vs. hands-off approaches, with no clear superiority for any single technique.
Important caveat: The RCT by Jönsson et al. (PMID 18669713) specifically tested the modified Ritgen (during contraction) vs. standard perineal support in 1,623 nulliparous women and found no significant reduction in 3rd/4th degree tears.
Summary: The One-Line Difference
| Maneuver | |
|---|---|
| Original Ritgen | Between contractions - active extraction by pulling the chin outward to force extension |
| Modified Ritgen | During a contraction - gentle upward chin pressure + occiput control to guide and slow extension |
The modified version is what is taught and used in modern obstetric practice. The word "modified" refers primarily to the timing shift to during a contraction and the gentler, more controlled technique, which is considered safer and more physiologic than the original forceful between-contraction extraction.
Sources: Pfenninger & Fowler's Procedures for Primary Care | Roberts & Hedges' Clinical Procedures in Emergency Medicine | Rosen's Emergency Medicine | Aquino et al. J Matern Fetal Neonatal Med 2020 [PMID 30696316] | Dwan et al. Cochrane 2024 [PMID 39465967]
Ritgen maneuver
The Ritgen maneuver is a two-hand technique for controlling fetal head delivery - one hand on the occiput, the other pressing the fetal chin upward through the perineum to guide head extension.
Searching sources...
Finding Sources
Reading File
Reading File
Reading File
Now let me fetch all the key images for a comprehensive visual answer:
Loading Image
Loading Image
Loading Image
The Ritgen Maneuver
Definition
The Ritgen maneuver is a two-hand obstetric technique used during the second stage of labour to control extension of the fetal head at crowning, allowing the head's smallest diameter to pass through the pelvic outlet while protecting the maternal perineum from tearing.
In modern obstetrics, what is practiced is the Modified Ritgen Maneuver - the original maneuver was performed between contractions; the modified version is performed during a contraction (see below).
The Two Hands
| Hand | Placement | Action |
|---|---|---|
| Upper hand | Palm over the fetal occiput | Gentle downward pressure - slows delivery, prevents explosive expulsion |
| Lower hand | Draped with sterile towel; fingers on posterior perineum just anterior to the coccyx | Presses upward on the fetal chin through the perineal soft tissue - guides head into extension |
How It Works - The Biomechanics
The fetal head delivers by extension as it clears the pelvic outlet. The critical point is how fast and how much extension occurs:
- Too fast / uncontrolled extension → chin pops through perineum → 3rd or 4th degree laceration
- Controlled extension (Ritgen) → smallest diameter (suboccipitobregmatic ~9.5 cm) presents → perineum protected
Step-by-Step Technique
1. Recognise crowning
The fetal head is visible at the introitus; the biparietal diameter is distending the vulva. Introitus opens to 5 cm or more.
2. Position hands and begin the maneuver
- Upper hand: palm over the occiput, gentle downward pressure
- Lower hand: draped in sterile towel, reach to posterior perineum anterior to coccyx, palpate the fetal chin and press upward and anteriorly
- Instruct the mother to pant, not push - this synergises with the maneuver to slow passage
3. Guide extension deliberately
- The lower hand lifts the chin → the neck extends → head delivers face-down
- Do NOT let the chin "pop" suddenly through the perineum - this is the most common cause of laceration
- In most cases controlled extension can be achieved without explosive delivery
4. After the head delivers
- Allow the head to rotate toward the maternal thigh (restitution)
- Clear the face and airway
- Check for nuchal cord (present in ~20% of deliveries) - slip it over the head or doubly clamp and cut if tight
When to Use It
| Indication | Notes |
|---|---|
| All routine vertex deliveries | Standard of care during crowning |
| Fetal distress / rapid delivery needed | Pull outward then upward on chin to actively extend and expedite |
| Regional anaesthesia / maternal exhaustion | Assists extension when maternal expulsive effort is inadequate |
| Occiput posterior (OP) | ⚠️ Do NOT use - favour flexion in OP; extension dramatically increases laceration risk to 3rd/4th degree |
Important Practical Points
- Always use a sterile towel on the lower hand - prevents fecal contamination from the anus
- The lower hand is placed anterior to the coccyx, not over it - this is the correct anatomical approach to the fetal chin
- The maneuver assists natural extension - it does not replace maternal pushing effort
- Panting by the mother between pushes is the non-instrumental equivalent and works synergistically
- If episiotomy is needed, cut it before applying the maneuver, when the introitus opens to 3-4 cm
- After head delivery, always check for nuchal cord before proceeding to shoulder delivery
What the Evidence Says
- A 2020 meta-analysis (Aquino et al., PMID 30696316) of 3 RCTs (1,589 women) found the Ritgen maneuver does not significantly reduce severe perineal lacerations (RR 0.69, 95% CI 0.10-4.61) and is associated with higher postpartum pain (RR 1.95, 95% CI 1.13-3.38)
- The 2024 Cochrane Review (Dwan et al., PMID 39465967) (17 RCTs, 13,695 women) found low-certainty evidence across all perineal techniques - no single technique is definitively superior
- Despite mixed evidence, the Ritgen maneuver remains widely taught as it provides the clinician with active control of head delivery, which is especially valuable in emergency or rapid delivery situations
Sources: Roberts & Hedges' Clinical Procedures in Emergency Medicine (Fig. 56.10-56.11, Williams Obstetrics 22e) | Pfenninger & Fowler's Procedures for Primary Care | Rosen's Emergency Medicine | Aquino et al. 2020 [PMID 30696316] | Dwan et al. Cochrane 2024 [PMID 39465967]
This is a shared conversation. Sign in to Orris to start your own chat.