
/ visulize the land marks of laparoscopic surgery
Reading File
The landmarks of laparoscopic surgery include the umbilicus (primary trocar site), anterior superior iliac spine, pubic symphysis, epigastric vessels, round ligament, and internal ring. Let me search the medical library for comprehensive content and images.
Searching sources...
Finding Sources
Finding Sources
Finding Sources
Finding Sources
Searching the Web
landmarks of laparoscopic surgery anatomy diagram trocar sites
Finding Sources
Loading Image
Loading Image
Reading File
Loading Image
Loading Image
Reading File
Searching the Web
laparoscopic surgery peritoneal landmarks internal view visualization diagram
Loading Image
Loading Image
Loading Image
Reading File
Loading Image
Loading Image
Loading Image
Here is a comprehensive visual guide to the landmarks of laparoscopic surgery:
Landmarks of Laparoscopic Surgery
Laparoscopic surgery relies on both external (surface) landmarks and internal (peritoneal/intraperitoneal) landmarks to guide safe trocar placement and dissection.
1. External / Surface Landmarks
These are visible and palpable on the body surface and guide initial trocar insertion.
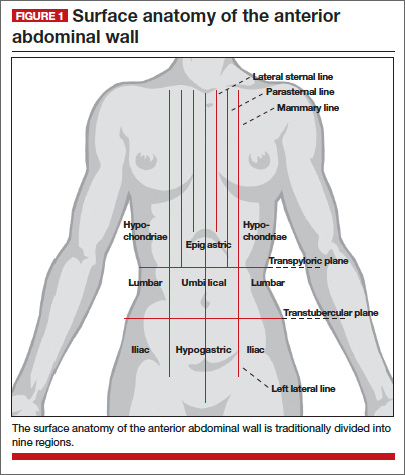
| Landmark | Significance |
|---|---|
| Umbilicus | Primary camera port site; corresponds to vertebral level L3-L4; distance to aorta varies by BMI |
| Anterior Superior Iliac Spine (ASIS) | Two thumbs medial = standard working trocar insertion point |
| Pubic symphysis | Inferior midline reference; guides lower port placement |
| Xiphisternum | Superior midline reference for upper abdominal ports |
| Costal margin | Upper quadrant port reference |
| Rectus abdominis border | Ports placed lateral to rectus to avoid epigastric vessels |
Trocar Depth by Body Habitus
This illustration shows how umbilical trocar depth varies significantly with BMI - a key safety consideration:
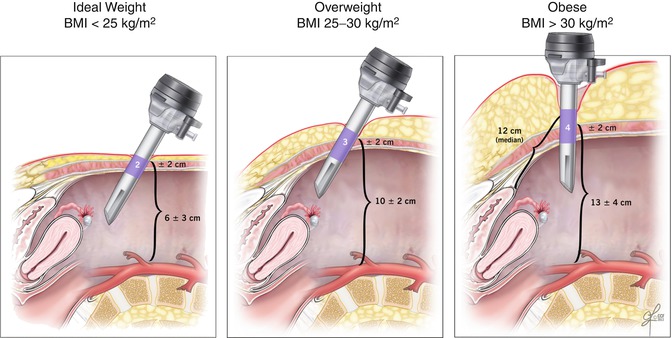
- BMI < 25: ~6 ± 3 cm to peritoneum
- BMI 25-30: ~10 ± 2 cm
- BMI > 30: ~13 ± 4 cm (median 12 cm)
2. Anterior Abdominal Wall Vascular Landmarks
The inferior epigastric vessels are the most critical vascular landmark for secondary trocar placement. Ports must be placed lateral to these vessels under transillumination (diaphanoscopy).
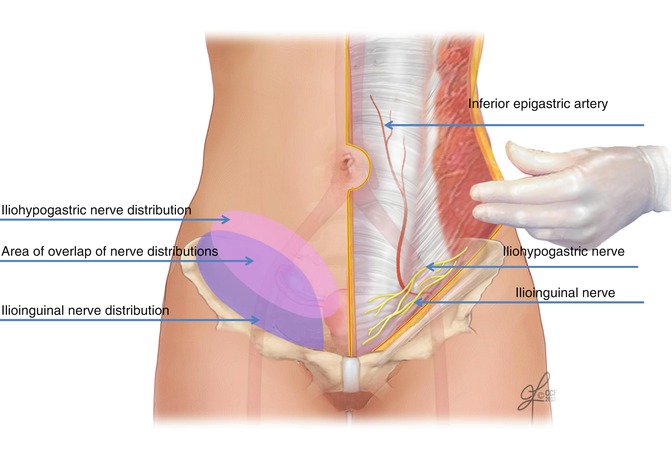
Key vessels and structures to identify:
- Inferior epigastric artery and vein - run within the rectus sheath; injury causes port-site hematoma
- Iliohypogastric nerve - at risk with lower quadrant trocars
- Ilioinguinal nerve - runs below the ASIS; risk in pelvic surgery
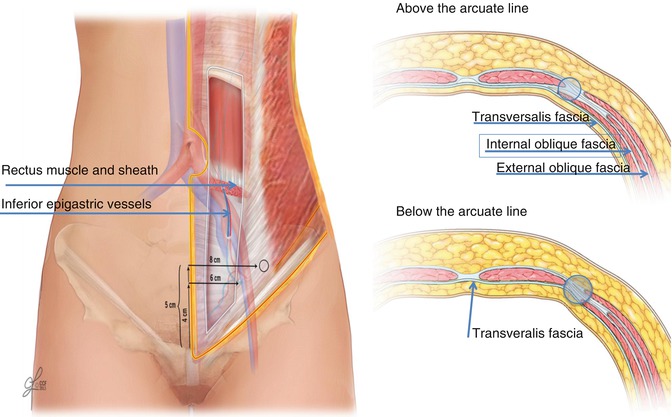
The abdominal wall above and below the arcuate line has different fascial layers - important for understanding the retroperitoneal plane in laparoscopic hernia repair (TEP/TAPP):
3. Internal (Peritoneal) Landmarks
Once the laparoscope is inside, the surgeon navigates by 5 peritoneal folds visible on the posterior surface of the anterior abdominal wall:
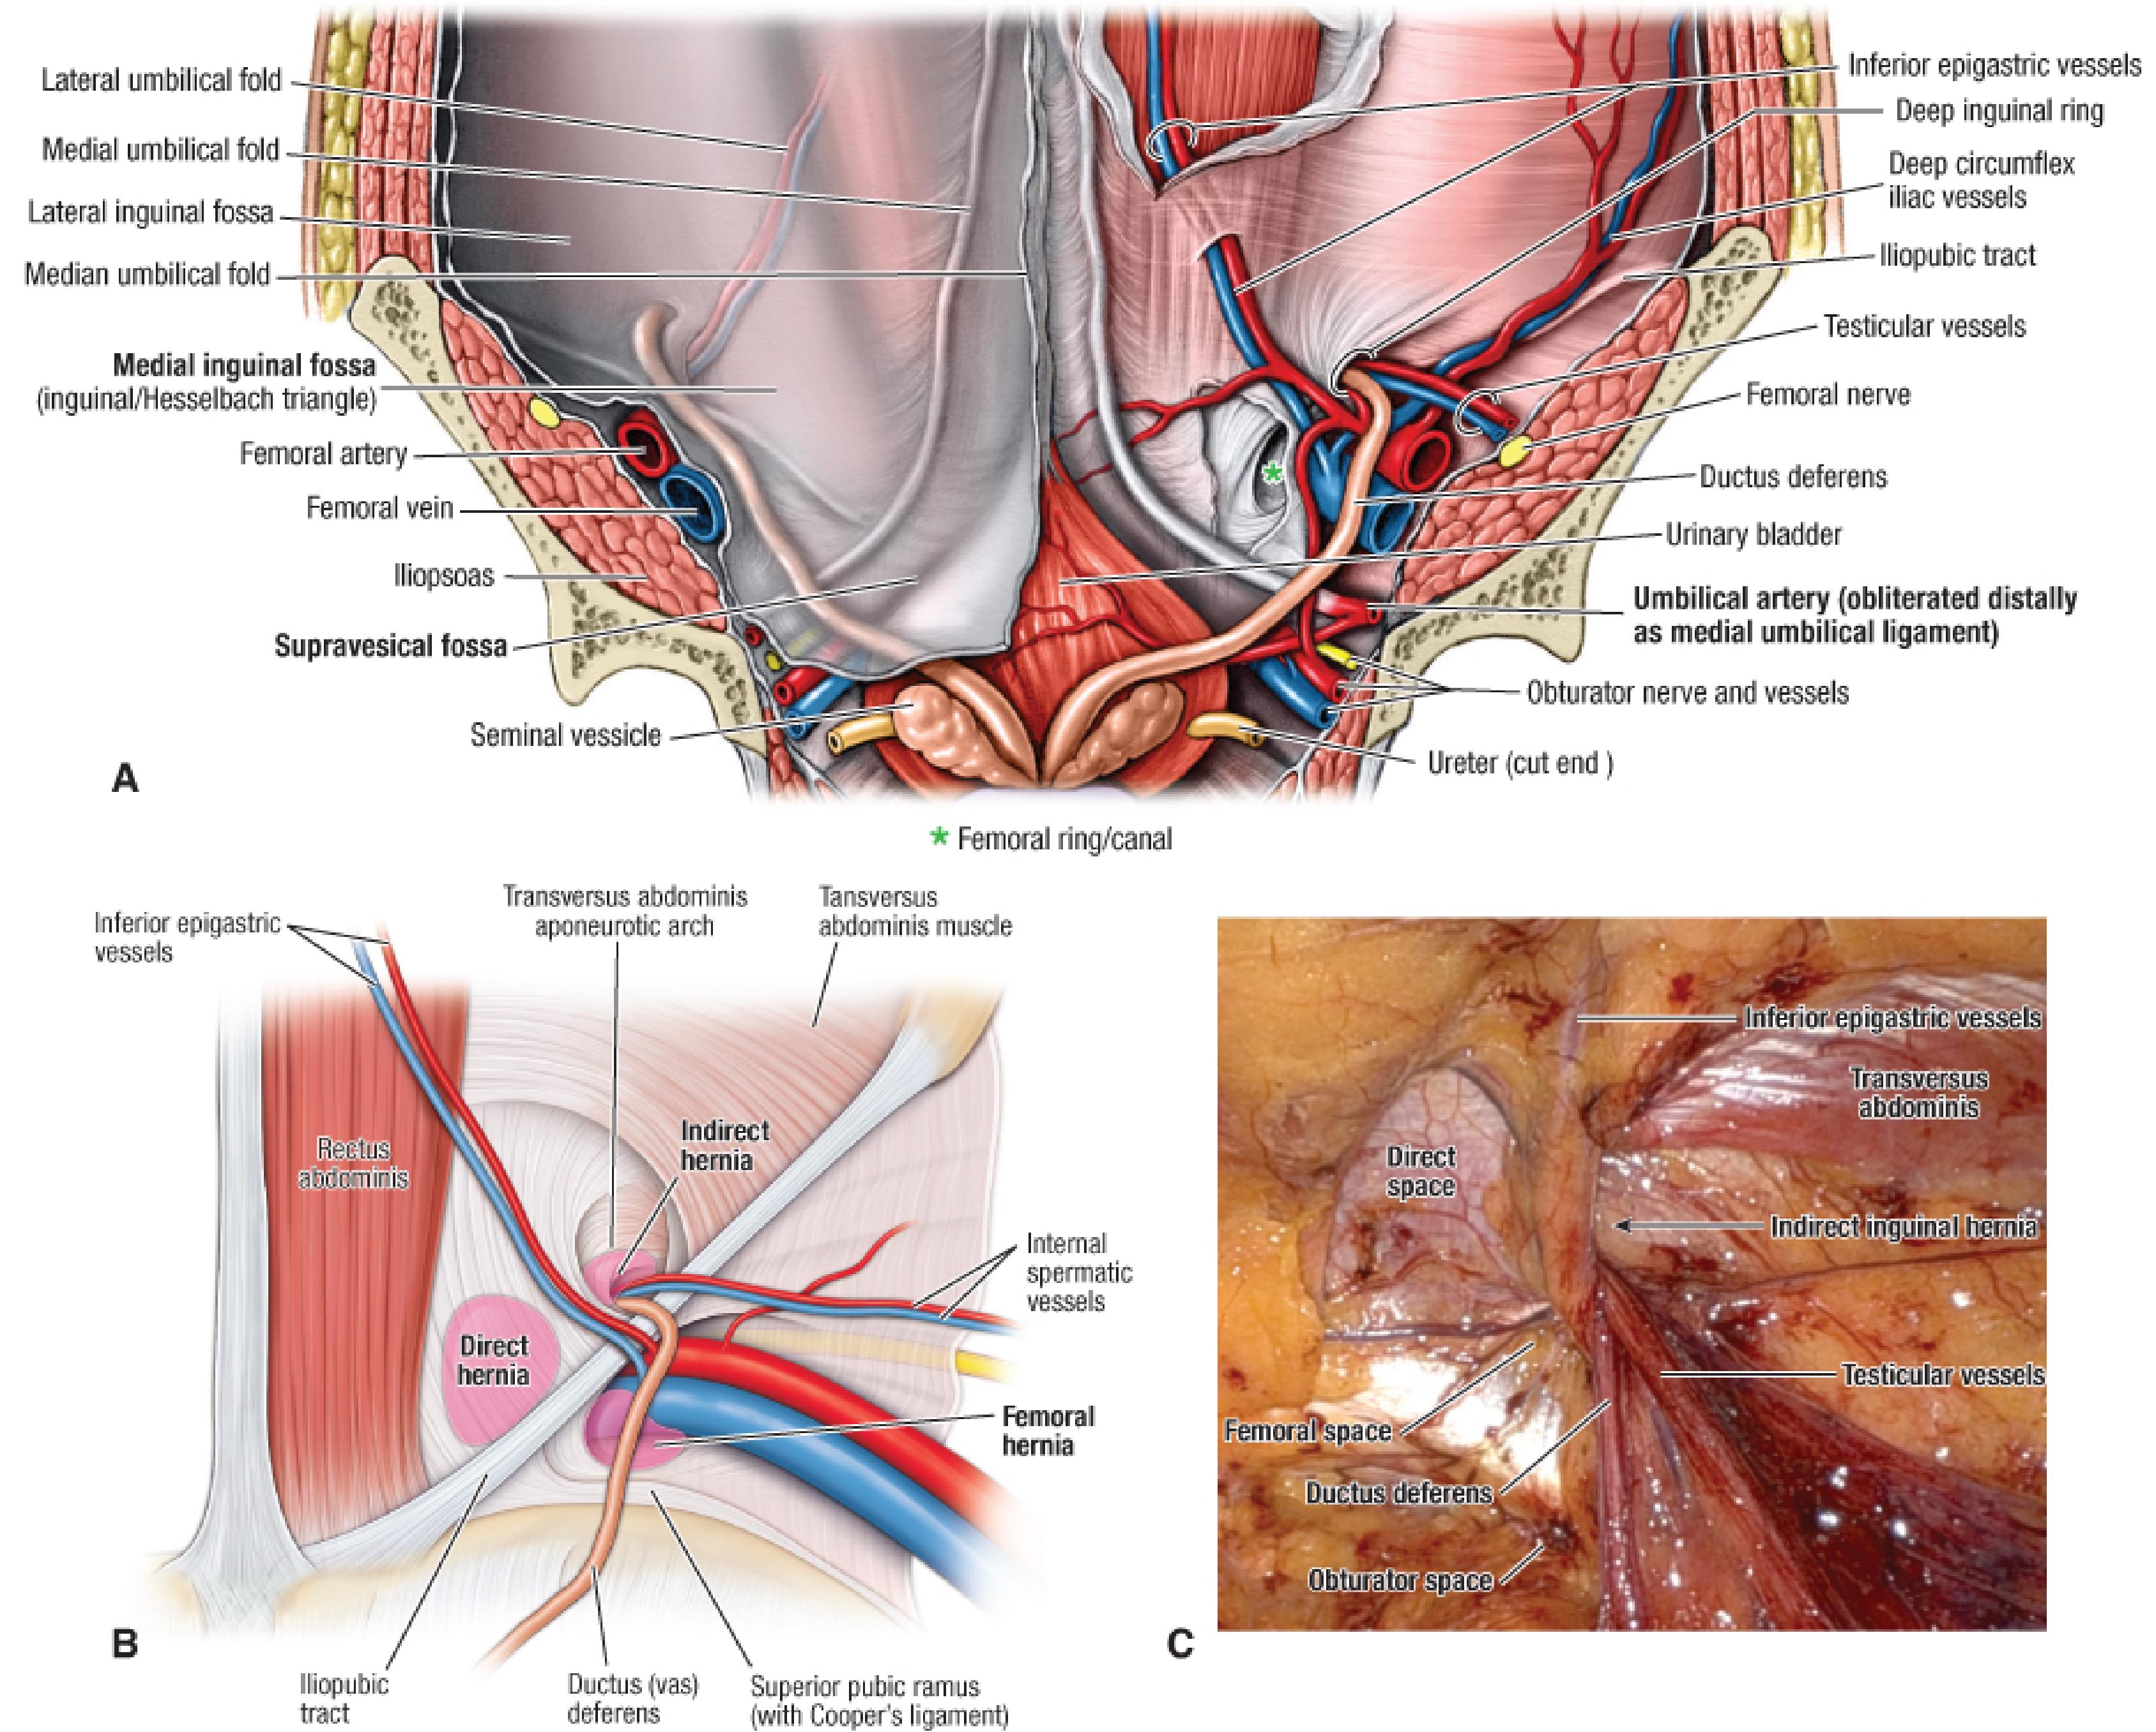
The Five Peritoneal Folds (Plicae)
| Fold | Structure Underneath | Location |
|---|---|---|
| Median umbilical fold (1, midline) | Obliterated urachus | Midline, bladder to umbilicus |
| Medial umbilical folds (paired) | Obliterated umbilical arteries | Run from internal iliac arteries to umbilicus |
| Lateral umbilical folds (paired) | Inferior epigastric vessels | Most lateral pair - the KEY surgical landmark |
Fossae (spaces between folds)
| Fossa | Between | Clinical Significance |
|---|---|---|
| Supravesical fossa | Median and medial folds | Hernia here = supravesical hernia |
| Medial inguinal fossa (Hesselbach triangle) | Medial and lateral folds | Site of direct inguinal hernia |
| Lateral inguinal fossa | Lateral to lateral fold | Site of indirect inguinal hernia (via internal ring) |
4. Deep Inguinal Region Landmarks (TAPP/TEP View)
This is the laparoscopic surgeon's view of the right groin during hernia repair, showing the peritoneum intact (left panel) and with overlay anatomy (right panel):

Key structures in the inguinal region visible laparoscopically:
- Deep (internal) inguinal ring - lateral to the inferior epigastric vessels
- Iliopubic tract - condensation of transversalis fascia; runs parallel to inguinal ligament; defines the "safety line" for fixation
- Cooper's ligament (pectineal ligament) - on the superior pubic ramus; used for mesh fixation
- Ductus (vas) deferens - passes medially to the internal ring
- Testicular (gonadal) vessels - pass laterally through the internal ring
- Urinary bladder - medial structure, avoid with staples/tacks
- External iliac artery and vein - deep to inguinal ligament
5. The Triangles of Doom and Pain
These two danger zones lie below (posterior to) the iliopubic tract and are visible laparoscopically. Fixation devices must NEVER be placed here.
Triangle of Doom (vascular)
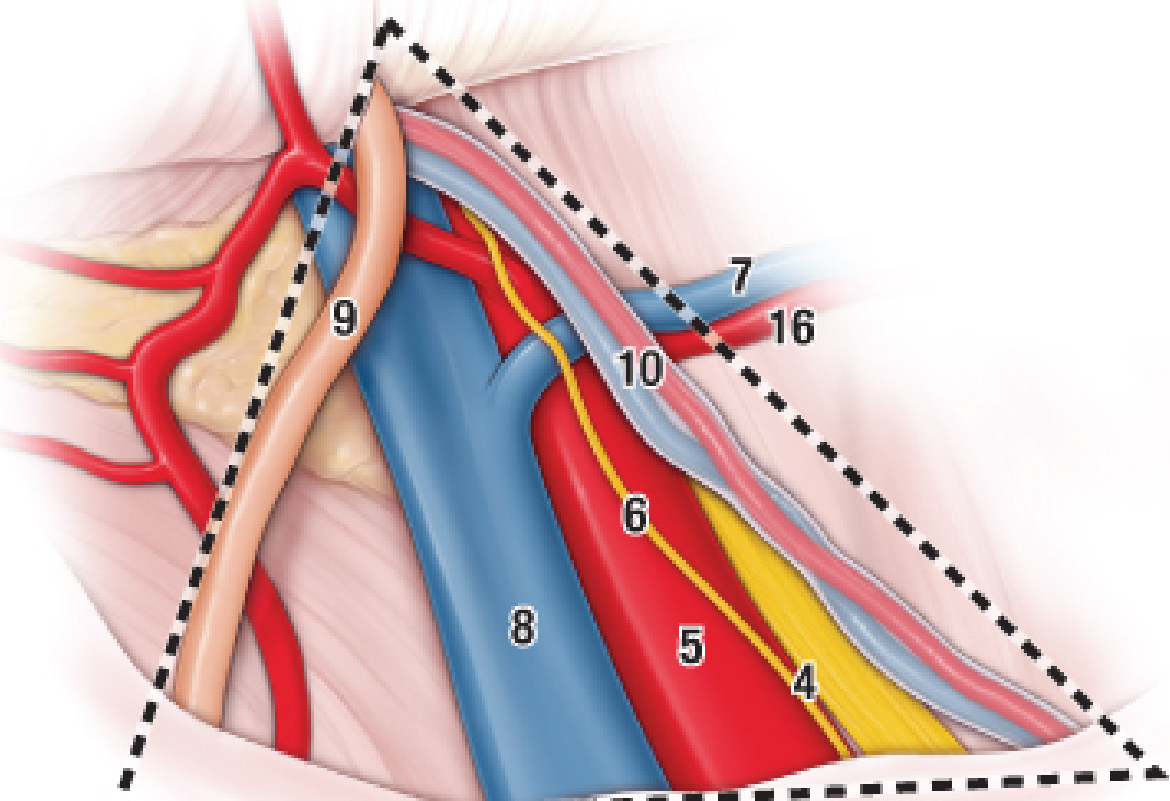
- Medial border: ductus deferens (9)
- Lateral border: gonadal vessels (10)
- Contents: external iliac artery (5), external iliac vein (8), deep circumflex iliac vessels
- Injury = catastrophic hemorrhage
Triangle of Pain (neural)
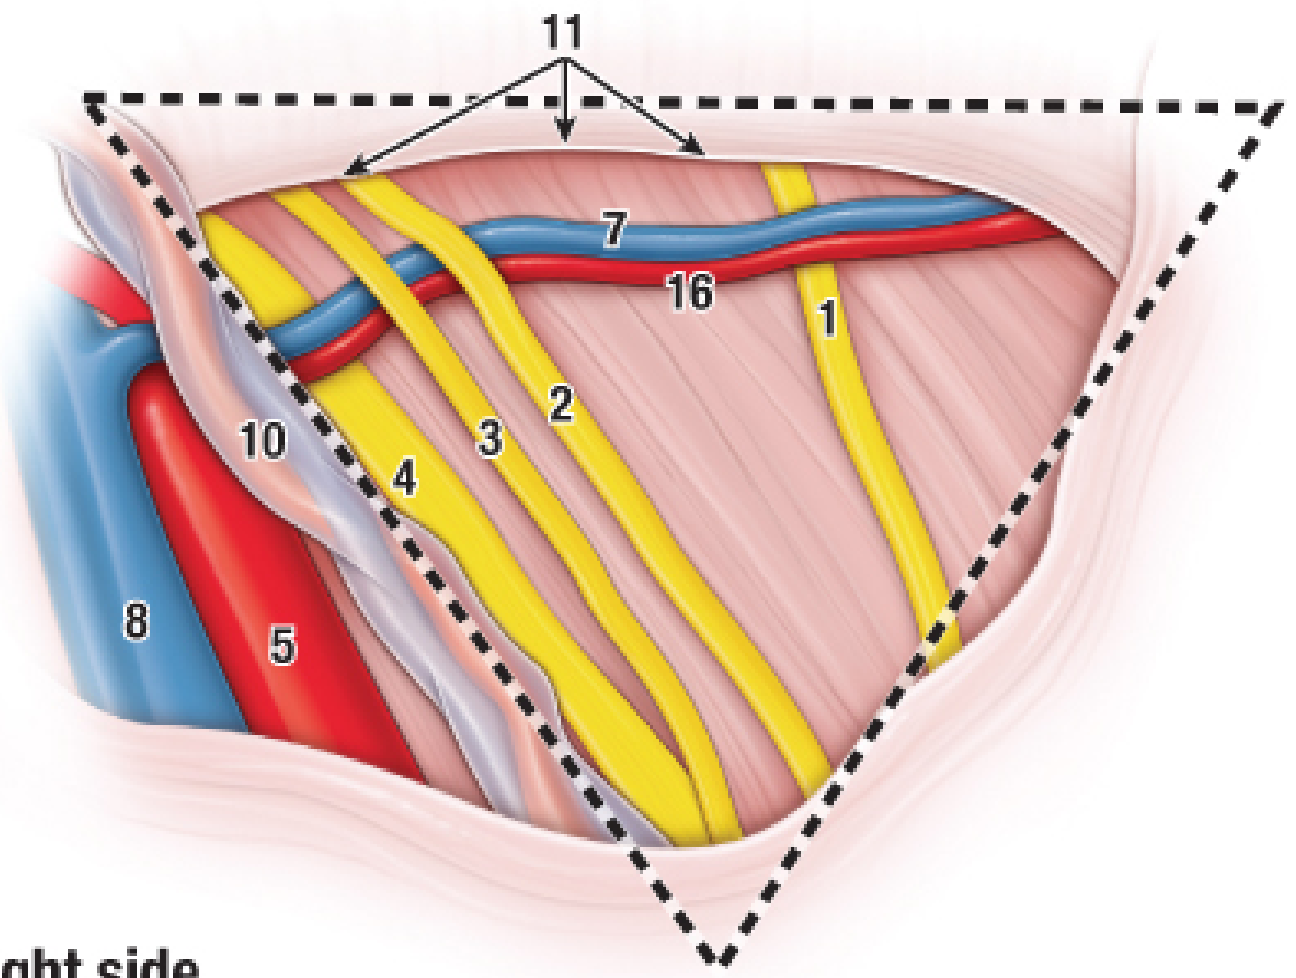
- Contains: femoral nerve (4), lateral cutaneous nerve of the thigh (1), anterior cutaneous nerve of the thigh (2), femoral branch of genitofemoral nerve (3), genital branch of genitofemoral nerve (6)
- Injury = chronic post-operative groin pain, numbness, neuropathy
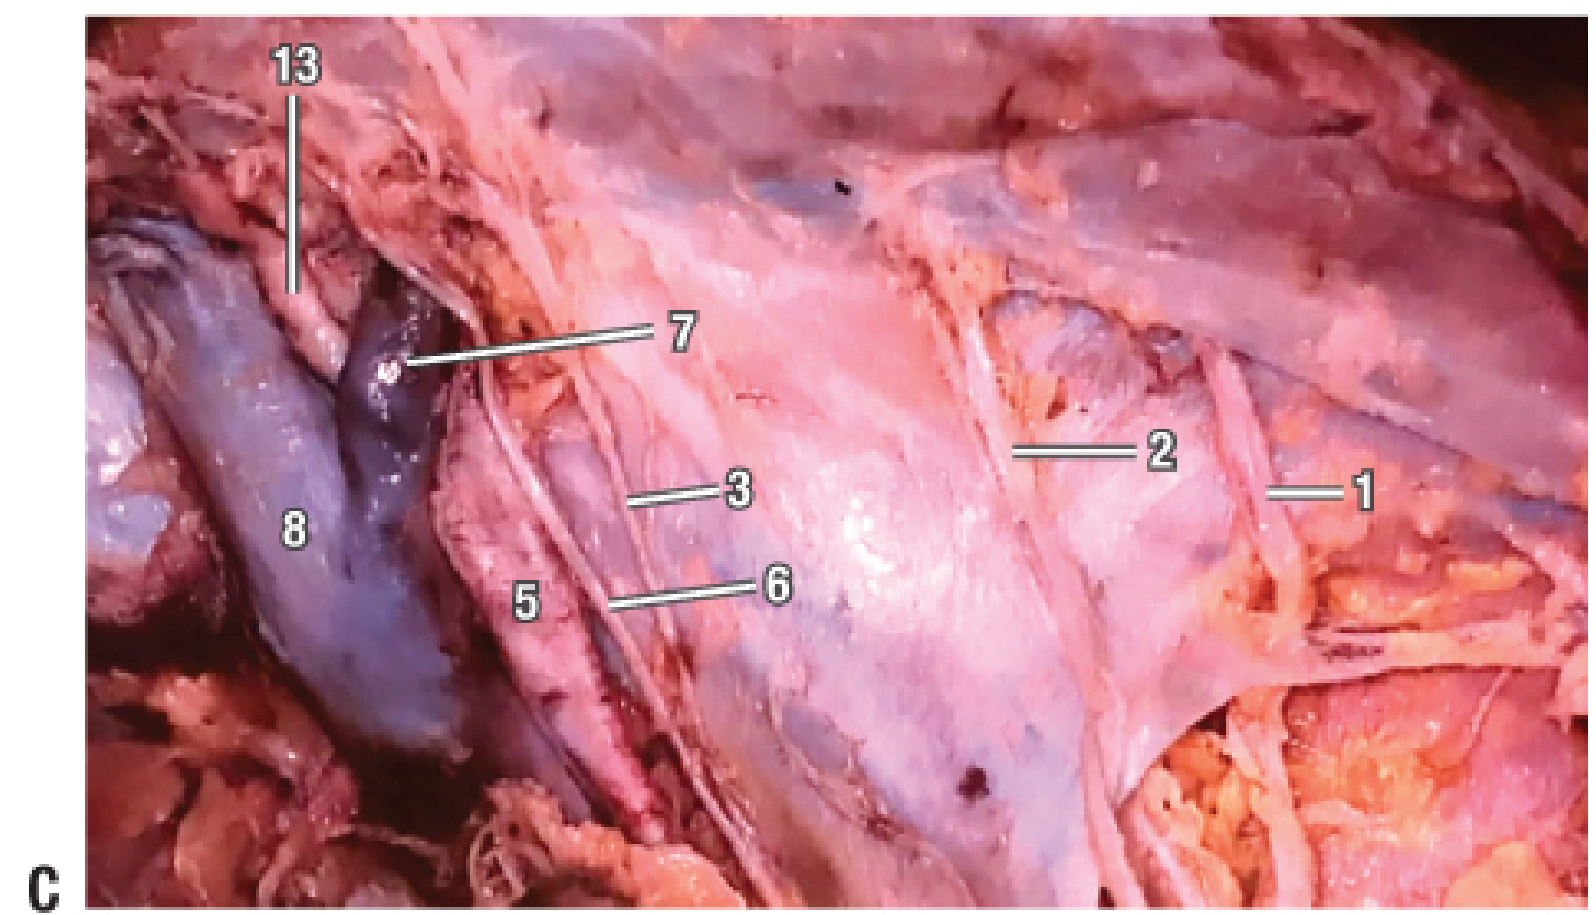
Cadaveric dissection (laparoscopic perspective) confirming the nerve and vessel positions in these triangles:
Summary Table
| Category | Key Landmark | Relevance |
|---|---|---|
| Entry | Umbilicus (L3-L4) | Primary camera port |
| Entry | Palmer's point (LUQ) | Alternative entry in previous surgery/obesity |
| Vascular avoidance | Inferior epigastric vessels | Lateral to rectus = safe zone for secondary ports |
| Orientation | Sacral promontory | Pelvic landmark for pelvic surgery |
| Pelvic | Round ligament | Defines lateral access to pelvic sidewall |
| Pelvic | Ureter | "Water under the bridge" - crosses iliac vessels at pelvic brim |
| Hernia | Iliopubic tract | Inferior boundary for safe staple/tack fixation |
| Hernia | Cooper's ligament | Mesh anchoring point |
| Hernia | Triangle of doom | No fixation - external iliac vessels |
| Hernia | Triangle of pain | No fixation - femoral/genitofemoral nerves |
Sources: Fischer's Mastery of Surgery, 8th ed.; Abdominal Key - Inguinal Anatomy Laparoscopic View; Abdominal anatomy in the context of port placement (PMC4664217)
/visulize types of wounds
Reading File
Wounds are classified by mechanism (incised, lacerated, contused, puncture, avulsion, burn, etc.), depth, and contamination. Let me pull comprehensive textbook content and images now.
Searching sources...
Finding Sources
Finding Sources
Searching the Web
types of wounds classification incised lacerated contused puncture avulsion clinical images diagram
Finding Sources
Finding Sources
Loading Image
Finding Sources
Searching the Web
wound classification surgical clean contaminated dirty infected clinical photos types
Reading File
Reading File
Loading Image
Loading Image
Finding Sources
Searching the Web
wound healing primary secondary tertiary intention diagram stages
Loading Image
Loading Image
Loading Image
Searching the Web
burn wound depth classification superficial partial full thickness diagram
Finding Sources
Loading Image
Loading Image
Here is a complete visual guide to the types of wounds, organized across all major classification systems used in clinical practice.
Types of Wounds - A Visual Guide
Wounds are classified in three main ways: by mechanism of injury, by surgical contamination class, and by depth/tissue layers involved. Each system serves a different clinical purpose.
CLASSIFICATION 1 — By Mechanism of Injury
This is the most fundamental surgical and forensic classification, based on how the wound was caused.

| Type | Cause | Key Features | Bleeding |
|---|---|---|---|
| Abrasion | Friction / scraping | Epidermis removed; superficial; raw oozing surface | Serous/blood ooze |
| Incised wound | Sharp instrument (knife, glass, scalpel) | Clean, straight edges; edges gape; tissue bridges absent | Profuse; vessels cut cleanly |
| Laceration | Blunt force / tearing | Ragged, irregular edges; tissue bridges present; contused margins | Moderate; vessels torn |
| Contusion (Bruise) | Blunt impact, skin intact | Skin unbroken; subcutaneous hemorrhage; blue-black discoloration | Internal only |
| Puncture wound | Pointed object (nail, needle, thorn) | Small external opening; deep track; high tetanus risk | Minimal external bleeding |
| Penetrating wound | Any object entering a body cavity | May involve organs; depth > surface appearance | Depends on depth |
| Avulsion | Tearing/ripping force | Tissue flap partially or completely separated | Significant; difficult to control |
| Crush injury | Heavy compressive force | Massive tissue destruction; devitalized tissue; swelling | Variable + deep compartment damage |
| Gunshot wound | Ballistic projectile | Entry + possible exit wound; cavitation; blast injury | Severe; tract not predictable |
Key Differentiators: Incised vs. Lacerated
| Feature | Incised | Lacerated |
|---|---|---|
| Edges | Clean, sharp | Ragged, irregular |
| Tissue bridges | Absent | Present |
| Cause | Sharp instrument | Blunt trauma |
| Infection risk | Lower | Higher |
| Scar | Minimal | More prominent |
CLASSIFICATION 2 — Surgical Wound Contamination (CDC / AORN Classes)
Used perioperatively to predict surgical site infection (SSI) risk and guide antibiotic prophylaxis.
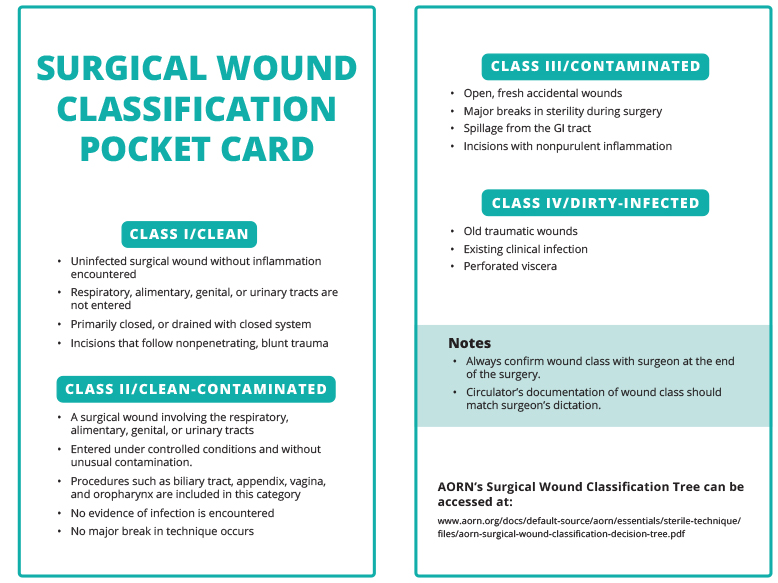
| Class | Name | Definition | SSI Risk |
|---|---|---|---|
| Class I | Clean | No inflammation; no entry into GI/GU/respiratory tract; no break in technique | 1-5% |
| Class II | Clean-Contaminated | Controlled entry into GI/GU/biliary tract (e.g., appendix, vagina); no unusual contamination | 3-11% |
| Class III | Contaminated | Open fresh traumatic wounds; gross GI spillage; major break in sterile technique; acute non-purulent inflammation | 10-17% |
| Class IV | Dirty-Infected | Old traumatic wounds; pus encountered; perforated viscus; fecal contamination; devitalized tissue | >27% |
Source: Originally developed in 1964 by the National Academy of Sciences; refined by the CDC wound classification system
CLASSIFICATION 3 — By Depth (Open vs. Closed)
Open Wounds
Skin/mucosa broken - infection risk present
- Abrasion, incision, laceration, puncture, avulsion, gunshot
Closed Wounds
Skin intact - no external hemorrhage
- Contusion, hematoma, crush injury, fracture blisters
CLASSIFICATION 4 — Wound Healing by Intention
This describes how wounds are managed and healed, not just the wound itself.
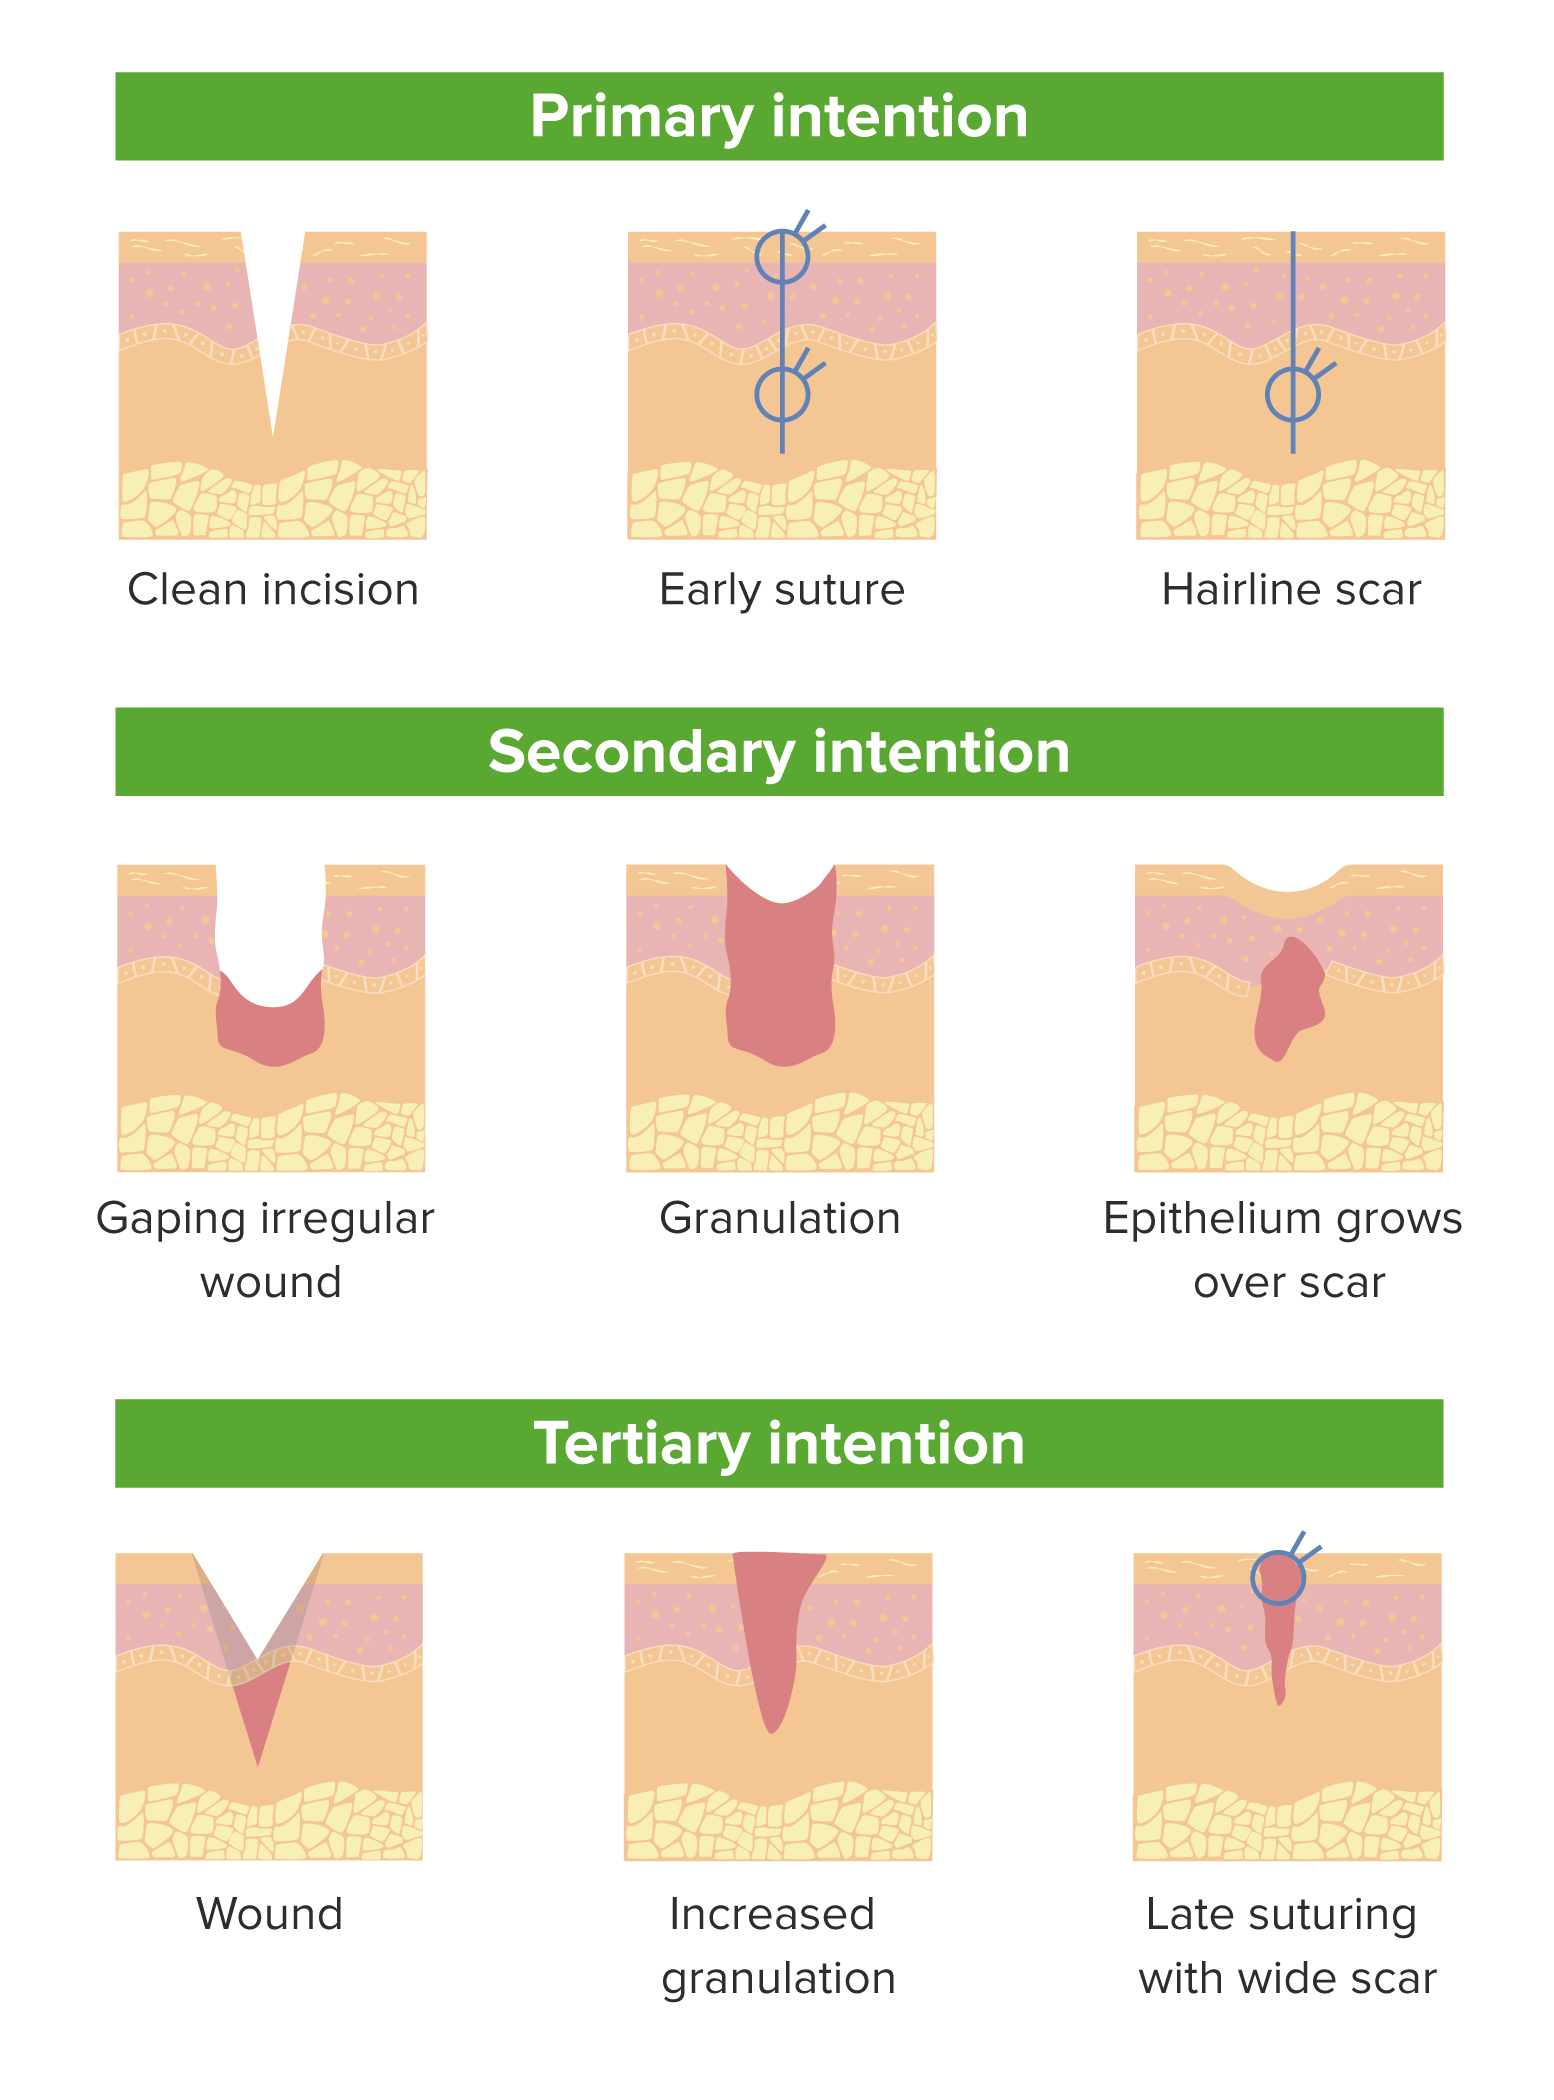
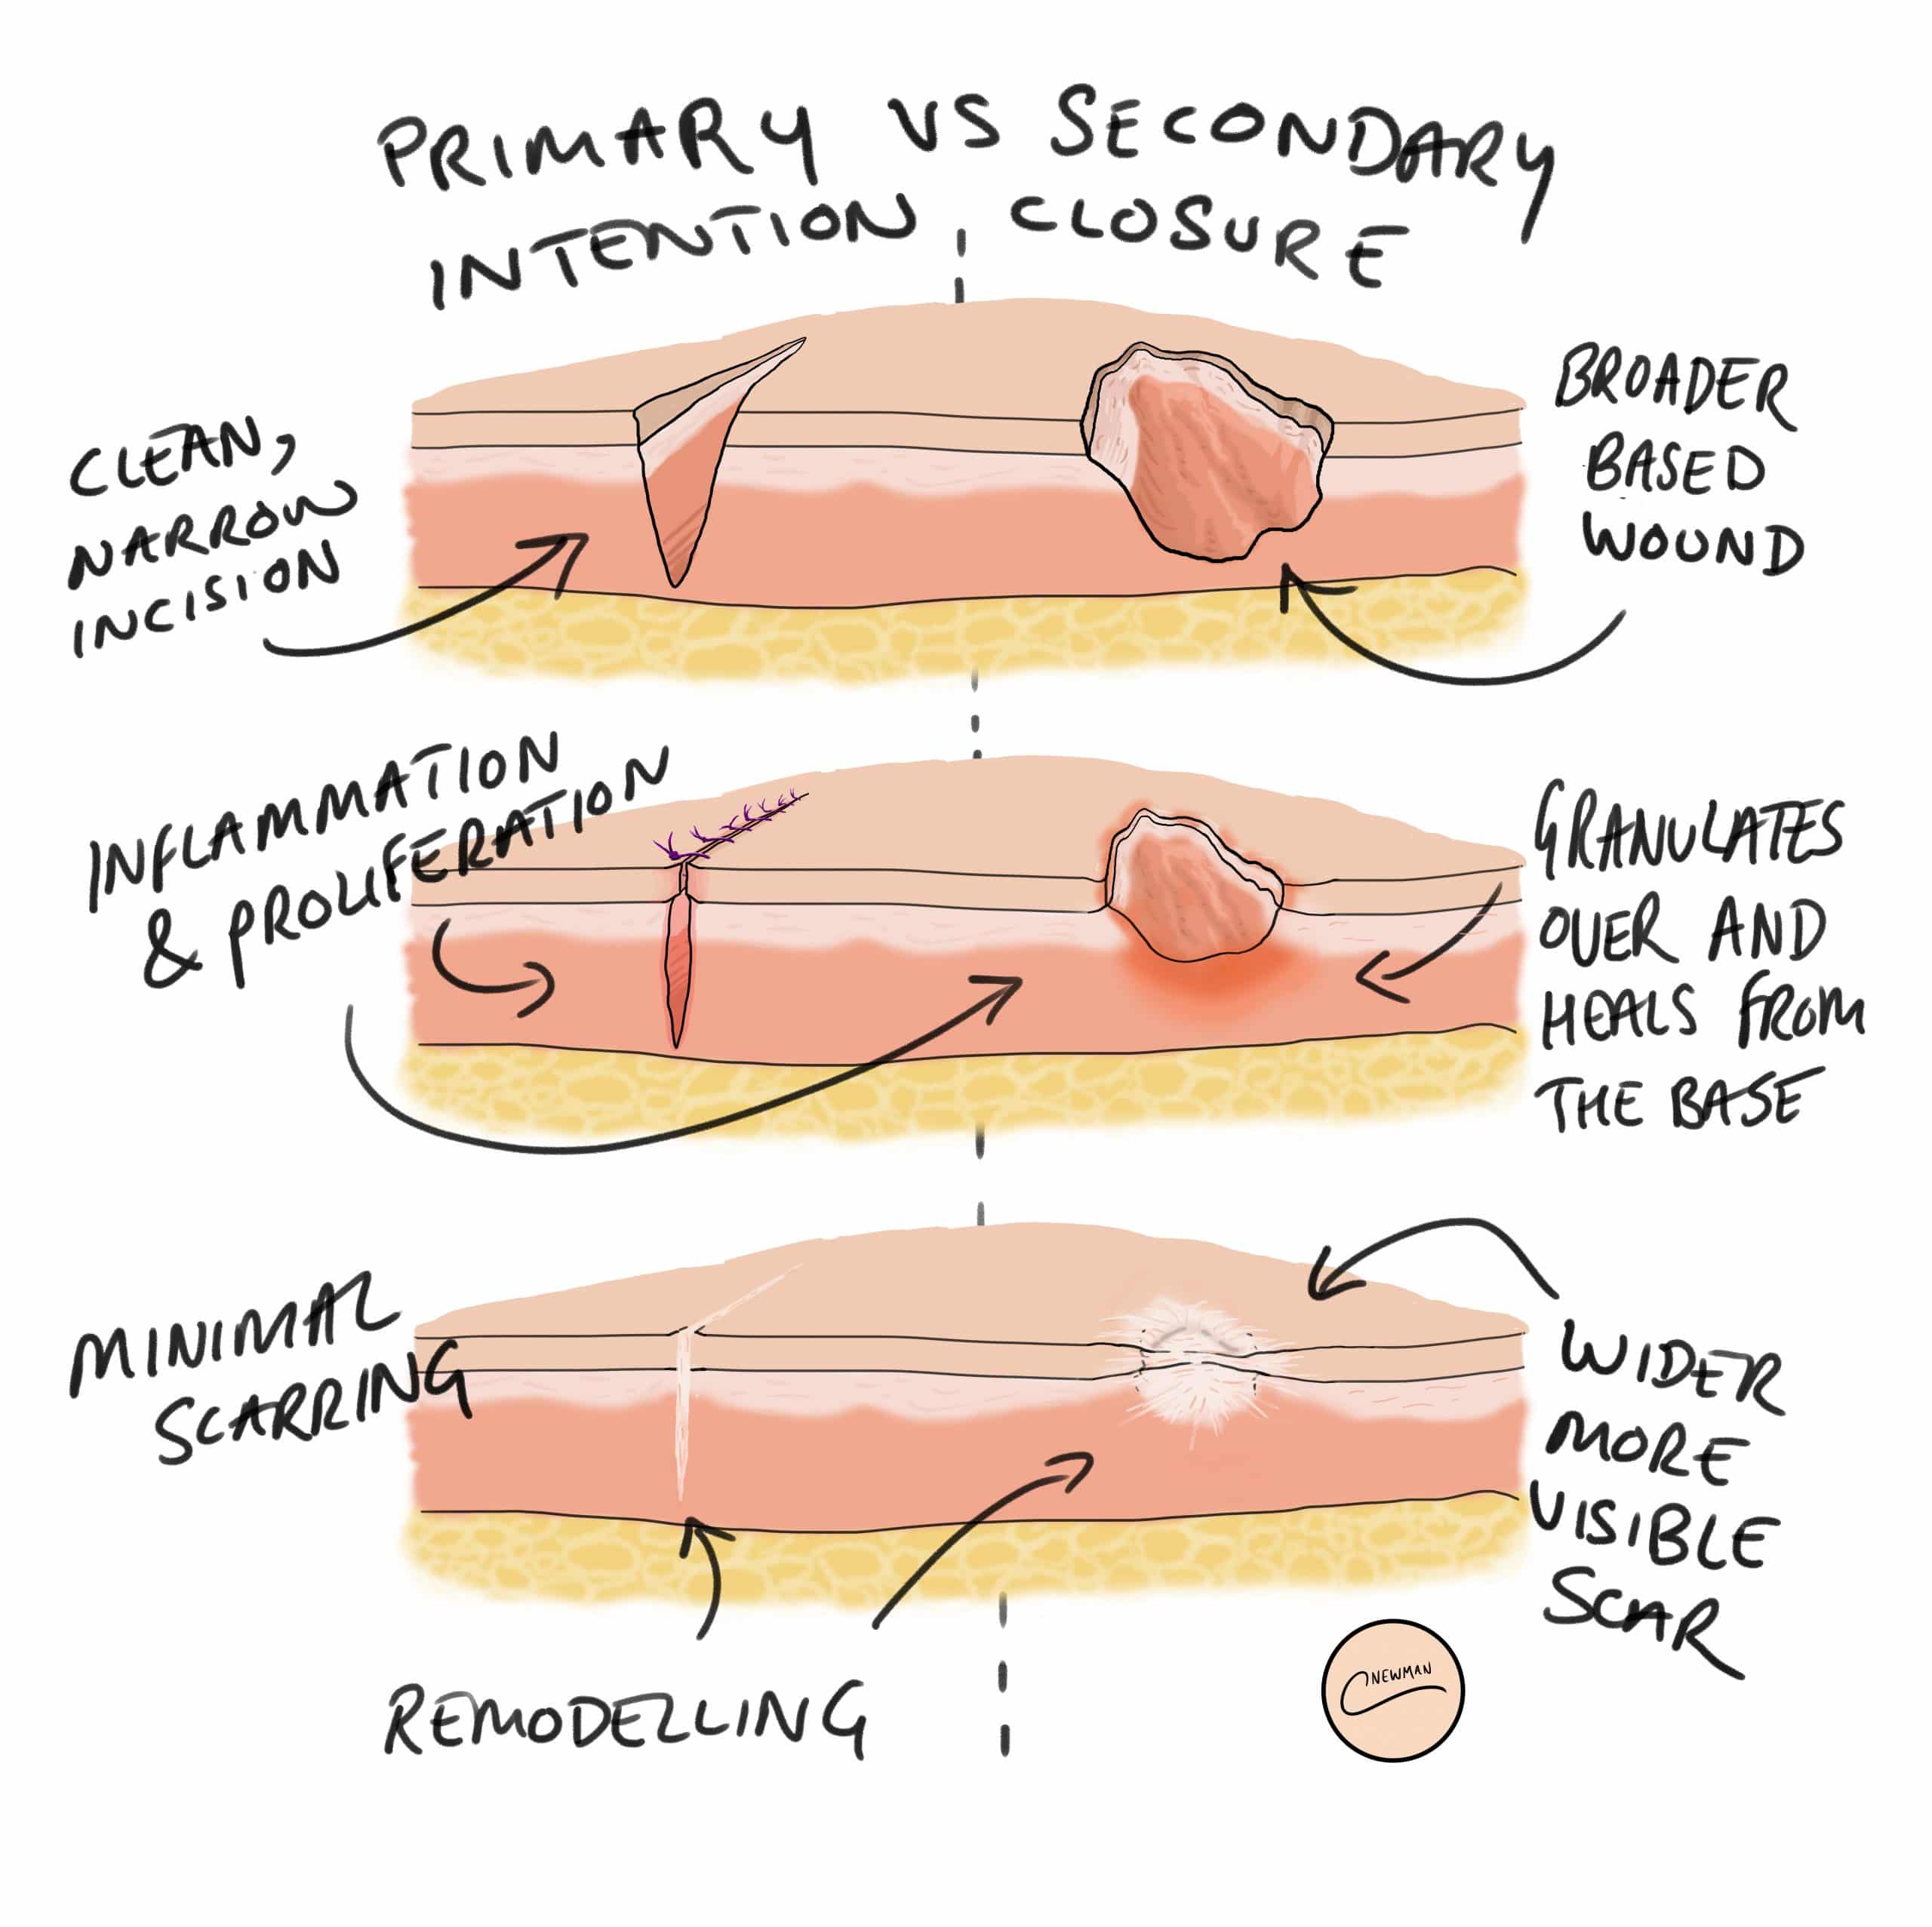

| Intention | Definition | Example | Outcome |
|---|---|---|---|
| Primary | Wound edges apposed and sutured immediately | Surgical incision, clean laceration | Minimal scarring, fastest healing |
| Secondary | Wound left open; heals from base by granulation | Abscess cavity, pressure ulcer, infected wound | Wider scar, slower healing |
| Tertiary (Delayed Primary) | Wound cleaned, left open 4-5 days, then sutured | Contaminated traumatic wound, bite wounds | Reduces infection risk; wider scar than primary |
CLASSIFICATION 5 — Burn Wounds (Special Category)
Burns are a distinct wound type classified by depth of tissue destruction.
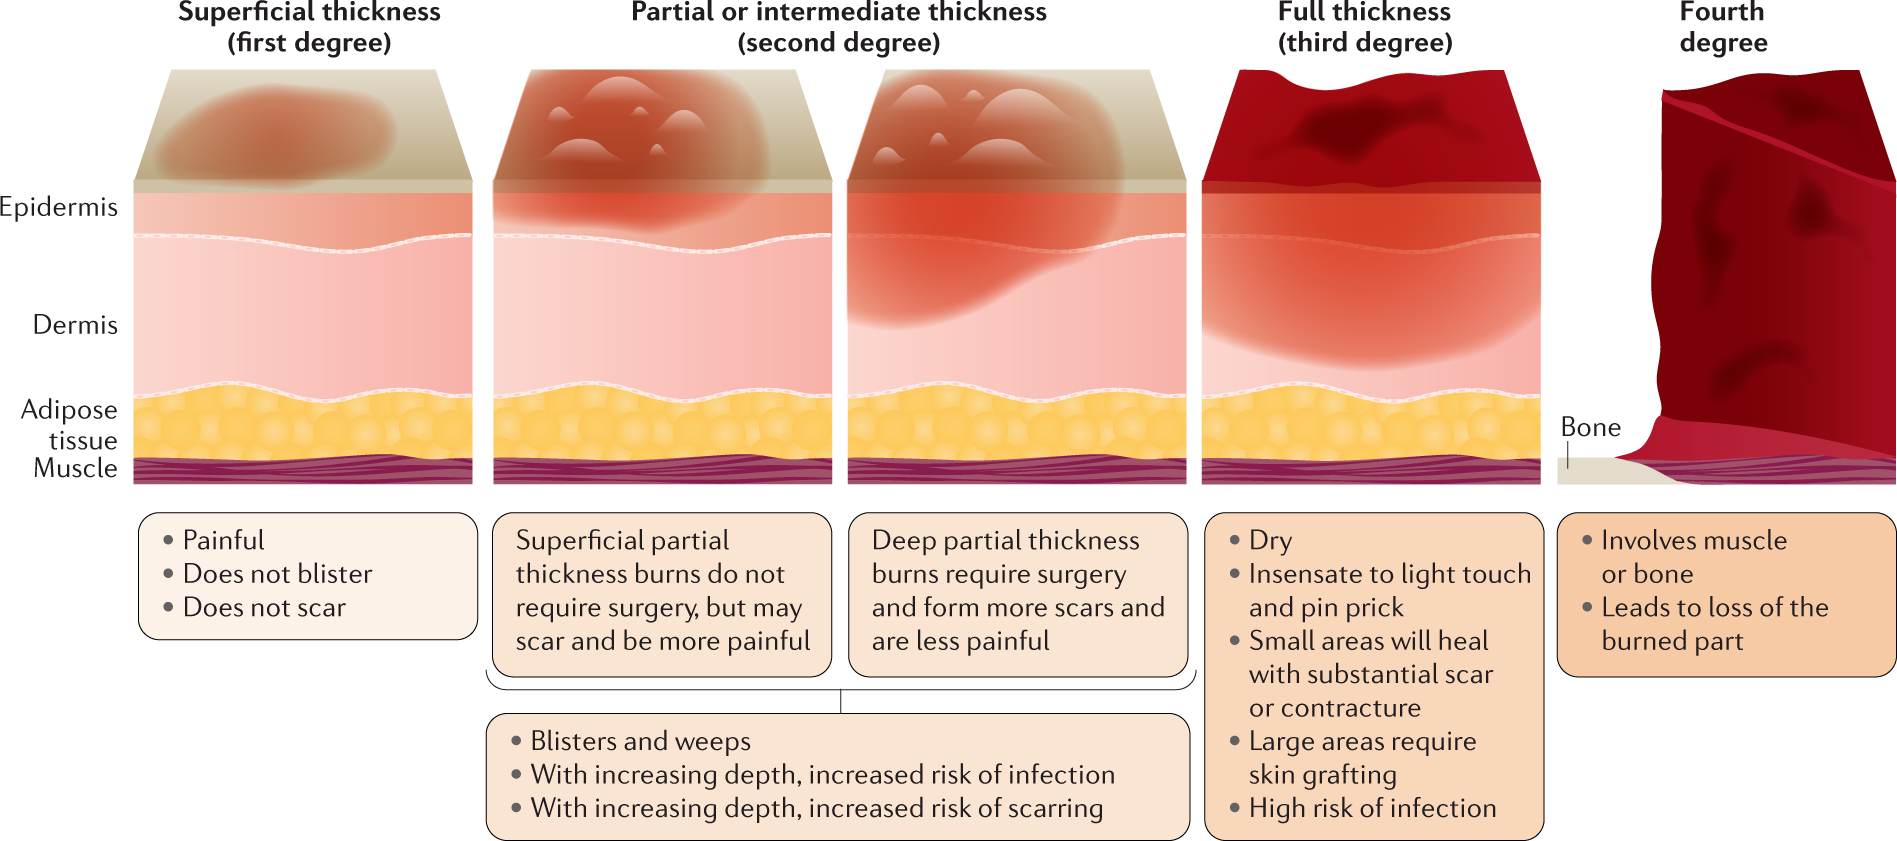
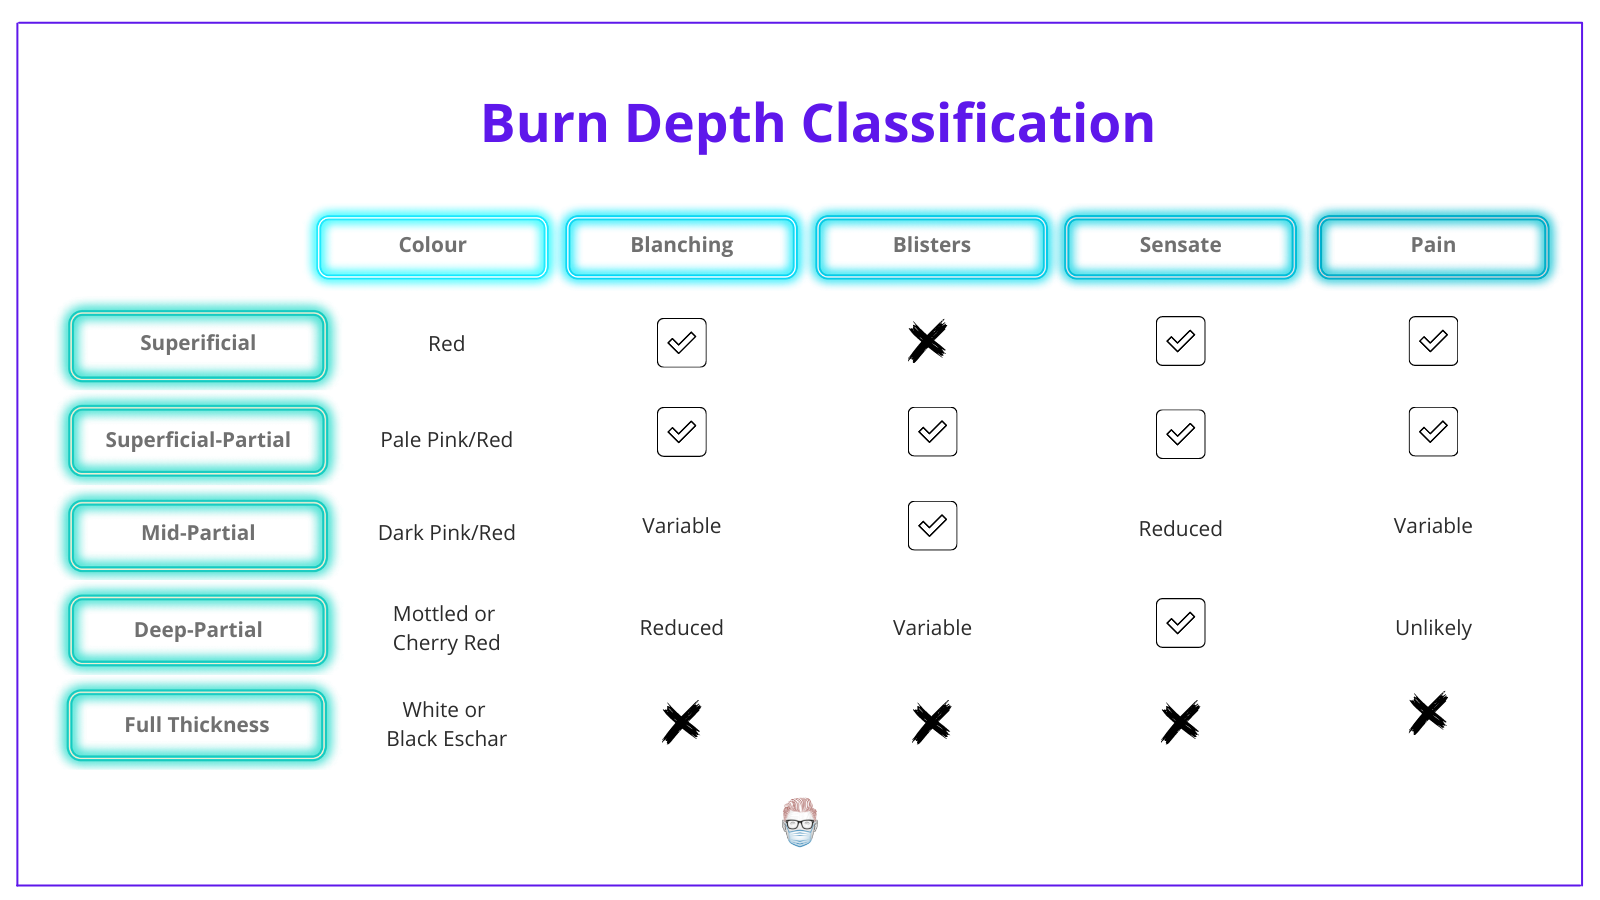
| Degree | Depth | Appearance | Pain | Blisters | Heals |
|---|---|---|---|---|---|
| Superficial (1st) | Epidermis only | Red, dry | Painful | No | 3-7 days, no scar |
| Superficial partial (2nd) | Epidermis + superficial dermis | Pale pink/red, moist | Very painful | Yes | 7-14 days, minimal scar |
| Deep partial (2nd) | Epidermis + deep dermis | Mottled/cherry red | Reduced pain | Variable | >21 days, significant scar; often needs grafting |
| Full thickness (3rd) | All skin layers | White/brown/black eschar | Painless (nerve destruction) | No | Cannot self-heal; requires skin grafting |
| 4th degree | Skin + muscle/bone | Charred, black | Painless | No | Loss of part; amputation may be needed |
Source: Pye's Surgical Handicraft, 22nd ed.; Burn Classification, StatPearls
Summary: Quick Reference
WOUND
├── OPEN (skin broken)
│ ├── Abrasion → friction, surface
│ ├── Incised → sharp, clean edges
│ ├── Lacerated → blunt, ragged edges
│ ├── Puncture → deep, narrow entry
│ ├── Penetrating → enters body cavity
│ ├── Avulsion → tissue torn off
│ └── Burn → heat/chemical/electrical
│
└── CLOSED (skin intact)
├── Contusion → bruise
├── Hematoma → blood collection
└── Crush injury → devitalized tissue
SURGICAL CLASS → I (Clean) → II → III → IV (Dirty-Infected)
HEALING → Primary → Secondary → Tertiary intention
This is a shared conversation. Sign in to Orris to start your own chat.