
Steps of proximal humerus PHILOS plating
PHILOS plate proximal humerus fracture surgical technique
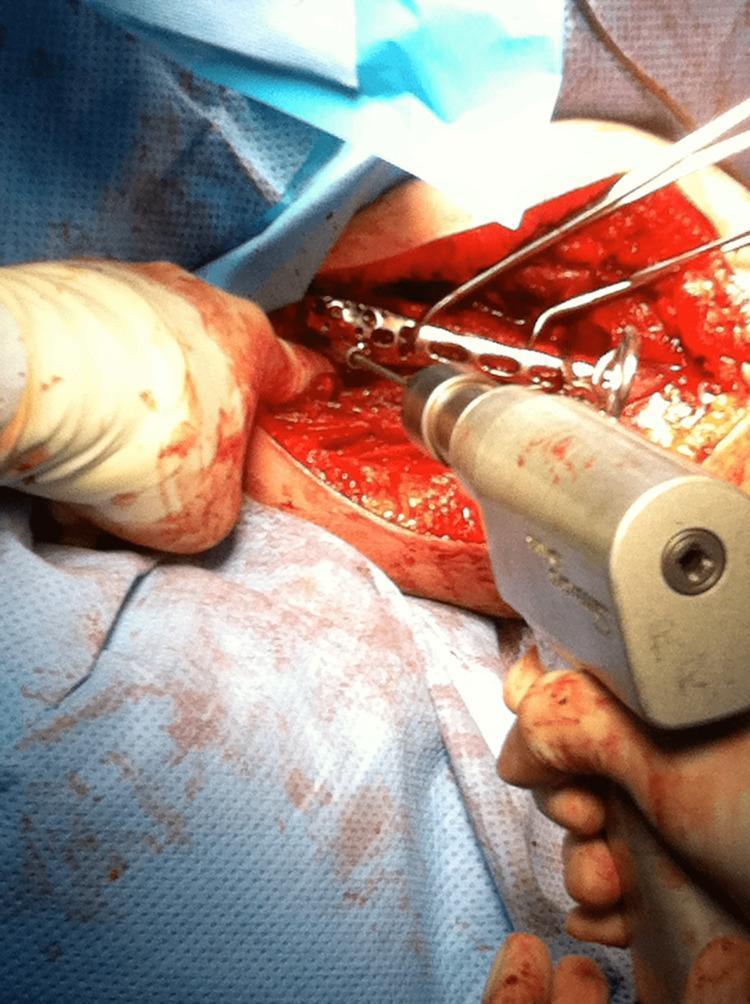
This intra-operative clinical photograph captures a surgical procedure for proximal humeral fracture fixation. The image demonstrates the placement of a PHILOS (Proximal Humeral Interlocking System) plate onto the humerus via a deltopectoral approach. A metallic, multi-hole anatomical locking plate is positioned against the bone, and a surgical power drill is seen in the foreground, perpendicular to the plate, engaged in drilling or screw insertion. Retractors are utilized to maintain visualization of the surgical field, which shows exposed muscle and bone tissue with some surgical hemorrhage. A surgeon's gloved hand is visible, stabilizing the area. The educational focus is on the orthopedic technique of internal fixation and the intra-operative application of locking compression plates for complex humeral fractures.
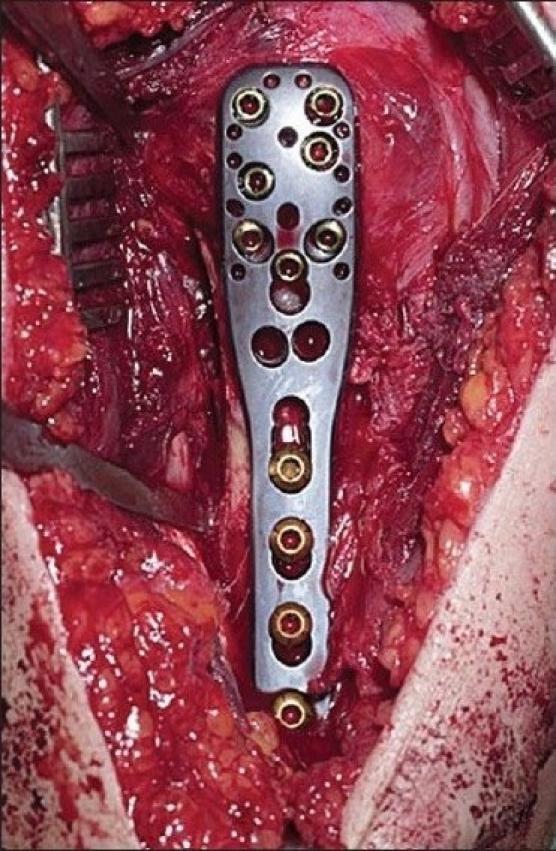
This clinical photograph captures an intraoperative view of an orthopedic surgical procedure for a proximal humerus fracture. The primary focus is a silver-toned Proximal Humeral Interlocking System (PHILOS) plate securely fixed to the bone. The plate features an anatomically shaped widened head at the proximal end, containing multiple multidirectional locking screw holes to support the articular surface. Several locking screws are visible within these proximal holes, oriented at convergent and divergent angles. The distal portion consists of a narrower shaft containing vertical rows of screw holes, where bicortical locking screws are seen fixing the plate to the humeral diaphysis. The surrounding surgical field demonstrates a deltopectoral approach with retracted soft tissues, exposing deep musculature and fatty tissue. Surgical retractors are visible at the periphery, maintaining the operative window. This image serves as an educational tool for demonstrating internal fixation techniques, the configuration of specialized locking plates, and surgical anatomy during fracture management in orthopedic surgery.
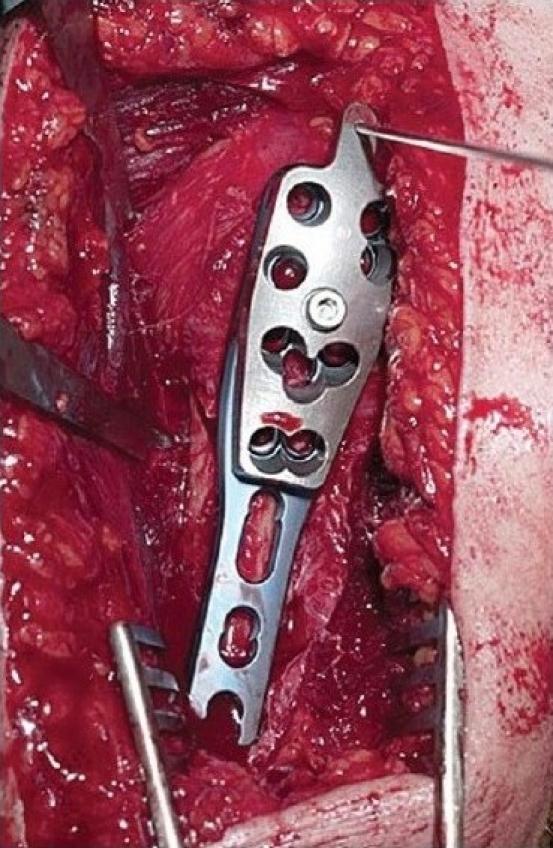
This clinical photograph shows an intraoperative view of an orthopedic surgical procedure, specifically the fixation of a proximal humerus fracture using a PHILOS (Proximal Humeral Internal Locking System) plate. The surgical site is exposed via a deltopectoral approach, revealing red muscle fibers and deep soft tissue. A metallic locking plate is positioned vertically against the bone. The proximal part of the plate is wider, featuring multiple circular screw holes for multi-directional locking in the humeral head, while the distal shaft is narrower with elongated slots. A thin metallic guide wire is inserted through a hole at the top of the plate to establish the correct implant height and orientation, preventing subacromial impingement. Surgical retractors are visible at the bottom and sides of the wound, maintaining exposure. The image demonstrates key steps in orthopedic trauma surgery: fracture reduction, plate positioning, and the use of temporary k-wires for anatomical alignment before definitive screw fixation.
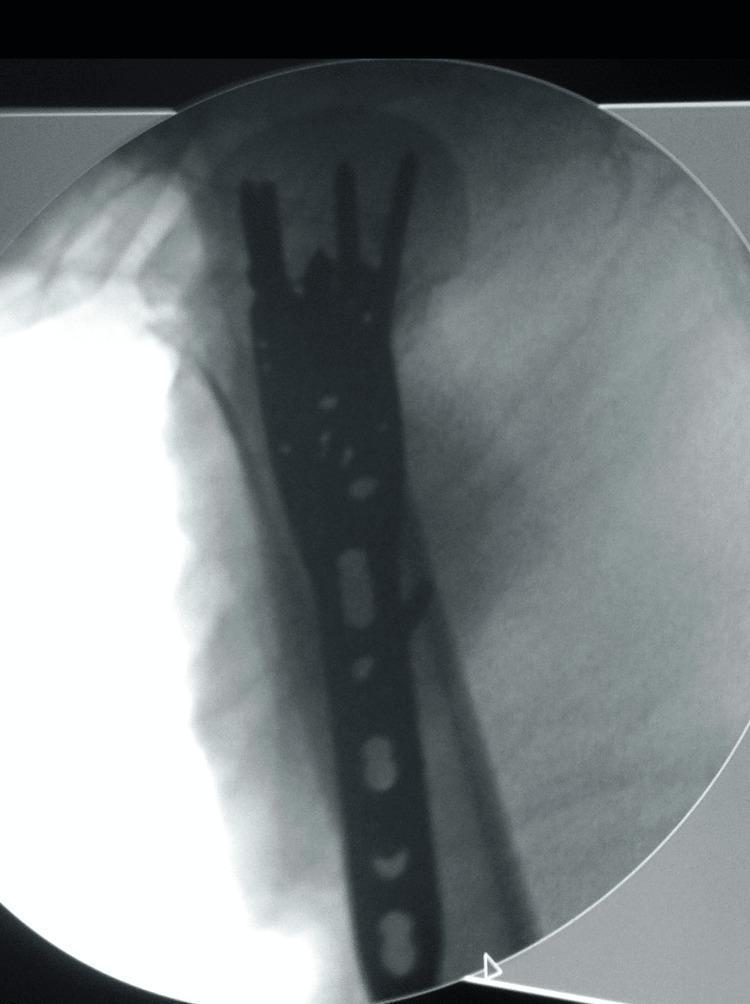
This intra-operative radiograph (fluoroscopy) demonstrates the surgical fixation of a proximal humeral fracture using a PHILOS (Proximal Humeral Interlocking System) plate. The image shows the radiopaque metallic plate positioned along the lateral aspect of the proximal humerus. The proximal portion of the plate is wider and contoured to fit the greater tuberosity, featuring multiple screw holes directed into the humeral head to provide multidirectional stability. Several locking screws are visible, penetrating the humeral head to secure fracture fragments. The distal shaft of the plate is narrower, following the humeral diaphysis, and contains several longitudinal slotted holes (combislots) for both compression and locking screws. The plate-bone interface shows close apposition, indicating proper reduction and hardware placement. This visual is typical of orthopedic trauma surgery, specifically for treating displaced proximal humerus fractures, aiming to preserve the vascularity of the humeral head while providing stable internal fixation for early mobilization.
PHILOS plate proximal humerus surgical technique steps deltopectoral approach
https://www.oslo-universitetssykehus.no/4ad681/contentassets…
PHILOS Plating for Proximal Humerus Fractures - Surgical Steps
Indications
- Displaced 2-, 3-, and 4-part proximal humerus fractures (Neer classification)
- Fractures in osteoporotic bone
- Pseudarthrosis and osteotomies of the proximal humerus
- PHILOS Long: fractures extending into the shaft or with no medial support
Step 1: Patient Positioning
- Beach chair (barber chair) position - trunk at approximately 70° from horizontal
- Position the patient laterally on the table so the entire arm is free for manipulation
- Leave the elbow unsupported to use gravity for fracture reduction
- Confirm AP and axial fluoroscopic views of the proximal humerus can be obtained before draping
- A small C-arm with sterile cover brought from the surgical side is preferred by many surgeons
Rockwood and Green's Fractures in Adults, 10th Ed 2025, p. 1365
Step 2: Approach
Deltopectoral Approach (preferred for most cases)
- Identify landmarks: coracoid process proximally, proximal humeral shaft at axilla level
- 12-14 cm skin incision from coracoid to proximal humeral shaft (straight or curved)
- Expose the deltopectoral groove - identified by the cephalic vein and surrounding fat
- Retract the cephalic vein laterally (preferred, respects venous drainage) or medially; preserve it to reduce postoperative limb edema
- Bluntly dissect between deltoid and pectoralis major down to the clavipectoral fascia
- Incise the clavipectoral fascia lateral to the conjoined tendon and inferior to the coracoacromial ligament
- Retract deltoid laterally (Hohmann/delta retractor) and conjoined tendon medially (Langenbeck retractor)
- Expose the proximal humerus - confirm landmarks: subscapularis, lesser tuberosity, bicipital groove with biceps tendon, greater tuberosity
- Resect hemorrhagic bursa as needed
- Identify and protect the axillary nerve (runs 5-7 cm below acromion, in the deep deltoid layers)
Note: Deltoid-splitting approach is favored by many when greater tuberosity management is the primary challenge; it gives superior access to the greater tuberosity.
Step 3: Fracture Exposure and Traction Suture Placement
- Resect the bursa covering the tuberosities and rotator cuff
- Identify fracture planes and clean hematoma, interposed soft tissue, and small fragments
- Assess rotator cuff for tears and bone quality of fragments
- Place traction sutures through the rotator cuff (perpendicular to fiber orientation, close to cuff attachment):
- 1-2 sutures in the subscapularis (lesser tuberosity)
- 1 suture in supraspinatus (greater tuberosity)
- 1 suture in infraspinatus (greater tuberosity)
- These sutures serve dual purpose: fracture mobilization (joysticks) and later tuberosity fixation
Rockwood and Green's, p. 1366
Step 4: Fracture Reduction
Head Fragment Reduction (varies by fracture pattern):
- Varus/posteromedial fractures: Insert K-wires into humeral head at steep angle to use as joysticks to lever the head back into valgus/anatomic position
- Valgus fractures: Use a periosteal elevator inserted at the fracture site to reduce the impacted head
- Surgical neck fractures: Apply traction and rotation to the shaft; the shaft typically translates anteromedially and needs to be pulled out laterally
Provisional Fixation of Head:
- Fix reduced head to shaft with threaded 1.6-1.8 mm K-wires introduced from the anterolateral aspect of the head to the posterolateral diaphysis (positioned so they do NOT interfere with plate placement)
- Verify reduction quality under fluoroscopy
- Add bone graft/structural graft at areas of bone void at this stage (before tuberosity reduction blocks access)
- Consider calcar screw or calcar support augmentation in varus-posteromedial patterns
Step 5: Tuberosity Reduction and Fixation
- The locking plate will be positioned over the greater tuberosity - so tuberosity must be reduced first
- Use the traction sutures to reduce the greater tuberosity: tie subscapularis sutures to infraspinatus sutures in a cross pattern
- Goal: place tuberosities under the head to capture and support it
- Vertical sutures through cortical perforations in the shaft and through the rotator cuff may augment fixation if needed
Rockwood and Green's, p. 1369
Step 6: Plate Insertion and Positioning
- Insert plate using the PHILOS aiming device along the lateral side of the humerus
- Critical height rule: Superior border of the plate must be placed at least 5 mm below the superior edge of the greater tuberosity to prevent subacromial impingement
- But also high enough so the lower locking screws support the calcar region (reduces varus collapse)
- The plate should be positioned so screws will engage the humeral head in multiple points
- Use the biceps tendon as a rotational landmark for correct anterior positioning (medial edge of plate sits just posterior to the bicipital groove)
- Provisional fixation: Insert a non-locking screw through the oblong/elongated hole (combislot) in the metadiaphyseal region - this allows fine-tuning of plate position
- Confirm plate height and position under fluoroscopy in AP and axial views
Synthes PHILOS Technique Guide; Rockwood and Green's, p. 1370
Step 7: Shaft Fixation
- Once plate position is confirmed, lock the plate to the shaft
- Insert at least 2-3 locking screws into the diaphyseal portion
- Use longer plates with more screws in:
- Severe osteoporosis
- Fractures with significant shaft extension
Step 8: Humeral Head Screw Fixation
- All head screws are locking screws only
- Use the aiming device - insert outer sleeve into desired hole
- Predrill only the lateral cortex with the drill bit with stop (do NOT drill through the full head)
- Measure screw length using the length probe - push until increased bone density is felt (subchondral bone)
- Subtract 4 mm from measured length (6 mm if cement augmentation planned) to avoid articular penetration after fracture settling
- Insert and lock the screw to the plate
- Repeat for all required holes (typically 5-9 screws depending on fracture complexity and bone quality)
- Poor bone quality: Introduce as many screws as possible into the humeral head for an angular stable construct
- Verify under fluoroscopy in multiple planes that no screw tips are intra-articular
Rockwood and Green's, p. 1370
Step 9: Calcar Screw (Critical Step)
- Insert a calcar screw (inferomedial locking screw) directed toward the medial cortex of the humeral head
- This supports the posteromedial calcar and dramatically reduces varus collapse
- The "tip-apex distance" equivalent in proximal humerus: ensure calcar screw engages dense posteromedial bone
- Available in most modern PHILOS plate versions as a dedicated calcar hole
Step 10: Suture Fixation of Rotator Cuff/Tuberosities to Plate
- Pass the traction sutures through the suture attachment holes in the PHILOS plate (10 holes are specifically designed for this)
- Tie sutures to counteract deforming rotator cuff forces
- This augments tuberosity reduction and provides secondary stability
Step 11: Selective Cement Augmentation (when indicated)
- Recommended for patients >70 years or women >65 with low-energy fractures or confirmed osteoporosis
- Use low-viscosity, slow-curing acrylic cement through cannulated locking screws
- First inject 2-3 cc of iodinated IV contrast through selected screws and confirm no intra-articular leakage under fluoroscopy
- Then inject ~5 cc cement per screw (typically 3 central screws) under continuous fluoroscopic guidance
- Increasing pressure forces cement into the cancellous bone of the humeral head
Rockwood and Green's, p. 1370
Step 12: Final Fluoroscopic Check
- Check in multiple arm positions: AP, scapular Y, axillary lateral views
- Confirm:
- Adequate anatomic reduction
- Correct plate height (no impingement)
- No screw tips intra-articular
- Medial support/calcar adequately fixed
- Check for screw tip penetration by rotating the arm under fluoroscopy
Step 13: Closure
- If biceps tenodesisis indicated (e.g., biceps tendon disease identified), perform at this stage
- Repair deltopectoral interval loosely (do not close tight)
- If pectoralis major or deltoid insertions were released, repair to soft tissue, bone, or each other
- Irrigate wound thoroughly
- Layered closure over a drain
Step 14: Aftercare
- Arm sling for comfort immediately postoperatively
- Pendulum exercises begin Day 1
- Passive ROM begins at 1-2 weeks
- Active-assisted ROM at 4-6 weeks (once radiographic callus confirmed)
- Full active ROM and strengthening at 3 months
Intraoperative Images
Key Pitfalls to Avoid
| Error | Consequence | Prevention |
|---|---|---|
| Plate placed too high | Subacromial impingement | Keep >5 mm below GT apex |
| Too long screws | Secondary intra-articular penetration | Subtract 4-6 mm from measured length |
| No calcar screw | Varus collapse | Always insert inferomedial locking screw |
| Varus reduction | Hardware failure, AVN | Restore neck-shaft angle (130-135°) |
| Axillary nerve injury | Deltoid paralysis | Identify and protect before retraction |
| Medial hinge disruption | Loss of blood supply, AVN | Preserve periosteum medially |
- Rockwood and Green's Fractures in Adults, 10th Ed (2025), pp. 1362-1371 - Internal Fixation Using Locking Plates
- Synthes PHILOS Technique Guide - official Synthes implantation guide
- AO Surgery Reference - Deltopectoral Approach