
What are the critical risks associated with a 50 year old person with starvation for 20 days who is showing posturing and negativism suspecting catatonia. He is started on diazepam 5 mg injection 6 hourly and IV Fluids RL and DNS and cathetorised . He has edeme of both legs and hand and creatinine of 3 with all vitals stable and potassium value of 2.3
refeeding syndrome management critical care
Critical Risk Analysis: 50-Year-Old with 20-Day Starvation + Catatonia + Multi-Organ Compromise
1. REFEEDING SYNDROME (IMMINENT, HIGHEST PRIORITY)
- Severe hypophosphatemia - the hallmark. Phosphate is already depleted after 20 days; the insulin-driven intracellular shift can drop serum phosphate precipitously.
- Worsening of hypokalemia (already at 2.3) - insulin further drives K⁺ into cells
- Hypomagnesemia - compounds cardiac arrhythmia risk
- Hypocalcemia - tetany, seizures
- Cardiac arrhythmias and sudden cardiac arrest
- Respiratory failure (diaphragm weakness from hypophosphatemia)
- Confusion, seizures, coma
- Haemolytic anaemia
- Ileus
"Refeeding syndrome is a potentially lethal condition...symptoms from electrolyte abnormalities include cardiac arrhythmias, confusion, respiratory failure, and even death." - Schwartz's Principles of Surgery, 11e
"Underlying electrolyte and volume deficits should be corrected. Additionally, thiamine should be administered before the initiation of feeding. Caloric repletion should be instituted slowly." - Schwartz's, p. 126
2. SEVERE HYPOKALEMIA (K⁺ = 2.3 mEq/L) + ACUTE KIDNEY INJURY (Creatinine = 3)
Risks from K⁺ = 2.3:
- Ventricular arrhythmias (VT, VF, torsades de pointes) - ECG monitoring is mandatory
- Diaphragmatic and skeletal muscle weakness - worsens risk of respiratory failure
- Rhabdomyolysis (already suspected given prolonged immobility in catatonia + starvation)
- Further aggravation by diazepam-induced sedation (reduced respiratory drive + muscle weakness = hypoventilation)
Risk from Creatinine = 3 (AKI):
- Potassium correction must be done very cautiously. In AKI, the kidneys cannot excrete excess potassium. However, at K⁺ = 2.3, replacement is needed - but over-replacement risks fatal hyperkalemia as renal function fluctuates.
- AKI in this context is likely pre-renal/intrinsic due to volume depletion from 20 days of starvation, muscle breakdown (rhabdomyolysis), and possibly RL fluids insufficient for the degree of depletion.
- RL (Ringer's Lactate) contains 4 mEq/L of K⁺ - appropriate over DNS, but rate and total load need monitoring given the AKI.
- Fluid overload risk: the bilateral leg and hand oedema suggests third-spacing or hypoalbuminaemia from starvation malnutrition, not volume excess per se - yet aggressive fluids in AKI can worsen pulmonary oedema.
"Oliguric renal failure requires close monitoring of serum potassium levels...should be instituted early, including consideration of early hemodialysis." - Schwartz's, p. 126
3. DIAZEPAM RISKS IN THIS CLINICAL CONTEXT
Preferred agent concern:
- The preferred benzodiazepine for catatonia per evidence is lorazepam (not diazepam), due to its shorter half-life and lack of active metabolites.
- Diazepam has a very long half-life (20-100 hours) and its active metabolite desmethyldiazepam (half-life 36-200 hours) accumulates.
In the context of AKI and starvation:
- Protein binding is reduced (hypoalbuminaemia from starvation) → higher free fraction → more sedation than expected per dose
- Drug accumulation with 6-hourly dosing: by day 3-4, plasma levels may be 3-4x the initial level
- One case of interstitial nephritis with diazepam in chronic renal failure is documented (Maudsley Prescribing Guidelines, 15e)
Respiratory risk:
- The patient already has muscle weakness from starvation + hypokalemia
- Diazepam causes central respiratory depression
- Combined with these factors: high risk of respiratory failure and need for intubation
IV Propylene glycol (PGS) toxicity:
- Diazepam injection contains propylene glycol as solvent
- With repeated high-dose IV dosing (every 6 hours), propylene glycol accumulates especially in renal failure
- Causes: metabolic acidosis (raised anion gap), renal tubular toxicity, worsening AKI
"Benzodiazepine monotherapy is the treatment of choice for stupor occurring in the context of affective and conversion disorders. There is most clinical experience with lorazepam." - Maudsley Prescribing Guidelines, 15e, p. 179
4. OEDEMA: CAUSE AND RISK
- Hypoalbuminaemia from 20 days starvation (main cause) - third-spacing of fluids
- Renal retention from AKI (creatinine = 3)
- Possibly early cardiac decompensation if the electrolyte abnormalities are causing subclinical cardiac dysfunction
- They worsen hypokalemia (K⁺ already at 2.3)
- They can worsen AKI (further reduce renal perfusion)
- Use only if frank pulmonary oedema develops
5. CATATONIA-SPECIFIC RISKS
- Aspiration pneumonia - the catatonic posturing, negativism, and inability to eat/swallow places the airway at risk. The catheterisation confirms loss of voluntary function. With current position maintenance, secretions pool.
- DVT/PE - 20 days of immobility + dehydration = very high risk of deep venous thrombosis. Pulmonary embolism in a compromised patient could be fatal.
- Pressure ulcers - prolonged posturing damages skin over bony prominences.
- Malignant catatonia - if hyperthermia, autonomic instability, or elevated CK develops, this escalates to a neuroleptic malignant syndrome-like emergency requiring ICU care, and benzodiazepines alone may be insufficient.
- Worsening of AKI from rhabdomyolysis - sustained muscle rigidity/posturing causes myoglobinuria, which directly damages renal tubules.
6. DNS (Dextrose Normal Saline) - SPECIFIC CONCERNS
| Problem | Mechanism |
|---|---|
| Triggers refeeding syndrome | Dextrose load → insulin surge → electrolyte shifts |
| Worsens hypokalemia | Insulin drives K⁺ into cells |
| Hypernatremia risk | 0.9% NaCl is hypertonic relative to plasma sodium |
| Glucose load without thiamine | Risks precipitating Wernicke's encephalopathy |
| False calories | May delay proper nutritional rehabilitation |
Summary Priority Action List
| Priority | Action |
|---|---|
| 1 - Immediate | Give IV Thiamine 200 mg NOW before any further dextrose |
| 2 - Immediate | ECG - rule out hypokalemia-related QT prolongation / arrhythmia |
| 3 - Urgent | Check phosphate, magnesium, calcium, albumin, CK, LFTs, CBC |
| 4 - Urgent | Replace K⁺ cautiously (no faster than 10-20 mEq/hr); recheck frequently given AKI |
| 5 - Urgent | Stop or minimise DNS - switch to 0.9% NaCl or RL only |
| 6 - Urgent | SpO₂ monitoring + airway readiness for diazepam-induced respiratory depression |
| 7 - Monitor | Urine output hourly (catheter in place - use it to trend); AKI may need nephrology/RRT consult |
| 8 - Consider | Switch diazepam to IV lorazepam (preferred for catatonia, safer profile) |
| 9 - Consider | DVT prophylaxis (mechanical if pharmacological is high-risk given AKI) |
| 10 - Escalate | If no response to benzodiazepines in 3-5 days, escalate to ECT |
| 11 - Escalate | Nephrology consult for creatinine = 3 - plan for potential RRT |
| 12 - Escalate | ICU transfer if respiratory compromise, worsening AKI, or malignant catatonia features emerge |
When do we say catatonia not responding to benzodiazepines
catatonia benzodiazepine resistance treatment criteria
When is Catatonia Considered Not Responding to Benzodiazepines?
Step 1: The Lorazepam Challenge Test (Diagnosing AND Predicting Response)
- Give lorazepam 1-2 mg IV (0.5-1 mg in elderly/children)
- Observe for ≥50% improvement in catatonia symptoms within 5 minutes
- If no change at 5 minutes: give an additional 1-2 mg IV
- Failure to respond to this challenge does not immediately mean treatment-resistant - it may mean the diagnosis needs reconsideration (e.g., NMS, autoimmune encephalitis, malignant catatonia)
"The diagnosis can be confirmed by improvement after a challenge dose of a benzodiazepine (typically 1 to 2 mg of lorazepam IV). If no change in symptoms is noted within 5 minutes, an additional 1 to 2 mg of lorazepam can be given." - Goldman-Cecil Medicine
Note for your patient: Diazepam 5 mg IV is being used. Diazepam is effective but at 5x the lorazepam dose (so 5 mg diazepam ≈ 1 mg lorazepam). The current 5 mg 6-hourly dose is on the lower end of the effective range.
Step 2: What Constitutes an "Adequate Trial" Before Declaring Non-Response?
Phase 1 - Standard Dose: 1-2 days at lorazepam up to 4 mg/day
- Start with lorazepam 2 mg IM/IV
- Give a further 2 mg if no effect after 3 hours
- Use IM route for subsequent doses in non-cooperative patients
- If no response after 1-2 days → move to Phase 2
Phase 2 - High Dose: 1-2 days at lorazepam 8-24 mg/day (up to 30 mg/day in some protocols)
- Escalate to 6-16 mg/day in divided doses, sometimes as high as 30 mg/day
- IV lorazepam or diazepam infusion can be used here
- One protocol: IV infusion of 10 mg diazepam in 500 mL normal saline at 1.25 mg/hr until catatonia remits
- If no response after another 1-2 days → declare benzodiazepine non-response
"Many patients will respond to standard doses (up to 4 mg/day) but repeated and higher doses (between 8 and 24 mg per day) may be needed." - Maudsley Prescribing Guidelines, 15e
"The dose is further increased to 6 to 16 mg/day, and sometimes as much as 30 mg/day." - Kaplan & Sadock's Comprehensive Textbook of Psychiatry
Step 3: The Treatment Algorithm (Maudsley Prescribing Guidelines, 15e)
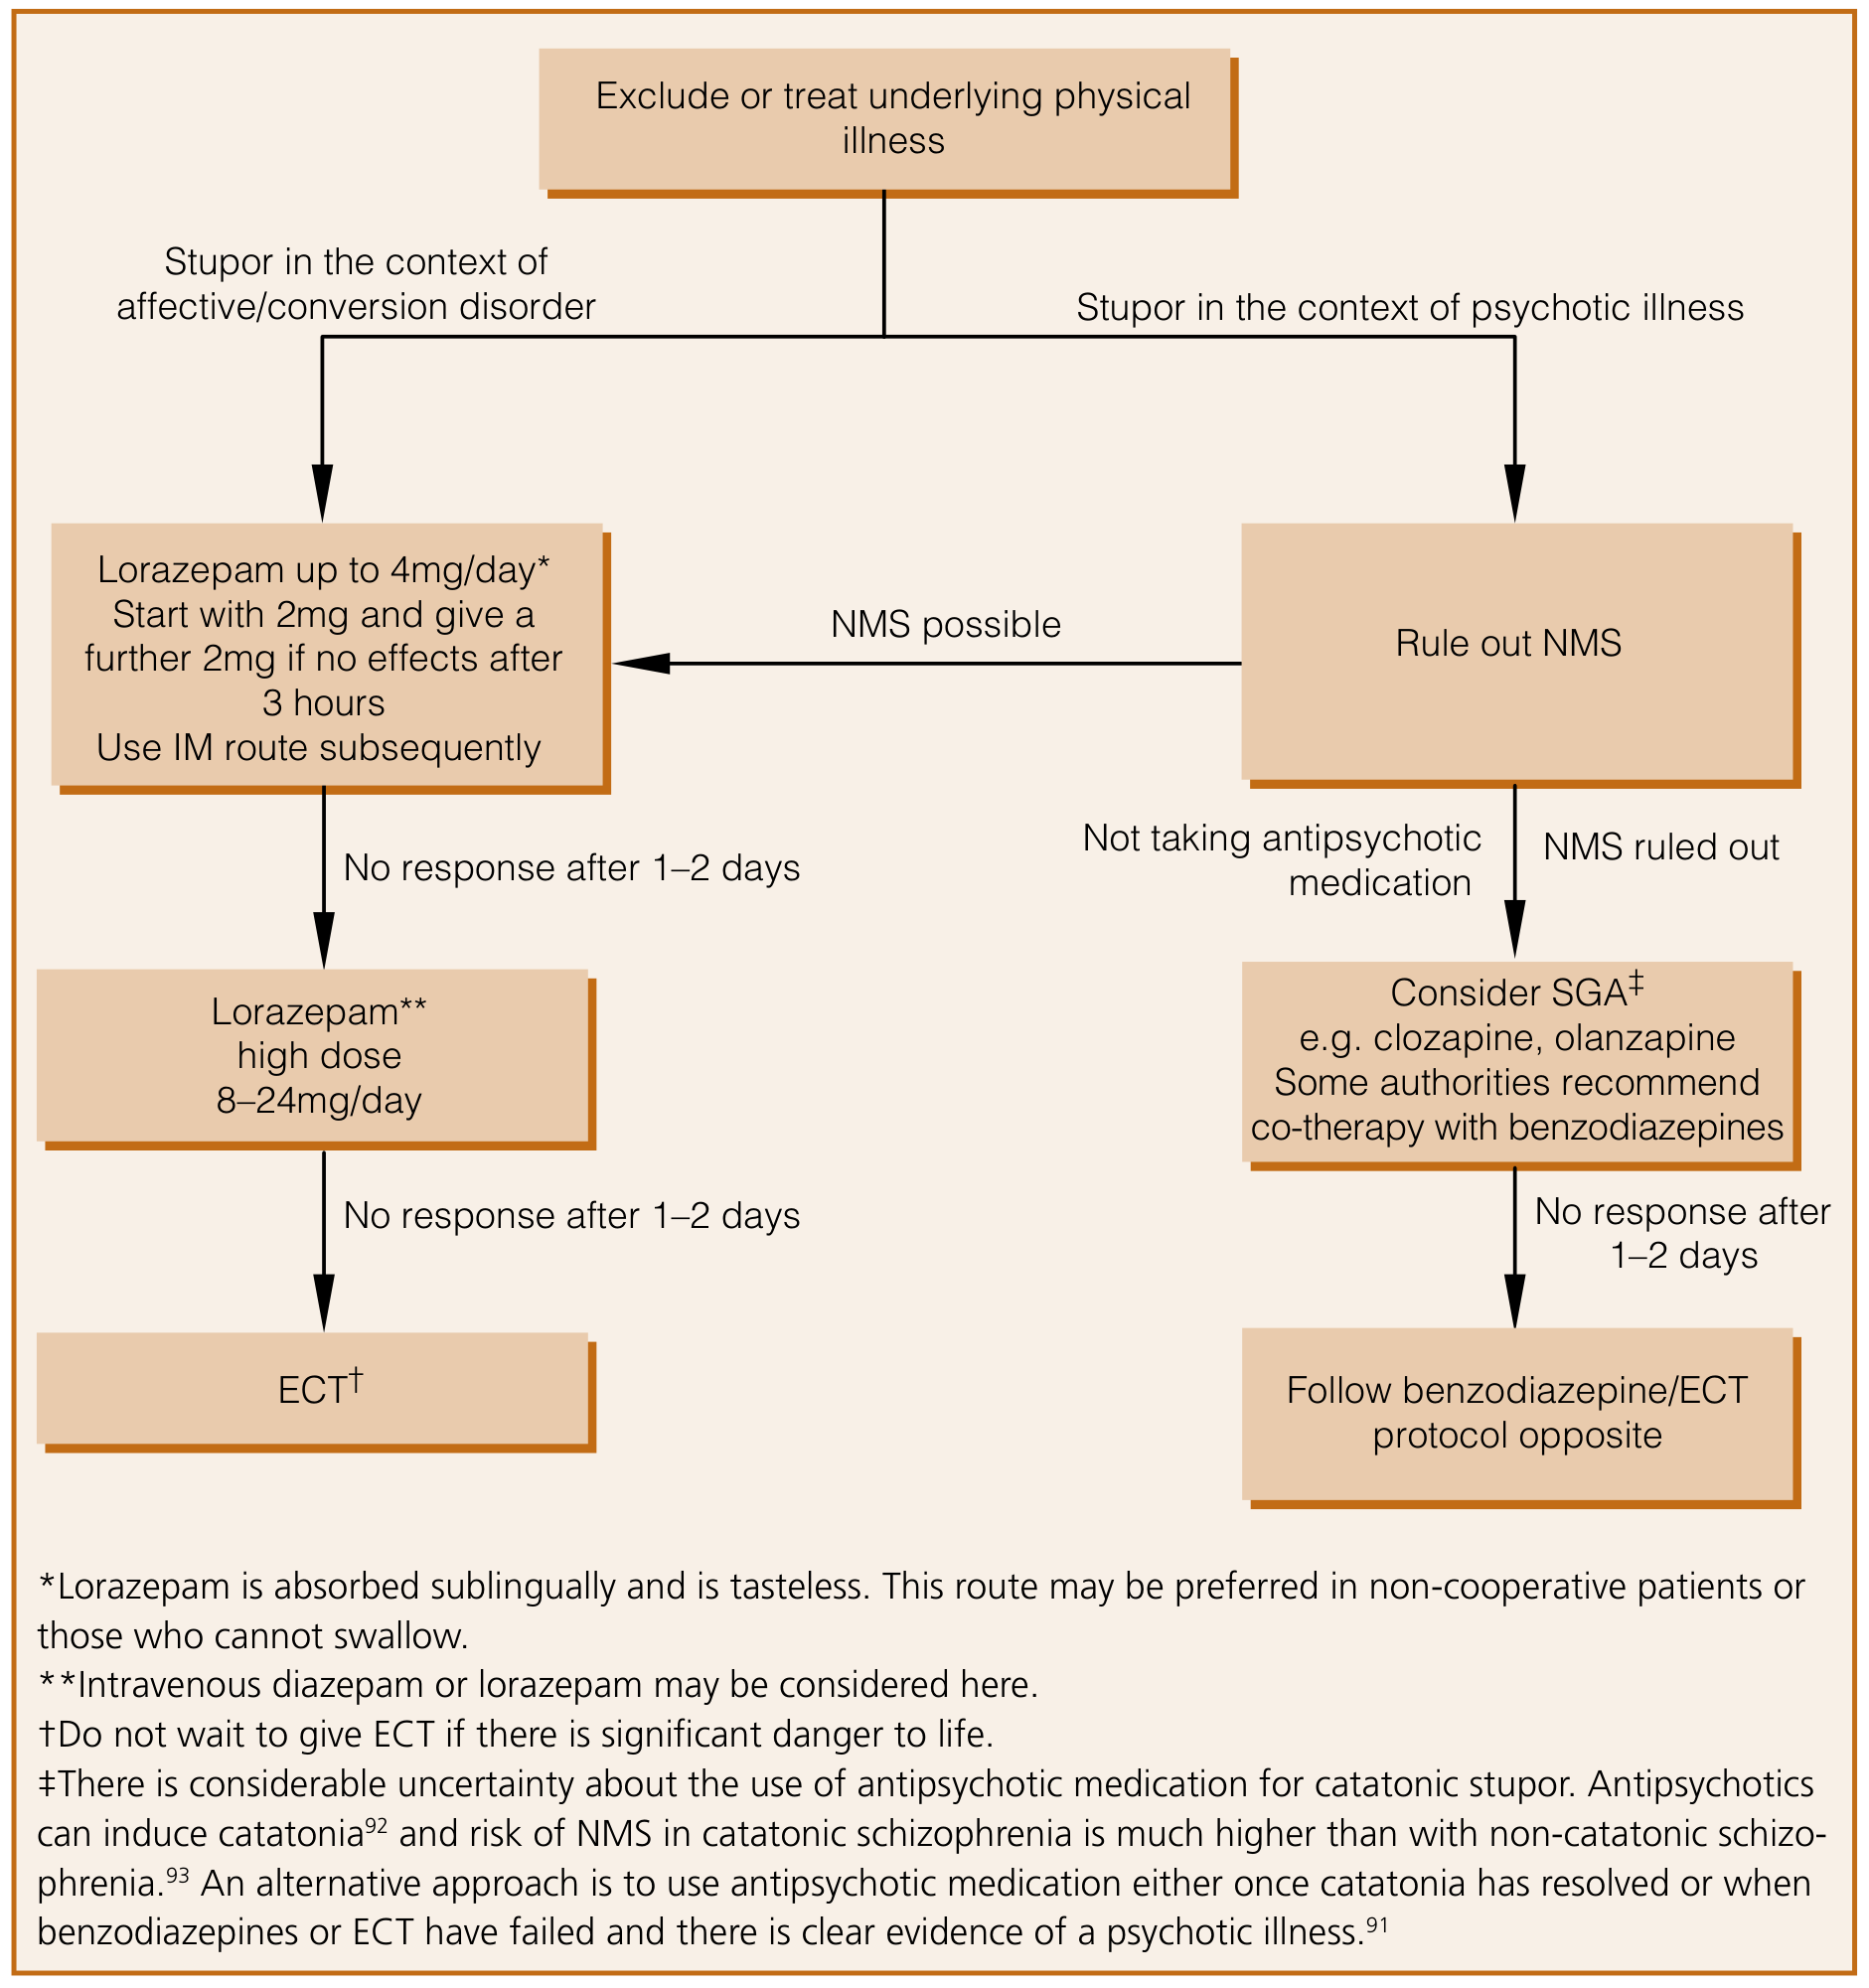
- No response after 1-2 days at standard dose → escalate to high dose (8-24 mg/day)
- No response after further 1-2 days at high dose → proceed to ECT
- In psychotic illness: first rule out NMS, consider SGA (clozapine/olanzapine), then ECT if still no response
"Do not wait to give ECT if there is significant danger to life."
Step 4: Specific Contexts That Change the Timeline
| Context | What it means |
|---|---|
| Affective/conversion disorder | Faster and more complete response expected. Non-response at 4 mg/day lorazepam in 1-2 days = early escalation |
| Catatonia in schizophrenia | Response rate only 40-50% with benzodiazepines. Lower threshold for declaring non-response; consider ECT earlier |
| Malignant catatonia (hyperthermia, autonomic instability, elevated CK) | Do not wait 3-5 days. This is life-threatening. ECT should be considered as first-line or alongside benzodiazepines immediately |
| Underlying medical cause (e.g. autoimmune encephalitis, lupus, paraneoplastic) | Benzodiazepines provide partial/no relief until the underlying cause is treated - declare non-response earlier and aggressively work up the cause |
| NMS (from antipsychotic) | Benzodiazepines alone insufficient; use dantrolene/bromocriptine; ECT for refractory cases |
"Several studies suggest a more robust response to lorazepam is more likely with a shorter duration of catatonia and waxy flexibility. Factors predicting poorer response include passivity, mutism, auditory hallucinations, marked retardation complicating schizophrenia." - Kaplan & Sadock's Comprehensive Textbook
Step 5: What to Do When Non-Response is Declared
-
ECT (Electroconvulsive Therapy) - the most evidence-based next step. Highest response rates in all forms of catatonia, including malignant. A 2024 systematic review reinforced ECT as effective and suggested it may be considered first-line in certain cases (Maudsley, 15e). In malignant catatonia: liberal stimulus dosing for well-generalised seizures.
-
Memantine 10 mg/day or Amantadine 100 mg/day (glutamate antagonists) - may be added alongside benzodiazepines to allow dose reduction while maintaining effect
-
Second-generation antipsychotics (if psychotic etiology, NMS ruled out): clozapine, olanzapine, aripiprazole - with caution (can worsen catatonia or precipitate NMS)
-
rTMS / tDCS - emerging evidence, may be considered when ECT is unavailable or refused
Applied to Your Current Patient
- If there is no meaningful improvement in 1-2 more days, this qualifies as non-response to standard dosing
- The next step would be dose escalation (increase diazepam to 10-15 mg 6-hourly, or switch to lorazepam 4-6 mg/day)
- However, given this patient's AKI (creatinine = 3), hypoalbuminaemia, respiratory risk, and propylene glycol toxicity from IV diazepam - ECT consultation should be initiated now in parallel with continued benzodiazepine therapy, rather than waiting for full non-response
- The note from Maudsley is especially relevant here: "Do not wait to give ECT if there is significant danger to life" - and this patient's overall condition qualifies
What are the excercise which can be done for back muscles and gluteal strength when I have L5 S1 disc prolapse and pirifomis syndrome. I have Dumbbells and pull Up road
L5 S1 disc prolapse piriformis syndrome safe exercises back gluteal strengthening physiotherapy
lumbar disc herniation exercise rehabilitation gluteal strengthening
lumbar disc herniation L5 S1 rehabilitation exercises piriformis gluteal
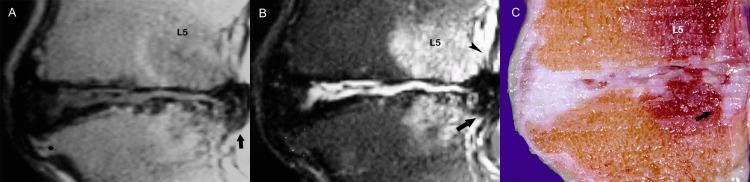
This composite figure presents a comparison of L5-S1 lumbar disc herniation across three modalities: (A) Sagittal T1-weighted MR, (B) Sagittal T2-weighted MR, and (C) an anatomical gross section. Image A shows advanced intervertebral osteochondrosis characterized by severe disc space narrowing, irregular vertebral end-plate configuration, and a prominent anterior osteophyte at the S1 level (asterisk). A posterior disc herniation is indicated by an arrow. Image B highlights the herniated segment (arrow), which demonstrates high signal intensity on T2-weighted imaging and appears to penetrate or disrupt the thin, dark line representing the posterior longitudinal ligament (arrowhead). The anatomical section in Image C provides pathological correlation, showing the structural degradation of the nucleus pulposus and the physical extrusion of disc material (arrow) into the spinal canal. This sequence illustrates the radiological-pathological correlation of degenerative disc disease and acute disc displacement in the lower lumbar spine.
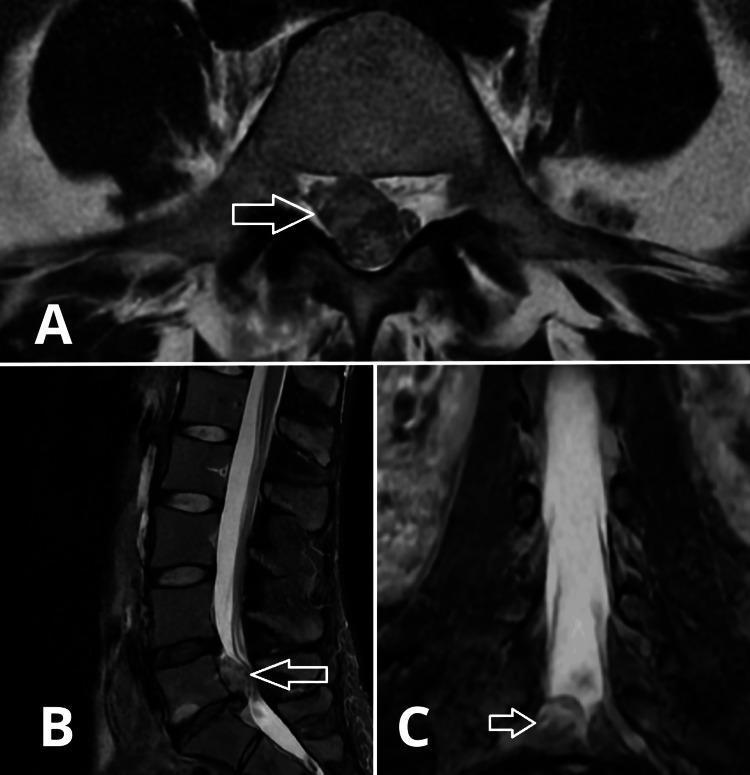
Multi-planar MRI images of the lumbar spine demonstrating a significant disc herniation at the L5-S1 level. The composite image includes axial (A), sagittal (B), and coronal (C) views. In all three projections, a large, hypointense (dark-gray) mass—indicated by white arrows—represents a cranially migrated sequestered disc fragment. In the axial view (A), the herniation is situated in the right paracentral/subarticular zone, causing significant compression of the thecal sac and narrowing of the right lateral recess. The sagittal view (B) highlights the cranial migration of the disc material posterior to the L5 vertebral body. The coronal view (C) shows the mass projecting from the right side into the spinal canal. This imaging is characteristic of lumbar radiculopathy secondary to disc sequestration. The T2-weighted appearance (high signal in the CSF) provides contrast against the low-signal disc fragment, emphasizing the degree of canal stenosis and neural element compression.
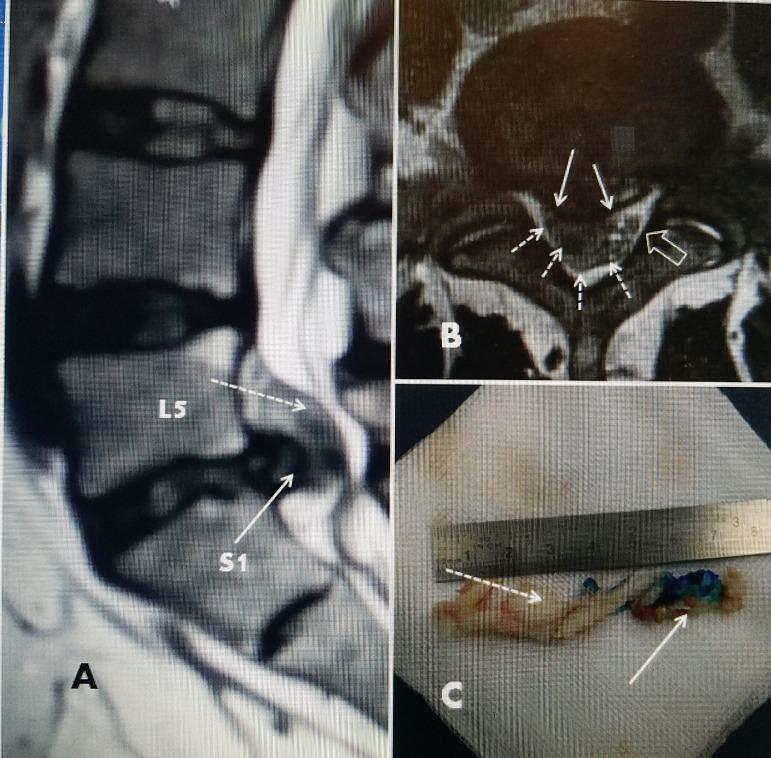
This composite educational image illustrates a large L5-S1 lumbar disc herniation through diagnostic imaging and gross pathology. Panel A is a sagittal T2-weighted MRI of the lumbar spine, demonstrating a significant posterior disc herniation at the L5-S1 level (solid arrow) with a more superiorly positioned extruded fragment (dotted arrow) causing posterior displacement of the dural sac. Panel B shows an axial MRI scan at the same level, highlighting the disc's posterior and lateral extension (solid arrow) and the surrounding extruded fragment pushing the thecal sac toward the contralateral side (open arrow). Panel C displays the surgical specimen following endoscopic discectomy. The removed material includes a portion of the nucleus pulposus stained with Indigo Carmine blue dye (solid arrow) and an attached extruded annulus fragment (dotted arrow) that had migrated into the spinal canal. A ruler in the frame indicates that the total length of the excised disc material exceeds 7 cm. This visual sequence is used to correlate radiological evidence of severe spinal canal compromise with postoperative clinical findings in neurosurgery and orthopedic pathology.
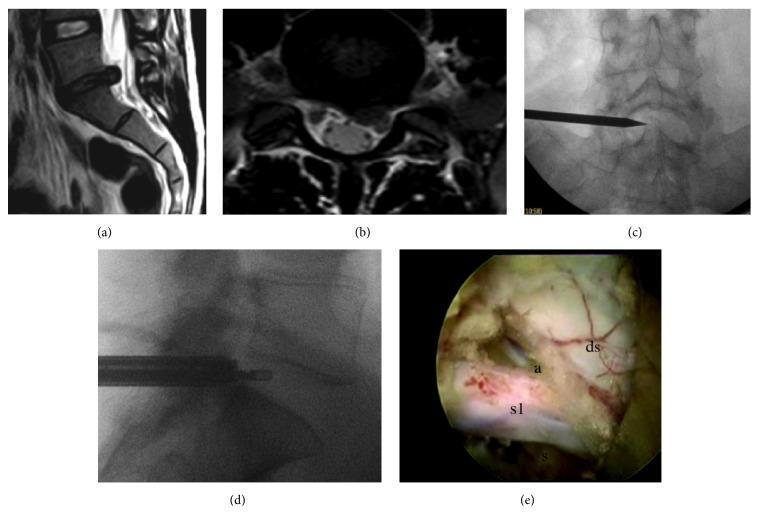
This composite figure illustrates the surgical management of a lumbar disc herniation. Panels (a) and (b) present preoperative T2-weighted sagittal and axial MRI scans, demonstrating an L5-S1 disc herniation causing significant compression of the left S1 nerve root. Panels (c) and (d) provide intraoperative fluoroscopic images of a transforaminal approach. The anteroposterior view (c) shows a surgical pointer identifying the L5-S1 interlaminar window, while the lateral view (d) depicts a radiofrequency bipolar endoscopic probe positioned within the intervertebral disc space. Panel (e) is an intraoperative endoscopic clinical photograph following discectomy. It reveals the decompressed neural structures, with clear labels for the dural sac (ds), the S1 nerve root (s1), and the root's specific anatomical landmarks: the axilla (a) and the shoulder (s). This sequence provides a comprehensive educational overview of preoperative diagnosis, intraoperative localization, and the final surgical outcome of endoscopic lumbar decompression.
Safe Exercise Guide: L5-S1 Disc Prolapse + Piriformis Syndrome
With Dumbbells and a Pull-Up Bar
Understanding the Constraints
| Condition | What to AVOID | Why |
|---|---|---|
| L5-S1 disc prolapse | Heavy axial loading, spinal flexion under load, deep squats, deadlifts | Increases posterior disc pressure, can worsen nerve root compression |
| Piriformis syndrome | External hip rotation under load, prolonged sitting, deep hip flexion | Irritates piriformis / sciatic nerve running through or adjacent to it |
| Both together | Anything that causes leg/buttock pain to shoot down (sciatica) | Neural irritation - back off immediately |
Phase 1: Foundation (Weeks 1-4) - Zero Equipment Needed
1. Prone Press-Up (McKenzie Extension)
- Lie face down, hands under shoulders
- Press up through your arms while keeping hips on the floor (like a cobra)
- Hold 10 seconds, 10 reps
- Why: Pushes disc material anteriorly away from the nerve root at L5-S1
2. Glute Bridge (most important exercise for both conditions)
- Lie on back, knees bent, feet flat
- Drive through heels, squeeze glutes, lift hips until body is straight from knees to shoulders
- Hold 3-5 seconds at the top, 3 x 15 reps
- Why: Activates gluteus maximus without spinal compression. Directly targets what is weak in both L5-S1 disc prolapse AND piriformis syndrome
3. Bird-Dog
- On all fours, spine neutral (do NOT let the back sag or arch)
- Extend opposite arm and leg simultaneously
- Hold 5 seconds, 3 x 10 each side
- Why: Builds deep spinal stabilizers (multifidus, erector spinae) without loading the disc
4. Dead Bug
- Lie on back, arms pointing to ceiling, knees bent at 90° (tabletop position)
- Slowly lower opposite arm and leg toward the floor, keeping low back pressed down
- 3 x 10 each side
- Why: Core anti-extension training - protects the L5-S1 level during any functional activity
5. Clamshell
- Lie on side, hips and knees bent at 45°
- Keep feet together, rotate top knee upward like a clamshell opening
- 3 x 20 each side
- Why: Directly targets gluteus medius - the primary muscle weakened in piriformis syndrome; reduces piriformis overactivation
6. Side-Lying Hip Abduction
- Lie on side, bottom knee slightly bent, top leg straight
- Lift top leg to about 30-40° and slowly lower
- 3 x 15 each side
- Why: Same as clamshell - loads gluteus medius without any spinal stress
Phase 2: Dumbbell Exercises (After pain settles, usually weeks 3-6)
7. Single-Leg Romanian Deadlift (RDL) - Light Dumbbell
- Hold one light dumbbell in the hand opposite to the standing leg
- Hinge at hips with a straight back, reach dumbbell toward the floor as the rear leg extends behind
- This is the best dumbbell exercise for both conditions - loads glutes/hamstrings, trains hip hinge without compressing the disc
- Start with 3-5 kg, 3 x 10 each side
- Key: Keep the spine neutral and completely avoid rounding the lower back
8. Dumbbell Glute Bridge / Hip Thrust
- Set up for glute bridge as above
- Place one dumbbell across hip crease, hold with both hands
- Drive hips up, squeeze glutes hard at the top
- 3 x 15 reps
- Start light (5-10 kg), progress gradually
9. Dumbbell Step-Up
- Use a sturdy chair/step (30-40 cm height)
- Hold light dumbbells at your sides
- Step up one foot, drive through the heel to stand up on the step, squeeze the glute
- Step down slowly
- 3 x 12 each leg
- Why: Unilateral glute and lower back activator; avoids spinal compression because the load is split and movement is vertical
10. Dumbbell Side Lunge (Lateral Lunge)
- Hold one dumbbell at chest
- Step wide to one side, sit into that hip while keeping the other leg straight
- Drive back to center through the bent leg's heel
- 3 x 10 each side
- Why: Activates glute medius and maximus in a functional plane without posterior disc loading
11. Dumbbell Reverse Hyperextension (on a table edge)
- Lie face down on a firm surface with hips at the edge, legs hanging down
- Lift both legs together to horizontal by squeezing glutes (hold a light dumbbell between feet if needed)
- 3 x 12 reps
- Why: Directly strengthens the posterior chain (erector spinae, glutes) and is actually decompressive for the L5-S1 disc
12. Dumbbell Bent-Over Row (Supported)
- Place one hand and same-side knee on a bench/surface for support
- Row dumbbell up to hip with a completely neutral spine
- Do NOT do standing unsupported bent-over rows with L5-S1 prolapse
- 3 x 12 each side
- Why: Works upper and mid back (latissimus, rhomboids) with protected lumbar spine
Phase 3: Pull-Up Bar Exercises
13. Dead Hang
- Simply hang from the bar with relaxed shoulders - do not pull up yet
- Hold 20-30 seconds, 3-5 sets
- Why: Gentle lumbar traction - the hanging position decompresses the L5-S1 disc and creates space for disc material to retract. Many people report immediate symptom relief.
14. Scapular Pull-Up (Scapular Retraction)
- Hang from the bar
- Without bending the elbows, depress and retract your shoulder blades (pull your shoulders "down and together")
- Return slowly
- 3 x 10 reps
- Why: Activates lower trapezius and serratus without any lumbar loading
15. Assisted or Full Pull-Up (once pain is controlled)
- Use a resistance band looped over the bar if needed (kneel in it to reduce bodyweight)
- Pull up with a neutral or slight arch in the lower back - avoid posterior pelvic tilt while pulling
- 3 x 5-8 reps to start
- Why: Lat and mid-back strength without spinal compression - the spine is actually in a decompressed position during a pull-up
16. Hanging Knee Raise (NOT straight-leg raises)
- Hang from bar, bring knees to chest slowly
- 3 x 10 reps
- Why: Core activation in a decompressed spinal position. Use bent knees only - straight-leg raises create significant posterior disc pressure at L5-S1.
Piriformis-Specific Stretches to Pair with Strengthening
Figure-4 Stretch (most effective piriformis stretch)
- Lie on back, cross one ankle over the opposite knee
- Gently push the crossed knee away and/or pull both legs toward your chest
- Hold 30-60 seconds each side
Seated Piriformis Stretch
- Sitting in a chair, cross the affected leg's ankle over the opposite knee
- Gently lean forward with a straight back until you feel a deep gluteal stretch
- Hold 30 seconds, repeat 3x
What to AVOID (Especially With Your Equipment)
| Exercise | Why to avoid |
|---|---|
| Heavy deadlifts | Extreme L5-S1 disc compression |
| Weighted squats | High posterior disc pressure |
| Sit-ups / crunches | Flexion-based disc loading |
| Standing bent-over rows (unsupported) | Shear force at L5-S1 |
| Leg press (deep knee bend) | Loads L5-S1 in flexion |
| Straight-leg raises | Increases intradiscal pressure at L5-S1 |
| Toes-to-bar / L-sit | Same reason as straight-leg raises |
Progression Principle
Weeks 1-2:  Phase 1 only (bodyweight) - focus on pain centralization
Weeks 3-4:  Add Phase 2 dumbbell work (very light)
Weeks 5-8:  Add pull-up bar work; increase dumbbell load
Weeks 8+:   Progress load only when: no leg pain, good form, no symptom worsening
I experience sharp pain at tip of penis when I jump , what all are probable causes
Sharp Pain at the Tip of the Penis on Jumping - Probable Causes
Most Likely Cause (Classic)
1. Vesical Calculus (Bladder Stone) - Top Diagnosis
"Presence of stone in the bladder will give rise to pain in the suprapubic region particularly after micturition. This pain is often referred to the tip of the penis or to the labia majora and becomes aggravated by running and jolting." - S. Das, A Manual on Clinical Surgery, 13e
- Urinary frequency (worse in daytime, better at night - stone falls off trigone when lying)
- Sudden interruption of urine stream mid-flow, which resumes when you change posture
- Blood in urine (hematuria) - especially after exercise
- Burning at end of urination (terminal dysuria)
- Suprapubic pain after voiding
Other Important Causes
2. Distal Ureteric Stone (Lower Ureteric Calculus)
- A stone stuck in the vesicoureteric junction (VUJ) or distal ureter refers pain down to the groin, scrotum, and the tip of the penis
- Jumping/running can dislodge a partially obstructing stone, causing acute colic
- Usually associated with loin-to-groin colicky pain, nausea, restlessness
- May have hematuria
3. Urethral Stone / Calculus
- A stone lodged in the pendulous urethra or meatus causes direct sharp meatal pain
- Pain is worse with any pressure or movement
- You may feel a hard lump along the underside of the penis
- Obstructed or poor urinary stream
4. Urethritis (Infective or Non-infective)
- Inflammation of the urethra from STIs (chlamydia, gonorrhea) or non-specific urethritis
- Causes burning/sharp pain at the meatus, especially with urination, but can be felt as a constant ache at the tip that worsens with activity
- Look for: penile discharge, pain during intercourse, urethral itch
5. Meatal Stenosis
- Narrowing of the urethral opening (meatus) - can be congenital, post-inflammatory, or post-circumcision
- Creates a partial obstruction; the back-pressure and turbulence causes sharp meatal pain, especially when flow is increased with physical activity
- Associated with thin, deflected, or difficult urine stream
6. Acute or Chronic Prostatitis
- Prostate inflammation irritates the bladder neck and urethra
- Causes referred pain to the penile tip, perineum, and inner thighs
- Can be worsened by running/impact (prostate gets jostled)
- Associated with: perineal aching, painful ejaculation, urinary frequency/urgency, low back pain, sometimes fever (in acute prostatitis)
7. Interstitial Cystitis / Bladder Pain Syndrome
- Chronic bladder condition causing hypersensitivity of the bladder wall
- Pain is referred to the penile tip and suprapubic area
- Worsened by a full bladder, physical activity, certain foods
- Associated with severe urinary urgency and frequency, no infection found on cultures
8. Urinary Tract Infection (UTI / Cystitis)
- Bladder inflammation causes trigonal irritation
- Burning, sharp pain referred to the penile tip - usually with urination, but physical activity can provoke it
- Associated with: frequency, urgency, burning on urination, cloudy or smelly urine
- UTI is less common in males - if present, always investigate for an underlying structural cause
9. Pudendal Neuralgia
- Irritation or entrapment of the pudendal nerve (S2-S4)
- Causes burning, sharp, or electric-shock pain in the perineum, scrotum, or penile tip
- Worsened by sitting, running, impact activities
- No urinary symptoms necessarily - this is a nerve pain syndrome
Summary Table
| Cause | Pain provoked by jumping? | Key associated feature |
|---|---|---|
| Bladder stone | Yes - classic | Interrupted urine stream, day frequency |
| Distal ureteric stone | Yes - colicky | Loin-to-groin pain, hematuria |
| Urethral stone | Yes | Palpable lump, obstructed stream |
| Urethritis (STI) | Sometimes | Discharge, dysuria |
| Meatal stenosis | Yes | Poor/thin stream |
| Prostatitis | Yes | Perineal ache, painful ejaculation |
| Interstitial cystitis | Yes | Severe urgency, no infection |
| UTI/cystitis | Sometimes | Burning urination, frequency |
| Pudendal neuralgia | Yes | Nerve-type pain, no urinary symptoms |
What to Do
- Urine routine and microscopy - look for red blood cells, pus cells, infection
- Ultrasound of kidneys, ureters, and bladder (KUB) - will detect bladder stones, ureteric stones
- Plain X-ray KUB - most bladder stones are radio-opaque and visible
- Urine culture - rule out infection
- If negative: Consider CT urogram to pick up small stones, urethroscopy/cystoscopy