innervation of lower limb

Reading File
Finding Sources
Finding Sources
Searching Images

innervation of lower limb nerves diagram
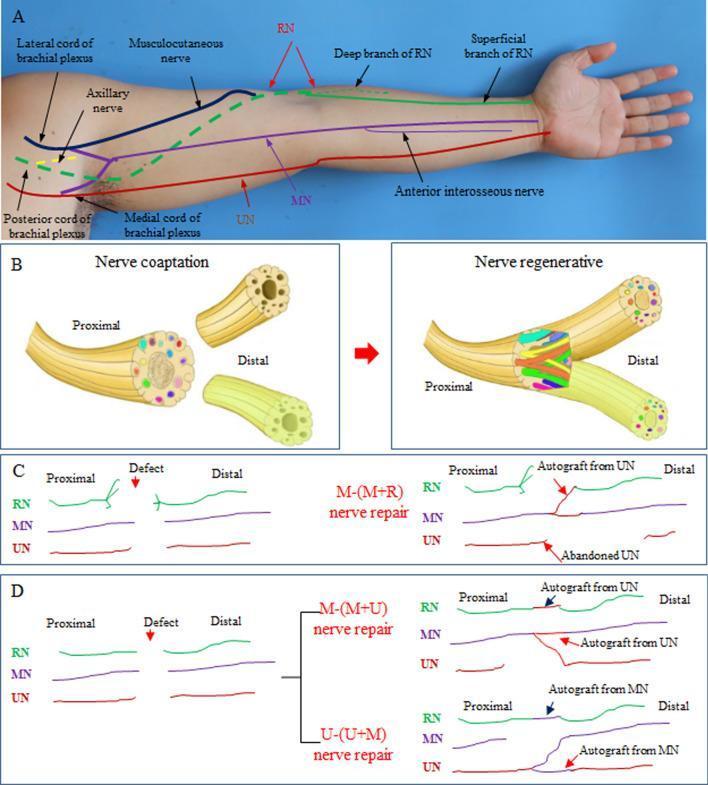
Educational medical illustration detailing upper limb nerve anatomy and surgical nerve merging repair techniques. Panel A is an anatomical diagram overlaid on a human arm showing the brachial plexus cords (lateral, posterior, medial) and the primary nerves: Musculocutaneous, Axillary, Radial (RN), Median (MN), and Ulnar (UN), including the deep and superficial RN branches and the anterior interosseous nerve. Panel B illustrates the concept of 'magnified nerve regeneration,' showing nerve coaptation where one proximal nerve trunk is sutured to two distal nerve segments to facilitate dual innervation. Panels C and D provide schematics of specific surgical protocols: M-(M+R) repair, where the proximal MN is connected to distal MN and RN segments while abandoning the UN; and M-(M+U) or U-(U+M) repairs, which utilize Y-shaped coaptations and autografts (often derived from sacrificed or donor segments) to bridge defects. The illustration serves as a clinical guide for repairing complex nerve avulsions or defects in the upper extremity by using fewer proximal donors to reinnervate multiple distal targets.
Educational medical illustration detailing upper limb nerve anatomy and surgical nerve merging repair techniques. Panel A is an anatomical diagram overlaid on a human arm showing the brachial plexus cords (lateral, posterior, medial) and the primary nerves: Musculocutaneous, Axillary, Radial (RN), Median (MN), and Ulnar (UN), including the deep and superficial RN branches and the anterior interosseous nerve. Panel B illustrates the concept of 'magnified nerve regeneration,' showing nerve coaptation where one proximal nerve trunk is sutured to two distal nerve segments to facilitate dual innervation. Panels C and D provide schematics of specific surgical protocols: M-(M+R) repair, where the proximal MN is connected to distal MN and RN segments while abandoning the UN; and M-(M+U) or U-(U+M) repairs, which utilize Y-shaped coaptations and autografts (often derived from sacrificed or donor segments) to bridge defects. The illustration serves as a clinical guide for repairing complex nerve avulsions or defects in the upper extremity by using fewer proximal donors to reinnervate multiple distal targets.

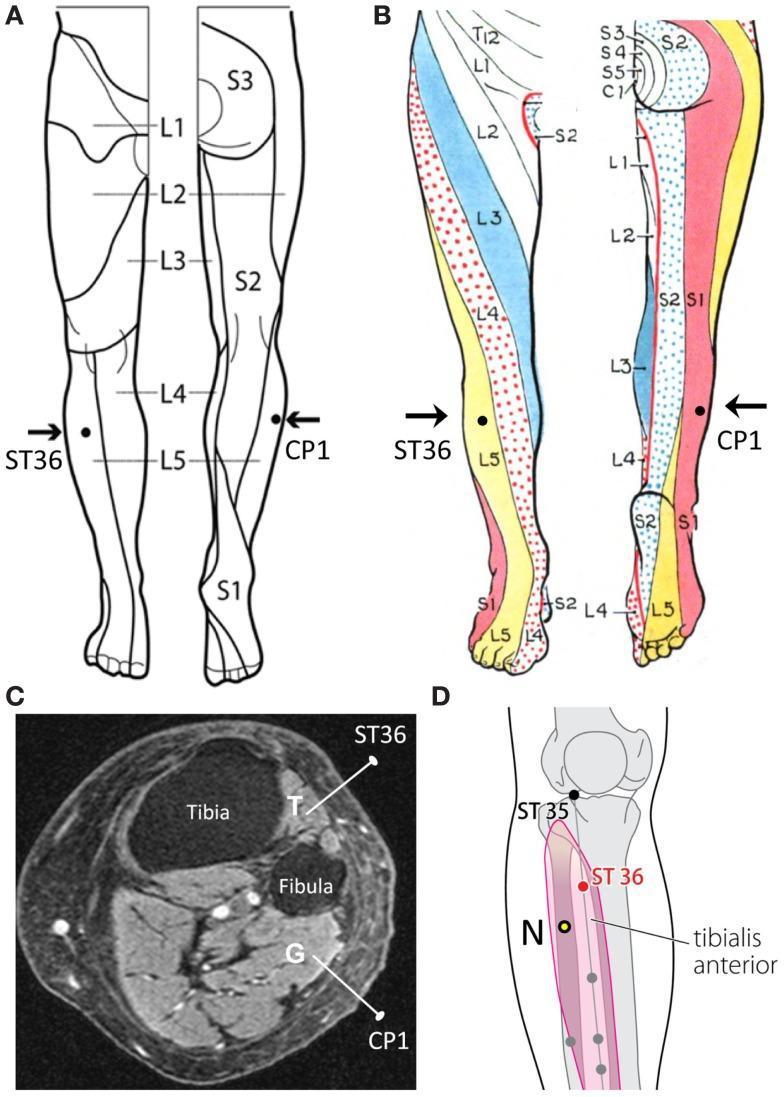
A multi-panel medical illustration and diagnostic image set concerning lower limb neuroanatomy and acupuncture point localization. Panels A and B present comparison charts of human dermatome maps of the lower extremity, highlighting variations in sensory innervation levels (L1-S3). Specifically, they demonstrate the positioning of acupuncture points ST36 (Zusanli) and a control point CP1. In map A, both points reside within the L5 dermatome, while in map B, CP1 is situated within the S1 dermatome. Panel C is an axial T1-weighted MRI of the right lower leg providing cross-sectional anatomical detail. It identifies the Tibia and Fibula bones, the Tibialis Anterior muscle (T) with a needle inserted at ST36, and the Gastrocnemius muscle (G) with a needle inserted at CP1. Panel D features an anatomical diagram of the proximal lower leg, illustrating the Tibialis Anterior muscle belly and suggesting an alternative control point (N) located posterior and inferior to ST36 within the same muscle and dermatome. This composite serves as an educational resource for studying the relationship between surface acupuncture points, deeper myotomal structures, and segmental dermatomal innervation.
A multi-panel medical illustration and diagnostic image set concerning lower limb neuroanatomy and acupuncture point localization. Panels A and B present comparison charts of human dermatome maps of the lower extremity, highlighting variations in sensory innervation levels (L1-S3). Specifically, they demonstrate the positioning of acupuncture points ST36 (Zusanli) and a control point CP1. In map A, both points reside within the L5 dermatome, while in map B, CP1 is situated within the S1 dermatome. Panel C is an axial T1-weighted MRI of the right lower leg providing cross-sectional anatomical detail. It identifies the Tibia and Fibula bones, the Tibialis Anterior muscle (T) with a needle inserted at ST36, and the Gastrocnemius muscle (G) with a needle inserted at CP1. Panel D features an anatomical diagram of the proximal lower leg, illustrating the Tibialis Anterior muscle belly and suggesting an alternative control point (N) located posterior and inferior to ST36 within the same muscle and dermatome. This composite serves as an educational resource for studying the relationship between surface acupuncture points, deeper myotomal structures, and segmental dermatomal innervation.

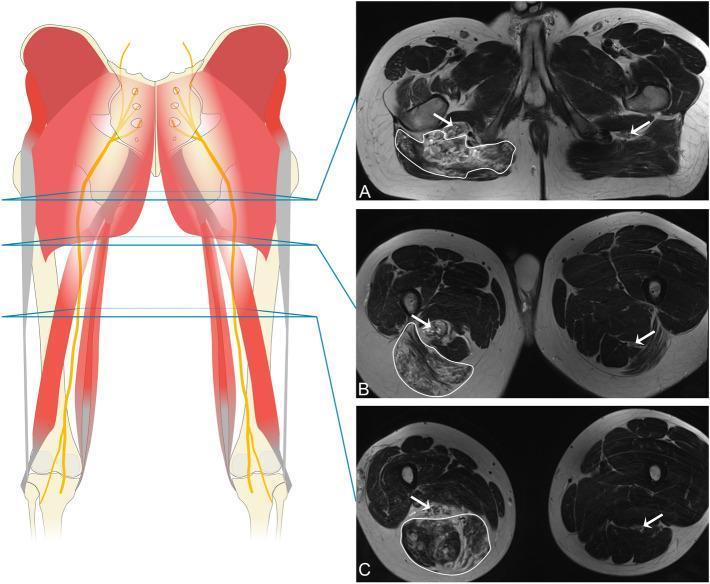
This composite educational graphic features an anatomical diagram and three axial MRI images (T2-weighted) demonstrating a widespread venous malformation (VM) of the right thigh. The anatomical diagram on the left illustrates the posterior lower limb musculature and the course of the sciatic nerve, with blue lines indicating the axial cross-section levels for the MRIs. The MRI sequence (A-C) provides a comparative view of the affected right limb versus the healthy left limb. White outlines in the right thigh highlight extensive intramuscular infiltration of the VM. Image A (proximal) shows infiltration of the gluteal muscles. Image B (mid-thigh) shows involvement of the distal gluteus maximus and proximal hamstrings. Image C (distal) demonstrates infiltration of the semimembranosus, semitendinosus, and biceps femoris. White arrows identify the sciatic nerve bilaterally; on the right side, the nerve shows altered signal intensity and morphological distortion due to extraneural and subepineurial infiltration. This material is designed for teaching radiological identification of vascular anomalies and their secondary effects on peripheral nerves and skeletal muscle.
This composite educational graphic features an anatomical diagram and three axial MRI images (T2-weighted) demonstrating a widespread venous malformation (VM) of the right thigh. The anatomical diagram on the left illustrates the posterior lower limb musculature and the course of the sciatic nerve, with blue lines indicating the axial cross-section levels for the MRIs. The MRI sequence (A-C) provides a comparative view of the affected right limb versus the healthy left limb. White outlines in the right thigh highlight extensive intramuscular infiltration of the VM. Image A (proximal) shows infiltration of the gluteal muscles. Image B (mid-thigh) shows involvement of the distal gluteus maximus and proximal hamstrings. Image C (distal) demonstrates infiltration of the semimembranosus, semitendinosus, and biceps femoris. White arrows identify the sciatic nerve bilaterally; on the right side, the nerve shows altered signal intensity and morphological distortion due to extraneural and subepineurial infiltration. This material is designed for teaching radiological identification of vascular anomalies and their secondary effects on peripheral nerves and skeletal muscle.

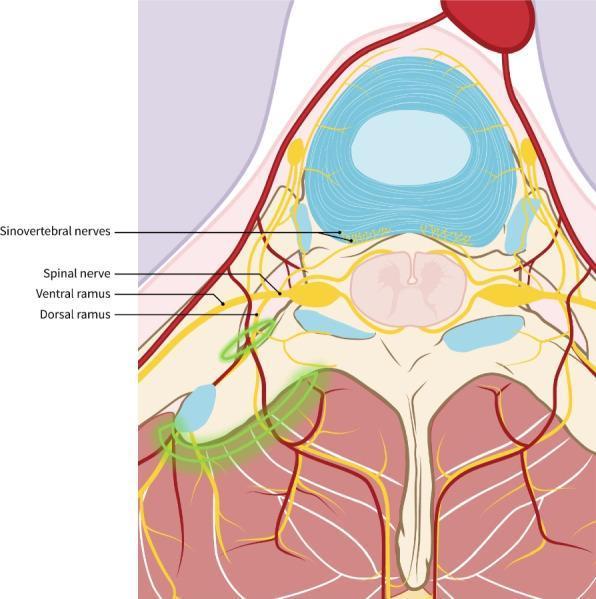
This medical anatomical diagram illustrates the sensory innervation of the vertebral column and surrounding musculature in an axial cross-section. Key anatomical structures labeled include the spinal nerve, which bifurcates into the ventral ramus and dorsal ramus. The diagram highlights the sinuvertebral nerves (recurrent meningeal nerves) arising from the ventral ramus and gray ramus communicans to provide innervation to the intervertebral disc and posterior longitudinal ligament. A distinctive green highlighted area overlays the dorsal ramus and the paraspinal muscles, specifically the erector spinae group. This green zone represents the targeted spread of local anesthetic during an Erector Spinae Plane (ESP) block. The illustration demonstrates the clinical relevance of regional anesthesia, showing how the block consistently covers the dorsal ramus responsible for posterior trunk sensation and back muscle innervation, while contrasting this with the more anteriorly located ventral ramus and sinuvertebral nerves that supply the vertebral bodies and discs. This content is suitable for medical education focusing on regional anesthesia, pain management, and spinal anatomy.
This medical anatomical diagram illustrates the sensory innervation of the vertebral column and surrounding musculature in an axial cross-section. Key anatomical structures labeled include the spinal nerve, which bifurcates into the ventral ramus and dorsal ramus. The diagram highlights the sinuvertebral nerves (recurrent meningeal nerves) arising from the ventral ramus and gray ramus communicans to provide innervation to the intervertebral disc and posterior longitudinal ligament. A distinctive green highlighted area overlays the dorsal ramus and the paraspinal muscles, specifically the erector spinae group. This green zone represents the targeted spread of local anesthetic during an Erector Spinae Plane (ESP) block. The illustration demonstrates the clinical relevance of regional anesthesia, showing how the block consistently covers the dorsal ramus responsible for posterior trunk sensation and back muscle innervation, while contrasting this with the more anteriorly located ventral ramus and sinuvertebral nerves that supply the vertebral bodies and discs. This content is suitable for medical education focusing on regional anesthesia, pain management, and spinal anatomy.

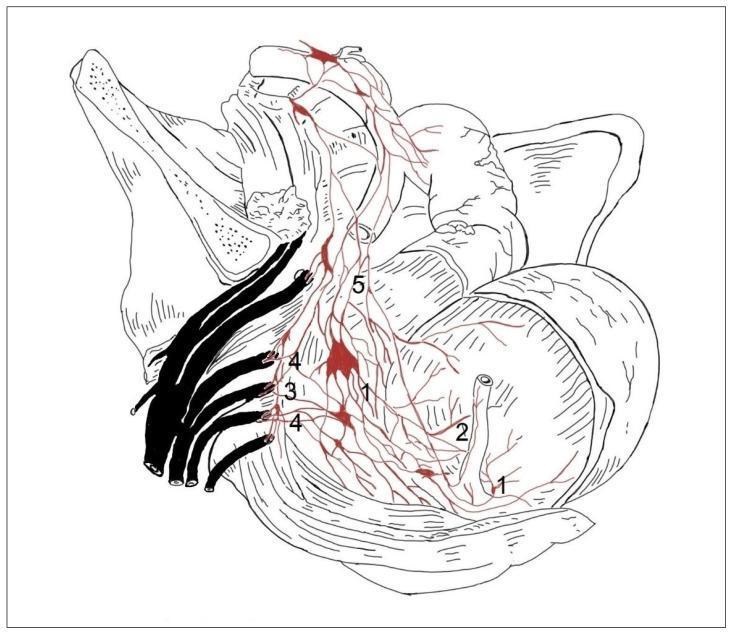
This medical anatomical diagram illustrates the autonomic nerve supply to the human pelvic viscera, specifically demonstrating the 'concentrated type' of innervation pattern. The illustration depicts a lateral view of the pelvic cavity with the rectum (1) and urinary bladder (2) as primary targets of innervation. Key structures include the sacral sympathetic trunk (3), shown as prominent vertical dark cords, and the nervi erigentes (4) or pelvic splanchnic nerves arising from the sacral plexus. The inferior hypogastric plexus (5) is shown as a network of nerves and ganglia (red highlights) distributing to the bladder and rectum. This concentrated variation is characterized by a simplified neural architecture: fewer, larger ganglia and less frequent, weaker connections between the sympathetic trunk and the visceral plexuses compared to the segmental type. The diagram is intended for neuroanatomical education, highlighting variations in pelvic autonomic pathways relevant to surgical considerations in proctology and urology.
This medical anatomical diagram illustrates the autonomic nerve supply to the human pelvic viscera, specifically demonstrating the 'concentrated type' of innervation pattern. The illustration depicts a lateral view of the pelvic cavity with the rectum (1) and urinary bladder (2) as primary targets of innervation. Key structures include the sacral sympathetic trunk (3), shown as prominent vertical dark cords, and the nervi erigentes (4) or pelvic splanchnic nerves arising from the sacral plexus. The inferior hypogastric plexus (5) is shown as a network of nerves and ganglia (red highlights) distributing to the bladder and rectum. This concentrated variation is characterized by a simplified neural architecture: fewer, larger ganglia and less frequent, weaker connections between the sympathetic trunk and the visceral plexuses compared to the segmental type. The diagram is intended for neuroanatomical education, highlighting variations in pelvic autonomic pathways relevant to surgical considerations in proctology and urology.

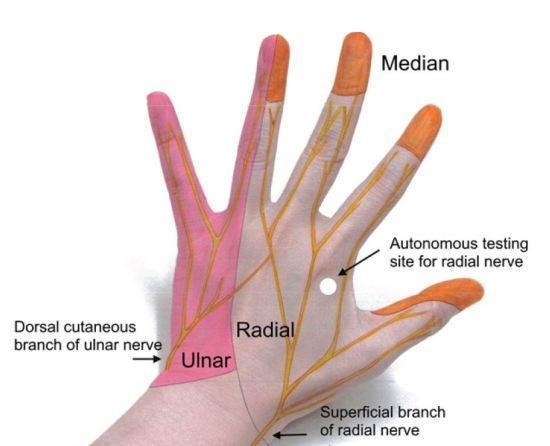
Anatomical diagram overlay on a clinical photograph showing the cutaneous sensory innervation of the dorsal hand. The image maps the distribution of three major nerves: the radial, ulnar, and median nerves. The radial nerve (shaded grey/yellow) covers the radial two-thirds of the dorsum, including the thumb and proximal portions of the index, middle, and radial half of the ring fingers up to the proximal interphalangeal (PIP) joints. A white dot identifies the 'autonomous testing site for the radial nerve' in the first dorsal webspace. The ulnar nerve (shaded pink) innervates the ulnar third of the hand, including the entire little finger and the ulnar half of the ring finger. The median nerve (shaded orange) provides sensation to the dorsal tips of the index, middle, and radial half of the ring fingers, extending distally from the PIP joints to the nail beds. Key anatomical structures labeled include the superficial branch of the radial nerve and the dorsal cutaneous branch of the ulnar nerve as they enter the hand from the forearm.

Anatomical diagram overlay on a clinical photograph showing the cutaneous sensory innervation of the dorsal hand. The image maps the distribution of three major nerves: the radial, ulnar, and median nerves. The radial nerve (shaded grey/yellow) covers the radial two-thirds of the dorsum, including the thumb and proximal portions of the index, middle, and radial half of the ring fingers up to the proximal interphalangeal (PIP) joints. A white dot identifies the 'autonomous testing site for the radial nerve' in the first dorsal webspace. The ulnar nerve (shaded pink) innervates the ulnar third of the hand, including the entire little finger and the ulnar half of the ring finger. The median nerve (shaded orange) provides sensation to the dorsal tips of the index, middle, and radial half of the ring fingers, extending distally from the PIP joints to the nail beds. Key anatomical structures labeled include the superficial branch of the radial nerve and the dorsal cutaneous branch of the ulnar nerve as they enter the hand from the forearm.

Reading File
Reading File
Finding Sources
Loading Image
Loading Image
Reading File
Finding Sources
Loading Image
Finding Sources
Finding Sources
Reading File
Reading File
Your credits are exhausted. You can purchase a top-up or subscribe to a plan to continue using Orris. If you're already subscribed, your daily credits will reset tomorrow.

nerve supply of lower limbs

Your credits are exhausted. You can purchase a top-up or subscribe to a plan to continue using Orris. If you're already subscribed, your daily credits will reset tomorrow.
This is a shared conversation. Sign in to Orris to start your own chat.