
140 human molar crowns were used after separating them from their roots at the cementoenamel junction with a water-cooled, low-speed diamond saw (Mecatome T201 A, Presi, Grenoble, France). The roots were discarded, and the crowns were randomly assigned into two groups: 70 samples for testing bond strength to enamel, and 70 for evaluating adhesion to dentin. To prepare enamel surfaces, a 0.5 mm-deep flat area was created in the center of the buccal surface of each crown using the cutting machine mentioned above. Each crown was then embedded in acrylic resin blocks (Acropars, Marlic Medical Industries Co., Tehran, Iran), positioning the buccal surface facing upward and level with the base. The enamel was polished gently with 320-grit silicon carbide abrasive paper (Starcke GmbH & Co. KG, Melle, Germany) to ensure surface uniformity. Enamel quality and flatness were examined using a stereomicroscope (Stemi 305, Carl Zeiss AG, Oberkochen, Germany). For the dentin group, the occlusal enamel and superficial dentin layers were removed to expose flat mid-coronal dentin using the same saw, under continuous water cooling. The dentin surfaces were also embedded in acrylic blocks with the surface aligned parallel to the base. A smear layer was created by polishing the exposed dentin for 60 s with 320-grit silicon carbide paper. Finally, the surfaces were rinsed and lightly dried using an air–water spray syringe (DABI Atlante, São Paulo, Brazil). Before bonding the RMGIC to the prepared enamel and dentin surfaces, a conditioning step was performed using GC Cavity Conditioner (GC Corporation, Tokyo, Japan) in accordance with the manufacturer's guidelines. The conditioner was applied to the tooth surface using a cotton pellet or applicator sponge. It was allowed to react for 10 s, after which the surface was thoroughly rinsed with water and gently blotted dry, leaving the surface moist but not desiccated. generate a image for this matter
Scientific dental research illustration showing the step-by-step preparation of human molar crowns for bond strength testing. The image shows: 1) A human molar tooth being cut at the cementoenamel junction with a water-cooled diamond saw, separating the crown from the root. 2) The crown being embedded in an acrylic resin block with the buccal surface facing upward. 3) Enamel surface being polished with 320-grit silicon carbide abrasive paper to create a flat, uniform surface. 4) Dentin preparation showing removal of occlusal enamel to expose flat mid-coronal dentin. 5) Application of GC Cavity Conditioner to the tooth surface using a cotton pellet for 10 seconds, followed by rinsing with water and blotting dry, leaving the surface moist. 6) Final prepared enamel and dentin surfaces ready for RMGIC bonding. The illustration is clean, labeled, and in a professional scientific/medical diagram style with a white background.
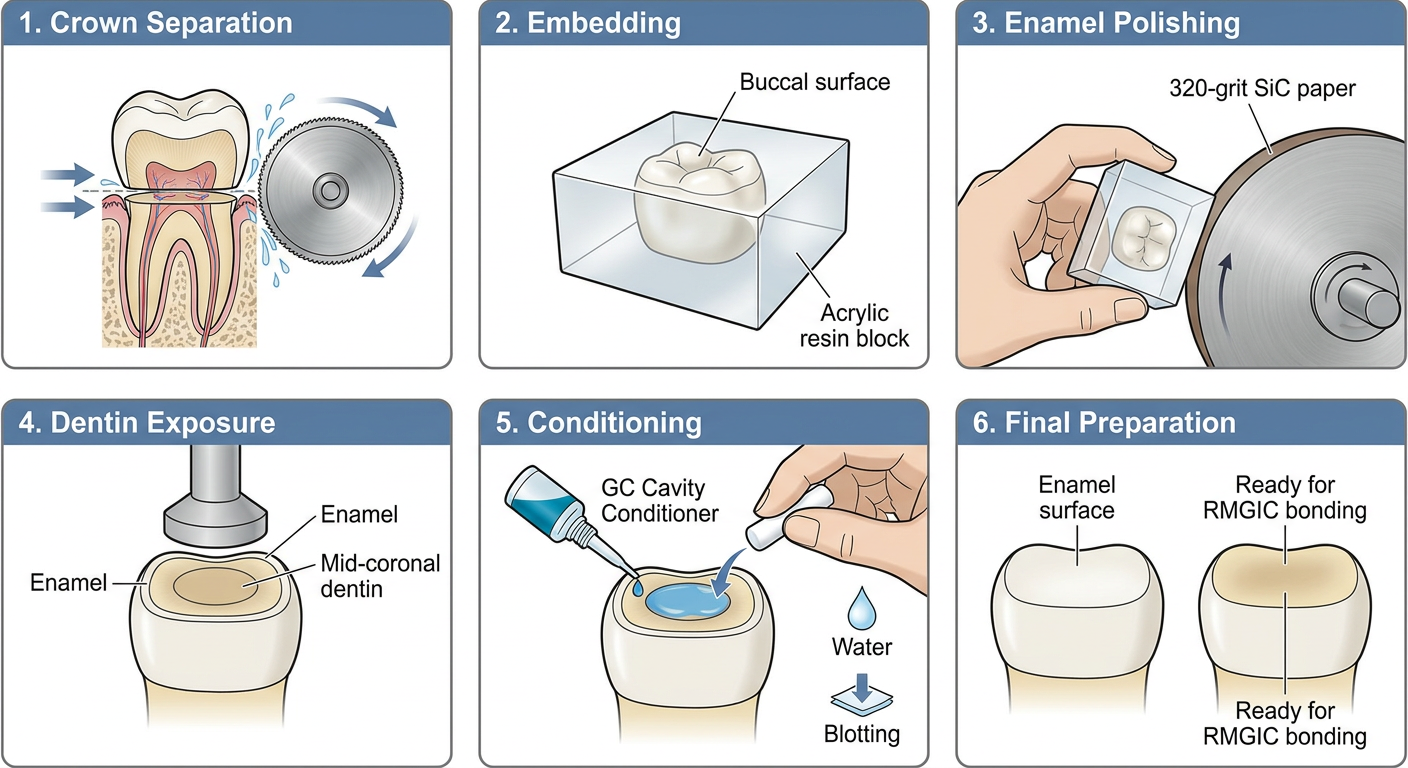
- Crown separation - Sectioning the molar at the cementoenamel junction with a water-cooled diamond saw, discarding the roots
- Enamel group preparation - Creating a 0.5 mm-deep flat area on the buccal surface, embedding in acrylic resin with the surface facing upward, and polishing with 320-grit SiC paper
- Dentin group preparation - Removing occlusal enamel and superficial dentin to expose flat mid-coronal dentin, embedded in acrylic blocks, and creating a smear layer with 320-grit SiC paper for 60 seconds
- Conditioning step - Applying GC Cavity Conditioner with a cotton pellet for 10 seconds, rinsing, and blot-drying to leave the surface moist (not desiccated) before RMGIC bonding
140 human molar crowns were used after separating them from their roots at the cementoenamel junction with a water-cooled, low-speed diamond saw (Mecatome T201 A, Presi, Grenoble, France). The roots were discarded, and the crowns were randomly assigned into two groups: 70 samples for testing bond strength to enamel, and 70 for evaluating adhesion to dentin. To prepare enamel surfaces, a 0.5 mm-deep flat area was created in the center of the buccal surface of each crown using the cutting machine mentioned above. Each crown was then embedded in acrylic resin blocks (Acropars, Marlic Medical Industries Co., Tehran, Iran), positioning the buccal surface facing upward and level with the base. The enamel was polished gently with 320-grit silicon carbide abrasive paper (Starcke GmbH & Co. KG, Melle, Germany) to ensure surface uniformity. Enamel quality and flatness were examined using a stereomicroscope (Stemi 305, Carl Zeiss AG, Oberkochen, Germany). For the dentin group, the occlusal enamel and superficial dentin layers were removed to expose flat mid-coronal dentin using the same saw, under continuous water cooling. The dentin surfaces were also embedded in acrylic blocks with the surface aligned parallel to the base. A smear layer was created by polishing the exposed dentin for 60 s with 320-grit silicon carbide paper. Finally, the surfaces were rinsed and lightly dried using an air–water spray syringe (DABI Atlante, São Paulo, Brazil). Before bonding the RMGIC to the prepared enamel and dentin surfaces, a conditioning step was performed using GC Cavity Conditioner (GC Corporation, Tokyo, Japan) in accordance with the manufacturer's guidelines. The conditioner was applied to the tooth surface using a cotton pellet or applicator sponge. It was allowed to react for 10 s, after which the surface was thoroughly rinsed with water and gently blotted dry, leaving the surface moist but not desiccated. generate a image for this matter
Detailed scientific dental research step-by-step flowchart illustration showing specimen preparation for RMGIC bond strength testing study. Panel 1: A human molar tooth with a dotted line at the cementoenamel junction and a water-cooled diamond saw cutting through it, separating crown from root - root labeled "discarded", crown labeled "retained". Panel 2: Split into two pathways labeled "Enamel Group (n=70)" and "Dentin Group (n=70)". Enamel path shows: buccal surface of crown with a 0.5mm flat area being created, then crown embedded upright in a rectangular acrylic resin block, then 320-grit SiC abrasive paper polishing the flat enamel surface, then a stereomicroscope examining the surface. Dentin path shows: crown with occlusal enamel being removed to expose flat mid-coronal dentin, embedded in acrylic block surface parallel to base, 320-grit SiC paper polishing for 60 seconds creating smear layer, then air-water syringe rinsing and drying. Final shared panel: GC Cavity Conditioner bottle with a cotton pellet being applied to tooth surface, 10-second timer icon, water rinse, blot drying with moist surface ready for bonding. Clean white background, professional biomedical illustration style, labeled arrows between steps, anatomically accurate tooth cross-sections.