
Smear layer in conservative dentistry and endodontics for 50 marks
Reading File
Now let me search the library for smear layer content in endodontics and conservative dentistry.
Finding Sources
Finding Sources
The library has limited smear layer content. Let me search for endodontics books and related topics in parallel.
Finding Sources
Finding Sources
Searching the Web
smear layer conservative dentistry endodontics composition removal significance 50 marks
Reading Web Page
https://pmc.ncbi.nlm.nih.gov/articles/PMC8814382
Searching PubMed
"smear layer" endodontics removal
I now have comprehensive information to write a detailed 50-mark answer. Let me compile this into a thorough, well-structured answer.
Smear Layer in Conservative Dentistry and Endodontics
1. Introduction and Historical Background
The concept of smear layer was first described by McComb and Smith in 1975 through scanning electron microscopic (SEM) investigation of root canal walls after endodontic instrumentation. The term "smear layer" was subsequently coined and elaborated by Pashley (1984), who provided a comprehensive framework for understanding its structure, composition, and clinical significance.
The smear layer is defined as:
"An amorphous, relatively smooth layer of microcrystalline debris whose featureless surface cannot be seen with the naked eye." - Cohen
It is an iatrogenic byproduct created whenever dentin, enamel, cementum, or root canal dentin is cut by hand or rotary instruments.
2. Formation of Smear Layer
When dentin is cut with any instrument, the mineralized matrix shatters rather than being uniformly sheared or cleaved. This produces cutting debris made up of very small particles of mineralized collagen matrix. These particles are smeared over the dentin surface by the instrument action, forming the smear layer.
The smear layer is produced by:
- Cavity preparation - burs, hand instruments during restorative procedures
- Root canal instrumentation - K-files, H-files, rotary NiTi instruments
- Root planing - during periodontal procedures
- Tooth preparation for crowns/veneers
- Scaling - on cemental surfaces
The term technically applies to debris from cutting of enamel, dentin, cementum, and root canal dentin - though it is most commonly discussed in the context of dentin.
3. Structure of Smear Layer
Brackett described the smear layer as having two distinct components:
3a. Outer (Superficial) Layer
- Amorphous layer approximately 2-5 micrometers thick (some sources cite 1-5 micrometers)
- Lies on the actual dentinal surface, covering tubule orifices and intertubular dentin
- Loosely adherent
- Featureless under SEM at low magnification
3b. Inner Layer (Smear Plugs)
- Debris forced into the ends of dentinal tubules
- Extends up to 40 micrometers deep into tubules
- Seals the tubule ends
- Dramatically decreases dentin permeability
- More firmly attached than the superficial layer
- Harder to remove than the outer smear layer
This two-layer model is important because the smear plugs are resistant to many removal methods that successfully dissolve the surface smear layer.
4. Composition of Smear Layer
The smear layer has both organic and inorganic components:
Organic Constituents:
- Denatured collagen (from intertubular and peritubular dentin)
- Coagulated proteins
- Necrotic and non-necrotic pulpal tissues
- Odontoblastic processes (remnants)
- Saliva
- Blood cells
- Microorganisms and their by-products (especially in infected canals)
- Cytoplasmic and organelle enzymes
Inorganic Constituents:
- Hydroxyapatite - minerals from dentinal tubules
- Dentin crystallites
The inorganic component (primarily hydroxyapatite) requires chelating agents for removal, while the organic component requires proteolytic/sodium hypochlorite action.
In infected root canals, the smear layer additionally contains:
- Bacteria and bacterial toxins (endotoxins/LPS)
- Lamina limitans
- Bacterial by-products
This distinction is clinically important - in endodontics, smear layer removal is prioritized because it may entomb bacteria and prevent irrigant penetration.
5. Significance - Why Smear Layer Matters
5a. Significance in Conservative Dentistry (Restorative)
DISADVANTAGES of retaining smear layer (reasons to remove it):
-
Reduced bonding strength: The smear layer is not a stable structure. It must be removed to obtain optimal chemical and mechanical bonding between restorative materials and tooth structure (composite resin, glass ionomer cement).
-
Barrier to resin infiltration: Removal and demineralization of smear layer allows resin to infiltrate the dentinal tubules, their branches, the collagen meshwork of intertubular matrix, and the collagen walls of the tubules - forming the hybrid layer (zone of interdiffusion).
-
Unstable substrate: Resin bonds to smear layer rather than to actual dentin - this bond is weak and may fail over time.
-
Microleakage: If smear layer detaches after bonding, it creates microleakage gaps at the restoration interface.
ADVANTAGES of retaining smear layer:
-
Reduces dentin permeability by up to 86% (smear plugs occlude tubules): This reduced flow of dentinal fluid may have a protective effect on pulpal tissues.
-
Impedes bacterial entry: The smear layer physically blocks bacteria from entering patent dentinal tubules.
-
Reduced postoperative sensitivity: By reducing fluid movement through tubules, the smear layer may reduce dentinal hypersensitivity.
5b. Significance in Endodontics
Reasons to REMOVE smear layer in endodontics:
-
Harbors bacteria: The smear layer in infected canals contains bacteria, their toxins, and by-products. It can entomb viable bacteria in smear plugs, protecting them from irrigants and medications.
-
Barrier to irrigant penetration: The smear layer prevents NaOCl and other irrigants from reaching bacteria deep in dentinal tubules.
-
Impairs canal disinfection: Intracanal medicaments (e.g., calcium hydroxide) cannot diffuse into dentinal tubules through the smear layer.
-
Impairs obturation seal: Smear layer prevents optimal adaptation of root canal sealers to dentinal walls, reducing the sealing quality of obturation.
-
Prevents sealer penetration: Sealers cannot enter dentinal tubules to provide interlocking and adequate apical seal when smear layer is present.
Argument FOR retaining smear layer in endodontics (minority view):
- Smear plugs physically block bacterial penetration into tubules
- Removal increases dentin permeability (potentially allowing bacterial re-entry)
- Some studies show no statistically significant difference in endodontic outcomes with or without smear layer removal
The current consensus strongly favors smear layer removal during root canal treatment to maximize disinfection.
6. Methods of Smear Layer Removal
6a. Chemical Methods
In Conservative Dentistry:
Acid etching (Total-etch technique)
- 37% Phosphoric acid for 15 seconds on dentin - completely removes the smear layer
- Demineralizes underlying dentin to expose the collagen network for resin hybridization
- Used with etch-and-rinse (3-step and 2-step) adhesive systems
Self-etching primers/adhesives
- Contain weak acidic monomers (e.g., 10-MDP, phenyl-P)
- Partially dissolve/modify the smear layer (not complete removal)
- The dissolved smear layer is incorporated into the hybrid layer
- Smear layer characteristics (thickness, density) critically affect bond strength of self-etching systems
- Thicker, denser smear layers reduce effectiveness of mild self-etching adhesives
Dentin conditioners
- 10% polyacrylic acid (used with glass ionomer cement) - modifies/partially removes smear layer
In Endodontics:
Chelating agents - remove the inorganic component:
-
EDTA (Ethylenediaminetetraacetic acid)
- Most widely used chelating agent
- Available as 15-17% solution (liquid or gel - RC Prep, Glyde)
- Removes inorganic component of smear layer
- Increases dentin permeability by opening dentinal tubules
- Used as final rinse after NaOCl irrigation
- Disadvantage: reduces microhardness of root dentin (makes it friable with prolonged use)
-
Citric Acid (10-50%)
- Removes both organic and inorganic components when used alone
- Less commonly used than EDTA
- Effective smear layer removal agent
-
MTAD (Mixture of Tetracycline, Acid, and Detergent)
- Contains doxycycline, citric acid, Tween 80
- Removes smear layer and has antibacterial activity
- Less dentin damage than EDTA
-
Etidronic acid (HEBP)
- Can be mixed directly with NaOCl (unlike EDTA)
- Emerging chelating agent
-
Chitosan
- Natural biopolymer - emerging irrigant
- Smear layer removal ability comparable to EDTA in some studies
- Biocompatible, antimicrobial properties
Sodium hypochlorite (NaOCl)
- Removes the organic component of smear layer
- Standard endodontic irrigant at 1-5.25% concentration
- Does NOT remove the inorganic component
Combined protocol (Gold standard):
NaOCl (organic dissolution) + EDTA (inorganic/chelation) = Complete smear layer removal
The classic irrigation sequence recommended is:
- NaOCl throughout instrumentation
- Final flush with 17% EDTA for 1 minute
- Final rinse with NaOCl
6b. Mechanical Methods
Ultrasonic irrigation (Passive Ultrasonic Irrigation - PUI)
- Acoustic streaming and cavitation enhance smear layer removal
- More effective than syringe irrigation alone
- Ultrasonic activation of NaOCl/EDTA improves efficacy
Laser-assisted irrigation
- Er:YAG laser - photoacoustic streaming (PIPS technique)
- Nd:YAG laser
- Effective smear layer removal in coronal and middle thirds
- Less effective in apical region
Sonic irrigation
- EndoActivator - uses sonic energy to agitate irrigants
- Moderate smear layer removal
Apical negative pressure irrigation (EndoVac)
- Draws irrigant apically, may improve smear layer removal in apical third
6c. Natural/Biological Agents (Recent Research)
- NAC (N-acetyl cysteine) - natural antioxidant with chelating properties
- Phytic acid - plant-derived chelator
- Papain gel, Bromelain - proteolytic enzymes for organic component
- Various plant extracts - emerging research area
7. Smear Layer and Dentin Bonding Systems
Classification by Smear Layer Strategy:
| Adhesive Strategy | Smear Layer Action | Example |
|---|---|---|
| Etch-and-rinse (3-step) | Complete removal | OptiBond FL, Scotchbond Multi-Purpose |
| Etch-and-rinse (2-step) | Complete removal | Single Bond, Prime & Bond |
| Self-etch (2-step) | Partial dissolution + incorporation | Clearfil SE Bond |
| Self-etch (1-step/all-in-one) | Minimal dissolution | Adper Prompt L-Pop |
| Glass ionomer | Modification only | Fuji II LC |
Key concept: The density and thickness of smear layer is more critical than its absolute thickness for self-etching adhesives. Denser smear layers formed by fine-grit burs or slow cutting speed resist demineralization by self-etch primers and reduce bond strength.
Clinical techniques to optimize bonding:
- Active application - rubbing adhesive with gentle force enhances smear layer dissolution and resin penetration
- Double application - applying adhesive twice (without light-curing between coats) enhances smear layer dissolution due to increased acid monomer concentration
- Solvent evaporation - thorough air-drying between coats
8. Smear Layer and Dentin Hypersensitivity
- Smear layer naturally forms on exposed dentin after abrasion/erosion, providing temporary protection from hypersensitivity
- Dentinal hypersensitivity treatments work partly by recreating a smear layer (Burnishing of toothpaste) or by blocking tubule orifices
- Desensitizing agents that precipitate within tubules (strontium chloride, potassium oxalate) functionally mimic the smear plug mechanism
- This is why some toothpastes containing NovaMin (calcium sodium phosphosilicate) are effective - they create a mineralizing smear-like layer
9. Evaluation of Smear Layer Removal
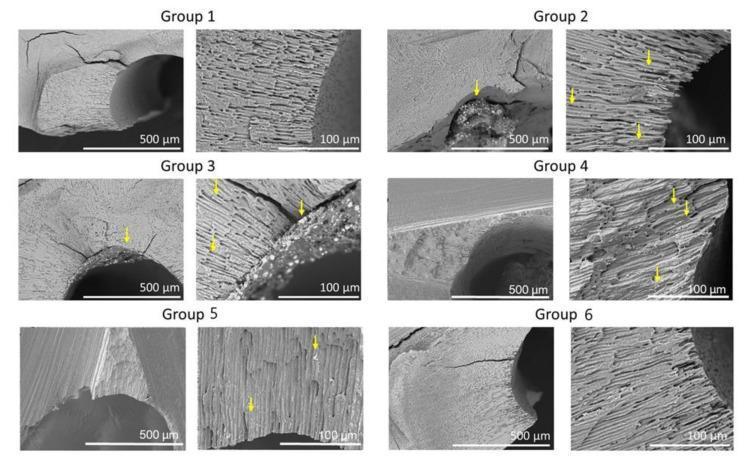
Scanning Electron Microscopy (SEM)
- Gold standard for evaluating smear layer removal
- Allows direct visualization of dentinal tubule patency
- Root canal sections examined at standard magnifications (150x, 600x)
- Grading systems (e.g., Torabinejad scoring system):
- Score 1: No smear layer, all tubules open
- Score 2: Moderate smear layer, some tubules open
- Score 3: Heavy smear layer, all tubules blocked
Other methods:
- Transmission Electron Microscopy (TEM)
- Energy Dispersive X-ray Analysis (EDXA)
- Dye penetration studies
- Bacterial penetration studies
The SEM studies consistently show that smear layer removal is least effective in the apical third of root canals, regardless of the method used - a key clinical limitation.
10. Clinical Considerations and Controversies
Should smear layer always be removed in endodontics?
The debate continues:
- For removal: Better disinfection, enhanced sealer/irrigant penetration, improved obturation quality
- Against removal: Removes natural barrier, increases dentin permeability (may allow bacterial penetration), some clinical trials (DTIC study) show no statistically significant difference in endodontic outcomes
Current consensus (evidence-based): Most endodontic authorities and societies recommend smear layer removal as part of complete chemomechanical preparation for superior canal disinfection.
Apical third challenge:
- Smear layer removal is consistently least effective at the apical 1-3 mm
- This is attributed to limited irrigant delivery, narrow canal diameter, and anatomical complexity
- New technologies (PUI, PIPS, EndoVac) aim to address this limitation
Effect on microhardness:
- EDTA significantly reduces root dentin microhardness with prolonged use
- Recommended contact time is 1 minute at final irrigation
- Over-use can make root dentin friable and increase susceptibility to vertical root fracture
11. Summary Table
| Feature | Conservative Dentistry | Endodontics |
|---|---|---|
| Smear layer composition | Dentin, enamel particles, collagen | Dentin, bacteria, pulpal tissue |
| Primary concern | Bonding interference | Bacterial harbor, disinfection barrier |
| Removal method | Phosphoric acid / Self-etch primers | EDTA + NaOCl (gold standard) |
| Retention benefit | Reduces sensitivity, protects pulp | Minimal; seals tubules temporarily |
| Current recommendation | Remove for optimal bonding | Remove for complete disinfection |
12. Recent Advances and Future Directions
- Chitosan as an alternative irrigant - systematic reviews (2025) confirm effectiveness comparable to EDTA with better biocompatibility
- Etidronic acid (HEBP) - can be mixed with NaOCl without precipitation; 2026 systematic review confirms efficacy
- Natural extracts (phytic acid, apple cider vinegar, EGCG from green tea) - show promising smear layer removal in preliminary studies
- Photodynamic therapy + laser activation - combined protocols for superior disinfection and smear layer removal
- Nanoparticle-based irrigants - silver nanoparticles, zinc oxide nanoparticles incorporated in chelating solutions
Key Points to Remember (50 marks format)
- Smear layer = iatrogenic byproduct of any instrumentation on tooth structure
- First described by McComb and Smith (1975) on root canal walls; coined by Pashley
- Thickness: 1-5 micrometers (surface) + smear plugs up to 40 micrometers deep
- Composition: hydroxyapatite + denatured collagen (+ bacteria in infected canals)
- Reduces dentin permeability by ~86% via smear plugs
- In conservative dentistry: removed by phosphoric acid (complete) or self-etch primers (partial)
- In endodontics: removed by NaOCl (organic) + EDTA (inorganic) combination
- SEM is gold standard for evaluation; apical third is most resistant to removal
- Adhesive systems classified by smear layer strategy: removal vs. modification/incorporation
- Current evidence supports removal in both restorative and endodontic contexts for optimal outcomes
Key references: Pashley DH (1984, 1992); Mader CL, Baumgartner JC, Peters DD (J Endod 1984); Saikaew et al. (Japanese Dental Science Review, 2022) [PMID: 35140823]; Ferreira-Reguera et al. (Medicina, 2025) [PMID: 39859096]; Vidal-Montolío et al. (J Funct Biomater, 2026) [PMID: 41590816]
This is a shared conversation. Sign in to Orris to start your own chat.