
7305be20-1f14-4de2-a662-867b7b8ef0a4.jpeg
Explain in simple language
Here's a simple breakdown of everything on this surgery notes page:
Suturing Techniques (Ways to Stitch a Wound)
These are the different patterns a surgeon uses to close a cut or wound:
| Stitch Type | What it means |
|---|---|
| Continuous Sutures | One long thread running in a line - like a running stitch in sewing. Fast to do. |
| Simple Interrupted | Separate individual stitches, each tied on its own. If one breaks, the rest hold. |
| Subcuticular Sutures | Hidden stitches just under the skin surface - leaves minimal scarring. |
| Horizontal Mattress | Stitches that go sideways in a "U" shape - good for holding tension. |
| Vertical Mattress | Stitches in a vertical "U" - specifically used to turn skin edges outward (eversion), which heals better. |
Purse String Suture
A circular stitch that tightens like a drawstring bag. Used for:
- Cervical incompetence (keeping the cervix closed during pregnancy)
- Herniotomy (hernia repair)
- Rectal prolapse (when the rectum slips out)
Rectal Prolapse Treatments
- Perineal approach (from below): Thiersche cerclage, Altemeier's procedure, Delorme procedure
- Abdominal approach (from the belly): Ripstein rectopexy, Wells procedure
Types of Surgical Knots
- Surgeon's Knot - most secure, standard knot
- Square/Reef Knot - flat, simple, common
- Granny's Knot (Slip) - can slip, less preferred
- Half-hitch - a simple loop knot
- Crossed Half-hitch - variation, used in combination
Jenkin's Rules (Important Exam Facts)
- Suture length should be 4x the length of the wound
- Needle entry angle for IM injection: 90°
- Veress needle (for laparoscopy) / SC injection: 45°
- ID (intradermal) injection: 10-15°
Instruments Needed for Suturing
Scalpel Blades (attached to a BP Handle):
| Blade | Used for |
|---|---|
| Blade 10 | Skin & muscle |
| Blade 11 | Incision & drainage (InD), vascular |
| Blade 15 | Suture removal |
| Blade 10 (Minor OT) | Precise cuts |
| Blade 22 | Abdominal incisions |
Other Instruments:
- BP Handle - holds the scalpel blade
- Needle Holding Forceps - clamps the suture needle so you can stitch safely
- Adson's Tissue Holding Forceps - fine-tipped tweezers to hold delicate tissue
- Mayo Scissors - heavy scissors for cutting tough tissue
- Metzenbaum Scissors - delicate scissors for fine, deep tissue dissection
In short: This page covers how wounds are closed (stitch patterns), the knots used to tie them, a memory rule for suture length and injection angles, and the key tools every surgeon needs on the table.
Search for clinical images showing proper suturing technique in practice
Reading File
Searching the Web
clinical images suturing technique proper wound closure steps
Finding Sources
Loading Image
Loading Image
Loading Image
Reading File
Reading File
Loading Image
Here is a visual guide to proper suturing technique, drawing from clinical textbooks and medical illustrations:
Clinical Images: Proper Suturing Technique
1. Simple Interrupted Suture - Step by Step

What you're seeing (Steps 1-10):
- Steps 1-2: Load the needle onto the needle holder at a 90° angle
- Steps 3-4: Pierce the skin on one side of the wound
- Steps 5-6: Pass the needle through and exit the other side at equal depth
- Steps 7-8: Pull the thread through and begin tying the knot
- Step 9: Tie off the knot snugly (approximate, don't strangulate)
- Step 10: Final result - evenly spaced individual stitches
2. Cross-Section: Correct vs. Wrong Placement

Key lessons from this image:
| What it looks like | Why it matters | |
|---|---|---|
| A - Correct | Even spacing, edges just touching | Heals flat, no scarring |
| B - Unequal spacing | Gaps between stitches | Wound may open between stitches |
| C - Excessive tension | Skin puckered and bunched | Can cut through skin, causes necrosis |
| D - Correct eversion | Edges slightly turned outward | As wound heals, it flattens out perfectly |
| E - Skin inversion | Edges turned inward | Creates a depressed, ugly scar |
| F - Skin overlap | One edge rides over the other | Heals poorly, uneven surface |
3. Needle Path Through Tissue - Simple Interrupted
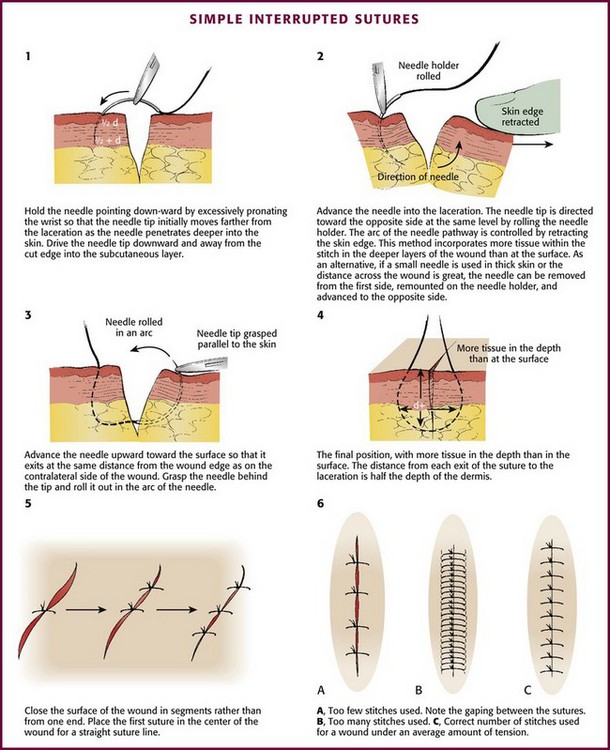
What this diagram teaches:
- Panel 1: Hold the needle pointing downward, pronate the wrist to drive it deeper into the wound
- Panel 2: Direct the needle toward the opposite side at the same skin level
- Panel 3: Advance the needle upward to exit at equal distance from the wound edge
- Panel 4: The final stitch should have more tissue at depth than at the surface - this creates eversion
- Panel 5: Start from the center of the wound and work outward for a straight line
- Panel 6 (A, B, C): Too few stitches gaps the wound, too many is unnecessary - use the correct number
4. The "Heart-Shaped" Buried Subcutaneous Suture (From Fitzpatrick's Dermatology)
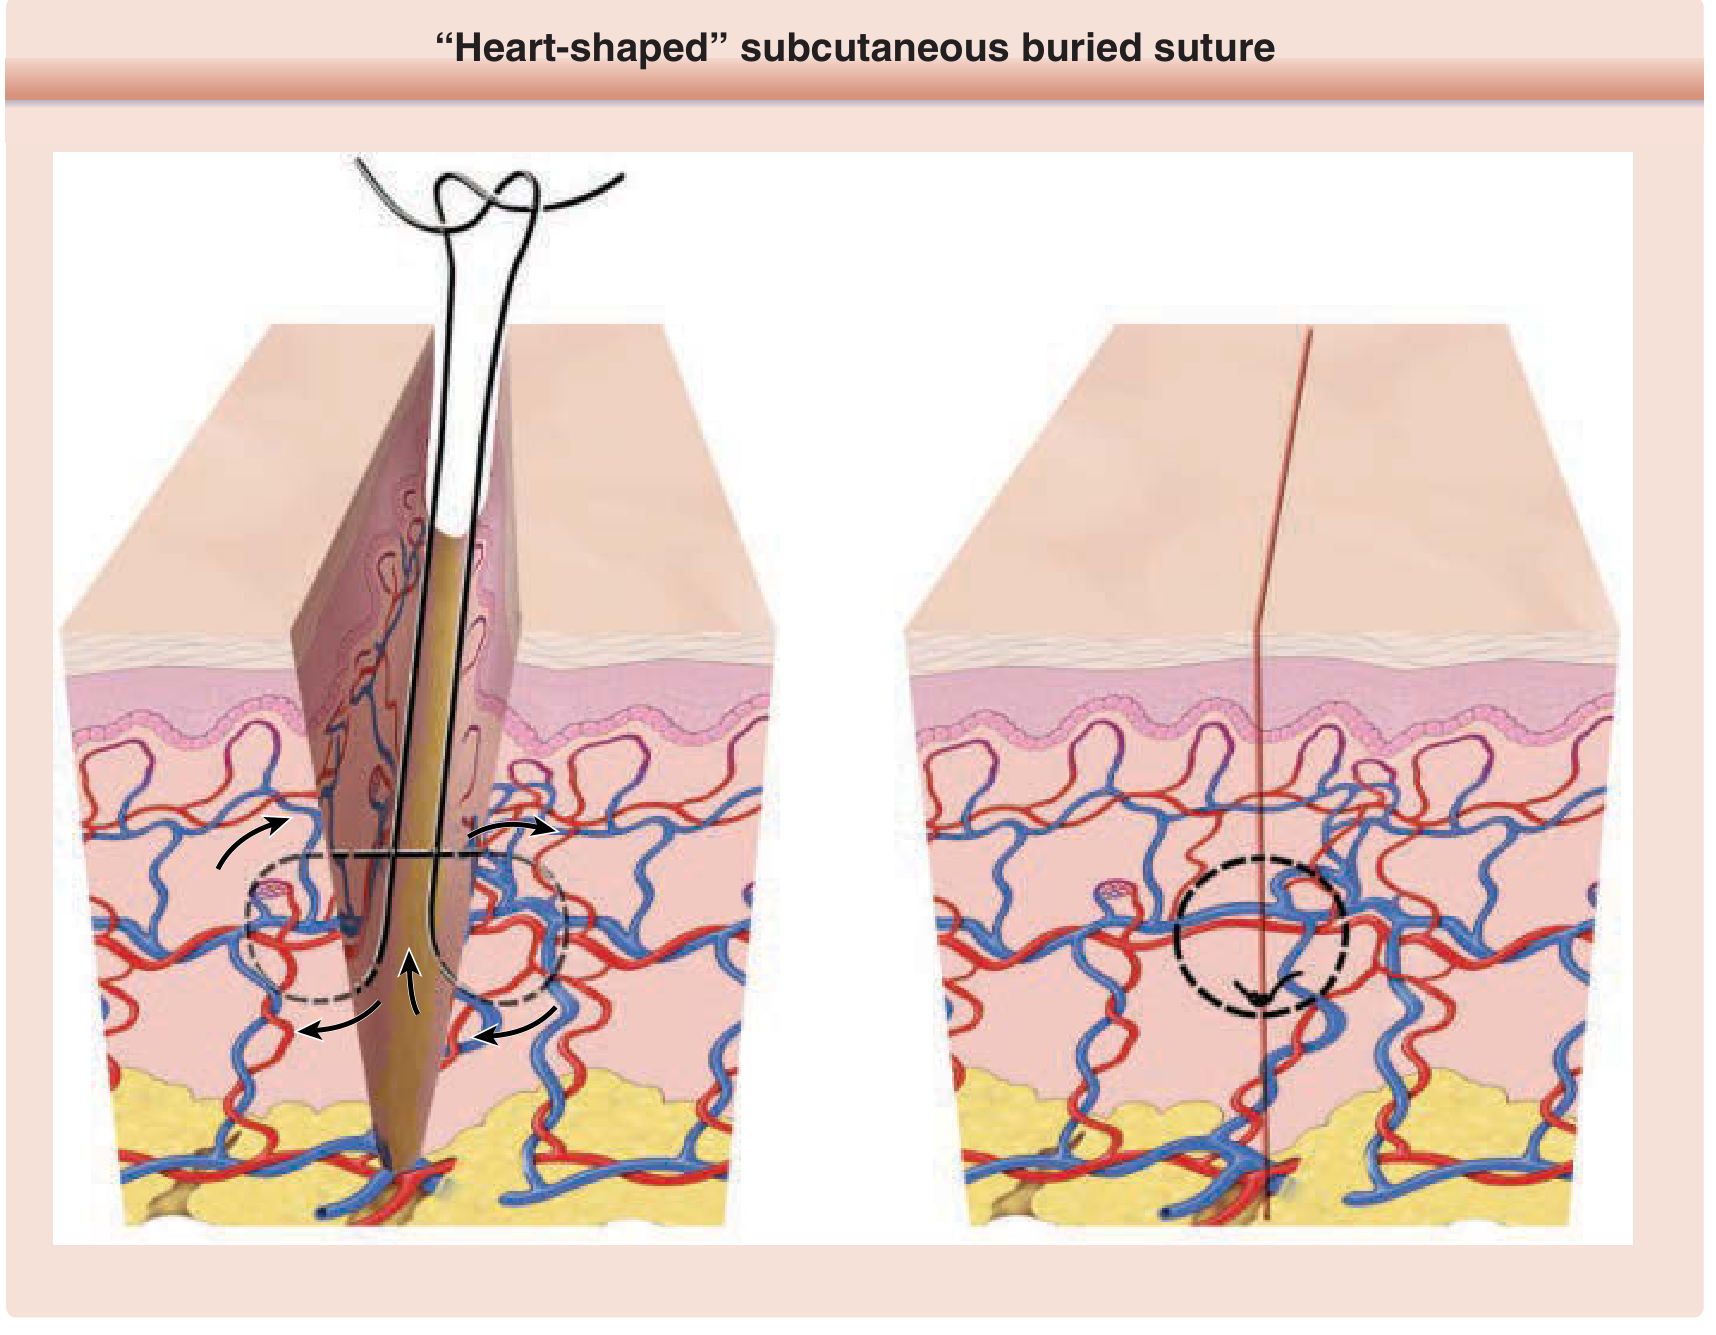
This is the deep layer stitch placed under the skin before closing the surface.
Why it's "heart-shaped":
- The needle enters deep on one side, loops up to the shallow dermis, crosses the wound, and exits deep on the other side
- When the knot is tied, the skin edges are pushed upward and outward (everted)
- The knot ends up buried below the skin surface so it doesn't poke through
From Fitzpatrick's Dermatology: "An ideal wound closure consists of meticulous wound edge approximation and eversion. As wound contraction normally occurs during healing, wound edge eversion at the time of closure promotes the development of a flat, smooth, cosmetically-appropriate scar."
Key Principles to Remember
- Needle enters at 90° to the skin surface
- Equal bites on both sides of the wound - same distance, same depth
- Approximate, don't strangulate - the edges should just touch, not be crushed
- Evert the edges (turn slightly outward) - they will flatten as healing occurs
- Suture length = 4x the wound length (Jenkin's Rule)
- Start at the center of the wound, then bisect outward for even spacingThe image is upside down but I can read all the instruments. Here's a complete explanation of the "World of Forceps" page:
🔧 World of Forceps - Simple Explanations
The image shows two categories written at the top (when flipped right-side up):
- To hold tubular structures (intestine, vessels)
- In-hydraulic (atraumatic - gentle, no crushing)
ROW 1 - Top Row Forceps
| Instrument | What it looks like | What it's used for |
|---|---|---|
| Babcock Forceps | Triangular/fan-shaped tip | Holds delicate tubular structures like intestine, fallopian tube, ureter - without crushing them |
| Rampley's Sponge Holding Forceps | Long, with ring tip | Holds sponges/gauze to clean the surgical field or prep the skin with antiseptic |
| Intestinal Clamps (Atraumatic) | Has ridged/serrated tip | Clamps the bowel/intestine temporarily without damaging it - atraumatic means no injury |
| Ovum Forceps | Two oval rings at tip | Used in gynaecology to remove products of conception (ovum/placental tissue) |
| Desjardins Forceps | Long, curved, narrow | Used for bile duct surgery - picks out gallstones from the common bile duct |
| Mayo's Towel Clip | Round rings, sharp tips | Clips surgical drapes/towels to the patient's skin to keep the sterile field in place |
ROW 2 - Bottom Row Forceps
| Instrument | What it looks like | Special feature | Used for |
|---|---|---|---|
| Kelly's Hemostatic Artery Forceps | Angled, serrated jaws | Shown in a set of 3 different angles | Clamping blood vessels to stop bleeding (hemostasis) |
| Mixter's Right Angled Forceps | Right-angle bend at tip | 90° angle | Passing sutures or ties around blood vessels and deep structures |
| Kocher's Forceps | Toothed tip with interlocking teeth | Has a lock mechanism | Holding tough tissues like fascia; also used in ARM (ano-rectal) surgery |
| Allis' Forceps | Multiple small teeth at tip | Has a lock (noted as "lock" in image) | Gripping tissue edges firmly - used in LSCS (caesarean section) |
| Green Armytage Forceps | Broad, flat tip | Used specifically in LSCS | Controls bleeding from the uterine incision edges during caesarean |
Memory Tips
| Feature | Instrument |
|---|---|
| Fan/triangle tip = delicate bowel | Babcock |
| Ring tip + long handle = swab holder | Rampley's |
| Right angle = going around vessels | Mixter's |
| Teeth + lock = grip and hold | Allis / Kocher |
| Broad flat tip = uterus bleeding | Green Armytage |
| Two ovals = gynaec products | Ovum forceps |
| Long curved tip = gallstones | Desjardins |
| Towel pin = drape holder | Mayo's towel clip |
Key Concept: Traumatic vs. Atraumatic
- Atraumatic (Babcock, Intestinal clamps) = gentle grip, does NOT crush or cut tissue - used on bowel, vessels, delicate organs
- Traumatic (Kocher's, Allis') = firm toothed grip, intended to hold tissue securely even if it causes minor damage - used on tougher structures like fascia or skin edges## World of Retractors - Simple Explanation
A retractor is a surgical instrument used to hold tissue, organs, or wound edges out of the way so the surgeon can see and work in the operating field. Think of it like holding open a door to look inside.
There are two types:
- Hand-held - an assistant holds it during surgery
- Self-retaining - has a locking mechanism, stays open on its own (no assistant needed)
The Retractors Explained
GROUP 1 - General Abdominal / Laparotomy Retractors
| Instrument | Shape | Used for |
|---|---|---|
| Czerny | Small curved hook, like a bent finger | Retracts superficial/skin edges in small wounds |
| Deaver's | Large, wide, smooth curved blade (like a big spoon shape) | Retracts liver, bowel - used in deep abdominal surgery. Very commonly used in laparotomy |
| Morris' | Flat wide blade with a gentle curve | General abdominal wall retraction - holds the wound edges open during laparotomy |
Note written on page: Czerny and Deaver's are used in laparotomy closure too - the curved blade sweeps under the abdominal wall to help place closure sutures.
GROUP 2 - LSCS (Caesarean Section) Retractors
| Instrument | Shape | Used for |
|---|---|---|
| Doyen's Retractor | Wide, flat, curved blade with a long handle | Used in LSCS - retracts the bladder downward to expose the lower uterine segment before the incision |
| Balfour's Retractor | Large frame with a central blade + two side wings | Self-retaining abdominal retractor used in LSCS and laparotomy - holds the entire wound open by itself |
GROUP 3 - Thyroid Surgery Retractors
| Instrument | Shape | Used for |
|---|---|---|
| Langenbach's | Small flat blade with a right-angle tip | Hand-held retractor for thyroidectomy - retracts the strap muscles of the neck to expose the thyroid |
| Joll's Self-retaining Thyroid Retractor (x2) | Two curved frames that lock together in a ring/oval shape | Self-retaining - holds the neck wound open during thyroidectomy without an assistant. Comes as a pair (x2) |
GROUP 4 - Mastoid / ENT Surgery Retractors
These are used in ear surgery (mastoidectomy - removal of mastoid bone behind the ear):
| Instrument | Shape | Special Feature |
|---|---|---|
| Mollison Self-retaining Mastoid Retractor | Ratcheted frame with multiple prongs | Self-retaining; prongs grip the scalp/tissue behind the ear |
| Jansen Self-retaining Mastoid Retractor | Similar ratcheted frame, slightly different prong design | Self-retaining; standard retractor for mastoid surgery |
| Perkin's Self-retaining Mastoid Retractor | Smaller, angled design | Self-retaining; used for smaller/deeper mastoid exposures |
Bottom of page - Karner Thyroid Dissector
A blunt dissecting instrument used during thyroidectomy to separate the thyroid gland from surrounding structures gently without cutting blood vessels.
Quick Memory Summary
| Surgery | Retractor(s) to remember |
|---|---|
| Laparotomy | Czerny, Deaver's, Morris' |
| LSCS (C-section) | Doyen's (bladder down), Balfour's (whole wound) |
| Thyroidectomy | Langenbach's (hand-held), Joll's (self-retaining) |
| Mastoidectomy (ENT) | Mollison, Jansen, Perkin's |
Hand-held vs. Self-retaining - at a glance
| Hand-held | Self-retaining |
|---|---|
| Czerny, Deaver's, Morris', Langenbach's, Doyen's | Balfour's, Joll's, Mollison, Jansen, Perkin's |
| Needs an assistant to hold | Locks open by itself |
| More flexible positioning | Frees up hands in the surgical team |
PART 1: Bags & Drains
A drain removes unwanted fluid (blood, pus, bile, urine) from inside the body after surgery or injury. A bag collects that fluid outside the body.
DRAINAGE BAGS
| Device | What it does |
|---|---|
| Abdominal Drainage Bag | Collects fluid draining from the abdominal cavity after surgery (e.g., after appendix removal, bowel surgery) |
| Chest Drainage Bag | Connected to an underwater seal drain — removes air, blood, or fluid from the chest (pleural) cavity |
CHEST DRAIN - How to Read It
The diagram shows an underwater seal drain with three important signs:
| Sign | What it means |
|---|---|
| Oscillating column (water level moves up/down) | Normal - means the drain is working, lung is expanding |
| Persistent ↑ bubbles (constant bubbling) | Bronchopleural Fistula - abnormal air leak from the lung into the chest cavity |
SUCTION DRAINS
| Device | Shape/Feature | Used for |
|---|---|---|
| Romovac Suction Drain | Closed system with negative (-ve) pressure bulb | Post-op wound drainage - sucks fluid out actively (closed suction) |
| Jackson Pratt Suction Drain | Grenade-shaped bulb, also closed negative pressure | Same as Romovac - used after breast, abdominal, and neck surgeries |
CATHETERS / TUBES
| Device | Special Feature | Used for |
|---|---|---|
| Pigtail Catheter | Curls into a "pigtail" loop at the tip (so it stays in place) | Draining abscesses and fluid collections - inserted using Seldinger technique (wire-guided) |
| Malecot's Catheter | Has 4 "wings" at the tip that open up like a flower | Draining thick pus or used as SPC (Suprapubic Catheter) for urine when normal catheter can't pass |
| T-tube (Kehr's tube) | Shaped like a letter T | Placed in the common bile duct after bile duct surgery - allows bile to drain out while the duct heals |
DJ STENT (Double J Stent) / Ureteric Stent
The X-ray shows a DJ stent inside the ureter (the tube from kidney to bladder):
- Has a J-curl at both ends - one curl sits in the kidney, one in the bladder
- Keeps the ureter open if it's blocked (by a stone, tumor, or after surgery)
- Inserted via Cysto-Urethroscopy (a camera passed through the urethra into the bladder)
PART 2: Hemostatic Devices
A hemostatic device stops bleeding during surgery. Each works by a different method.
CAUTERY (Burning to stop bleeding)
| Device | How it works | Key difference |
|---|---|---|
| Monopolar Cautery | Electric current flows from the instrument through the patient's body to a grounding pad | Needs a grounding pad on the patient's thigh/back. Use distilled water/glycine to irrigate (NOT RL/NS - they conduct electricity and disperse the current) |
| Bipolar Cautery | Current flows only between the two tips of the forceps - doesn't travel through the body | No grounding pad needed. Safe near nerves/brain. Irrigate with RL or NS |
Simple rule: Monopolar = current travels far (needs grounding), Bipolar = current stays local (safer)
LIGASURE / HARMONIC SCALPEL / THUNDERBEAT
These are advanced sealing devices that cut AND seal blood vessels simultaneously:
| Device | Mechanism | Simple explanation |
|---|---|---|
| LigaSure | Pressure + RF (radiofrequency) waves | Squeezes the vessel + uses heat to fuse the walls together permanently |
| Harmonic Scalpel | Ultrasonic oscillation (vibration) | Vibrates at 55,000 times/second - friction creates heat that cuts and seals |
| ThunderBeat | Oscillation + RF waves combined | Best of both - cuts faster AND seals more securely. Most advanced of the three |
CUSA (Cavitatory Ultrasound Surgical Aspirator)
- Uses ultrasonic vibrations to break up and suck out tissue
- Targets soft tissue (like tumors) while sparing blood vessels and bile ducts (which are more elastic)
- Used in liver surgery, brain surgery, and complex tumor removal
STAPLERS (Mechanical stitching devices)
| Device | What it does | Used for |
|---|---|---|
| Linear Stapler | Fires a straight row of staples and cuts in between | Zenker's Diverticulum (pouch in the throat/oesophagus) - staples across the neck of the pouch |
| Circular Stapler | Fires a circular ring of staples to join two hollow organs end-to-end | Haemorrhoids (PPH - stapled haemorrhoidopexy) - pulls the haemorrhoids back up and staples them |
Quick Summary Table
| Category | Device | One-line purpose |
|---|---|---|
| Drain | Romovac / Jackson Pratt | Suck out post-op wound fluid |
| Drain | Pigtail catheter | Drain abscess via wire technique |
| Drain | Malecot's | Thick pus / suprapubic urine |
| Drain | T-tube | Bile duct decompression |
| Stent | DJ stent | Keep ureter open |
| Cautery | Monopolar | General surgery cutting/burning |
| Cautery | Bipolar | Delicate/near-nerve surgery |
| Seal+Cut | LigaSure | Pressure + RF sealing |
| Seal+Cut | Harmonic | Vibration sealing |
| Seal+Cut | ThunderBeat | Combined best of both |
| Aspirator | CUSA | Remove tumors, spare vessels |
| Stapler | Linear | Zenker's diverticulum |
| Stapler | Circular | Haemorrhoids (PPH) |
PART 1: Surgical Safety Checklist (WHO Checklist)
This is the WHO Surgical Safety Checklist — a mandatory step-by-step verbal check done before every surgery to prevent wrong-site surgery, infections, and deaths. It has 3 phases:
PHASE 1 — SIGN IN
(Before the patient goes to sleep / before anesthesia)
| Check | What happens |
|---|---|
| Patient has confirmed | Patient verbally confirms their Identity, Procedure, and Site (which side/organ) |
| Written Consent | Consent form has been signed |
| Site Marked | The correct surgical site is marked on the body (e.g., "LEFT knee") |
| Anesthesia safety check completed | Anesthesia machine and drugs are checked |
| Pulse oximeter on patient & functioning | The oxygen monitor is attached and working |
| Does patient have known allergy? | Yes/No - allergy history confirmed |
| Difficult Airway? | Is intubation likely to be hard? Equipment ready? |
| Risk of >500 mL blood loss? | If yes - IV access, blood products ready |
PHASE 2 — TIME OUT
(Just before skin incision - the most important pause)
Everyone in the OT stops and confirms together:
| Check | What happens |
|---|---|
| All team members introduced | Everyone says their name and role |
| Surgeon + Anesthesia + Nurse confirm: | Patient name, Site, Procedure |
| Antibiotic prophylaxis given? | Cefazolin must be given 30-60 minutes before incision |
| Anticipated Critical Events | Surgeon mentions any expected difficult steps |
| Essential imaging displayed | X-rays, scans are visible on the screen |
PHASE 3 — SIGN OUT
(Before patient leaves the operating room)
| Check | What happens |
|---|---|
| Nurse verbally confirms with team | Name of procedure actually performed is recorded |
| Instrument, sponge and needle counts correct | Nothing is left inside the patient |
| Specimen labelled | Any tissue removed is correctly labelled with patient name |
| Any equipment issues? | Problems with instruments are noted |
| Surgeon + Anesthesia + Nurse review | Key concerns for recovery and post-op management discussed |
Why this matters: The WHO checklist has been shown to reduce surgical deaths by up to 40% worldwide.
PART 2: OT Zones (Operating Theatre Zones)
The OT is divided into 4 zones based on how clean/sterile they need to be. As you go from Zone 1 → Zone 3, the area becomes progressively more sterile.
| Zone | Name | What's in it | Who can enter |
|---|---|---|---|
| Zone 1 | Protective area | Reception, waiting area, trolley bay, change rooms | Everyone (patients, visitors, staff in normal clothes) |
| Zone 2 | Clean area | Pre-op room, recovery room, staff lounge, plaster room, stores | Staff in scrubs |
| Zone 3 | Sterile area | Operating Room, Anesthesia room | Staff in full scrub suit, cap, mask |
| Zone 4 | Disposal area | Dirty utility room, disposal corridor | Waste and used instruments exit here |
Think of it like layers of an onion - the operating table is at the cleanest center (Zone 3), and the outside world is the outermost layer (Zone 1).
PART 3: Hand Hygiene
Hand Hygiene is the single most effective method to prevent SSI (Surgical Site Infection)
Two Methods:
| Method | When to use |
|---|---|
| Alcohol Rub | When hands look clean - quick and effective |
| Soap & Water | When hands are visibly soiled (dirty, blood, body fluids) |
The 11 Steps of Hand Hygiene (WHO Technique):
| Step | Action |
|---|---|
| 0 | Wet hands with water |
| 1 | Apply enough soap to cover all surfaces |
| 2 | Rub palm to palm |
| 3 | Right palm over left back, fingers interlaced - then vice versa |
| 4 | Palm to palm, fingers interlaced |
| 5 | Backs of fingers to opposing palms, fingers interlocked |
| 6 | Rotational rubbing of left thumb clasped in right palm - then vice versa |
| 7 | Rotational rubbing backwards and forwards with clasped fingers of right hand in left palm - then vice versa |
| 8 | Rinse hands with water |
| 9 | Dry hands thoroughly with a single-use towel |
| 10 | Use towel to turn off faucet |
| 11 | Your hands are now safe |
Duration: At least 20-30 seconds for alcohol rub, 40-60 seconds for soap and water.
Quick Exam Summary
| Topic | Key Point |
|---|---|
| Antibiotic prophylaxis | Cefazolin, given 30-60 min before incision |
| Most sterile OT zone | Zone 3 (Operating Room) |
| Disposal zone | Zone 4 |
| Best method to prevent SSI | Hand Hygiene |
| Visibly soiled hands | Use Soap & Water (not alcohol) |
| Sign In timing | Before anesthesia |
| Time Out timing | Just before skin incision |
| Sign Out timing | Before patient leaves OT |
What is Laparoscopy?
Instead of making a large cut to open the abdomen, the surgeon makes 2-4 tiny holes (ports), inserts a camera (telescope) and long instruments, and operates while watching a screen. Less pain, faster recovery, smaller scars.
STEP 1: Getting INTO the Abdomen (Access Techniques)
Before surgery can start, the surgeon needs to safely enter the abdomen. There are two ways:
METHOD A — Veress Needle (Closed Technique)
A Veress needle is a special spring-loaded needle inserted blindly into the abdomen to pump in CO₂ gas first (creating space), then the camera port is inserted.
Where to insert it:
| Site | When to use |
|---|---|
| Umbilicus | Standard first choice |
| Palmer's Point | Left upper abdomen (below left ribcage) - used when there are previous scars around the umbilicus |
| Jain's Point | Alternative entry point |
| Palmer's / Jain's Point | If patient has prior surgery / adhesions around the umbilicus - too risky to enter there |
Rule: If previous surgery → avoid umbilicus → use Palmer's Point
Confirming You're in the Right Place (Intraperitoneal Position):
Before pumping gas in, you must confirm the needle tip is inside the abdominal cavity (not in bowel or a vessel):
| Test | How it works |
|---|---|
| Push Saline (Free Flow) | Inject saline - if it flows in freely with no resistance, you're in the right place |
| Aspirate (Air Bubble) | Pull back the syringe - if no blood or bowel content comes back, it's safe |
| Hanging Drop Method | A drop of saline is placed at the needle hub - negative pressure inside the abdomen sucks it in |
METHOD B — Hasson Technique (Open Technique)
Instead of a blind needle, the surgeon cuts down directly to the abdominal wall under vision and inserts the port under direct sight. Safer in patients with previous surgery.
STEP 2: The Gas Used
Once inside, gas is pumped in to inflate the abdomen (create a working space):
| Feature | Detail |
|---|---|
| Best gas | CO₂ (carbon dioxide) — safest, absorbed by the body |
| Why not others? | CO₂ > N₂O > Air > He (Helium) — order of preference |
| Ideal pressure | 12-15 mmHg |
| Flow rate | 1 L/min |
| Volume needed | 2 litres to create adequate space |
| Side effect of CO₂ | J-reflex — transient (temporary) increase in Heart Rate and possible Heart Block due to CO₂ absorption |
STEP 3: Camera and Instrument Angles
The diagram shows the three angles that matter in laparoscopy:
| Angle | What it means |
|---|---|
| Azimuth angle | The horizontal angle between the working instruments - ideally 60° between the two working ports and the telescope |
| Manipulation angle | The angle at which instruments can be moved - wider is better for freedom of movement |
| Elevation angle | The vertical angle of the telescope - affects the view |
Ideal port placement: Telescope in the middle, two working ports on either side like a triangle - this gives the best azimuth angle and avoids the "chopstick effect" (instruments crossing each other)
STEP 4: SILS (Single Incision Laparoscopic Surgery)
Only ONE hole (usually at the umbilicus) instead of multiple ports. All instruments go through one incision.
Advantages:
- Faster recovery
- No visible scar (hidden in umbilicus)
- Reduced risk of incisional hernia
STEP 5: Da Vinci Robotic Surgery
A robotic system controlled by the surgeon from a console. The robot arms hold and move the instruments with extreme precision.
| Feature | Laparoscopic Surgery | Robotic Surgery (Da Vinci) |
|---|---|---|
| DOF (Degrees of Freedom) | 4 | 7 (more movement = more precise) |
| Tremor | Surgeon's hand tremor transmitted | Tremor filtered out by robot |
| Precision | Good | Better |
| Tactile feedback | Present (can feel tissue resistance) | Lost (surgeon cannot "feel") |
Key exam point: Robotic surgery has 7 DOF (vs 4 in standard laparoscopy) and no tactile feedback — the surgeon cannot feel how hard they are gripping
Quick Summary Table
| Topic | Key Fact |
|---|---|
| Standard access point | Umbilicus |
| Previous surgery → use | Palmer's Point |
| Confirm needle position | Saline free flow + Aspirate + Hanging drop |
| Best gas | CO₂ |
| Ideal pressure | 12-15 mmHg |
| CO₂ side effect | Transient ↑ HR / Heart Block (J-reflex) |
| Single port technique | SILS |
| Robotic DOF | 7 (vs 4 in laparoscopy) |
| Robotic disadvantage | Loss of tactile feedback |
PART 1: ERAS Protocol
ERAS = Enhanced Recovery After Surgery
The idea is simple: instead of keeping patients fasting for long, resting in bed, and on IV drips for days — ERAS gets patients eating, moving, and recovering faster with less stress on the body. It is a set of evidence-based steps done before, during, and after surgery.
PRE-OP (Before Surgery)
| What | Why |
|---|---|
| No prolonged fasting - Solids allowed up to 6 hours before, clear liquids up to 2 hours before | Old practice of "nothing after midnight" is unnecessary and causes dehydration and insulin resistance |
| Carbohydrate loading - a carb drink given the night before surgery | Reduces post-op insulin resistance, nausea, and anxiety. Body starts surgery in a "fed" state |
| No bowel prep | Traditional bowel prep (laxatives) caused dehydration and discomfort with no proven benefit |
INTRA-OP (During Surgery)
| What | Why |
|---|---|
| Minimal access (laparoscopy where possible) | Smaller cuts = less pain, faster healing |
| Maintenance fluids only | Avoid fluid overload - too much IV fluid causes bowel swelling and delays recovery |
| Normothermia (keep body temperature normal) | Cold patients have more bleeding, infections, and delayed healing - use warming blankets |
| PONV prophylaxis (2 classes of drugs) | PONV = Post-Operative Nausea & Vomiting. Give Ondansetron + Steroids together to prevent it |
| Long-acting LA (Bupivacaine) or epidural analgesia | Give local anaesthetic at the wound site or epidural to reduce pain without opioids |
POST-OP (After Surgery)
| What | Why |
|---|---|
| Early feeding within 24 hours | Gut starts working sooner, reduces infections, shorter hospital stay |
| Early ambulation (walking early) | Prevents DVT (blood clots in legs), pneumonia, and muscle wasting |
| Discontinue IV fluids | Get patient eating/drinking instead - IV fluids are not needed once patient can eat |
| Multimodal analgesia (opioid-sparing) | Use combinations of paracetamol, NSAIDs, local anaesthetic - reduce or avoid opioids (which cause constipation, nausea, drowsiness) |
| Early catheter removal | Urinary catheter out as soon as possible - reduces UTI risk and helps patient mobilise |
ERAS in one sentence: Get the patient eating, moving, and off drips as fast as safely possible.
PART 2: Classification of Surgeries (Wound Classification)
This is the Altemeier / CDC wound classification — it classifies surgeries by how contaminated/infected the surgical field is, and predicts the risk of SSI (Surgical Site Infection).
The 4 Classes (Decision Flowchart Logic):
Ask Question 1: Is there gross pus, existing infection, perforated viscera >4hrs, traumatic wound >4hrs, or penetrating injury >4hrs?
YES →
🔴 CLASS IV — Dirty / Infected
| Feature | Detail |
|---|---|
| Definition | Active infection or old contamination already present before surgery |
| Examples | Drainage of abscess, repair of perforated bowel (>4hrs old), Gangrene surgery |
| SSI risk without antibiotics | >20% |
| SSI risk with antibiotics | 9% |
NO → Ask Question 2: Is there acute non-purulent inflammation, unplanned entry into bowel/lung/gut, or major break in sterile technique?
YES →
🟠 CLASS III — Contaminated
| Feature | Detail |
|---|---|
| Definition | Surgery where contamination occurred but not yet infected |
| Examples | Cholecystectomy with bile spillage, open cardiac massage, acute appendicitis (non-perforated) |
| SSI risk without antibiotics | 10-20% |
| SSI risk with antibiotics | 6% |
NO → Ask Question 3: Was there controlled/intentional entry into respiratory tract, GIT, or GUT?
YES →
🟡 CLASS II — Clean-Contaminated
| Feature | Detail |
|---|---|
| Definition | Planned entry into a hollow organ (bowel, lung, bladder) under controlled conditions, no spillage |
| Examples | Hysterectomy, Lobectomy (lung), Laryngectomy, Small bowel resection, TURP, LSCS |
| SSI risk without antibiotics | 2-10% |
| SSI risk with antibiotics | 3% |
NO →
🟢 CLASS I — Clean
| Feature | Detail |
|---|---|
| Definition | No hollow organ entered, no inflammation, perfect sterile technique |
| Examples | Mastectomy, Hernia repair, Thyroidectomy, TKR (knee replacement), THR (hip replacement), CABG (heart bypass) |
| SSI risk without antibiotics | <2% |
| SSI risk with antibiotics | <2% (antibiotics make little difference here) |
SSI Risk Summary Table
| Class | Type | SSI without AB | SSI with AB | Examples |
|---|---|---|---|---|
| I | Clean | <2% | <2% | Mastectomy, Hernia, Thyroidectomy, CABG |
| II | Clean-Contaminated | 2-10% | 3% | Hysterectomy, LSCS, Bowel resection |
| III | Contaminated | 10-20% | 6% | Bile spillage, Acute appendix |
| IV | Dirty/Infected | >20% | 9% | Abscess, Perforated bowel, Gangrene |
Key Exam Points
| Fact | Answer |
|---|---|
| ERAS carb loading: when? | Night before surgery |
| Clear liquids allowed until? | 2 hours before surgery |
| Solids allowed until? | 6 hours before surgery |
| PONV drugs used | Ondansetron + Steroids |
| Cleanest wound class | Class I (<2% SSI) |
| Dirtiest wound class | Class IV (>20% SSI) |
| LSCS wound class | Class II (Clean-contaminated) |
| Cholecystectomy with bile spillage | Class III (Contaminated) |
| Perforated bowel repair | Class IV (Dirty) |
PART 1: Post-Operative Fever
When a patient gets fever after surgery, the timing tells you the cause. This is remembered with the "5 W's" mnemonic (Wonder drugs, Wind, Water, Walking, Wound).
The 5 W's of Post-Op Fever
| Day (POD) | Cause | Mnemonic | Prevention |
|---|---|---|---|
| Any time | Drug reaction / Malignant Hyperthermia | Wonder drugs | Stop the offending drug immediately |
| POD 1-3 | Atelectasis (MCC on Day 1) = lung collapse | Wind | Incentive spirometry, Early mobilisation, Antibiotics |
| POD 3-4 | UTI (MCC overall) | Water | Short-term Foley catheter use only |
| POD 4-5 | DVT (Deep Vein Thrombosis) | Walking | Early mobilisation, Compression stockings, LMWH (most effective) |
| POD 7+ | SSI (Surgical Site Infection) | Wound | Dressing changes, Pre-op antibiotics |
Simple Way to Remember:
"Wonder drugs blow Wind into Water while Walking to the Wound" Anytime → POD1-3 → POD3-4 → POD4-5 → POD7+
DVT Prevention Devices (shown in images):
| Device | What it does |
|---|---|
| Incentive Spirometer | Patient breathes into it to expand lungs and prevent atelectasis |
| Intermittent Pneumatic Compression (IPC) Stocking | Inflates and deflates around the legs rhythmically - pumps blood back up to prevent clots |
| Military Anti-Shock Garment (MASG) | Compresses the legs and abdomen - used in shock and also DVT prevention |
PART 2: Surgical Site Infections (SSI)
Definition:
- Infection occurring within 30 days of surgery
- Within 1 year if an implant (mesh, prosthesis) was placed
Southampton Grading (How bad is the wound?)
| Grade | What it looks like | Simple meaning |
|---|---|---|
| Grade I | Mild bruising or redness only | Normal healing - just a bit red |
| Grade II | Redness + other signs of inflammation (swelling, warmth) | Getting worse - early infection |
| Grade III | Clear or blood-stained (haemoserous) discharge | Fluid leaking - not yet pus |
| Grade IV | Pus coming out | Definite infection - needs antibiotics/drainage |
| Grade V | Deep infection, tissue breakdown, or hematoma needing drainage | Worst - may need surgical re-opening |
ASEPSIS Criterion (Scoring System for SSI)
Each letter scores points - the higher the score, the worse the infection:
| Letter | Stands for |
|---|---|
| A | Additional treatment needed (antibiotics / Incision & Drainage) |
| S | Serous discharge |
| E | Erythema (redness) |
| P | Purulent exudates (pus) |
| S | Separation of deep tissues |
| I | Isolation of bacteria from wound |
| S | Stay in hospital prolonged beyond 14 days |
Memory: All Surgeons Expect Perfect Sterile Incisions to Succeed
Burst Abdomen (Wound Dehiscence)
This is when the abdominal wound completely breaks open after surgery - a surgical emergency.
| Feature | Detail |
|---|---|
| Timing | Typically Day 6 post-op |
| Pathognomonic sign | Salmon-colored (sero-sanguinous) fluid leaking from the wound - this is the warning sign BEFORE the wound bursts open |
| Management | Cover the bowel with a Bagota Bag or Urobag (sterile bag to protect exposed bowel) and take back to OT immediately |
Key exam point: Salmon-coloured discharge from wound on Day 6 = Burst abdomen until proven otherwise
Intra-abdominal Abscess (Pus pocket inside the abdomen)
| Feature | Detail |
|---|---|
| Most common site | Supine position: Morrison's Pouch (between liver and right kidney) |
| Most common overall / ambulatory | Pelvis (because fluid drains down by gravity when standing) |
| Investigation of choice (IOC) | CECT (Contrast-Enhanced CT scan) |
| Treatment of choice (TOC) | Pigtail Catheter drainage (percutaneous - through the skin, guided by ultrasound/CT) |
Quick Exam Bullet Points
| Fact | Answer |
|---|---|
| MCC fever on Day 1 | Atelectasis |
| MCC fever overall | UTI |
| Best DVT prevention drug | LMWH |
| Burst abdomen timing | Day 6 |
| Burst abdomen fluid colour | Salmon / sero-sanguinous |
| Burst abdomen emergency cover | Bagota Bag / Urobag |
| SSI definition window | 30 days (1 year if implant) |
| MC site of abscess (supine) | Morrison's Pouch |
| MC site of abscess (overall) | Pelvis |
| Investigation for abscess | CECT |
| Treatment for abscess | Pigtail Catheter |
| Grade IV Southampton | Pus |
| Grade V Southampton | Deep infection / tissue breakdown |
PART 1: SEPSIS
What is SIRS?
SIRS = Systemic Inflammatory Response Syndrome — the body's exaggerated response to stress (infection OR non-infection like trauma, burns, pancreatitis).
Diagnosis: ≥ 2 of the following (mnemonic: White THR):
| Parameter | Abnormal value |
|---|---|
| Temperature (Core) | <36°C or >38°C |
| Heart Rate | >90 bpm |
| Respiratory Rate | >20/min OR PaCO₂ <32 mmHg |
| WBC | >12,000 OR <4,000 OR >10% band forms |
The Spectrum (OLD definitions):
| Term | Meaning |
|---|---|
| SIRS | ≥2 SIRS criteria (any cause) |
| Sepsis | SIRS + Infection |
| Severe Sepsis | Sepsis + Organ Dysfunction |
| Septic Shock | Severe Sepsis + ↓BP → needs IV fluids + Vasopressors |
NEW Definitions (Sepsis-3):
| Term | Meaning |
|---|---|
| Sepsis | Life-threatening organ dysfunction caused by infection → SOFA score ≥ 2 |
| Septic Shock | Sepsis + needs IV fluids + vasopressors AND MAP ≥ 65 AND Lactate > 2 mmol/L |
qSOFA (quick bedside screen): Altered mental status + RR ≥22 + SBP ≤100 → score 0-3. Score ≥2 = likely sepsis
Surviving Sepsis Guidelines — TARGETS:
| Parameter | Target |
|---|---|
| CVP (Central Venous Pressure) | 8-12 mmHg |
| MAP (Mean Arterial Pressure) | >65 mmHg |
| MvO₂ (Mixed venous oxygen saturation) | >70% |
| Urine Output | >0.5 mL/kg/hr in adults (>1 in children) |
THE SEPSIS SIX — "Give 3, Take 3"
Give 3:
- Give O₂ (keep SpO₂ >94%)
- Give IV antibiotics
- Give IV fluid challenge
Take 3:
4. Take blood cultures
5. Measure lactate
6. Measure urine output
Do all 6 within 1 hour of recognising sepsis
Trauma Scores (briefly mentioned):
| Score | What it is |
|---|---|
| RTS | Revised Trauma Score - based on GCS, BP, RR |
| TRISS | RTS + ISS (Injury Severity Score) + MOI (mechanism of injury) + age = predicts survival probability |
PART 2: SHOCK
Shock = inadequate tissue perfusion — cells not getting enough oxygen.
Types of Shock — Hemodynamic Profile:
| Type | CO (Cardiac Output) | SVR (Resistance) | CVP (Filling pressure) | Simple explanation |
|---|---|---|---|---|
| Cardiogenic | ↓↓ | ↑ | ↑ | Heart pump failing - output drops, fluid backs up |
| Hypovolemic | ↓ | ↑ | ↓ | Not enough blood volume - heart has nothing to pump |
| Obstructive | ↓ | ↑ | ↑ | Something blocking blood flow (PE, tamponade) |
| Distributive | ↑↑ | ↓ | ↓ | Blood vessels dilated everywhere (sepsis, anaphylaxis) |
| Neurogenic | ↓↓ | ↓ | ↓ | Nerve signal loss → vessels dilate + heart slows |
Key trick: Distributive (septic) shock is the only one with ↑CO and ↓SVR - the heart pumps fast but blood pools in dilated vessels
Warm vs Cold Extremities:
| Finding | Type |
|---|---|
| Shock + Warm extremities + MvO₂ >70% | Septic shock (distributive) - blood flowing but not being used |
| Shock + Cold/clammy extremities | All other types (vasoconstriction to compensate) |
Shock Indices (Quick bedside tools):
| Index | Formula | Critical value |
|---|---|---|
| Shock Index | HR ÷ SBP | >0.9 = critical shock |
| Modified Shock Index | HR ÷ MAP | >0.9 = critical shock |
| ROPE | HR ÷ Pulse Pressure | >3 = critical shock |
Normal Shock Index = 0.5-0.7. As HR rises and BP falls → index rises → more severe shock
Best Indicators in Shock:
| What you want to know | Best indicator |
|---|---|
| Adequacy of resuscitation (is treatment working?) | Urine Output |
| How much fluid is needed? | CVP |
| Tissue perfusion (lab) | Base Deficit + Lactate |
| Systemic perfusion (overall) | Lactate + MvO₂ |
Monitoring a Shock Patient:
| Minimum (every patient) | Additional (ICU/severe) |
|---|---|
| ECG | Central Venous Pressure (CVP) |
| Pulse oximetry | Invasive blood pressure (arterial line) |
| Non-invasive BP | Cardiac output monitoring |
| Urine output | Base deficit + serum lactate |
Flow Phase — Body's Response to Trauma/Shock:
The body releases hormones to survive:
Acute response (immediate):
- ↑ Cortisol (stress hormone)
- ↑ Catecholamines (adrenaline - speeds heart, constricts vessels)
- ↑ Glucagon (raises blood sugar)
- ↑ Growth hormone, ↑ ACTH
- ↑ Inflammatory cytokines: IL-1, IL-6, IL-8, TNF-α
Chronic response (prolonged stress):
- ↓ Insulin (can't store energy)
- ↓ IGF-1, ↓ Testosterone, ↓ T3 (thyroid)
- Body enters catabolic state (breaking down muscle for energy)
Quick Exam Summary
| Fact | Answer |
|---|---|
| SIRS needs how many criteria? | ≥ 2 |
| New sepsis definition uses which score? | SOFA ≥ 2 |
| Septic shock lactate target | >2 mmol/L |
| MAP target in sepsis | >65 mmHg |
| Urine output target in adults | >0.5 mL/kg/hr |
| Sepsis Six: "Give 3" | O₂, Antibiotics, IV fluids |
| Sepsis Six: "Take 3" | Cultures, Lactate, Urine output |
| Only shock with ↑CO | Distributive (Septic) |
| Only shock with ↓SVR + ↓CVP | Distributive + Neurogenic |
| Shock index >0.9 means | Critical shock |
| Best clinical indicator of resuscitation | Urine output |
| Best lab indicator of perfusion | Lactate |
This is a shared conversation. Sign in to Orris to start your own chat.