
Incisional hernia
Reading File
Now let me search the medical library for incisional hernia content in parallel.
Finding Sources
Finding Sources
Searching PubMed
"incisional hernia" repair mesh
Good results. Now let me read the key sections in parallel - Bailey & Love, Fischer's Mastery, and Maingot's.
Reading File
Reading File
Reading File
Now let me read the Bailey & Love clinical features/treatment section and Fischer's high-risk patient + repair sections.
Reading File
Reading File
Now let me get the Bailey & Love repair techniques section and the Fischer's repair and prophylactic mesh sections.
Reading File
Reading File
I now have comprehensive content. Let me also fetch a clinical image from Bailey & Love.
Loading Image
I now have all the information needed for a comprehensive answer. Let me compile it.
Incisional Hernia
An incisional hernia is a protrusion of abdominal contents through a defect in the musculofascial layers at the site of a previous surgical scar. It is the most common long-term complication of abdominal surgery.
Definition
A hernia that arises through a defect in the musculofascial layers of the abdominal wall at the site of a postoperative scar. It can occur wherever a laparotomy has been made.
Incidence
- 10-50% after open laparotomy incisions
- 1-5% after laparoscopic port-site incisions
- Midline incisions carry the highest risk compared to off-midline incisions
- Rates can reach 50% in specific high-risk populations
- Bailey and Love's Short Practice of Surgery, 28th Ed.
Aetiology and Risk Factors
Risk factors fall into three categories:
Patient Factors
- Obesity (increases intra-abdominal pressure AND wound infection risk)
- Diabetes (impairs wound healing)
- Malnutrition
- Immunosuppression / steroid therapy
- Smoking
- Chronic cough / COPD (elevated intra-abdominal pressure)
- Genetic collagen disorders
- Previous wound infection
Wound Factors
- Poor-quality tissue
- Wound tension
- Wound infection / surgical site infection (SSI) - an independent predictor of early (<6 months) incisional hernia formation
Surgical/Technical Factors
- Inappropriate suture material
- Poor closure technique
- Drains brought through the midline wound (prevents fascial apposition)
- Ostomies through the midline incision
- Incorporating fatty/muscular tissue in fascial bites (causes ischemia and necrosis)
- Fischer's Mastery of Surgery, 8th Ed.; Bailey and Love, 28th Ed.
Pathophysiology
The hernia usually starts as disruption of the musculofascial layers in the early postoperative period. This may:
- Progress rapidly to full-thickness wound dehiscence, heralded by serosanguineous discharge around the 6th postoperative day
- Pass unnoticed if overlying skin has healed, with a visible swelling appearing weeks, months, or years later
The linea alba (fusion of bilateral anterior and posterior rectus sheath collagenous layers) is the key structural layer. When sutures incorporate fatty or muscular tissue, those areas become ischemic under tension, leading to seroma, SSI, and eventual fascial disruption.
Clinical Features
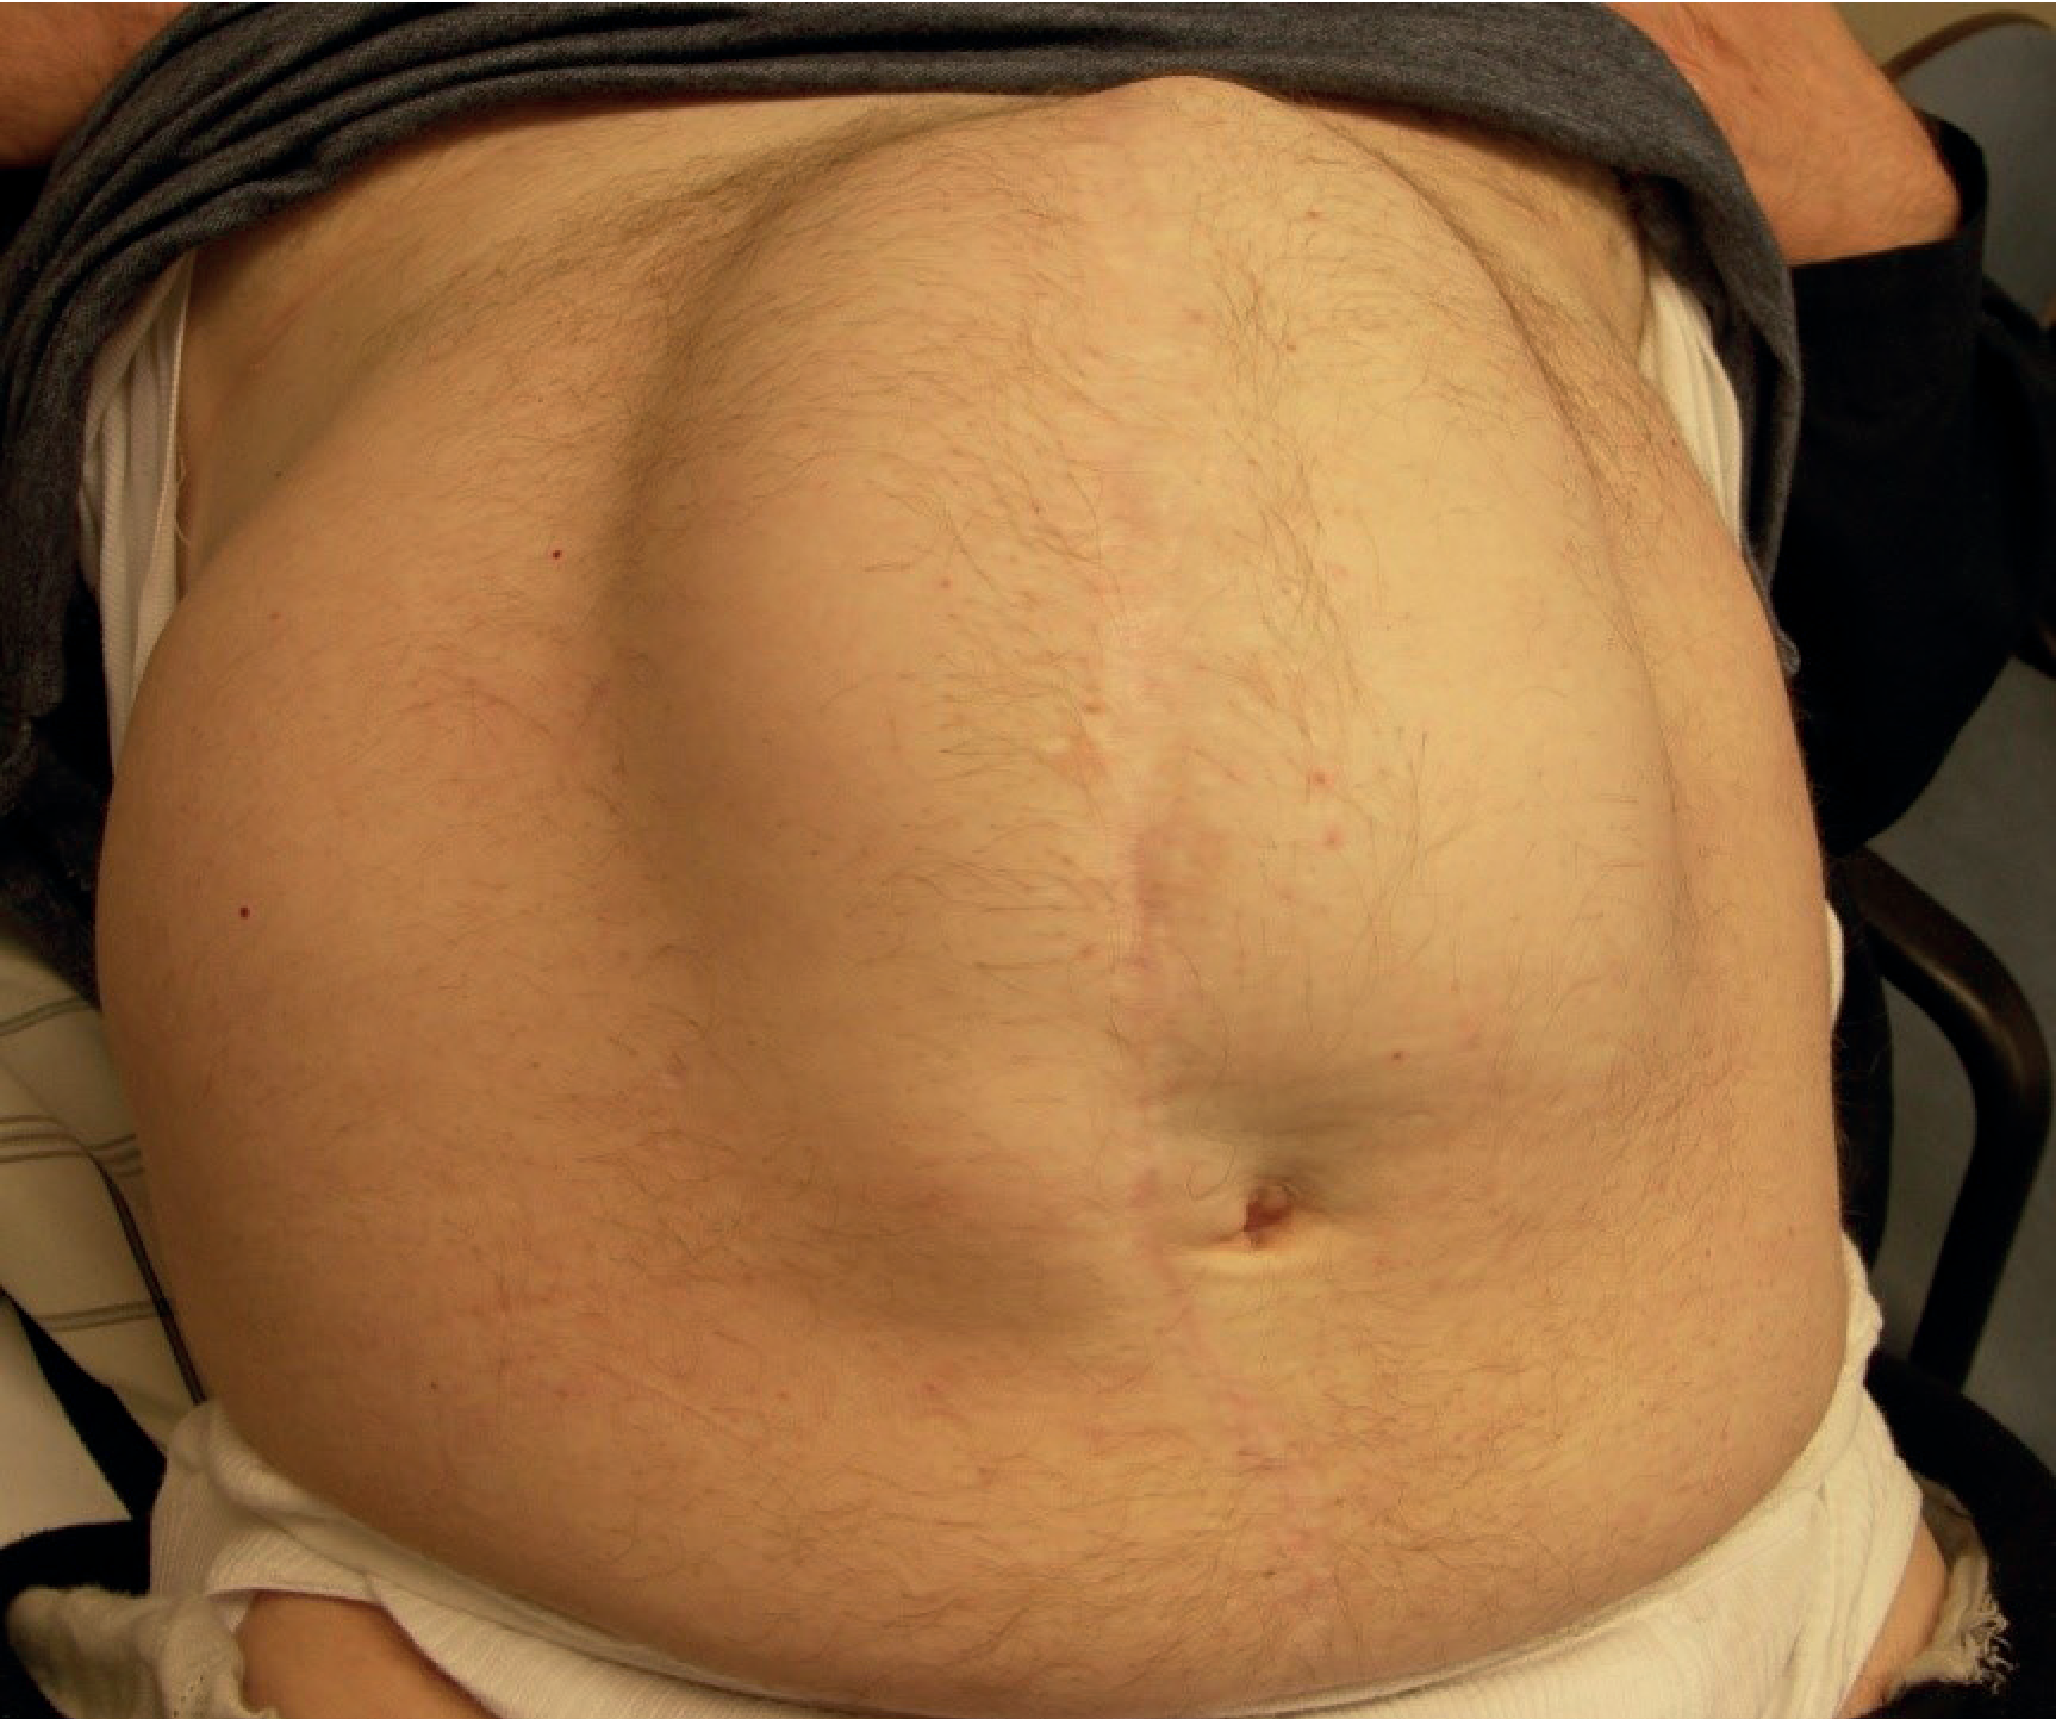
Large incisional hernia involving the full length of the midline incision (Bailey and Love, Fig. 64.25)
- Localised swelling at the surgical scar, OR diffuse bulging along the whole incision length
- Multiple discrete defects within the same scar are very common (always check full incision length)
- Hernia tends to increase in size over time
- Overlying skin may become thin, atrophic, and prone to ulceration
- Obstruction is common (due to coexisting internal adhesions)
- Strangulation is less frequent - most incisional hernias are shallow and wide-necked; strangulation is most likely when the fibrous defect is small and the sac is large
Risk Stratification
The HERNIA score is an externally validated tool that considers both patient and operative factors to identify those at high risk, guiding decisions about prophylactic mesh augmentation.
Prevention
- Preoperative optimisation - smoking cessation, weight loss, glycaemic control, nutritional support
- Fascial closure technique:
- Close the linea alba only - do not incorporate fat or muscle
- Small-stitch, small-bite technique (STITCH trial): 5 mm fascial bites spaced 5 mm apart
- Suture length:wound length ratio of ≥4:1 (European Hernia Society guideline)
- Use slowly absorbable monofilament suture (e.g. 2-0 PDS with 30-40 mm needle)
- Avoid closing under excessive tension
- Drains must exit through separate stab incisions, never through the midline wound
- Prophylactic mesh augmentation (PMA) in high-risk patients - reduces incisional hernia formation regardless of mesh plane (onlay, retrorectus, preperitoneal, or intraperitoneal)
- Use laparoscopic approach when safe and feasible (lower hernia risk vs open)
- Bailey and Love, 28th Ed.; Fischer's Mastery of Surgery, 8th Ed.
Treatment
Conservative
- Asymptomatic hernias may not require immediate surgery
- Abdominal binder/belt provides symptomatic relief and may limit enlargement
- Patients with significant comorbidities: balance benefits vs operative risks carefully
Preoperative Optimisation ("Prehabilitation")
- Weight loss (loss of 7% bodyweight achieves significant metabolic improvement; 5 kg body weight ~1 extra litre of intra-abdominal space in adult males)
- Smoking cessation
- Fitness improvement and core-strengthening exercises
- Multidisciplinary team assessment is increasingly standard
Surgical Principles
- Repair must cover the entire length of the previous incision
- Musculofascial approximation with minimal tension
- Prosthetic mesh should be used to reduce recurrence risk
- Contraindicated in grossly contaminated field (e.g. perforated strangulated bowel)
- May be used in clean-contaminated field (e.g. elective bowel resection) with strict hygiene and prophylactic antibiotics
- Mesh should augment primary fascial closure - not "bridge" a gap (bridging repair leads to central mesh bulge)
Mesh Placement Planes (ICAP Classification, 2019)
| Plane | Description | Notes |
|---|---|---|
| Onlay | On top of anterior rectus sheath/external oblique | Simplest; risk of exposure, wound seroma, skin ischaemia |
| Inlay | Inlaid into the defect | Rarely used |
| Sublay - Retromuscular | Between posterior rectus sheath and rectus muscle | Preferred by many surgeons; good vascularisation |
| Sublay - Preperitoneal | Between peritoneum and posterior rectus sheath | Good plane, avoids visceral contact |
| Sublay - Intraperitoneal | Inside peritoneal cavity | Open approach difficult; risk of adhesions, visceral erosion, fistula |
Surgical Approaches
Open Repair
- Open previous incision along its full length to expose unsuspected defects
- Expose hernial sac, neck, and margins; reduce contents; divide adhesions; excise redundant sac
- Primary suture repair alone (Mayo/da Silva overlap) - NOT recommended due to unacceptable recurrence rates; only acceptable in gross contamination where mesh is contraindicated
- For small hernias (<2 cm): primary closure may be acceptable
- For larger defects: mesh-based repair is standard
Laparoscopic Repair
- Laparoscopy and adhesiolysis performed first
- Hernia contents reduced
- Mesh placed intraperitoneally and fixed with tacks/sutures
- Advantages: less wound morbidity, shorter hospital stay
- Access ports at a distance from the hernia; may need robotic assistance for complex cases
Component Separation
Used for large, complex hernias where primary fascial closure cannot be achieved without undue tension. Involves releasing the external oblique aponeurosis ± transversus abdominis release (TAR) to gain medialization of rectus muscles.
Complications of Repair
- Wound seroma (very common, especially with large flap elevation)
- Wound infection / SSI
- Mesh infection (may require mesh removal)
- Recurrence (lower with mesh vs suture alone)
- Adhesive bowel obstruction (especially with intraperitoneal mesh)
- Visceral erosion/fistula
Key Points Summary
- Incidence: 10-50% after laparotomy; 1-5% after laparoscopic ports
- Most important modifiable prevention factor: fascial closure technique (small-bite, ≥4:1 suture:wound ratio)
- Obstruction is common; strangulation is rare (wide-necked)
- Multiple defects in same scar are very common - always explore full incision
- Mesh repair is standard - simple suture repair has unacceptable recurrence
- Retromuscular/sublay plane is preferred for mesh placement
- Prehabilitation (weight loss, smoking cessation) is important preoperatively
Sources: Bailey and Love's Short Practice of Surgery 28th Ed., Fischer's Mastery of Surgery 8th Ed., Maingot's Abdominal Operations
Steps for incisional hernia
The surgical steps for incisional hernia repair vary by technique (open primary, open mesh, or laparoscopic). Let me get the detailed operative steps from the surgical textbooks.
Searching sources...
Finding Sources
Finding Sources
Reading File
Reading File
Reading File
Reading File
Reading File
Reading File
Reading File
I now have all the operative details needed. Here is the complete step-by-step guide.
Surgical Steps for Incisional Hernia Repair
There are three main operative approaches. Steps are described for each.
A. Open Primary Suture Repair
(For small defects <2-4 cm with strong, viable surrounding tissue)
Step 1 - Anaesthesia and Positioning
- General anaesthesia to achieve full relaxation of abdominal wall musculature
- Patient supine, arms out
- Foley catheter for bladder decompression
- Orogastric tube for gastric decompression
Step 2 - Incision
- Open through the previous scar along its full length (to expose any unsuspected additional defects)
- Dissect through subcutaneous tissues carefully - sac contents may lie just at the level of the anterior rectus sheath
Step 3 - Identify and Expose the Defect
- Identify the hernial sac and clear it of all attachments to the fascia using electrocautery
- Expose the full circumference of the fascial defect
- Clear fascia of soft tissue both anteriorly and posteriorly for a 3-4 cm margin of healthy fascia all around the defect
Step 4 - Sac Management
- Reduce hernia contents back into the abdominal cavity
- Take down any peritoneal attachments to the anterior abdominal wall
- Open the sac, divide any internal adhesions, and reduce contents
- Excise redundant sac if present
Step 5 - Fascial Closure (Small-Bite Technique - STITCH Trial)
- Clear fascial edges of extraneous fat and muscle (to avoid incorporating ischemic tissue)
- Use a 2-0 slowly resorbable monofilament suture (e.g. PDS) with a 30-40 mm needle
- Running technique with 5 mm fascial bites spaced 5 mm apart
- Suture length:wound length ratio must be ≥ 4:1
- Alternative for wide defects: interrupted figure-of-eight sutures placed loosely along the wound first, then cinched together to distribute tension evenly
Step 6 - Inspect Repair
- Confirm no additional unsuspected defects
- Confirm sutures are not pulling through tissue (if so, tension is excessive - proceed to component separation)
Step 7 - Wound Closure
- Closed suction drain in the subcutaneous space if a large dead-space pocket remains
- Skin closed with staples or running subcuticular suture
Note: If tension is excessive on attempted closure, component separation (Ramirez technique) is required - see below.
B. Open Mesh Repair
(Standard of care for defects >4 cm or high recurrence risk; reduces recurrence from ~43% to ~24%)
Step 1 - Anaesthesia, Positioning, Preparation
- General anaesthesia; supine position with arms out
- Foley catheter and orogastric tube placed
Step 2 - Incision and Exposure
- Incision extends beyond the hernia defect in all directions
- Dissect down to anterior rectus sheath
- Identify the defect; clear fascia with a 3-4 cm margin of healthy fascia circumferentially
Step 3 - Adhesiolysis
- Perform adhesiolysis to free the entire anterior abdominal wall (improves mobilisation and medialization for closure)
- Dissect in planes other than intraperitoneal where bowel is fused to peritoneum to minimise visceral entry
- If intraperitoneal entry is necessary, carefully take down adhesions
- Remove all prior intraperitoneal mesh (reduces infection/fistulisation risk)
- After adhesiolysis, inspect bowel for any inadvertent injury and repair
Step 4 - Determine Need for Full Enterolysis
- If no preoperative bowel obstruction symptoms: anterior abdominal wall adhesiolysis alone suffices
- If signs of bowel obstruction preoperatively: full enterolysis required (with careful judgment to avoid unnecessary dissection of clinically insignificant fused bowel)
Step 5 - Protect Viscera
- Place a large, counted laparotomy towel over the entire viscera to prevent injury during subsequent dissection and mesh placement
Step 6 - Myofascial Release (if needed for tension-free closure)
See Component Separation below. If primary closure is achievable without tension, proceed directly to Step 7.
Step 7 - Mesh Selection and Preparation
- Mesh is cut to the shape of the defect with a generous circumferential margin added (at least 3-5 cm overlap all around)
- Mesh types:
- Polypropylene (macroporous, promotes tissue ingrowth/incorporation) - most common
- ePTFE (microporous, less adhesion but requires secure fixation)
- Biologic mesh (acellular dermal matrix - for contaminated/infected fields)
Step 8 - Mesh Placement (Plane Choice)
| Plane | Position | Notes |
|---|---|---|
| Onlay | On top of anterior rectus sheath | Simplest; large skin flaps needed; seroma/skin ischaemia risk |
| Inlay | Bridging the defect without tissue overlap | Avoid electively - poor outcomes; acceptable only in emergencies |
| Retromuscular (sublay) | Between posterior rectus sheath and rectus muscle | Preferred plane - good vascularisation, low infection risk |
| Preperitoneal (sublay) | Between peritoneum and transversalis fascia | Good; avoids visceral contact |
| Intraperitoneal (sublay) | Inside the peritoneal cavity | Use barrier-coated mesh to prevent adhesions/fistulae |
Step 9 - Mesh Fixation
- Suture mesh to fascia with large, nonabsorbable interrupted sutures at multiple sites throughout the entire circumference
- Distributes tension evenly across the entire patch
- Ensure ≥3-5 cm overlap of healthy fascia around the defect
- For intraperitoneal mesh: also use tacking staples (laparoscopic tacks)
- Omentum can be interposed between bowel and mesh where possible
Step 10 - Fascial Closure Over Mesh
- Bring fascial edges together over the mesh (augmented/reinforced closure, not bridging)
- Small-bite technique as described above
Step 11 - Wound Closure
- Closed suction drain placed away from the mesh to minimise infection risk
- Layered subcutaneous closure; skin staples or subcuticular suture
C. Laparoscopic Repair
Step 1 - Preparation
- General anaesthesia; supine with arms tucked
- Foley catheter and orogastric tube
- Ensure port placement sites are distant from the hernia defect
Step 2 - Port Placement
- Initial access away from the scar (open Hasson technique preferred to avoid inadvertent bowel entry)
- Additional working ports placed laterally, well away from the defect
Step 3 - Laparoscopic Adhesiolysis
- Divide all adhesions between bowel/omentum and the anterior abdominal wall
- Use sharp dissection (scissors preferred over energy devices to avoid thermal bowel injury)
- Inspect bowel for injury at completion
Step 4 - Define the Defect
- Identify all fascial defects from the inside
- Measure the defect accurately using intraperitoneal measurement (usually with a spinal needle and ruler or marking pen on skin)
Step 5 - Mesh Selection and Sizing
- Use a barrier-coated mesh (e.g. composite dual-layer mesh) to prevent visceral adhesions
- Mesh sized to overlap defect by 3-5 cm in all directions
Step 6 - Mesh Delivery and Orientation
- Mark mesh orientation before introduction (to ensure correct positioning once inside)
- Roll/fold mesh and introduce through a port
- Unfurl and position under laparoscopic vision
Step 7 - Mesh Fixation
- Transfascial (full-thickness) sutures placed at cardinal points first (usually 4 sutures: superior, inferior, left, right)
- Circumferential tacking with laparoscopic tackers (~1 cm apart) around the entire mesh perimeter
- Some surgeons use suture fixation alone (avoids chronic tack pain)
Step 8 - Inspection and Closure
- Inspect mesh position, ensure no herniation of bowel or omentum beside the mesh
- Inspect for bowel injury throughout
- Deflate pneumoperitoneum
- Port sites >5 mm closed at fascial level to prevent port-site herniation
D. Component Separation (Ramirez Technique)
(When fascial closure cannot be achieved without undue tension)
Step 1 - Develop skin/subcutaneous flaps off the anterior rectus sheath out to the linea semilunaris
Step 2 - Incise the posterior rectus sheath just lateral to the linea alba; separate rectus abdominis from posterior sheath
Step 3 - Incise the external oblique aponeurosis just lateral to the linea semilunaris from costal margin to iliac crest
Step 4 - Separate the external oblique from the internal oblique in the avascular intermuscular plane (allows medialization of 5-10 cm per side)
Step 5 (TAR - Transversus Abdominis Release) - For greater medialization: divide the posterior lamella of the internal oblique and then the transversus abdominis muscle/aponeurosis just lateral to the linea semilunaris; extend lateral dissection to the lateral retroperitoneum (border of psoas)
Step 6 - Mesh placed in the large retromuscular/preperitoneal space created, with wide overlap
Step 7 - Close midline fascia with small-bite technique as described above
Postoperative Care
- Early ambulation
- Abdominal binder for support (reduces seroma, supports repair)
- Avoid heavy lifting for 6-8 weeks
- Monitor drain output (remove when <30 mL/day)
- Wound inspection for seroma, infection
- Address modifiable risk factors (weight loss, smoking cessation, glycaemic control) to reduce recurrence
Recurrence Rates by Technique
| Technique | Recurrence Rate |
|---|---|
| Primary suture repair | 30-50% |
| Open mesh repair | ~10-24% |
| Laparoscopic repair | 0-11% |
Sources: Maingot's Abdominal Operations; Fischer's Mastery of Surgery, 8th Ed.; Bailey and Love's Short Practice of Surgery, 28th Ed.
Steps of incisional hernia
This looks like the same question as the previous one. Just to make sure I give you exactly what you need:
Asking for Preferences
What do you mean by 'steps of incisional hernia'?
The detailed operative steps were covered in my previous response. Here is a clean, consolidated summary organized as a step-by-step surgical guide:
Steps of Incisional Hernia Repair
STEP 1 - Preoperative Preparation
- Anaesthesia: General anaesthesia (ensures full abdominal wall relaxation)
- Position: Supine, arms out
- Catheter: Foley catheter (bladder decompression)
- Gastric tube: Orogastric tube (gastric decompression)
- Prophylactic antibiotics: Given before incision
- Optimisation (elective cases): Weight loss, smoking cessation, glycaemic control done beforehand
STEP 2 - Incision
- Reopen through the previous surgical scar along its entire length (not just over the visible bulge)
- Full-length opening is mandatory - clinically unsuspected additional defects are very common along the same scar
- Dissect through subcutaneous tissues carefully - the sac or its contents may lie just beneath the skin at the level of the anterior rectus sheath
STEP 3 - Exposure of the Defect
- Identify the hernial sac, its neck, and the margins of the fascial defect
- Using electrocautery, clear the sac of all attachments to the fascia
- Clear the fascia of soft tissue both anteriorly and posteriorly for a 3-4 cm healthy margin circumferentially around the entire defect
- Inspect the entire length of the incision for any additional (Swiss cheese) defects
STEP 4 - Adhesiolysis
- Free the anterior abdominal wall from all adhesions (bowel, omentum)
- Improves mobilisation and medialization of the abdominal wall muscles
- Dissect in planes other than intraperitoneal wherever possible to avoid visceral injury
- Remove any previously placed intraperitoneal mesh (reduces infection/fistulisation risk)
- After adhesiolysis, inspect the bowel for inadvertent injury and repair immediately if found
- Full enterolysis only if patient had preoperative bowel obstruction symptoms; otherwise anterior wall adhesiolysis alone suffices
STEP 5 - Sac Management
- Open the hernial sac
- Reduce all hernia contents back into the abdominal cavity
- Divide any internal adhesions
- Excise redundant sac as needed
- Place a large counted towel over viscera to protect them during subsequent repair steps
STEP 6 - Decision: Primary Closure vs Mesh vs Component Separation
| Defect Size | Decision |
|---|---|
| < 2 cm | Primary suture repair acceptable |
| 2-4 cm | Mesh strongly preferred |
| > 4 cm | Mesh mandatory + consider component separation if closure is under tension |
| Contaminated field | Biologic mesh or primary suture only |
STEP 7A - Primary Suture Repair (small defects only)
- Use 2-0 slowly resorbable monofilament suture (e.g. PDS) with 30-40 mm needle
- Small-bite technique (STITCH trial): 5 mm bites of fascia, 5 mm apart, running suture
- Suture length : wound length ratio ≥ 4:1
- For wide defects: interrupted figure-of-eight sutures - place loosely along entire wound first, then cinch together (distributes tension evenly)
- Incorporate fascia (linea alba) only - never include fat, muscle, or peritoneum in bites (causes ischaemia and breakdown)
STEP 7B - Mesh Repair (standard for most incisional hernias)
Choose Mesh Plane:
| Plane | Where | Preferred? |
|---|---|---|
| Onlay | On top of anterior rectus sheath | Simple but seroma/skin ischaemia risk |
| Retromuscular (sublay) | Between posterior rectus sheath and rectus muscle | Most preferred |
| Preperitoneal (sublay) | Between peritoneum and transversalis fascia | Good; no visceral contact |
| Intraperitoneal | Inside peritoneal cavity | Use barrier-coated composite mesh only |
| Inlay (bridge) | Spanning the defect without fascial overlap | Avoid electively - high recurrence/bulge |
Mesh Technique:
- Cut mesh to cover defect + ≥3-5 cm overlap of healthy fascia in all directions
- Position mesh in chosen plane
- Protect bowel from direct mesh contact (interpose omentum where possible)
- Fix mesh with large nonabsorbable interrupted sutures distributed around the entire circumference
- Close the fascia over the mesh (augment, do not bridge)
STEP 7C - Component Separation (if fascial closure under excessive tension)
Anterior Component Separation (Ramirez, 1990):
- Raise skin/subcutaneous flaps off anterior rectus sheath to the linea semilunaris
- Incise posterior rectus sheath just lateral to linea alba; separate rectus from posterior sheath
- Incise external oblique aponeurosis just lateral to linea semilunaris from costal margin to iliac crest
- Separate external oblique from internal oblique in the avascular intermuscular plane
- Achieves 5-10 cm medialization per side
Transversus Abdominis Release (TAR - for larger defects):
- Additionally divide the posterior lamella of internal oblique and transversus abdominis muscle lateral to linea semilunaris
- Carry lateral dissection to retroperitoneum (border of psoas)
- Creates a large retromuscular space for wide mesh placement
- Achieves even greater medialization
STEP 8 - Drain Placement
- Closed suction drain placed in the subcutaneous space if large dead space remains
- Keep drain away from the mesh (proximity to mesh increases infection risk)
- Remove when output <30 mL/day
STEP 9 - Wound Closure
- Layered subcutaneous closure
- Skin closed with staples or running subcuticular suture
STEP 10 - Postoperative Care
- Abdominal binder - worn postoperatively to reduce seroma and support the repair
- Early ambulation
- No heavy lifting for 6-8 weeks
- Monitor for seroma (most common complication - usually self-resolves), wound infection, mesh infection
- Address modifiable risk factors for recurrence: weight loss, smoking cessation, glycaemic optimisation
Key Rules to Remember
- Always open the full length of the scar - never assume a single defect
- Mesh is the standard - suture-only repair has 30-50% recurrence; mesh reduces it to 10-24%
- Mesh must augment, not bridge (bridging = mesh bulge = apparent recurrence)
- Never incorporate fat or muscle in fascial bites - only the linea alba/fascia
- Suture length : wound length ratio must always be ≥ 4:1
- Drains always exit through separate stab incisions, never through the repair
Sources: Fischer's Mastery of Surgery 8th Ed.; Maingot's Abdominal Operations; Bailey and Love's Short Practice of Surgery 28th Ed.
This is a shared conversation. Sign in to Orris to start your own chat.