ergonomic training for billing staff (desk worker)
ergonomic training desk workers billing staff guidelines 2024
office ergonomics desk workers musculoskeletal
office ergonomics musculoskeletal disorders sedentary workers
OSHA office ergonomics checklist workstation setup recommendations desk worker
ergonomic workstation setup posture desk worker
ergonomic workstation setup neutral posture desk computer
billing staff desk worker ergonomic risks carpal tunnel eye strain breaks stretching exercises
Ergonomic Training for Billing Staff (Desk Workers)
Why Ergonomics Matters
- Work-related musculoskeletal disorders (WMSDs) — cumulative trauma from repetitive twisting, static postures, mechanical pressure, and keyboard use
- Carpal tunnel syndrome — median nerve compression from sustained wrist deviation during keyboarding
- Tendinitis / tenosynovitis — inflammation from repetitive hand/wrist motion
- Lower back pain — prolonged sitting without lumbar support
- Neck & shoulder strain — forward head posture looking at screens
- Digital eye strain — sustained near-focus on monitors
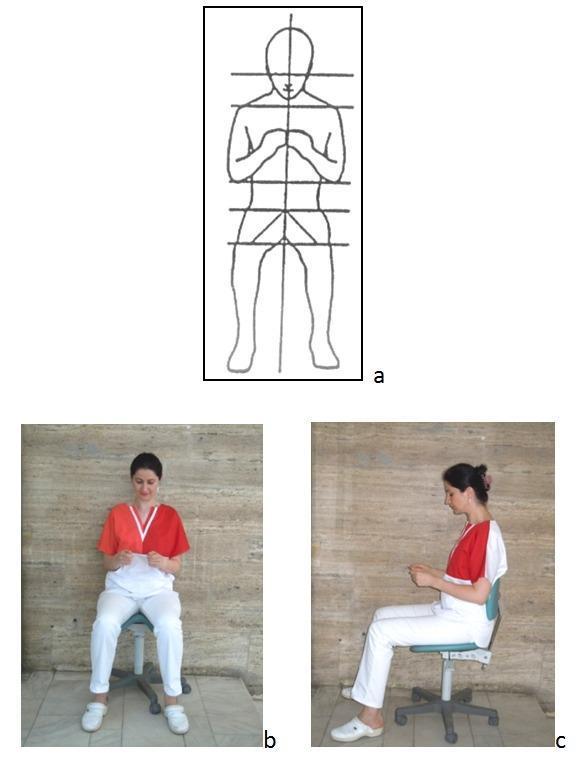
Module 1: Workstation Setup (Neutral Body Positioning)
Chair Setup
| Body Part | Target Position |
|---|---|
| Seat height | Feet flat on floor (or footrest); thighs approximately horizontal |
| Lumbar support | Backrest contacting the curve of the lower back |
| Seat depth | 2–3 finger-widths between seat edge and back of knees |
| Armrests | Elbows at ~90–100°; shoulders relaxed, not elevated |
Desk & Keyboard
- Desk height: forearms parallel to the floor, elbows close to the body (not extended forward or outward)
- Keyboard: flat or slightly negative tilt; wrists straight, not bent up, down, or sideways
- Mouse: directly beside the keyboard — avoid reaching
- Wrist/palm rests: use only during breaks from typing, not while actively keying
Monitor
- Top of screen at or slightly below eye level
- Distance: arm's length (~50–70 cm / 20–28 inches)
- Centered directly in front of you — avoid twisting the neck
- Tilt screen slightly upward to reduce glare
Document Holder (billing-specific)
- Place source documents on a document holder positioned between the keyboard and monitor, or beside the monitor at the same height
- Prevents repeated head rotation between paper and screen — a common injury source for billing staff
Phone Use
- Use a headset if frequently on calls while typing — never cradle the phone between ear and shoulder
Module 2: Common Risk Factors for Billing Staff
| Risk Factor | Examples in Billing Work |
|---|---|
| Repetitive motion | High-volume keystroke entry, 10-key data entry |
| Sustained static posture | Sitting fixed for extended periods reading/entering codes |
| Awkward wrist position | Mousing with wrist extended or deviated |
| Forward head posture | Leaning toward screen to read small text |
| Contact stress | Wrist resting on hard desk edge while keying |
| Eye strain | Dual monitors at different distances/heights, small fonts |
Module 3: Healthy Work Habits & Micro-Breaks
Break Schedule
- Every 20–30 minutes: brief 1–2 minute micro-break — rest hands flat, look away from screen, change position
- Every 60 minutes: stand up, walk briefly, reset posture
- Vary tasks: alternate keyboarding with phone calls, filing, or other tasks that change body position
20-20-20 Rule (Eye Strain)
Posture Reminders
- Alternate between upright sitting, slightly reclined (105–120°), and periodic standing if a sit-stand desk is available
- Chin should be level — if your chin juts forward, your monitor may be too low or too far away
Module 4: Stretches at the Workstation
Hands & Wrists
- Wrist flexion/extension — Hold arm out, gently pull fingers back (extension); then bend wrist downward (flexion). Hold 3–5 sec. Repeat 3×.
- Wrist circles — Slowly rotate wrist in both directions, 5× each.
- Prayer stretch — Elbows on desk, palms together; slowly lower wrists toward desk surface until stretch is felt. Hold 5–7 sec. Repeat 3×.
- Finger tendon glide — Open hand fully → make a fist (thumb out) → slide fingertips up palm to base of fingers. Repeat 5×.
- Every 30 minutes: shake hands out loosely; rotate wrists; gently spread and close fingers.
Neck & Shoulders
- Chin tuck — Gently retract chin back (making a "double chin"). Hold 5 sec. Repeat 5×.
- Neck side stretch — Tilt ear toward shoulder until stretch felt. Hold 15 sec each side.
- Shoulder rolls — Roll shoulders backward 5×, then forward 5×.
- Chest opener — Clasp hands behind back, gently squeeze shoulder blades together. Hold 10 sec.
Back
- Seated trunk rotation — Hold chair back with both hands, rotate gently to each side. Hold 10–15 sec.
- Seated forward lean — Lean slightly forward, resting forearms on thighs; let back relax. Hold 10 sec.
Module 5: Recognizing Early Warning Signs
| Symptom | Possible Issue | Action |
|---|---|---|
| Tingling/numbness in fingers, especially at night | Carpal tunnel syndrome | Report to supervisor; seek early assessment |
| Aching forearm or wrist with keying | Tendinitis / tenosynovitis | Modify workstation; take more micro-breaks |
| Persistent neck or upper trap pain | Postural strain, forward head | Review monitor height and chair setup |
| Lower back fatigue by end of shift | Lumbar support issue | Adjust chair backrest; consider lumbar pillow |
| Eye redness, headache, blurred vision after screen work | Digital eye strain | Apply 20-20-20 rule; adjust monitor brightness/contrast |
Module 6: Workstation Self-Assessment Checklist
- Head and neck balanced, ears over shoulders (not jutting forward)
- Head, neck, and trunk facing forward (not twisted)
- Torso vertical or slightly reclined
- Back fully supported by lumbar support
- Shoulders relaxed, not elevated
- Elbows close to body, forearms parallel to floor
- Wrists and hands straight (not bent up, down, or sideways)
- Thighs approximately horizontal; feet flat on floor or footrest
- Monitor at arm's length, top at or slightly below eye level
- Keyboard allows straight wrists during keying
- Mouse directly beside keyboard, at same height
- Document holder in use if referencing paper records
- Headset used for combined phone/keyboard tasks
- Chair height, backrest, and armrests adjusted to user (not left on defaults)
Module 7: Administrative & Programmatic Steps
- Initial workstation assessment for all new billing staff during onboarding
- Annual re-assessment — especially when staff change workstations, return from leave, or report discomfort
- Early reporting process — a clear, non-punitive path for employees to report musculoskeletal discomfort before it becomes a compensable injury
- Productivity norms — review whether keystroke quotas or turnaround targets inadvertently discourage breaks
- Equipment availability — document holders, headsets, footrests, and lumbar supports are low-cost interventions with strong ROI
Quick Reference Card (Post at Workstation)
| ✅ Do | ❌ Avoid |
|---|---|
| Sit with feet flat, back supported | Crossing legs for long periods |
| Keep wrists straight while typing | Resting wrists on hard edges while keying |
| Monitor at arm's length, top at eye level | Tilting head up or down at screen |
| Use headset for combined phone/keyboard tasks | Cradling phone between ear and shoulder |
| Take a 1–2 min break every 20–30 min | Sitting fixed for >60 min straight |
| Apply 20-20-20 for eyes | Staring at screen without visual breaks |
| Report early symptoms to supervisor | Pushing through persistent pain or numbness |
can you explain more about this section :Workstation Setup
workstation setup chair monitor keyboard desk ergonomic adjustment
ergonomic workstation chair monitor keyboard posture adjustment diagram
ergonomic workstation setup step by step chair monitor keyboard desk height adjustment office worker
Workstation Setup — Detailed Guide
Step 1: The Chair — Your Foundation
Seat Height
- Raise or lower until your feet rest flat on the floor (or on a footrest)
- Thighs should be approximately parallel to the floor — not sloping sharply up or down
- Quick test: Sit back fully. If your feet dangle, the chair is too high. If your knees are higher than your hips, it's too low.
- If you raise the chair to match the keyboard height and your feet come off the floor, use a footrest — don't compromise foot support
Seat Depth
- Slide back until your spine touches the backrest
- There should be 2–3 finger-widths of space between the front edge of the seat and the back of your knees
- Too long a seat pan puts pressure on the back of the knees, restricting blood flow; too short provides no thigh support
Lumbar (Back) Support
- Adjust the backrest height until it contacts the curve of your lower back (the lumbar region, roughly at your belt line)
- This maintains the spine's natural S-curve — without it, the lower back rounds outward, increasing disc pressure significantly
- If your chair lacks adjustable lumbar support, a small rolled towel or lumbar cushion placed at the small of the back works as a substitute
Armrests
- Set armrest height so your shoulders are relaxed and not shrugged up — elbows should rest lightly at roughly 90°
- Armrests that are too high force the shoulders upward all day, a primary cause of upper trap and neck pain
- If armrests prevent you from getting close enough to the keyboard, lower them or remove them
⚠️ Common billing staff error: Sitting perched on the front edge of the seat to reach the keyboard, completely losing back support. If you have to do this, the keyboard is too far away or the chair height is wrong.
Step 2: The Desk & Keyboard Surface
Desk / Keyboard Height
- With your chair properly set, your elbows should be at approximately the same height as the keyboard surface — forming a 90–100° angle at the elbow
- Forearms parallel to the floor, elbows close to the sides of the body (not winged out)
- If the desk is fixed and too high: raise the chair and use a footrest
- If the desk is fixed and too low: use a keyboard tray or monitor/desk riser
Keyboard Position
- Center the keyboard in front of you, aligned with the spacebar at your midline
- Position it close enough that your upper arms hang naturally at your sides — you should not be reaching forward
- Place the keyboard about 10–15 cm (4–6 inches) from the desk edge to leave room for wrists to rest during pauses
- Keyboard tilt: flat or very slightly negative tilt (front edge slightly higher than back) keeps wrists neutral; avoid propping the back legs up, as this forces wrists into upward extension
Wrists While Typing
- Wrists must be straight and level with the forearms — not bent up (extension), down (flexion), or sideways
- Just 15° of wrist deviation dramatically increases pressure inside the carpal tunnel
- Wrist rests: use only between typing bursts (during pauses), not while actively keying — resting on them while typing creates contact stress on the carpal tunnel
Mouse
- Place the mouse directly beside the keyboard at the same height — no reaching to the side or forward
- A mouse positioned too far to the right is one of the most common causes of shoulder, rotator cuff, and neck strain in office workers
- Keep your wrist straight when mousing; avoid "ulnar deviation" (wrist bent toward the pinky side)
Step 3: The Monitor
Distance
- Arm's length away: approximately 20–26 inches (50–65 cm) from your eyes
- Too close → eyestrain and tendency to lean the head forward
- Too far → leaning forward and squinting, which strains the neck
- Quick test: Sit back with good posture and extend your arm — your fingertips should nearly touch the screen
Height
- Top edge of the screen at eye level or 1–2 inches below eye level
- Your natural downward gaze is about 15°, so you should be looking slightly downward at the center of the screen
- Screen too high → head tilted back, neck extensor muscle fatigue (the head weighs ~12 lbs; at 15° forward tilt it effectively loads the neck with ~27 lbs)
- Screen too low → forward head posture and rounded upper back
📌 Bifocal wearers: You tend to tilt the head backward to look through the lower portion of bifocal lenses. Lower the monitor slightly below the standard recommendation so you don't have to crane your neck back.
Angle
- Tilt the screen 10–20° away from you (top tilted slightly back) so the screen surface is more perpendicular to your line of sight
- This reduces neck strain and helps minimize glare from overhead lighting
Position (Side-to-Side)
- Centered directly in front of you — not offset to one side
- Twisting the head to look at a monitor that is off to the side, even slightly, causes cumulative neck and upper back strain over a full shift
Glare
- Position the monitor perpendicular to windows (not facing a window or with a window behind you)
- Adjust brightness and contrast so characters are clear without the screen appearing to glow
- Consider a matte anti-glare screen filter if overhead lighting is a problem
Dual Monitors (common in billing)
- If you use two monitors equally, place them in a slight V-shape centered on you — 20–30° each side
- If one monitor is primary (e.g., the billing software) and the other is secondary (e.g., email/reference), place the primary directly in front and the secondary slightly angled off to one side
- Both monitors should be at the same height to avoid repeated head tilting between screens
Step 4: The Phone & Document Holder
Phone / Headset
- Always use a headset for any call lasting more than 1–2 minutes while your hands are occupied
- Never cradle the phone between the ear and shoulder — this holds the neck in lateral flexion under load, causing muscle strain and cervical joint compression
- A basic wired headset or even earbuds with a mic are sufficient
Document Holder
- If you are referencing paper documents (EOBs, patient records, superbills) while typing, place a document holder between the keyboard and monitor, or to the side at the same height as the monitor
- This keeps your head in a neutral position rather than repeatedly looking down at a flat desk and back up at the screen
- Looking down at flat paper repeatedly is a major driver of neck pain in billing roles — a holder is low-cost and highly effective
Summary: The Setup Sequence
| Order | What to Do |
|---|---|
| 1. Chair | Feet flat, thighs level, lumbar supported, armrests at shoulder height |
| 2. Keyboard | Elbows 90–100°, wrists straight, keyboard close and centered |
| 3. Mouse | Right beside the keyboard, same height, wrist neutral |
| 4. Monitor | Arm's length, top at eye level, centered, perpendicular to light |
| 5. Phone | Headset if doing dual phone/keyboard tasks |
| 6. Documents | Document holder at monitor height if referencing paper |
What Happens When Setup Is Wrong
| Problem | What Goes Wrong | Result |
|---|---|---|
| Chair too high, feet dangling | Thigh pressure, pelvis tilts back | Lumbar pain, reduced circulation |
| Keyboard too far away | Arms reach forward, shoulders elevate | Neck, shoulder, rotator cuff strain |
| Wrists bent during typing | Increased carpal tunnel pressure | Tingling, numbness, carpal tunnel syndrome |
| Monitor too high | Head tilts back | Neck extensor fatigue, headache |
| Monitor off to one side | Chronic neck rotation | Cervical joint and muscle strain |
| Phone cradled on shoulder | Lateral neck flexion under load | Acute and chronic neck injury |
| No lumbar support | Lumbar spine rounds outward | Lower back disc pressure, fatigue pain |