
Webers test conduction towards one side
Weber's Test
Interpretation of Lateralization
| Weber Result | Meaning |
|---|---|
| Heard at midline (no lateralization) | Normal hearing, OR equal hearing loss in both ears |
| Lateralizes to the AFFECTED (poorer) ear | Conductive hearing loss on that side |
| Lateralizes to the BETTER (opposite) ear | Sensorineural hearing loss on the opposite (poorer) side |
Why Does Sound Lateralize This Way?
1. Conductive Loss - sound goes TOWARD the affected ear
2. Sensorineural Loss - sound goes AWAY from the affected ear
Key Clinical Rule (Memory Aid)
Weber lateralizes TO the side of conductive loss, and AWAY from the side of sensorineural loss.
- A 5 dB or greater hearing difference between the two ears is required for lateralization to occur.
- Always combine Weber with the Rinne test to confirm which type of loss is present, since Weber alone cannot distinguish between the two without knowing which ear is the "better" one.
Summary Table of All Tuning Fork Tests
| Test | Normal | Conductive Loss | Sensorineural Loss |
|---|---|---|---|
| Weber | Midline | Lateralizes to poorer ear | Lateralizes to better ear |
| Rinne | AC > BC (positive) | BC > AC (negative) | AC > BC (positive) |
| Bing | Positive (louder with occlusion) | Negative | Positive |
| Schwabach | Same as examiner | Prolonged (longer than examiner) | Diminished (shorter than examiner) |
Schwabacks test
Schwabach Test
Principle
Technique
- Strike a tuning fork (512 Hz) and place its stem on the patient's mastoid process.
- When the patient can no longer hear the tone, immediately transfer the fork to the examiner's mastoid.
- Note whether the examiner can still hear the tone.
- The process may be reversed (examiner first, then patient) for comparison.
Interpretation
| Result | Meaning |
|---|---|
| Normal Schwabach | Patient and examiner stop hearing the tone at about the same time = Normal hearing |
| Diminished Schwabach | Patient stops hearing before the examiner = Sensorineural hearing loss (cochlea/auditory nerve damaged, so bone-conducted sound perceived for a shorter time) |
| Prolonged Schwabach | Patient hears the tone longer than the examiner = Conductive hearing loss (the damaged middle ear blocks ambient environmental noise, reducing its masking effect on bone conduction, so the tone appears to last longer) |
Why Does Conductive Loss Prolong the Schwabach?
Summary Comparison with Other Tuning Fork Tests
| Test | Conductive Loss | Sensorineural Loss |
|---|---|---|
| Weber | Lateralizes to affected (poorer) ear | Lateralizes to better ear |
| Rinne | BC > AC (negative Rinne) | AC > BC (positive Rinne) |
| Schwabach | Prolonged (hears longer than examiner) | Diminished (hears shorter than examiner) |
| Bing | Negative (no occlusion effect) | Positive (occlusion effect present) |
Limitations
Radial artery palpation
Radial Artery Palpation
Site and Technique
- The radial pulse is palpated at the wrist, on the flexor surface, just medial to the radial styloid process (lateral aspect of the wrist, in the groove between the flexor carpi radialis tendon and the bony styloid).
- Use the tips of the index and middle fingers (NOT the thumb - the thumb has its own pulsation which can be mistakenly counted).
- Apply gentle, steady pressure - excessive pressure obliterates the pulse.
- For accurate rate: count for 1 full minute if any irregularity is present; in a regular rhythm, count for 15 seconds and multiply by 4.
Parameters Assessed (the 7 features)
| Feature | What to Assess | Normal |
|---|---|---|
| Rate | Beats per minute | 60-100 bpm in adults |
| Rhythm | Regular or irregular | Regular |
| Volume (amplitude) | Fullness of the pulse - how easily it rises and falls | Medium volume |
| Character (waveform) | Upstroke speed, peak, and downstroke | Smooth, brisk upstroke |
| Vessel wall | Roll artery under fingers - feel the wall itself | Soft, compressible, not palpable between beats |
| Symmetry | Compare both radial pulses simultaneously | Equal bilaterally |
| Radio-femoral delay | Feel radial and femoral simultaneously | Simultaneous |
Pulse Rate Interpretation
| Rate | Interpretation |
|---|---|
| < 60 bpm | Bradycardia (athletes may be normal at 30-40 bpm) |
| 60-100 bpm | Normal |
| > 100 bpm | Tachycardia |
Pulse Rhythm Abnormalities
- Regularly irregular - e.g., premature beats with a fixed pattern (bigeminy, trigeminy)
- Irregularly irregular - e.g., atrial fibrillation (no two intervals are the same)
- Sinus dysrhythmia - physiologic variation with respiration (faster on inspiration, slower on expiration)
Pulse Character / Waveform Abnormalities
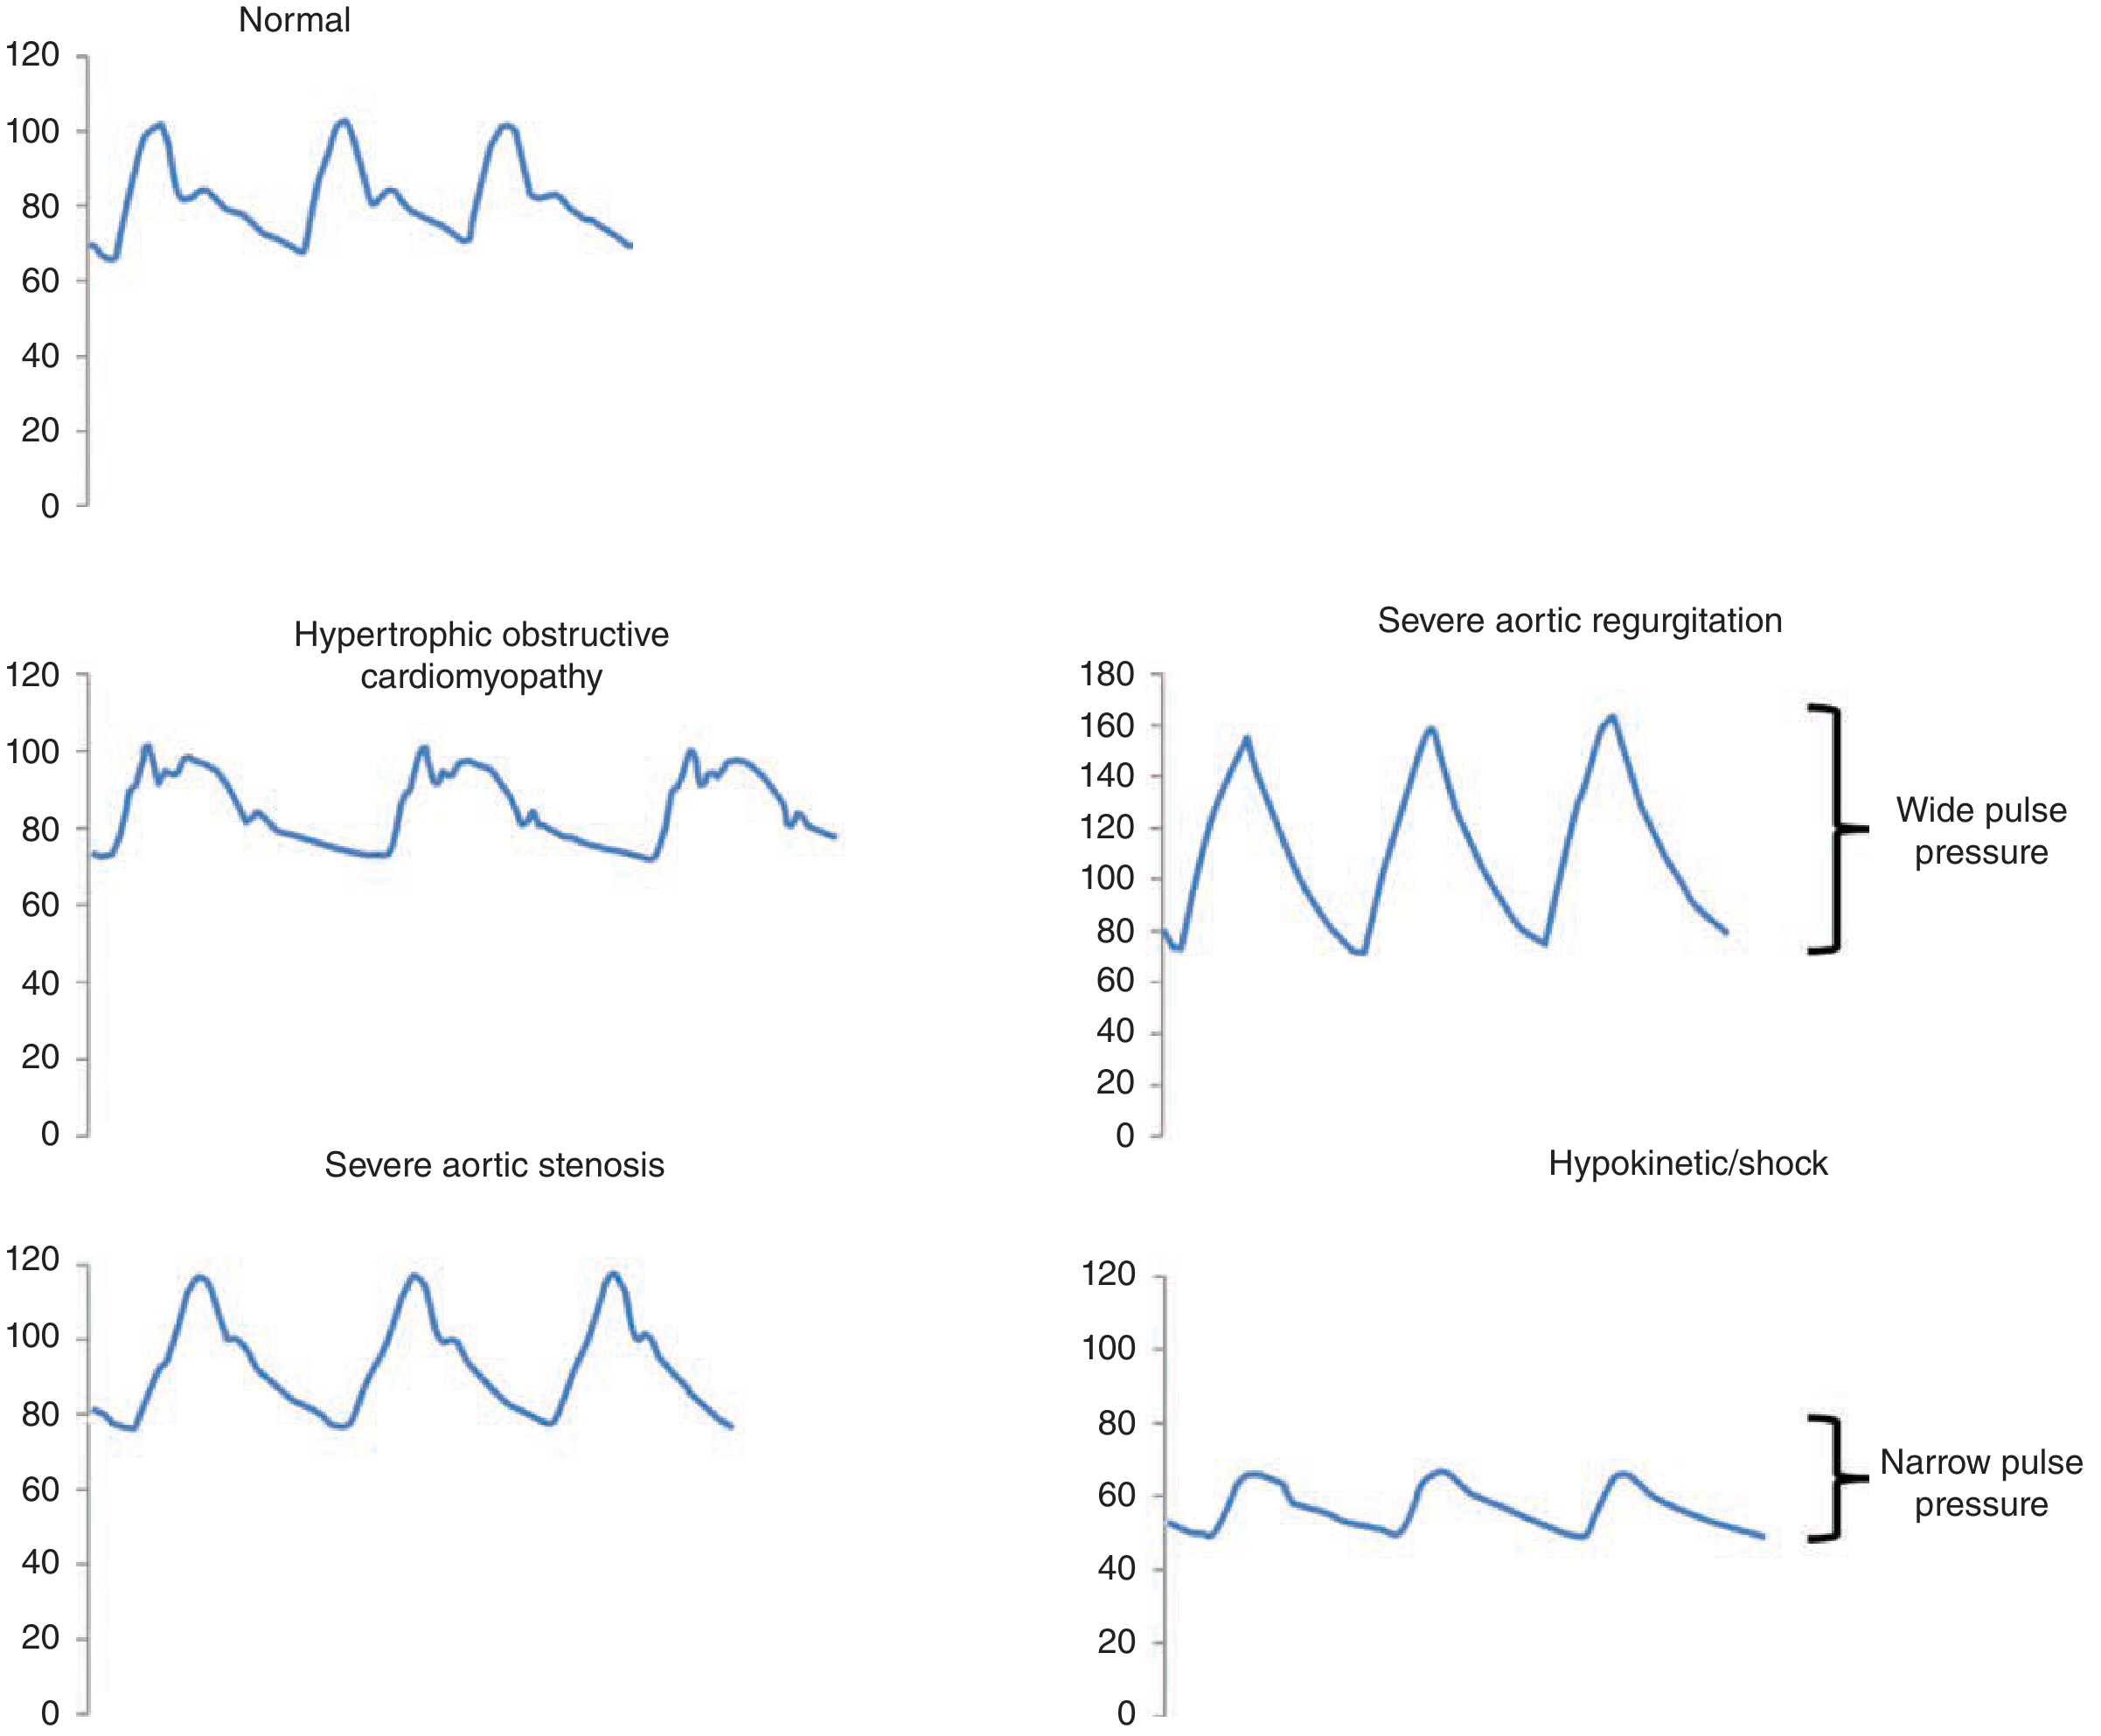
| Pulse Type | Character | Clinical Cause |
|---|---|---|
| Pulsus parvus et tardus | Small amplitude + slow/delayed upstroke | Severe aortic stenosis |
| Water hammer (Corrigan's) pulse | Bounding, large amplitude, collapses rapidly | Severe aortic regurgitation |
| Bisferiens pulse | Two palpable systolic peaks | Mixed aortic valve disease (AR predominant); HOCM |
| Spike-and-dome | Brisk initial spike then mid-systolic dip | Hypertrophic obstructive cardiomyopathy (HOCM) |
| Pulsus alternans | Alternating strong and weak beats | Severe left ventricular systolic dysfunction |
| Pulsus paradoxus | Pulse weakens or disappears on inspiration (>10 mmHg drop in SBP) | Cardiac tamponade, severe asthma, COPD |
| Dicrotic pulse | Exaggerated dicrotic notch felt on descent | Severe shock, peripheral vasoconstriction |
| Anacrotic pulse | Notch on the ascending limb | Aortic stenosis |
Vessel Wall Assessment
Radio-Femoral Delay
Pulse Volume Grading (0 to 4+)
| Grade | Description |
|---|---|
| 0 | Absent |
| 1+ | Weak/thready (barely palpable) |
| 2+ | Normal |
| 3+ | Full/bounding |
| 4+ | Aneurysmal |
Why we r using three fingers
Why Three Fingers Are Used for Radial Pulse Palpation
The Role of Each Finger
| Finger | Position | Function |
|---|---|---|
| Index finger (proximal) | Closest to the elbow | Occludes (compresses) the artery from above - cuts off proximal blood flow to assess vessel wall and tension |
| Middle finger | Over the pulse | Feels the pulse - main sensing finger, best tactile sensitivity at the fingertip pad |
| Ring finger (distal) | Closest to the thumb | Steadies the hand and helps feel the distal transmission of the pulse wave |
Specific Reasons for Using Three Fingers
- The proximal finger can partially occlude the vessel - this helps assess pulse tension (how much pressure is needed to obliterate it).
- With the proximal finger compressing, the middle finger feels only the true pulse amplitude without the proximal background pressure - this better reflects stroke volume.
Why NOT the Thumb?
Summary
Three fingers = proximal occludes + middle feels + distal steadies - together giving rate, rhythm, volume, tension, and character in a single examination maneuver.
Give me as a image
Medical education diagram showing radial pulse palpation technique with three fingers. A realistic illustration of a clinician's right hand (index, middle, and ring fingers) placed along the radial artery at the wrist of a patient's left hand. The wrist is in slight extension. Each finger is clearly labeled: "Index finger - Proximal (Occludes artery / assesses tension)", "Middle finger - Centre (Main sensing finger / feels pulse)", "Ring finger - Distal (Stabilizes / detects distal wave)". An anatomical inset shows the radial artery running beneath the three fingers near the radial styloid. A note at the bottom reads "Thumb NOT used - has its own pulse (Princeps Pollicis Artery)". Clean clinical diagram style with clear annotations on a white background.
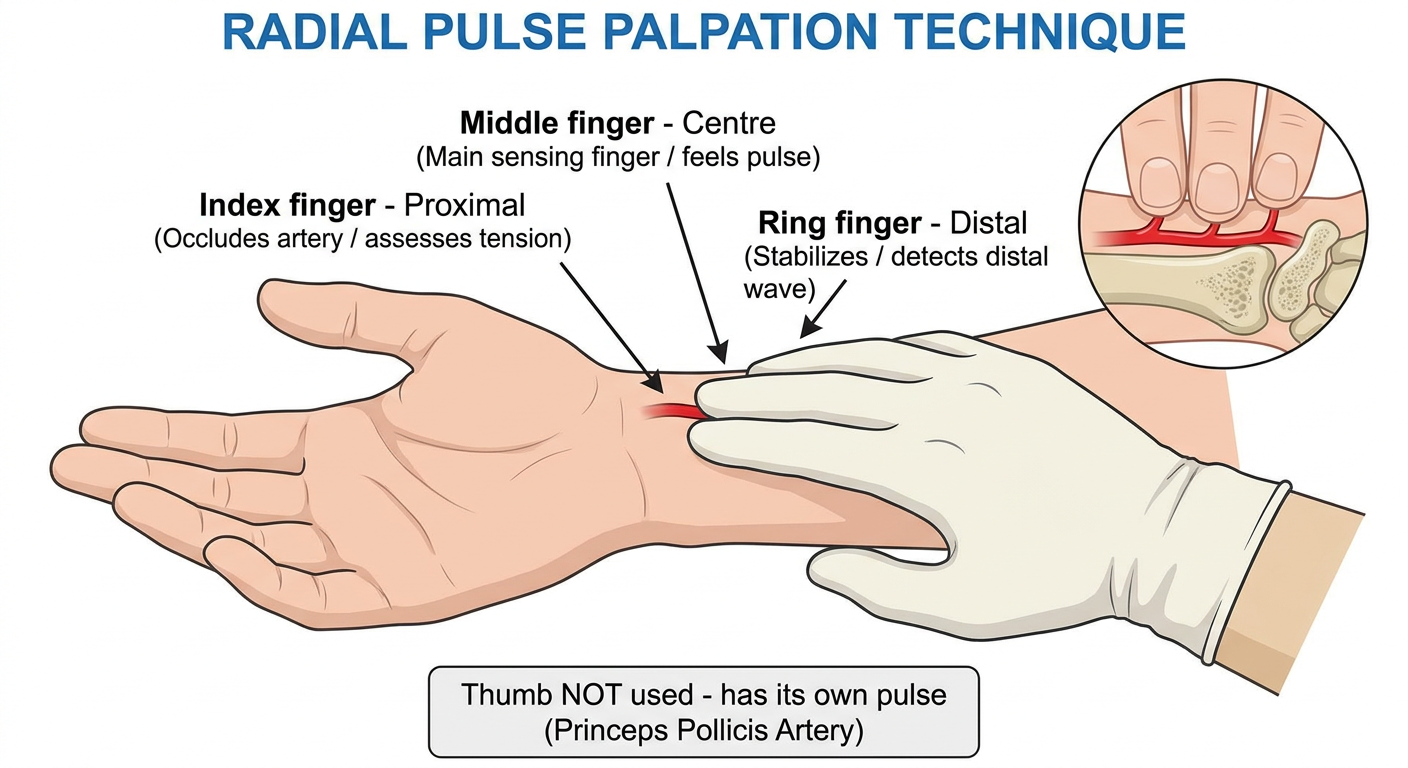
- Index finger (proximal) - occludes the artery and assesses tension
- Middle finger (centre) - the main sensing finger that feels the pulse
- Ring finger (distal) - stabilizes and detects the distal pulse wave
- Thumb is never used - it has its own strong pulse from the princeps pollicis artery
Thank you