
Create a poster between simple continuous and interlocking continuous sutures
simple continuous vs interlocking continuous suture technique comparison
A clean, professional medical educational poster comparing two suture types side by side: Title at top: "Continuous Suture Techniques: A Comparison" LEFT PANEL - "Simple Continuous Suture" (also called Running Suture): - Step-by-step diagram showing: anchor knot at one end, needle passing at oblique angle across wound, loops forming a helical coil pattern along the wound, final knot tying using last loop as tail - Visual shows evenly spaced diagonal stitches on skin surface without interlocking - Key Features listed below diagram: • Fastest placement method • Tension evenly distributed along entire length • Fewer knots (only 2 total) • Accommodates mild wound swelling • Best for: thin skin (eyelids, ears, neck), skin grafts, low-tension wounds • Limitation: if one loop breaks, entire stitch may unravel • Limitation: fine adjustments along suture line are difficult RIGHT PANEL - "Interlocking Continuous Suture" (also called Running Locking / Lock Stitch): - Step-by-step diagram showing: same start as simple continuous, but needle passes THROUGH the previous loop before each new bite, creating a chain-lock effect along the wound - Visual shows the characteristic locked loop pattern on skin surface - Key Features listed below diagram: • Stronger than simple running suture • Better hemostasis in well-vascularized wounds (e.g. scalp) • Prevents loop slippage during placement • Best for: moderate tension wounds, scalp, vascular wounds • Limitation: increased risk of wound-edge necrosis if too tight or post-op swelling • Limitation: avoid at sites prone to inversion BOTTOM COMPARISON TABLE with 5 rows: | Feature | Simple Continuous | Interlocking Continuous | | Strength | Moderate | Higher | | Hemostasis | Moderate | Superior | | Necrosis Risk | Lower | Higher if overtightened | | Best Sites | Eyelid, ear, neck, grafts | Scalp, vascular tissue | | Wound Swelling | Accommodates well | Less forgiving | Footer note: "Both techniques begin with an interrupted anchor knot and end with a final knot tied to the last loop. If one loop fails, entire closure may open." Color scheme: clean white background, navy blue headers, teal accent for simple suture diagrams, burgundy/red accent for interlocking diagrams, light gray table rows. Medical textbook illustration style, anatomical cross-section showing skin layers (epidermis, dermis, subcutaneous tissue) in the diagrams.
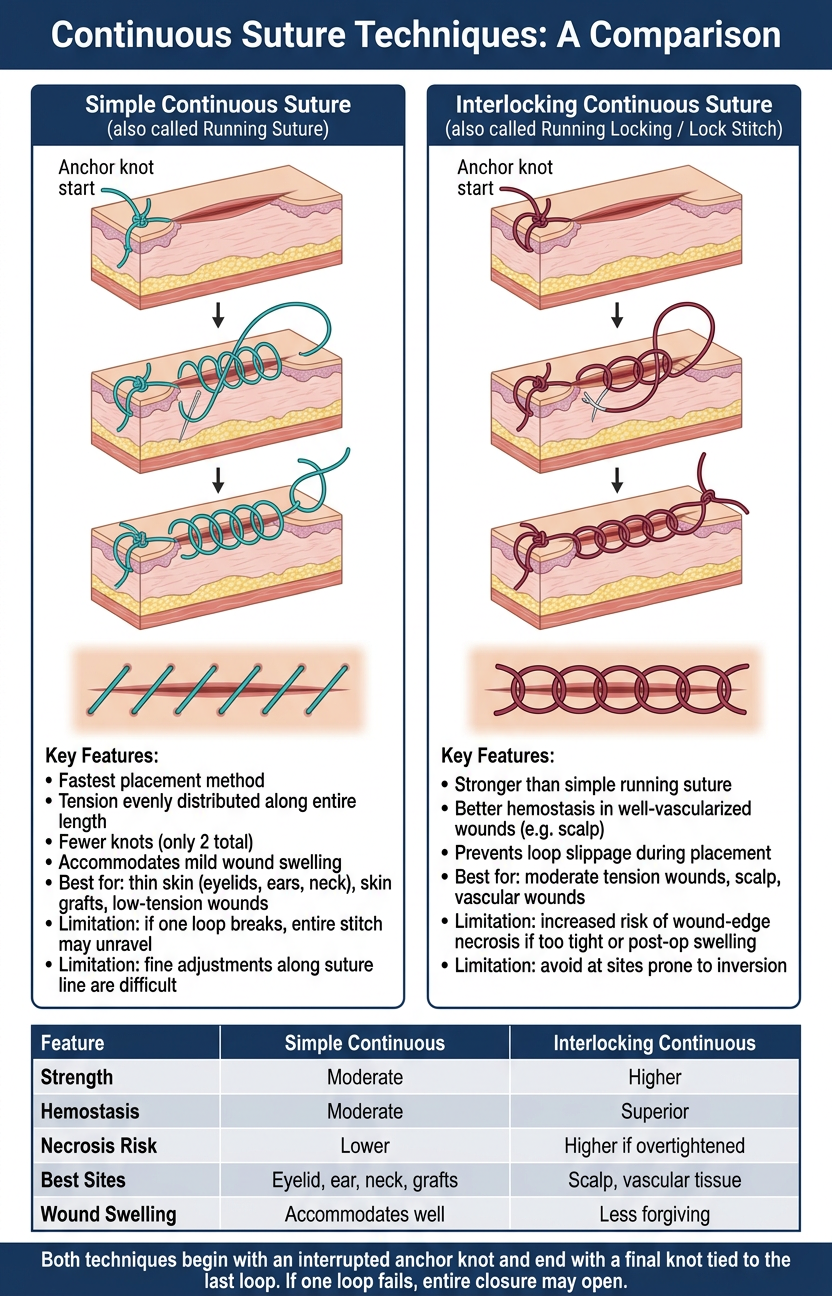
Simple Continuous (Running) Suture
- An anchor knot is placed at one end; only the free tail is cut, preserving the needle-end
- The needle passes at an oblique angle across the wound repeatedly, forming a helical coil
- Loops are the exposed portions of this coil, tied off at both ends with only 2 knots total
- Tension is distributed evenly along the full length of the wound
- Accommodates mild post-op wound swelling
- Best for thin, lax skin (eyelids, ears, neck, scrotum) and skin graft attachment
- Risk: if one loop breaks, the entire closure can unravel (Roberts & Hedges' Clinical Procedures in Emergency Medicine)
Interlocking Continuous (Running Locking / Lock Stitch) Suture
- Starts identically to simple continuous, but the needle passes through the previous loop before each new bite
- This creates a chain-lock effect that prevents loop slippage during placement
- Stronger than the simple running suture and provides superior hemostasis
- Particularly useful on the scalp and other well-vascularized wounds
- Risk: increased risk of wound-edge necrosis if placed too tightly or if significant post-op swelling occurs (Fitzpatrick's Dermatology)