
Free fibula flap operative steps
I'll start by reading the medical library skill, then search for free fibula flap content in parallel.
Searching sources...
Reading File
Now let me search the library and web in parallel for free fibula flap content.
Finding Sources
Finding Sources
Searching Images
free fibula flap operative steps surgical technique
Searching the Web
free fibula flap operative steps surgical technique mandible reconstruction
Good - found two textbook sections. Let me read both in parallel along with extracting key web content.
Reading File
Reading File
Reading Web Page
https://www.ncbi.nlm.nih.gov/books/NBK564337
Let me fetch the key images and read more of the Rockwood text for operative details.
Loading Image
Loading Image
Reading File
I now have comprehensive information from two authoritative textbooks (Cummings Otolaryngology and Rockwood & Green's Fractures) plus StatPearls. Here is the full detailed answer:
Free Fibula Flap - Operative Steps
The free fibula flap is the workhorse for vascularized bone reconstruction, particularly mandibular and maxillofacial defects following tumor resection, trauma, or osteomyelitis. Up to 25 cm of bone is available; its vascular pedicle is the peroneal artery and venae comitantes.
Preoperative Planning
- Vascular assessment: Confirm three-vessel (anterior tibial, posterior tibial, peroneal) flow to the foot by ankle-brachial index or CT/MR angiography. Harvesting the peroneal artery must not compromise the foot.
- Laterality selection: Choose the leg based on ideal pedicle geometry at the recipient site. Ipsilateral leg is preferred for mandibular body defects (pedicle exits posteriorly toward neck vessels). Contralateral leg is used for condyle/ramus defects.
- Virtual surgical planning (VSP): 3D CT renderings of the face and leg allow simulation of mandibular resection, osteotomy positions on the fibula, cutting guide fabrication, and dental implant planning.
- Mark the common peroneal nerve on the skin surface preoperatively.
Patient Positioning & Setup
- Supine with hip slightly internally rotated, knee flexed ~20-30°, and a bump under the ipsilateral buttock.
- The leg is prepped and draped free; tourniquet may be applied but is not always inflated.
- A two-team approach (simultaneous harvest and ablation) is possible - one advantage over other flaps.
Step 1 - Skin Marking
- The skin paddle (up to 5 cm wide) is designed over the lateral lower leg, centered over septocutaneous or musculocutaneous perforators (typically 1-2 perforators found in the posterior crural septum between peroneus longus and flexor hallucis longus).
- Mark the safe harvest zone: from 2 cm distal to the fibula neck proximally (to protect the common peroneal nerve) to 6 cm proximal to the lateral malleolus distally (to preserve ankle syndesmosis integrity).
Step 2 - Lateral Incision & Skin Paddle Dissection
- A longitudinal incision is made along the posterior border of the fibula (or centered on the perforator if a skin paddle is needed).
- The skin paddle is incised on all four margins. The anterior skin flap is elevated deep to the deep fascia.
- The superficial peroneal nerve (exits the anterior compartment ~10 cm above the lateral malleolus) is identified and carefully protected.
Step 3 - Anterior Compartment Dissection
- The anterior intermuscular septum is incised.
- Extensor hallucis longus (EHL) and extensor digitorum longus (EDL) are elevated off the anterior fibula.
- Dissection proceeds to the interosseous membrane, which is divided close to the bone, protecting the anterior tibial vessels.
Step 4 - Posterior Compartment Dissection
- The posterior crural septum between peroneus longus and the flexor hallucis longus (FHL) is identified.
- Skin perforators are identified and protected; a small cuff of FHL or soleus muscle is included with the flap to encompass musculocutaneous perforators and improve skin paddle reliability.
- The common peroneal nerve is identified proximally and protected throughout.
Step 5 - Bony Cuts (Osteotomies)
- Distal cut first: Performed with a saw or osteotome, leaving ≥6 cm of fibula above the lateral malleolus.
- Proximal cut: Leaving ≥2 cm below the fibular neck.
- The fibula is gently elevated after both cuts, facilitating access to the deep peroneal vessels.
Step 6 - Pedicle Dissection
- After bone cuts, the fibula is carefully elevated and the peroneal artery and venae comitantes are identified on the deep (medial) surface.
- The pedicle is dissected proximally toward its origin from the tibioperoneal trunk to achieve adequate pedicle length (up to 15 cm can be obtained if needed).
- Small muscular branches are ligated. The posterior tibial artery and nerve are preserved.
Step 7 - Flap Harvest & Division
- Once adequate pedicle length is confirmed, the pedicle is ligated distally (at the level of the distal bone cut) and proximally only when the recipient site is ready.
- The flap is kept on its pedicle until the recipient team signals readiness, minimizing ischemia time.
- Pedicle is divided and the flap is transferred to the back table for bench shaping.
Key rule: Hardware (plates, screws) should NOT be changed once vascular anastomosis is complete, as repositioning can compromise pedicle perfusion.
Step 8 - Bench Work / Flap Shaping
- Fibula is shaped using closing wedge osteotomies to match the mandibular contour (anterior arch, body, angle, ramus).
- The periosteum must NOT be stripped circumferentially - preserve it to maintain endosteal blood supply.
- Patient-specific cutting guides (from VSP) are used to guide osteotomy positions.
- A reconstruction plate (pre-bent to the native mandible preoperatively in the preplating technique) is secured to the shaped fibula segments.
Step 9 - Inset at Recipient Site
- The shaped fibula with plate is transferred to the mandibular defect.
- Bony segments are fixed to the remnant native mandible using locking screws through the pre-bent plate.
- The skin paddle is inset to close the mucosal defect.
- Intermaxillary fixation (IMF) may be applied to protect the reconstruction from torque.
Step 10 - Microvascular Anastomosis
- The peroneal artery is anastomosed (end-to-end or end-to-side) to a recipient artery in the neck - typically the facial artery, superior thyroid artery, or a branch of the external carotid artery.
- The venae comitantes are anastomosed to the internal jugular vein, facial vein, or external jugular vein.
- Anastomosis is performed under microscope using interrupted 9-0 or 10-0 nylon sutures.
- A coupling device (mechanical anastomotic coupler) is commonly used for venous anastomosis to reduce time and improve patency.
- Flap perfusion is confirmed by return of skin paddle color, Doppler signal, or intraoperative SPY angiography.
Step 11 - Donor Site Closure
- If skin paddle width ≤5 cm, primary closure is usually possible.
- Larger paddles require a split-thickness skin graft (STSG) to the donor site.
- A drain is placed. The leg is dressed and elevated.
Intraoperative & Postoperative Monitoring
- Clinical checks every 2-3 hours for the first 4 days (skin paddle color, turgor, capillary refill).
- For osseous-only flaps (no skin paddle): daily Doppler ultrasound of the pedicle.
- Implantable Dopplers may be used for continuous monitoring.
Key Anatomical Points
| Structure | Relevance |
|---|---|
| Peroneal artery | Primary vascular pedicle |
| Venae comitantes | Venous drainage |
| Common peroneal nerve | Risk at fibular neck - preserve ≥2 cm below |
| Superficial peroneal nerve | Exits anterior compartment, protect during harvest |
| Lateral malleolus | Preserve ≥6 cm proximal for ankle stability |
| Posterior crural septum | Houses skin perforators for skin paddle |
Advantages of the Fibula Flap
- Up to 25 cm of bone available (the "most donatable bone in the body") - Cummings Otolaryngology Head and Neck Surgery
- Dual blood supply (endosteal + periosteal from peroneal artery)
- Bone stock adequate for osseointegrated dental implants
- Long pedicle length
- Simultaneous two-team harvest
- Allows multiple osteotomies without compromising vascularity (periosteum intact)
- Skin paddle option for composite defects
Disadvantages
- Skin paddle size limitations for large soft tissue defects
- Variable perforator anatomy
- Peroneal artery sacrifice (requires confirmed three-vessel runoff preop)
- Prolonged ambulation pain in some donor site patients
Sources: Cummings Otolaryngology Head and Neck Surgery (§ Osteocutaneous Fibula Flap, p. 1414); Rockwood and Green's Fractures in Adults 10th ed. 2025 (§ Free Fibula Flap, p. 756-757); StatPearls - Fibula Free Flaps
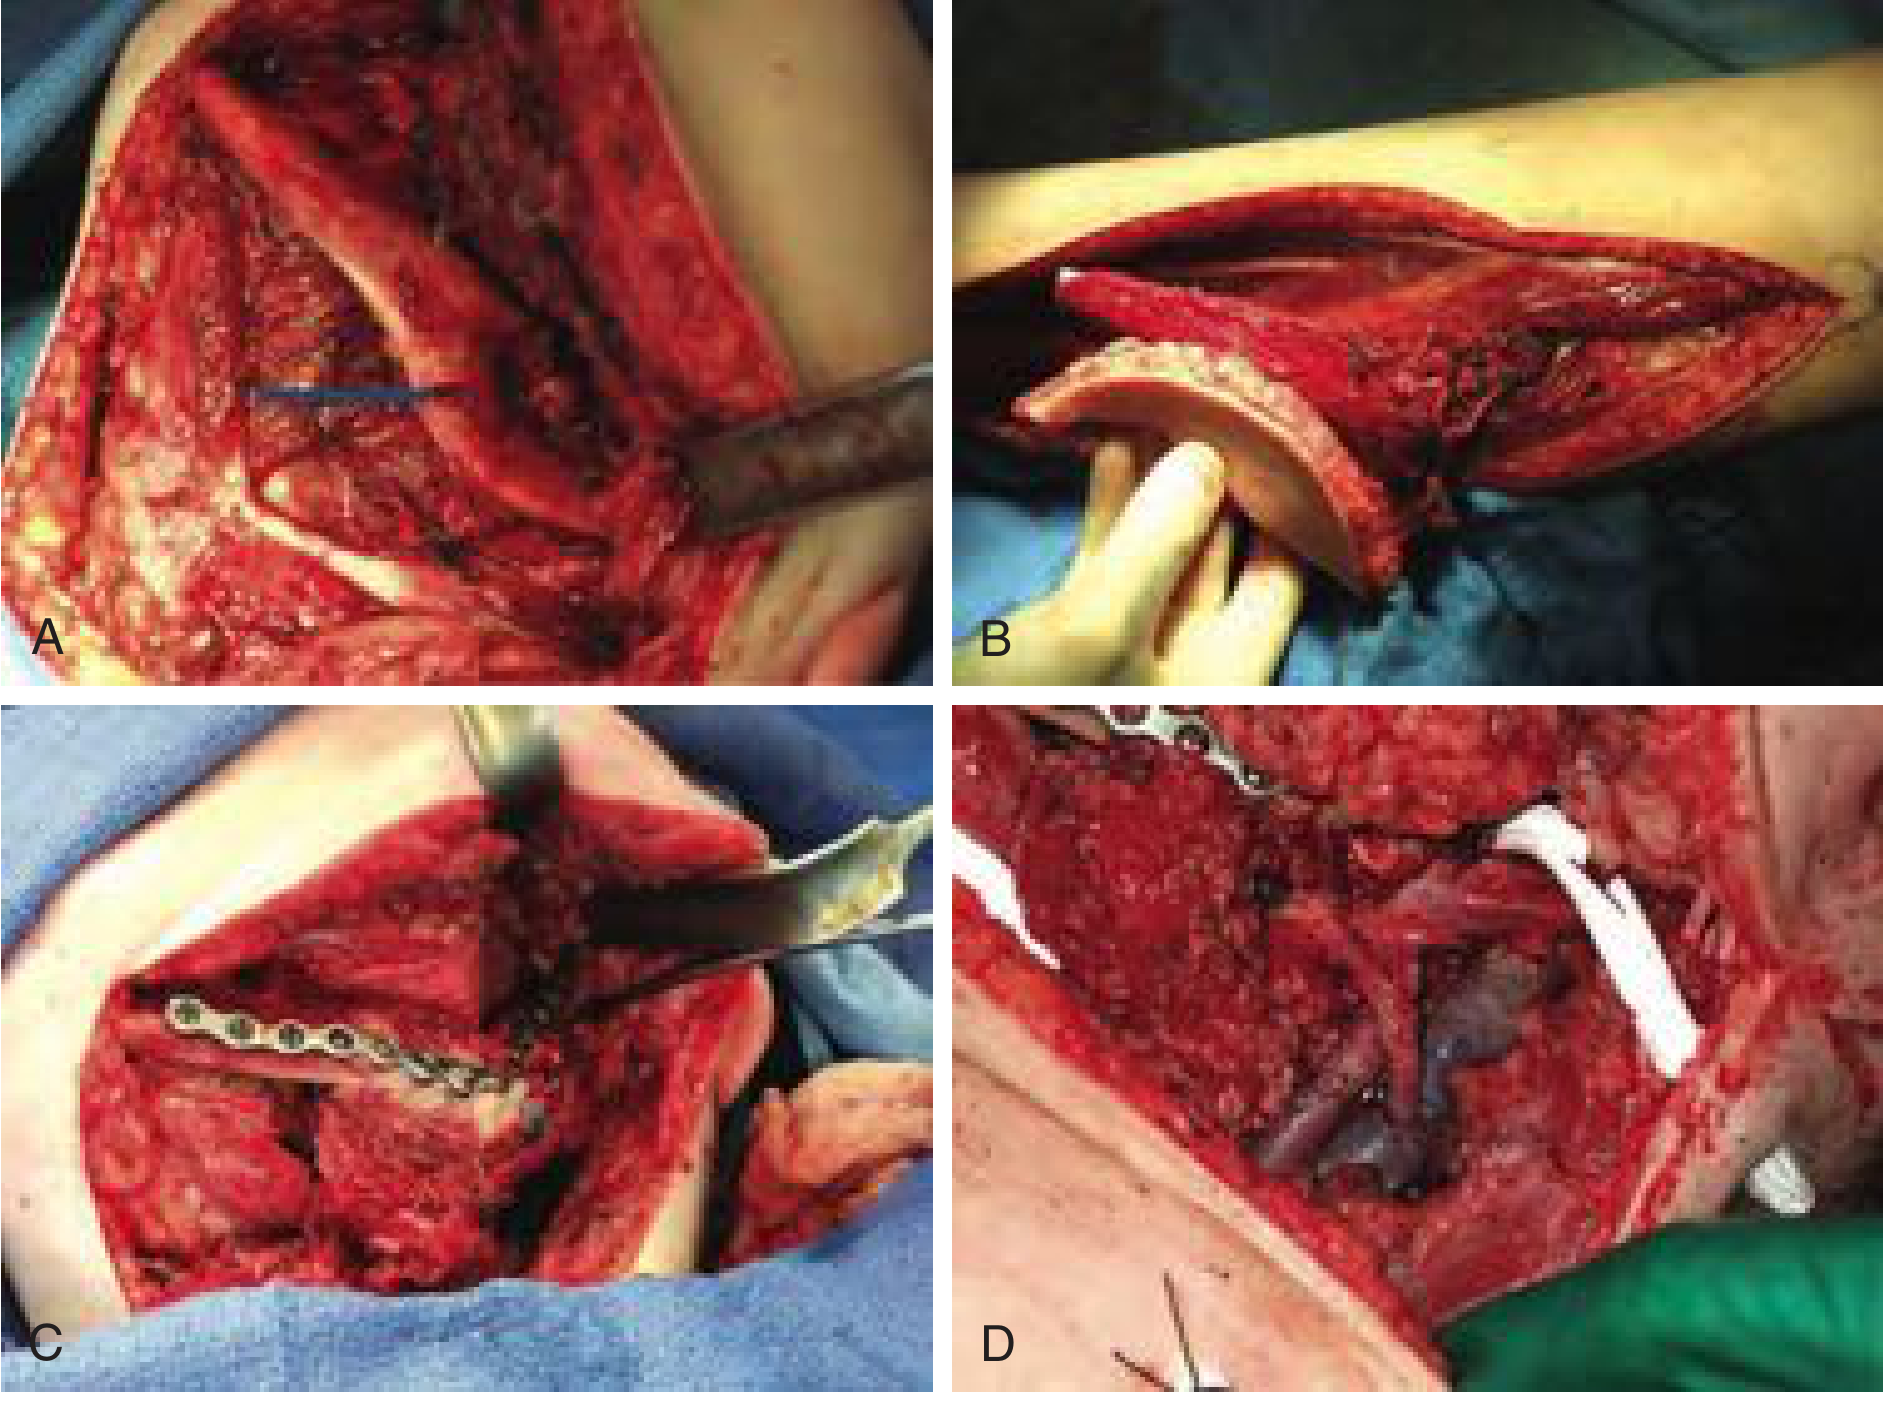
Intraoperative photographs from Cummings (Fig. 78.3) - fibula harvested from the lower leg, osteotomized segments secured to a reconstruction plate, and soft tissue inset with completed microvascular anastomosis:
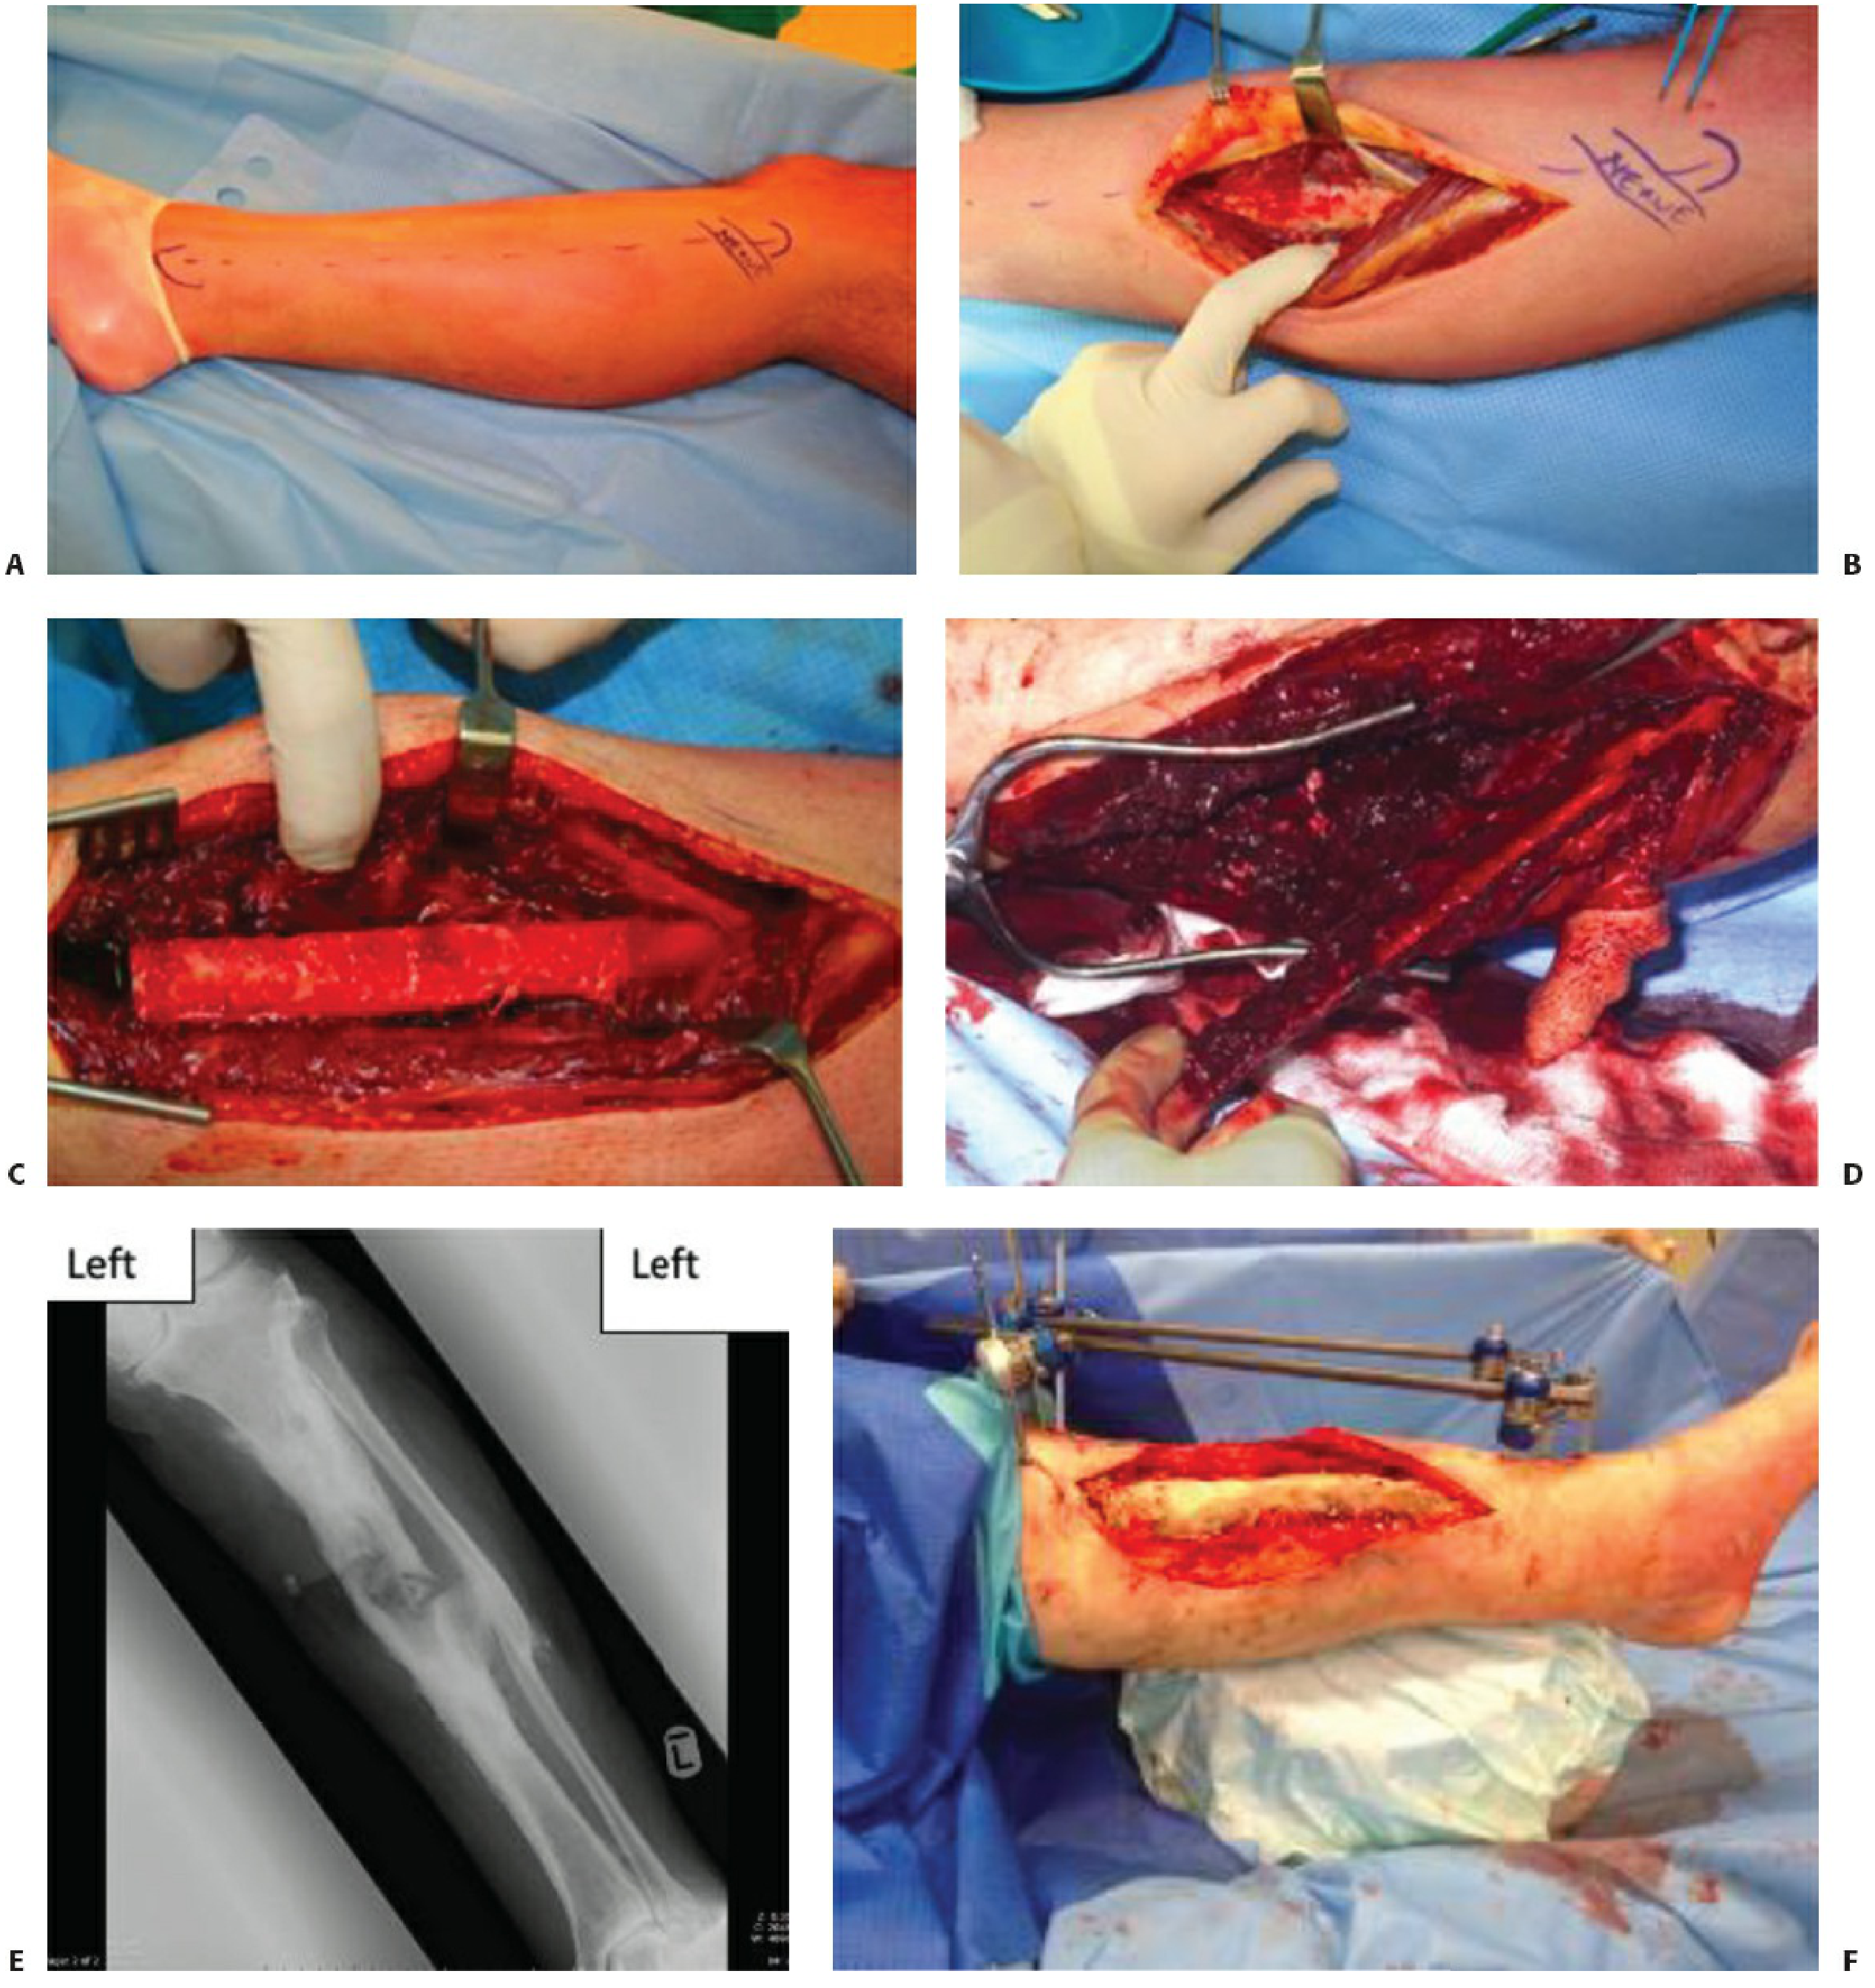
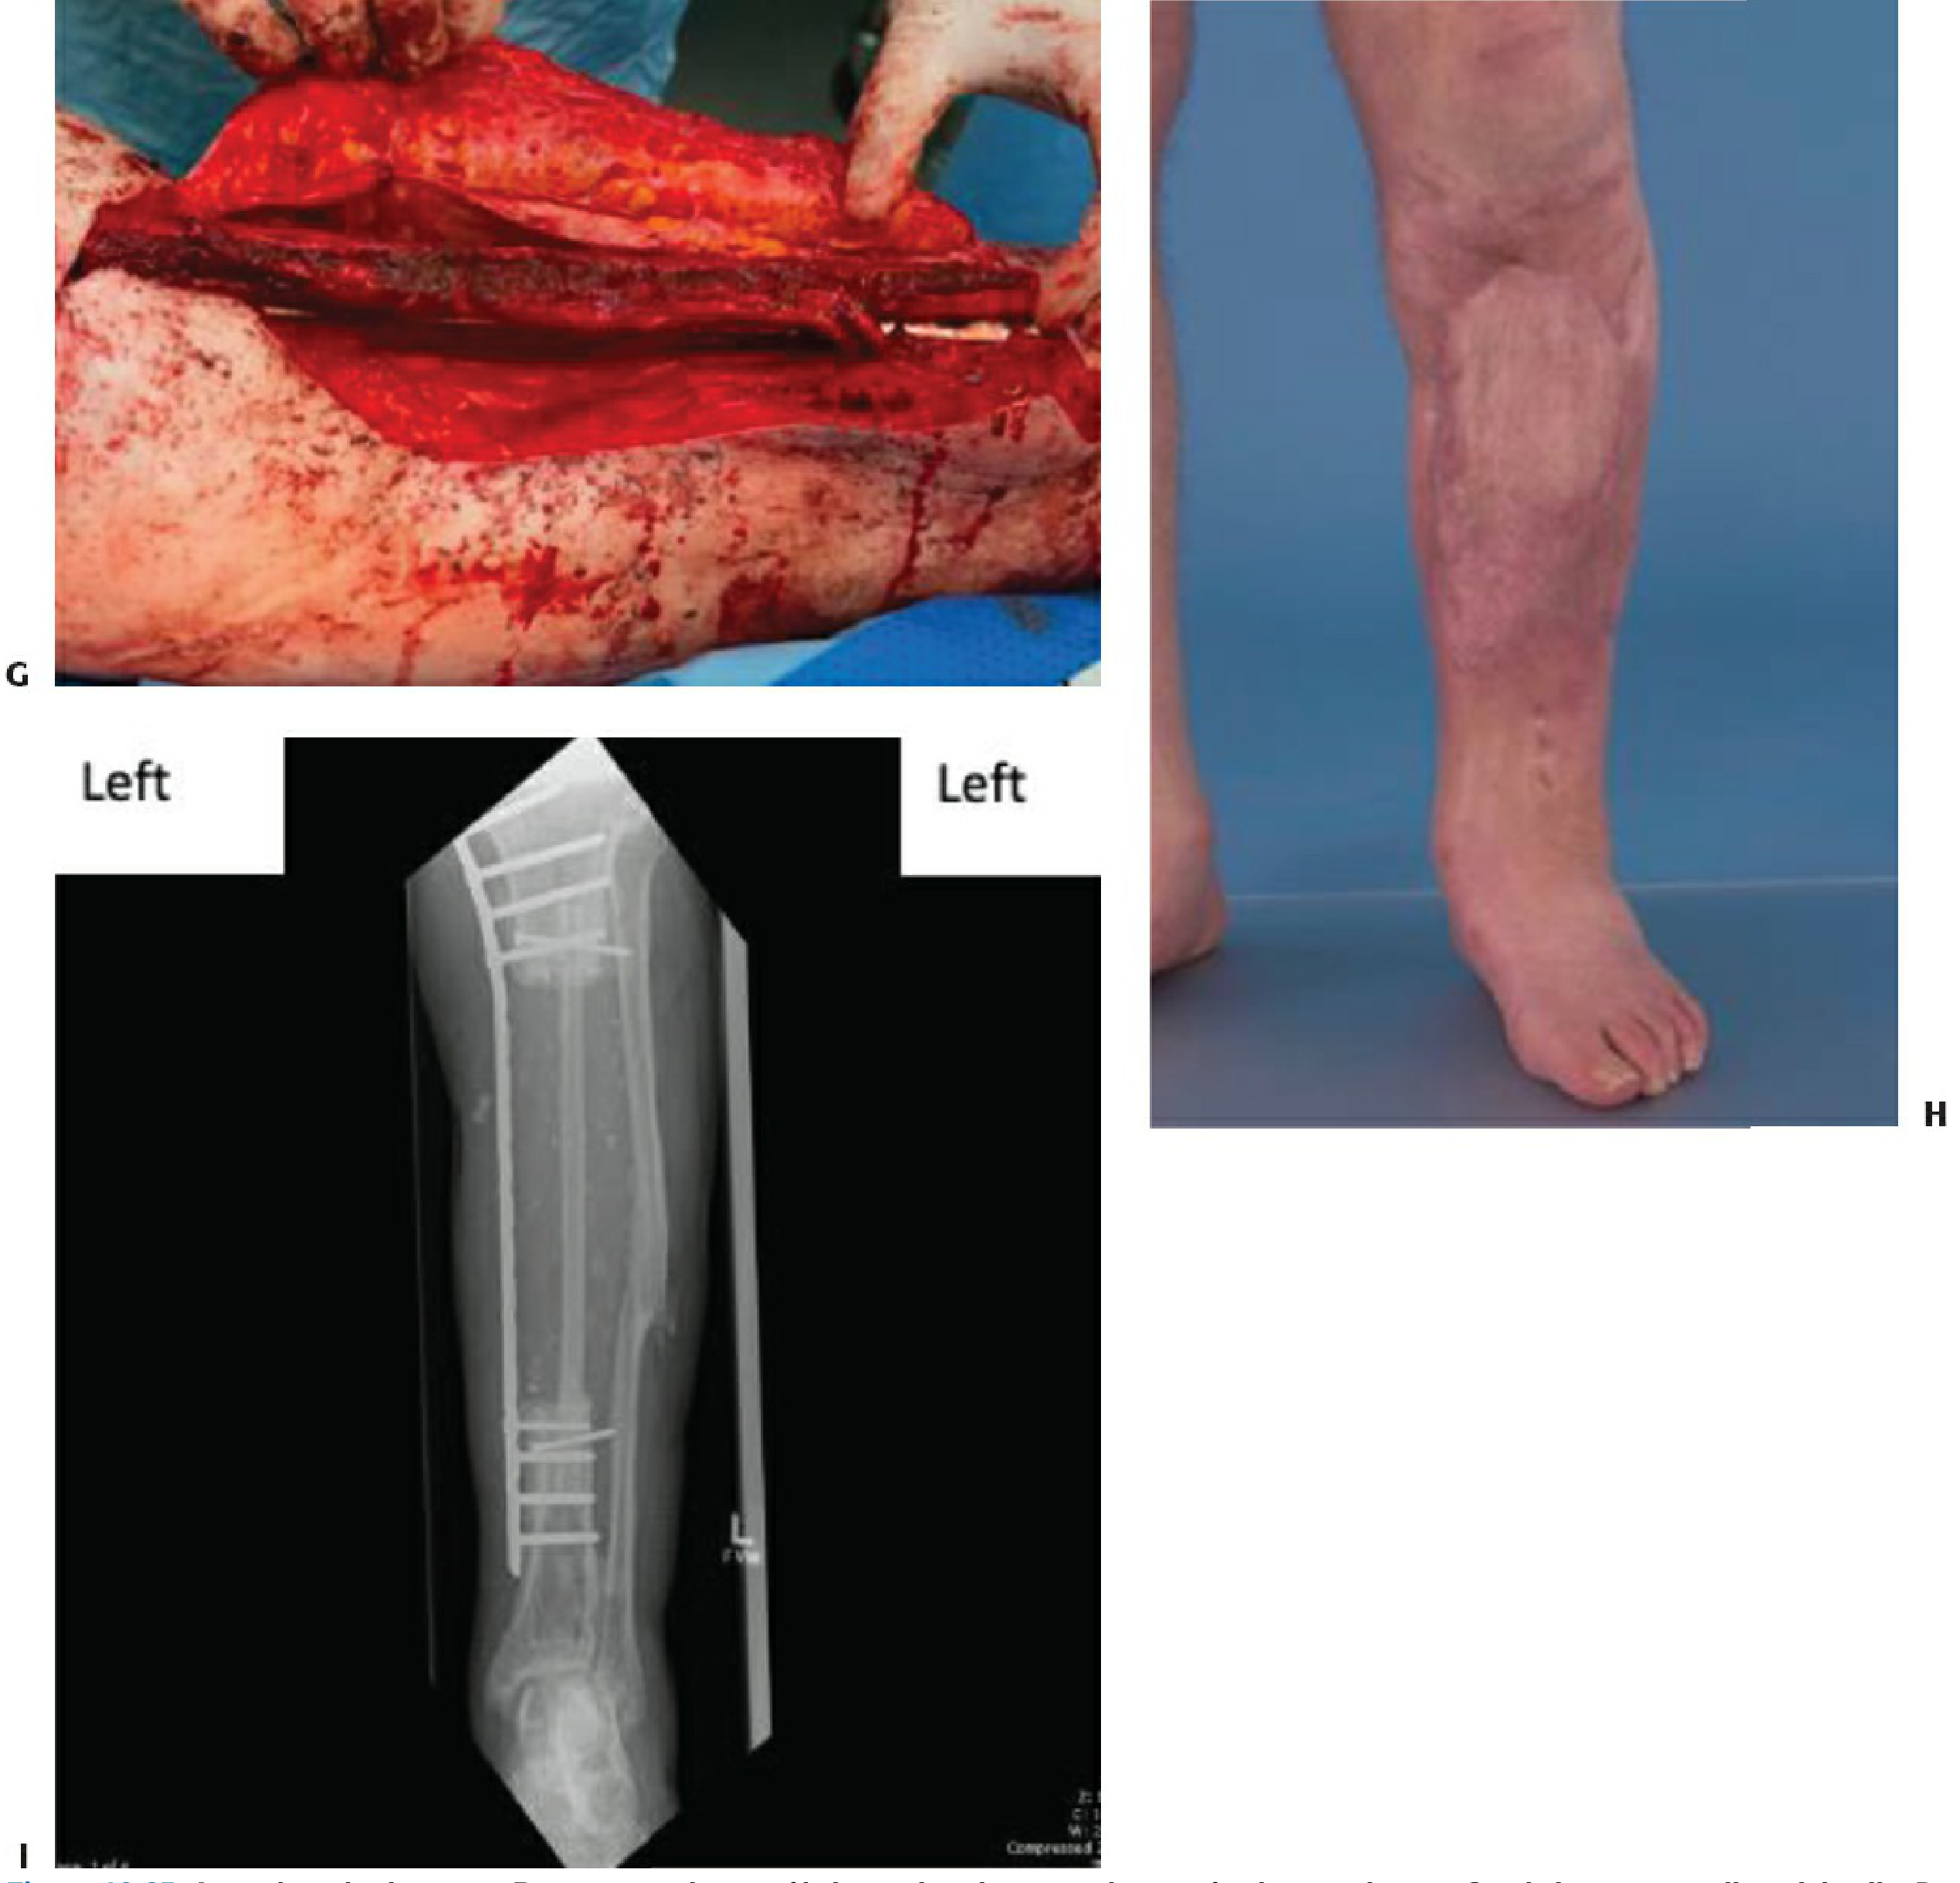
Operative steps from Rockwood & Green (Fig. 19-25) - donor site marking, dissection to fibula with superficial peroneal nerve protection, proximal and distal bone cuts, and mobilization:
Show pictures
Here are the operative images from the textbooks, plus I'll search for more:
Searching Images
free fibula flap harvest surgical technique peroneal artery
Loading Image
Here are all the operative images from the textbooks, organized by surgical stage:
1. Donor Site Marking, Harvest & Bone Cuts
(Rockwood & Green's Fractures in Adults, Fig. 19-25 A-F)
- A - Preoperative marking of the donor leg with the common peroneal nerve outlined
- B - Initial dissection down to the fibula, protecting the superficial peroneal nerve
- C - Fibula exposed after anterior and posterior compartment dissection
- D - Mobilization of the fibula segment after proximal and distal bone cuts
- E - X-ray showing the tibial defect (pathologic fracture/osteomyelitis) to be reconstructed
- F - Defect with cement spacer prior to free fibula transfer
2. Fibula Inset, Plate Fixation & Final Outcome
(Rockwood & Green's Fractures in Adults, Fig. 19-25 G-I)
- G - Fibular graft inset into the tibial defect with plate fixation
- H - Final healed clinical outcome showing restored leg contour
- I - AP radiograph with fibular graft in situ, secured by locking plate
3. Mandibular Reconstruction with Osteocutaneous Fibula Flap
(Cummings Otolaryngology Head & Neck Surgery, Fig. 78.3)
- A - Rhabdomyosarcoma of the mandible in an 11-year-old (arrow marks tumor)
- B - Fibula free flap harvested from the lower leg
- C - Mandible replaced by fibula bone - osteotomized segments secured to a reconstruction plate
- D - Skin paddle inset and microvascular anastomosis completed in the neck
These three image sets cover the full operative arc: preop marking → dissection → bone cuts → mobilization → inset → plate fixation → anastomosis → final outcome.
Transfusion reactions
Reading File
Searching sources...
Finding Sources
Searching Images
transfusion reaction types classification mechanism
Excellent - multiple dedicated sections across 3 major textbooks. Reading them all in parallel.
Reading File
Reading File
Reading File
Good data so far. Now reading the remaining sections - Goldman-Cecil continuation, Miller's TRALI/TACO sections, and Tietz workup.
Reading File
Reading File
Reading File
Excellent - now I have comprehensive data from three authoritative sources. Let me compile the full answer.
Transfusion Reactions
Transfusion reactions are adverse events that occur as a consequence of blood component transfusion. They are broadly classified as immunologic or non-immunologic, and as acute (within 24 hours) or delayed (days to weeks after transfusion).
Classification Overview
| Category | Reaction | Timing |
|---|---|---|
| Immunologic - Acute | Acute hemolytic | During / <24 h |
| Febrile nonhemolytic (FNHTR) | During / <4 h | |
| Allergic / Anaphylaxis | During | |
| TRALI | Within 6 h | |
| Hypotensive | During | |
| Immunologic - Delayed | Delayed hemolytic | 2-21 days |
| Delayed serologic | Days-weeks | |
| TA-GvHD | 1-6 weeks | |
| Post-transfusion purpura | 5-10 days | |
| Non-immunologic | TACO | During / <6 h |
| Septic/bacterial | During | |
| Hypothermia, citrate toxicity, air embolism | During |
Incidence (per unit transfused - US data)
| Reaction | Risk |
|---|---|
| Febrile nonhemolytic | ~1 : 1,100 |
| Allergic | ~1 : 1,200 |
| Allergic (severe) | ~1 : 15,500 |
| TACO | ~1 : 9,000 |
| Delayed hemolytic | ~1 : 32,000 |
| TRALI | ~1 : 140,000 |
| Acute hemolytic | ~1 : 110,000 |
| TA-GvHD | <1 : 10,000,000 |
| Post-transfusion purpura | ~1 : 10,000,000 |
(Goldman-Cecil Medicine, Table 162-2)
1. Acute Hemolytic Transfusion Reaction (AHTR)
Mechanism: Preformed recipient antibodies (usually anti-A, anti-B IgM) bind transfused RBC antigens → antigen-antibody complex activates complement cascade → intravascular hemolysis. Most commonly caused by ABO incompatibility due to clerical/human error (wrong patient, wrong unit). As little as 10 mL of incompatible blood can trigger the reaction.
Cause: ~70% from RBC transfusions, ~30% from platelets. The most common cause is mistransfusion due to improper patient identification.
Symptoms:
- Fever, chills/rigors
- Chest pain, flank/back pain, abdominal pain
- Nausea, vomiting
- Dyspnea
- Hemoglobinuria (pink/red urine)
- Hypotension, shock
- Diffuse bleeding (DIC)
- Oliguria/anuria (acute renal failure)
Under general anesthesia: classic symptoms are masked. Hemoglobinuria, unexplained hypotension, or a bleeding diathesis may be the only clues. - Miller's Anesthesia, 10e
Labs:
- Decreased Hb, decreased haptoglobin
- Elevated LDH, elevated bilirubin
- Positive direct antiglobulin test (DAT)
- Hemoglobinuria (dipstick positive, NO RBCs on microscopy - distinguishes from hematuria)
- Incompatible crossmatch on repeat testing
- Prolonged PT/PTT, low fibrinogen (if DIC)
Treatment (Miller's Anesthesia protocol):
- Stop the transfusion immediately
- Maintain urine output ≥75-100 mL/h:
- IV fluids ± mannitol
- Furosemide if fluids/mannitol inadequate
- Alkalinize the urine (sodium bicarbonate)
- Assay urine and plasma hemoglobin
- Check platelets, PT, PTT, fibrinogen
- Return unused blood to blood bank for repeat crossmatch
- Send patient blood and urine to blood bank
- Prevent hypotension to ensure adequate renal blood flow
- Treat DIC with plasma, cryoprecipitate, platelets ± heparin
Complications: Acute renal failure, DIC. About 5% of ABO-incompatible transfusions are fatal; ~50% have no adverse effect.
2. Febrile Nonhemolytic Transfusion Reaction (FNHTR)
Most common type of transfusion reaction (~1:1,100).
Mechanism:
- Platelets: Leukocyte-derived cytokines (IL-1, IL-6, TNF) accumulate in the component during storage
- RBCs: Donor leukocytes interact with recipient white blood cell antibodies (anti-HLA, anti-granulocyte)
Definition: Temperature increase of ≥1°C (or >38°C) AND/OR chills/rigors within 4 hours of cessation of transfusion, with no other explanation.
Symptoms: Fever, chills, rigors. No hemolysis, no hypotension.
Diagnosis of exclusion - must rule out AHTR and septic reaction first.
Treatment:
- Stop transfusion, report to transfusion service
- Antipyretics (acetaminophen)
- Can restart with crossmatch-compatible blood once hemolytic reaction excluded
Prevention: Prestorage leukoreduction is the most effective measure (removes leukocytes before cytokine accumulation).
3. Allergic Transfusion Reaction
Second most common (~1:1,200). Range: mild urticaria to life-threatening anaphylaxis.
Mechanism: IgE-mediated allergic response to donor plasma proteins. Special case: IgA-deficient recipients (1 in 700 people) who have anti-IgA antibodies can develop severe anaphylaxis when exposed to IgA in donor plasma.
Symptoms:
- Mild: urticaria, hives, pruritus, flushing
- Severe (anaphylaxis): bronchospasm, laryngeal edema, hypotension, shock
Workup: No abnormal findings on standard transfusion reaction workup (no hemolysis).
Treatment:
| Severity | Management |
|---|---|
| Mild (localized urticaria) | Antihistamines; may restart transfusion after symptom resolution |
| Recurrent mild | Pretreat with antihistamines 30 min before transfusion |
| Severe/recurrent | Steroids 2-3 hours prior to future transfusions |
| Anaphylaxis | Parenteral epinephrine; stop transfusion permanently |
| IgA-deficient + anaphylaxis | Provide IgA-deficient donor units or washed cellular components |
4. Transfusion-Related Acute Lung Injury (TRALI)
Leading cause of transfusion-related mortality (FDA data 2012-2016).
Mechanism (two-hit model):
- Immune (antibody-mediated): Donor anti-HLA or anti-neutrophil antibodies bind recipient neutrophils → neutrophil activation → capillary leak in lungs
- Non-immune: Biologically active lipids from stored blood components prime/activate neutrophils in susceptible patients
Definition: New acute lung injury within 6 hours of transfusion, in the absence of pre-existing ALI, circulatory overload, or other ALI risk factors.
Symptoms: Acute dyspnea, hypoxemia (PaO₂/FiO₂ <300), bilateral pulmonary infiltrates on CXR - noncardiogenic pulmonary edema. No evidence of left heart failure (normal PCWP/CVP).
Treatment: Supportive - oxygen, mechanical ventilation if needed. No specific therapy. Do NOT give diuretics (unlike TACO).
Prevention: Use of male-only or never-pregnant plasma donors (female multiparous donors are the primary source of anti-HLA antibodies). Leukoreduction also helps.
5. Transfusion-Associated Circulatory Overload (TACO)
Mechanism: Simple volume overload from transfusion in patients with impaired cardiovascular reserve (elderly, renal failure, heart failure, pediatric patients).
Symptoms: Dyspnea, orthopnea, hypertension, tachycardia, pulmonary edema - cardiogenic pulmonary edema.
Distinguishing TRALI vs. TACO:
| Feature | TRALI | TACO |
|---|---|---|
| Mechanism | Non-cardiogenic | Cardiogenic |
| BP | Often hypotensive | Hypertensive |
| BNP | Normal/mildly elevated | Markedly elevated |
| Response to diuretics | No | Yes |
| CXR | Bilateral infiltrates | Bilateral infiltrates + cardiomegaly |
| PCWP | Normal | Elevated |
Treatment: Upright position, oxygen, diuretics (furosemide).
6. Delayed Hemolytic Transfusion Reaction (DHTR)
Timing: 2-21 days post-transfusion.
Mechanism: Patient was previously sensitized to RBC antigens (prior transfusion or pregnancy) but antibody level was too low to detect at pretransfusion screening. After transfusion, an anamnestic (secondary) immune response boosts the antibody titer → extravascular hemolysis in the reticuloendothelial system.
Antibodies involved: Predominantly Rh system (anti-D, anti-E, anti-C) and Kidd system (anti-Jk^a) - NOT ABO (unlike AHTR). More common in females.
Symptoms: Often subtle:
- Unexpected fall in hemoglobin 2-21 days post-transfusion
- Mild jaundice
- Positive DAT
- Rarely hemoglobinuria or renal impairment
- Rarely fatal
Clinical Pitfall: In postoperative patients, the unexplained Hb drop may be mistakenly attributed to surgical bleeding, leading to unnecessary return to the OR. - Miller's Anesthesia, 10e
Treatment: Usually self-limiting. Avoid future transfusion with the implicated antigen. Future crossmatch must use antibody-screened, antigen-negative blood.
7. Transfusion-Associated Graft-versus-Host Disease (TA-GvHD)
Mechanism: Viable donor T-lymphocytes engraft in an immunocompromised recipient, recognize host tissues as foreign, and mount an immune attack.
At-risk patients: Severe immunodeficiency, hematologic malignancies, allogeneic SCT recipients, neonates, congenital immunodeficiencies.
Symptoms: 1-6 weeks post-transfusion - fever, skin rash (erythroderma), diarrhea, hepatitis, bone marrow aplasia (pancytopenia).
Mortality: >90% - because unlike solid organ GvHD, the marrow is also attacked.
Prevention: Irradiation of cellular blood components (25 Gy) inactivates donor T-lymphocytes. Leukoreduction alone is NOT sufficient.
8. Post-Transfusion Purpura (PTP)
Timing: 5-10 days post-transfusion.
Mechanism: Recipient produces alloantibodies (typically anti-HPA-1a) against platelet antigens on donor platelets, which paradoxically also destroy the recipient's own platelets.
Symptoms: Sudden severe thrombocytopenia, purpura, mucosal bleeding.
Treatment: IV immunoglobulin (IVIg) is first-line; plasmapheresis for refractory cases.
9. Septic (Bacterial Contamination) Reaction
Mechanism: Transfusion of a bacterially contaminated blood component. Platelets (stored at room temperature) are at greatest risk.
Common organisms: Staphylococcus spp., Gram-negative bacteria in RBCs; Staphylococcus epidermidis, Staphylococcus aureus in platelets.
Symptoms: High fever, rigors, hypotension, shock - can mimic AHTR. Rapid deterioration.
Treatment: Stop transfusion; broad-spectrum antibiotics immediately; blood cultures from patient and bag; supportive care (vasopressors if needed).
Transfusion Reaction Workup
When a reaction is suspected, the following steps are standard (Quick Compendium of Clinical Pathology, 5th ed.):
- Stop transfusion immediately
- Clerical check: Verify patient ID on all paperwork and the blood bag - the most common cause of severe hemolytic reaction is clerical error
- Inspect serum/plasma for visible hemolysis (pink/red = hemolysis)
- Urine dipstick for hemoglobinuria (positive dipstick + no RBCs on microscopy = hemoglobinuria; distinguishes from hematuria)
- Repeat ABO typing on a post-transfusion sample
- Direct Antiglobulin Test (DAT): Positive DAT indicates antibody-coated RBCs. A negative DAT in AHTR can occur if hemolysis was complete and no transfused cells remain.
- Repeat crossmatch using pre- and post-transfusion samples
- Send blood from bag + patient sample to blood bank
- Transfusion service physician reviews workup; determines further testing
- Report to FDA within 7 days for fatalities or serious morbidity
Key Distinguishing Features at a Glance
| Feature | AHTR | FNHTR | Allergic | TRALI | TACO | DHTR |
|---|---|---|---|---|---|---|
| Timing | Immediate | <4 h | Immediate | <6 h | <6 h | 2-21 days |
| Fever | Yes | Yes | No | Yes | No | Mild |
| Hemolysis | Yes (intravascular) | No | No | No | No | Yes (extravascular) |
| Hypotension | Yes | No | Severe only | Yes | No | Rarely |
| Respiratory | No | No | Wheeze (severe) | Severe (ARDS) | Pulm edema | No |
| Urticaria | No | No | Yes | No | No | No |
| DAT | Positive | Negative | Negative | Negative | Negative | Positive |
| Antibody system | ABO | Anti-HLA/WBC | IgE vs plasma | Anti-HLA/neutrophil | N/A | Rh, Kidd |
| Key treatment | Stop; hydration; diuresis | Antipyretics | Epi (severe) | Supportive | Diuretics | Antigen-neg blood |
Sources: Goldman-Cecil Medicine International Edition (Ch. 162, pp. 1845-1848); Miller's Anesthesia 10e (Ch. 45, pp. 6653-6661); Quick Compendium of Clinical Pathology 5th ed. (§2.8.2, pp. 89-90)
This is a shared conversation. Sign in to Orris to start your own chat.