
Pain at tail bone region , pathology , physiotherapy treatment
coccydynia treatment physiotherapy
coccyx anatomy tailbone sacrococcygeal region diagram
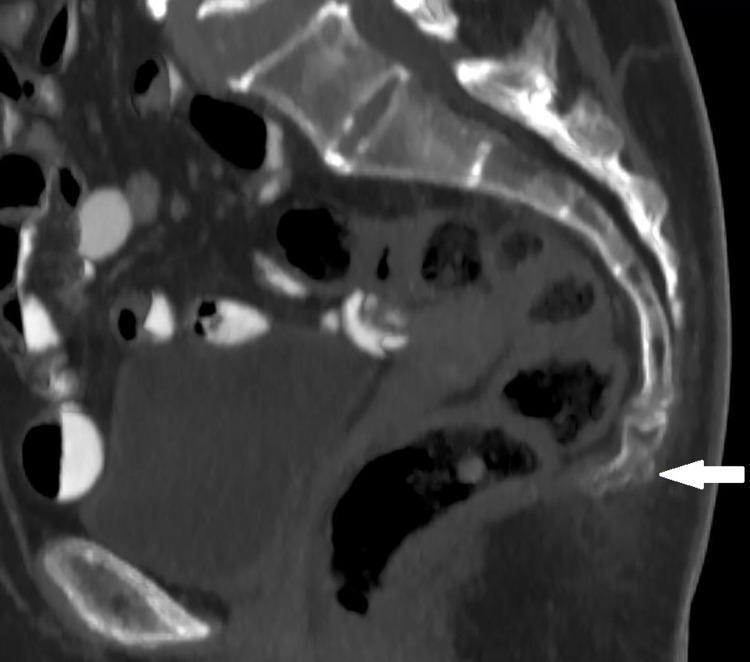
This diagnostic image is a midline sagittal computerized tomography (CT) scan of the lower spine and pelvic region, focusing on the sacrococcygeal anatomy. The image demonstrates the curvature of the sacrum and the articulated segments of the coccyx. A prominent white arrow indicates a coccygeal spicule, which is a small, pointed, bony outgrowth with high radiodensity located at the distal tip of the terminal coccygeal segment. Surrounding soft tissue structures, including the rectum and pelvic floor musculature, are visible anterior to the bony column with lower attenuation values. This CT finding is clinically relevant in the evaluation of coccydynia, as a spicule can cause irritation of the overlying skin or subcutaneous tissues during sitting. The image serves as a teaching tool for recognizing morphological variations in coccygeal anatomy and identifying specific causes of idiopathic tailbone pain.
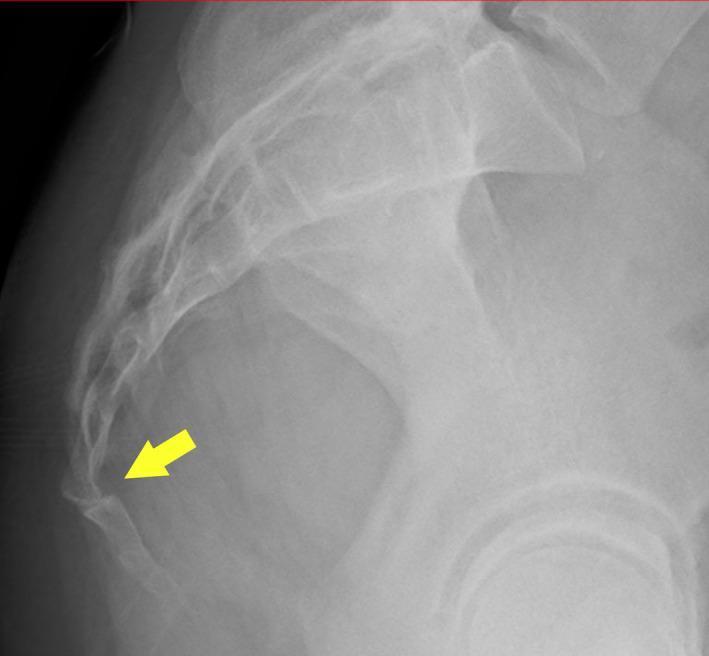
This diagnostic image is a lateral plain radiograph of the sacrococcygeal region of the human spine. The image displays the lower sacral vertebrae and the articulating coccygeal segments. A yellow arrow points specifically to the sacrococcygeal junction, highlighting a ventral (anterior) subluxation of the coccyx. The coccygeal segments are displaced forward relative to the distal sacrum, indicating a disruption of the normal pelvic curve. This radiological finding is clinically significant for the diagnosis of coccydynia (tailbone pain), which may be associated with postpartum trauma or direct injury. The image serves as an educational example of sacrococcygeal malalignment and traumatic orthopedic displacement in a clinical setting.
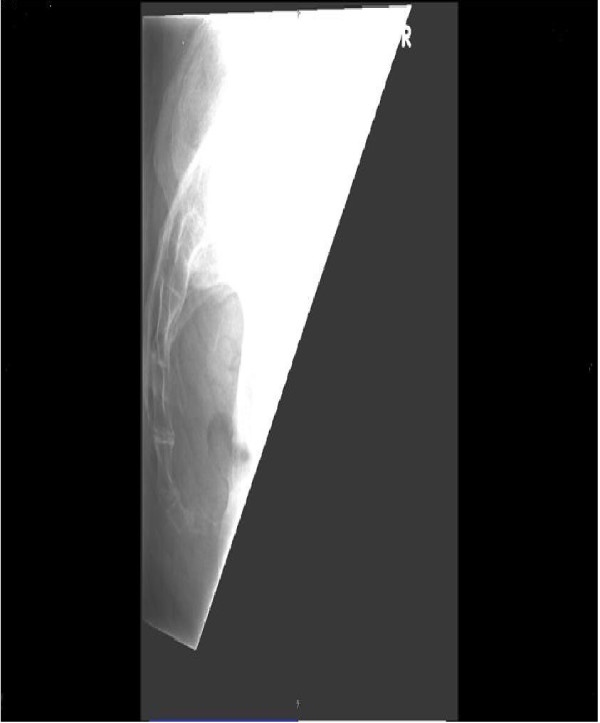
**Imaging Modality:** Conventional Radiography (X-ray). **Anatomical Region:** Lower pelvic region focusing on the sacrum and coccyx. **View:** Lateral projection. **Description of Findings:** The image displays the terminal portion of the spinal column. The sacrum is visible superiorly, articulating with the coccygeal segments. The coccyx demonstrates an anteverted morphology, characterized by an exaggerated anterior angulation relative to the sacral axis. The coccygeal segments appear intact without definitive evidence of acute cortical disruption or displaced fracture lines visible in this projection. The sacrococcygeal and intercoccygeal joints are visualized, with the distal-most segments curved sharply forward toward the pelvic cavity. **Characteristic Visual Features:** * Increased anterior curvature of the coccyx (antiversion). * Visualization of distinct coccygeal vertebrae and distal sacral segments. * Lateral orientation providing clear assessment of sagittal alignment. **Clinical Context/Diagnostic Utility:** This radiographic finding is indicative of an anatomical variation or positional change of the coccyx. It is a key diagnostic feature used in the evaluation of coccydynia (tailbone pain) to assess for morphological abnormalities, subluxation, or hypermobility that may contribute to clinical symptoms.
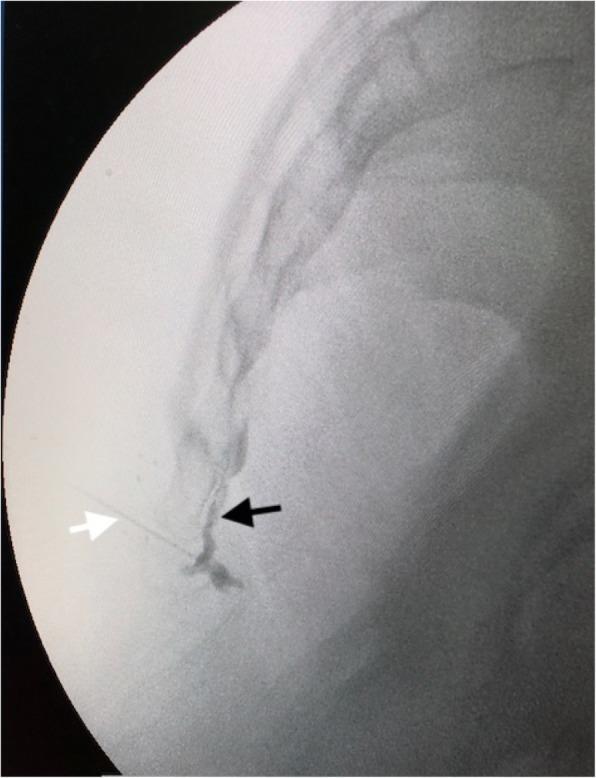
This diagnostic image is a lateral fluoroscopic view of the sacrococcygeal region, demonstrating the procedure for an impar ganglion block. The image shows the bony anatomy of the distal sacrum and coccyx. A thin, radiopaque 22-gauge needle is visible (indicated by a white arrow) inserted through the sacrococcygeal junction. The needle tip is positioned in the retrorectal space, immediately anterior to the sacrococcygeal joint. A dark, radiopaque contrast agent (indicated by a black arrow) is seen spreading along the anterior aspect of the coccyx, forming a characteristic 'comma' shape that confirms the correct retroperitoneal placement of the needle for the sympathetic block. This procedure is clinically relevant for managing chronic perineal or pelvic pain. The image serves as an educational example of real-time imaging guidance for precise interventional pain management in anesthesiology and radiology.
PMID: 40420056
PMID: 40308532
PMID: 42097750
coccydynia physiotherapy manual therapy pelvic floor exercise treatment
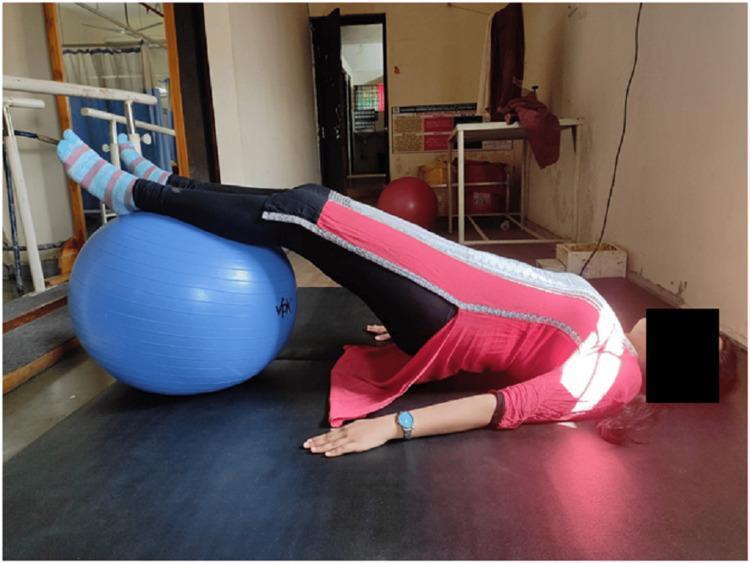
Clinical photograph of a patient performing a pelvic bridging exercise on a treatment mat, categorized under physical therapy and rehabilitation. The patient is in a supine position with the upper back and shoulders supported by the mat, while the lower limbs are elevated on a large, blue inflatable Swiss ball (stability ball). The pelvis is actively lifted into a bridge posture, demonstrating a core and pelvic floor strengthening maneuver. The patient's arms are extended laterally along the torso for stability. This exercise is designed to improve the strength and endurance of the pelvic floor muscles, gluteus maximus, paraspinal muscles, and abdominal core through gravity-resisted contraction. The image serves as a visual guide for therapeutic exercise protocols in specialties such as physical medicine, urogenital rehabilitation, and sports medicine. The setting is a clinical gym or physiotherapy clinic, indicated by the presence of parallel bars and other exercise equipment in the background.
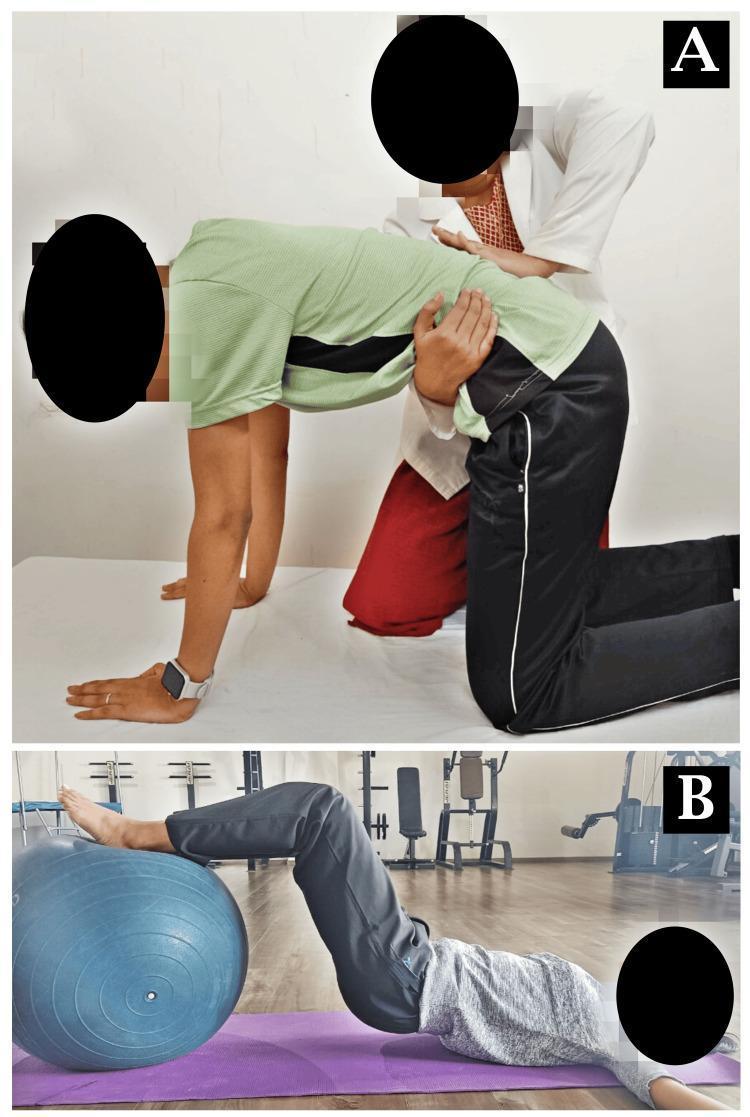
Clinical photograph showing two stages of physiotherapy for sacroiliac joint (SIJ) dysfunction. Panel A demonstrates a manual therapy technique known as mobilization with movement (MWM). A patient is in a quadruped (all-fours) position on a treatment table while a therapist, wearing a white lab coat, applies a manual gliding force to the posterior pelvic/sacroiliac region to facilitate pain-free movement. Panel B illustrates a rehabilitative exercise for core and pelvic stability. The patient is performing a supine bridge on a purple yoga mat with their lower legs and heels resting on a blue Swiss ball (stability ball). This movement combines hip extension and knee flexion to target the gluteal muscles, hamstrings, and lumbopelvic stabilizers. The images serve as educational examples of combined manual and active rehabilitation strategies for managing pelvic girdle pain and improving musculoskeletal function in the lumbosacral region.
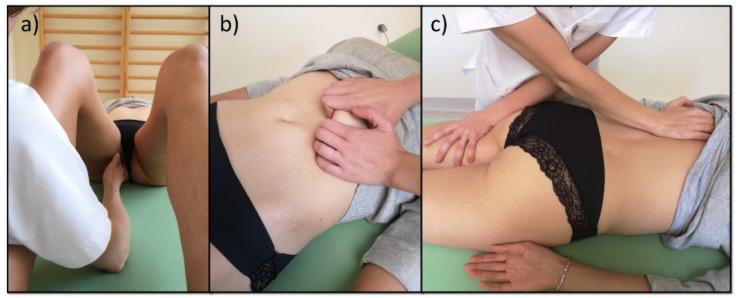
This set of three clinical photographs (a–c) demonstrates various manual therapy techniques used in the treatment of primary dysmenorrhea. Panel (a) illustrates a pelvic floor release technique; the patient is in a supine position with knees flexed and hips abducted (lithotomy-like position), while the therapist performs manual manipulation in the perineal region to normalize muscle tension. Panel (b) shows the mobilization and stretching of the breathing diaphragm; the therapist's hands are positioned subcostally, applying targeted pressure to the upper abdominal wall to improve diaphragmatic flexibility. Panel (c) depicts a combined release of the limbs and breathing diaphragm; the patient is in a lateral recumbent position while the therapist applies stabilizing pressure to the hip and manual release to the thoracolumbar and costal regions. These images serve as educational examples of physiotherapy interventions—including trigger point therapy and myofascial release—aimed at reducing menstrual pain and improving musculoskeletal flexibility in gynecological rehabilitation.
Coccydynia (Tailbone Pain) - Pathology & Physiotherapy Management
1. Anatomy of the Coccyx
2. Definition
3. Etiology & Classification
By Etiology
| Type | Description |
|---|---|
| Traumatic | Direct axial fall onto the coccyx; cumulative trauma from prolonged awkward sitting; childbirth injury |
| Idiopathic | No identifiable structural cause; may reflect pelvic floor muscle spasticity or dysfunction |
By Pathology (Classification of Coccydynia)
- Degeneration of the sacrococcygeal and intercoccygeal disc and joints
- Morphological abnormalities: coccyx types II, III, IV; presence of a bony spicule; coccygeal retroversion
- Hypermobility: posterior or anterior subluxation
- Fracture (acute or old)
- Rarely: infection, chordoma, other neoplasm
BMI-Coccygeal Lesion Correlation
| BMI Category | Common Coccygeal Finding |
|---|---|
| Obese | Posterior subluxation |
| Normal weight | Hypermobility or radiographically normal |
| Thin/underweight | Anterior subluxation and spicules |
4. Clinical Features
- Primary complaint: Localised pain at/around the coccyx, worse on sitting and characteristically exacerbated when rising from a seated position
- Patient often shifts from buttock to buttock to offload pain
- Localised tenderness and swelling on palpation over the coccyx
- No significant low back pain or radiation in typical cases
- Goldman-Cecil notes: "The patient squirms from buttock to buttock to relieve the pressure and consequent pain and often chooses to sit on a cushion." - Goldman-Cecil Medicine
5. Imaging
| Modality | Indication |
|---|---|
| Plain X-ray (AP + lateral) | First-line; sitting vs. standing views measure coccygeal angle of incidence and sagittal pelvic rotation |
| Dynamic sitting/standing XR | Assess hypermobility and mechanical subluxation |
| MRI | Rule out chordoma, infection, disc inflammation; demonstrates sacrococcygeal inflammation in hypermobility |
| Technetium-99m bone scan | Detects inflammation in hypermobility |
| CT | Reserved for trauma, red flags, or inconclusive plain imaging |
6. Pathological Mechanisms
7. Red Flags (Require Urgent Workup)
- Night pain or unrelenting rest pain
- Constitutional symptoms (fever, weight loss)
- Saddle anesthesia or bowel/bladder dysfunction
- History of malignancy (suspect chordoma or metastasis)
- Neurological deficits
8. Physiotherapy Management
A. Conservative First-Line (Effective in ~90% of patients)
| Intervention | Detail |
|---|---|
| Offloading cushion | Donut or coccyx-cutout (wedge) cushion to redistribute sitting pressure away from tailbone |
| Sitting posture advice | Lean slightly forward, sit on firm surfaces, avoid sinking into soft chairs |
| Activity modification | Limit prolonged sitting; stool softeners if defecation is painful |
| NSAIDs / Simple analgesics | First-line pharmacological support |
B. Physical Therapy Interventions (Evidence-Based, 2025)
1. Extracorporeal Shock Wave Therapy (ESWT)
- Strongest evidence for coccydynia among all PT modalities
- Significant reductions in pain and improved functional outcomes
- Benefits sustained up to 6 months
- Recommended as first-line physiotherapy by a 2026 contemporary management review - Staartjes et al. 2026, Neurospine
2. Manual Therapy
- Particularly effective for recent-onset coccydynia
- Techniques: internal (transrectal) and external coccygeal mobilisation, manipulation at the sacrococcygeal joint
- Efficacy diminishes over time; more useful in acute/subacute phase
- Combination with electrotherapy or exercise improves outcomes
3. Levator Ani Stretching / Pelvic Floor Massage
- Effective for intermediate- and long-term pain relief (the only modality showing sustained long-term improvement in pain)
- Especially useful in idiopathic coccydynia with pelvic floor dysfunction
- Internal soft tissue release of levator ani and piriformis
- Key when pelvic floor spasm is the primary driver
4. Kinesiotaping (KT) + Exercise
- Improves pain perception
- Significant short-term improvement in trunk mobility
- Limited impact on disability measures alone
5. Muscle Energy Technique (MET)
- Shown to produce short-term improvements in pain and function
- Targets sacroiliac joint and lumbopelvic alignment
6. Electrotherapy
- Ultrasound, TENS used as adjuncts
- Combined with manual therapy for better outcomes
7. Exercise Therapy
- Core stabilisation and pelvic floor strengthening
- Gluteal strengthening (bridging exercises)
- Flexibility: hamstring, piriformis, iliopsoas stretching
- Used in combination with kinesiotaping
9. Stepwise Treatment Algorithm
Step 1 - First Line (all patients)
  → Education + ergonomic advice (coccyx cushion, posture)
  → NSAIDs / simple analgesics
  → Physiotherapy: ESWT, manual therapy, pelvic floor treatment

Step 2 - Persistent pain (6-8 weeks)
  → Image-guided local injection: corticosteroid + local anesthetic
    (methylprednisolone 40mg/mL + local anesthetic under fluoroscopy)
  → Ganglion impar block for refractory cases
  → Radiofrequency ablation

Step 3 - Chronic, refractory (failed conservative + injections)
  → Partial or total coccygectomy
  (Success rate 60-91% in hypermobility/subluxation confirmed cases)
  (Only if diagnostic block provides temporary relief)
10. Key Recent Evidence (2025)
| Study | Finding |
|---|---|
| Blanco-Diaz et al., BMC MSK Disord 2025 (Systematic Review, 9 RCTs, n=532) | ESWT strongest evidence; manual therapy effective early; KT improves pain perception |
| Sidiq et al., Arch Physiother 2025 (Systematic Review, 10 RCTs, n=515) | Levator ani stretching/massage shows sustained long-term pain relief; all PT modalities improve short-term pain and function |
| Staartjes et al., Neurospine 2026 (Review, 42 studies) | Proposes current best framework: PT (ESWT first), then injections, then surgery; dynamic XR for mechanical pain |
11. Prognosis
- ~90% resolve with conservative management (cushion + NSAIDs + PT)
- Fracture-related coccydynia: discomfort typically persists 4-8 weeks
- Persistent or severe cases warrant orthopaedic or spine specialist referral
- Surgery (coccygectomy) reserved for those who fail all conservative and interventional care, with concordant clinical, imaging, and diagnostic block findings - Rosen's Emergency Medicine; Campbell's Operative Orthopaedics
especially ESWT, pelvic floor manual therapy (levator ani release), and joint mobilisation - forms the backbone of management In deatil with every step by step with precautions also
extracorporeal shock wave therapy coccydynia protocol
ESWT shock wave therapy musculoskeletal parameters protocol
coccyx manipulation mobilization technique pelvic floor
PMID: 40032293
ESWT shock wave therapy application lower back sacral region treatment
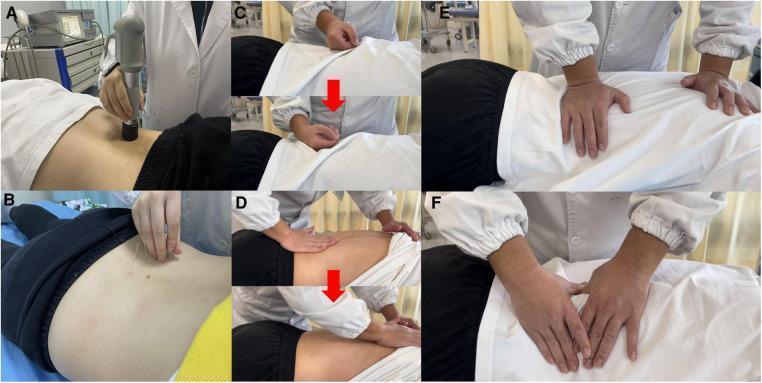
A multi-panel figure illustrating various integrative rehabilitation modalities for lower back pain management. Panel (A) demonstrates Extracorporeal Shock Wave Therapy (ESWT) using a handheld pneumatic applicator applied to the paraspinal lumbar region. Panel (B) shows acupuncture, with thin filiform needles inserted into lumbar acupoints on a prone patient. Panels (C) through (F) depict different Tui-na manual therapy techniques: (C) the rolling technique using the ulnar aspect of a closed fist and forearm; (D) the rubbing technique involving palm-surface contact and longitudinal movement; (E) the kneading technique utilizing rhythmic, circular pressure with the palms; and (F) the plucking technique targeting specific muscle fibers like the erector spinae or multifidus. The figure highlights both modern physical medicine technologies and Traditional Chinese Medicine (TCM) manual and needle-based interventions, emphasizing diverse hand positions, tools, and mechanical forces applied to the lumbar and sacral regions for myofascial relaxation and pain relief.
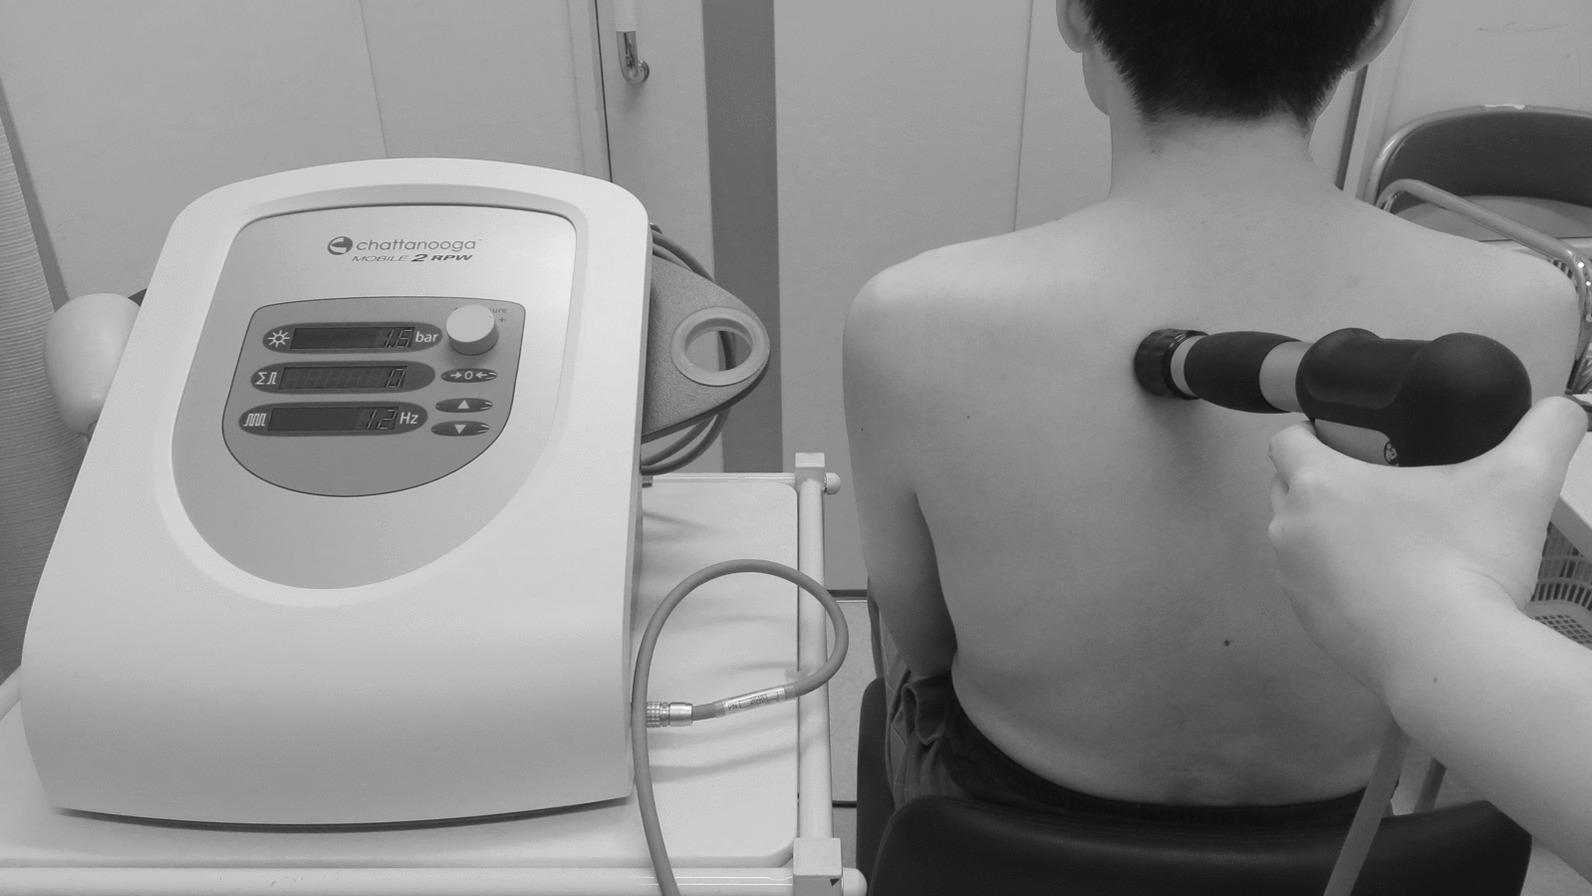
This procedural photograph illustrates the clinical application of Extracorporeal Shock Wave Therapy (ESWT) using a radial pressure wave (RPW) device for musculoskeletal treatment. On the left, a Chattanooga Mobile 2 RPW unit is positioned on a medical cart, displaying real-time parameters including a pressure of 1.5 bar and a frequency of 12 Hz. The interface features digital status displays and manual control dials for pressure adjustment. On the right, a practitioner is shown administering the therapy to a seated patient's upper back. The black, pneumatic handheld applicator is pressed firmly against the right trapezius/rhomboid region, delivering acoustic energy to target myofascial trigger points. This modality is commonly used in physical medicine and rehabilitation to manage chronic tension-type headaches and myofascial pain syndromes by inducing localized mechanical stimulation, which aims to improve blood flow and disrupt the 'vicious cycle' of ischemic muscle pain.
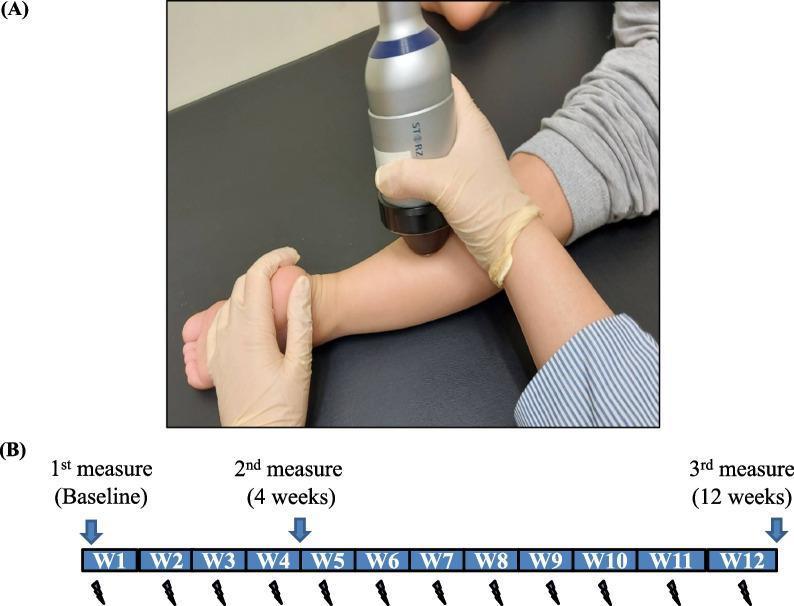
This composite educational graphic consists of a clinical photograph and a corresponding study timeline. Part (A) is a procedural photograph showing Extracorporeal Shock Wave Therapy (ESWT) being administered to the lower extremity of a pediatric patient. A clinician's gloved hand applies the applicator tip of a Storz medical device to the posterior calf region (gastrocnemius-soleus complex), while another gloved hand stabilizes the foot in a neutral position. Part (B) presents a horizontal timeline diagram outlining a 12-week therapeutic protocol. The timeline is divided into weekly segments (W1–W12). Weekly treatment sessions are denoted by lightning bolt icons below each segment. Outcome assessment points are marked with blue downward arrows at three intervals: 1st measure (Baseline at W1), 2nd measure (4 weeks), and 3rd measure (12 weeks). The visual demonstrates the practical application and research design for treating spasticity or muscle contractures using shock wave therapy.
pelvic floor internal manual therapy rectal coccyx mobilisation technique physiotherapy
This set of three clinical photographs (a–c) demonstrates various manual therapy techniques used in the treatment of primary dysmenorrhea. Panel (a) illustrates a pelvic floor release technique; the patient is in a supine position with knees flexed and hips abducted (lithotomy-like position), while the therapist performs manual manipulation in the perineal region to normalize muscle tension. Panel (b) shows the mobilization and stretching of the breathing diaphragm; the therapist's hands are positioned subcostally, applying targeted pressure to the upper abdominal wall to improve diaphragmatic flexibility. Panel (c) depicts a combined release of the limbs and breathing diaphragm; the patient is in a lateral recumbent position while the therapist applies stabilizing pressure to the hip and manual release to the thoracolumbar and costal regions. These images serve as educational examples of physiotherapy interventions—including trigger point therapy and myofascial release—aimed at reducing menstrual pain and improving musculoskeletal flexibility in gynecological rehabilitation.
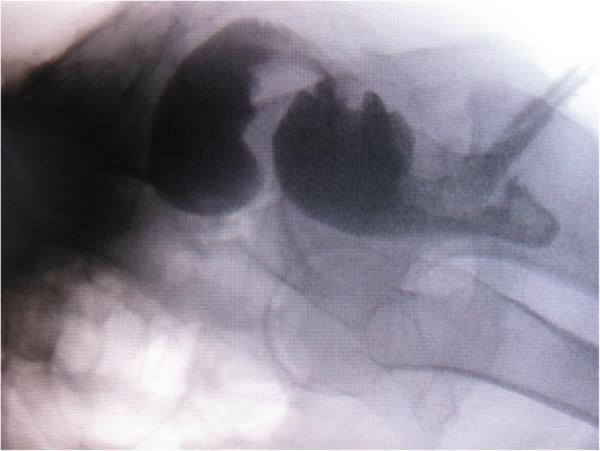
This lateral proctography image (defecography) demonstrates a contrast-filled rectum and anal canal. The radiopaque contrast medium highlights the internal morphology of the pelvic floor, revealing a significant anterior outpouching of the rectal wall consistent with a rectocele. The rectal lumen appears distended, with visible irregularities in the mucosal contour and a narrowing distal to the rectocele. An opacified catheter is visible, likely used for contrast administration. Surrounding anatomical landmarks include the bony pelvis, specifically the sacrum, coccyx, and pubic symphysis, which are visible as high-density structures providing spatial orientation. Clinically, this imaging modality is used to evaluate pelvic floor dysfunction, including obstructed defecation syndrome, rectal prolapse, and the anatomical relationship between the rectum and the vaginal wall during straining. The presence of the large rectocele and luminal narrowing provides visual evidence for mechanical causes of chronic constipation and difficult bowel movements.
Clinical photograph showing two stages of physiotherapy for sacroiliac joint (SIJ) dysfunction. Panel A demonstrates a manual therapy technique known as mobilization with movement (MWM). A patient is in a quadruped (all-fours) position on a treatment table while a therapist, wearing a white lab coat, applies a manual gliding force to the posterior pelvic/sacroiliac region to facilitate pain-free movement. Panel B illustrates a rehabilitative exercise for core and pelvic stability. The patient is performing a supine bridge on a purple yoga mat with their lower legs and heels resting on a blue Swiss ball (stability ball). This movement combines hip extension and knee flexion to target the gluteal muscles, hamstrings, and lumbopelvic stabilizers. The images serve as educational examples of combined manual and active rehabilitation strategies for managing pelvic girdle pain and improving musculoskeletal function in the lumbosacral region.
coccyx external mobilisation joint manipulation sacrococcygeal technique hands
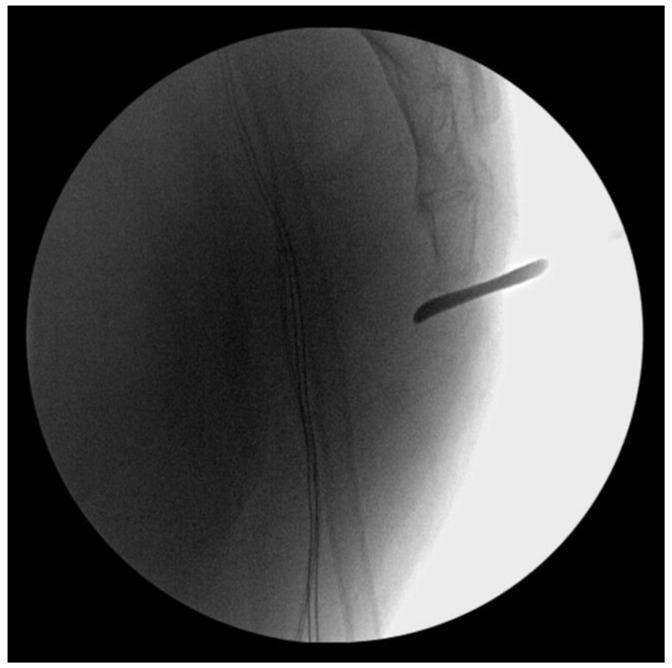
This lateral view intraoperative fluoroscopic image demonstrates a surgical reduction procedure for an anteriorly dislocated coccyx in a 56-year-old male. The imaging modality displays various grayscale densities, with the stacked radiopaque segments of the distal sacrum and coccygeal vertebrae visible in the right-central field. A distinct, radiopaque, elongated, and slightly curved instrument, identified as a Freer periosteal elevator, is seen inserted percutaneously. The elevator is positioned to act as a lever (joystick technique), with its tip placed near the anterior aspect of the sacrococcygeal joint to facilitate posterior realignment of the dislocated coccygeal segment. The surrounding soft tissues appear as diffuse, less dense shadows. This visual serves as an educational example of orthopedic trauma management, specifically demonstrating a minimally invasive surgical approach to manual reduction of traumatic coccygeal dislocation when closed rectal manipulation has failed.
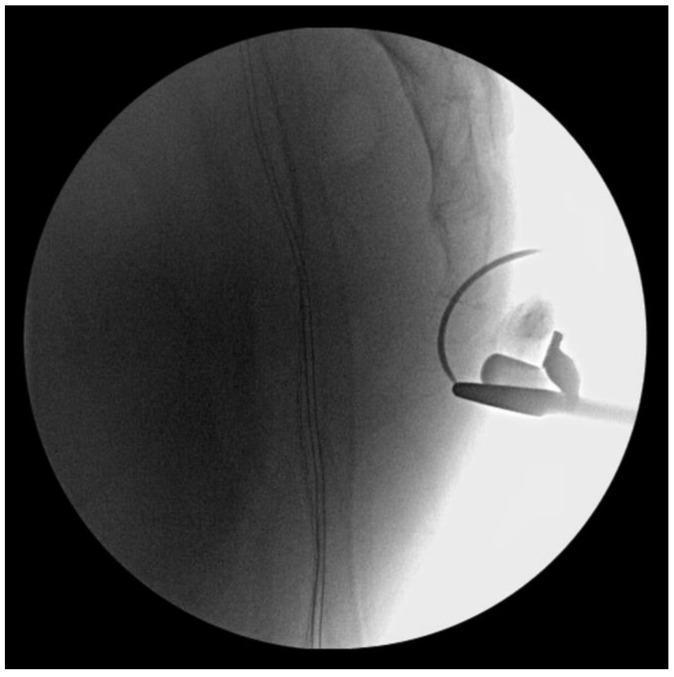
Lateral view intraoperative fluoroscopic image of the sacrococcygeal region during a surgical reduction procedure. The radiopaque structures of the distal sacrum and coccyx are visible. A Freer periosteal elevator is shown in situ, positioned against the anterior aspect of the sacrococcygeal joint. The instrument acts as a lever, resting on the distal sacral segment to provide posterior traction on the dislocated coccyx, facilitating alignment. Additionally, a curved surgical needle and suture material are visible, demonstrating the technique for a trans-osseous vertical suture to stabilize the joint post-reduction. This image illustrates the orthopedic management of traumatic anterior coccygeal dislocation and the use of manual surgical instruments for joint reduction under real-time imaging guidance.
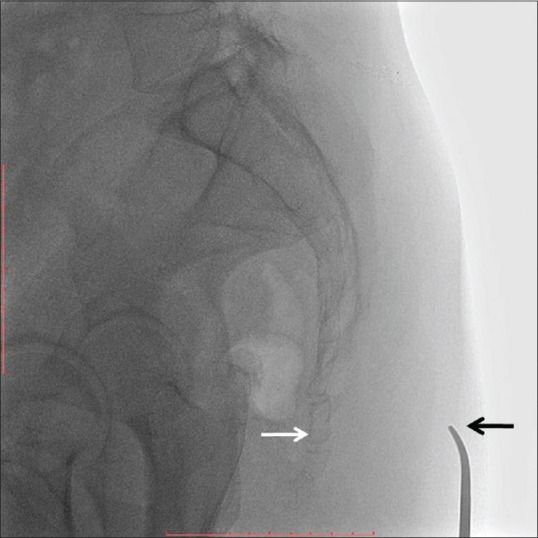
**Imaging Modality:** Lateral fluoroscopy (X-ray). **Anatomical Region:** Lower pelvic region, specifically the sacrum and coccyx. **Key Landmarks and Findings:** - The image displays a lateral profile of the sacral curvature transitioning into the coccygeal segments. - A **white arrow** points to the **sacrococcygeal joint**, the articulation between the apex of the sacrum and the base of the coccyx. - A **black arrow** indicates a radiopaque external pointer (medical instrument) positioned on the skin surface, serving as a fiduciary marker to correlate superficial anatomy with internal osseous structures. - The distal sacral segments and the individual segments of the coccyx are visible, showing normal alignment in this view. **Clinical Context:** This imaging is characteristic of procedural localization, likely for a sacrococcygeal nerve block, ganglion impar block, or diagnostic evaluation of coccydynia. The use of a surface pointer ensures accurate needle entry trajectory relative to the target joint space. **Search Keywords:** Lateral fluoroscopy, sacrococcygeal joint, coccyx, sacrum, ganglion impar block, procedural localization, radiopaque marker.
PMID: 39981432
Coccydynia Physiotherapy - Detailed Step-by-Step Protocols
PART 1: EXTRACORPOREAL SHOCK WAVE THERAPY (ESWT)
What is ESWT?
- Focused ESWT (fESWT): Deep penetration, precise targeting, lower energy spread
- Radial pressure wave therapy (RSWT/rESWT): Wider dispersal, more superficial, most commonly used in clinical practice for coccydynia
ESWT - Pre-Treatment Assessment (Before Every Session)
- Active infection, open wound, or skin breakdown over the coccyx/sacral region
- Malignancy at or near the treatment site (MUST exclude chordoma before starting)
- Blood coagulation disorders or anticoagulant therapy (relative)
- Pregnancy
- Presence of pacemaker or implanted electronic device near treatment area
- Skeletally immature patients (growth plates)
- Undiagnosed fracture (must be ruled out radiologically first)
- Explain that treatment may cause some discomfort or a dull aching sensation during application
- Warn patient: local bruising, redness, swelling, or temporary pain increase (post-treatment flare) for 24-48 hours is normal
- Advise avoiding NSAIDs/ice for 24-48 hours post-treatment (can blunt the biological healing response)
- Patient position: prone lying (face down), pillow under the abdomen to reduce lumbar lordosis
- Expose the sacrococcygeal region
- Palpate and identify the point of maximum tenderness over the coccyx
- Mark this point with a skin marker - this is your primary target
ESWT - Treatment Parameters for Coccydynia
| Parameter | Recommended Range |
|---|---|
| Type | Radial ESWT (rESWT) - most evidence |
| Pressure | 1.5 - 3.0 bar |
| Frequency | 8 - 15 Hz |
| Impulses per session | 1,500 - 3,000 impulses |
| Number of sessions | 3 - 6 sessions |
| Session interval | Once per week |
| Applicator tip | Large flat (D35) or ballistic tip |
| Coupling medium | Ultrasound gel (liberal amount) |
ESWT - Step-by-Step Application Protocol
- Select radial ESWT mode
- Set starting pressure low: 1.5 bar (increase progressively based on pain tolerance)
- Set frequency: 10-12 Hz to start
- Set impulse counter: 2,000 impulses for first session
- Apply a generous layer of ultrasound gel over the entire sacrococcygeal region (from S3 to coccyx tip)
- Gel must cover all planned treatment zones - gaps in gel cause pain spikes and energy loss
- Place applicator at the sacrococcygeal junction (typically 1-2 cm above the coccyx tip)
- Apply firm, consistent perpendicular pressure - do not angle the probe
- Move the applicator in slow, overlapping circular strokes (approximately 1-2 cm per second)
- Cover the entire posterior coccyx surface including surrounding soft tissues
- Spend extra time (approximately 30-60 seconds) over the point of maximum tenderness
- Extend coverage to the anococcygeal ligament region (inferior coccyx)
- Treat the sacrotuberous ligament attachments bilaterally
- Treat the gluteus maximus insertion at the coccyx if tender
- After 500 impulses, ask patient their pain level (0-10 scale)
- If pain > 6/10: reduce pressure by 0.5 bar
- If well tolerated (< 4/10): gradually increase pressure up to 2.5-3.0 bar
- Target a "comfortable discomfort" - 3-5/10 during treatment
- Wipe gel off the area
- Apply a cold pack (5-10 min) only if significant local inflammation or bruising appears
- Advise patient:
- Avoid vigorous activity for 24 hours
- Avoid NSAIDs and ice for 48 hours (impairs tissue remodeling response)
- Expect possible 24-48 hour pain flare - this is normal and expected
- Use coccyx cushion for sitting during the treatment course
| Session | Pressure | Impulses | Notes |
|---|---|---|---|
| 1 | 1.5-2.0 bar | 1,500-2,000 | Assess baseline tolerance |
| 2 | 2.0-2.5 bar | 2,000-2,500 | Increase if tolerated |
| 3 | 2.5-3.0 bar | 2,500-3,000 | Full therapeutic dose |
| 4-6 | 2.5-3.0 bar | 3,000 | Maintain therapeutic dose |
ESWT - Precautions Summary
| Precaution | Action |
|---|---|
| Never apply over bony spicule directly (sharp point) | Treat surrounding soft tissue only; avoid direct bony tip |
| Do not apply over bowel/rectal area (anterior coccyx) | Posterior surface only - maintain firm pressure to avoid slipping anteriorly |
| Skin integrity must be intact | Check at start of every session |
| Post-injection period | Wait minimum 6 weeks after corticosteroid injection before applying ESWT |
| Acute fracture | Do not apply over fresh fracture site |
| Pain > 7/10 during treatment | Stop and reassess - reduce pressure or discontinue |
PART 2: PELVIC FLOOR MANUAL THERAPY - LEVATOR ANI RELEASE
Rationale
Pre-Treatment Assessment
- Active anorectal infection, fistula, fissure, abscess, or recent anorectal surgery
- Active rectal bleeding or bowel malignancy
- Patient refusal or inability to consent (internal approach requires explicit consent)
- Acute pelvic inflammatory disease
- Presence of anorectal prolapse or severe haemorrhoids
- Explain the anatomy: the muscles attach to the coccyx and cause pain when tight/spasmed
- Explain both external (skin surface) and internal (transrectal) approaches
- Obtain explicit written consent for internal approach
- Allow patient to choose a chaperone for all pelvic floor treatments
- Reassure: discomfort is expected but should never be sharp or severe
- External technique: prone or lateral decubitus (side lying)
- Internal technique: left lateral (Sims' position) - left side down, right knee drawn up, or dorsal lithotomy position
- Ensure full draping for dignity and comfort
- Warm the room - cold causes involuntary muscle guarding
EXTERNAL PELVIC FLOOR TECHNIQUES (Step-by-Step)
INTERNAL PELVIC FLOOR TECHNIQUES (Step-by-Step)
- Don sterile/examination gloves
- Apply generous water-based lubricant to the index finger
- Ask patient to take a deep breath and breathe out slowly before insertion
- Before internal access, assess external perianal tone and sphincter resting tension
- Ask patient to voluntarily contract and then fully relax the pelvic floor
- Note any inability to fully relax (hypertonicity indicator)
- Insert the gloved, lubricated index finger gently into the anal canal (approximately 3-4 cm)
- Never force entry - if resistance is felt, wait and encourage deep breathing + voluntary release
- Confirm patient comfort verbally at each step
- Once inside, rotate the finger laterally (to 3 o'clock and 9 o'clock positions)
- The levator ani (puborectalis, iliococcygeus) is palpable as a broad muscular band on the lateral rectal walls
- Press outward and slightly posteriorly - tenderness here confirms levator hypertonia
- Locate the most tender point (trigger point) in the levator ani
- Apply sustained, firm pressure (enough to produce a "deep dull ache" - 4-6/10) directly into the trigger point
- Hold for 60-90 seconds - do not release until you feel the tissue soften under your finger
- Then move to the next tender point
- Treat 3-5 trigger points per session
- Coccygeus lies more posteriorly, attaching from the ischial spine to the lateral coccyx
- With finger still inserted, move to 4-5 o'clock or 7-8 o'clock position
- Palpate the posterolateral wall - coccygeus is palpable as a firm cord
- Apply same sustained pressure release (60-90 seconds per point)
- After trigger point release, apply a gentle lateral stretch of the levator ani
- Hold 20-30 seconds, breathing instruction: "breathe out and let everything drop"
- This lengthens inhibited/shortened muscle fibres
- Slowly withdraw the finger
- Allow patient to rest in the position for 2-3 minutes
- Ask them to gently contract and relax pelvic floor 5 times (biofeedback-style awareness)
Levator Ani Release - Precautions
| Precaution | Action Required |
|---|---|
| Always use gloves and lubricant | Non-negotiable for hygiene and patient safety |
| If pain spikes to > 7/10 | Reduce pressure immediately; do not push through severe pain |
| Never use instrument/tools internally | Fingers only |
| Latex allergy | Use nitrile/latex-free gloves |
| Post-partum (< 6 weeks) | Avoid internal approach until cleared by obstetric team |
| Rectal conditions (fissure, fistula, haemorrhoids grade 3-4) | Use external techniques only |
| Male patients | Same technique is valid but consent and chaperone are especially important |
| Each session: max 2-3 muscles treated | Overtreatment increases post-treatment soreness |
Home Programme - Pelvic Floor Self-Release
- Pelvic floor drop: Lie in supported supine position, deep diaphragmatic breath in, on exhale completely "let go" of pelvic floor; hold for 5 seconds. Repeat 10x daily
- Piriformis stretch: Supine, cross right ankle over left knee, pull left thigh toward chest; hold 30 seconds each side; daily
- Child's pose (yoga): Kneel, sit back, arms extended forward on floor; natural pelvic floor elongation; 60 seconds, 2-3x daily
PART 3: SACROCOCCYGEAL JOINT MOBILISATION
Rationale
Pre-Treatment Assessment
- Palpate the posterior coccyx: reproduce the patient's familiar pain with direct pressure
- Assess coccygeal mobility: place one hand on sacrum (stabiliser), other hand grasps coccyx between thumb (posterior) and index finger pressed into natal cleft (anterior pressure) - gently move coccyx anteroposteriorly
- Hypomobile coccyx: restricted movement + pain = mobilisation indicated
- Hypermobile coccyx: excessive movement (clicks, gross instability) = mobilisation contraindicated; use stabilisation instead
- Acute undisplaced fracture (< 4-6 weeks old)
- Suspected tumour (chordoma, metastasis) - MRI first
- Osteoporosis with significant risk of fracture
- Active infection/osteomyelitis of coccyx
EXTERNAL COCCYX MOBILISATION - Step-by-Step
- Grade I-II (pain relief, gentle): Small amplitude, beginning of range (< 25% push) - for acute/irritable coccydynia
- Grade III-IV (mobilisation): Larger amplitude into resistance - for chronic, stiff, hypomobile coccydynia
INTERNAL COCCYX MOBILISATION (Maigne's Technique)
Joint Mobilisation - Precautions
| Precaution | Action |
|---|---|
| Hypermobile coccyx | Mobilisation is contraindicated - use stabilisation taping and pelvic floor strengthening instead |
| Grade IV+ mobilisation with acute pain | Do not use high-grade mobilisation in acute phase (< 4 weeks); Grade I-II only |
| Neurological symptoms (saddle numbness, bladder/bowel changes) | Stop immediately - refer for urgent spine/neurology workup |
| Patient bracing / guarding | Wait, use breathing techniques to reduce guarding before applying forces |
| Post-partum | Ligamentous laxity is high; avoid aggressive mobilisation; gentle Grade I-II only |
| Elderly / osteoporotic | Use Grade I-II oscillations only; avoid high-grade thrust techniques |
| Worsening pain after session | Reassess grade - reduce to Grade I; if persists, reconsider diagnosis |
OVERALL SESSION STRUCTURE (Combined Protocol)
| Phase | Time | Intervention |
|---|---|---|
| Assessment | 5 min | VAS/NRS pain, posture, tenderness map |
| Warm-up | 5 min | Heat pack to sacrococcygeal region (10 min before ESWT) |
| ESWT | 15-20 min | 2,000-3,000 impulses at 1.5-3.0 bar, 10-12 Hz |
| Manual therapy | 15-20 min | Levator ani release (external) + sacrococcygeal mobilisation |
| Home exercise instruction | 10 min | Pelvic floor drop, piriformis stretch, posture/seating advice |
| Total session | ~50-60 min |
Universal Precautions for All Three Interventions
- Always exclude red flags before starting: chordoma, sacral metastasis, infection, cauda equina syndrome
- Dynamic X-ray first: distinguish hypermobile (unstable) from hypomobile (stiff) coccyx - the treatment is opposite for each
- Never apply ESWT and inject in the same period: minimum 6-week gap between corticosteroid injection and ESWT
- Document pain pre- and post-session using NRS every session - track trajectory
- Reassess at session 3: if no response, refer for injection therapy consideration
- Infection control: gloves for all pelvic contact; internal techniques require sterile examination conditions
- Post-treatment flare counselling: a 24-48 hour increase in pain is normal after both ESWT and internal manual work - prepare the patient
- Progress sitting tolerance throughout - goal is to increase pain-free sitting time from baseline toward 30+ minutes
- Blanco-Diaz et al. BMC MSK Disord 2025 - SR, 9 RCTs (n=532): ESWT strongest, manual therapy effective early
- Sidiq et al. Arch Physiother 2025 - SR, 10 RCTs (n=515): levator ani release = only modality with sustained long-term effect
- Mazzoleni et al. Ann Joint 2025 - SR, 16 studies (n=858): multidisciplinary PT is first-line; manipulation effective short-term
- Campbell's Operative Orthopaedics 15th Ed 2026; Goldman-Cecil Medicine
Coccyx manual therapy
coccyx manual therapy manipulation coccydynia
coccyx sacrococcygeal manual therapy mobilisation technique prone position
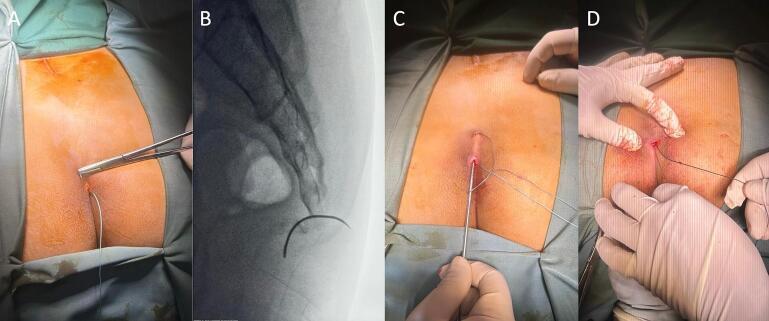
A multi-panel clinical and diagnostic composite illustrating a minimally invasive surgical fixation of a sacrococcygeal fracture-dislocation. Panels A, C, and D are clinical photographs showing the intraoperative procedure in a patient in the prone position. Panel A demonstrates a small, approximately 1 cm midline incision in the sacrococcygeal region with a surgical needle holder positioned at the entry site. Panel C shows a surgical probe or guide being used to facilitate a subcutaneous figure-of-eight suture technique, while Panel D shows the final tensioning and tying of the non-absorbable suture. Panel B is a lateral fluoroscopic (X-ray) image of the sacrococcygeal spine, showing a radiopaque surgical needle passing intraosseously to bridge the fracture gap between the sacrum and the displaced coccygeal segments. The composite demonstrates the sequence of a 'mini-open' reduction and internal fixation (ORIF) designed to stabilize the coccyx while minimizing soft tissue trauma.
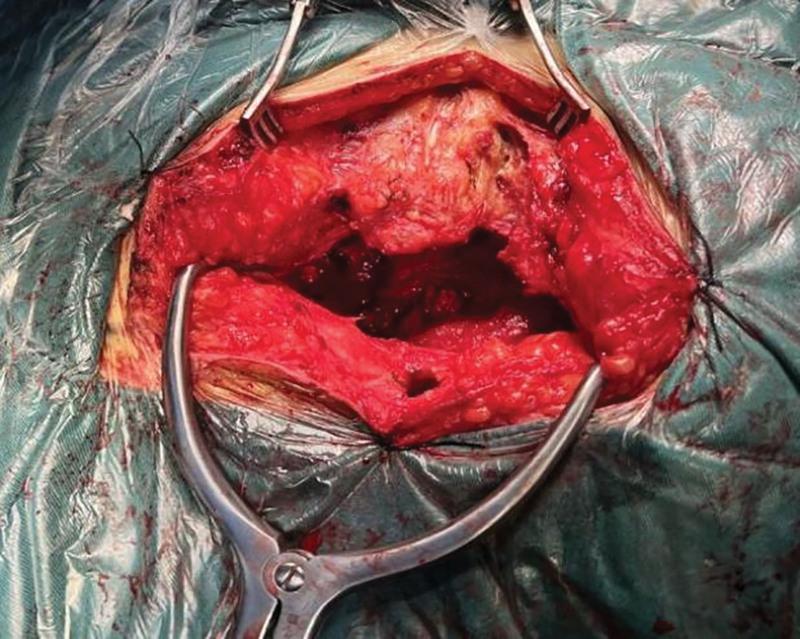
This clinical photograph captures an intraoperative view of a sacrococcygeal surgical procedure. The patient is in a prone position, and an inverted 'Y'-shaped longitudinal incision has been made extending from the S1 level toward the posterior midline of the coccyx. The surgical field is maintained using several metal retractors, including a Weitlaner-style retractor at the inferior margin, which pull back the skin and subcutaneous fat to expose deeper muscular and fascial layers. The exposed area reveals raw, erythematous tissue and a deep cavity in the sacrococcygeal region, corresponding to the space created during the resection of a sacrococcygeal teratoma (SCT). The surgical approach targets the S3 to S5 laminae, providing access to the anterior sacrum and the retroperitoneal space behind the rectum. Visible landmarks include the incised subcutaneous tissue and the underlying musculature of the gluteal and sacral regions. This image demonstrates the parasacrococcygeal approach for the management of complex pelvic masses.
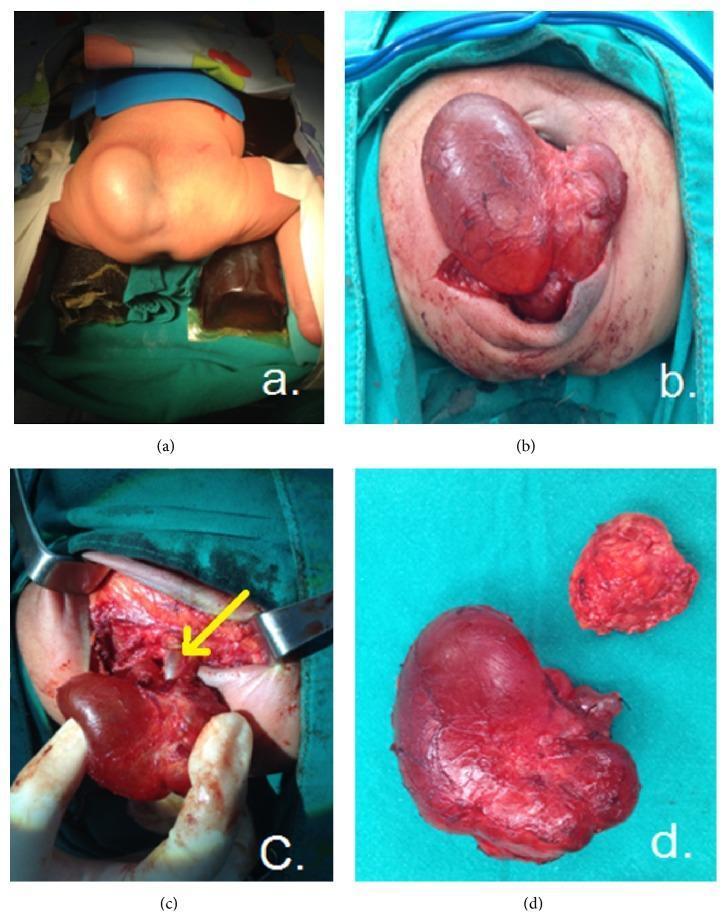
A series of four clinical and surgical photographs (a-d) documenting the resection of a type I sacrococcygeal teratoma in a pediatric patient. (a) Pre-surgical view of the patient in a prone, frog-legged position, showing a large, skin-covered mass protruding from the sacrococcygeal region. (b) Intraoperative view demonstrating the mobilization of the tumor through a surgical incision; the mass is reddish-brown and lobulated. (c) Continued dissection showing the exposure of the deep attachments; a yellow arrow points to the coccyx being isolated for en bloc resection. (d) Post-excision specimen photograph showing the completely removed solid tumor and the attached coccyx on a surgical drape. This sequence illustrates the standard surgical technique of total tumor resection with coccygectomy to prevent recurrence in germ cell tumors. The pathology is characteristic of an extragonadal germ cell tumor in the neonatal or infant period, where complete excision is the primary treatment modality.
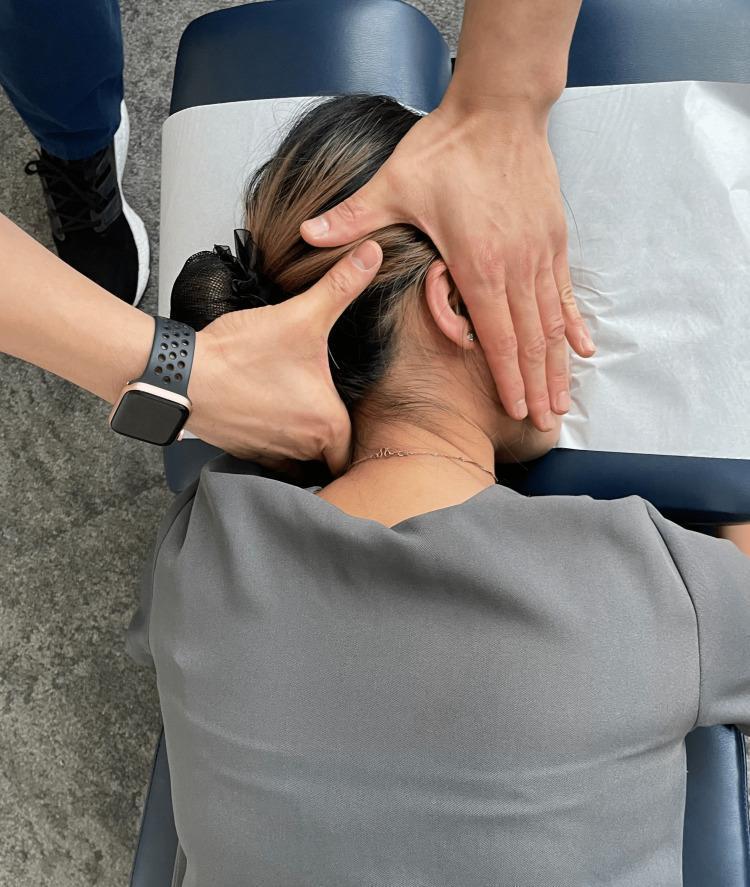
A clinical photograph demonstrating a manual therapy technique identified as prone cervical spinal manipulation. The patient is positioned prone on a chiropractic or osteopathic treatment table with the head resting on a headrest covered by protective paper. The practitioner is shown at the head of the table applying specific hand placements to the cervical region. The left hand provides stabilization of the patient's head on the left side, while the right hand is positioned with the palm over the ear and the index finger contacting the lateral cervical spine. This setup is characteristic of a high-velocity, low-amplitude (HVLA) thrust directed toward the C5/C6 spinal segments. The educational focus is on the biomechanical setup, patient positioning, and contact points necessary for delivering a targeted adjustment to the mid-to-lower cervical spine in a prone position. This image serves as a clinical reference for manual medicine, physical therapy, and chiropractic education.
PMID: 37999720
coccydynia physical therapy manipulation outcomes RCT
coccydynia conservative treatment manipulation injection outcomes
sacrococcygeal joint posterior anterior glide mobilisation hands on treatment table
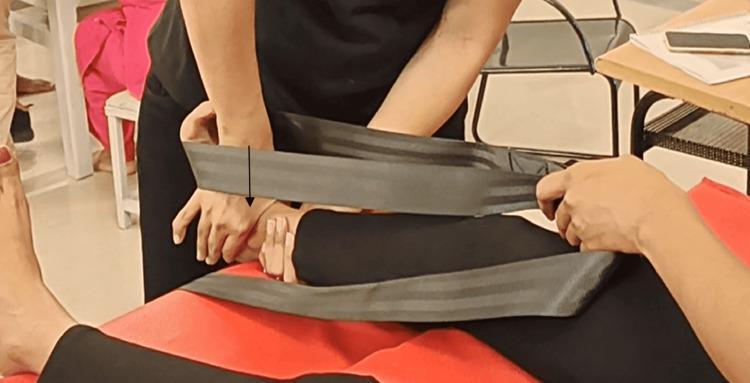
This clinical photograph demonstrates a physical therapy manual mobilization technique for the ankle joint. A therapist is performing a posterior talar glide in a non-weight-bearing position to increase the range of motion for ankle dorsiflexion. The patient is positioned supine on a treatment table. The therapist utilizes a stabilization strap (Mulligan-style belt) looped around their own waist and the patient’s distal tibia/fibula to provide stabilization and traction. The therapist's hands are placed specifically over the anterior aspect of the talus to apply a posterior force, indicated by a black directional arrow. This orthopedic intervention is commonly used in the management of joint stiffness related to conditions like plantar fasciitis, heel spurs, or post-immobilization stiffness. The image illustrates the clinical application of mobilization with movement (MWM) principles within sports medicine and musculoskeletal rehabilitation.
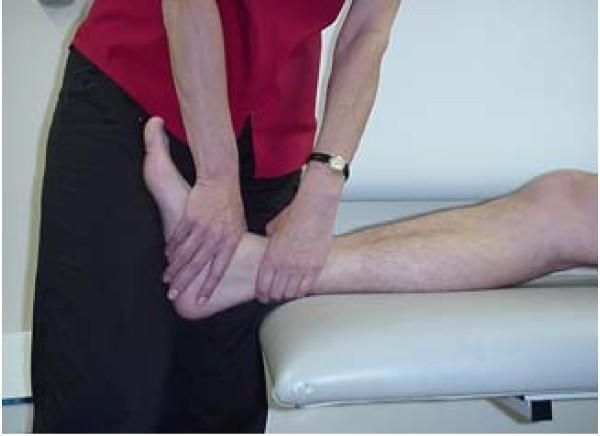
This procedural photograph illustrates a physiotherapist performing a passive joint mobilization technique on a patient's ankle, specifically an anterior-posterior (A-P) glide of the talus. The patient is positioned supine or in long-sitting on a treatment table with the lower limb extended. The clinician demonstrates a manual therapy technique where the left hand stabilizes the calcaneus and posterior ankle, while the right hand is positioned on the anterior aspect of the talus, just distal to the ankle joint line. This specific grip is used to apply Grade III oscillatory movements into resistance, aimed at improving dorsiflexion range of motion following injuries such as ankle sprains or fractures. The image serves as a clinical guide for orthopedic manual therapy, highlighting correct hand placement for mobilizing the talocrural joint.
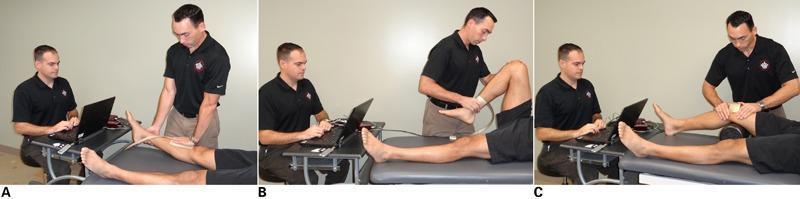
A series of clinical procedural photographs (A, B, C) demonstrating different manual physical therapy mobilization techniques for the knee joint, integrated with a biomechanical data capture system. In all images, a therapist performs a technique on a patient lying supine on a treatment table, while a researcher records data using a laptop-connected multi-channel analyzer. Panel A shows a physiological tibiofemoral extension technique, where the therapist's mobilizing hand is positioned on the anterior proximal tibia and the stabilizing hand on the posterior calcaneus. Panel B illustrates a physiological tibiofemoral flexion technique, with the mobilizing hand on the anterior distal tibia and the stabilizing hand at the knee. Panel C depicts a medial patellofemoral accessory glide technique, with hands positioned on the proximal tibia and distal femur to apply force to the lateral patella. Crucial to the educational focus is the use of a thin, flexible capacitance-based pressure sensing mat placed between the therapist’s hand and the patient’s skin to measure mobilization force, dosage, and oscillation frequency. This setup demonstrates the quantification of manual therapy grades (e.g., Maitland grades III and IV) for clinical research and educational validation.
PMID: 34927468
coccydynia Maigne manipulation levator ani stretching RCT
Maitland grades joint mobilisation oscillation technique spine posterior anterior pressure
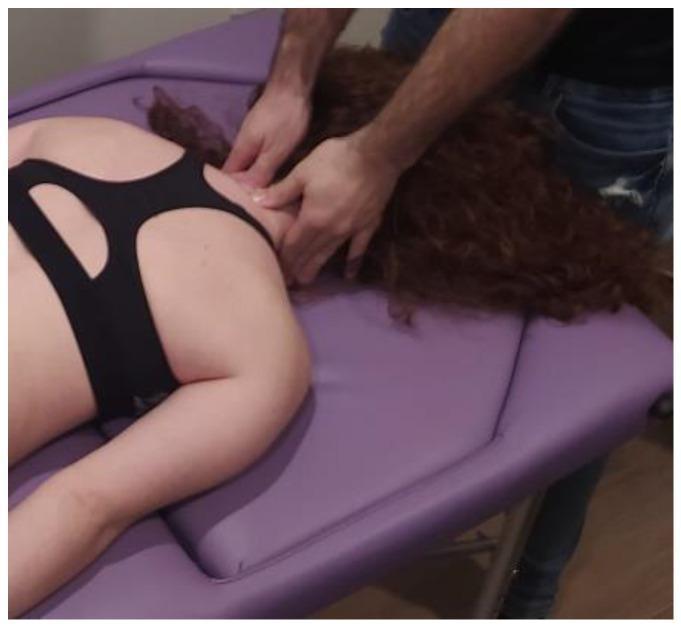
This clinical photograph demonstrates a physical therapy session focused on cervical spine joint mobilization. The patient is positioned prone on a purple padded examination table with her head comfortably turned. A therapist is shown at the head of the table applying a manual therapy technique consistent with Maitland's postero-anterior (PA) mobilization. The therapist's hands are placed over the upper cervical region, with the thumbs positioned to apply targeted pressure toward the spinous processes of the cervical vertebrae. The image illustrates the clinical application of manual therapy for musculoskeletal conditions, specifically addressing spinal mobility and pain management in the cervical region. This visual is representative of educational materials for physical therapy, osteopathy, and manual medicine, highlighting proper practitioner hand placement and patient positioning for posterior-to-anterior joint glides.
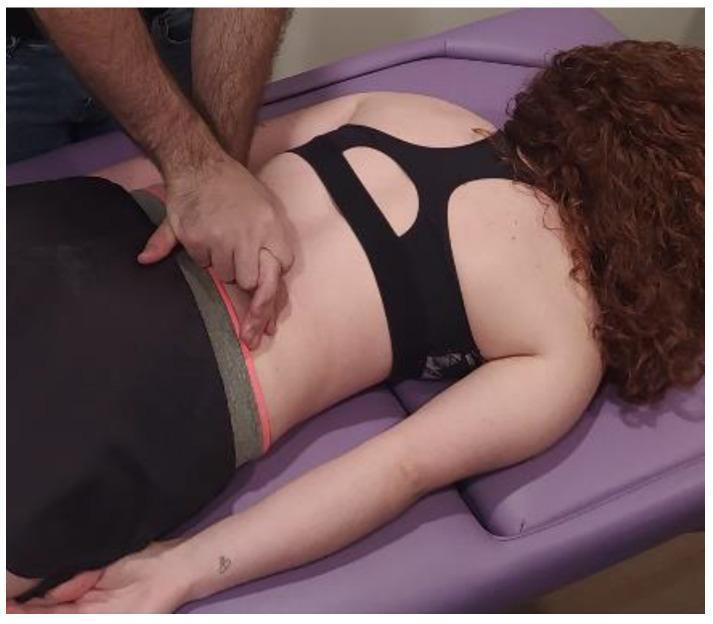
This procedural photograph demonstrates a postero-anterior (PA) joint mobilization of the lumbar spine, specifically utilizing Maitland's technique. The patient is positioned in a prone orientation on a treatment table. A clinician is shown applying manual therapy to the lumbar region. The clinician's right hand uses a reinforced finger-tip contact (index and middle fingers) to apply a focused, downwards force directly over the spinous process of a target lumbar vertebra. The left hand provides stabilization and counter-pressure on the contralateral side of the lower back/iliac crest area. This technique is commonly used in physical therapy and manual medicine to improve joint mobility, assess segmental irritability, and reduce localized spinal pain. The visual emphasizes the specific hand placement and the vector of force required for effective vertebral mobilization in clinical practice.
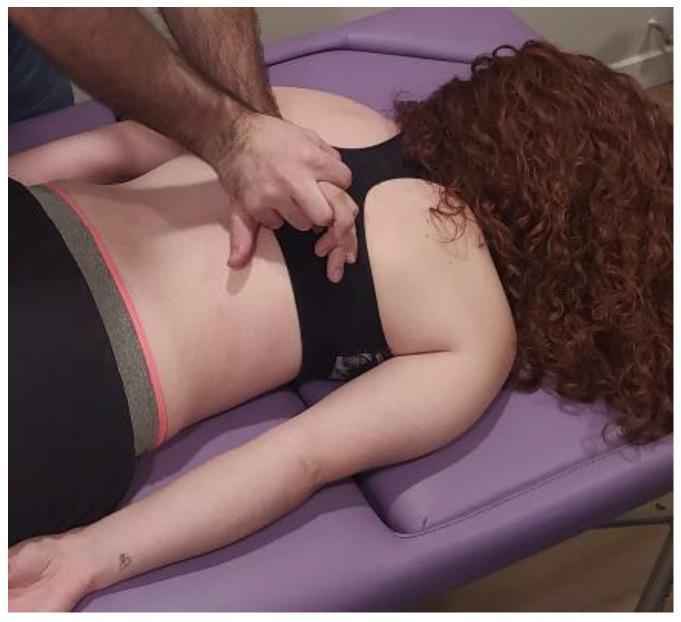
This clinical photograph demonstrates a thoracic spine mobilization procedure using Maitland’s manual therapy technique. The patient is positioned prone on a treatment table with the neck rotated laterally and arms relaxed at the sides. A physical therapist is positioned at the patient's side, applying a manual postero-anterior (PA) pressure. The therapist's hands are configured in a specialized grip to target a specific spinous process of the thoracic vertebrae. The contact point is centrally located on the upper back, approximately at the level of the mid-thoracic region. This procedural image illustrates a common orthopedic intervention aimed at increasing joint mobility and reducing localized pain, often utilized in clinical trials for conditions such as fibromyalgia. The visual focus is on the correct hand placement and body mechanics necessary for effective spinal joint mobilization.
coccydynia stretching manipulation levator ani clinical trial
Coccyx Manual Therapy - Complete Step-by-Step Guide
Overview and Evidence Position
- Manipulation alone: effective short and intermediate term for pain and function
- Levator ani stretching/massage: the only modality showing sustained long-term pain relief
- Manipulation + electrotherapy/exercise: superior combination over manipulation alone
- Transrectal osteopathic manipulation: feasible, acceptable, immediate pain improvement, no adverse events - Nourani et al. 2024, J Osteopath Med
ANATOMY RELEVANT TO MANUAL THERAPY
| Structure | Attachment to Coccyx | Role in Coccydynia |
|---|---|---|
| Sacrococcygeal joint | Between S5 and Co1 | Hypomobile or subluxed - primary mechanical pain source |
| Intercoccygeal joints | Between Co1-Co4 | Degenerated or locked segments |
| Levator ani (iliococcygeus, pubococcygeus) | Lateral coccyx | Spasm = referred coccygeal pain |
| Coccygeus muscle | Lateral coccyx to ischial spine | Hypertonic in pelvic floor dysfunction |
| Anococcygeal ligament | Coccyx tip to anus | Tethers coccyx - restricts movement |
| Gluteus maximus | Posterior/inferior coccyx | Compresses coccyx on sitting |
| Sacrotuberous ligament | Lateral sacrum/coccyx to ischium | Restricts coccygeal mobility |
ASSESSMENT BEFORE MANUAL THERAPY
Step 1 - Determine Coccyx Mobility Type
| Finding | Interpretation | Manual Therapy Action |
|---|---|---|
| Firm end-feel, restricted, painful | Hypomobile - joint stiffness | Mobilisation and manipulation indicated |
| Excessive movement, clicking, gross instability | Hypermobile - unstable coccyx | Mobilisation contraindicated - use stabilisation, taping, and pelvic floor strengthening |
| Pain with pressure but normal range | Nociceptive/soft tissue dominant | Soft tissue techniques, pelvic floor work |
| No local pain, referred pain pattern | Referred pain (levator ani, piriformis, SIJ) | Address source muscle, not coccyx directly |
Step 2 - Palpation Map
- Posterior coccyx midline - direct coccygeal tenderness
- Sacrococcygeal junction - just above coccyx
- Lateral coccyx borders - bilateral ligament and muscle attachments
- Natal cleft - anococcygeal ligament from tip toward anus
- Gluteal groove bilaterally - gluteus maximus/piriformis tenderness
- Ischial tuberosity - exclude ischiogluteal bursitis mimicking coccydynia
THE FIVE MANUAL THERAPY TECHNIQUES
TECHNIQUE 1: POSTERIOR-ANTERIOR (P-A) CENTRAL PRESSURES
- Place the pad of your dominant thumb directly on the posterior surface of the coccyx body (midline)
- Reinforce with non-dominant thumb stacked on top (pisiform of non-dominant hand can also reinforce)
- Wrists straight, elbows slightly flexed - force comes from your body weight through straight arms, not wrist flexion
- Slowly increase pressure until you feel the "first stop" - the onset of tissue resistance
- This is the beginning of range - do not push past this on first contact
| Grade | Description | When to Use |
|---|---|---|
| I | Small amplitude, beginning of range (very light oscillations, no resistance) | Acute/very irritable coccydynia, severe pain |
| II | Large amplitude, does not reach resistance (rhythmic oscillations through mid-range) | Subacute, pain-dominant presentation |
| III | Large amplitude into resistance (oscillations that engage the stiff barrier) | Chronic, stiffness-dominant, hypomobile coccyx |
| IV | Small amplitude at end of range into resistance | Chronic, very restricted - mobilise stiff end range |
| V (HVLA thrust) | High velocity, low amplitude thrust through resistance | Only if trained; rarely used at coccyx |
- Frequency: approximately 2 oscillations per second (rhythmic, smooth)
- Each set: 30-60 seconds (approx. 60-120 oscillations)
- Perform 3-4 sets per session with 30-second rest between sets
- Breathe out during each downward pressure application
- Ask NRS pain score after each set
- If pain reduces or range improves → progress to next grade
- If pain increases > 2 points → drop back one grade or stop
- Move thumb 1 cm distally from sacrococcygeal junction to contact first intercoccygeal joint (Co1-Co2)
- Repeat same P-A pressures - 3 sets Grade II-III
- Continue distally to Co2-Co3 if tolerated
- Never apply Grade IV-V in acute phase (< 4 weeks from injury)
- Do not apply directly over a known bony spicule - treat above and below it, not on it
- If neurological signs appear (tingling, saddle numbness) - stop immediately
- Osteoporosis: Grade I-II only - no thrust techniques
TECHNIQUE 2: TRANSVERSE LATERAL GLIDE
- Apply lateral pressure to the right side of the coccyx (pushing it leftward)
- Apply lateral pressure to the left side (pushing it rightward)
- The side that is stiffer or more painful is the restricted side - treat that side more
- Place the radial border of your thumb on the lateral coccyx border (the restricted side)
- Reinforcing hand: palm over the back of your treating hand for added control
- Direction: horizontal, pushing coccyx toward the opposite side
- Grade II-III amplitude
- 10-15 oscillations per set, 3 sets
- Compare left and right after each set
- As you apply the lateral glide, combine a slight rotational component (tipping the coccyx tip left or right)
- This addresses rotational fixation at intercoccygeal levels
- Do not force past a hard bony end-feel - this suggests ankylosis (cannot be mobilised)
- If bruising or skin breakdown is present over lateral coccyx, skip this technique
TECHNIQUE 3: LONGITUDINAL COCCYX TRACTION (DISTRACTION)
- Identify the inferior tip of the coccyx through the natal cleft externally
- No internal approach needed for this technique
- Curl your index and middle fingers around the inferior coccyx (in the natal cleft)
- Contact is on the posterolateral aspect of the coccyx tip
- Your thumb can stabilise on the posterior sacrum above
- Direction: caudal (directly downward, away from sacrum) - NOT posteriorly
- Apply slow, sustained traction with 20-30% of your hand strength
- Hold for 5-10 seconds, then slowly release over 3 seconds
- Repeat 6-8 times per set
- While maintaining traction, gently guide the coccyx into slight flexion (anteriorly) then extension (posteriorly)
- This combines traction with accessory movement - more effective than traction alone
- Range is tiny (2-4 mm movement) - use minimal force
- Never use fingernails - always use the soft pad of your fingers
- Do not apply traction to a hypermobile coccyx
- Avoid if recent perineal surgery or wound in natal cleft
TECHNIQUE 4: ANOCOCCYGEAL LIGAMENT RELEASE
- Identify midpoint between the coccyx tip and the anus (posterior midline, in the natal cleft)
- Place your thumb firmly in this midline groove - you will feel a firm fibrous band running vertically
- Apply direct perpendicular pressure into the ligament with your thumb
- Pressure level: enough to create a "deep, dull ache" (4-5/10 on NRS)
- Hold the pressure 60-90 seconds without releasing
- You will feel the tissue "melt" or soften under your thumb - this is the barrier release
- Once softened, maintain for a further 10-20 seconds, then slowly release
- After the sustained release, apply transverse (cross-fibre) friction across the ligament
- Direction: left-right, 2-3 mm amplitude, moderate pressure
- Duration: 2 minutes continuous friction
- Purpose: breaks down adhesions and scar tissue in the ligament
- With your thumb, stroke along the length of the ligament from the coccyx tip toward the anus
- 5-6 slow strokes (3-4 seconds each), firm pressure
- Repeat in the opposite direction (anus toward coccyx)
- Avoid if there is a skin rash, folliculitis, or wound in the natal cleft
- Post-operative perineum: minimum 8-10 weeks before applying this technique
- Always maintain draping/dignity during this technique
TECHNIQUE 5: INTERNAL (TRANSRECTAL) COCCYX MANIPULATION
- Specialised training in pelvic floor physiotherapy
- Explicit written informed consent
- Gloves (non-latex/nitrile) + lubricant (water-based)
- Chaperone presence (mandatory)
- Private, dignity-preserving clinical environment
- Place thumb on posterior coccyx
- Gently rock coccyx anterior-posteriorly to establish baseline mobility
- Note restriction, pain response, and position (retroversion or anteversion)
- "I am now going to place my gloved finger gently inside; tell me at any point if you want me to stop"
- Patient must be able to say "stop" at any point and be obeyed immediately
- Apply lubricant generously to the index finger of your dominant gloved hand
- Ask patient: "Take a deep breath in... now breathe out slowly"
- As patient exhales and pelvic floor relaxes, begin insertion
- Insert the index finger slowly and gently into the anal canal
- Advance 3-4 cm only (to the level of the anorectal junction - do not go beyond into the rectum)
- If resistance is felt: stop, ask patient to breathe out again and consciously release pelvic floor; wait 10-15 seconds before trying again
- Never force past resistance
- Rotate your finger posteriorly (toward the spine) - the anterior surface of the coccyx is directly behind the rectal wall
- Your fingertip now faces the anterior (rectal) surface of the coccyx
- Your non-dominant hand: place the thumb on the posterior surface of the coccyx (through skin)
- Your dominant hand's index finger: in the anal canal, contacting the anterior surface of the coccyx
- You now have the coccyx between your two contacts - like a pincer
- Apply gentle pressure between internal finger and external thumb
- You should feel the coccyx between both contacts
- Ask patient: "Do you feel the familiar pain with this pressure?" - confirms correct position
- Internal finger: push anteriorly (away from spine, toward patient's abdomen)
- External thumb: simultaneously push posteriorly (into the treatment table, toward the spine)
- This creates a rocking/oscillatory movement at the sacrococcygeal joint
- Amplitude: 2-4 mm (very small - this is not a gross movement)
- Rhythm: slow and controlled - 1 oscillation per 2-3 seconds
- Duration: 10-15 oscillations, rest, reassess, repeat 3 sets
- Internal finger: push posteriorly (toward the spine)
- External thumb: simultaneously give way/reduce pressure
- Creates opposite direction movement
- Same duration and sets as above
- Internal finger: push laterally to the right while external thumb pushes leftward
- Creates a lateral tilt of the coccyx
- Then reverse: internal pushes left, external pushes right
- 5-8 tilts in each direction
- Purpose: frees rotational restriction at intercoccygeal joints
- Internal finger: hook the anterior surface of the coccyx and apply caudal (downward) traction
- External thumb: simultaneously applies caudal traction on the posterior surface
- Both contacts pull the coccyx away from the sacrum
- Hold 5-8 seconds, release slowly; repeat 5-6 times
- This is the most decompressive element of the technique
- Rotate internal finger laterally (to 3 o'clock or 9 o'clock)
- The levator ani is palpable as a broad band on the lateral rectal wall
- Apply sustained pressure into any tender area (trigger point) for 60-90 seconds
- Treat up to 3 trigger points per session
- Move finger to 4-5 o'clock or 7-8 o'clock position
- Coccygeus is a firmer cord attaching posterolaterally
- Same sustained pressure release: 60-90 seconds per point, up to 2 points
- Slowly and smoothly withdraw the finger
- Apply gentle external pressure over the sacrococcygeal region with your palm for 15-20 seconds (calming effect)
- Ask patient to sit up slowly and rate their pain (NRS)
- Most patients report immediate improvement of 1-3 points on NRS after a single session (Nourani et al. 2024)
- Perform external P-A coccyx test again - compare mobility to pre-treatment
- Patient rests for 5 minutes prone or supine
- Advise: mild aching/tenderness for 24-48 hours is expected
- Avoid straining at stool for 48 hours (stool softeners if needed)
- Continue using coccyx cushion for sitting
PRECAUTIONS - ALL MANUAL THERAPY TECHNIQUES
Absolute Contraindications (Do NOT treat)
| Contraindication | Reason |
|---|---|
| Suspected chordoma or malignancy | Do not mobilise a tumour |
| Coccygeal osteomyelitis / active infection | Risk of spread |
| Acute rectal bleeding (unexplained) | Internal technique must wait for clearance |
| Active anorectal abscess, fistula, or acute fissure | Internal technique absolutely contraindicated |
| Hypermobile/unstable coccyx | Mobilisation worsens instability |
| Recent anorectal surgery (< 8 weeks) | Allow tissue healing |
Relative Precautions (Modify approach)
| Situation | Modification |
|---|---|
| Acute coccyx fracture (< 4-6 weeks) | Grade I-II only; no traction or internal technique |
| Post-partum (< 6 weeks) | External techniques only; pelvic ligament laxity is high |
| Severe osteoporosis | Grade I-II; no thrust; no traction with force |
| Haemorrhoids Grade 3-4 | External techniques only |
| Inflammatory bowel disease (active flare) | External only; postpone internal |
| Patient anxiety or pain intolerance | Start with Grade I; build rapport before internal technique |
| Pain > 7/10 during treatment | Reduce grade; reassess diagnosis |
SESSION FREQUENCY AND PROGRESSION
| Week | Techniques | Grade | Focus |
|---|---|---|---|
| Week 1-2 | External P-A, ligament release | Grade I-II | Pain relief, restore movement |
| Week 3-4 | External P-A + transverse glide + traction | Grade II-III | Restore accessory movement |
| Week 4-6 | Internal mobilisation (bimanual) | Grades II-IV | Deep joint and pelvic floor work |
| Week 6-8 | Combination + home exercise | Maintenance | Prevent recurrence |
- Sessions: 1-2 per week for 6-8 weeks
- Reassess at session 3: if no response at all, consider injection therapy
- Discharge criteria: NRS pain < 2/10, sitting tolerance > 30 minutes, functional goals achieved
POST-SESSION HOME PROGRAMME
- Patient lies prone, places their own thumbs stacked on the coccyx
- Applies gentle anterior pressure (Grade I-II) for 30-second sets, 3x per day
- Reduces inter-session stiffness
- Supine, deep breath in, exhale and completely let go of all pelvic floor tension
- Hold the "dropped" state for 5 seconds, repeat 10 times, 2-3x daily
- Supine, cross ankle over opposite knee, gently pull knee toward chest
- 30-second hold each side, 3 repetitions, daily
- Kneel, sit back toward heels, arms extended on floor
- Natural elongation of levator ani and sacrococcygeal region
- Hold 60 seconds, 2-3x daily
| Study | Finding for Manual Therapy |
|---|---|
| Sidiq et al. Arch Physiother 2025 (SR, 10 RCTs, n=515) | Manipulation alone effective short + intermediate term; levator ani stretching/massage = only modality with long-term sustained effect |
| Andersen et al. Global Spine J 2022 (SR, 64 studies, n=1,980) | Mean VAS improvement 2.19 for stretching/manipulation; ESWT and RFT give greater relief in refractory cases |
| Nourani et al. J Osteopath Med 2024 | Transrectal OMT feasible, acceptable, immediate and follow-up pain improvement, zero adverse events in 16 patients |
| Pye's Surgical Handicraft 22nd Ed | "manipulation of the coccyx via the rectum... can give relief" - validated as part of standard treatment ladder |