
I will be doing incision and drainage of lower limb what are the basics i should know about this procedure and also describe anatomy related to it
incision and drainage abscess technique procedure
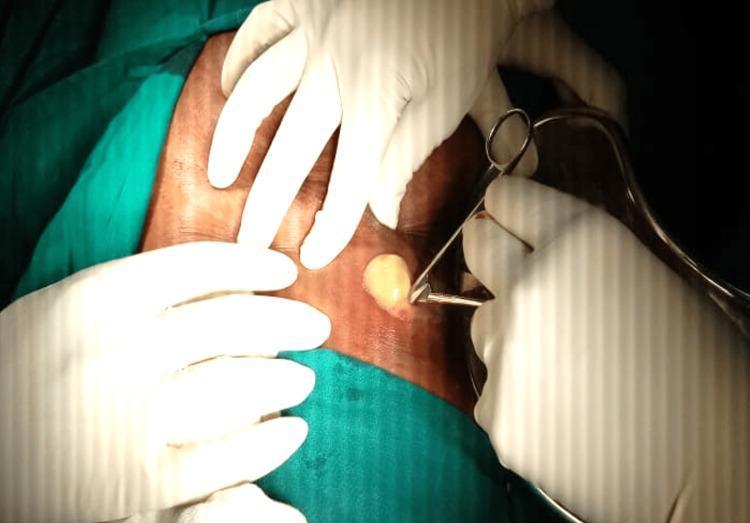
This clinical photograph captures a surgical incision and drainage (I&D) procedure of a subcutaneous abscess. The image focuses on a small, transverse incision made in the right hypochondriac region of the abdomen. Thick, opaque, yellowish purulent material (pus) is visible emerging from the opening, indicating an active infectious process. Several hands clad in sterile white surgical gloves are positioned around the site; one set of hands applies pressure to the surrounding skin to facilitate drainage, while another hand holds a surgical instrument, likely a hemostat or forceps, to keep the incision edges open. The surgical field is prepared with green sterile drapes, and the surrounding skin appears erythematous and taut. This visual demonstrates the management of a liver abscess with parietal extension, illustrating key steps in bedside or operating room drainage of localized collections. It serves as an educational example for general surgery and infectious disease specialties, highlighting the physical characteristics of purulent exudate and basic surgical technique.
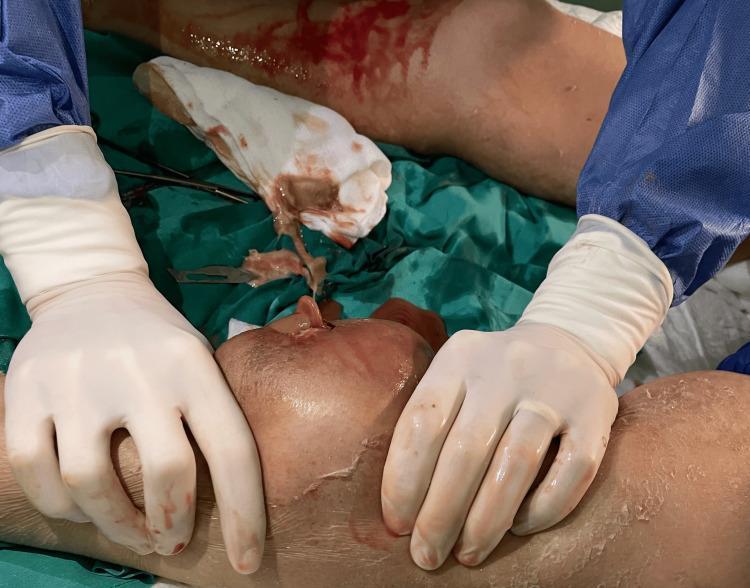
This clinical photograph captures a surgical procedure involving the drainage of a lower limb abscess. The central focus is an inflamed, erythematous, and significantly indurated area of skin on the leg where an incision has been made. A surgical drain (Penrose or similar) is seen emerging from the incision site, accompanied by hematopurulent drainage. The surrounding skin exhibits signs of inflammation and desquamation, partially covered by transparent adhesive dressing remnants. Medical personnel are shown performing the procedure wearing sterile white gloves and blue surgical gowns. The operative field is defined by green sterile drapes, upon which a scalpel and blood-stained gauze are visible. This image illustrates surgical management of deep-seated soft tissue infections or muscular abscesses, highlighting clinical findings of cellulitis, localized inflammation, and the technique for establishing drainage to manage purulent collections. It serves as an educational example of bedside or operating room intervention for complicated skin and soft tissue infections (SSTIs).
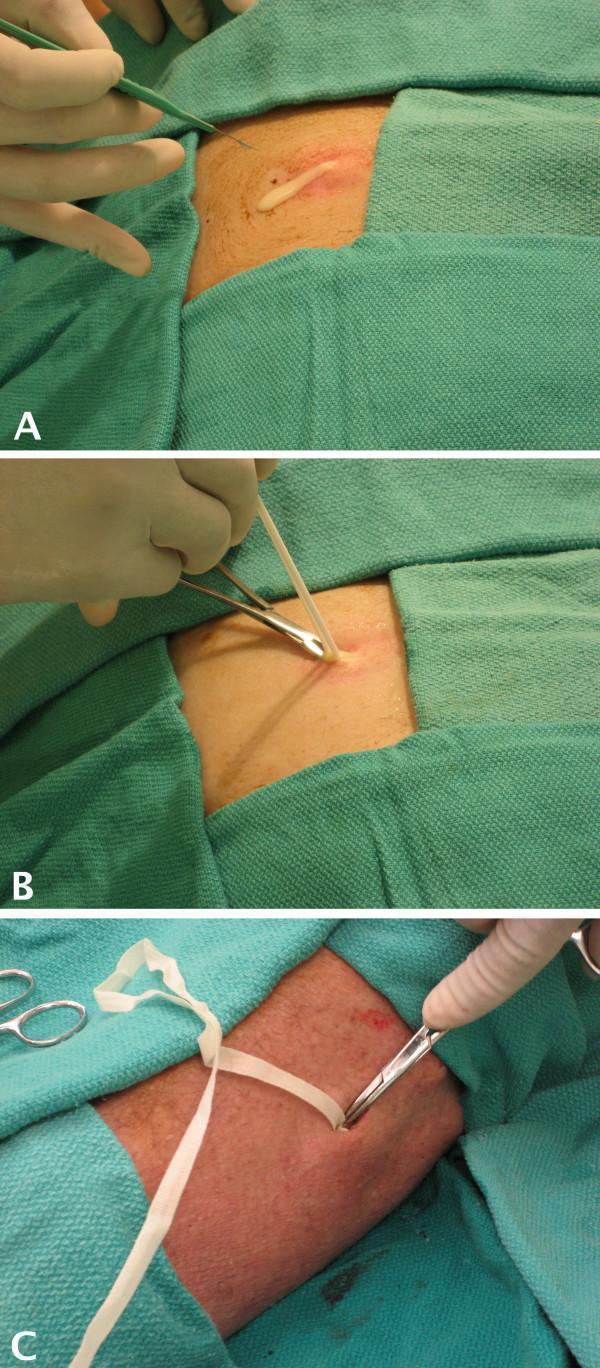
This three-panel clinical instructional photograph demonstrates the sequential steps of an incision and drainage (I&D) procedure using a cadaveric abscess model. Panel A: A gloved hand uses a scalpel to make an incision into a simulated abscess on the abdominal wall, showing the resulting drainage of white, purulent-like material from the raised, erythematous lesion. Panel B: Following the initial drainage, hemostats and a culture swab are used to access the interior of the abscess cavity to simulate the collection of a specimen for microbiology. Panel C: The final stage of the procedure is shown on a lower extremity site, where a gloved operator uses forceps to pack the open abscess cavity with white, ribbon-like iodoform gauze or similar wound-packing material. The area is draped with green surgical cloths throughout the panels. This series serves as an educational tool for medical students and surgical residents to visualize the primary steps of managing cutaneous abscesses, including incision, sampling, and wound packing to prevent premature skin closure.
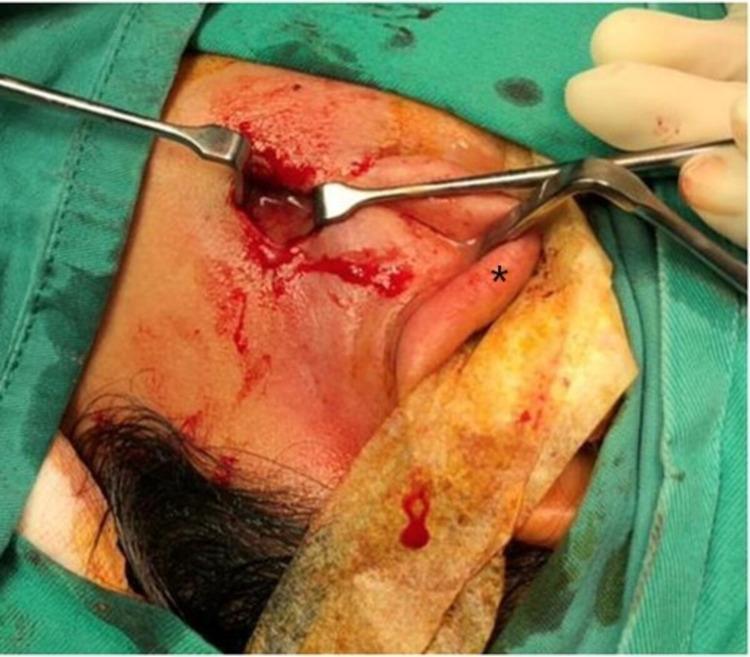
This clinical photograph captures an intraoperative view of a parotid abscess drainage procedure. The surgical field is focused on the preauricular and infraauricular region of the left side of the face. A 'mini' modified Blair skin incision has been performed to access the parotid gland. Key anatomical landmarks include the ear lobule, which is marked with an asterisk (*) and is being retracted superiorly and posteriorly away from the surgical site to provide adequate exposure. Small surgical retractors are being used to hold the incision open, revealing a cavity from which purulent material is being drained. The surrounding skin is prepped with antiseptic and shows mild erythema and surgical blood staining. Sterile green surgical drapes surround the area, and a gloved hand and gauze are visible at the periphery of the field. This image serves as an educational example of the surgical approach and technique for draining deep-seated parotid space infections while minimizing the surgical footprint through a modified incision.
lower limb anatomy skin layers fascia muscles compartments leg
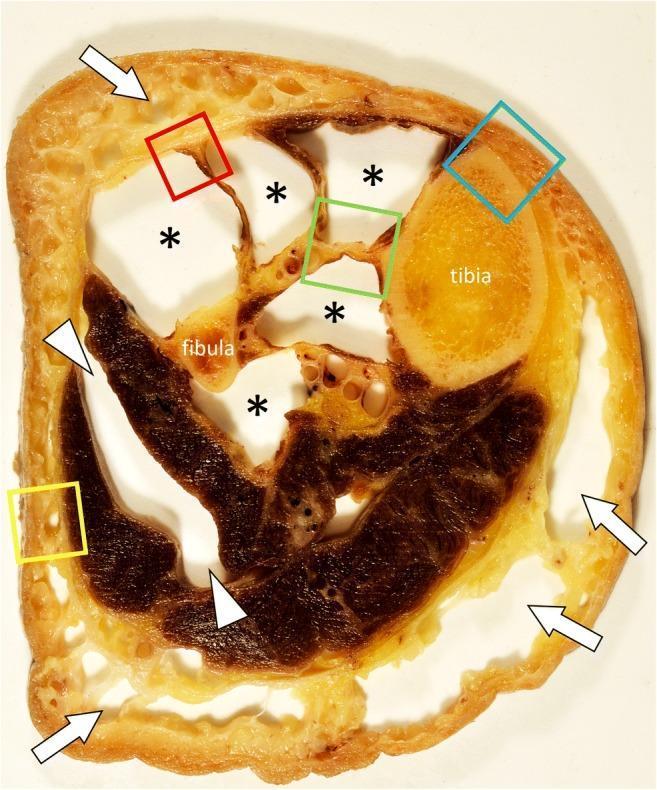
This clinical photograph shows a transverse anatomical section of a human cadaver leg, illustrating the organization of the fascial and musculoskeletal systems. Key skeletal landmarks include the tibia and fibula. The specimen has been partially dissected to highlight specific layers: white arrows indicate the superficial fascia and hypodermis where subcutaneous fat has been removed, revealing a lobular connective tissue framework. Asterisks mark empty spaces where the muscles of the anterior and deep posterior compartments were excised to reveal the underlying deep intermuscular fascia and septa. Arrowheads point to the separated muscles of the lateral compartment. Four colored squares (red, blue, yellow, green) delineate specific regions of interest for histopathological correlation, focusing on the interface between the fascia superficialis, deep peripheral fascia, and the periosteum. This material is designed to teach the three-dimensional structural relationships of the lower limb’s connective tissue skeleton, essential for understanding clinical conditions such as compartment syndrome and inflammatory fasciitis.
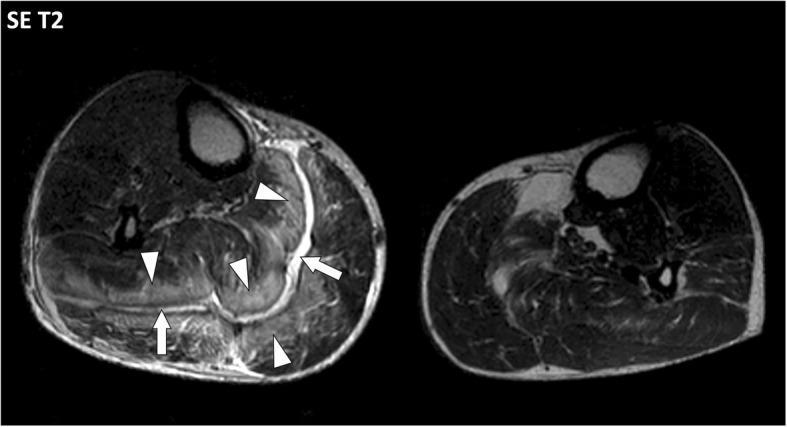
This diagnostic image is an axial Spin Echo (SE) T2-weighted MRI of the lower legs, demonstrating findings consistent with necrotizing fasciitis in the right leg (left side of image). The primary pathological hallmark is significant thickening and hyperintensity of the deep intermuscular fascia, specifically visualized between the gastrocnemius and soleus muscles. This bright, fluid-like signal along the fascial planes (indicated by arrows) suggests inflammatory fluid accumulation and necrosis. Additionally, there is extensive high-signal infiltration within the connective tissue and endomysium of the adjacent muscles (indicated by arrowheads), representing reactive edema and inflammatory spread. The contralateral leg serves as a healthy anatomical reference, highlighting the marked asymmetry, fascial distension, and soft tissue swelling present in the affected limb. This imaging modality is critical for assessing the depth of soft tissue infections and identifying the involvement of deep fascial layers and muscular compartments, which are key indicators for surgical intervention in necrotizing soft tissue infections.
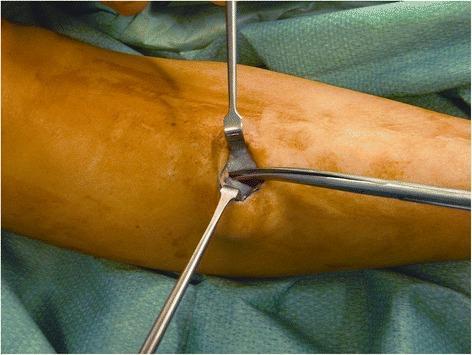
This clinical photograph displays an intraoperative view of a fasciotomy procedure on the leg, specifically targeting the cranial division of the anterior and lateral compartment fascia. The surgical field is prepared with blue-green sterile drapes, revealing a tan-colored limb with a small, vertical incision approximately 2.5 cm in length. Two metal retractors are positioned to hold back the skin and subcutaneous tissue, exposing the underlying deep fascia. A surgical instrument, likely long Metzenbaum-style scissors, is being used to perform a subcutaneous division of the fascia. The whitish, fibrous texture of the deep fascia is visible within the depth of the incision. This visual demonstrates a minimally invasive technique for compartment decompression, emphasizing the anatomical relationship between the skin, subcutaneous layers, and the muscular compartments of the lower leg.
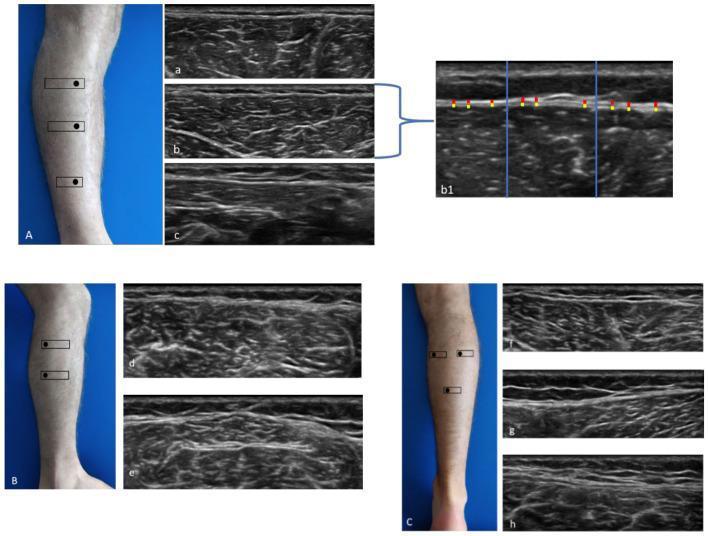
This composite educational image illustrates ultrasound (US) imaging of the lower leg musculature and fascia across three anatomical compartments: anterior (A), lateral (B), and posterior (C). Clinical photographs accompany the US scans, showing the probe orientation and levels (Ant 1-3, Lat 1-2, Post 1-3) used for data collection. The grayscale ultrasound images demonstrate high-frequency linear probe findings of skeletal muscle and overlying fascial layers. Key features include the crural fascia (highlighted with red/yellow markers) and epimysial fascia. Image b1 provides a detailed methodological visualization of fascial thickness measurement: the ultrasound frame is divided into three equal sections by vertical blue lines, with nine specific measurement points identified by red and yellow indicators to ensure objective data averaging. The anterior compartment scans (a, b, c) show the tibialis anterior muscle texture and fascial boundaries, while posterior scans (f, g, h) depict the layered architecture of the gastrocnemius and soleus muscles. This image is used to teach standardized ultrasonographic assessment of myofascial structures and thickness quantification in clinical research.
Incision and Drainage (I&D) of Lower Limb Abscess - A Practical Guide
What Is an Abscess?
- Infected hair follicles (furuncle/boil) or multiple follicles (carbuncle)
- Subcutaneous infections from minor trauma, wound contamination, or hematogenous spread
- Infected sebaceous/epidermoid cysts
- Hidradenitis suppurativa (groin/inner thigh)
- Diabetic foot infections - these can be surgical emergencies
- Pfenninger and Fowler's Procedures for Primary Care, p. 176
ANATOMY RELEVANT TO LOWER LIMB I&D
Layers from Superficial to Deep
| Layer | Details |
|---|---|
| Epidermis & Dermis | 1-4 mm thick; thicker on the sole of the foot and shin |
| Superficial fascia (hypodermis) | Contains subcutaneous fat, superficial veins, lymphatics, and cutaneous nerves. Most simple abscesses lie here |
| Deep (investing) fascia | Fascia lata in the thigh, crural fascia in the leg. Tough, fibrous layer. Separates superficial from deep compartments |
| Muscular compartments | Divided by fascial septa; contains muscles, deep vessels, and nerves |
| Bone (tibia, fibula, femur) | Risk of osteomyelitis if deep infection tracks to periosteum |
Compartments of the Leg (Below Knee)
- Anterior - tibialis anterior, extensor digitorum longus, anterior tibial artery and deep peroneal nerve
- Lateral - peroneus longus/brevis, superficial peroneal nerve
- Superficial posterior - gastrocnemius, soleus, sural nerve
- Deep posterior - flexor hallucis longus, tibialis posterior, posterior tibial artery and tibial nerve
Key Neurovascular Structures to Know and Protect
- Great saphenous vein (GSV): runs anterior to the medial malleolus, ascends the medial aspect of the leg and thigh - superficial and vulnerable. Accompanied by the saphenous nerve.
- Short saphenous vein: runs posterior to the lateral malleolus, up the midline of the calf - accompanied by the sural nerve.
- Femoral triangle (thigh): contains femoral artery, femoral vein, and femoral nerve - avoid deep incisions here.
- Popliteal fossa: popliteal artery, vein, tibial nerve, and common peroneal nerve - at-risk zone.
- Dorsum of foot: dorsalis pedis artery and deep peroneal nerve are superficial here.
Clinical rule: Most lower limb abscesses are subcutaneous - superficial to the deep fascia. If you suspect deep-space or deep fascial involvement, do this in an operating room setting, not at bedside.
INDICATIONS FOR I&D
- Localized, tender, fluctuant collection of pus
- Abscess that is "pointing" (area of thin, fluctuant skin over the pus)
- Failure to resolve with antibiotics or warm compresses alone
- Diabetic foot abscess (surgical emergency)
CONTRAINDICATIONS / CAUTION ZONES (Lower Limb Specific)
- Popliteal fossa: danger zone - major vessels and nerves. Refer or take to OR.
- Femoral triangle: femoral vessels are close. Do not blindly deepen your incision.
- Dorsum of foot: tendons and extensor apparatus are superficial; protect them.
- Non-fluctuant lesions: do not incise. Wait until fluctuance develops.
- Suspected necrotizing fasciitis: I&D is not sufficient - requires urgent debridement in OR. Clues: rapid spread, disproportionate pain, skin discoloration, gas on imaging, systemic toxicity.
EQUIPMENT NEEDED
- 1-2% lidocaine ± sodium bicarbonate (to reduce sting)
- 25-30 gauge needle and syringe for local anesthetic
- Alcohol or povidone-iodine for prep
- No. 11 blade scalpel
- Curved hemostats
- 4x4 gauze
- Iodoform/iodiform packing gauze (3/8 to 3/4 inch wide, up to 24 inches long depending on size)
- Culture swab or 18-gauge needle for aspiration if needed
- Bandage scissors and dressing
STEP-BY-STEP TECHNIQUE
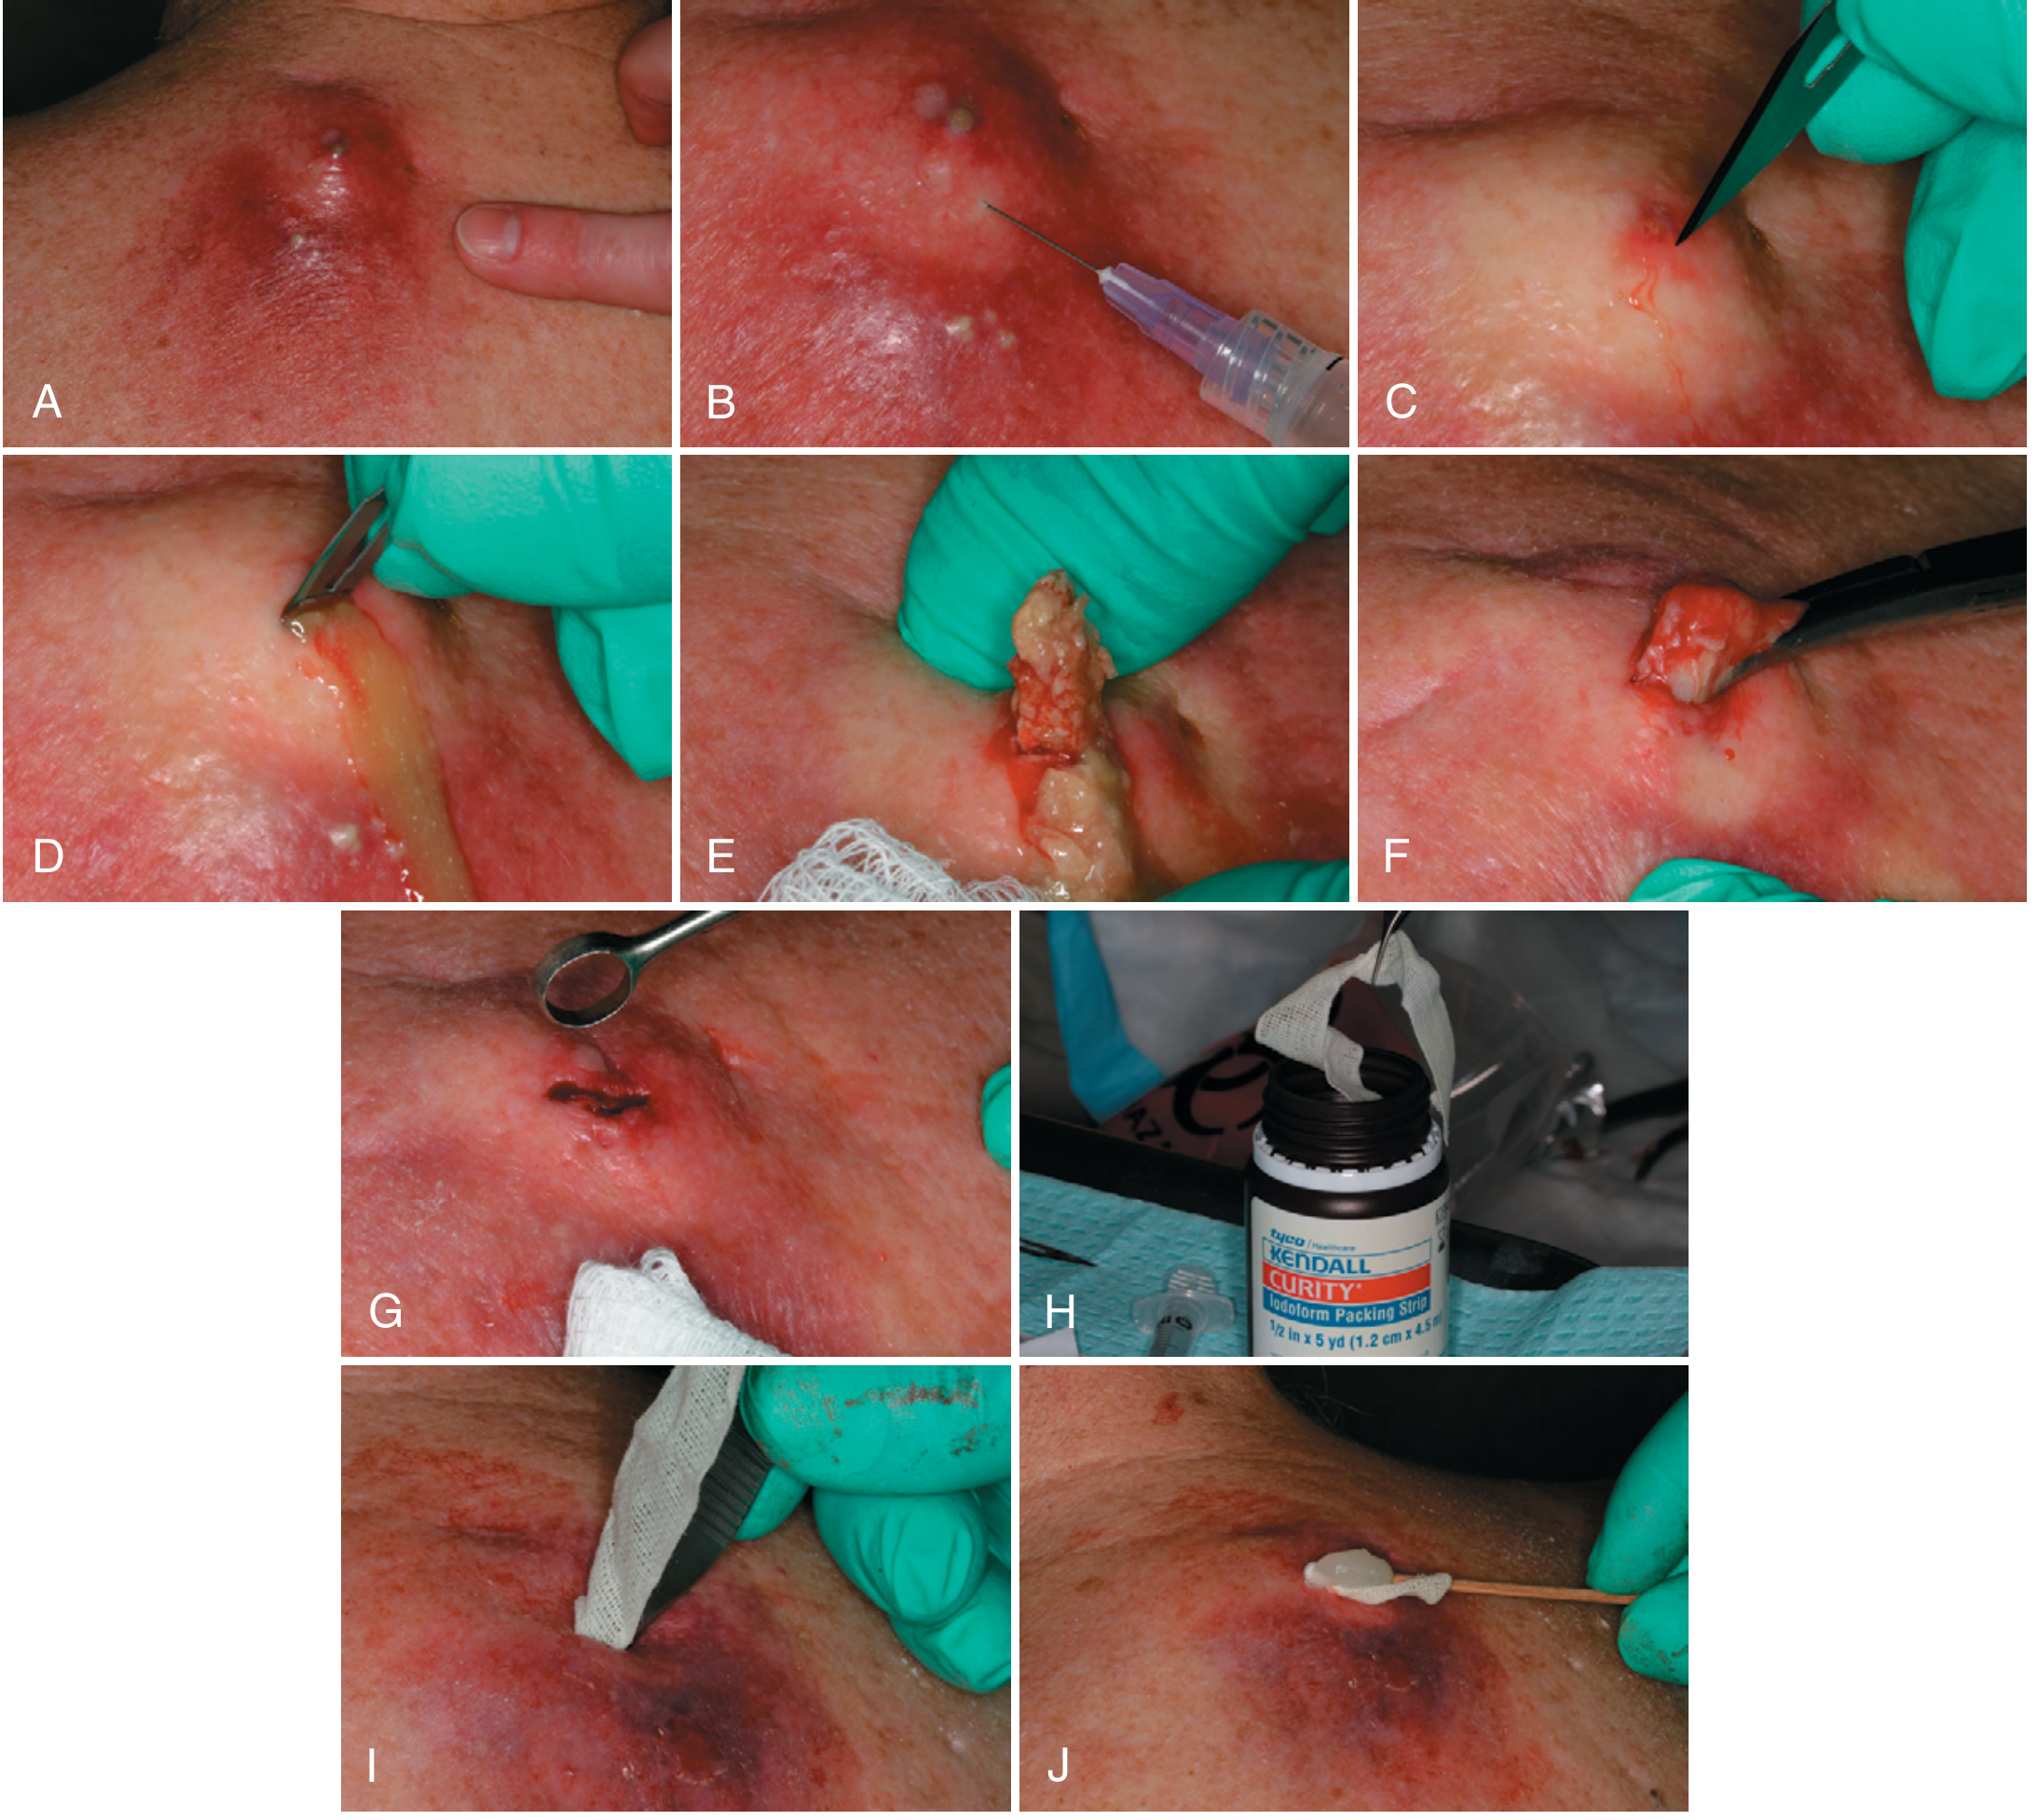
- Clean the area with povidone-iodine or alcohol.
- Wear protective eyewear - pus can eject under pressure.
- Perform a field block around the perimeter of the abscess, NOT into the cavity itself.
- Local anesthetic works poorly inside the acidic abscess cavity.
- Use more volume than usual - inflammation reduces efficacy.
- Alternative: diphenhydramine 10-25 mg diluted in saline, or cryocautery (ethyl chloride spray) to freeze the roof.
- Use a no. 11 blade to make a sufficiently wide linear incision - typically 1 cm for a large abscess.
- Align the incision along skin lines (Langer's lines) to minimize scarring.
- On the lower limb, make incisions parallel to the long axis of the limb wherever possible.
- The incision must be wide enough to prevent premature closure - the most common cause of recurrence.
- Obtain culture from inside the cavity (not the skin surface).
- Alternatively, aspirate with an 18-gauge needle before incising for culture.
- Culture is especially important in immunocompromised patients, diabetics, and recurrent abscess.
- Apply gentle digital pressure to express all pus.
- Use a curved hemostat or cotton-tipped applicator to explore the cavity and break down any loculations or septa - incomplete drainage is a major cause of treatment failure.
- If the lesion started as a cyst, use a dermal curette to remove residual sac wall.
- Pack the cavity with iodoform gauze, leaving a small "tail" protruding from the wound.
- Apply antibiotic ointment over the tail to prevent the outer dressing from sticking and inadvertently removing the wick.
- Do not suture the wound closed - this guarantees recurrence.
- Change the outer dressing several times daily.
- Slowly advance/remove packing over days to weeks - do not pull all at once.
- For large cavities, leave the wick for up to 4 weeks, advancing it a few cm every few days.
- Healing must occur from the inside out.
- Review at 5-7 days to reassess.
ANTIBIOTICS: WHEN ARE THEY NEEDED?
| Situation | Antibiotic Recommendation |
|---|---|
| Uncomplicated abscess in healthy patient | I&D alone is sufficient - antibiotics usually not needed |
| Surrounding cellulitis present | Add antibiotics covering S. aureus |
| Diabetic, immunocompromised, or debilitating disease | Antibiotics + close follow-up |
| MRSA suspected (recurrence, no response) | Culture + sensitivity guided; clindamycin, trimethoprim/sulfamethoxazole, doxycycline, or rifampin |
COMPLICATIONS TO RECOGNIZE
- Recurrence - usually due to inadequate incision or premature closure
- Scar or keloid formation - especially in predisposed patients
- Progression to cellulitis or septicemia - systemic symptoms require IV antibiotics and admission
- Fistula formation
- Osteomyelitis - if deep infection tracks to bone (especially foot/ankle in diabetics)
- Necrotizing fasciitis - missed diagnosis is life-threatening. Hallmarks: severe pain out of proportion, rapid spread, crepitus, skin necrosis, systemic sepsis. This is an OR emergency, not a bedside procedure.
- Compartment syndrome - rare but possible if deep infection spreads into a closed compartment
SPECIAL CONSIDERATIONS FOR THE LOWER LIMB
-
Diabetic foot: An abscess here is a surgical emergency. I&D may need to include partial toe or metatarsal resection. Always assess vascular status (ABI) and get imaging if deep space infection is possible.
-
Recurrence: Always send culture, especially in the thigh/groin region. MRSA is the most common pathogen in ER-presenting skin infections.
-
Hidradenitis suppurativa (groin): Recurrent abscesses in the groin. I&D provides acute relief but these patients need long-term antibiotics and possibly surgical excision of involved tissue.
-
Ultrasound-guided aspiration/I&D: Consider if abscess is deep, poorly demarcated, or in a danger zone. Ultrasound confirms the collection, rules out vascular lesions (pseudoaneurysm!), and guides the incision.
-
Never confuse an abscess with a vascular lesion - a pulsatile swelling in the groin or popliteal fossa could be a pseudoaneurysm or aneurysm. Aspirating or incising this is catastrophic. Confirm with Doppler ultrasound when in doubt.
QUICK SUMMARY TABLE
| Element | Key Point |
|---|---|
| Most common organism | S. aureus (MRSA increasingly common) |
| Incision | No. 11 blade, along skin lines, wide enough to prevent premature closure |
| Anesthesia | Field block around (not into) the cavity |
| After opening | Break all loculations with hemostat |
| Closure | Never suture; pack open with iodoform gauze |
| Antibiotics | Only if cellulitis, systemic signs, or high-risk patient |
| Red flags for OR | Necrotizing fasciitis, deep space infection, vascular proximity, diabetic foot |
| Anatomy to protect | GSV, saphenous nerve, sural nerve, femoral triangle, popliteal fossa |
- Pfenninger and Fowler's Procedures for Primary Care, 3rd ed., Chapter 20, pp. 176-178
- Bailey and Love's Short Practice of Surgery, 28th ed., Chapter 62 (lower limb venous anatomy)
Can this happen if pt has cellulitis
Cellulitis and I&D - What You Need to Know
The Short Answer
Understanding the Distinction
| Feature | Abscess | Cellulitis |
|---|---|---|
| Pathology | Localized pus collection, walled off | Diffuse bacterial invasion of dermis/subcutaneous tissue; no pus cavity |
| Fluctuance | Present (soft, fluctuant center) | Absent - uniformly firm/indurated |
| Borders | Relatively localized | Poorly defined, spreading edges |
| Organism | Usually S. aureus / MRSA | Usually beta-hemolytic Streptococci or S. aureus |
| Treatment | I&D (primary); antibiotics if surrounding cellulitis | Antibiotics (primary); no I&D |
| Response to antibiotics | Poor once pus has formed | Good |
When Cellulitis and Abscess Coexist
- I&D the abscess - this is the primary treatment
- Add antibiotics because of the associated cellulitis
- The cellulitis usually resolves once the abscess is drained - the pus is the driving source of infection
From Tintinalli's Emergency Medicine: "If abscesses are present, they should be drained and cultures obtained. Small (<5 cm) pus collections can typically be treated with I&D alone."
The Purulent vs. Non-Purulent Cellulitis Classification
- Purulent cellulitis: cellulitis with purulent drainage or exudate but no drainable abscess cavity - caused mostly by MRSA. Treatment is antibiotics (MRSA coverage); no I&D because there is no discrete pocket.
- Non-purulent cellulitis: no pus, no abscess - caused mostly by beta-hemolytic Streptococci. Antibiotics only (penicillin/cephalosporin class).
When to Add Antibiotics with I&D (in Cellulitis-Associated Abscess)
- Surrounding cellulitis is severe or extensive
- Rapid progression of erythema
- Signs of systemic illness (fever, tachycardia, raised WBC)
- Immunocompromised patient (diabetes, HIV, steroids)
- Extremes of age
- IVDU patient with fever (rule out endocarditis before discharge)
- Abscess unresponsive to I&D alone
- Multiple infection sites
Ultrasound: The Key Tool When You Are Unsure
- Abscess on US: anechoic (dark) or hypoechoic fluid-filled cavity - compressible, with posterior acoustic enhancement
- Cellulitis on US: no cavity; classic "cobblestone" pattern - hyperechoic fat lobules separated by hypoechoic fluid-filled septa
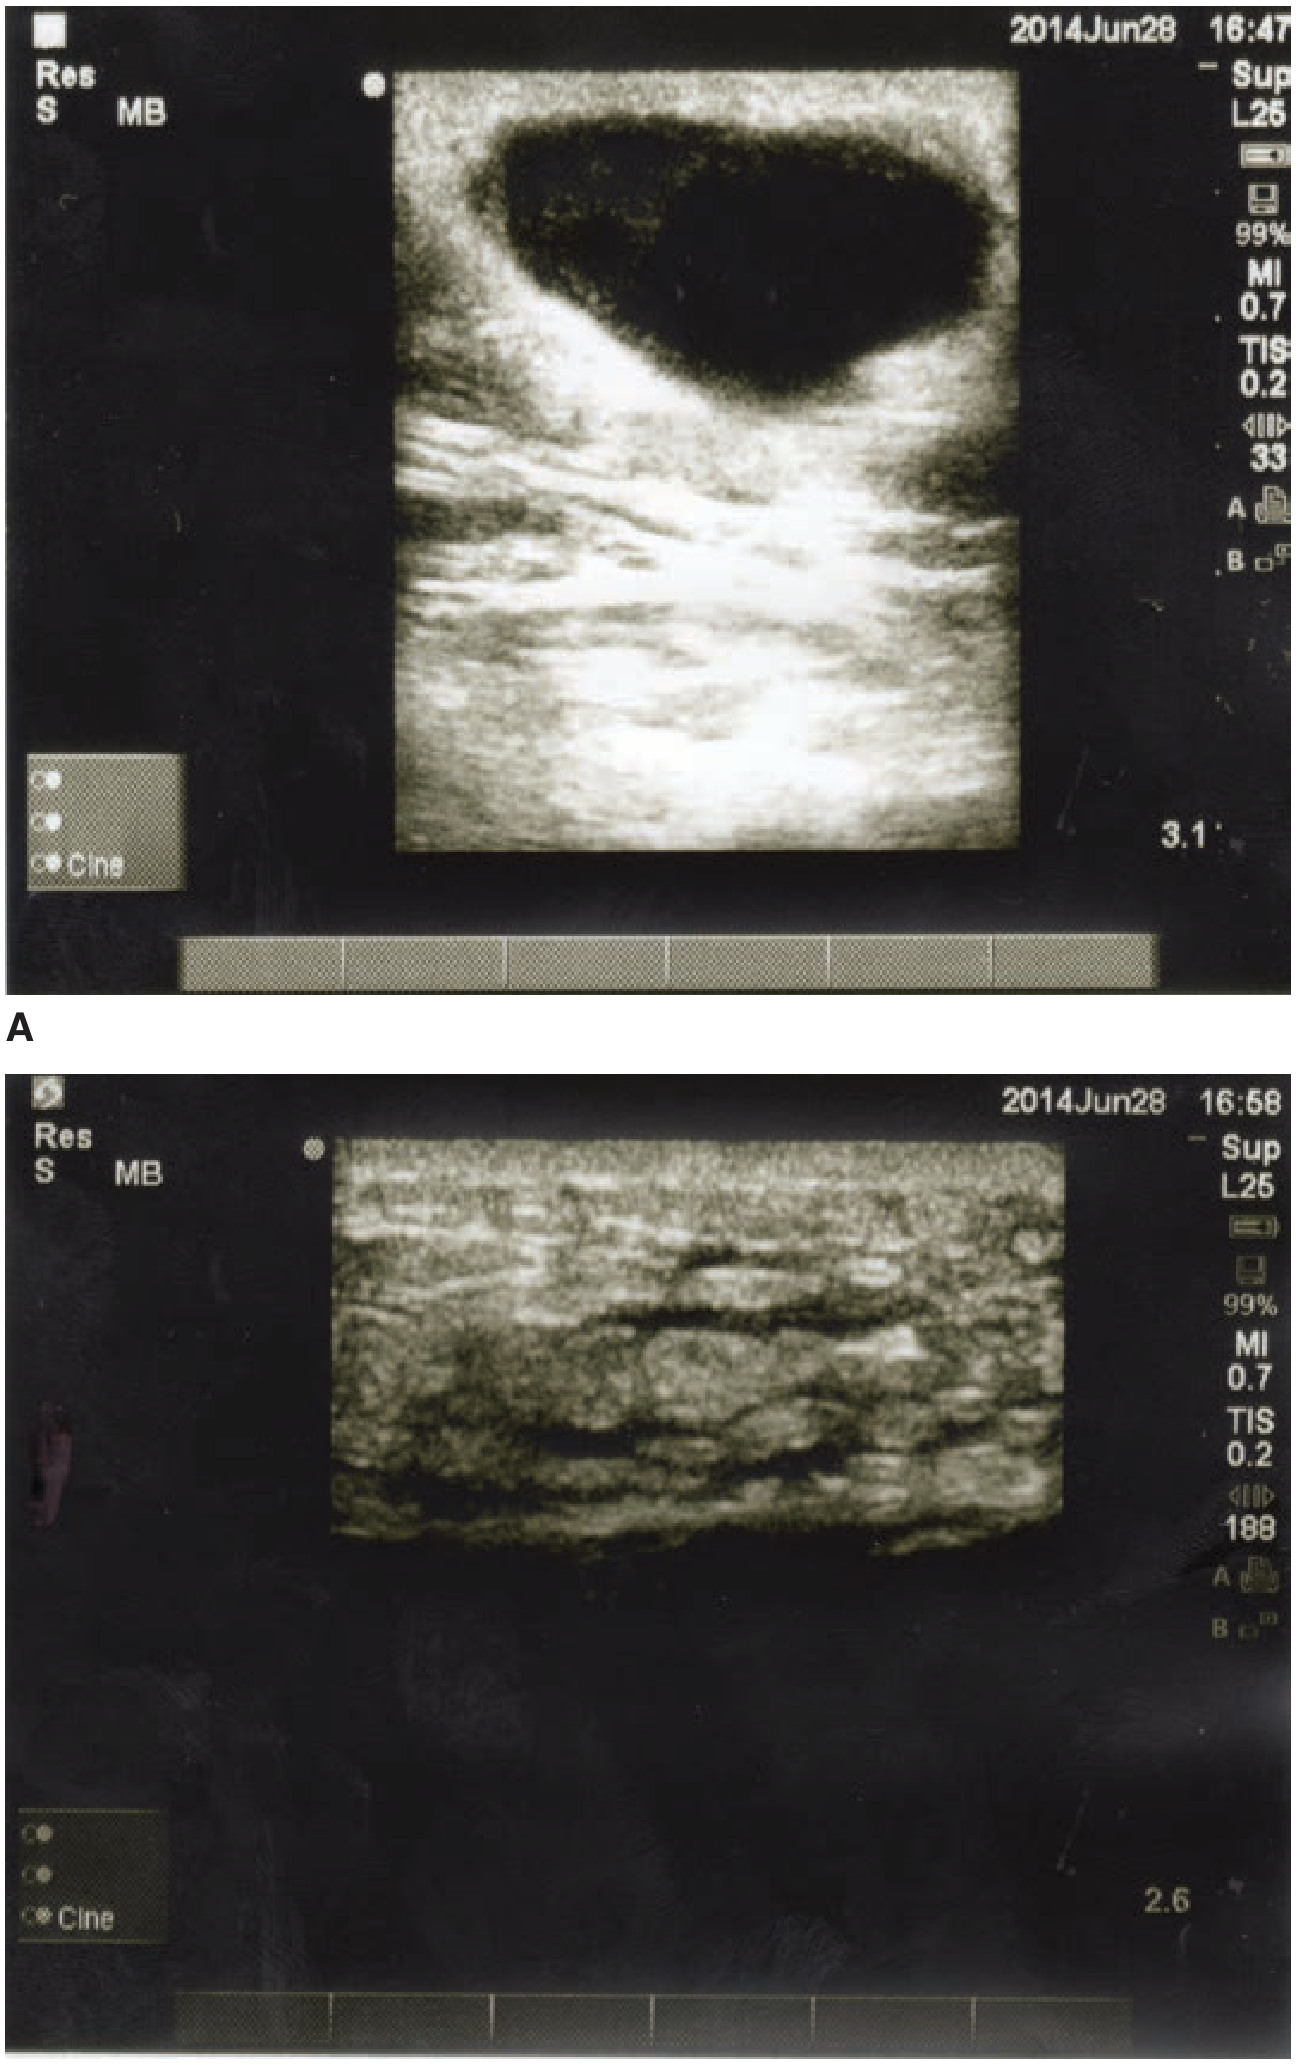
Clinical rule: If ultrasound shows no fluid collection, do not incise. If it shows a collection, drain it.
Summary Decision Tree
Patient with red, swollen, tender lower limb
        |
        ↓
Is it fluctuant? / Does US show a fluid collection?
        |
   YES  |  NO
        |
   ABSCESS     CELLULITIS
      |              |
    I&D           Antibiotics only
   +/- antibiotics  (no I&D)
   if cellulitis    Mark borders, reassess in 24-48h
   is significant
- Tintinalli's Emergency Medicine, Chapter 142, p. 977
- Roberts and Hedges' Clinical Procedures in Emergency Medicine, pp. 869-870