
Can you give me details regarding steps of doing TKR
Reading File
Now let me search the medical library for TKR (Total Knee Replacement) surgical steps.
Finding Sources
Finding Sources
Excellent! Campbell's Operative Orthopaedics is the gold standard for surgical steps. Let me search specifically for TKR surgical technique steps.
Finding Sources
Finding Sources
Found the key section in Campbell's. Let me read both the surgical technique section and the broader TKA section from Campbell's and Miller's simultaneously.
Reading File
Reading File
Campbell's has the detailed technique. Let me read more of it to get the complete surgical steps including bone cuts, component insertion, etc.
Reading File
Reading File
Reading File
Reading File
Reading File
Reading File
I now have comprehensive material from Campbell's Operative Orthopaedics covering all major steps of TKR. Let me also fetch a key diagram to illustrate the procedure.
Loading Image
Finding Sources
I now have all the information needed to compile a comprehensive, well-structured answer on TKR surgical steps. Let me also grab one more relevant image showing the bone cuts.
Reading File
I now have thorough content from Campbell's Operative Orthopaedics to present a complete, well-structured guide to TKR surgical steps. Let me compile the full answer.
Total Knee Replacement (TKR) - Surgical Steps
Based on Campbell's Operative Orthopaedics, 15th Ed. 2026 (Technique 8.1, 8.2, and related sections)
Overview
TKR (also called Total Knee Arthroplasty, TKA) replaces the arthritic surfaces of the distal femur, proximal tibia, and optionally the patella with prosthetic components. The goals are restoration of the mechanical axis, balanced soft-tissue gaps in flexion and extension, and optimal patellar tracking.
STEP 1 - Patient Positioning and Preparation
- Patient placed supine on the operating table.
- A thigh tourniquet is applied and inflated to reduce intraoperative blood loss.
- The limb is draped free to allow full knee flexion.
- Preoperative long-standing radiographs are reviewed to plan the mechanical-anatomic axis angle.
STEP 2 - Skin Incision
- Anterior midline incision is the most commonly used approach.
- Made with the knee in flexion so subcutaneous tissue falls medially and laterally, improving exposure.
- If a prior scar is present, incorporate the most lateral usable scar (blood supply to the anterior knee comes predominantly from the medial side).
- The incision must be long enough to avoid excessive skin tension during retraction, which can cause skin necrosis.
STEP 3 - Deep Approach / Arthrotomy
The standard deep approach is the medial parapatellar retinacular approach:
- Extend the retinacular incision proximally along the full length of the quadriceps tendon, leaving a 3-4 mm cuff of tendon on the vastus medialis for later closure.
- Continue the incision around the medial side of the patella, extending 3-4 cm onto the anteromedial tibial surface along the medial border of the patellar tendon.
- Expose the medial side of the knee by subperiosteal elevation of the anteromedial capsule and deep medial collateral ligament off the tibia to the posteromedial corner.
Alternative approaches:
- Subvastus ("Southern") approach - the vastus medialis is lifted off the intermuscular septum without splitting the quadriceps tendon; reduces patellofemoral complications.
- Midvastus approach - a limited incision into the vastus medialis obliquus muscle.
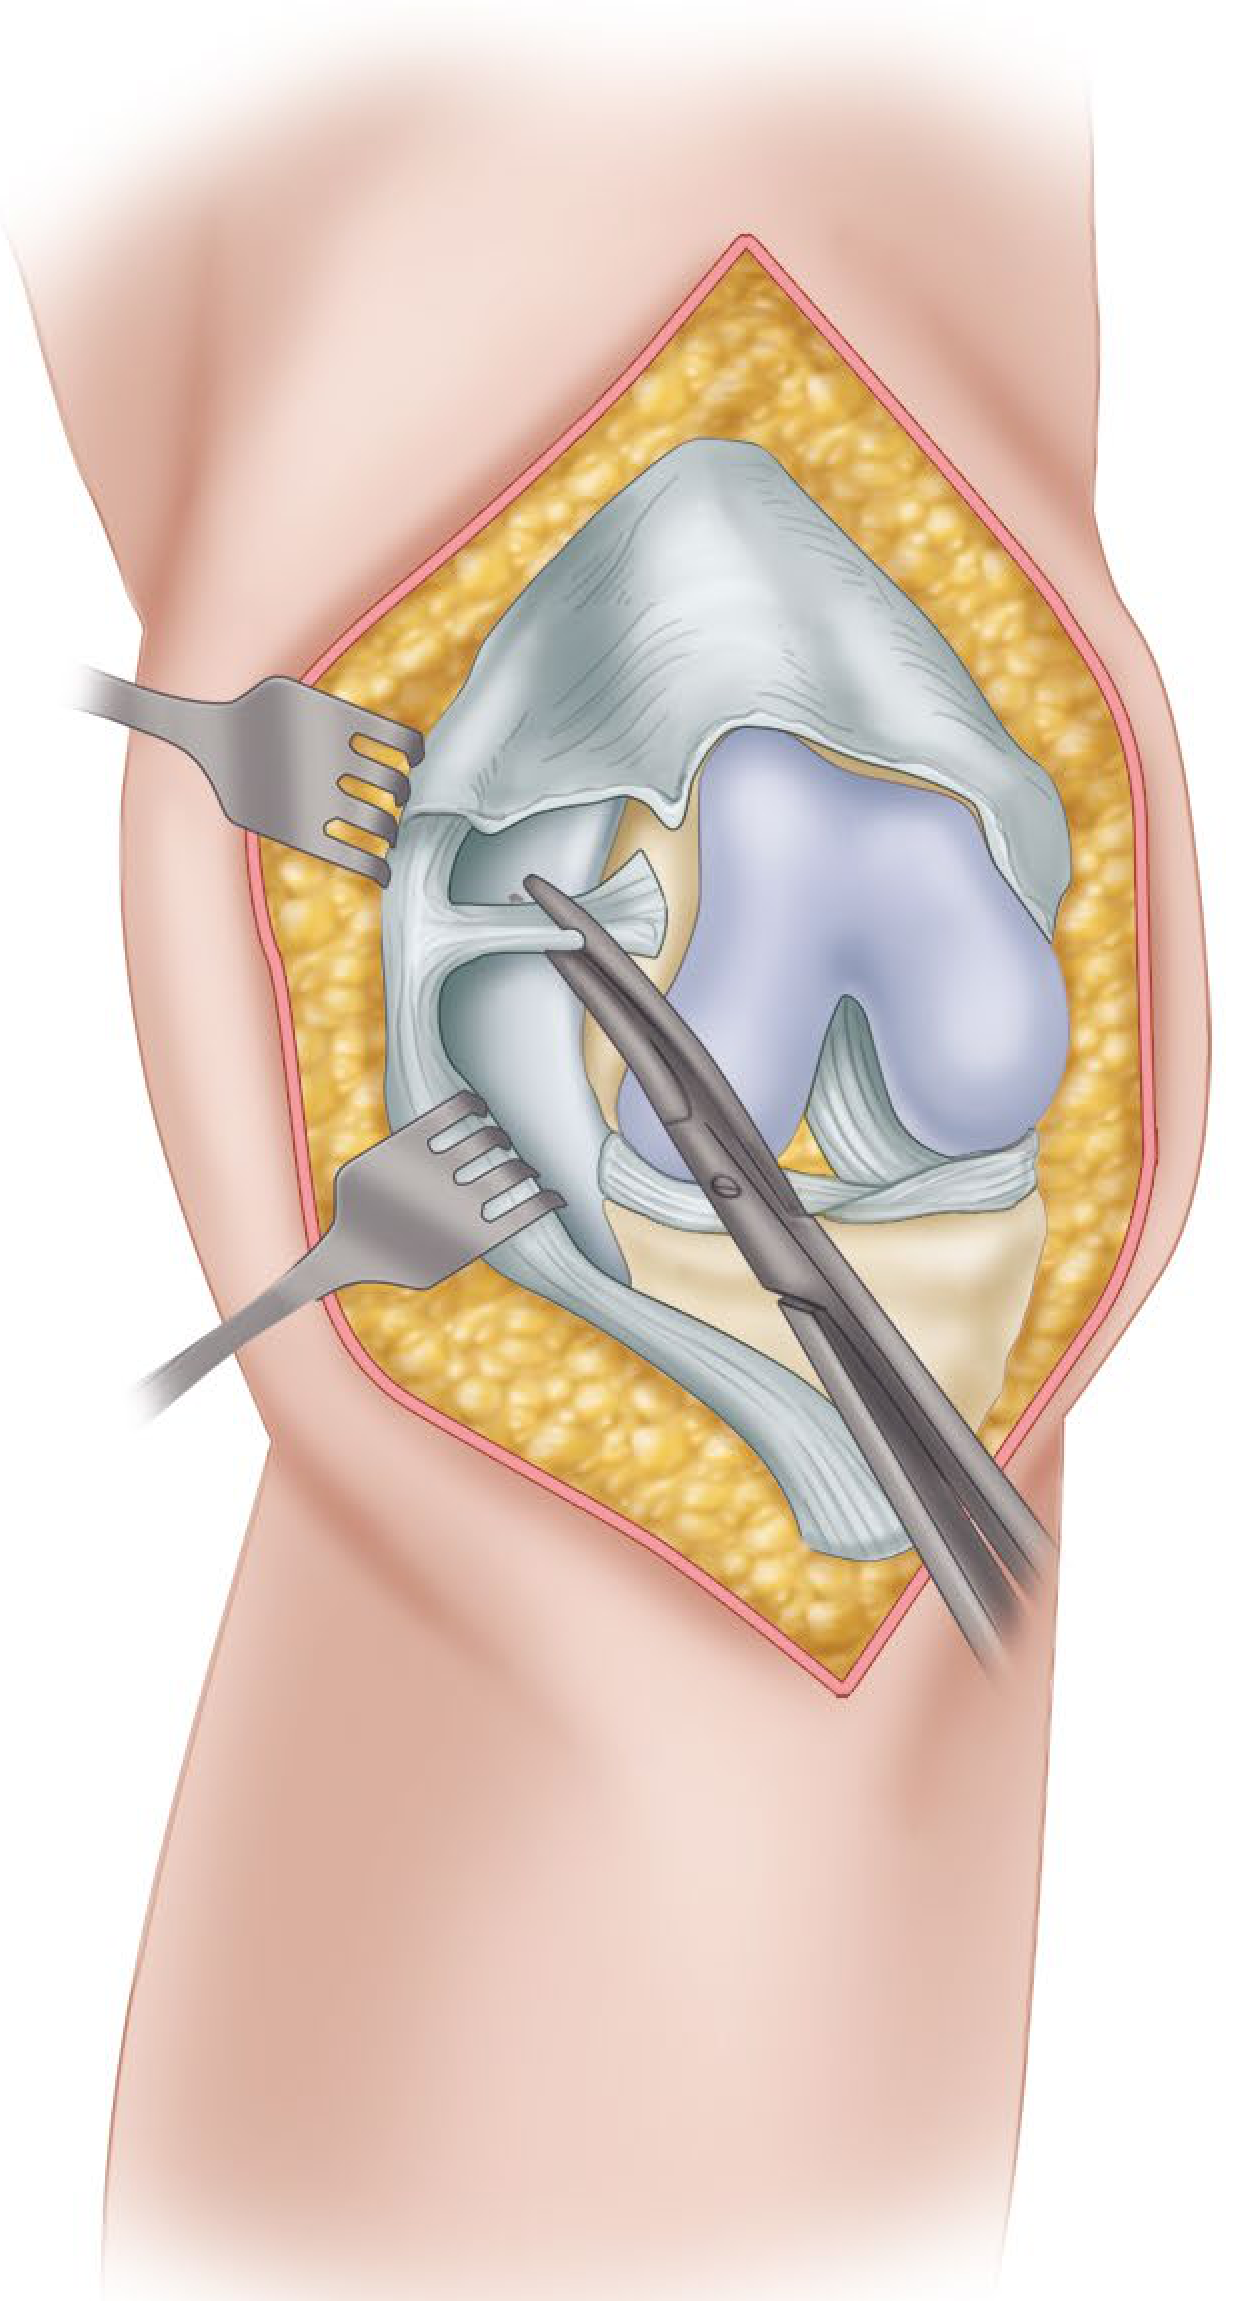
STEP 4 - Patellar Eversion and Joint Exposure
- Extend the knee and evert the patella laterally; in obese patients, develop the lateral subcutaneous flap further or subluxate the patella laterally.
- Flex the knee and remove the:
- Anterior cruciate ligament (ACL)
- Anterior horns of the medial and lateral menisci
- Any osteophytes that may cause component malposition or soft-tissue imbalance
- If a PCL-substituting prosthesis is used, the PCL may be resected now.
- Subluxate and externally rotate the tibia - this relaxes the extensor mechanism, reduces risk of patellar tendon avulsion, and improves tibial plateau exposure.
- Expose the lateral tibial plateau by partial or complete excision of the infrapatellar fat pad.
Important: Always protect the patellar tendon attachment at the tibial tubercle. Avulsion is a devastating complication.
STEP 5 - Tibial Preparation (Proximal Tibial Cut)
- The proximal tibial cut is made perpendicular to the mechanical axis of the tibia in the coronal plane.
- A posterior slope of 3-7 degrees is typically built in (either by the cut or the implant).
- Extramedullary alignment of the tibia is preferred at most institutions; the alignment rod tip is aimed slightly medial to the center of the ankle (~2 mm medial to the midmalleolar point).
- The amount of tibial bone removed should equal the thickness of the tibial tray plus polyethylene insert.
- After the cut, posterior meniscal horns are excised and the tibial plateau is sized and templated.
STEP 6 - Distal Femoral Cut (Technique 8.2)
- Make the distal femoral cut at a valgus angle of 5-7 degrees (measured from the anatomic-mechanical axis angle on long-standing radiograph), perpendicular to the mechanical axis of the femur.
- The amount of bone resected should equal the thickness of the femoral component.
- If a significant flexion contracture is present, up to 2 mm of additional distal resection may be done (avoid elevating the joint line by >4 mm).
- For a PCL-substituting prosthesis, an additional 2 mm of distal femoral resection equalizes the change in flexion gap caused by PCL sacrifice.
- Intramedullary alignment rods are most commonly used for the femoral cut.
STEP 7 - Anterior and Posterior Femoral Cuts (Sizing & Rotation)
Femoral component rotation is critical and can be determined by:
| Reference | Method |
|---|---|
| Transepicondylar axis | Posterior cut parallel to a line between medial and lateral femoral epicondyles |
| AP (Whiteside's) axis | Line from bottom of the trochlear groove to the center of the intercondylar notch; posterior cut perpendicular to it |
| Posterior condylar axis | 3 degrees of external rotation from the posterior condylar line |
| Tibial cut surface | Referenced after the tibial cut is made |
- Excessive external rotation widens the medial flexion gap and may cause flexion instability.
- Internal rotation of the femoral component causes lateral patellar tilt or patellofemoral instability.
- The femoral size determines the shape of the flexion gap; a smaller component enlarges the flexion gap.
STEP 8 - Flexion and Extension Gap Balancing
After bone cuts, trial components are inserted and gaps assessed:
- Equal rectangular gaps in both flexion and extension are the target.
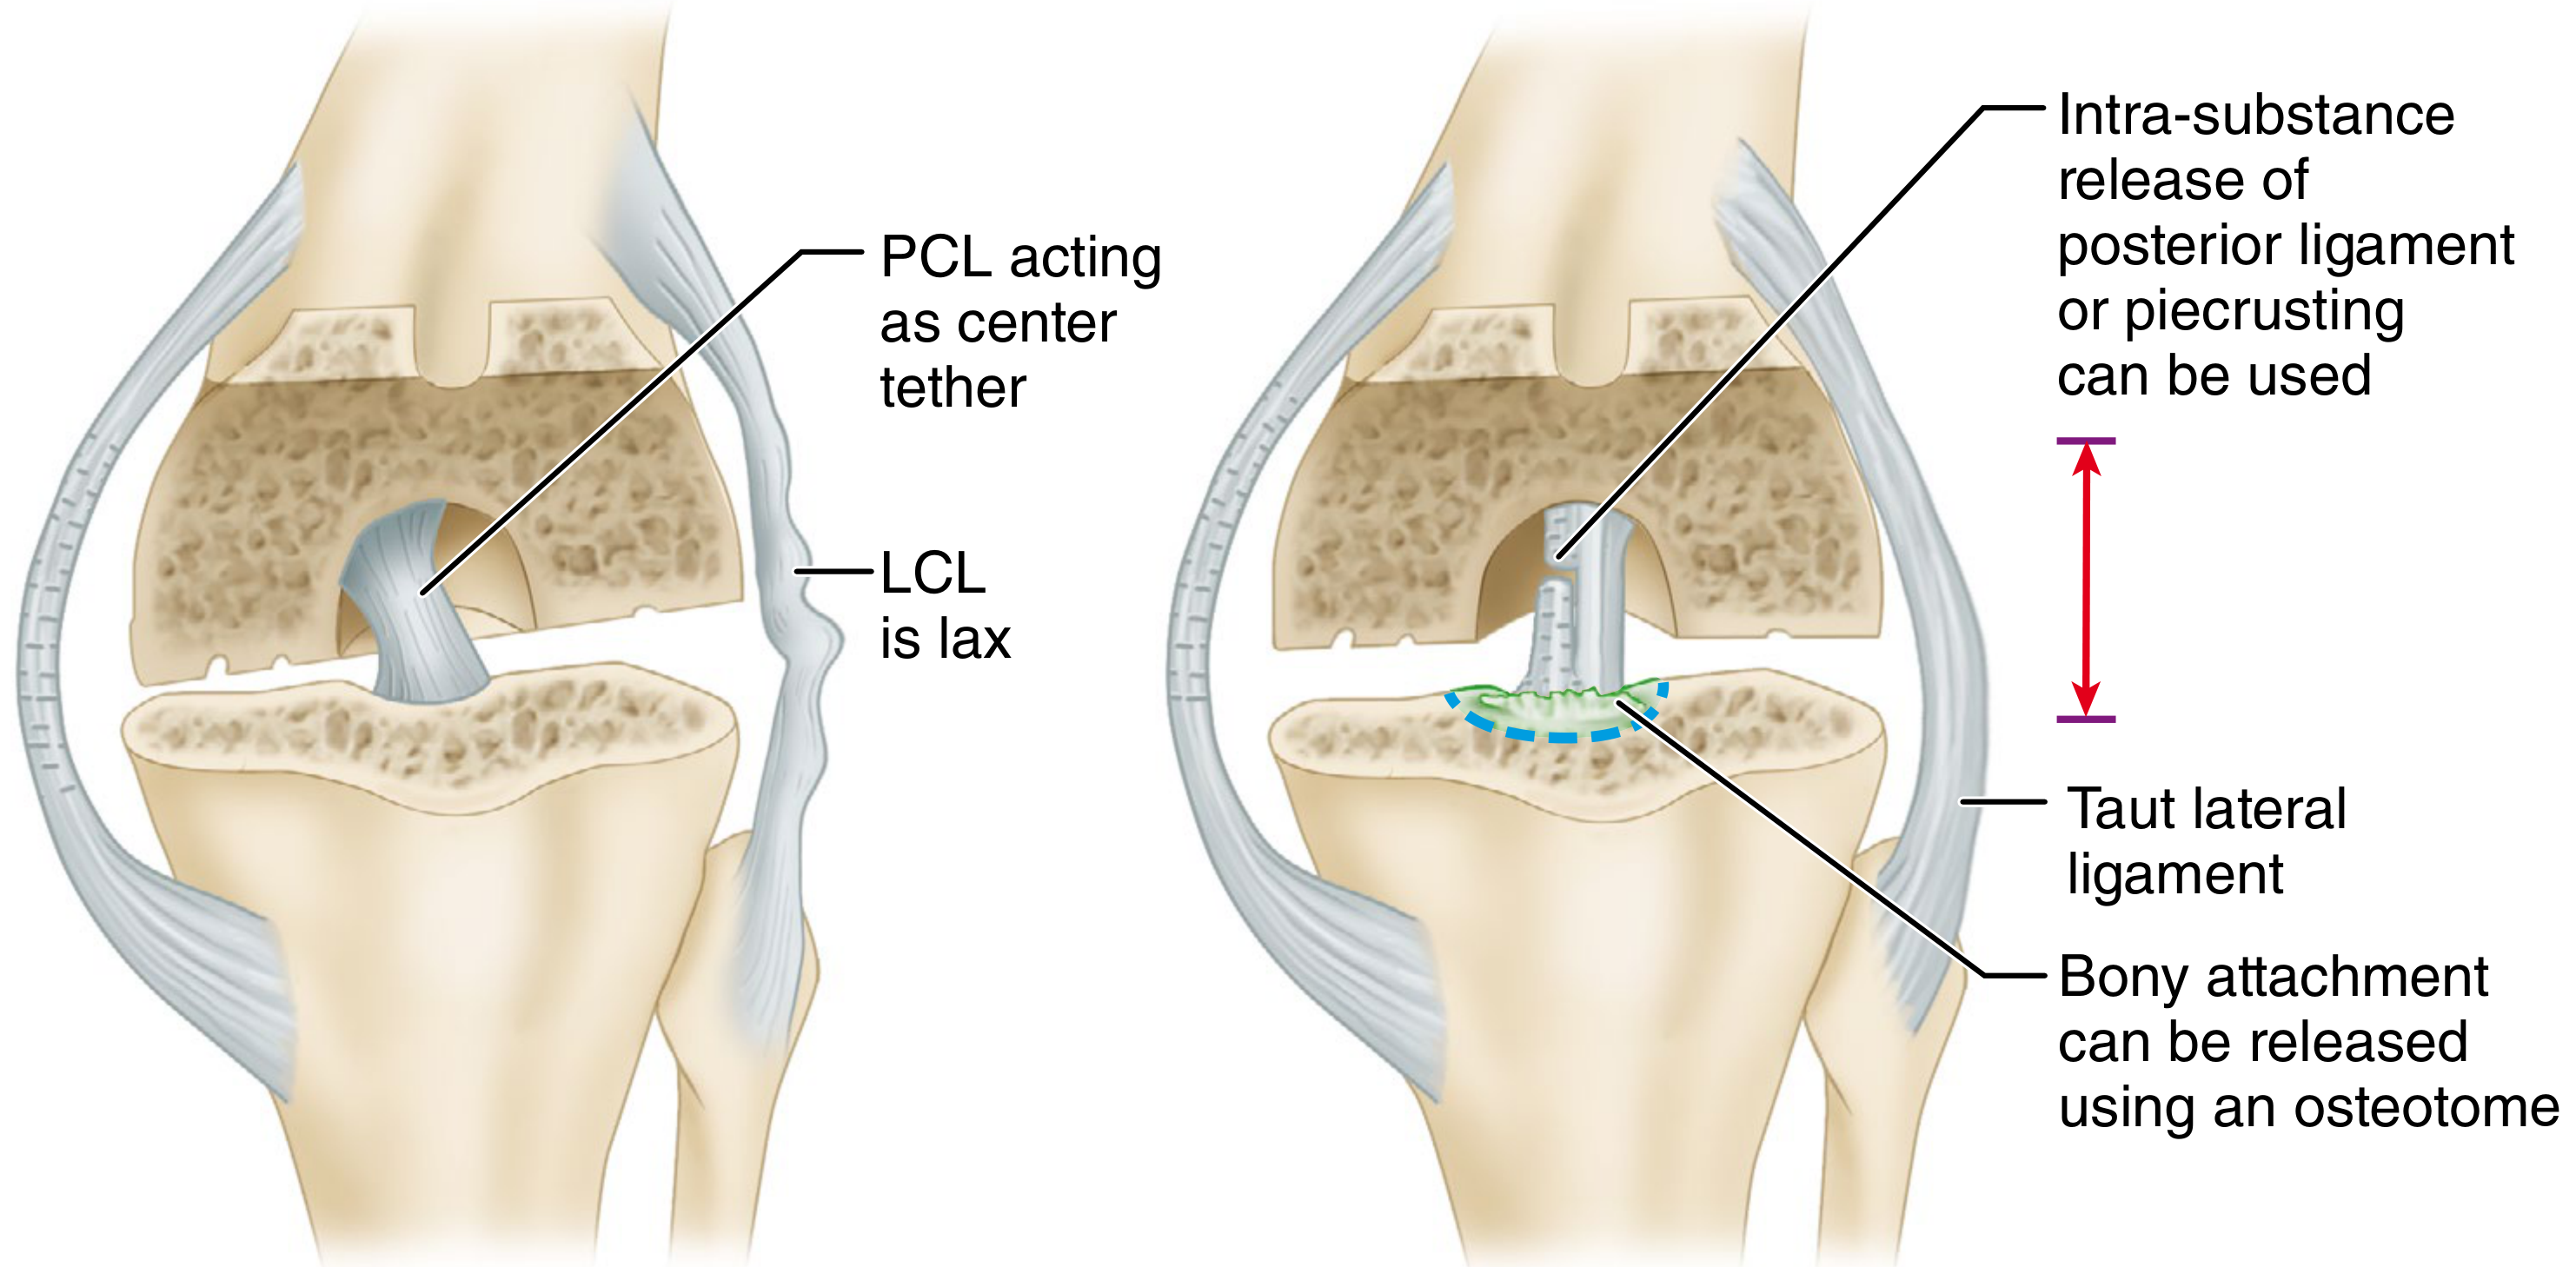
- Varus deformity correction involves sequential medial soft-tissue release:
- Remove osteophytes first (they tent the medial sleeve)
- Release posterior oblique ligament portion
- Release semimembranosus and posteromedial capsule if needed
- PCL recession (off tibial insertion in 1-2 mm intervals)
- If medial gap still tight: constrained condylar implant
- Valgus deformity correction focuses on lateral structure release (posterolateral capsule, lateral collateral ligament, popliteus).
STEP 9 - Patellar Resurfacing (Technique 8.10)
- The patellar articular surface is resected using a free-hand or guided saw technique.
- Resect enough bone so that the original patellar thickness is restored after the button is cemented.
- The patellar button is positioned medially to recreate the apex of the native patella and optimize tracking.
- Avoid "over-replacing" the patella (increases risk of tilt and lateral subluxation).
- "No-thumb" test: with knee taken through range of motion, the patella should track centrally with no manual correction applied.
- If maltracking is identified, lower the tourniquet first before deciding on lateral retinacular release (tourniquet deflation corrects maltracking in ~30-48% of cases).
STEP 10 - Trial Reduction and Assessment
- Insert trial femoral, tibial, and patellar components.
- Assess:
- Range of motion (target: full extension to at least 90 degrees of flexion)
- Patellar tracking
- Ligament balance (varus/valgus stress in extension and at 30 degrees flexion)
- Joint line restoration
STEP 11 - Component Fixation (Cemented vs. Cementless)
Cemented fixation:
- Most commonly used; long-term survivorship data is excellent.
- All bony surfaces are pulsatile-lavaged and dried before cement application.
- Cement is pressurized into the bone.
- All components are impacted simultaneously or sequentially.
- Excess cement is removed before polymerization.
Cementless fixation:
- Relies on press-fit and biological bone ingrowth (porous or hydroxyapatite-coated surfaces).
- Requires excellent host bone quality and intimate bone-prosthesis contact (<0.5 mm gap; gaps >0.5 mm fill with fibrous tissue).
- Adjunctive screw fixation of the tibial tray improves early stability.
- Fine autogenous bone graft can fill small surface irregularities.
STEP 12 - Wound Closure
- Release the tourniquet; pack the knee with moist sponges and apply pressure.
- Obtain hemostasis by identifying and coagulating bleeding geniculate arteries.
- Close the retinacular incision with care to approximate elevated periosteal tissues to the patellar tendon.
- Flex the knee past 90 degrees to confirm closure does not limit flexion, patella tracks normally, and no sutures are at risk of failure.
- Close subcutaneous tissue and skin with the knee in approximately 40 degrees of flexion to aid skin flap alignment.
- Suction drains are no longer routinely used (no benefit shown for infection or hematoma; drains increase transfusion rates).
Modern Technology-Assisted Approaches
| Technique | Key Feature |
|---|---|
| Computer-navigated TKA | Real-time tracking of femoral and tibial trackers; avoids intramedullary canal violation; better implant alignment in studies but modest functional outcome improvement |
| Robotic-assisted TKA | Semi-active or active robotic systems for bone preparation; improved component positioning accuracy |
| Patient-specific instrumentation (PSI) | Pre-operative CT-based cutting guides; reduces operative time in experienced hands |
Summary of Bone Cuts
| Cut | Plane | Alignment |
|---|---|---|
| Distal femur | Perpendicular to femoral mechanical axis | 5-7 degrees valgus (anatomic axis) |
| Proximal tibia | Perpendicular to tibial mechanical axis | 3-7 degrees posterior slope |
| Anterior/posterior femur | Parallel to transepicondylar axis | Determines rotational alignment |
| Chamfer cuts | Complete femoral preparation for component | Anterior and posterior chamfers |
| Patella | Parallel to articular surface | Equal resection to component thickness |
Sources:
- Campbell's Operative Orthopaedics, 15th Ed. 2026, Techniques 8.1, 8.2, 8.5, 8.9, 8.10 (Surgical Approach and Primary TKA sections)
- Miller's Review of Orthopaedics, 9th Ed., Section 14 (TKA Design and Principles)
This is a shared conversation. Sign in to Orris to start your own chat.