Explain about the indirect ophthalmoscope
Reading File
Finding Sources
Finding Sources
Finding Sources
Finding Sources
Reading File
Reading File
Reading File
Loading Image
Loading Image
Reading File
I now have comprehensive information to provide a thorough answer. Let me compile everything from Kanski's Clinical Ophthalmology.
Indirect Ophthalmoscope
What Is It?
The indirect ophthalmoscope is a fundus examination instrument that allows visualization of the retina through a condensing lens held between the examiner and the patient's eye. The most widely used form is the Binocular Indirect Ophthalmoscope (BIO) — a head-mounted device worn by the examiner. By convention, "indirect ophthalmoscopy" refers to this head-mounted technique, though the term technically also covers slit-lamp indirect ophthalmoscopy.
Optical Principle
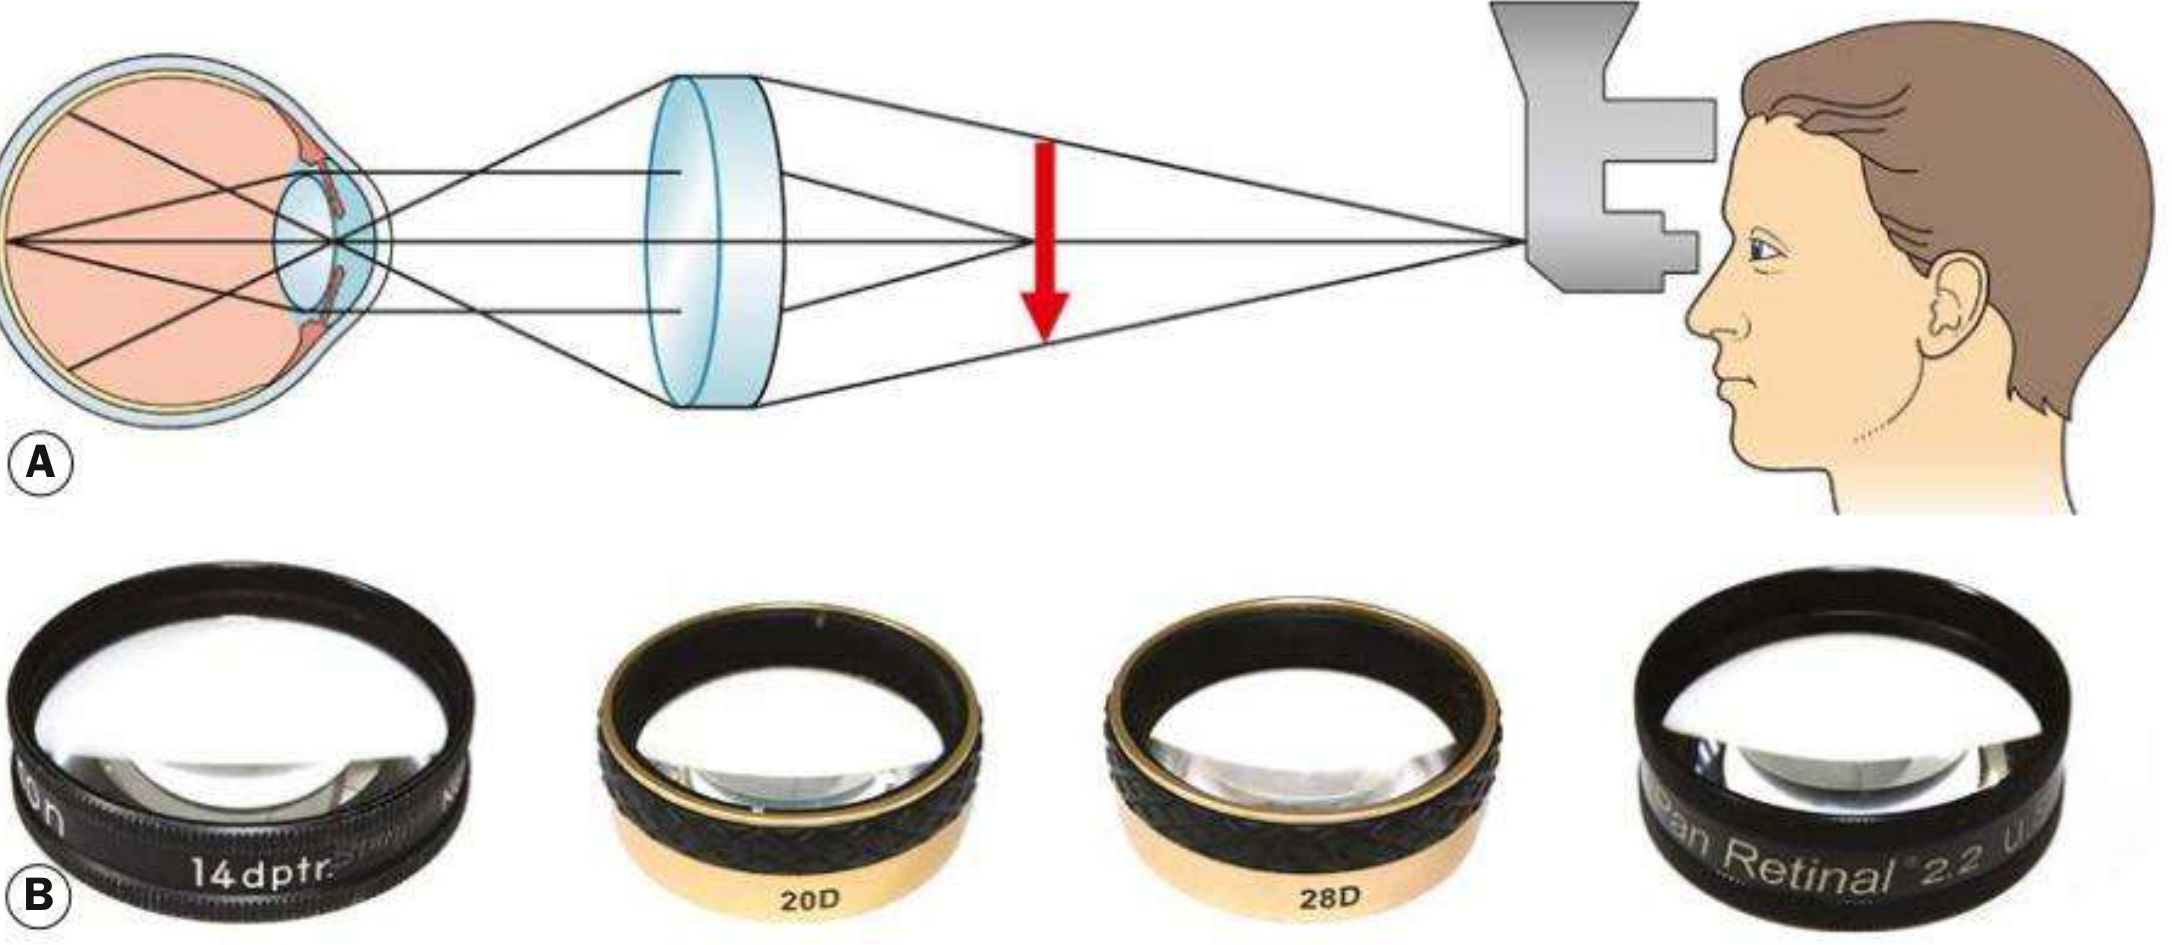
Fig. 1.38 (A) Principles of indirect ophthalmoscopy; (B) condensing lenses — 14D, 20D, 28D, and Panretinal 2.2
Light is transmitted from the headset through a condensing lens held at the focal point of the patient's eye. The rays converge between the lens and the examiner, forming a real, inverted and laterally reversed aerial image of the fundus. The examiner views this image through a stereoscopic binocular viewing system mounted on the headset.
This is the key optical distinction from the direct ophthalmoscope:
- Direct → virtual, upright, magnified (×15) image; small field of view; no stereopsis
- Indirect → real, inverted image; wide field of view; true stereopsis; greater working distance
Condensing Lenses
Magnification is calculated as 60 ÷ lens power (D):
| Lens | Magnification | Field of View | Notes |
|---|---|---|---|
| 20 D | ×3 | ~45° | Most commonly used for general fundus examination |
| 28 D | ×2.27 | 53° | Shorter working distance; useful for small pupils |
| 40 D | ×1.5 | 65° | Preferred for small children (e.g. ROP screening); also used at slit lamp for high magnification |
| Panretinal 2.2 | ~×3 | ~53° | Combines 20D magnification with 28D field; works with small pupils |
| Macula Plus 5.5 | Ultra-high | Narrow | For detailed macula and optic disc examination |
Rule: Lower power = higher magnification but narrower field. Higher power = lower magnification but wider field.
The flat surface of the lens always faces the patient. Yellow filters may be used to reduce patient discomfort from bright illumination.
The Instrument
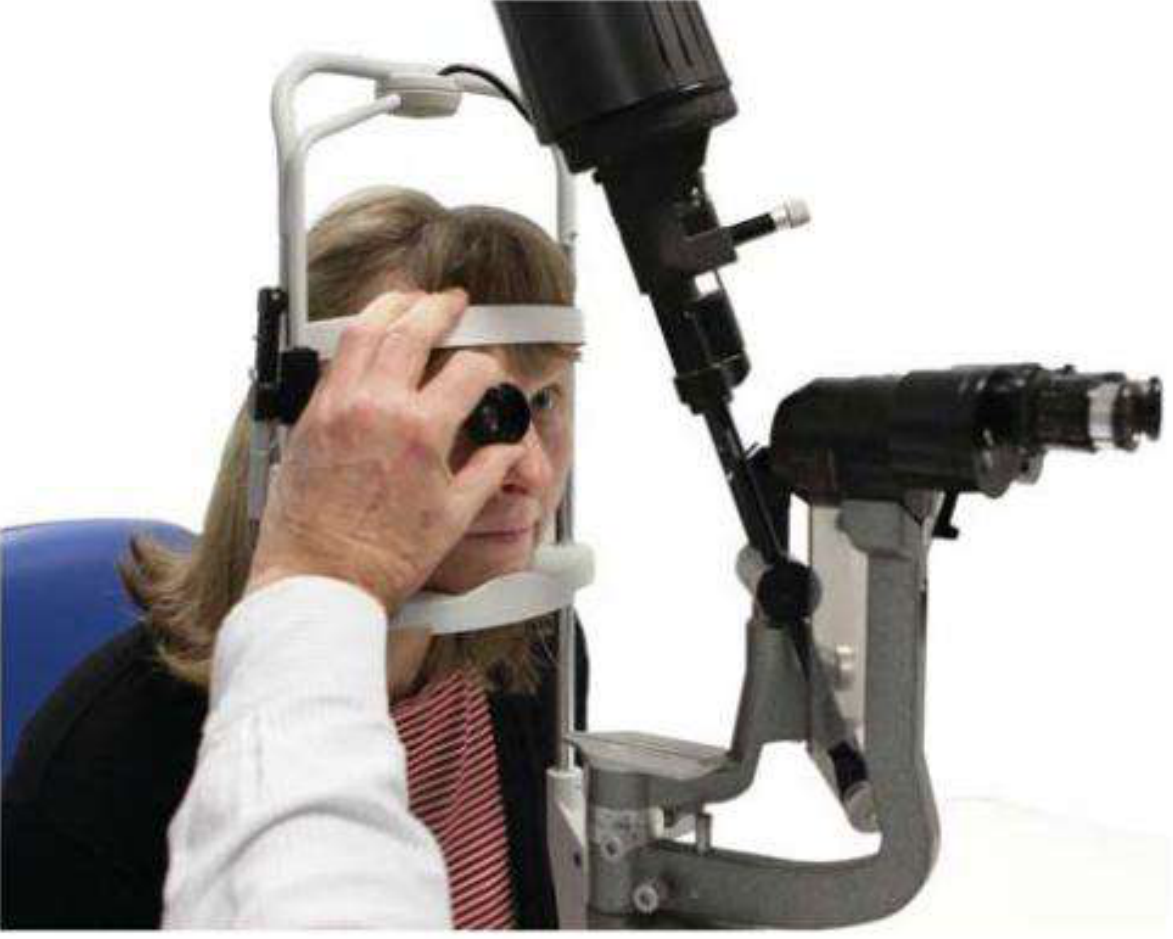
Head-mounted BIO being used during examination
The headset contains:
- A light source (bright halogen or LED)
- A stereoscopic viewing system (two eyepieces set at the examiner's interpupillary distance)
- Adjustable beam alignment so the illumination sits centrally in the viewing frame
Advantages over Direct Ophthalmoscopy
| Feature | Indirect | Direct |
|---|---|---|
| Image type | Real, inverted | Virtual, upright |
| Stereopsis | Yes (binocular) | No |
| Field of view | Wide (up to 65°) | Narrow (~5–8°) |
| Magnification | Lower (×1.5–3) | Higher (×15) |
| Pupil size needed | Smaller pupil tolerated | Larger pupil required |
| Media opacity | Works through greater opacity | More limited |
| Peripheral retina | Excellent | Poor |
| Scleral indentation | Possible | Not possible |
| Portability | Moderate | High |
BIO allows retinal visualization through a greater degree of media opacity than slit lamp biomicroscopy (e.g., denser cataracts), and can visualize retina anterior to the equator when combined with scleral indentation.
Technique
- Pupil dilation is required. Ambient illumination should be reduced to improve contrast and allow lower incident light intensity.
- The patient is positioned supine on a bed or reclining chair (not upright).
- The eyepiece interpupillary distance is adjusted, and the beam is centred in the viewing frame.
- The patient is asked to keep both eyes open throughout; eyelids are gently separated if needed.
- The condensing lens is held in one hand with the flat surface facing the patient.
- Start with the peripheral fundus — this helps the patient adapt to the bright light.
- The patient is directed to look in specific gaze positions to bring different retinal quadrants into view (e.g., look away from the examiner to examine the periphery).
- For children (e.g., ROP screening), a lid speculum and squint hook may be used to control lid and globe position.
Scleral Indentation
Scleral indentation (depression) is performed alongside BIO to:
- Visualize the retina anterior to the equator and up to the ora serrata
- Enable kinetic evaluation of retinal breaks (distinguishing flat retina from detached retina)
Technique:
- A cotton-tipped applicator or dedicated scleral depressor is applied to the outside of the eyelid (or directly to the sclera under topical anaesthesia for 3 and 9 o'clock positions)
- The indenter is advanced parallel to the globe into the anterior orbit while the patient changes gaze direction
- A "mound" of retina is created and viewed through the BIO
- The indenter must always remain tangential to the globe — perpendicular pressure causes pain and risks scleral perforation (especially in thin sclera)
Clinical Applications
- Retinal detachment — peripheral break detection, delineating extent of detachment, guiding treatment (cryotherapy, laser)
- Retinopathy of prematurity (ROP) — screening and laser treatment of peripheral zones
- Peripheral retinal degenerations — lattice degeneration, tears, holes
- Vitreoretinal disorders — vitreous opacities, traction
- Pediatric fundus examination — preferred due to wide field and ability to work through smaller pupils
- Intraoperative use — during vitreoretinal surgery
- Laser photocoagulation via BIO — delivers laser to peripheral retina (e.g., ROP treatment under general anaesthesia)
Fundus Documentation
After BIO examination, findings are recorded as a colour-coded fundus drawing:
- Detached retina → blue shading
- Flat retina → red shading
- Retinal veins → blue lines
- Retinal breaks → red with blue outline; tear flap in blue
- Lattice degeneration → blue hatching outlined in blue; thin retina = red hatching with blue outline
- Retinal pigment → black
- Exudates → yellow
- Vitreous opacities → green
Wide-field photographic imaging (e.g., Optos) can supplement or replace manual drawings when available.
Comparison: BIO vs. Slit-Lamp Indirect Ophthalmoscopy
Both are technically "indirect," but BIO (head-mounted) offers easier peripheral examination and scleral indentation capability. Slit-lamp indirect (with non-contact or contact lenses) provides higher image quality and greater magnification for posterior pole and macular assessment, but gives a narrower field and poorer peripheral access.
Source: Kanski's Clinical Ophthalmology: A Systematic Approach, 10th Edition, Chapter 1.
This is a shared conversation. Sign in to Orris to start your own chat.