
Examination of rhinoscopy and laryngeoscopy
Reading File
Now let me search the library for rhinoscopy and laryngoscopy examination content in parallel.
Finding Sources
Finding Sources
Excellent findings. Let me now read the key sections in parallel - rhinoscopy from Scott-Brown's and the best laryngoscopy sections.
Reading File
Reading File
Reading File
Good content so far. Let me read more of the rhinoscopy section and the Scott-Brown's laryngoscopy section, plus the direct laryngoscopy and posterior rhinoscopy sections.
Reading File
Reading File
Finding Sources
Let me now read more of the rhinoscopy section (for posterior/endoscopic rhinoscopy) and the Scott-Brown laryngoscopy section, plus fetch the key images.
Reading File
Reading File
Loading Image
Let me get the rest of the flexible laryngoscopy technique and the mirror laryngoscopy details.
Reading File
Reading File
I now have comprehensive content from multiple authoritative sources. Let me compile the full answer.
Examination of Rhinoscopy and Laryngoscopy
RHINOSCOPY
Rhinoscopy is the examination of the nasal cavity. It is divided into anterior rhinoscopy and nasendoscopy (posterior/endoscopic rhinoscopy).
1. Anterior Rhinoscopy
Instrument: Thudicum's speculum + headlight illumination.
Procedure:
- Ask the patient to breathe normally through the nose - note any difficulty or noise.
- Occlude each nostril with a thumb to assess unilateral patency (note: many normal subjects cannot breathe comfortably through a single nostril).
- Observe the degree of alar margin / external nasal valve collapse on normal and forced inspiration (some dynamic narrowing is normal).
- Evaluate the inferior turbinates for: congestion, mucosal thickening, and presence of exudate.
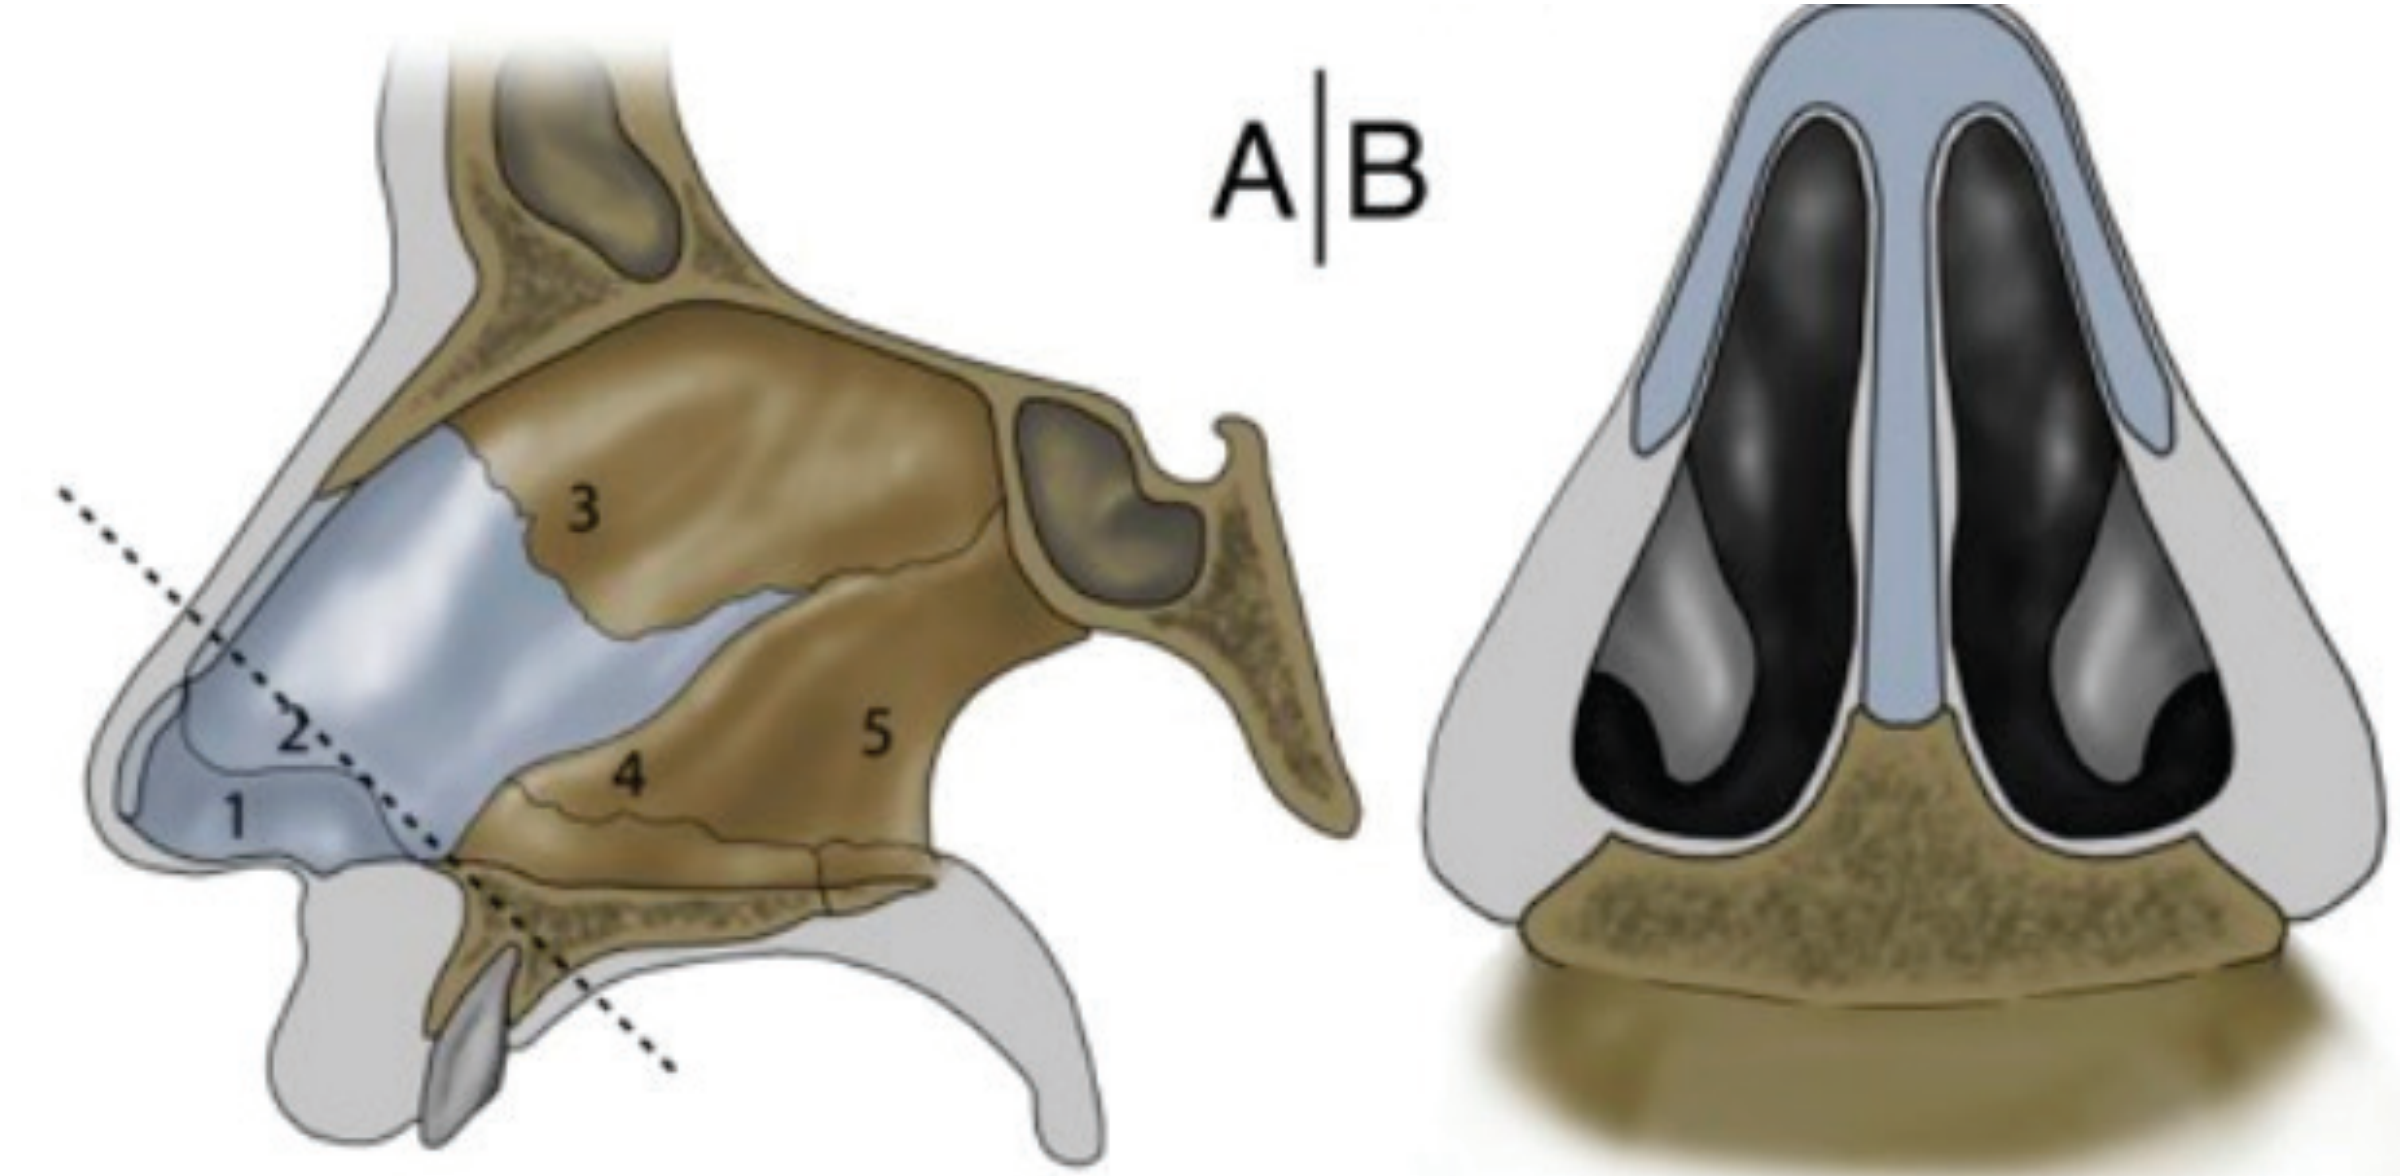
Internal Nasal Valve Assessment:
The area between the inferior turbinate head, upper lateral cartilage, and septum forms the internal nasal valve - the narrowest part of each nasal airway. Assess at rest and on inspiration for:
- Septal deformity
- Turbinate engorgement
- Static or dynamic internal valve collapse (normal valve angle > 15°; acute angle < 15° suggests static collapse)
Adjunct Tests for Nasal Patency:
- Peak nasal inspiratory flow
- Nasal vapour condensation (metal tongue depressor or Glatzel mirror)
- Nasal valve splinting tests (Breathe-Right strips, alar dilators)
- Note: Cottle's manoeuvre (lateral traction on the alar) is NOT recommended as a discriminant test - it improves all nasal airways non-specifically.
2. Nasendoscopy (Endoscopic Rhinoscopy)
Indications: All patients referred for specialist investigation of nasal or paranasal sinus disease.
Preparation: Apply decongestant (± local anaesthetic) before the procedure. Vasoconstriction effect on turbinate mucosa indicates reversibility of congestion.
Equipment: Narrow diameter (2.5-3.0 mm) angled endoscopes (30-45°) - allow visualization around corners into narrow meatuses.
Three-Pass Technique (Table 88.2):
| Pass | Route | Structures Visualized |
|---|---|---|
| 1st Pass (Front to Back) | Along nasal floor - visualizes septum and inferior turbinate | Post-nasal space: Eustachian cushion & orifice, fossa of Rosenmüller, mucopurulent post-nasal drainage. On withdrawal: inferior meatus, Hasner's valve |
| 2nd Pass (Medial to middle turbinate) | Endoscope passed medial to middle turbinate | Sphenoethmoidal recess, superior turbinate, sphenoid ostium (slit-like), olfactory cleft anteriorly. Angled endoscope recommended |
| 3rd Pass (Middle meatus) | Retract, rotate laterally, roll endoscope into middle meatus | Hiatus semilunaris (bounded by uncinate and ethmoid bulla), membranous fontanelles, accessory ostia, any mucopurulence |
Practical tip: Start examination on the side opposite to any septal deviation to build patient confidence. Severe obstruction (dramatic septal deviation, large polyps) may preclude endoscopy beyond the anterior airway.
LARYNGOSCOPY
Laryngoscopy examines the larynx to: (1) identify structural lesions (vocal nodules, papillomas, tumors), and (2) assess laryngeal mobility during phonation.
1. Indirect / Mirror Laryngoscopy
Historical method - still used where fiber-optic equipment is unavailable.
Equipment: Laryngeal mirror, headlamp, gauze.
Technique:
- Establish rapport; explain the procedure to the patient.
- Have the patient sit erect in the "sniffing position" - feet flat, leaning slightly forward.
- Warm the mirror in warm water to prevent fogging (check temperature on hand first). Alternatively, apply antifogging solution.
- Wrap the patient's tongue in gauze; grasp it with the nondominant hand (thumb and index finger). Lift the upper lip with the middle finger.
- Slide the mirror into the oropharynx with glass surface parallel to the tongue, not touching it.
- Place back of mirror against uvula and soft palate; smoothly lift until the larynx is visualized.
- Instruct the patient to say "eeeee" in a high-pitched voice - this lifts the epiglottis and allows visualization of the glottis and vocal cord movement.
- For patients with a gag reflex: apply topical pharyngeal anesthetic.
Limitations:
- Significant perceptual errors
- Difficulty reliably recording side of lesion
- Steep learning curve
- High failure rate - mandates direct endoscopy in failed cases
- Failure of indirect laryngoscopy suggests microlaryngoscopy may also be difficult
Advantages: Widely available in all ENT departments, low cost, complication-free (except gagging).
2. Flexible (Fibreoptic) Laryngoscopy
The current standard of care - has largely replaced mirror laryngoscopy.
Equipment: Nasopharyngolaryngoscope (2.2 mm for children, 4 mm preferred for adults), light source, suction.
Preparation:
- Check equipment and light source.
- Examine both nares; choose the more patent one.
- Anesthetize and vasoconstrict the chosen naris (topical LA + decongestant - e.g., cophenylcaine; cocaine 10% aerosol/4% paste now largely replaced due to cardiotoxicity and misuse concerns).
- May also anesthetize the pharynx to minimize gagging.
- Warm the scope tip in warm water to prevent fogging.
- Patient seated in the "sniffing position" with head against headrest.
Technique (Scott-Brown's):
- Pass the endoscope through the anterior nares, along the floor of the nose under the inferior turbinate.
- If airway is narrowed, pass between the middle and inferior turbinate, or use the opposite nostril.
- Once in the postnasal space, ask the patient to inspire through the nose - this opens the postnasal sphincter and allows passage into the oropharynx.
- Perform a stepwise assessment:
- Vallecula (inspect by asking patient to protrude tongue)
- Supraglottic larynx
- Glottic larynx (vocal cords, arytenoids)
- Assess anatomy and function during both respiration and phonation.
- Accurately record the correct side of any lesion (errors are common).
If scope will not pass nasally: Pass through the oropharynx using a plastic bite block or modified 10-mL syringe as a guide to prevent scope biting.
Extended applications:
- Flexible endoscopic evaluation of swallowing (FEES) ± sensory testing
- Videoendoscopy of hypopharynx and cervical oesophagus
- Biopsy and foreign body removal (scopes with biopsy channel)
- Paediatric adenoid assessment
- Neonatal upper airway assessment
3. Rigid Laryngoscopy
Equipment: Hopkins rod system using 70° or 90° angled lenses, transoral approach.
Applications:
- Favored in the "voice clinic" due to wider lens producing much higher optical resolution.
- Can be combined with stroboscopy (assessment of mucosal wave), laryngography, and digital acoustic voice analysis.
- Provides unparalleled information on vocal fold movement and structure.
- Also serves as an important educational tool for patients.
Limitations: Requires significant patient cooperation; generally only feasible in children over 6 years.
4. Direct (Rigid) Laryngoscopy (for Intubation/Airway)
Equipment: Macintosh blade (curved) or Miller blade (straight).
Technique:
- Position patient in the sniffing position (occiput elevated, neck flexed, head extended).
- Elevate bed so patient's head is at the level of the clinician's lower sternum.
- Hold laryngoscope in the left hand; open mouth with right hand.
- Introduce blade into the right side of the mouth; push tongue to the left.
- Progressively identify: base of tongue → epiglottis → posterior cartilages.
- Macintosh blade: tip placed in the vallecula
- Miller blade: tip placed under the epiglottis
- Lift in the direction of the handle (do not use as a lever).
- Manipulate the thyroid cartilage externally for optimal laryngeal exposure.
- Visualize vocal cords and arytenoid cartilages; do not take eyes off cords.
- Pass endotracheal tube 3-4 cm beyond the vocal cords under direct visualization.
- Confirm placement: end-tidal CO₂, auscultation, chest radiograph.
Summary Comparison
| Feature | Anterior Rhinoscopy | Nasendoscopy | Mirror Laryngoscopy | Flexible Laryngoscopy | Rigid Laryngoscopy |
|---|---|---|---|---|---|
| Access | Anterior nose | Full nasal cavity | Oral, indirect | Transnasal | Oral (direct) |
| Equipment | Thudicum's speculum | 2.5-3 mm endoscope | Laryngeal mirror + headlamp | Flexible 2.2-4 mm scope | Hopkins rod 70°/90° |
| Anesthesia | None | Topical decongestant ± LA | None/topical | Topical nasal LA | Topical/general |
| Main use | Septum, turbinate, patency | Meati, sinuses, postnasal space | Larynx structure & movement | Larynx, hypopharynx, swallowing | Voice clinic, detailed cord assessment |
| Limitations | Only anterior nose | Operator skill | High failure rate, gag | Less optical resolution than rigid | Requires cooperation |
Sources:
- Scott-Brown's Otorhinolaryngology Head & Neck Surgery Vol 1, Chapter 88 (Rhinoscopy, Nasendoscopy)
- Scott-Brown's Otorhinolaryngology Head & Neck Surgery (Laryngoscopy, Flexible technique)
- Roberts and Hedges' Clinical Procedures in Emergency Medicine (Direct, Flexible & Mirror Laryngoscopy)
- Scott-Brown's Vol 2 (Paediatric Laryngoscopy)
This is a shared conversation. Sign in to Orris to start your own chat.