
Ecg position with image
Reading File
ECG position & location with image
ECG electrode placement involves specific anatomical positions for both limb leads and precordial (chest) leads. Let me pull detailed textbook content and images for you.
Searching sources...
Finding Sources
Searching the Web
ECG electrode lead placement positions anatomical landmarks diagram
Finding Sources
Loading Image
Loading Image
Loading Image
Finding Sources
Reading File
Loading Image
Reading File
Loading Image
Here is a complete guide to ECG electrode positions and locations, with images from authoritative sources:
12-Lead ECG: Electrode Positions & Locations
A standard 12-lead ECG uses 10 electrodes total - 4 limb electrodes and 6 precordial (chest) electrodes - to generate 12 electrical "views" of the heart.
PART 1: Limb Leads (4 electrodes)
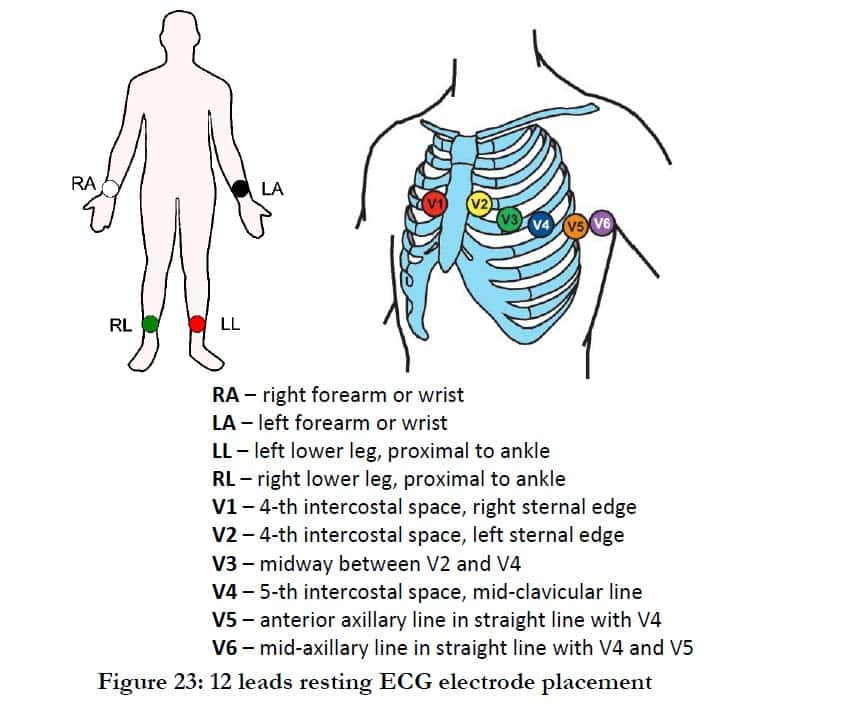
| Electrode | Position |
|---|---|
| RA (Right Arm) | Right forearm / wrist |
| LA (Left Arm) | Left forearm / wrist |
| RL (Right Leg) | Right lower leg, proximal to ankle (ground electrode) |
| LL (Left Leg) | Left lower leg, proximal to ankle |
These 4 electrodes generate 6 frontal plane leads: I, II, III, aVR, aVL, aVF.
Note: Electrodes may be moved more proximally (e.g., upper arm/thigh) if needed due to amputation or injury, with a notation on the ECG. The Mason-Likar configuration moves limb leads to the torso for ambulatory monitoring.
PART 2: Precordial Leads (V1-V6) - Chest Electrodes
Anatomical Landmarks Diagram
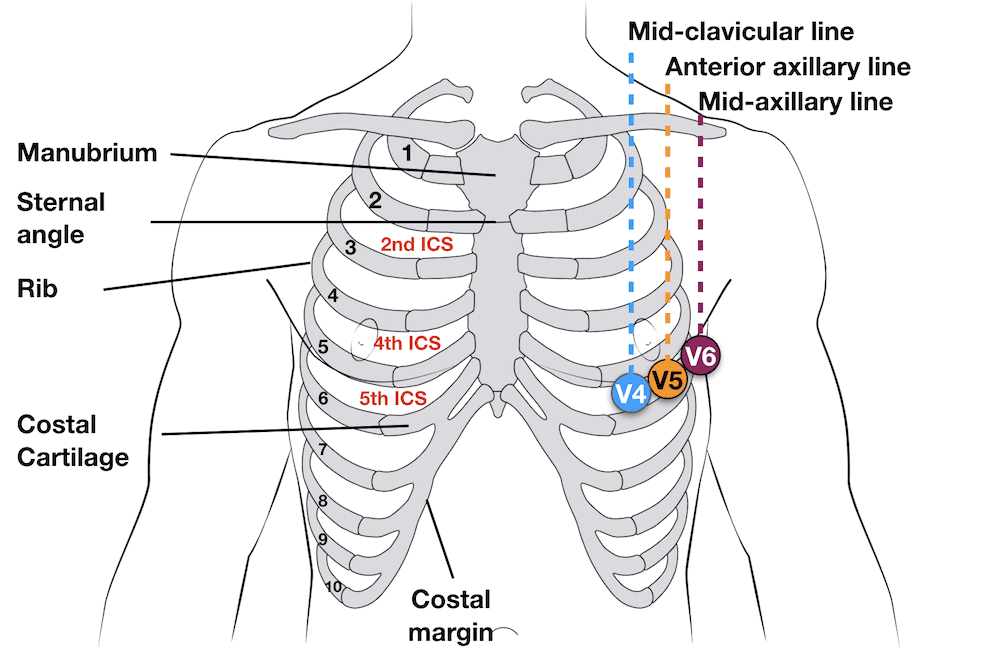
Precordial Lead Positions
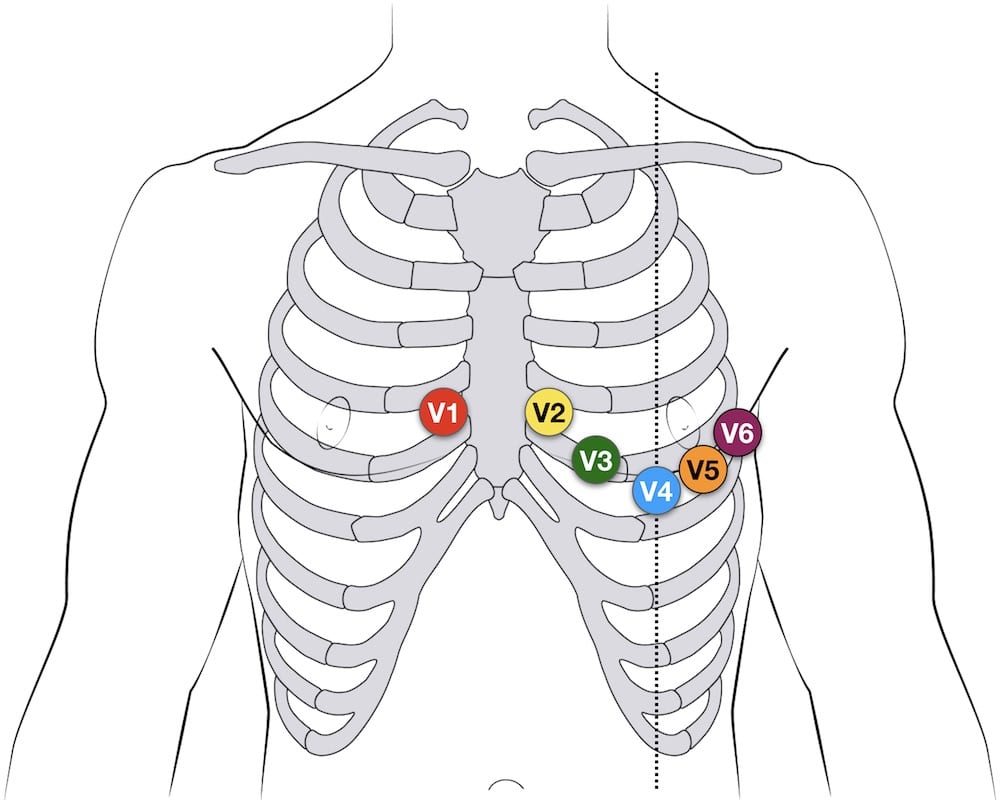
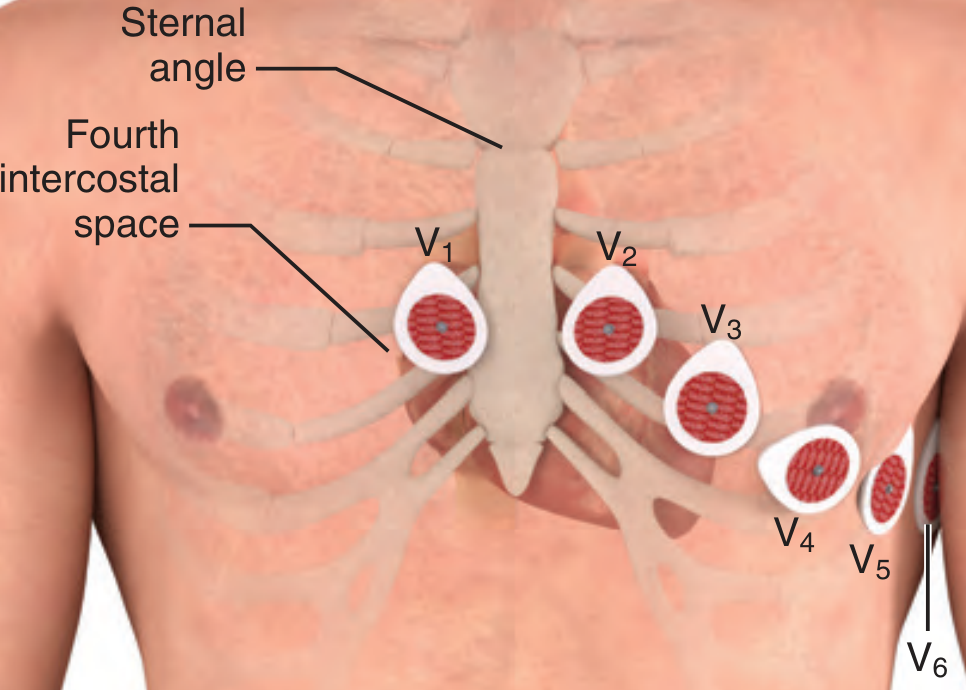
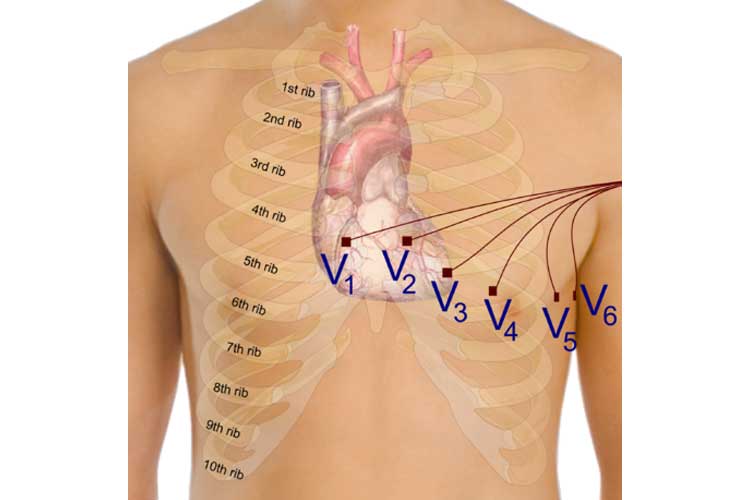
| Lead | Exact Position | What It "Looks At" |
|---|---|---|
| V1 | 4th intercostal space (ICS), right sternal border | Septal / RV |
| V2 | 4th ICS, left sternal border | Septal / RV |
| V3 | Midway between V2 and V4 (diagonal) | Anterior wall |
| V4 | 5th ICS, midclavicular line | Anterior / Apex |
| V5 | Anterior axillary line, same horizontal level as V4 | Lateral wall |
| V6 | Midaxillary line, same horizontal level as V4 & V5 | Lateral wall |
Key: V4, V5, and V6 must all be on the same horizontal level - not following the curve of the ribs, which would displace V5 and V6 superiorly.
PART 3: How to Find the 4th Intercostal Space
- Palpate the sternal notch (top of the sternum) - move fingers downward
- Find the sternal angle (Angle of Louis) - the transverse bony ridge ~5 cm below the sternal notch, where the manubrium meets the sternal body
- Immediately lateral and inferior to the sternal angle = 2nd intercostal space
- Count down two more spaces = 4th intercostal space (where V1 and V2 go)
- For V4: from the 4th ICS on the left, move diagonally down-out to the 5th ICS at the midclavicular line
PART 4: What Each Region of Leads Represents
| Region | Leads | Coronary Artery Territory |
|---|---|---|
| Inferior | II, III, aVF | Right coronary artery (RCA) |
| Lateral | I, aVL, V5, V6 | Left circumflex artery (LCx) |
| Anterior | V1-V4 | Left anterior descending (LAD) |
| Septal | V1, V2 | LAD (septal branches) |
| Right Ventricular | V1, (V3R, V4R) | RCA |
PART 5: Special Lead Placements
- Right-sided ECG (V3R-V6R): Mirror image placements on the right chest - used to detect right ventricular MI
- Posterior leads (V7-V9): Placed at posterior axillary line, tip of scapula, and paravertebral line at the same horizontal level as V4-V6 - used to detect posterior MI
- Pediatric: Standard V1-V6 plus V3R and V4R (right-sided leads) are routinely added
Source: Roberts and Hedges' Clinical Procedures in Emergency Medicine - Electrode Placement; LITFL ECG Lead Positioning
This is a shared conversation. Sign in to Orris to start your own chat.