
Baker cyst
A Baker cyst (popliteal cyst) is a fluid-filled swelling in the popliteal fossa, typically arising from distension of the gastrocnemius-semimembranosus bursa. It's most often secondary to intra-articular pathology (meniscal tears, osteoarthritis, rheumatoid arthritis) that increases synovial fluid production. Clinically it presents as a posterior knee mass, sometimes painless, sometimes causing tightness or pain on extension. Rupture mimics deep vein thrombosis ("pseudothrombophlebitis syndrome").
Searching sources...
Reading File
Finding Sources
Finding Sources
Searching PubMed
"Baker cyst" OR "popliteal cyst"
Good sources found. Let me read all the key sections in parallel.
Reading File
Reading File
Reading File
Reading File
Now let me get the treatment details from Campbell's and fetch the key images.
Reading File
Loading Image
Loading Image
Excellent - I now have comprehensive information from multiple authoritative sources. Here is the full synthesis:
Baker Cyst (Popliteal Cyst)
Definition and Anatomy
A Baker cyst is a fluid-filled swelling in the popliteal fossa formed by distension of the gastrocnemius-semimembranosus bursa. Specifically, it arises from the fusion of the semimembranosus bursa with the subtendinous bursa deep to the medial head of the gastrocnemius, lying in the medial popliteal fossa at the level of the medial posterior femoral condyle.
The cyst was described by Adams in 1840 but named after Baker, who described it in 1877. It can form by one of two mechanisms:
- Herniation of the synovial membrane through the posterior joint capsule
- Escape of fluid via normal communication between the gastrocnemius-semimembranosus bursa and the knee joint (a ball-valve mechanism through a capsular fold)
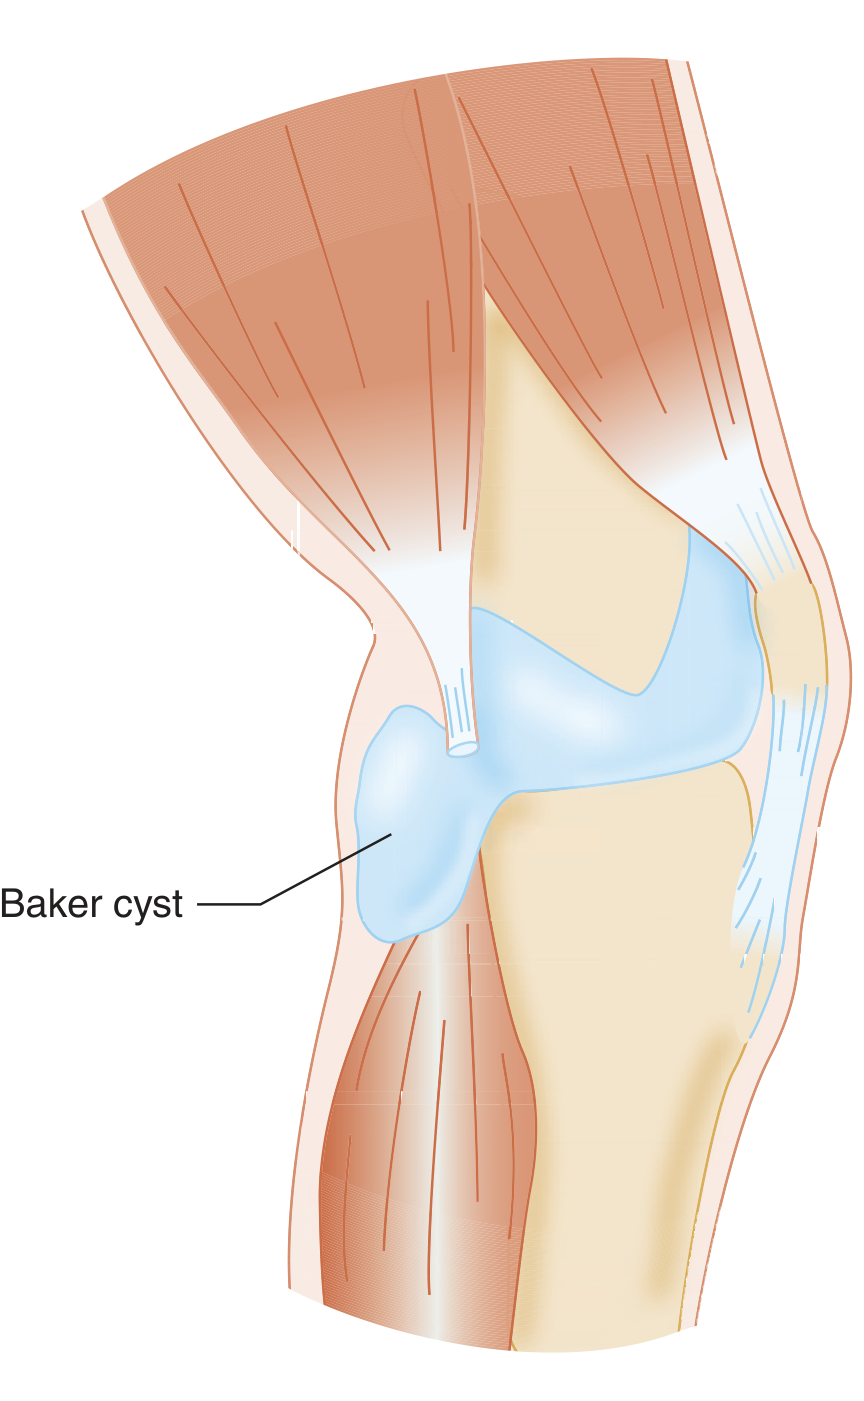
Anatomical illustration showing the Baker cyst communicating with the knee joint via the posterior capsule (Tintinalli's Emergency Medicine)
Pathophysiology
Increased intra-articular pressure from any cause drives synovial fluid through the valvular capsular communication into the bursa, where it accumulates. Common underlying intra-articular pathologies include:
- Osteoarthritis (most common in adults)
- Degenerative tear of the posterior horn of the medial meniscus (very common association)
- Rheumatoid arthritis (may produce giant synovial cysts extending down the calf)
- Patellofemoral chondromalacia
- Any cause of knee effusion
In children, the cyst rarely communicates with the joint, and intra-articular pathology is uncommon - most resolve spontaneously.
Clinical Features
- Posterior knee mass - palpable in the posteromedial corner of the knee
- Pressure, pain, and limitation of range of motion (particularly extension)
- Many go unnoticed until they rupture
Rupture leads to escape of fluid into the calf, producing:
- Unilateral lower extremity edema
- Calf pain and swelling mimicking DVT ("pseudothrombophlebitis syndrome")
- Rarely, acute compartment syndrome
Patients on anticoagulants can bleed into popliteal cysts, leading to dissection into the calf. Concurrent popliteal vein thrombosis can occur.
Differential Diagnosis
| Condition | Distinguishing Feature |
|---|---|
| DVT | Doppler ultrasound; may coexist |
| Lipoma | Solid on ultrasound, no communication with joint |
| Vascular tumor / aneurysm | Pulsatile, Doppler flow |
| Fibrosarcoma | Solid, irregular margins |
| Popliteal artery aneurysm | Pulsatile mass |
| Pyogenic abscess | Fever, tenderness, septic signs |
Diagnostics
Ultrasound is the first-line modality in the ED - readily available, confirms the cystic nature, rules out DVT, and can be used for aspiration guidance. On ultrasound, the cyst appears as an anechoic or hypoechoic structure in the popliteal fossa:
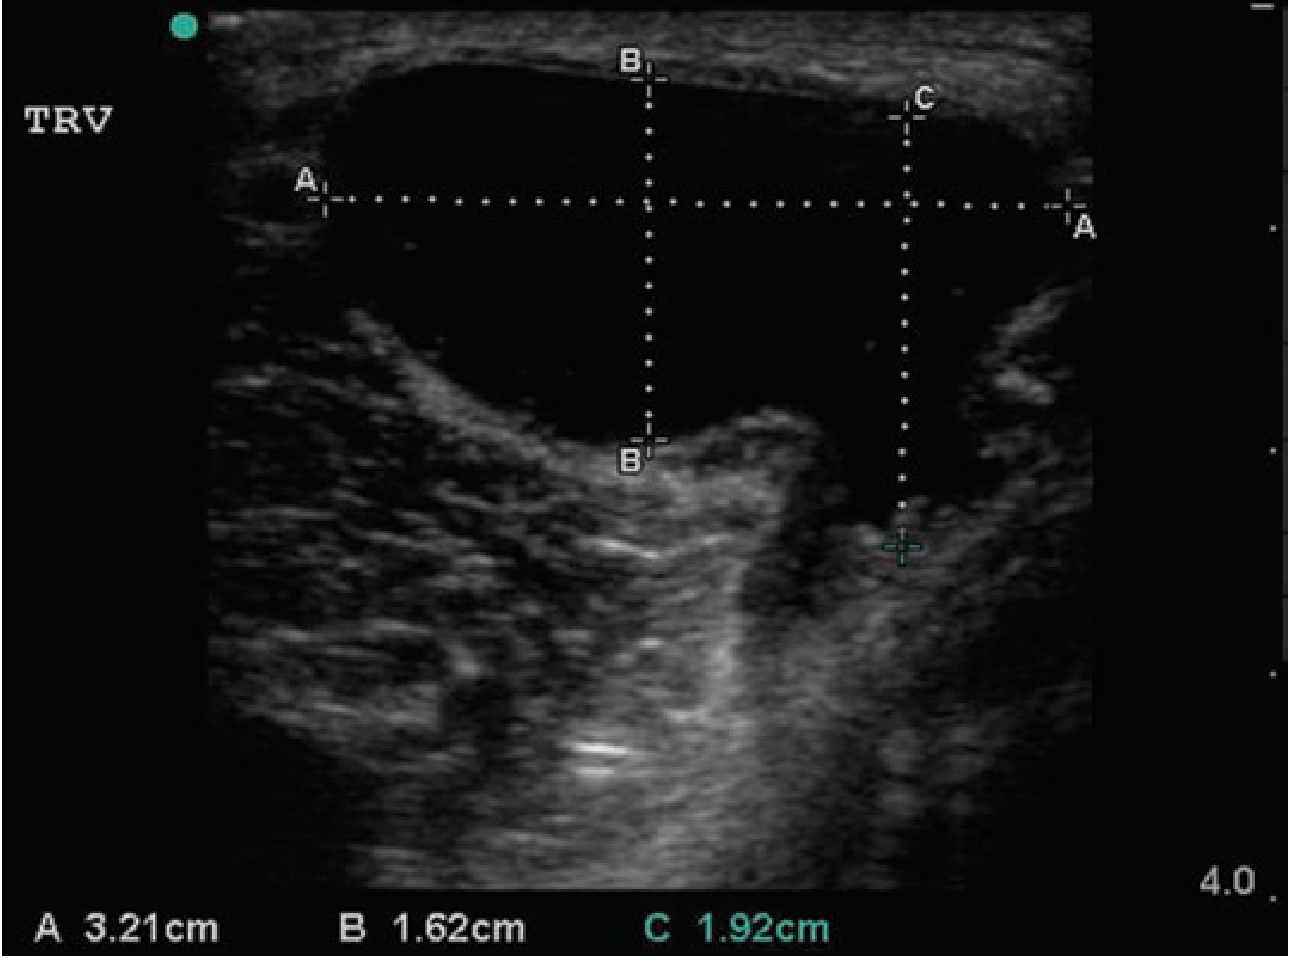
Transverse ultrasound of a Baker cyst (3.21 x 1.62 cm) (Tintinalli's Emergency Medicine)
MRI is the preferred modality for complete evaluation because it also delineates intra-articular pathology (e.g., meniscal tears, cartilage lesions) - important for surgical planning. On T2-weighted MRI, the cyst appears as a bright area of high signal intensity communicating with the joint space.
- Baker cyst is a diagnosis of exclusion in the ED setting
- Venous duplex to exclude DVT if clinically suspected
- The cyst can sometimes be transilluminated clinically
Treatment
Conservative (first-line)
- Relative rest, compression, NSAIDs
- Treat the underlying intra-articular pathology
- US-guided aspiration can be performed outpatient if diagnosis is certain (not recommended in the ED)
- Intra-articular corticosteroid injection (e.g., triamcinolone 40 mg) reduces cyst size by decreasing synovial fluid production
- In children: benign neglect - the majority resolve spontaneously
Surgical (when conservative fails)
The most important principle: treat the underlying cause, not just the cyst.
- Arthroscopic treatment of intra-articular pathology - most common approach in adults (partial meniscectomy, debridement of cartilage fragments)
- Arthroscopic cystectomy - resection of the cyst wall, enlarging the cyst-joint communication, and removal of the capsular fold (valvular mechanism) via posteromedial portals. This produces the best results; recurrence <2% when combined with posterior capsule repair.
- Open excision (Henderson posteromedial incision) - for cysts that do not communicate with the joint, or when arthroscopic access is insufficient. A 40% recurrence rate is reported with open cystectomy alone.
In rheumatoid arthritis patients: synovectomy should accompany cyst removal to prevent recurrence.
Recent evidence (2024): A systematic review and meta-analysis (PMID 38700675) comparing cyst wall preservation vs. cyst wall resection during arthroscopic decompression found that neither approach was clearly superior - both methods are acceptable during arthroscopic popliteal cyst surgery (Arch Orthop Trauma Surg, 2024).
Key Clinical Pearls
- Always exclude DVT when a Baker cyst ruptures - they can coexist
- In adults, always look for and address the underlying intra-articular pathology; the cyst will recur without this
- In children, conservative management is almost always sufficient
- Giant synovial cysts extending into the calf = think rheumatoid arthritis
- Loose bodies can travel between the knee joint and the cyst intermittently
Sources: Rosen's Emergency Medicine (9th ed.), Campbell's Operative Orthopaedics (15th ed., 2026), Tintinalli's Emergency Medicine, THIEME Atlas of Anatomy - General Anatomy and Musculoskeletal System
Total knee replacement steps
Total knee replacement (TKR) involves a sequential series of steps: exposure via medial parapatellar arthrotomy, bone cuts (distal femur, proximal tibia, patella), trial reduction, cementing of components, and closure. The goal is to resurface the tibiofemoral and patellofemoral joints with metal and polyethylene implants while restoring mechanical alignment.
Searching sources...
Reading File
Finding Sources
Searching PubMed
"total knee arthroplasty" AND technique
Finding Sources
Finding Sources
Good - Campbell's and Miller's are the key surgical sources. Let me pull the operative technique sections.
Finding Sources
Reading File
That block appears to be references. Let me search the TOC more specifically for the operative technique section in Campbell's block 4/5, and also read Miller's TKA section.
Finding Sources
Reading File
Finding Sources
Finding Sources
Now I can see the key sections. Let me read the TKA content from Campbell's block 4 (around the KNEE REPLACEMENT SYSTEMS section) and Miller's TKA section.
Reading File
Reading File
Reading File
Reading File
Excellent content from Miller's. Now let me get the full operative steps and ligament balancing sections.
Reading File
Finding Sources
Schwartz's has a surgical approach section. Let me read that alongside more of Miller's detailed steps.
Reading File
Reading File
Now let me get the femoral component cuts section and the cementing/closure steps.
Reading File
Finding Sources
Now let me get the femoral sizing/rotation cuts and the implantation/cementing steps from Miller's.
Reading File
I now have thorough content from multiple authoritative sources. Let me also fetch the key alignment diagram image for the response.
Loading Image
I now have comprehensive material from Campbell's Operative Orthopaedics (2026), Miller's Review of Orthopaedics (9th ed.), and Schwartz's Principles of Surgery. Here is the full synthesis:
Total Knee Arthroplasty (TKA) - Operative Steps
Preoperative Planning
Before the patient enters the OR:
- Templating on full-length standing radiographs - measure the anatomic axis of the femur (AAF), mechanical axis of the femur (MAF), and the valgus cut angle (the angle between AAF and MAF, typically 5-7 degrees)
- Confirm no active infection anywhere in the body
- Hold biologic DMARDs at the appropriate dosing interval before surgery (e.g., adalimumab: hold until week 3; infliximab: hold until week 5, 7, or 9 depending on dosing)
- Avoid intra-articular corticosteroid injection within 2 weeks of surgery (injection within 2 weeks is the interval statistically associated with postoperative infection)
- Optimize nutrition: confirm normal albumin and prealbumin
Step 1 - Patient Positioning and Setup
- Supine position on the operating table
- Tourniquet applied to the proximal thigh (used by most surgeons, though some perform TKA without tourniquet)
- Leg holder or foot roll to maintain knee in desired flexion (typically 90 degrees for exposure)
- Prep and drape the entire limb
Step 2 - Skin Incision
- Straight midline longitudinal skin incision, approximately 15-20 cm centered over the knee
- Skin incision extends roughly 5 cm proximal to the patella to the medial aspect of the tibial tubercle distally
- Medially based full-thickness skin flaps are raised
Step 3 - Arthrotomy (Medial Parapatellar Approach)
The standard approach is the medial parapatellar arthrotomy:
- Incise the capsule medial to the patella, extending proximally along the most medial aspect of the quadriceps tendon
- The incision extends distally just medial to the patellar tendon, to the anteromedial tibial metaphysis
- This gives access to all three compartments of the knee after patellar eversion or lateral subluxation
- The patella is everted (or laterally subluxed) to expose the distal femur, proximal tibia, and patellofemoral joint
- Alternative approaches: midvastus (splits the VMO), subvastus (below VMO), or lateral parapatellar (for fixed valgus deformity)
Step 4 - Initial Exposure and Preparation
- Divide the anterior cruciate ligament (ACL) if present
- In cruciate-retaining (CR) designs, preserve the PCL; in posterior-stabilized (PS) designs, excise it
- Remove medial and lateral menisci
- Remove prominent osteophytes from the margins of the femur, tibia, and patella to allow correct soft tissue tensioning and component seating
- Release the anterior fat pad as needed for exposure
Step 5 - Alignment and Bone Cuts
This is the core technical phase. The goal is to restore neutral mechanical limb alignment (Mikulicz line from hip center through knee center to ankle center).
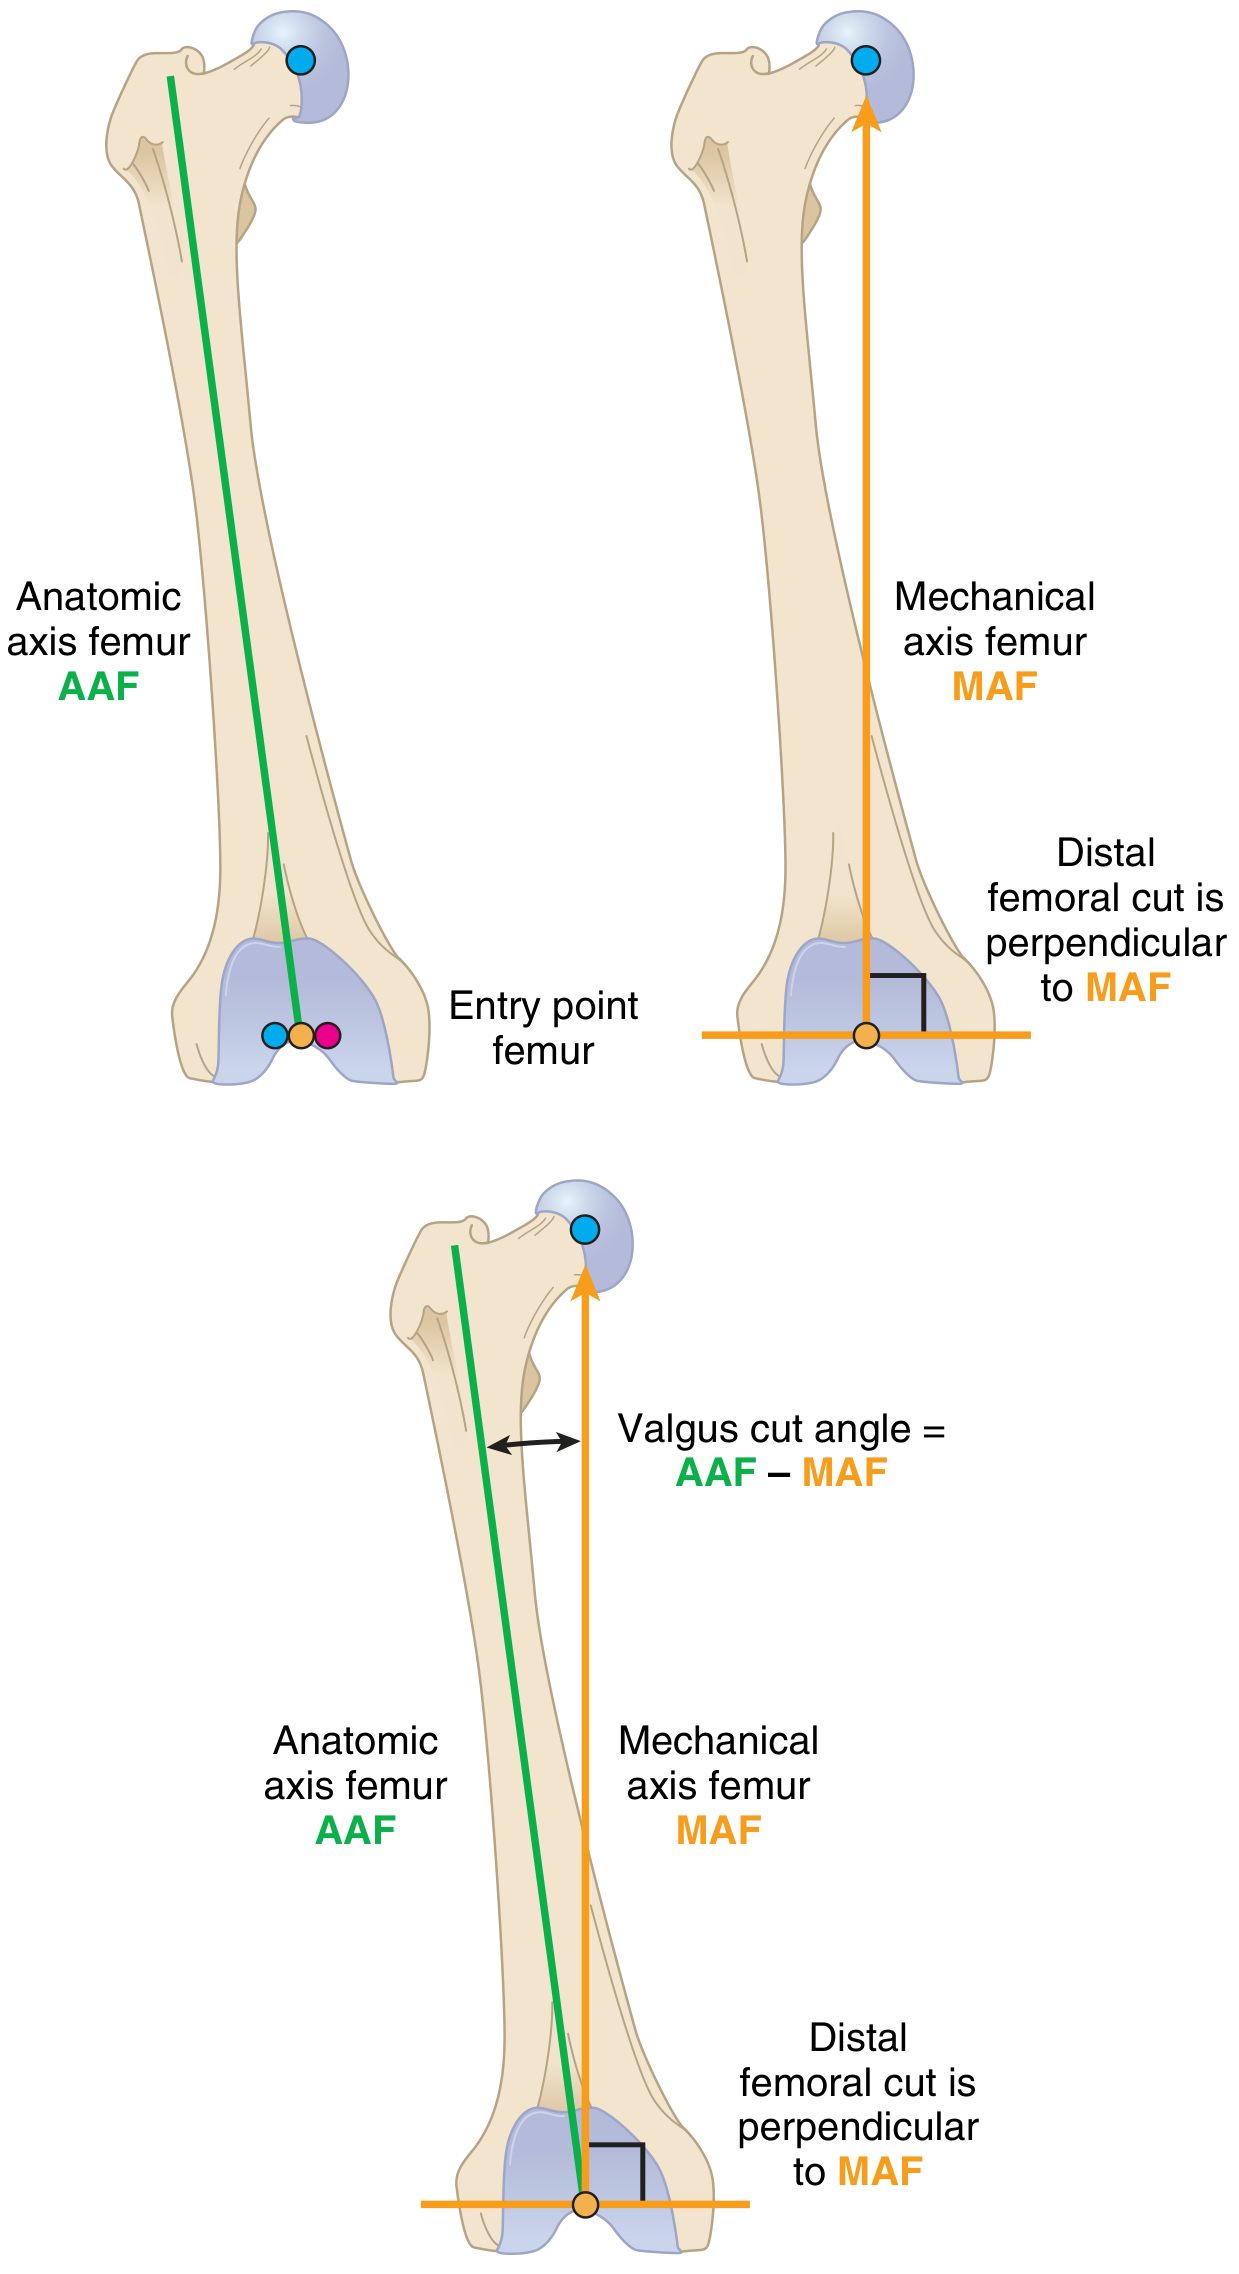
Femoral axis planning - the distal femoral cut is perpendicular to the MAF, not the AAF (Miller's Review of Orthopaedics, 9th ed.)
A. Distal Femoral Cut
- An intramedullary (IM) guide rod is inserted into the femoral canal through a drill hole ~1 cm anterior to the PCL footprint on the intercondylar notch
- The cutting jig is set to the preoperatively calculated valgus cut angle (typically 5-7 degrees from the AAF), so the distal femoral cut is perpendicular to the MAF
- ~9-10 mm of distal femur is resected (matched to the prosthesis thickness)
- The distal femoral cut controls the extension gap
B. Proximal Tibial Cut
- An intramedullary or extramedullary guide is used to set the cutting jig perpendicular to the mechanical axis of the tibia (MAT)
- Usually a 0-degree tibial cut angle (AAT and MAT are coincident in most patients)
- A slight posterior slope (3-7 degrees) is often incorporated depending on the implant design and surgeon preference (for CR designs, posterior slope helps with PCL tension)
- ~8-10 mm of tibia is resected from the less-involved compartment
- The proximal tibial cut controls both the extension and flexion gaps
C. Femoral Sizing and Four-in-One Cut Block (Femoral Box Cut)
- After distal femoral and proximal tibial cuts, the femoral component size is measured using a sizing guide
- Femoral rotation is referenced to:
- The transepicondylar axis (TEA) - most reliable
- The Whiteside line (AP axis - anterior trochlear groove to the center of the intercondylar notch)
- The posterior condylar axis (typically 3 degrees of external rotation relative to the posterior condylar line, to create a rectangular flexion gap)
- The 4-in-1 cutting block is applied and makes 4 cuts simultaneously:
- Anterior femoral cut
- Anterior chamfer cut
- Posterior femoral cut (controls the flexion gap)
- Posterior chamfer cut
- The intercondylar notch is then prepared for PS designs (box cut for the cam-post mechanism)
Step 6 - Ligament Balancing
Balancing ensures equal tension in medial and lateral compartments in both extension and flexion.
Key principle: Release the tight (concave) side; the loose (convex) side tensions up once the implant fills the space.
| Deformity | Release Sequence |
|---|---|
| Varus | Medial capsule complex → superficial MCL (posterior oblique for extension, anterior for flexion) → pes anserinus if needed |
| Valgus | Lateral capsule → iliotibial band (off Gerdy tubercle or pie-crust) → popliteus (off lateral epicondyle, for lateral flexion tightness) → LCL (last resort) |
Gap balancing:
- Extension gap is controlled by: distal femoral cut + tibial cut + posterior capsule release
- Flexion gap is controlled by: posterior femoral cut + tibial cut + PCL tension/recession
- Goal: equal rectangular gaps in both flexion and extension
- Rule: 2 mm extra proximal tibial cut = ~10-degree correction of a flexion contracture
Step 7 - Patellar Resurfacing
- The posterior patellar surface is measured and a cutting guide applied
- Sufficient bone is resected to allow implantation of the polyethylene patellar button while maintaining an adequate "stuffed" thickness (patellar bone + implant ≤ original patellar thickness)
- Electrocautery is applied around the patellar rim (lateral retinacular release if patellar tracking is lateral)
- The "no-thumb test": the patella should track centrally in the femoral groove without the surgeon pressing on the lateral retinaculum
- Some surgeons selectively resurface or leave the patella unresurfaced (both approaches have equivalent long-term outcomes in many studies)
Step 8 - Trial Reduction
- Trial components are placed: femoral trial, tibial tray trial, polyethylene insert trial, and patellar trial
- Assess:
- Range of motion (target: full extension and ≥ 110 degrees flexion)
- Stability - varus/valgus stress in extension and flexion, AP drawer
- Patellar tracking - no-thumb test
- Gap balance - symmetric flexion and extension gaps
- Limb alignment - check neutral mechanical alignment
- Adjust bone cuts, ligament releases, or component size as needed before final implantation
Step 9 - Final Component Implantation (Cemented Technique)
Most primary TKAs in contemporary practice are cemented:
- Thorough irrigation of all bone surfaces with pulsatile lavage to remove bone debris and fat
- Dry the bone surfaces with suction and gauze (cement bonds better to dry bone)
- Mix polymethylmethacrylate (PMMA) cement to a doughy consistency
- Tibial component first: press cement into the tibial cancellous bone, seat the tibial tray, remove excess cement while holding in position
- Femoral component: apply cement to the femoral cuts or to the back of the femoral component, impact into position, remove excess cement
- Patellar component: cement into prepared patellar surface
- Knee is brought into extension and held while cement polymerizes (typically 7-10 minutes)
- Remove all excess cement from the posterior recesses (retained cement fragments are a cause of early polyethylene wear)
- Insert the final polyethylene tibial insert
Step 10 - Closure
- Copious irrigation of the joint
- Place intra-articular drain (optional - practice varies)
- Close the arthrotomy/capsule with heavy interrupted absorbable sutures, with the knee at approximately 45-60 degrees of flexion to assess tension
- Subcutaneous layer closure
- Skin closure (staples or sutures)
- Hemostasis and wound compression dressing
Key Implant Design Choices
| Feature | Cruciate Retaining (CR) | Posterior Stabilized (PS) |
|---|---|---|
| PCL | Preserved | Sacrificed |
| Tibial insert | Dished, conforming | Cam-post mechanism |
| Flexion kinematics | PCL-driven femoral rollback | Cam-post driven rollback |
| Bone cut difference | Slightly less bone | Requires intercondylar box cut |
| Clinical results | Equivalent long-term outcomes | Equivalent long-term outcomes |
Alignment Philosophies
- Mechanical alignment (most common): neutral Mikulicz line; distal femoral cut perpendicular to MAF; proximal tibial cut perpendicular to MAT; requires ligament balancing
- Kinematic alignment: maintains native limb alignment; respects native ligament geometry; bone cuts match native mLDFA and mPTA; no ligament balancing required
Modern Adjuncts
- Computer navigation: provides real-time intraoperative feedback on component position and alignment; reduces outliers but has not definitively improved clinical outcomes
- Robotic-assisted TKA: associated with improved early functional recovery and reduced hospital stay vs. conventional jig-based TKA; no proven long-term survivorship advantage yet (PMID 39052153)
- Patient-specific instrumentation (PSI): custom cutting guides based on preoperative CT/MRI
Sources: Campbell's Operative Orthopaedics 15th ed. (2026); Miller's Review of Orthopaedics 9th ed.; Schwartz's Principles of Surgery 11th ed.
This is a shared conversation. Sign in to Orris to start your own chat.