
Teach me Types of episiotomy and episiotomy sutures
Reading File
Now let me search the medical library and images in parallel.
Finding Sources
Searching Images
types of episiotomy median mediolateral diagram
Searching Images
episiotomy suture repair technique
Good - found multiple sources. Let me read the most comprehensive ones in parallel.
Reading File
Reading File
Reading File
Excellent - rich content found. Let me fetch the diagram and read the rest of the repair section:
Loading Image
Reading File
Reading File
Let me fetch the suture repair diagram and also get the Thieme Atlas content on episiotomy technique:
Loading Image
Loading Image
Reading File
Excellent - I now have comprehensive, high-quality information from multiple authoritative textbooks along with excellent diagrams. Let me compile the full teaching answer.
Episiotomy: Types and Suture Repair
What is an Episiotomy?
An episiotomy is a surgical incision in the perineum made to enlarge the vaginal introitus during delivery. It is one of the most common obstetric procedures performed. Routine use is no longer recommended - it is now reserved for selected indications such as:
- Fetal distress requiring expedited delivery
- Breech delivery
- Shoulder dystocia
- Occiput-posterior presentation
- Imminent severe perineal tear
Textbook of Family Medicine 9e, p. 514
Timing
- Early episiotomy: Made before the head crowns (head is visible with contractions but recedes between them)
- Timely episiotomy: Made after crowning, when there is maximum tension on the perineal skin - performed at the height of a contraction when the fetal head distends the perineum to 3-4 cm visible diameter
General Anatomy and Musculoskeletal System (THIEME Atlas), p. 254
Types of Episiotomy
There are 3 types, though only 2 are commonly used:
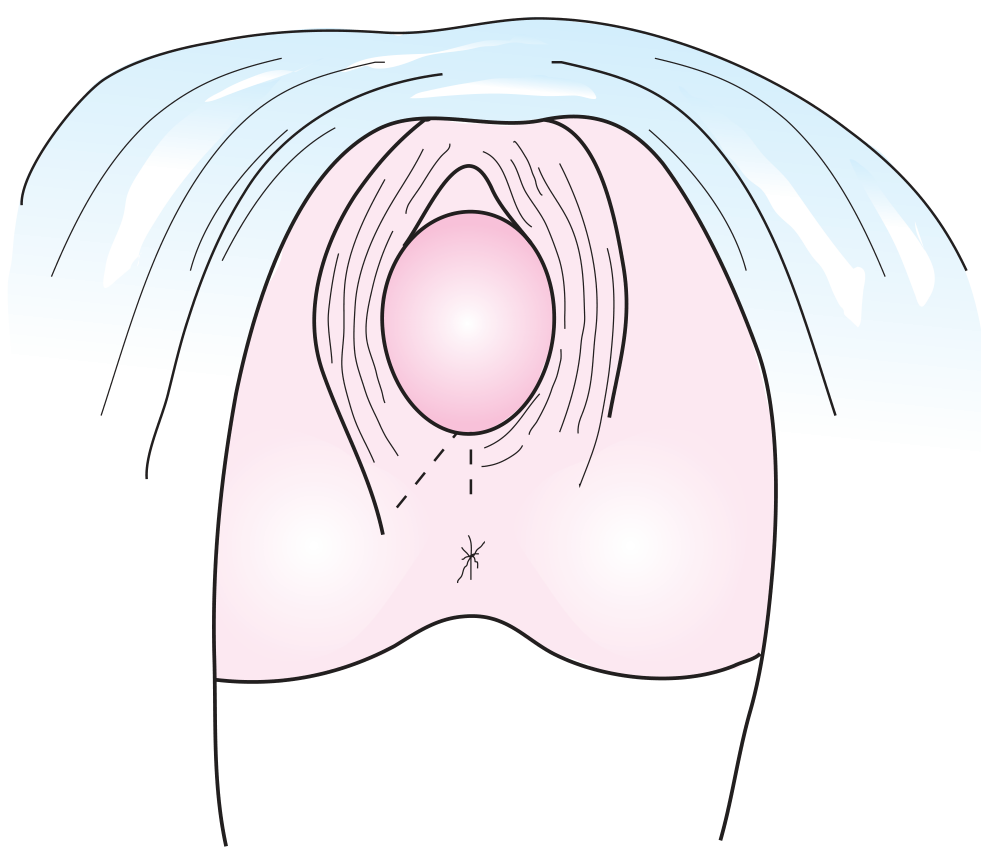
1. Midline (Median) Episiotomy
- Direction: Straight downward from the posterior vaginal fourchette directly toward the anus, along the median raphe
- Length: Approximately half the length of the perineum; extends 2-3 cm upward into the vaginal mucosa
- Structures divided: None of the major muscles (cuts only the median raphe)
- Common in: United States
Advantages:
- Easiest to perform and repair
- Least blood loss
- Heals more rapidly
- Minimal postoperative discomfort
Major Disadvantage:
- High risk of extension into the anal sphincter (3rd degree) or rectal mucosa (4th degree laceration) - it is paradoxically an independent risk factor for these severe tears
Roberts and Hedges' Clinical Procedures in Emergency Medicine, p. 1366
2. Mediolateral Episiotomy
- Direction: Oblique incision from the posterior fourchette downward and outward, directed toward the lateral margin of the anal sphincter - either right or left
- Structures divided: Bulbospongiosus muscle + superficial transverse perineal muscle
- Common in: Europe and many other countries
Advantages:
- Seldom extends into the anal sphincter
- Gains more room than midline
- Lower risk of 3rd/4th degree laceration
Disadvantages:
- Greater blood loss
- More difficult to repair
- More painful healing
- May cause dyspareunia
Roberts and Hedges' Clinical Procedures in Emergency Medicine, p. 1367
3. Lateral Episiotomy
- Direction: Lateral incision from the lower third of the vulva
- Structures divided: Bulbospongiosus + superficial transverse perineal + levator ani (puborectalis)
- Very rarely used in modern obstetrics
Disadvantages:
- Heaviest bleeding
- Greatest potential complications including anal incontinence
- Most postpartum complaints
- Most difficult healing
THIEME Atlas of Anatomy, p. 254
Summary Comparison Table
| Feature | Midline | Mediolateral | Lateral |
|---|---|---|---|
| Direction | Straight toward anus | Oblique (45°) | Lateral |
| Muscles divided | None | Bulbospongiosus, superficial transverse perineal | + Levator ani |
| Ease of repair | Easiest | Moderate | Difficult |
| Blood loss | Least | More | Most |
| Risk of 3rd/4th degree tear | Highest | Low | Low |
| Healing | Best | Moderate | Worst |
| Usage | USA | Europe | Rarely |
Episiotomy Suture Repair
Repair is performed after delivery of the infant and placenta, and after inspection/repair of any cervical or upper vaginal injuries.
Suture Material
- 2-0 or 3-0 absorbable suture (chromic catgut or polyglycolic acid) on a large atraumatic needle
- Minimal tension on the wound allows use of finer suture
- Bleeding vessels are ligated separately with absorbable sutures
Repair Steps (3-Layer Closure)
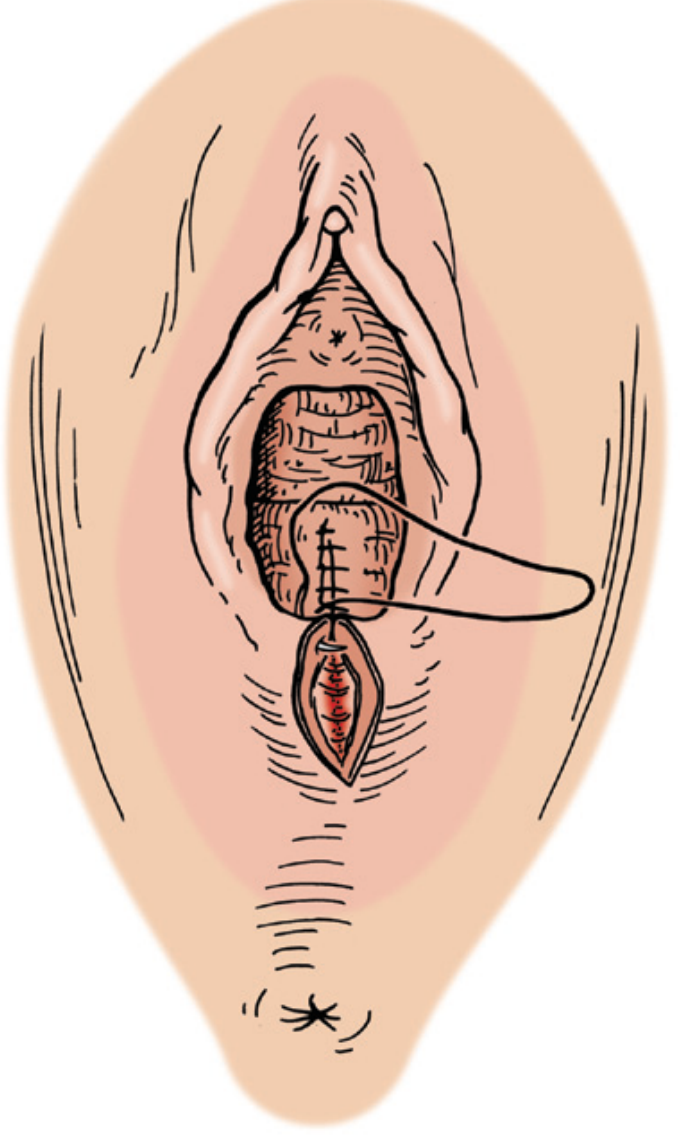
Layer 1 - Vaginal Mucosa
- Place the first stitch 1 cm cephalad to the apex of the episiotomy/laceration to ensure hemostasis
- Use a continuous locked absorbable suture running down from the apex to the hymenal ring
- Reapproximate the margins of the hymenal ring
Layer 2 - Deep Perineal Tissue (Muscle and Fascia)
- Use 3-4 simple interrupted absorbable sutures to close the deep perineal fascia and underlying levator ani muscles
- This takes the tension off the skin closure and obliterates dead space
- Bring the vaginal epithelial suture below the skin into subcutaneous tissue
Layer 3 - Skin / Superficial Layer
Two methods:
Method A (One-suture / Continuous technique):
- Continue the existing suture as a running subcuticular stitch along the perineal skin
- Run it back up to the hymenal ring and tie off - this is associated with less pain than interrupted transcutaneous sutures
Method B (Interrupted technique):
- Place several interrupted sutures through the skin and subcutaneous fascia, tied loosely
- Avoids burying two full layers of suture in a single closure
Key point: Continuous subcuticular sutures (unlocked) are associated with less pain than locked or interrupted transcutaneous sutures. Deep placement leaving the wound slightly gaping (2-3 mm) significantly decreases itching during healing.
Pfenninger and Fowler's Procedures for Primary Care, p. 1160-1161
Final Step - Rectovaginal Examination
After repair is complete, always perform a digital rectovaginal examination to:
- Confirm rectal mucosa is intact
- Confirm no suture has entered or obstructed the rectum
- Confirm no sponges or instruments remain
If any problem is found, the repair must be immediately taken down and repeated.
Repair of Extensions
| Extension | Repair |
|---|---|
| 3rd degree (anal sphincter involved) | Retrieve sphincter with Allis forceps, repair with interrupted sutures, then standard 3-layer closure |
| 4th degree (rectal mucosa torn) | Repair rectal mucosa first with interrupted submucosal stitches (inverting mucosa), then repair sphincter, then standard closure |
| Hockey stick extension | Follow the incision with the subcuticular suture |
Pfenninger and Fowler's Procedures for Primary Care, p. 1159-1161
Complications
- Blood loss ~300 mL from an uncomplicated midline episiotomy (can be more with delays)
- Wound infection
- Hematoma
- Dehiscence
- Dyspareunia (more common with mediolateral)
- Rectovaginal fistula (if suture pierces rectal mucosa during repair)
- Extension to 3rd/4th degree tear
Sources: Roberts and Hedges' Clinical Procedures in Emergency Medicine | Pfenninger and Fowler's Procedures for Primary Care | Textbook of Family Medicine 9e | THIEME Atlas of Anatomy - General Anatomy and Musculoskeletal System
Teach me for OSCE mechanism of labour LOA
Finding Sources
Searching Images
mechanism of labour LOA left occiput anterior cardinal movements
Finding Sources
Searching Images
cardinal movements of labor engagement descent flexion internal rotation extension restitution
Finding Sources
Finding Sources
Found excellent sources. Let me read all the relevant sections in parallel now.
Reading File
Reading File
Reading File
Let me fetch the cardinal movements diagram and look for Creasy & Resnik's content on LOA specifically.
Loading Image
Finding Sources
Finding Sources
I have a perfect cardinal movements diagram and rich textbook content. Let me also get the Tintinalli figure reference and look for any Creasy & Resnik-specific LOA content:
Reading File
Finding Sources
Let me fetch the Tintinalli cardinal movements figure which shows all 6 panels:
Loading Image
I now have comprehensive textbook content and two excellent diagrams. Let me compile the full OSCE-focused teaching answer.
Mechanism of Labour - LOA (Left Occiput Anterior)
Background - What is LOA?
LOA = Left Occiput Anterior
This refers to fetal position - the relationship of the fetal denominator (occiput in vertex presentations) to the maternal pelvis.
In LOA:
- The occiput (back of the fetal head) points toward the left anterior quadrant of the maternal pelvis
- This is the most common fetal position (along with OA/direct occiput anterior)
- LOA is the most favourable starting position - it leads to a straightforward normal delivery
LOA is the most common intrauterine position. It places the left hip of the fetus against the maternal lumbosacral spine. (Campbell's Operative Orthopaedics, 15th Ed.)
The Denominator & Presenting Diameter
| Feature | LOA |
|---|---|
| Presentation | Vertex (cephalic) |
| Denominator | Occiput |
| Presenting diameter | Suboccipitobregmatic (9.5 cm) - fully flexed |
| Station at engagement | 0 station (biparietal diameter at pelvic inlet level) |
Cardinal Movements of Labour
There are 7 cardinal movements (some texts list 6 by combining engagement with flexion/descent):
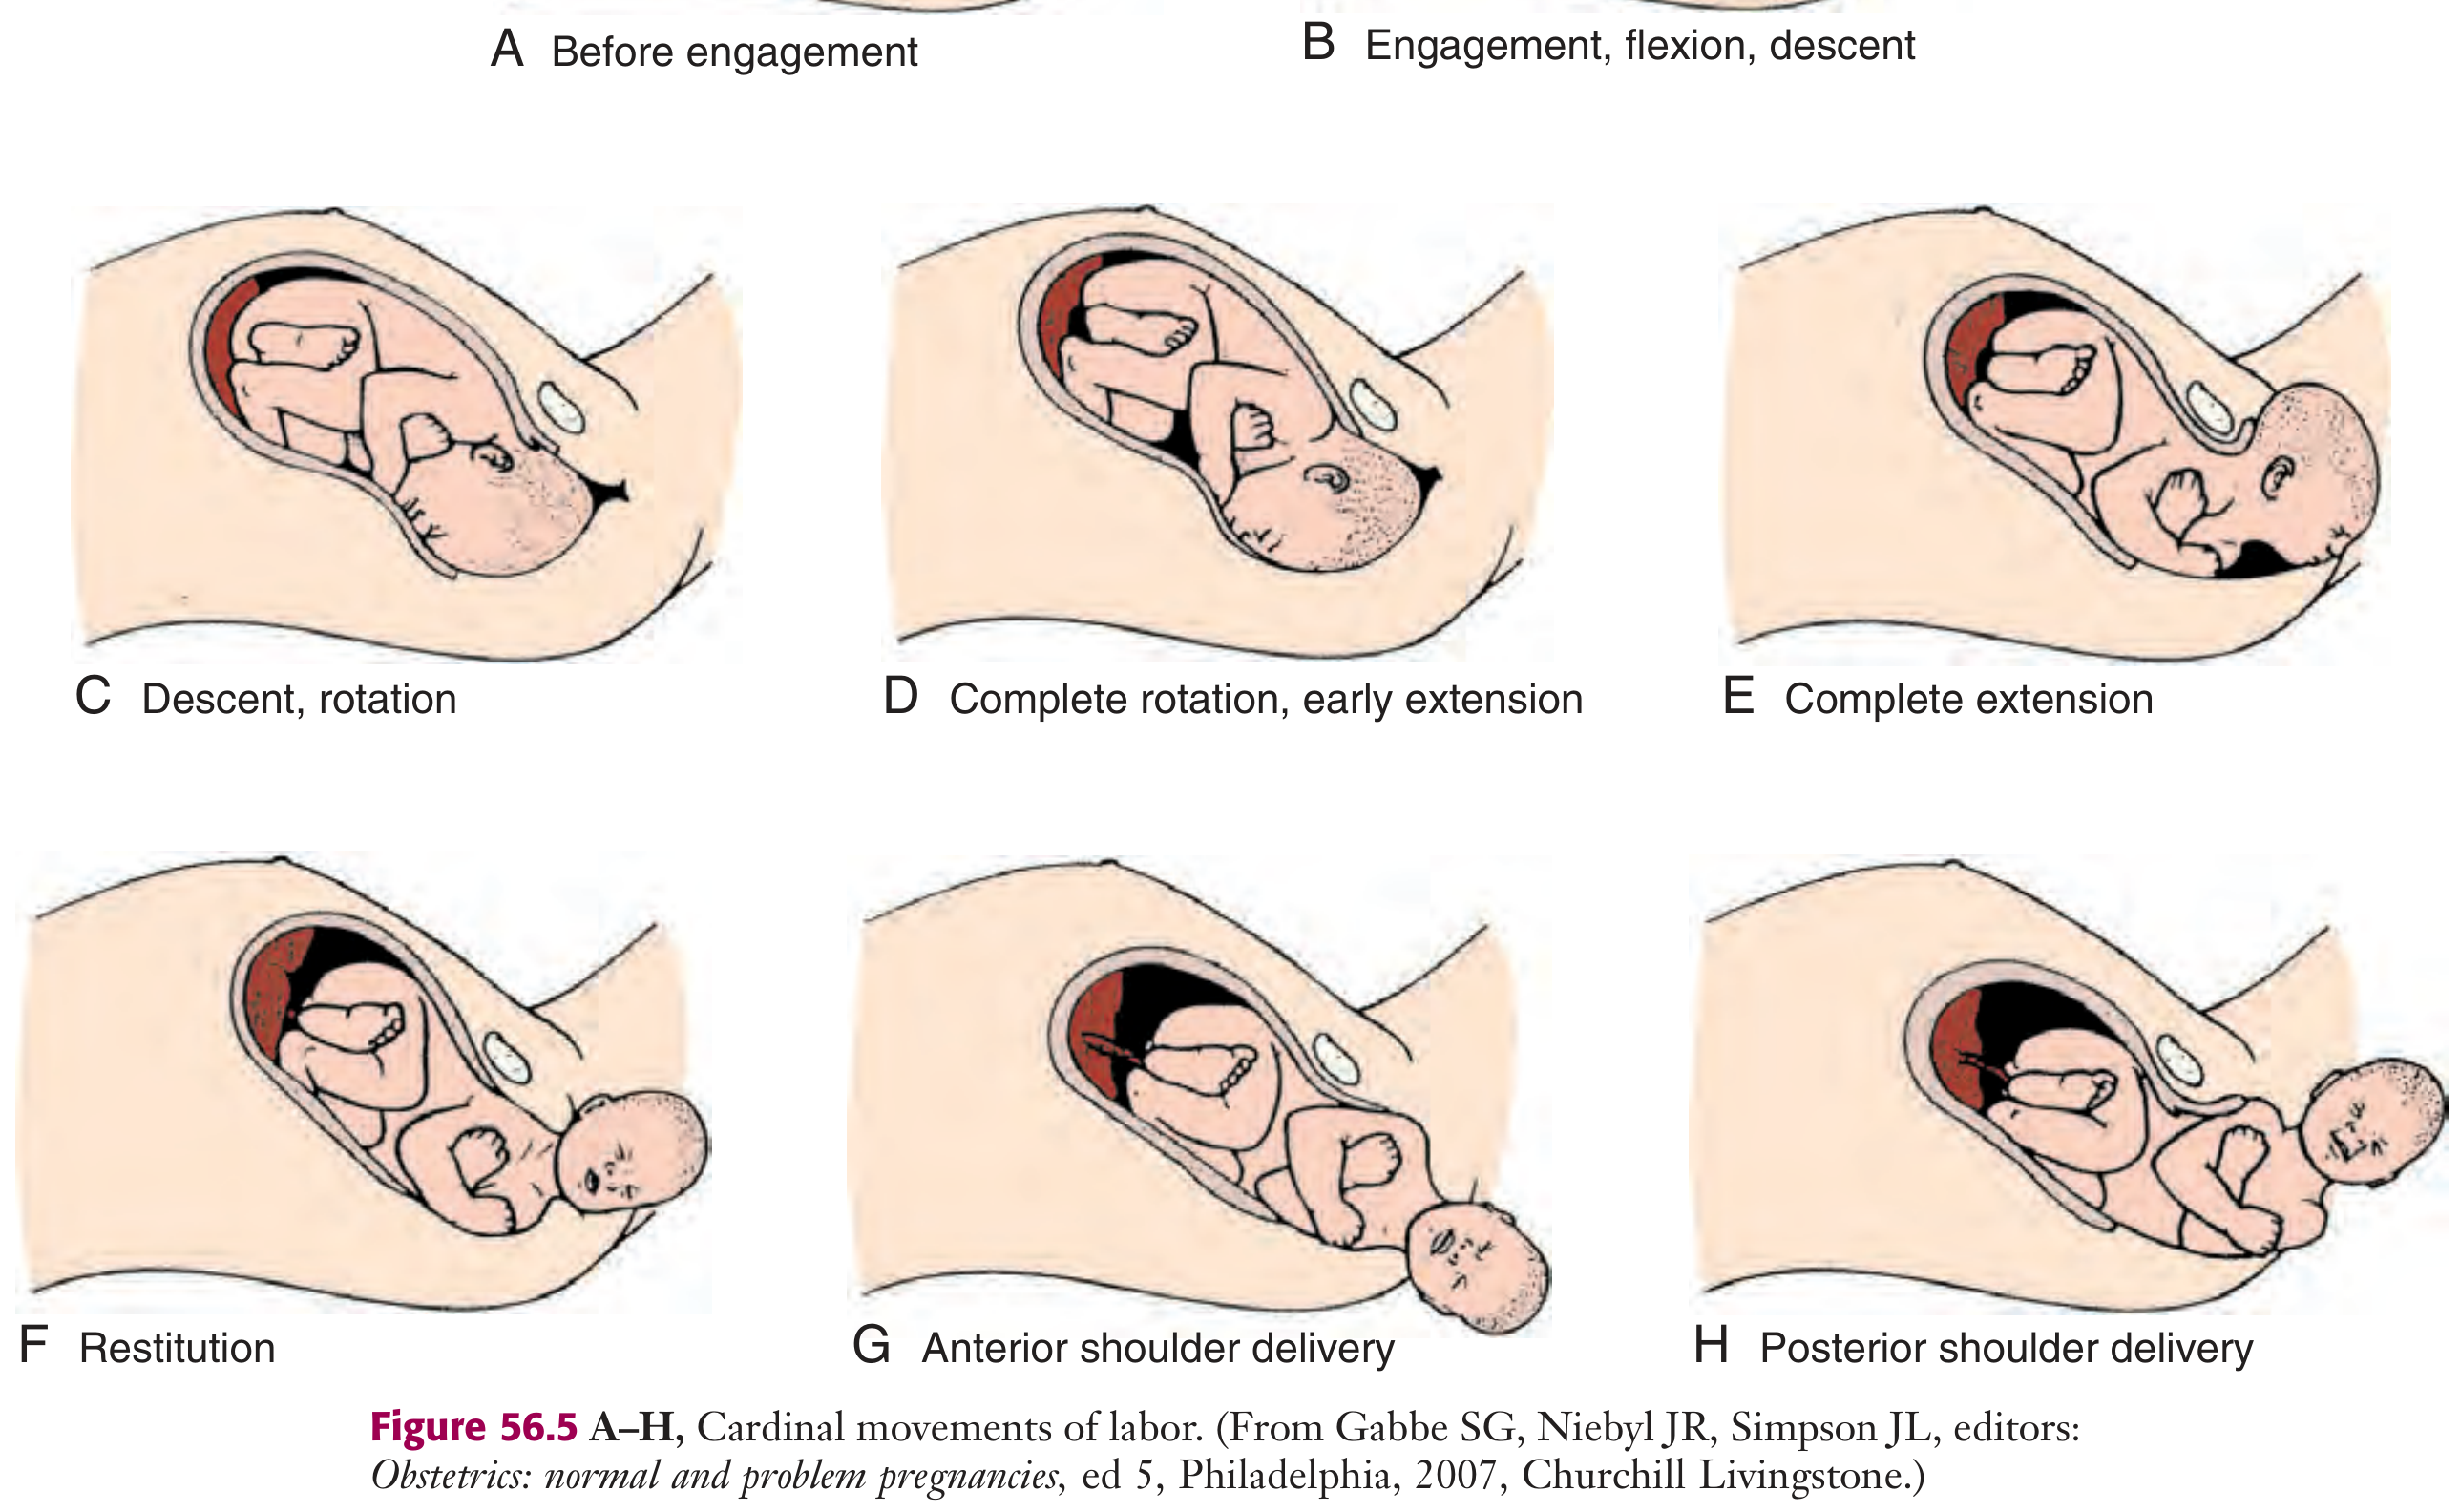
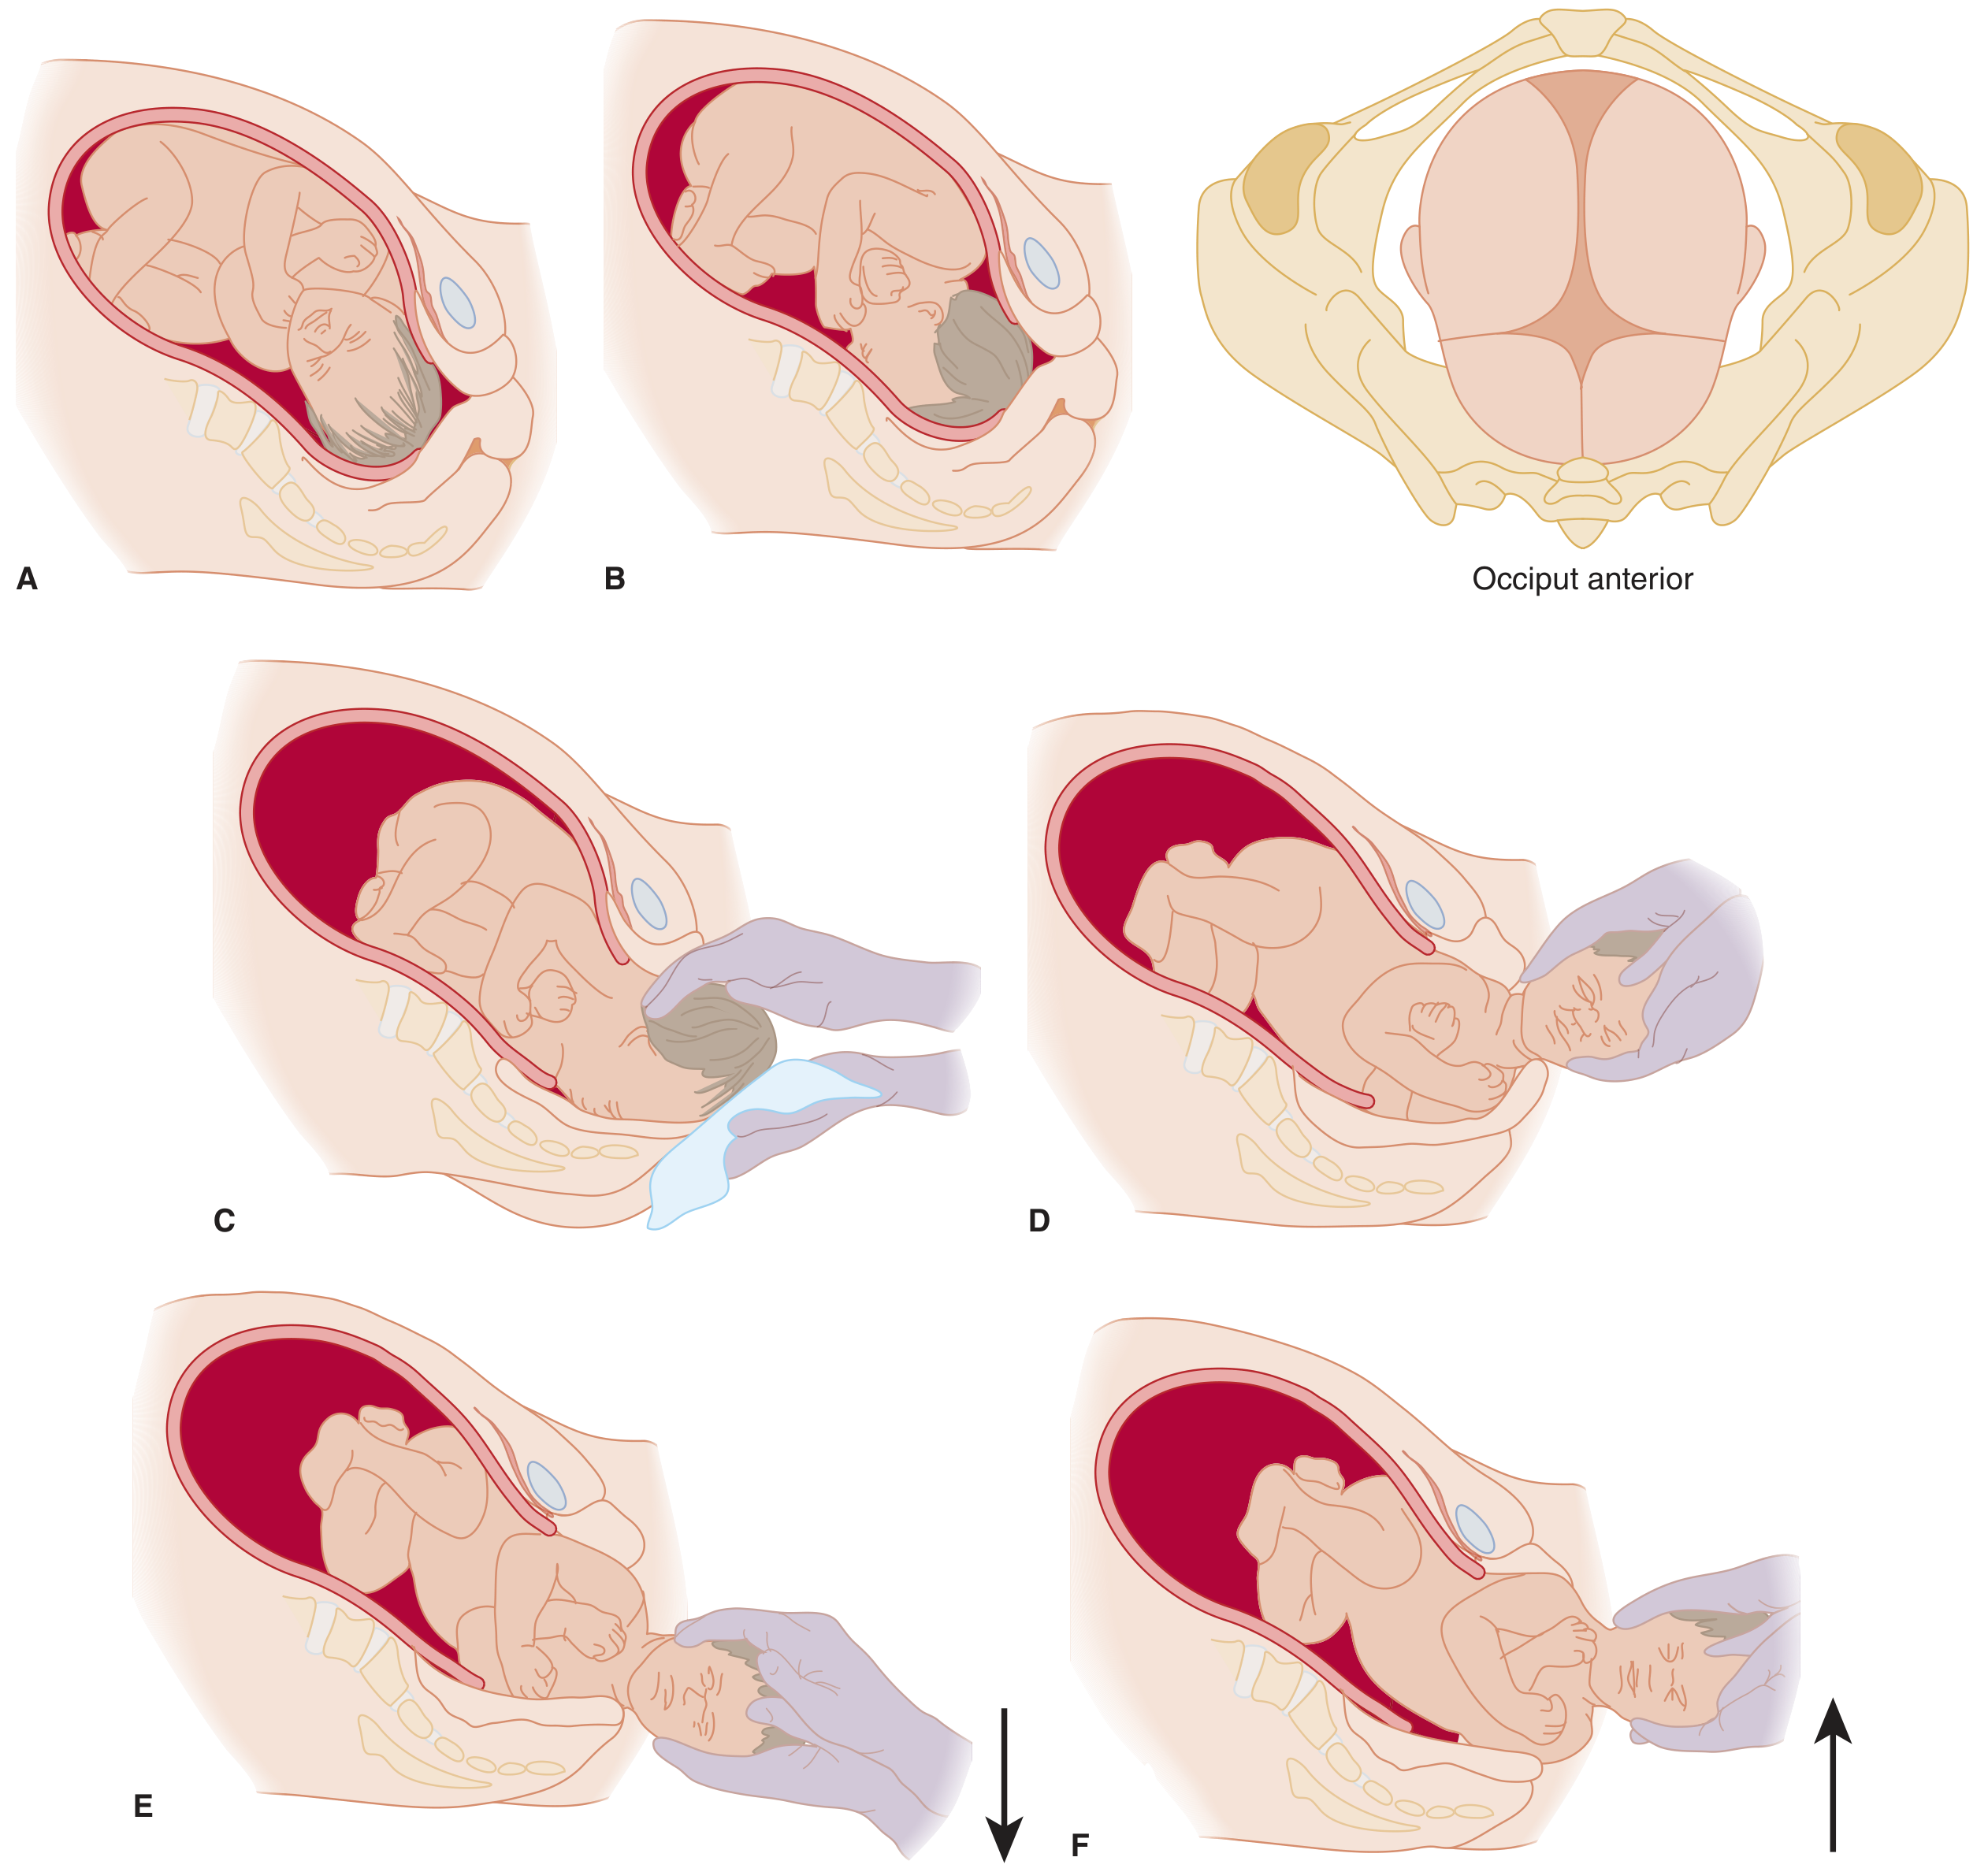
1. ENGAGEMENT
Definition: The greatest transverse diameter of the fetal head (biparietal diameter, ~9.5 cm) passes through the pelvic inlet.
- Fetus is engaged when the presenting part is at 0 station (ischial spine level)
- In LOA, the head enters the pelvic inlet with the sagittal suture in the left oblique diameter of the pelvis (the widest available diameter)
- The occiput points toward the left iliopectineal eminence, the sinciput toward the right sacroiliac joint
- Primigravida: engagement usually occurs in the last 2 weeks of pregnancy
- Multigravida: may only occur at onset of labour
The mechanism is determined by the pelvic dimensions and configuration, the size of the fetus, and the strength of uterine contractions. The fetus follows the path of least resistance by adapting the smallest achievable diameter to the most favourable dimensions of the birth canal. (Roberts and Hedges, p. 1351)
2. FLEXION
Mechanism: As the descending head meets resistance from the cervix, pelvic walls, and pelvic floor, the chin is brought down onto the chest (passive movement).
- Converts the presenting diameter from occipitofrontal (11.5 cm) to suboccipitobregmatic (9.5 cm)
- This smaller diameter allows easier passage through the pelvic brim and midcavity
- Occurs passively - no muscle action required
- Necessary for both engagement and descent
Flexion of the fetal head is necessary to minimize the presenting cross-sectional diameter of the head during passage through the smallest diameter of the bony pelvis. (Roberts and Hedges, p. 1351)
3. DESCENT
Mechanism: Downward passage of the fetal presenting part through the birth canal.
- Occurs throughout labour but most rapid in the second stage
- Forces producing descent:
- Uterine contractions
- Abdominal muscle contractions (bearing down / pushing)
- Straightening and extension of the fetal body
- Amniotic fluid pressure
- Descent is gradual and progressive but not necessarily continuous
- In LOA, the head descends with the occiput leading in the left oblique diameter
4. INTERNAL ROTATION
Mechanism: The fetal head rotates within the pelvis so that the occiput moves anteriorly toward the symphysis pubis.
- In LOA, the occiput rotates 45° to the right (anteriorly) to reach the direct occiput anterior (OA) position
- Now the sagittal suture lies in the anteroposterior diameter of the pelvic outlet
- The occiput slides under the pubic arch
- This movement is necessary for the head to traverse the ischial spines (the narrowest part of the pelvis at the midcavity)
- Caused by the gutter-shaped levator ani muscle guiding the head anteriorly
- The smallest presenting diameter (suboccipitobregmatic) now aligns with the largest pelvic outlet diameter (AP diameter = 13.5 cm in gynaecoid pelvis)
Internal rotation occurs with descent and is necessary for the head or presenting part to traverse the ischial spines. The occiput gradually moves from its original, more transverse position anteriorly toward the symphysis pubis. (Roberts and Hedges, p. 1351)
5. EXTENSION (Delivery of the Head)
Mechanism: As the fully flexed head reaches the pelvic outlet and distends the perineum, the occiput reaches the inferior aspect of the pubic symphysis and the head extends around the pubic arch.
- The suboccipital region (nape of neck) becomes the pivot point under the symphysis pubis
- The following parts are delivered in sequence over the perineum:
- Occiput (already under symphysis)
- Bregma (anterior fontanelle)
- Forehead
- Nose
- Mouth
- Chin - last to pass over the perineum
- Immediately after delivery, the head drops downward so the chin lies over the maternal anal region
Extension occurs as the flexed head reaches the anteriorly directed vaginal introitus. The head is born by further extension as it rotates around the pubic symphysis and the occiput, bregma, forehead, nose, mouth, and finally, the chin pass successively over the anterior margin of the perineum. (Roberts and Hedges, p. 1351)
6. RESTITUTION (External Rotation - Part 1)
Mechanism: Immediately after delivery of the head, it rotates back to the natural anatomical alignment with the fetal shoulders.
- The head had been twisted on the neck during internal rotation
- Restitution "undoes" this twist - a passive, elastic recoil movement
- In LOA: the occiput rotates back 45° to the left (to the original LOA position)
- The sagittal suture returns to the left oblique diameter
7. EXTERNAL ROTATION (Restitution continued)
Mechanism: The head continues to rotate a further 45° as the shoulders undergo their own internal rotation within the pelvis.
- The shoulders, which entered the pelvis in the oblique diameter, now rotate to the AP diameter of the pelvic outlet
- In LOA: the occiput rotates a total of 90° to the left (ending up pointing toward the left maternal thigh)
- The head is now in the transverse position that it occupied at engagement
- The face turns to look at the mother's right inner thigh
External rotation or restitution is the return of the head to the correct anatomic position with respect to the fetal torso. It follows delivery of the head as it rotates to the transverse position that it occupied at engagement. This is also a passive movement. (Roberts and Hedges, p. 1351)
8. EXPULSION (Delivery of Shoulders and Body)
Mechanism: Delivery of the remainder of the fetal body.
- Anterior shoulder is delivered first - beneath the symphysis pubis (with gentle downward traction)
- Posterior shoulder - delivered across the perineum (with gentle upward traction)
- Remainder of the body follows easily
- In LOA: anterior shoulder (fetal right) delivers from under the symphysis; posterior shoulder (fetal left) over the perineum
The shoulders descend in a path similar to that traced by the head - rotating anteroposteriorly for delivery. First, the anterior shoulder is delivered beneath the symphysis pubis followed by the posterior shoulder across the perineum. (Roberts and Hedges, p. 1351)
OSCE Summary Table - All 7 Movements in LOA
| # | Movement | What Happens | Key Diameter / Landmark |
|---|---|---|---|
| 1 | Engagement | BPD passes pelvic inlet; 0 station | BPD (9.5 cm) in left oblique diameter |
| 2 | Flexion | Chin on chest; smaller diameter presented | Suboccipitobregmatic (9.5 cm) |
| 3 | Descent | Head moves downward through canal | Driven by contractions + pushing |
| 4 | Internal rotation | Occiput rotates 45° right → OA | Sagittal suture now in AP diameter |
| 5 | Extension | Head delivers around pubic arch | Occiput pivots under symphysis |
| 6 | Restitution | Head rotates 45° left back to LOA | Passive elastic recoil |
| 7 | External rotation | Occiput rotates further 45° left | Total 90° left; shoulders in AP |
| 8 | Expulsion | Anterior then posterior shoulder | Downward then upward traction |
Key OSCE Points to Remember
- LOA is the most common fetal position - most favourable for normal vaginal delivery
- The fetus follows the path of least resistance, adapting its smallest diameter to the widest pelvic dimension at each level
- Flexion is the most important movement - without it, a larger diameter is presented and descent is impeded
- Internal rotation is the critical movement at the midcavity - failure leads to deep transverse arrest
- The total internal rotation in LOA = 45° (from left oblique → direct anterior)
- The total external rotation in LOA = 90° (45° restitution + 45° further rotation)
- Movements are not strictly sequential - descent occurs throughout; flexion and engagement often occur together
- Internal rotation is caused by the gutter shape of the levator ani directing the head anteriorly
Sources: Roberts and Hedges' Clinical Procedures in Emergency Medicine | Tintinalli's Emergency Medicine | Textbook of Family Medicine 9e | Campbell's Operative Orthopaedics 15th Ed 2026
This is a shared conversation. Sign in to Orris to start your own chat.