
Gudels airway all about for md emergency medicine exam
Guedel oropharyngeal airway sizing insertion technique
Guedel oropharyngeal airway sizing insertion contraindications complications emergency medicine
Guedel Airway (Oropharyngeal Airway) — Exam Notes
1. Basics
2. Indications
- Unconscious patient with upper airway obstruction from a relaxed tongue/soft palate (GCS low, no gag reflex)
- Adjunct during bag-valve-mask ventilation to maintain patency
- Spontaneously breathing, deeply obtunded patients with no gag reflex
- Bite block during seizures or to protect an ET tube/bite injury
3. Contraindications
- Conscious patient or any patient with an intact gag reflex (will trigger vomiting/laryngospasm)
- Oral trauma
- Trismus / restricted mouth opening
- Recent oral surgery, loose or broken teeth
- Active seizure (relative - risk of dental/oral injury during insertion)
- Foreign body airway obstruction
4. Sizing
- Corner of the mouth to the earlobe (tragus), or
- Corner of the mouth to the angle of the mandible
| Size | Length | Typical patient |
|---|---|---|
| No. 3 | 80 mm | Small adult |
| No. 4 | 90 mm | Medium adult |
| No. 5 | 100 mm | Large adult |
- Too small: fails to displace tongue, can push tongue further back and worsen obstruction
- Too large: tip can press on the epiglottis, causing laryngospasm or obstructing the larynx directly
5. Insertion Technique (adults)
- Measure and select correct size.
- Open the mouth with thumb-and-index-finger scissor technique.
- Insert the airway inverted (concave side up, tip pointing toward the hard palate).
- Once the tip reaches the soft palate/back of the mouth, rotate 180° so the curve follows the tongue, seating the distal end in the hypopharynx. Pulling the jaw forward during passage helps.
- Open the mouth widely, depress the tongue with a tongue blade/laryngoscope blade.
- Advance the airway directly along the tongue's curve into the oropharynx - no rotation needed. (This is the preferred method in pediatric patients because rotation can injure the soft palate/tonsillar pillars.)
6. Complications
- Induces gagging/vomiting and aspiration if gag reflex present
- Can worsen obstruction if malpositioned (tongue pushed backward)
- Laryngospasm if oversized
- Dental/oral soft tissue trauma (e.g., case reports of fractured teeth during Guedel airway use)
- Does not protect against aspiration (unlike a cuffed ET tube) - Bailey and Love's Short Practice of Surgery, 28e
7. OPA vs NPA (common exam comparison)
| Feature | Oropharyngeal (Guedel) | Nasopharyngeal |
|---|---|---|
| Tolerated in semi-conscious patient | No (needs absent gag) | Better tolerated |
| Contraindication | Intact gag reflex | Base of skull/facial fracture, coagulopathy |
| Sizing | Corner of mouth to earlobe/angle of mandible | Tip of nose to earlobe |
| Risk | Laryngospasm, dental injury | Epistaxis, rarely intracranial placement in basilar skull fracture |
8. Key exam one-liners
- "If the patient can cough or gag, don't put in an oral airway - use an NPA."
- Guedel airway "holds the tongue forward but does not prevent aspiration" - useful for short-term BVM ventilation, not definitive airway protection.
- Always pair with jaw thrust/head-tilt-chin-lift and have suction ready (risk of inducing vomiting).
NPA for md emergency medicine practical exam parts of device
nasopharyngeal airway parts diagram flange trumpet safety pin
nasopharyngeal airway parts flange bevel safety pin diagram device
Nasopharyngeal Airway (NPA) — Parts of the Device (Practical Exam)
Parts of the NPA
- The wide, funnel-shaped end that sits outside the nostril.
- Function: prevents the entire tube from being swallowed/inhaled into the nasal passage; also allows air entry/exit and can be used to attach a bag-valve mask connector in some designs.
- Some devices have an adjustable flange that can be repositioned along the shaft to fix the insertion depth.
- Soft rubber or PVC/silicone tube, anatomically curved to follow the floor of the nasal cavity and posterior nasopharynx.
- Hollow lumen throughout, allowing airflow and, if needed, passage of a suction catheter.
- Marked with the size (in French gauge or internal diameter, mm) printed on the flange or shaft.
- The leading end is cut at an angle (bevel).
- Convention: the bevel opening faces the nasal septum during insertion, with the pointed heel of the bevel facing laterally (toward the turbinates) - this minimizes trauma/epistaxis from the turbinates and septum.
- The tip should ultimately rest just behind the base of the tongue/above the epiglottis, roughly at the level of the tip of the uvula, without stimulating the gag reflex.
- A pin placed transversely through the shaft just proximal to the flange.
- Purpose: prevents the airway from slipping further into the nose and disappearing into the nasopharynx/being aspirated - a classic exam point (older rubber trumpets lacked a fixed flange, so the pin was mandatory safety equipment).
- Printed size in French (Fr) gauge and corresponding internal diameter (mm). Common exam-quoted sizes:
| Size (Fr) | Internal diameter (mm) | External diameter (mm) | Typical use |
|---|---|---|---|
| 24 | 6 | 8.1 | Adult female (small) |
| 28 | 7 | 9.4 | Adult female/male |
| 32 | 8 | 10.8 | Adult male (large) |
Quick functional summary (how to present in the exam)
Sizing method (often asked alongside parts)
Contrast with OPA (frequently paired practical station)
| Feature | NPA | OPA (Guedel) |
|---|---|---|
| Material | Soft, flexible rubber/silicone | Rigid plastic |
| Tolerated with gag reflex | Yes - preferred in semi-conscious/awake patients | No - contraindicated |
| Key parts | Flange, shaft, bevelled tip, (safety pin) | Flange, bite block, curved body |
| Main risk | Epistaxis, rarely intracranial placement in basilar skull fracture | Laryngospasm, dental trauma, vomiting |
| Contraindication | Base of skull fracture, severe facial/nasal trauma, coagulopathy | Intact gag reflex |
Both images with parts
oropharyngeal airway Guedel airway diagram parts flange bite block
nasopharyngeal airway nasal trumpet diagram parts flange bevel tip
oropharyngeal airway parts diagram labeled flange bite block tip
nasopharyngeal airway nasal trumpet parts diagram labeled flange bevel
Oropharyngeal Airway (Guedel Airway) - Parts
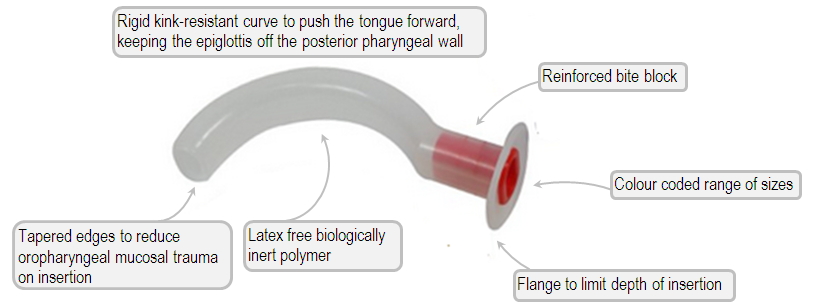
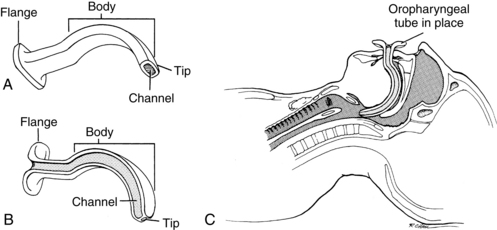
- Flange - the wide flat end that sits at the lips/teeth; limits depth of insertion
- Reinforced bite block - hard, kink-resistant segment just behind the flange; prevents occlusion of the air channel if the patient bites down
- Curved body (rigid, kink-resistant) - anatomically curved to push the tongue forward and keep the epiglottis off the posterior pharyngeal wall
- Tapered tip/edges - reduces oropharyngeal mucosal trauma on insertion
- Colour-coded sizing - each size (e.g. Guedel No. 3/4/5) has a distinct flange colour for quick identification
- Central channel - hollow lumen running the length of the device for airflow and suction catheter passage
Nasopharyngeal Airway (Nasal Trumpet) - Parts
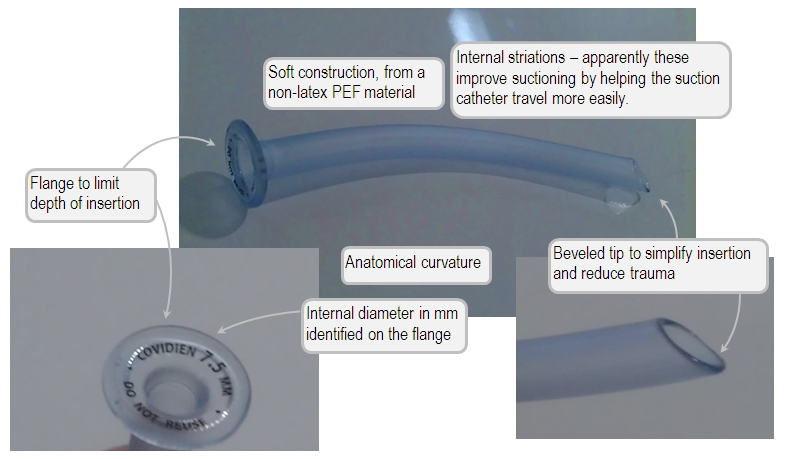
- Flange - wide proximal end that rests against the nostril; limits depth of insertion (in older rubber trumpets, a safety pin was added just behind this instead of/alongside a fixed flange)
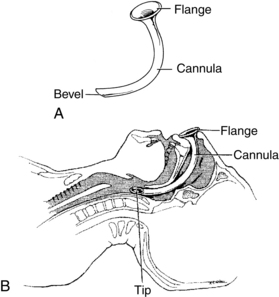
- Body/shaft with anatomical curvature - soft, non-latex PVC or silicone; follows the natural curve of the nasal floor and nasopharynx
- Internal striations (device-specific feature) - ridges inside the lumen that help a suction catheter pass through more easily
- Bevelled tip - angled distal opening; faces the nasal septum on insertion to reduce turbinate trauma and epistaxis
- Size marking on flange - internal diameter in mm (e.g. "7.5 mm") printed directly on the flange
Side-by-side exam summary
| Part | OPA (Guedel) | NPA (Trumpet) |
|---|---|---|
| Proximal end | Flange + reinforced bite block | Flange only (± safety pin on old rubber models) |
| Shaft | Rigid curved body with central channel | Soft curved cannula with lumen (± internal striations) |
| Distal end | Tapered tip | Bevelled tip (opening faces septum) |
| Material | Rigid plastic | Soft PVC/silicone/rubber |
| Sizing marked by | Colour-coded flange (Guedel No.) | mm internal diameter printed on flange |
Nasal prongs same as above
nasal cannula nasal prongs parts diagram labeled prongs tubing flow meter connector
simple low flow nasal cannula prongs tubing diagram respiratory therapy zone
nasal cannula wikipedia commons diagram oxygen tubing prongs ear loop connector
https://en.wikipedia.org/wiki/Nasal_cannula
A clear medical educational diagram of a nasal cannula (oxygen nasal prongs) device, laid out flat, with labeled parts: two soft nasal prongs, the Y-junction, the flexible tubing that loops over the ears, the sliding adjuster under the chin, and the connector end that attaches to the oxygen flowmeter/humidifier. Label each part with a leader line and text, similar to a textbook line-diagram style.
Nasal Cannula (Nasal Prongs) - Parts
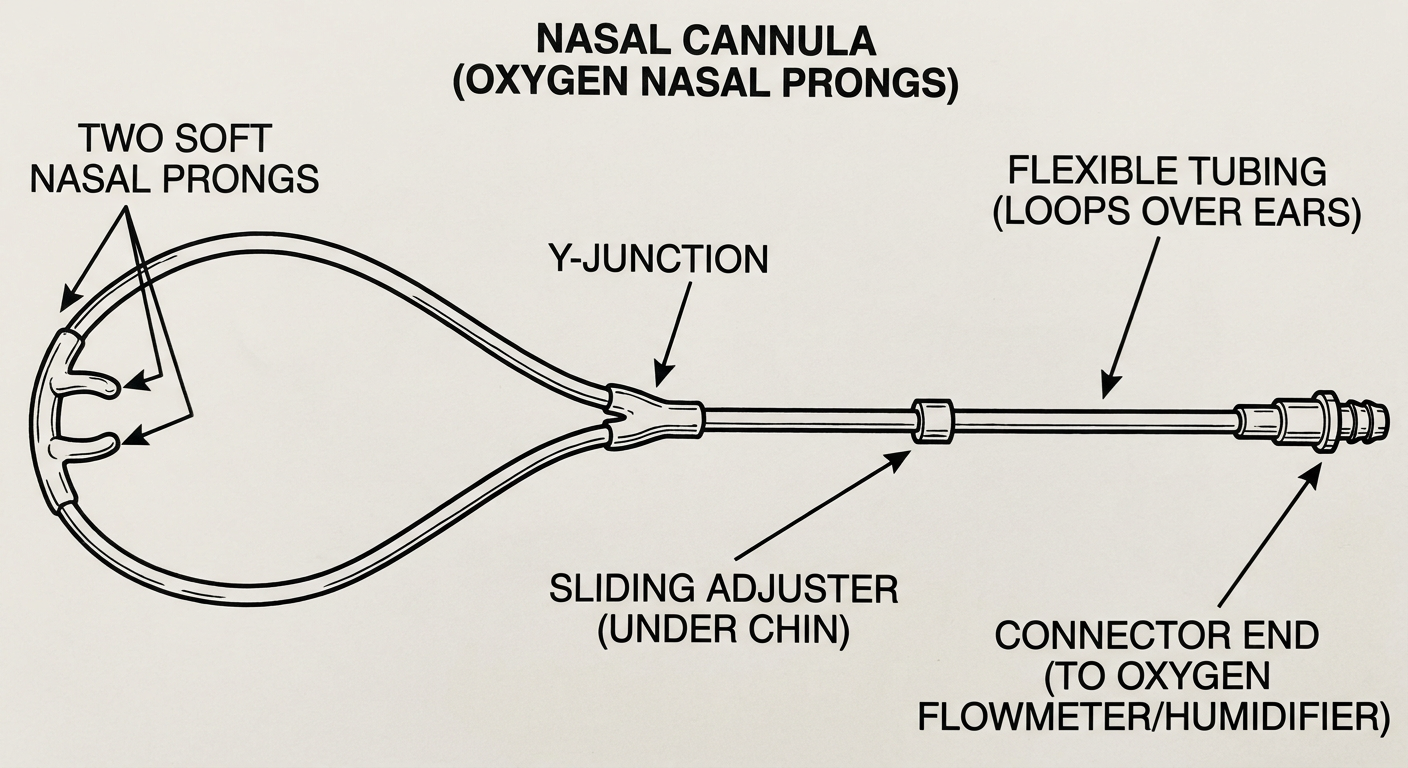
Parts of a standard (low-flow) nasal cannula
- Two soft nasal prongs - short, curved or straight soft plastic projections that sit just inside the nostrils (should not occlude more than ~50% of the nares); curved prongs point posteriorly toward the nasopharynx to reduce mucosal irritation
- Y-junction/bifurcation - the point where the single supply tube splits into the two prongs
- Flexible tubing (limbs) - light, soft tubing that loops over/behind the ears (or is held by an elastic headband in infants) to secure the device on the face
- Sliding adjuster - a small plastic ring under the chin that cinches the tubing snug against the face for a secure fit
- Connector/supply tube - the single length of tubing (commonly 7 feet in adults) that runs from the Y-junction to the oxygen source
- Universal connector/nipple adapter - the end that attaches to the oxygen flowmeter (wall oxygen outlet, cylinder regulator, or oxygen concentrator)
High-Flow Nasal Cannula (HFNC) - additional components (common exam add-on)
- Wide-bore nasal prongs - larger diameter prongs than standard NC to tolerate high flows without excessive noise/discomfort
- Heated humidifier chamber - saturates the gas at 31-37°C to prevent mucosal drying at high flows
- Heated inspiratory tubing (single-limb circuit) - contains heater wires within the tubing wall to minimize condensation ("rainout")
- Air-oxygen blender - allows independent titration of FiO2 from 21% to 100% regardless of flow rate
- Flow generator/flowmeter - delivers flows up to 60 L/min
Quick comparison across the three devices you've covered
| Device | Key parts | Main use |
|---|---|---|
| OPA (Guedel) | Flange, bite block, curved rigid body, tip | Unconscious patient, no gag reflex |
| NPA (trumpet) | Flange, soft curved shaft, bevelled tip | Semi-conscious/awake patient with intact gag |
| Nasal cannula | Prongs, Y-junction, tubing, ear loops, connector | Spontaneously breathing patient needing low-flow supplemental O2 |
| HFNC | Wide-bore prongs, humidifier, heated tubing, blender | Acute hypoxemic respiratory failure needing high flow/FiO2 control |
ET TUBE SAME AS ABOVE
endotracheal tube parts diagram cuff Murphy eye bevel pilot balloon connector
endotracheal tube parts diagram labeled cuff Murphy eye pilot balloon bevel connector centimeter markings
Endotracheal Tube (ETT) - Parts
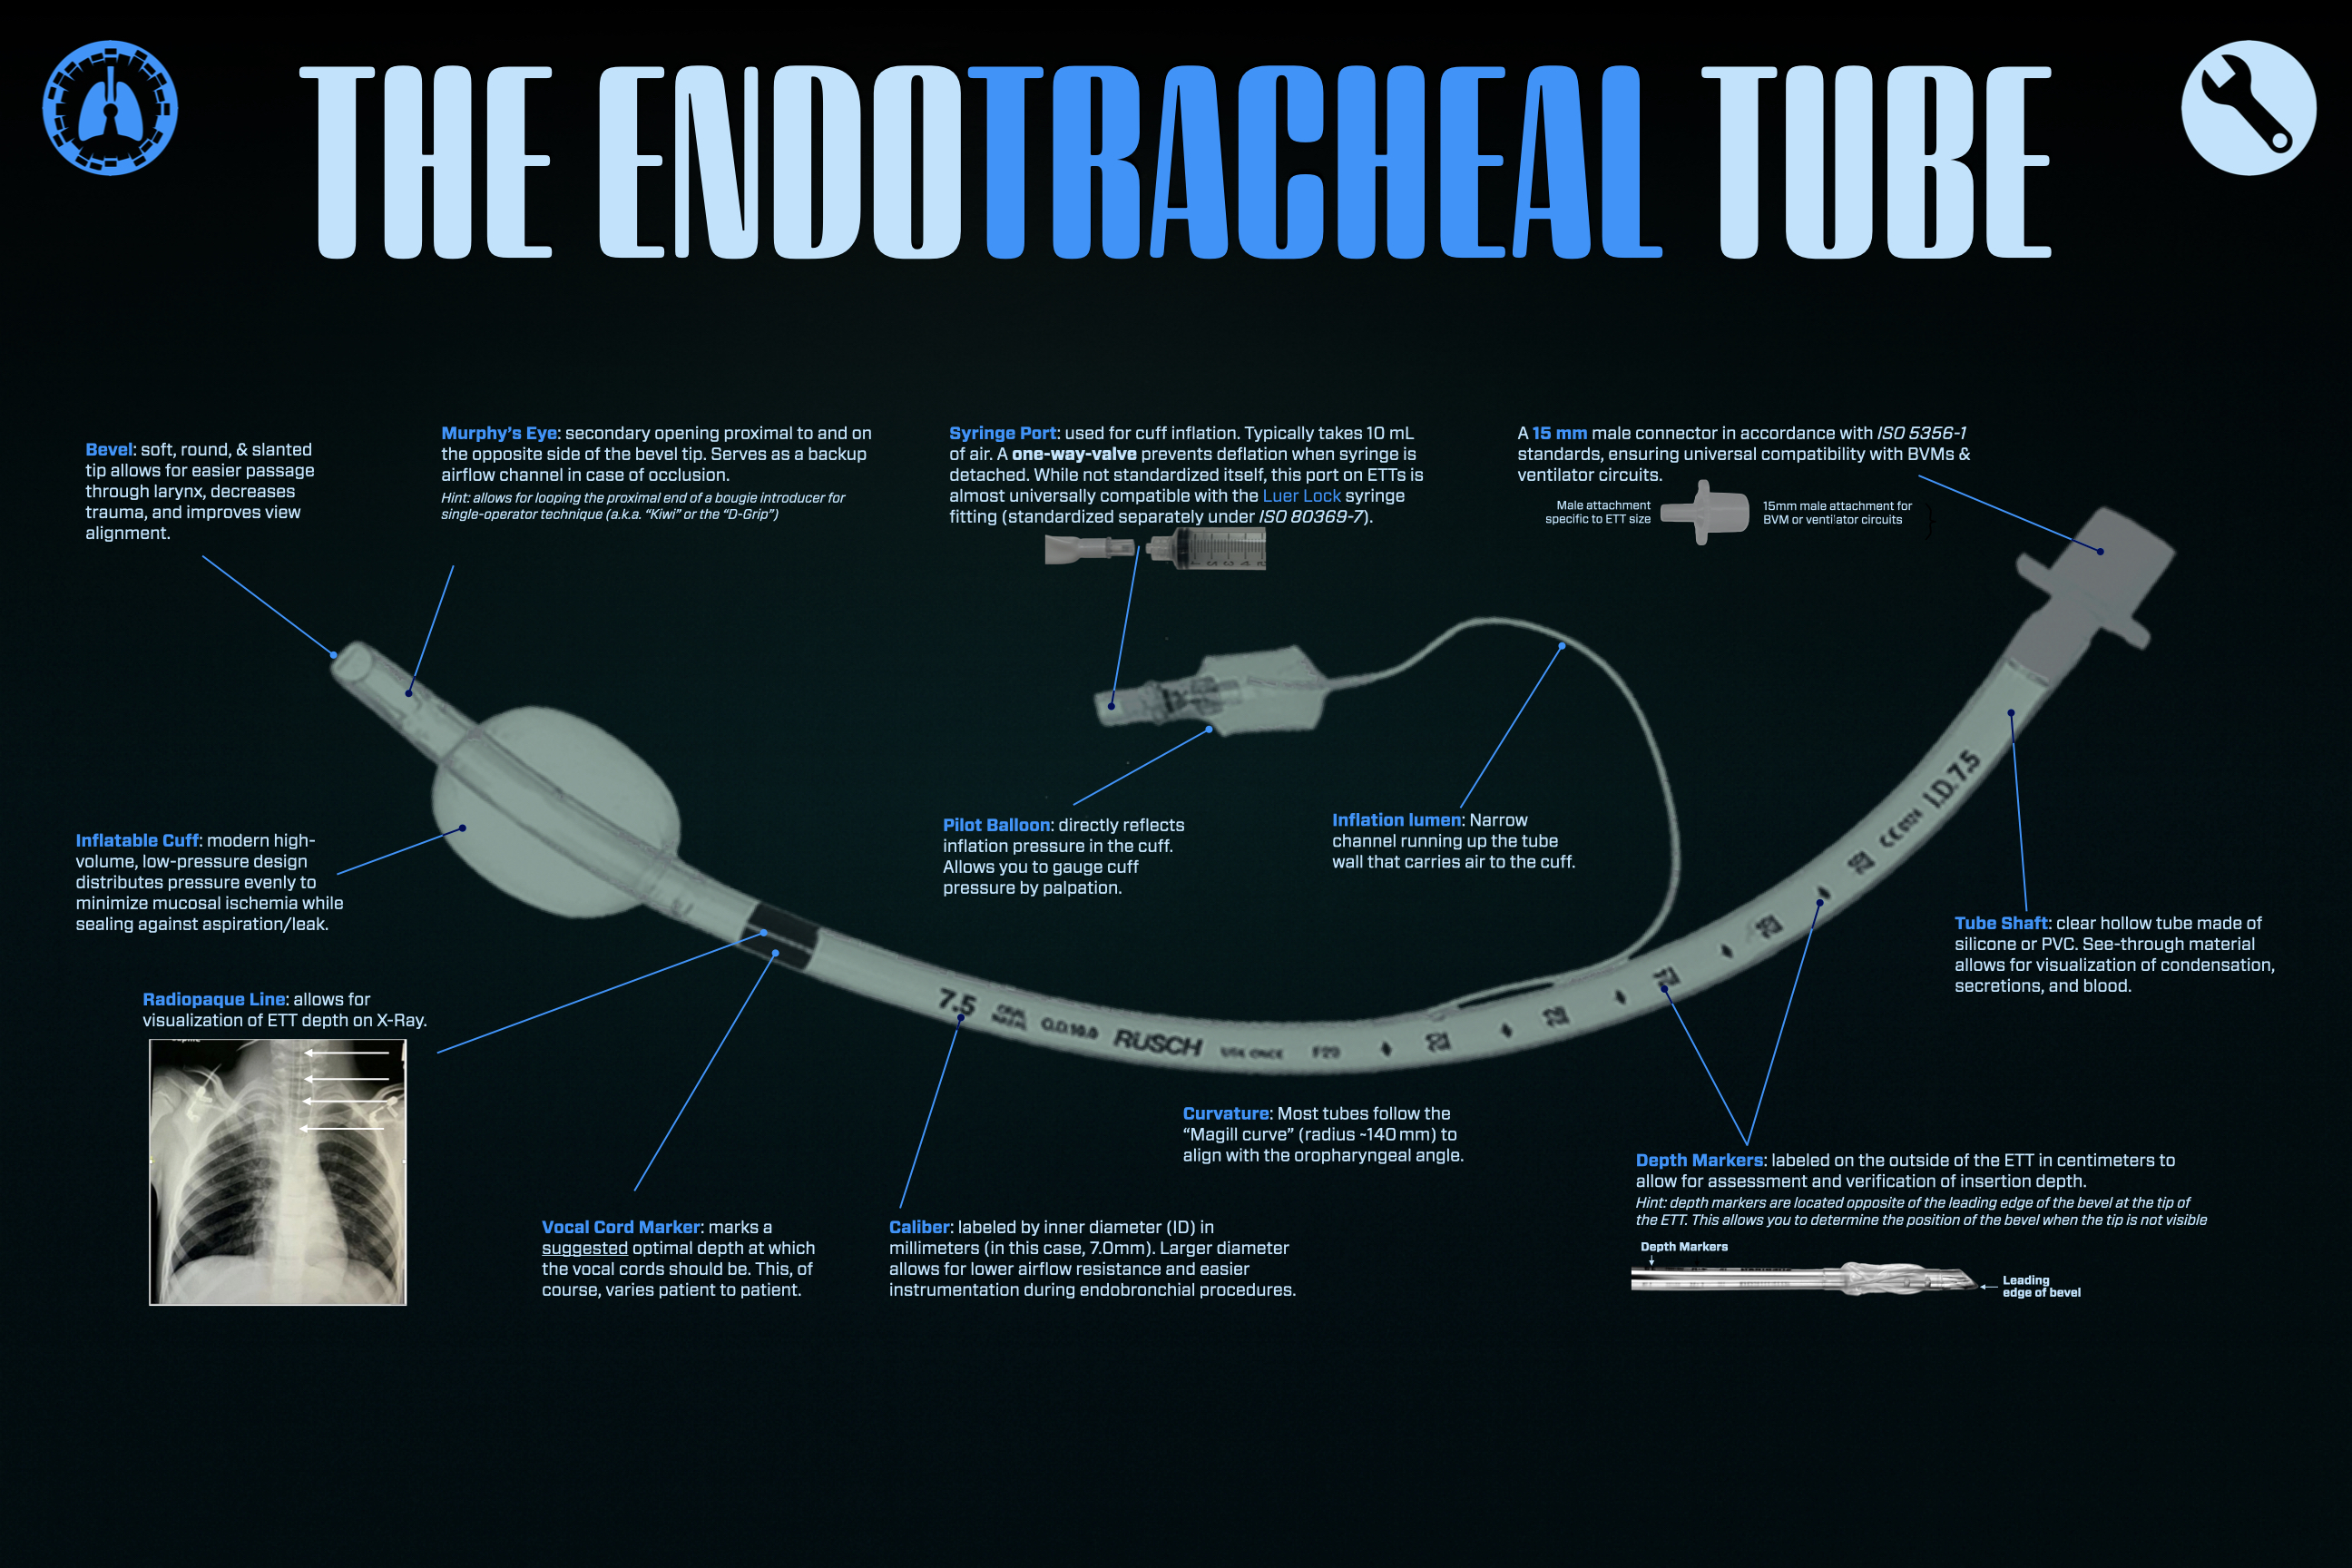
Parts of the ETT (proximal to distal)
- 15 mm connector - standardized male connector (ISO 5356-1) at the proximal end; universal fit for BVM or ventilator circuit tubing
- Tube shaft - clear, hollow silicone/PVC tube; transparency allows visualization of condensation, secretions, or blood (confirms ventilation)
- Depth/centimeter markers - printed along the outside of the tube in cm from the tip; used to verify and document insertion depth at the teeth/lips (normal depth: ~21-23 cm in males, ~19-21 cm in females, measured at the incisors)
- Vocal cord marker - a bold black line near the cuff that marks a suggested optimal depth at which the vocal cords should sit (varies patient to patient - not a substitute for depth confirmation)
- Radiopaque line - a line running the length of the tube, visible on chest X-ray, used to confirm tube position/depth relative to the carina
- Caliber (internal diameter, ID) - labeled in mm on the shaft (e.g., 7.0, 7.5); larger ID = lower airflow resistance, easier suctioning/bronchoscopy
- Curvature ("Magill curve") - most tubes follow a gentle curve (~140 mm radius) matching the natural oropharyngeal-laryngeal angle
- Inflatable cuff - modern high-volume, low-pressure cuff; seals the trachea against aspiration and air leak while distributing pressure evenly to minimize mucosal ischemia
- Inflation lumen - a narrow channel running within the tube wall, carrying air from the pilot balloon/syringe port down to the cuff
- Pilot balloon - small external balloon that reflects cuff inflation pressure; allows gauging (by palpation) whether the cuff is inflated, though it is not a reliable substitute for manometry
- Syringe port with one-way valve - Luer-lock compatible port for cuff inflation (usually takes ~10 mL of air); the one-way valve prevents deflation when the syringe is removed
- Murphy's eye - a secondary opening on the side of the tube, proximal to and opposite the bevel tip; acts as a backup airflow channel if the main tip lumen becomes occluded (e.g., against the tracheal wall); also allows looping a bougie/introducer through it for single-operator "Kiwi"/D-grip technique
- Bevelled tip - soft, round, slanted opening at the very distal end; eases passage through the vocal cords, reduces trauma, and improves visualization during passage
Exam-ready one-liner
Quick recall table across all four devices covered
| Device | Signature parts | Key exam point |
|---|---|---|
| OPA (Guedel) | Flange, bite block, curved body, tip | Contraindicated with intact gag reflex |
| NPA (trumpet) | Flange, soft shaft, bevelled tip | Tolerated with intact gag reflex |
| Nasal cannula | Prongs, Y-junction, tubing, connector | Low-flow O2, 1-6 L/min |
| ETT | Cuff, pilot balloon, Murphy's eye, bevel, connector | Definitive airway - only device that protects against aspiration |
Can you list all the instruments and drugs along with there important points such as parts, indications, doses that can be asked in emergency medicine boards viva exams
Topic Map
- Airway adjuncts (OPA/Guedel, NPA, ETT, LMA/supraglottic devices) - already covered
- Laryngoscopes (Macintosh, Miller blades, video laryngoscope) & bougie/stylet
- Cricothyroidotomy kit / surgical airway set
- Bag-valve-mask (BVM) and oxygen delivery devices (nasal cannula, HFNC, Venturi mask, NRB mask) - partly covered
- Chest tube (ICD) and needle decompression (14G cannula for tension pneumothorax)
- Ventilator basics (modes, settings a viva examiner may ask)
Brief Overview
Which category should we go deep into first for your viva prep?
Guedel Airway (Oropharyngeal Airway) — Exam Notes
1. Basics
2. Indications
- Unconscious patient with upper airway obstruction from a relaxed tongue/soft palate (GCS low, no gag reflex)
- Adjunct during bag-valve-mask ventilation to maintain patency
- Spontaneously breathing, deeply obtunded patients with no gag reflex
- Bite block during seizures or to protect an ET tube/bite injury
3. Contraindications
- Conscious patient or any patient with an intact gag reflex (will trigger vomiting/laryngospasm)
- Oral trauma
- Trismus / restricted mouth opening
- Recent oral surgery, loose or broken teeth
- Active seizure (relative - risk of dental/oral injury during insertion)
- Foreign body airway obstruction
4. Sizing
- Corner of the mouth to the earlobe (tragus), or
- Corner of the mouth to the angle of the mandible
| Size | Length | Typical patient |
|---|---|---|
| No. 3 | 80 mm | Small adult |
| No. 4 | 90 mm | Medium adult |
| No. 5 | 100 mm | Large adult |
- Too small: fails to displace tongue, can push tongue further back and worsen obstruction
- Too large: tip can press on the epiglottis, causing laryngospasm or obstructing the larynx directly
5. Insertion Technique (adults)
- Measure and select correct size.
- Open the mouth with thumb-and-index-finger scissor technique.
- Insert the airway inverted (concave side up, tip pointing toward the hard palate).
- Once the tip reaches the soft palate/back of the mouth, rotate 180° so the curve follows the tongue, seating the distal end in the hypopharynx. Pulling the jaw forward during passage helps.
- Open the mouth widely, depress the tongue with a tongue blade/laryngoscope blade.
- Advance the airway directly along the tongue's curve into the oropharynx - no rotation needed. (This is the preferred method in pediatric patients because rotation can injure the soft palate/tonsillar pillars.)
6. Complications
- Induces gagging/vomiting and aspiration if gag reflex present
- Can worsen obstruction if malpositioned (tongue pushed backward)
- Laryngospasm if oversized
- Dental/oral soft tissue trauma (e.g., case reports of fractured teeth during Guedel airway use)
- Does not protect against aspiration (unlike a cuffed ET tube) - Bailey and Love's Short Practice of Surgery, 28e
7. OPA vs NPA (common exam comparison)
| Feature | Oropharyngeal (Guedel) | Nasopharyngeal |
|---|---|---|
| Tolerated in semi-conscious patient | No (needs absent gag) | Better tolerated |
| Contraindication | Intact gag reflex | Base of skull/facial fracture, coagulopathy |
| Sizing | Corner of mouth to earlobe/angle of mandible | Tip of nose to earlobe |
| Risk | Laryngospasm, dental injury | Epistaxis, rarely intracranial placement in basilar skull fracture |
8. Key exam one-liners
- "If the patient can cough or gag, don't put in an oral airway - use an NPA."
- Guedel airway "holds the tongue forward but does not prevent aspiration" - useful for short-term BVM ventilation, not definitive airway protection.
- Always pair with jaw thrust/head-tilt-chin-lift and have suction ready (risk of inducing vomiting).
Parts of the NPA
- The wide, funnel-shaped end that sits outside the nostril.
- Function: prevents the entire tube from being swallowed/inhaled into the nasal passage; also allows air entry/exit and can be used to attach a bag-valve mask connector in some designs.
- Some devices have an adjustable flange that can be repositioned along the shaft to fix the insertion depth.
- Soft rubber or PVC/silicone tube, anatomically curved to follow the floor of the nasal cavity and posterior nasopharynx.
- Hollow lumen throughout, allowing airflow and, if needed, passage of a suction catheter.
- Marked with the size (in French gauge or internal diameter, mm) printed on the flange or shaft.
- The leading end is cut at an angle (bevel).
- Convention: the bevel opening faces the nasal septum during insertion, with the pointed heel of the bevel facing laterally (toward the turbinates) - this minimizes trauma/epistaxis from the turbinates and septum.
- The tip should ultimately rest just behind the base of the tongue/above the epiglottis, roughly at the level of the tip of the uvula, without stimulating the gag reflex.
- A pin placed transversely through the shaft just proximal to the flange.
- Purpose: prevents the airway from slipping further into the nose and disappearing into the nasopharynx/being aspirated - a classic exam point (older rubber trumpets lacked a fixed flange, so the pin was mandatory safety equipment).
- Printed size in French (Fr) gauge and corresponding internal diameter (mm). Common exam-quoted sizes:
| Size (Fr) | Internal diameter (mm) | External diameter (mm) | Typical use |
|---|---|---|---|
| 24 | 6 | 8.1 | Adult female (small) |
| 28 | 7 | 9.4 | Adult female/male |
| 32 | 8 | 10.8 | Adult male (large) |
Quick functional summary (how to present in the exam)
Sizing method (often asked alongside parts)
Contrast with OPA (frequently paired practical station)
| Feature | NPA | OPA (Guedel) |
|---|---|---|
| Material | Soft, flexible rubber/silicone | Rigid plastic |
| Tolerated with gag reflex | Yes - preferred in semi-conscious/awake patients | No - contraindicated |
| Key parts | Flange, shaft, bevelled tip, (safety pin) | Flange, bite block, curved body |
| Main risk | Epistaxis, rarely intracranial placement in basilar skull fracture | Laryngospasm, dental trauma, vomiting |
| Contraindication | Base of skull fracture, severe facial/nasal trauma, coagulopathy | Intact gag reflex |
Oropharyngeal Airway (Guedel Airway) - Parts
- Flange - the wide flat end that sits at the lips/teeth; limits depth of insertion
- Reinforced bite block - hard, kink-resistant segment just behind the flange; prevents occlusion of the air channel if the patient bites down
- Curved body (rigid, kink-resistant) - anatomically curved to push the tongue forward and keep the epiglottis off the posterior pharyngeal wall
- Tapered tip/edges - reduces oropharyngeal mucosal trauma on insertion
- Colour-coded sizing - each size (e.g. Guedel No. 3/4/5) has a distinct flange colour for quick identification
- Central channel - hollow lumen running the length of the device for airflow and suction catheter passage
Nasopharyngeal Airway (Nasal Trumpet) - Parts
- Flange - wide proximal end that rests against the nostril; limits depth of insertion (in older rubber trumpets, a safety pin was added just behind this instead of/alongside a fixed flange)
- Body/shaft with anatomical curvature - soft, non-latex PVC or silicone; follows the natural curve of the nasal floor and nasopharynx
- Internal striations (device-specific feature) - ridges inside the lumen that help a suction catheter pass through more easily
- Bevelled tip - angled distal opening; faces the nasal septum on insertion to reduce turbinate trauma and epistaxis
- Size marking on flange - internal diameter in mm (e.g. "7.5 mm") printed directly on the flange
Side-by-side exam summary
| Part | OPA (Guedel) | NPA (Trumpet) |
|---|---|---|
| Proximal end | Flange + reinforced bite block | Flange only (± safety pin on old rubber models) |
| Shaft | Rigid curved body with central channel | Soft curved cannula with lumen (± internal striations) |
| Distal end | Tapered tip | Bevelled tip (opening faces septum) |
| Material | Rigid plastic | Soft PVC/silicone/rubber |
| Sizing marked by | Colour-coded flange (Guedel No.) | mm internal diameter printed on flange |
Parts of a standard (low-flow) nasal cannula
- Two soft nasal prongs - short, curved or straight soft plastic projections that sit just inside the nostrils (should not occlude more than ~50% of the nares); curved prongs point posteriorly toward the nasopharynx to reduce mucosal irritation
- Y-junction/bifurcation - the point where the single supply tube splits into the two prongs
- Flexible tubing (limbs) - light, soft tubing that loops over/behind the ears (or is held by an elastic headband in infants) to secure the device on the face
- Sliding adjuster - a small plastic ring under the chin that cinches the tubing snug against the face for a secure fit
- Connector/supply tube - the single length of tubing (commonly 7 feet in adults) that runs from the Y-junction to the oxygen source
- Universal connector/nipple adapter - the end that attaches to the oxygen flowmeter (wall oxygen outlet, cylinder regulator, or oxygen concentrator)
High-Flow Nasal Cannula (HFNC) - additional components (common exam add-on)
- Wide-bore nasal prongs - larger diameter prongs than standard NC to tolerate high flows without excessive noise/discomfort
- Heated humidifier chamber - saturates the gas at 31-37°C to prevent mucosal drying at high flows
- Heated inspiratory tubing (single-limb circuit) - contains heater wires within the tubing wall to minimize condensation ("rainout")
- Air-oxygen blender - allows independent titration of FiO2 from 21% to 100% regardless of flow rate
- Flow generator/flowmeter - delivers flows up to 60 L/min
Quick comparison across the three devices you've covered
| Device | Key parts | Main use |
|---|---|---|
| OPA (Guedel) | Flange, bite block, curved rigid body, tip | Unconscious patient, no gag reflex |
| NPA (trumpet) | Flange, soft curved shaft, bevelled tip | Semi-conscious/awake patient with intact gag |
| Nasal cannula | Prongs, Y-junction, tubing, ear loops, connector | Spontaneously breathing patient needing low-flow supplemental O2 |
| HFNC | Wide-bore prongs, humidifier, heated tubing, blender | Acute hypoxemic respiratory failure needing high flow/FiO2 control |
Parts of the ETT (proximal to distal)
- 15 mm connector - standardized male connector (ISO 5356-1) at the proximal end; universal fit for BVM or ventilator circuit tubing
- Tube shaft - clear, hollow silicone/PVC tube; transparency allows visualization of condensation, secretions, or blood (confirms ventilation)
- Depth/centimeter markers - printed along the outside of the tube in cm from the tip; used to verify and document insertion depth at the teeth/lips (normal depth: ~21-23 cm in males, ~19-21 cm in females, measured at the incisors)
- Vocal cord marker - a bold black line near the cuff that marks a suggested optimal depth at which the vocal cords should sit (varies patient to patient - not a substitute for depth confirmation)
- Radiopaque line - a line running the length of the tube, visible on chest X-ray, used to confirm tube position/depth relative to the carina
- Caliber (internal diameter, ID) - labeled in mm on the shaft (e.g., 7.0, 7.5); larger ID = lower airflow resistance, easier suctioning/bronchoscopy
- Curvature ("Magill curve") - most tubes follow a gentle curve (~140 mm radius) matching the natural oropharyngeal-laryngeal angle
- Inflatable cuff - modern high-volume, low-pressure cuff; seals the trachea against aspiration and air leak while distributing pressure evenly to minimize mucosal ischemia
- Inflation lumen - a narrow channel running within the tube wall, carrying air from the pilot balloon/syringe port down to the cuff
- Pilot balloon - small external balloon that reflects cuff inflation pressure; allows gauging (by palpation) whether the cuff is inflated, though it is not a reliable substitute for manometry
- Syringe port with one-way valve - Luer-lock compatible port for cuff inflation (usually takes ~10 mL of air); the one-way valve prevents deflation when the syringe is removed
- Murphy's eye - a secondary opening on the side of the tube, proximal to and opposite the bevel tip; acts as a backup airflow channel if the main tip lumen becomes occluded (e.g., against the tracheal wall); also allows looping a bougie/introducer through it for single-operator "Kiwi"/D-grip technique
- Bevelled tip - soft, round, slanted opening at the very distal end; eases passage through the vocal cords, reduces trauma, and improves visualization during passage
Exam-ready one-liner
Quick recall table across all four devices covered
| Device | Signature parts | Key exam point |
|---|---|---|
| OPA (Guedel) | Flange, bite block, curved body, tip | Contraindicated with intact gag reflex |
| NPA (trumpet) | Flange, soft shaft, bevelled tip | Tolerated with intact gag reflex |
| Nasal cannula | Prongs, Y-junction, tubing, connector | Low-flow O2, 1-6 L/min |
| ETT | Cuff, pilot balloon, Murphy's eye, bevel, connector | Definitive airway - only device that protects against aspiration |
Topic Map
- Airway adjuncts (OPA/Guedel, NPA, ETT, LMA/supraglottic devices) - already covered
- Laryngoscopes (Macintosh, Miller blades, video laryngoscope) & bougie/stylet
- Cricothyroidotomy kit / surgical airway set
- Bag-valve-mask (BVM) and oxygen delivery devices (nasal cannula, HFNC, Venturi mask, NRB mask) - partly covered
- Chest tube (ICD) and needle decompression (14G cannula for tension pneumothorax)
- Ventilator basics (modes, settings a viva examiner may ask)
Brief Overview
- Airway & breathing instruments (laryngoscope, cricothyroidotomy kit, BVM, chest tube/ICD, ventilator basics)
- Circulation & access instruments (IV cannula, IO needle, central/arterial line, defibrillator/AED, pacing, pericardiocentesis)
- Trauma/immobilization instruments (cervical collar, spinal board, pelvic binder, traction splint, tourniquet)
- Resuscitation & cardiac arrest drugs (adrenaline, atropine, amiodarone, lidocaine)
- RSI drugs & antidotes (ketamine, etomidate, succinylcholine, rocuronium, naloxone, flumazenil, N-acetylcysteine, etc.)
- Status epilepticus & anaphylaxis drugs (lorazepam, phenytoin, levetiracetam, adrenaline IM, hydrocortisone)
Generate a comprehensive study guide PDF on EM airway instruments and resuscitation drugs
Topic Map
- Basic airway adjuncts - OPA (Guedel), NPA
- Bag-valve-mask (BVM) & oxygen delivery devices (nasal cannula, HFNC, NRB, Venturi mask)
- Laryngoscopes (Macintosh, Miller blades, video laryngoscope) + endotracheal tube
- Supraglottic devices (LMA, i-Gel)
- Airway adjuncts for difficult airway (bougie, stylet, Magill forceps, suction catheter)
- Surgical airway (cricothyroidotomy kit, tracheostomy set)
Overview
Which section should I build out in full detail first for the study guide?
Guedel Airway (Oropharyngeal Airway) — Exam Notes
1. Basics
2. Indications
- Unconscious patient with upper airway obstruction from a relaxed tongue/soft palate (GCS low, no gag reflex)
- Adjunct during bag-valve-mask ventilation to maintain patency
- Spontaneously breathing, deeply obtunded patients with no gag reflex
- Bite block during seizures or to protect an ET tube/bite injury
3. Contraindications
- Conscious patient or any patient with an intact gag reflex (will trigger vomiting/laryngospasm)
- Oral trauma
- Trismus / restricted mouth opening
- Recent oral surgery, loose or broken teeth
- Active seizure (relative - risk of dental/oral injury during insertion)
- Foreign body airway obstruction
4. Sizing
- Corner of the mouth to the earlobe (tragus), or
- Corner of the mouth to the angle of the mandible
| Size | Length | Typical patient |
|---|---|---|
| No. 3 | 80 mm | Small adult |
| No. 4 | 90 mm | Medium adult |
| No. 5 | 100 mm | Large adult |
- Too small: fails to displace tongue, can push tongue further back and worsen obstruction
- Too large: tip can press on the epiglottis, causing laryngospasm or obstructing the larynx directly
5. Insertion Technique (adults)
- Measure and select correct size.
- Open the mouth with thumb-and-index-finger scissor technique.
- Insert the airway inverted (concave side up, tip pointing toward the hard palate).
- Once the tip reaches the soft palate/back of the mouth, rotate 180° so the curve follows the tongue, seating the distal end in the hypopharynx. Pulling the jaw forward during passage helps.
- Open the mouth widely, depress the tongue with a tongue blade/laryngoscope blade.
- Advance the airway directly along the tongue's curve into the oropharynx - no rotation needed. (This is the preferred method in pediatric patients because rotation can injure the soft palate/tonsillar pillars.)
6. Complications
- Induces gagging/vomiting and aspiration if gag reflex present
- Can worsen obstruction if malpositioned (tongue pushed backward)
- Laryngospasm if oversized
- Dental/oral soft tissue trauma (e.g., case reports of fractured teeth during Guedel airway use)
- Does not protect against aspiration (unlike a cuffed ET tube) - Bailey and Love's Short Practice of Surgery, 28e
7. OPA vs NPA (common exam comparison)
| Feature | Oropharyngeal (Guedel) | Nasopharyngeal |
|---|---|---|
| Tolerated in semi-conscious patient | No (needs absent gag) | Better tolerated |
| Contraindication | Intact gag reflex | Base of skull/facial fracture, coagulopathy |
| Sizing | Corner of mouth to earlobe/angle of mandible | Tip of nose to earlobe |
| Risk | Laryngospasm, dental injury | Epistaxis, rarely intracranial placement in basilar skull fracture |
8. Key exam one-liners
- "If the patient can cough or gag, don't put in an oral airway - use an NPA."
- Guedel airway "holds the tongue forward but does not prevent aspiration" - useful for short-term BVM ventilation, not definitive airway protection.
- Always pair with jaw thrust/head-tilt-chin-lift and have suction ready (risk of inducing vomiting).
Parts of the NPA
- The wide, funnel-shaped end that sits outside the nostril.
- Function: prevents the entire tube from being swallowed/inhaled into the nasal passage; also allows air entry/exit and can be used to attach a bag-valve mask connector in some designs.
- Some devices have an adjustable flange that can be repositioned along the shaft to fix the insertion depth.
- Soft rubber or PVC/silicone tube, anatomically curved to follow the floor of the nasal cavity and posterior nasopharynx.
- Hollow lumen throughout, allowing airflow and, if needed, passage of a suction catheter.
- Marked with the size (in French gauge or internal diameter, mm) printed on the flange or shaft.
- The leading end is cut at an angle (bevel).
- Convention: the bevel opening faces the nasal septum during insertion, with the pointed heel of the bevel facing laterally (toward the turbinates) - this minimizes trauma/epistaxis from the turbinates and septum.
- The tip should ultimately rest just behind the base of the tongue/above the epiglottis, roughly at the level of the tip of the uvula, without stimulating the gag reflex.
- A pin placed transversely through the shaft just proximal to the flange.
- Purpose: prevents the airway from slipping further into the nose and disappearing into the nasopharynx/being aspirated - a classic exam point (older rubber trumpets lacked a fixed flange, so the pin was mandatory safety equipment).
- Printed size in French (Fr) gauge and corresponding internal diameter (mm). Common exam-quoted sizes:
| Size (Fr) | Internal diameter (mm) | External diameter (mm) | Typical use |
|---|---|---|---|
| 24 | 6 | 8.1 | Adult female (small) |
| 28 | 7 | 9.4 | Adult female/male |
| 32 | 8 | 10.8 | Adult male (large) |
Quick functional summary (how to present in the exam)
Sizing method (often asked alongside parts)
Contrast with OPA (frequently paired practical station)
| Feature | NPA | OPA (Guedel) |
|---|---|---|
| Material | Soft, flexible rubber/silicone | Rigid plastic |
| Tolerated with gag reflex | Yes - preferred in semi-conscious/awake patients | No - contraindicated |
| Key parts | Flange, shaft, bevelled tip, (safety pin) | Flange, bite block, curved body |
| Main risk | Epistaxis, rarely intracranial placement in basilar skull fracture | Laryngospasm, dental trauma, vomiting |
| Contraindication | Base of skull fracture, severe facial/nasal trauma, coagulopathy | Intact gag reflex |
Oropharyngeal Airway (Guedel Airway) - Parts
- Flange - the wide flat end that sits at the lips/teeth; limits depth of insertion
- Reinforced bite block - hard, kink-resistant segment just behind the flange; prevents occlusion of the air channel if the patient bites down
- Curved body (rigid, kink-resistant) - anatomically curved to push the tongue forward and keep the epiglottis off the posterior pharyngeal wall
- Tapered tip/edges - reduces oropharyngeal mucosal trauma on insertion
- Colour-coded sizing - each size (e.g. Guedel No. 3/4/5) has a distinct flange colour for quick identification
- Central channel - hollow lumen running the length of the device for airflow and suction catheter passage
Nasopharyngeal Airway (Nasal Trumpet) - Parts
- Flange - wide proximal end that rests against the nostril; limits depth of insertion (in older rubber trumpets, a safety pin was added just behind this instead of/alongside a fixed flange)
- Body/shaft with anatomical curvature - soft, non-latex PVC or silicone; follows the natural curve of the nasal floor and nasopharynx
- Internal striations (device-specific feature) - ridges inside the lumen that help a suction catheter pass through more easily
- Bevelled tip - angled distal opening; faces the nasal septum on insertion to reduce turbinate trauma and epistaxis
- Size marking on flange - internal diameter in mm (e.g. "7.5 mm") printed directly on the flange
Side-by-side exam summary
| Part | OPA (Guedel) | NPA (Trumpet) |
|---|---|---|
| Proximal end | Flange + reinforced bite block | Flange only (± safety pin on old rubber models) |
| Shaft | Rigid curved body with central channel | Soft curved cannula with lumen (± internal striations) |
| Distal end | Tapered tip | Bevelled tip (opening faces septum) |
| Material | Rigid plastic | Soft PVC/silicone/rubber |
| Sizing marked by | Colour-coded flange (Guedel No.) | mm internal diameter printed on flange |
Parts of a standard (low-flow) nasal cannula
- Two soft nasal prongs - short, curved or straight soft plastic projections that sit just inside the nostrils (should not occlude more than ~50% of the nares); curved prongs point posteriorly toward the nasopharynx to reduce mucosal irritation
- Y-junction/bifurcation - the point where the single supply tube splits into the two prongs
- Flexible tubing (limbs) - light, soft tubing that loops over/behind the ears (or is held by an elastic headband in infants) to secure the device on the face
- Sliding adjuster - a small plastic ring under the chin that cinches the tubing snug against the face for a secure fit
- Connector/supply tube - the single length of tubing (commonly 7 feet in adults) that runs from the Y-junction to the oxygen source
- Universal connector/nipple adapter - the end that attaches to the oxygen flowmeter (wall oxygen outlet, cylinder regulator, or oxygen concentrator)
High-Flow Nasal Cannula (HFNC) - additional components (common exam add-on)
- Wide-bore nasal prongs - larger diameter prongs than standard NC to tolerate high flows without excessive noise/discomfort
- Heated humidifier chamber - saturates the gas at 31-37°C to prevent mucosal drying at high flows
- Heated inspiratory tubing (single-limb circuit) - contains heater wires within the tubing wall to minimize condensation ("rainout")
- Air-oxygen blender - allows independent titration of FiO2 from 21% to 100% regardless of flow rate
- Flow generator/flowmeter - delivers flows up to 60 L/min
Quick comparison across the three devices you've covered
| Device | Key parts | Main use |
|---|---|---|
| OPA (Guedel) | Flange, bite block, curved rigid body, tip | Unconscious patient, no gag reflex |
| NPA (trumpet) | Flange, soft curved shaft, bevelled tip | Semi-conscious/awake patient with intact gag |
| Nasal cannula | Prongs, Y-junction, tubing, ear loops, connector | Spontaneously breathing patient needing low-flow supplemental O2 |
| HFNC | Wide-bore prongs, humidifier, heated tubing, blender | Acute hypoxemic respiratory failure needing high flow/FiO2 control |
Parts of the ETT (proximal to distal)
- 15 mm connector - standardized male connector (ISO 5356-1) at the proximal end; universal fit for BVM or ventilator circuit tubing
- Tube shaft - clear, hollow silicone/PVC tube; transparency allows visualization of condensation, secretions, or blood (confirms ventilation)
- Depth/centimeter markers - printed along the outside of the tube in cm from the tip; used to verify and document insertion depth at the teeth/lips (normal depth: ~21-23 cm in males, ~19-21 cm in females, measured at the incisors)
- Vocal cord marker - a bold black line near the cuff that marks a suggested optimal depth at which the vocal cords should sit (varies patient to patient - not a substitute for depth confirmation)
- Radiopaque line - a line running the length of the tube, visible on chest X-ray, used to confirm tube position/depth relative to the carina
- Caliber (internal diameter, ID) - labeled in mm on the shaft (e.g., 7.0, 7.5); larger ID = lower airflow resistance, easier suctioning/bronchoscopy
- Curvature ("Magill curve") - most tubes follow a gentle curve (~140 mm radius) matching the natural oropharyngeal-laryngeal angle
- Inflatable cuff - modern high-volume, low-pressure cuff; seals the trachea against aspiration and air leak while distributing pressure evenly to minimize mucosal ischemia
- Inflation lumen - a narrow channel running within the tube wall, carrying air from the pilot balloon/syringe port down to the cuff
- Pilot balloon - small external balloon that reflects cuff inflation pressure; allows gauging (by palpation) whether the cuff is inflated, though it is not a reliable substitute for manometry
- Syringe port with one-way valve - Luer-lock compatible port for cuff inflation (usually takes ~10 mL of air); the one-way valve prevents deflation when the syringe is removed
- Murphy's eye - a secondary opening on the side of the tube, proximal to and opposite the bevel tip; acts as a backup airflow channel if the main tip lumen becomes occluded (e.g., against the tracheal wall); also allows looping a bougie/introducer through it for single-operator "Kiwi"/D-grip technique
- Bevelled tip - soft, round, slanted opening at the very distal end; eases passage through the vocal cords, reduces trauma, and improves visualization during passage
Exam-ready one-liner
Quick recall table across all four devices covered
| Device | Signature parts | Key exam point |
|---|---|---|
| OPA (Guedel) | Flange, bite block, curved body, tip | Contraindicated with intact gag reflex |
| NPA (trumpet) | Flange, soft shaft, bevelled tip | Tolerated with intact gag reflex |
| Nasal cannula | Prongs, Y-junction, tubing, connector | Low-flow O2, 1-6 L/min |
| ETT | Cuff, pilot balloon, Murphy's eye, bevel, connector | Definitive airway - only device that protects against aspiration |
Topic Map
- Airway adjuncts (OPA/Guedel, NPA, ETT, LMA/supraglottic devices) - already covered
- Laryngoscopes (Macintosh, Miller blades, video laryngoscope) & bougie/stylet
- Cricothyroidotomy kit / surgical airway set
- Bag-valve-mask (BVM) and oxygen delivery devices (nasal cannula, HFNC, Venturi mask, NRB mask) - partly covered
- Chest tube (ICD) and needle decompression (14G cannula for tension pneumothorax)
- Ventilator basics (modes, settings a viva examiner may ask)
Brief Overview
- Airway & breathing instruments (laryngoscope, cricothyroidotomy kit, BVM, chest tube/ICD, ventilator basics)
- Circulation & access instruments (IV cannula, IO needle, central/arterial line, defibrillator/AED, pacing, pericardiocentesis)
- Trauma/immobilization instruments (cervical collar, spinal board, pelvic binder, traction splint, tourniquet)
- Resuscitation & cardiac arrest drugs (adrenaline, atropine, amiodarone, lidocaine)
- RSI drugs & antidotes (ketamine, etomidate, succinylcholine, rocuronium, naloxone, flumazenil, N-acetylcysteine, etc.)
- Status epilepticus & anaphylaxis drugs (lorazepam, phenytoin, levetiracetam, adrenaline IM, hydrocortisone)
Topic Map
- Basic airway adjuncts - OPA (Guedel), NPA
- Bag-valve-mask (BVM) & oxygen delivery devices (nasal cannula, HFNC, NRB, Venturi mask)
- Laryngoscopes (Macintosh, Miller blades, video laryngoscope) + endotracheal tube
- Supraglottic devices (LMA, i-Gel)
- Airway adjuncts for difficult airway (bougie, stylet, Magill forceps, suction catheter)
- Surgical airway (cricothyroidotomy kit, tracheostomy set)
Overview
mkdir -p /tmp/workspace/em-study-guide/output && ls -la /tmp/workspace/
Quick answer
EM Airway Instruments & Resuscitation Drugs — Viva Study Guide
SECTION A: AIRWAY INSTRUMENTS
1. Oropharyngeal Airway (Guedel Airway)
- Parts: Flange, reinforced bite block, curved rigid body, tapered tip, colour-coded sizing
- Sizing: Corner of mouth to earlobe/angle of mandible. Adult sizes: No. 3 (80mm), No. 4 (90mm), No. 5 (100mm)
- Indications: Unconscious patient, no gag reflex, BVM adjunct
- Contraindications: Intact gag reflex (absolute); oral trauma, trismus (relative)
- Complications: Vomiting/aspiration, worsened obstruction if too small, laryngospasm if too big, dental trauma
2. Nasopharyngeal Airway (Nasal Trumpet)
- Parts: Flange, soft curved shaft, bevelled tip, (safety pin in older rubber models)
- Sizing: Tip of nose to earlobe; sized in French gauge/internal diameter (24Fr=6mm, 28Fr=7mm, 32Fr=8mm)
- Indications: Semi-conscious/awake patients with intact gag reflex
- Contraindications: Base of skull/facial fracture, coagulopathy, nasal trauma
- Complications: Epistaxis, rarely intracranial placement in basilar skull fracture
3. Nasal Cannula / Oxygen Delivery Devices
- Parts: Two soft prongs, Y-junction, tubing with ear loops, sliding adjuster, universal connector
- Flow: 1–6 L/min low-flow O2
- HFNC additional parts: Wide-bore prongs, heated humidifier, heated single-limb circuit, air-O2 blender (up to 60 L/min, FiO2 21–100%)
4. Laryngoscope (Macintosh & Miller Blades)
- Parts: Handle (battery/power source), blade, light source, flange
- Macintosh (curved): Tip placed in vallecula, indirectly lifts epiglottis via hyoepiglottic ligament; most common in adults
- Miller (straight): Tip placed under/behind epiglottis, directly lifts it; preferred in infants/small children (large floppy epiglottis)
- Sizing: Blade length tip-to-handle joint should be within 1cm of the angle of the mandible
- Video laryngoscopy: Improves glottic view in difficult airway, especially with cervical spine precautions
5. Endotracheal Tube (ETT)
- Parts: 15mm connector, tube shaft, depth/cm markers, vocal cord marker, radiopaque line, cuff, inflation lumen, pilot balloon, syringe port (one-way valve), Murphy's eye, bevelled tip
- Sizing: Adult males ~8.0–8.5mm ID, females ~7.0–7.5mm ID; depth ~21–23cm (male), ~19–21cm (female) at incisors
- Confirmation: Direct visualization, capnography (gold standard), bilateral chest rise, auscultation, CXR (tip 2–4cm above carina)
6. Supraglottic Airway Devices (LMA, i-Gel)
- LMA: Inflatable cuff mask inserted blindly via mouth, seals around glottic opening (Dr. Archie Brain, first-generation SAD)
- i-Gel: Non-inflating gel cuff, faster insertion, gastric drainage channel, less sore throat than LMA
- Indications: Failed BVM ventilation, failed intubation attempt, elective anesthesia cases, difficult airway rescue
- Limitation: Does not fully protect against aspiration like a cuffed ETT
7. Bag-Valve-Mask (BVM)
- Parts: Face mask, self-inflating bag, one-way valve, PEEP valve, oxygen inlet/tubing, reservoir bag, air-inlet/pressure-release valve
- Function: Delivers ~75–100% O2 with reservoir and tight seal; minimum bag volume 450mL for older children/adults
- Technique: E-C clamp or two-handed two-person technique for optimal seal
8. Cricothyroidotomy Kit
- Indications: "Can't intubate, can't oxygenate" (CICO) scenario
- Techniques: Scalpel-bougie-tube technique (fastest, Difficult Airway Society recommended), Seldinger/cannula technique (e.g., Melker kit)
- Landmark: Cricothyroid membrane, identified via "laryngeal handshake" technique
SECTION B: RESUSCITATION DRUGS
1. Epinephrine (Adrenaline)
- Dose (cardiac arrest): 1 mg IV/IO every 3–5 minutes (adult); 0.01 mg/kg (max 1mg) in children
- Dose (anaphylaxis): 0.3–0.5 mg IM (1:1000)
- ET dose (if no IV/IO): 2–2.5 mg diluted
- Mechanism: Alpha and beta-adrenergic agonist — increases coronary/cerebral perfusion pressure
- Note: Only drug (with amiodarone) currently recommended in ACLS cardiac arrest algorithm
2. Atropine
- Dose (symptomatic bradycardia): 1 mg IV every 3–5 min, max total 3 mg
- Note: Removed from pulseless arrest/PEA/asystole algorithm (no longer used there); still first-line for symptomatic bradycardia and organophosphate poisoning (much higher doses used there)
3. Amiodarone
- Dose (VF/pulseless VT): 300 mg IV/IO rapid bolus; may repeat 150 mg once
- Pediatric: 5 mg/kg bolus, may repeat twice for refractory VF/pVT
- Note: 2016 ROC-ALPS trial showed no significant survival benefit vs placebo, but remains in ACLS algorithm
4. Lidocaine
- Dose: Alternative to amiodarone for VF/pVT; ~1–1.5 mg/kg IV bolus
- Note: No proven survival benefit over amiodarone or placebo (2016 study)
5. Vasopressors/Inotropes
| Drug | Typical Dose | Notes |
|---|---|---|
| Norepinephrine | 0.01–0.5 mcg/kg/min | First-line in septic shock; fewer arrhythmias than dopamine |
| Dopamine | 5–20 mcg/kg/min | Alternative in bradycardia with low arrhythmia risk; no renal-dose benefit |
| Dobutamine | 2.5–20 mcg/kg/min | Inotrope, added when cardiac output low despite norepinephrine |
| Vasopressin | Up to 0.03 U/min | Add-on in septic shock; no longer in cardiac arrest algorithm |
6. RSI Induction Agents
| Drug | Dose | Key Feature |
|---|---|---|
| Ketamine | 1–2 mg/kg IV | Hemodynamically stable/hypertensive; bronchodilator; good in shock/asthma |
| Etomidate | 0.3 mg/kg IV | Hemodynamically neutral; risk of adrenal suppression |
| Propofol | 1.5–2.5 mg/kg IV | Causes hypotension; good for status epilepticus/seizure |
7. Neuromuscular Blockers (Paralytics)
| Drug | Dose | Key Feature |
|---|---|---|
| Succinylcholine | 1–1.5 mg/kg IV | Depolarizing; fast onset/short duration; risk: hyperkalemia, malignant hyperthermia; contraindicated in burns, denervation, neuromuscular disease |
| Rocuronium | 1.2 mg/kg IV (RSI dose) | Non-depolarizing; used when succinylcholine contraindicated; reversed by sugammadex |
8. Reversal/Antidote Agents
- Naloxone: 0.4–2 mg IV/IM/IN for opioid overdose; can repeat
- Flumazenil: 0.2 mg IV for benzodiazepine reversal (caution: seizure risk in chronic users)
- Sugammadex: 2–4 mg/kg IV to reverse rocuronium/vecuronium-induced paralysis
Central line with parts and diagram with explanation
central venous catheter parts diagram labeled lumens hub clamp Seldinger technique
Central Venous Catheter (Central Line) - Parts & Diagram
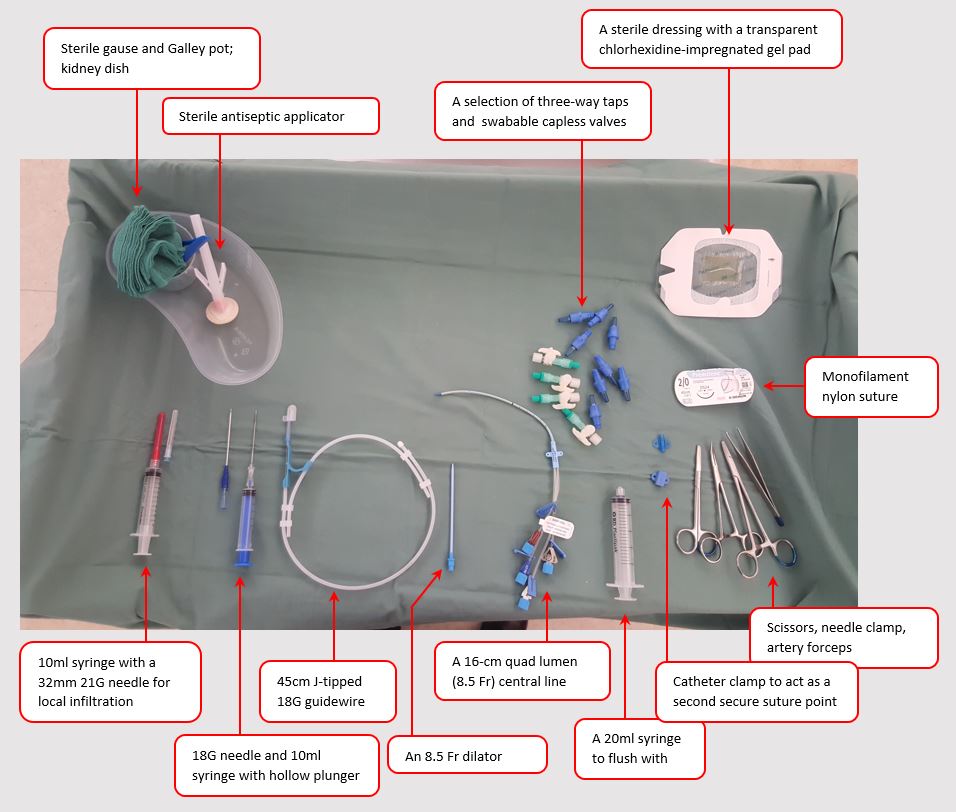
Parts of the Central Line Kit/Catheter
- Introducer needle - an 18G needle (with 10 mL syringe attached) used to puncture the target vein under negative pressure aspiration until dark venous blood flashback is seen
- Guidewire - a flexible, J-tipped (soft, curved end) wire, typically 45 cm, 18G; passed through the needle into the vein lumen once flashback confirms venous placement (this is the core of the Seldinger technique)
- Dilator - a rigid, tapered catheter (e.g., 8.5 Fr) passed over the guidewire to dilate the subcutaneous tract and vessel wall before the definitive catheter is threaded
- The central venous catheter itself - typically a multi-lumen (double, triple, or quad-lumen) catheter, e.g., 16 cm, 8.5 Fr quad-lumen for adults; each lumen exits at a different point along the catheter length to allow simultaneous infusions
- Lumens/hubs (color-coded) - each port at the proximal end is color-coded (commonly brown/white = distal/largest lumen, blue = medial, and additional proximal ports) and may need caps or three-way taps removed before insertion
- Three-way taps / needleless/swabable capless valves - attached to each hub for connecting IV lines, flushing, and preventing air embolism/backflow
- Catheter clamp - a plastic clamp on the catheter body that acts as a second secure suturing point in addition to the wings
- Suture wings and monofilament nylon suture (2-0) - used to anchor the catheter to the skin
- Local anesthetic syringe (10 mL with 21G needle) - for infiltrating the skin/subcutaneous tissue before puncture
- Flush syringes (10-20 mL, saline or heparinized saline) - used to confirm lumen patency and flush each port after insertion, preventing thrombosis
- Sterile dressing (chlorhexidine-impregnated transparent dressing) - covers the insertion site to reduce catheter-related bloodstream infection (CRBSI/CLABSI)
- Scalpel blade (#11) - occasionally used to nick the skin, easing dilator/catheter passage
- Scissors, needle driver (needle clamp), artery forceps - for suturing and tissue handling
Seldinger Technique - Step-by-Step Explanation
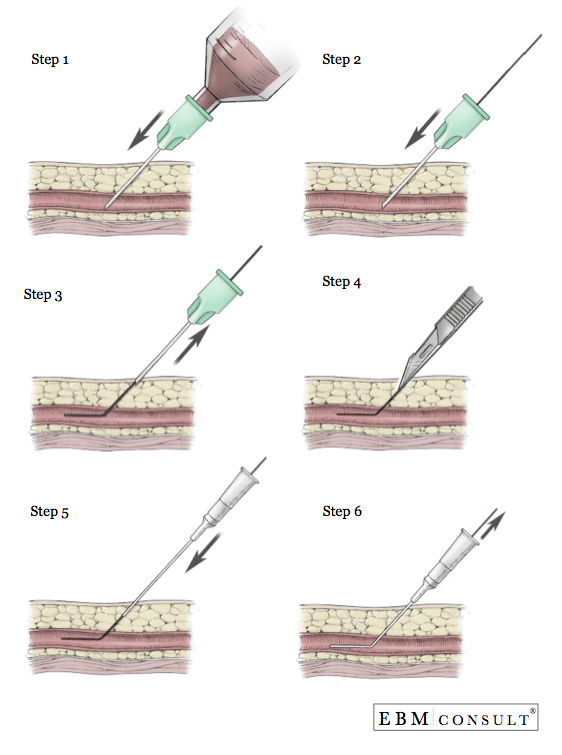
- Locate and anesthetize the target vein (internal jugular, subclavian, or femoral) - ideally under ultrasound guidance for IJ/subclavian access
- Needle puncture - advance the introducer needle with a syringe under constant negative pressure until venous blood flashback confirms intravascular position (dark, non-pulsatile blood; pulsatile bright red blood suggests arterial puncture - stop and hold pressure)
- Pass the guidewire through the needle into the vein, then remove the needle, leaving the wire in place (never let go of the wire)
- Skin nick with a scalpel at the wire entry site if the tract needs widening
- Dilate the tract by passing the dilator over the guidewire, then remove the dilator
- Thread the central catheter over the guidewire into the vein, then remove the guidewire, leaving the catheter in place
- Aspirate and flush all lumens to confirm intravascular position and patency
- Secure the catheter with sutures at the wings/clamp, apply the sterile dressing
- Confirm placement - chest X-ray for IJ/subclavian lines (catheter tip should sit in the SVC, just above the cavoatrial junction); ultrasound can also confirm no pneumothorax
Key Indications
- Central venous pressure monitoring, vasopressor/inotrope infusion, hypertonic solutions/TPN, hemodialysis access (larger bore), difficult peripheral access, rapid volume resuscitation (large-bore multi-lumen)
Key Complications (common viva question)
- Pneumothorax/hemothorax (especially subclavian approach)
- Arterial puncture/hematoma
- Air embolism
- Catheter malposition or arrhythmia (if wire/catheter enters right atrium/ventricle)
- Catheter-related bloodstream infection (CRBSI/CLABSI) - reduced by chlorhexidine dressings, maximal sterile barrier precautions
- Venous thrombosis
Quick comparison of access sites (frequent viva follow-up)
| Site | Advantage | Key risk |
|---|---|---|
| Internal jugular | Easy ultrasound guidance, compressible if bleeding | Carotid puncture, higher infection risk than subclavian |
| Subclavian | Lowest infection risk, comfortable for patient | Highest pneumothorax risk, non-compressible if bleeding |
| Femoral | Fastest in emergency/no ultrasound needed | Highest infection/DVT risk, not for long-term use |
Tell about each lumen
triple lumen central venous catheter distal medial proximal port color code uses CVP drugs
Central Venous Catheter - Each Lumen Explained
1. Distal Lumen
- Location: Opens at the very tip of the catheter (most distal point, farthest from the hub)
- Bore: Largest (16G) - because it needs to accommodate the highest flow
- Color code (common convention, not universally standardized): Brown or white
- Uses:
- CVP (central venous pressure) monitoring - since the tip sits closest to the right atrium/SVC, it gives the most accurate pressure reading
- Rapid fluid resuscitation or blood/blood product transfusion (largest bore = fastest flow)
- Blood sampling
- Administration of vasopressors (norepinephrine, vasopressin, phenylephrine) - preferred lumen since these need reliable central delivery close to the circulation
2. Medial (Middle) Lumen
- Location: Opens a short distance proximal to the distal port (somewhere along the mid-shaft)
- Bore: 18G (narrower than distal)
- Color code: Blue (by common convention)
- Uses:
- Dedicated line for TPN (total parenteral nutrition) and lipid infusions - kept separate from other drugs to avoid incompatibility/precipitation and reduce infection risk from repeated access
- Continuous infusions that should not be interrupted or mixed with bolus medications
3. Proximal Lumen
- Location: Opens closest to the hub/skin entry point (farthest from the catheter tip)
- Bore: 18G
- Color code: White or brown/red (by common convention - varies by manufacturer)
- Uses:
- Routine medication administration, IV fluids
- Blood draws
- General-purpose access port used most frequently at the bedside
Key teaching points for viva
- Why separate lumens matter: Each lumen is a fully isolated channel from hub to its own individual exit point on the catheter - this lets you run incompatible drugs simultaneously (e.g., vasopressor through distal while TPN runs through medial) without them mixing inside the catheter.
- No universal color standard: Unlike peripheral IV cannulas (which follow a fairly standardized international color-gauge code), central line lumen colors are not standardized across manufacturers - a 2025 review flagged this as a real patient-safety/medication-error risk, since "brown," "blue," and "white" can mean different lumens on different brands. Always confirm by tracing the tubing or checking the printed label on each lumen, not just the color.
- Distal = biggest and most central -> best for CVP monitoring, rapid transfusion, and vasoactive drugs.
- Exam trap: Don't say "the proximal lumen is best for CVP" - the distal lumen (tip-opening, largest bore) is correct because it best reflects true central venous/right atrial pressure and gives the fastest flow.
- Quad-lumen and other multi-lumen catheters follow the same logic - just add extra dedicated channels (e.g., an additional port for continuous infusions), with the largest/most distal always reserved for CVP and rapid infusion.
Merocele nasal packing same as above
Merocele nasal pack parts diagram airway tube tail insertion epistaxis
I/O needle
intraosseous needle EZ-IO parts diagram trocar hub catheter insertion sites
Intraosseous (IO) Needle - Parts, Diagram & Explanation
Component Diagram (EZ-IO System - most common powered device)
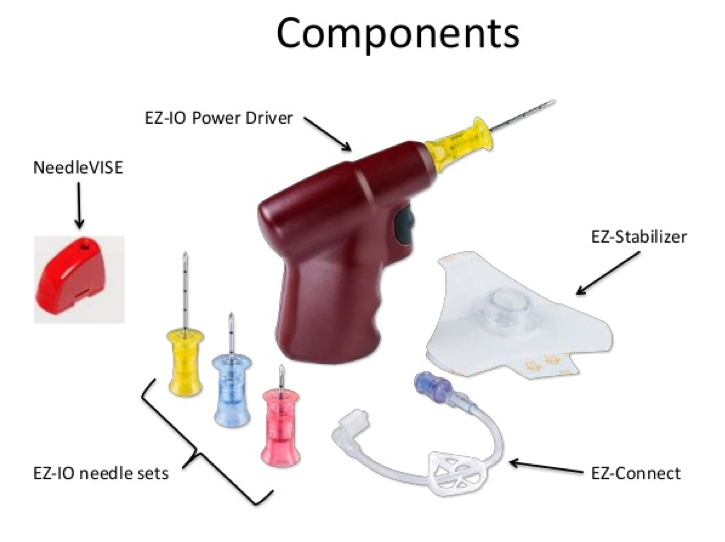
Parts of the IO Needle/System
- IO needle (catheter over trocar/stylet) - a rigid, hollow needle with an inner trocar (removable solid stylet) that provides the cutting/drilling tip; once bone marrow is reached, the trocar is withdrawn leaving only the hollow catheter in place for infusion
- Hub - color-coded by needle length/size for quick selection:
- Pink/45 mm - for humeral insertion or patients with excess overlying tissue
- Blue/25 mm - standard adult (>40 kg)
- Yellow/15 mm - pediatric (3-39 kg)
- Depth marker line - a black line 5 mm from the hub; after insertion, at least one line should remain visible above the skin to confirm adequate needle length was used
- EZ-IO power driver - battery-operated drill that attaches to the needle hub and drives it through the cortex into the medullary cavity (manual/spring-loaded IO devices exist too, e.g., NIO, Bone Injection Gun)
- EZ-Connect extension tubing - short primed IV extension line that connects the needle hub to a syringe or IV infusion set, minimizing catheter movement during flushing/infusion
- EZ-Stabilizer dressing - an adhesive stabilizer disc placed around the needle hub at the skin to prevent dislodgement
- NeedleVISE (sharps safety clip) - protects the used needle/trocar for safe disposal
- Syringes (10 mL x 3) - for the initial saline flush (to clear marrow and confirm patency) and for drug/fluid administration by manual push if a pump/pressure bag isn't available
Insertion Sites (labeled diagram)
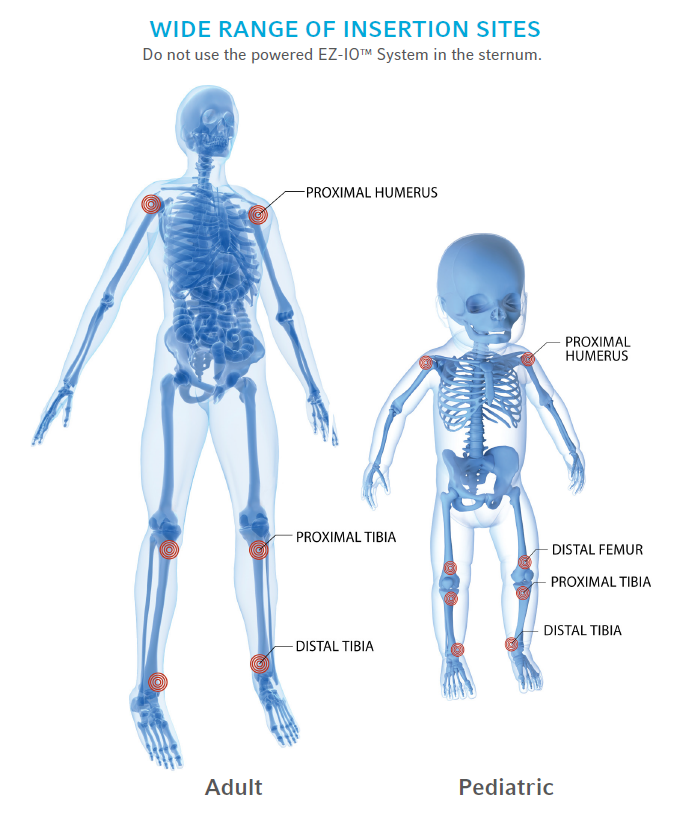
| Site | Landmark | Notes |
|---|---|---|
| Proximal tibia | 1-3 cm distal to the tibial tuberosity, on the flat medial surface | Most common/preferred site, especially in children |
| Distal tibia | 1-2 cm proximal to the medial malleolus | Alternative when proximal tibia unavailable |
| Proximal humerus | Greater tubercle, ~1 cm above the surgical neck | Fastest flow rate (excluding sternum) - preferred in resuscitation when time-critical drug delivery matters |
| Distal femur | ~1-2 cm above the patella, midline | Used mainly in infants/young children |
| Sternum (specialized device only) | - | Not used with powered EZ-IO system |
Technique (exam-ready steps)
- Select needle length based on tissue depth (not patient size) - confirm using the depth marker
- Clean site with chlorhexidine, insert needle perpendicular to the bone until it contacts the periosteum
- Drill (or push manually) through the cortex until a sudden "give"/loss of resistance is felt - this signals entry into the medullary cavity
- Remove the trocar/stylet, leaving the catheter in place
- Confirm placement: aspirate for bone marrow (not always successful, especially in children), needle stands firmly without support, and free flow of fluid without significant subcutaneous swelling
- Flush with 10 mL saline (this causes brief significant pain even in unconscious/sedated patients due to periosteal stretch - warn if patient is awake, consider 2% preservative-free lidocaine flush first in a conscious patient)
- Connect EZ-Connect tubing and infusion; secure with the stabilizer dressing
Indications
- Any emergent/urgent situation where IV access is difficult or delayed (cardiac arrest, severe shock, trauma, status epilepticus) - per ACLS/ATLS/PALS guidelines
- Can be used for any drug or fluid that can be given IV, including vasopressors, blood products, and resuscitation drugs
Contraindications
- Fracture or recent orthopedic surgery/hardware at the chosen bone
- Infection (cellulitis/osteomyelitis) at the insertion site
- Previous failed IO attempt at the same bone (risk of extravasation through the prior cortical breach)
- Inability to identify landmarks (e.g., severe edema)
Complications
- Extravasation/compartment syndrome (most feared - monitor the limb closely)
- Osteomyelitis, cellulitis (rare with short dwell times)
- Growth plate injury in children (avoid epiphyseal plate)
- Fat embolism (theoretical)
- Failure to penetrate the medullary cavity (needle too short or malpositioned)
- Pain on infusion (periosteal stretch - most common issue in awake patients)
Key viva point
Lma
laryngeal mask airway LMA parts diagram cuff aperture bars shaft pilot balloon labeled