
Vaginal hysterectomy
Reading File
What would you like to know about vaginal hysterectomy?
- Procedure and steps
- Indications and contraindications
- Preoperative preparation
- Complications and postoperative care
- Exam-style short note
Everything
Reading File
“Everything” about vaginal hysterectomy is a full exam-note topic. Here is the map:
- Definition, types, and relevant pelvic anatomy
- Indications, selection criteria, and contraindications
- Advantages and limitations versus abdominal and laparoscopic routes
- Preoperative assessment, counseling, investigations, and preparation
- Operative steps and surgical anatomy
- Intraoperative complications and their prevention/management
- Postoperative care, recovery, and discharge advice
- Early and late complications
- Special situations: prolapse, enlarged uterus, prior cesarean/operations, adnexal surgery
- Viva questions, short notes, and exam answer format
At a high level, vaginal hysterectomy removes the uterus through the vagina, without an abdominal incision. When a benign hysterectomy is appropriate and vaginal access is feasible, it is generally associated with faster recovery and fewer wound-related issues than an abdominal approach. The safest route depends on uterine size and mobility, vaginal access, associated pelvic disease, prior surgery, need for concurrent procedures, and surgeon expertise.
Which section should I cover in detail first?
Asking for Preferences
Choose one section for a detailed note.
What would you like to know about vaginal hysterectomy?
- Procedure and steps
- Indications and contraindications
- Preoperative preparation
- Complications and postoperative care
- Exam-style short note
“Everything” about vaginal hysterectomy is a full exam-note topic. Here is the map:
- Definition, types, and relevant pelvic anatomy
- Indications, selection criteria, and contraindications
- Advantages and limitations versus abdominal and laparoscopic routes
- Preoperative assessment, counseling, investigations, and preparation
- Operative steps and surgical anatomy
- Intraoperative complications and their prevention/management
- Postoperative care, recovery, and discharge advice
- Early and late complications
- Special situations: prolapse, enlarged uterus, prior cesarean/operations, adnexal surgery
- Viva questions, short notes, and exam answer format
At a high level, vaginal hysterectomy removes the uterus through the vagina, without an abdominal incision. When a benign hysterectomy is appropriate and vaginal access is feasible, it is generally associated with faster recovery and fewer wound-related issues than an abdominal approach. The safest route depends on uterine size and mobility, vaginal access, associated pelvic disease, prior surgery, need for concurrent procedures, and surgeon expertise.
Which section should I cover in detail first?Please choose one to start:
- Indications and selection
- Operative steps
- Complications
- Preoperative and postoperative care
- Exam-ready full answer
Explain the operative steps and pelvic anatomy
Reading File
Finding Sources
Finding Sources
Searching PubMed
"Vaginal Hysterectomy"[MeSH Terms]
Searching the Web
ACOG vaginal hysterectomy route pelvic anatomy uterosacral cardinal ligament bladder ureter
Searching Images
female pelvic anatomy vaginal hysterectomy uterosacral cardinal ligaments uterine artery ureter diagram
Reading File
Finding Sources
query_images_db
Reading File
Reading File
Reading Web Page
https://www.acog.org/clinical/clinical-guidance/committee-op…
Vaginal hysterectomy: pelvic anatomy and operative steps
A vaginal hysterectomy (VH) is removal of the uterus and cervix through the vaginal route. The sequence is effectively the reverse of abdominal hysterectomy: the vaginal attachments and lower pedicles are divided first, and the upper uterine or cornual pedicles last. This is an operative outline for study and supervised surgical training, not a substitute for specialist operative instruction.
When feasible for benign disease, the vaginal route is generally preferred because it avoids an abdominal incision and is associated with favorable recovery outcomes. ACOG route guidance emphasizes that route selection must remain individualized to anatomy, associated disease, and surgeon experience.
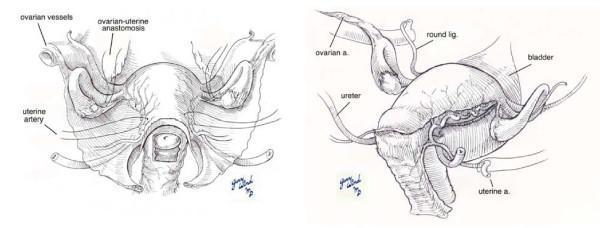
Pelvic anatomy relevant to vaginal hysterectomy
1. Uterus, cervix, and vaginal fornices
- The cervix protrudes into the upper vagina, creating:
- anterior fornix
- posterior fornix
- right and left lateral fornices
- The posterior fornix is closely related to the rectouterine pouch, also called the pouch of Douglas. It provides the usual first peritoneal entry in VH.
- The anterior fornix is related to the bladder and vesicouterine peritoneal reflection. It is opened only after the bladder is mobilized cephalad and away from the cervix.
2. Bladder and vesicocervical plane
- The bladder lies anterior to the cervix and lower uterine segment.
- The surgical plane is between the bladder and cervix, through the vesicocervical fascia.
- Prior cesarean delivery, infection, endometriosis, or previous pelvic surgery can obliterate this plane and increase the risk of cystotomy.
- The bladder is displaced anteriorly with a retractor after opening the anterior peritoneum.
3. Rectum and posterior cul-de-sac
- The rectum lies behind the posterior vaginal wall and cervix.
- Entry into the posterior cul-de-sac must be controlled, with correct recognition of the peritoneum, especially where adhesions, deep endometriosis, or obliteration of the pouch of Douglas is suspected.
4. Uterosacral ligaments
- These run posterolaterally from the cervix and upper vagina toward the sacrum.
- They are major Level I apical-support structures for the uterus and vaginal apex.
- During VH, they are commonly the first ligamentous pedicles divided and are often tagged for later incorporation into vaginal cuff closure or a vault-support procedure.
- The ureter is close to the uterosacral insertion near the cervix. Sutures placed too deep or too lateral during uterosacral suspension can entrap or kink the ureter.
5. Cardinal ligaments
- Also called transverse cervical ligaments or Mackenrodt ligaments.
- They extend from the cervix and upper vagina laterally toward the pelvic sidewall.
- They contain connective tissue, vessels, nerves, and lymphatics, and form a surgical pedicle with the uterine vessels.
- The distal, cervical portion is the portion usually dealt with vaginally. Dividing pedicles close to the cervix helps keep the ureter away from the clamp or suture.
6. Uterine artery and ureter
This is the key relationship in hysterectomy.
- The uterine artery, usually a branch of the anterior division of the internal iliac artery, runs medially toward the cervix and then ascends along the lateral uterus.
- Near the ischial-spine level, the ureter passes beneath the uterine artery. The classic mnemonic is:
“Water under the bridge”
Ureter = water; uterine artery = bridge.
- At this point the ureter is approximately 2 to 3 cm lateral to the cervix and then turns medially across the upper vagina to enter the bladder.
- Safe practice requires clamping the uterine pedicle close to the cervix and using controlled traction and direct anatomical recognition when anatomy is distorted. Berek & Novak’s Gynecology, p. 207.
7. Broad ligament and upper pedicles
- The broad ligament is a peritoneal fold extending from the uterus to the lateral pelvic wall.
- At the uterine cornu, the principal structures are:
- round ligament anteriorly
- fallopian tube
- utero-ovarian ligament attaching the ovary to the uterus
- In a hysterectomy conserving ovaries, the utero-ovarian ligament and tube are divided.
- If salpingo-oophorectomy is planned, the infundibulopelvic ligament, containing ovarian vessels, is dealt with instead. The ureter must be identified because it is near this pedicle at the pelvic brim.
Operative steps of total vaginal hysterectomy
A. Preparation and exposure
-
Position
The patient is placed in high lithotomy, with careful positioning to avoid nerve injury. A urinary catheter decompresses the bladder. -
Examination under anesthesia
Assess:- uterine size, mobility, and descent
- accessibility of vaginal fornices
- adnexal masses or fixation
- likelihood of adhesions
- pelvic organ prolapse, if present
-
Antisepsis and draping
Vaginal preparation is performed. Prophylactic antibiotics and venous-thromboembolism measures are used according to local protocol. -
Cervical traction
The cervix is grasped with tenacula or suitable traction instruments and brought downward. Some surgeons infiltrate a dilute vasoconstrictor solution around the cervix to reduce bleeding.
B. Circumferential vaginal incision
-
Circumcision of the cervix
A circumferential incision is made at the cervicovaginal junction, separating vaginal epithelium from the cervix. -
Posterior vaginal dissection
The posterior vaginal mucosa is reflected and the posterior peritoneal fold identified.
C. Enter the posterior cul-de-sac and secure uterosacrals
-
Posterior colpotomy
The posterior peritoneum is opened sharply to enter the pouch of Douglas. The opening is extended laterally under direct control. -
Division of uterosacral ligaments
On each side:- identify the uterosacral pedicle
- clamp close to the cervix
- divide
- suture-ligate with delayed absorbable material
- leave the sutures tagged for later vault support
A posterior vaginal speculum is then placed into the peritoneal cavity to maintain exposure.
D. Mobilize bladder and open anterior peritoneum
-
Bladder dissection
The anterior vaginal mucosa is elevated. The bladder is gently and sharply dissected away from the cervix until the vesicouterine peritoneal reflection is reached. -
Anterior colpotomy
The anterior peritoneum is opened. A right-angle or similar retractor is inserted to hold the bladder safely anteriorly throughout subsequent pedicle ligation.
Safety point: Do not force the anterior plane. If it is scarred or poorly defined, particularly after cesarean delivery, proceed with meticulous sharp dissection or reconsider the route.
E. Divide cardinal ligaments and uterine vessels
-
Cardinal ligament pedicles
Sequentially on each side, the cardinal ligaments are clamped, divided, and ligated close to the cervix. -
Uterine vessel pedicles
The uterine vessels are clamped, divided, and securely ligated in serial bilateral steps. Each pedicle release permits further downward delivery of the uterus.
Ureteral protection
- Maintain traction on the cervix and keep clamps medial, close to the uterine cervix.
- Avoid deep, lateral bites.
- Be alert for distorted anatomy from fibroids, endometriosis, pelvic adhesions, or previous surgery. The ureter's most vulnerable area is where it passes beneath the uterine artery and near the uterosacral-cervical attachment. Berek & Novak’s Gynecology, p. 207.
F. Deliver uterus and divide cornual pedicles
-
Progressive uterine descent
As lower pedicles are secured, the uterus is progressively delivered into the vagina. If necessary, a large uterus may require debulking techniques such as bisection, coring, or myomectomy, but only in appropriately selected benign cases. -
Cornual pedicles
The final pedicles contain:
- round ligament
- fallopian tube
- utero-ovarian ligament
Each is clamped, divided, and ligated under direct visualization. Before division, verify that bowel or adnexal structures have not been incorporated in the clamp.
-
Removal of specimen
The uterus and cervix are removed after the final pedicles are divided. -
If salpingectomy or oophorectomy is planned
- For salpingectomy with ovarian conservation, the tube is separated while preserving the ovarian blood supply.
- For oophorectomy, the infundibulopelvic pedicle is secured only after clear awareness of ureteral location.
G. Inspect, restore support, and close
-
Hemostasis and inspection
Inspect every pedicle, the operative field, and the vaginal angles for bleeding. Confirm that bowel has not been injured or entrapped. -
Vault support
The tagged uterosacral ligaments are incorporated into the vaginal angles or cuff closure. This restores apical support and may reduce later vault prolapse. -
Vaginal cuff closure
The vaginal cuff is closed horizontally with delayed absorbable suture, using interrupted, figure-of-eight, or continuous sutures. The peritoneal layer may be included according to surgeon technique. -
Final checks
- hemostasis
- integrity of bladder and ureter if concern exists
- count confirmation
- catheter drainage and postoperative plan
The textbook sequence is: posterior colpotomy, uterosacral ligation, bladder mobilization and anterior colpotomy, serial cardinal and uterine-vessel pedicles, then cornual pedicles, followed by uterosacral incorporation and cuff closure. Sabiston Textbook of Surgery, p. 2801.
Pedicles in order: exam mnemonic
A useful sequence is:
- Posterior colpotomy
- Uterosacrals
- Anterior colpotomy and bladder reflection
- Cardinals
- Uterine vessels
- Cornual pedicles: round ligament, tube, utero-ovarian ligament
- Vault support and cuff closure
Some units combine the cardinal and uterine vessels as a single pedicle or alter the precise order. The fundamental principles are safe bladder mobilization, controlled serial pedicle ligation, protection of the ureter, and restoration of apical support.
High-yield surgical danger points
| Step | Structure at risk | Prevention |
|---|---|---|
| Anterior dissection | Bladder | Stay in the vesicocervical plane; use sharp dissection if scarred |
| Posterior colpotomy | Rectum | Identify peritoneum clearly; avoid blind entry in adhesions |
| Uterosacral ligation or suspension | Ureter, sacral nerve roots | Place controlled, medial sutures; assess ureteral patency when indicated |
| Uterine vessel ligation | Ureter | Clamp close to cervix, not laterally |
| Cornual clamping | Bowel, adnexa | Direct visualization before clamping |
| Cuff closure | Ureter, bowel | Do not take excessively deep lateral bites; ensure no tissue is caught |
A 2025 systematic overview of reviews, PMID 40345622, supports the continued role of vaginal hysterectomy in appropriate patients; it does not change these core anatomical safety principles.
Uterine ligaments
Reading File
Finding Sources
query_images_db
Searching PubMed
"Uterine Ligaments" anatomy
Searching the Web
uterine ligaments round broad cardinal uterosacral anatomy NCBI
Uterine ligaments
The uterus is supported by a combination of true fibromuscular ligaments, condensations of endopelvic fascia, pelvic-floor muscles, and peritoneal folds. The most important supports of the cervix and upper vagina are the uterosacral-cardinal ligament complex.
Classification
| Group | Ligaments | Main role |
|---|---|---|
| Primary supports | Cardinal, uterosacral, pubocervical ligaments | Support the cervix and upper vagina, resist descent |
| Secondary supports | Round and broad ligaments | Maintain uterine position, especially anteversion; limited direct apical support |
| Adnexal attachments | Ovarian ligament and suspensory ligament of ovary | Attach ovary and transmit ovarian vessels, rather than directly supporting uterus |
A labelled overview is available in this NCBI anatomy figure.
1. Cardinal ligament
Other names: transverse cervical ligament, lateral cervical ligament, Mackenrodt ligament.
- A paired condensation of endopelvic fascia and parametrium.
- Runs from the lateral cervix and upper vagina to the lateral pelvic wall, near the ischial spine.
- It carries or lies closely associated with:
- uterine artery and veins
- vaginal vessels
- lymphatics
- autonomic nerves
- Together with the uterosacral ligaments, it provides apical or Level I support to the uterus and upper vagina.
Surgical importance
- It is clamped, divided, and ligated during vaginal hysterectomy after the bladder has been mobilized.
- The ureter passes through the parametrium and travels under the uterine artery near the cervix.
- Therefore, cardinal and uterine pedicles should be taken close to the cervix, avoiding deep lateral clamping.
Mnemonic:
Uterine artery = bridge; ureter = water
Thus, water passes under the bridge.
Uterine artery = bridge; ureter = water
Thus, water passes under the bridge.
2. Uterosacral ligaments
Also called: rectouterine ligaments.
- Paired fibromuscular fascial bands running from the posterolateral cervix and upper vagina backward toward the sacrum, usually near S2-S4.
- They form visible ridges on either side of the rectouterine pouch.
- They pull the cervix posteriorly and help maintain the normal anteverted, anteflexed uterine position.
- Along with the cardinal ligaments, they are the main support of the cervical-vaginal apex.
Surgical importance
- In vaginal hysterectomy, they are usually divided early and their sutures are tagged.
- During cuff closure, these sutures may be incorporated into the vaginal angles to restore apical support and reduce later vaginal-vault prolapse.
- The ureter lies close to the uterosacral insertion near the cervix. Sutures placed too deep or too lateral can cause ureteric obstruction or injury.
3. Pubocervical ligaments
- Fibrous condensations of endopelvic fascia extending from the anterior cervix and upper vagina toward the posterior surface of the pubis.
- They support the bladder base, urethra, anterior vaginal wall, and cervix.
- They form part of the anterior pelvic support system.
Clinical relevance
Weakness may contribute to anterior vaginal-wall prolapse, especially cystocele. These ligaments are less prominent as hysterectomy pedicles than the cardinal and uterosacral ligaments.
4. Round ligaments of uterus
- Paired cords arising from the anterolateral uterine cornu, just inferior and anterior to the fallopian tube.
- Pass laterally in the broad ligament to the deep inguinal ring.
- Continue through the inguinal canal and terminate in the connective tissue of the labia majora.
- Derived embryologically from the gubernaculum.
- Contain smooth muscle, connective tissue, vessels, and nerves.
Function
- Help maintain the uterus in an anteverted position.
- They are secondary, not primary, supports. Division alone does not cause uterine prolapse.
Surgical importance
- The round ligaments are part of the final cornual pedicle in vaginal hysterectomy, together with the tube and utero-ovarian ligament.
5. Broad ligament
The broad ligament is not a true ligament. It is a double-layered peritoneal fold extending from the sides of the uterus to the lateral pelvic walls.
Parts
- Mesometrium: largest inferior portion, adjacent to uterus
- Mesosalpinx: superior portion surrounding the fallopian tube
- Mesovarium: short posterior fold attaching ovary to the broad ligament
Contents and relations
Structures associated with the broad ligament include:
- fallopian tube
- round ligament
- ovarian ligament
- uterine and ovarian vessels
- nerves and lymphatics
- ureter, which runs in the base of the broad ligament and is at risk during pelvic surgery
Function
- Helps maintain the uterine position but provides only secondary support.
- It is an important surgical landmark and route to pelvic vessels, but it does not itself firmly suspend the uterus.
6. Ovarian ligament
Also called: proper ovarian ligament.
- A fibromuscular band from the medial pole of the ovary to the lateral uterine cornu, immediately below the fallopian-tube attachment.
- It is the ovarian part of the embryologic gubernaculum.
Surgical relevance
- In hysterectomy with ovarian conservation, it is divided with the tube as part of the utero-ovarian pedicle.
- It is not a major uterine-support ligament.
7. Suspensory ligament of ovary
Also called: infundibulopelvic ligament.
- Extends from the upper pole of the ovary and infundibulum of the tube to the lateral pelvic wall.
- Contains:
- ovarian artery
- ovarian vein
- lymphatics
- autonomic nerves
Surgical relevance
- This is an ovarian vascular pedicle, not a primary support of the uterus.
- It is ligated in salpingo-oophorectomy.
- The ureter must be identified before securing this pedicle because it lies nearby at the pelvic brim.
High-yield summary
True supports of the uterus
- Cardinal ligaments: lateral cervical support
- Uterosacral ligaments: posterior cervical support
- Pubocervical ligaments: anterior cervical support
- Pelvic diaphragm, especially levator ani: dynamic muscular support
Secondary supports
- Round ligaments: maintain anteversion
- Broad ligament: peritoneal fold with minor support
- Normal vaginal tone and pelvic fascia
Important hysterectomy sequence
In vaginal hysterectomy, the important ligamentous pedicles are generally dealt with in this order:
Uterosacral → cardinal with uterine vessels → cornual pedicle
(cornual pedicle contains round ligament + fallopian tube + utero-ovarian ligament).
(cornual pedicle contains round ligament + fallopian tube + utero-ovarian ligament).
The ureter is especially vulnerable near the uterosacral insertion and where it passes beneath the uterine artery. Berek & Novak’s Gynecology, p. 207.
This is a shared conversation. Sign in to Orris to start your own chat.