
Get me images of total laporoscopic hysterectomy from bailey and love
Reading File
Now let me search the library for total laparoscopic hysterectomy content in Bailey and Love.
Finding Sources
Finding Sources
Finding Sources
Finding Sources
The content is in block13. Let me read the section around "Morcellation" and the hysterectomy content to find associated images.
Reading File
Reading File
Let me now look further in the file for specific TLH (total laparoscopic hysterectomy) images and the hysterectomy-related sections:
Reading File
Let me search specifically for "total laparoscopic hysterectomy" or "TLH" in Bailey and Love, and also look earlier in the block for hysterectomy images:
Finding Sources
Reading File
Let me search specifically for "TLH" and also look at the hysterectomy section more carefully, including looking around line 2886-2935 where hysterectomy management appears:
Reading File
Let me now look for images specifically in the block around the hysterectomy sections (looking at lines around figures referenced in this area):
Searching Content
"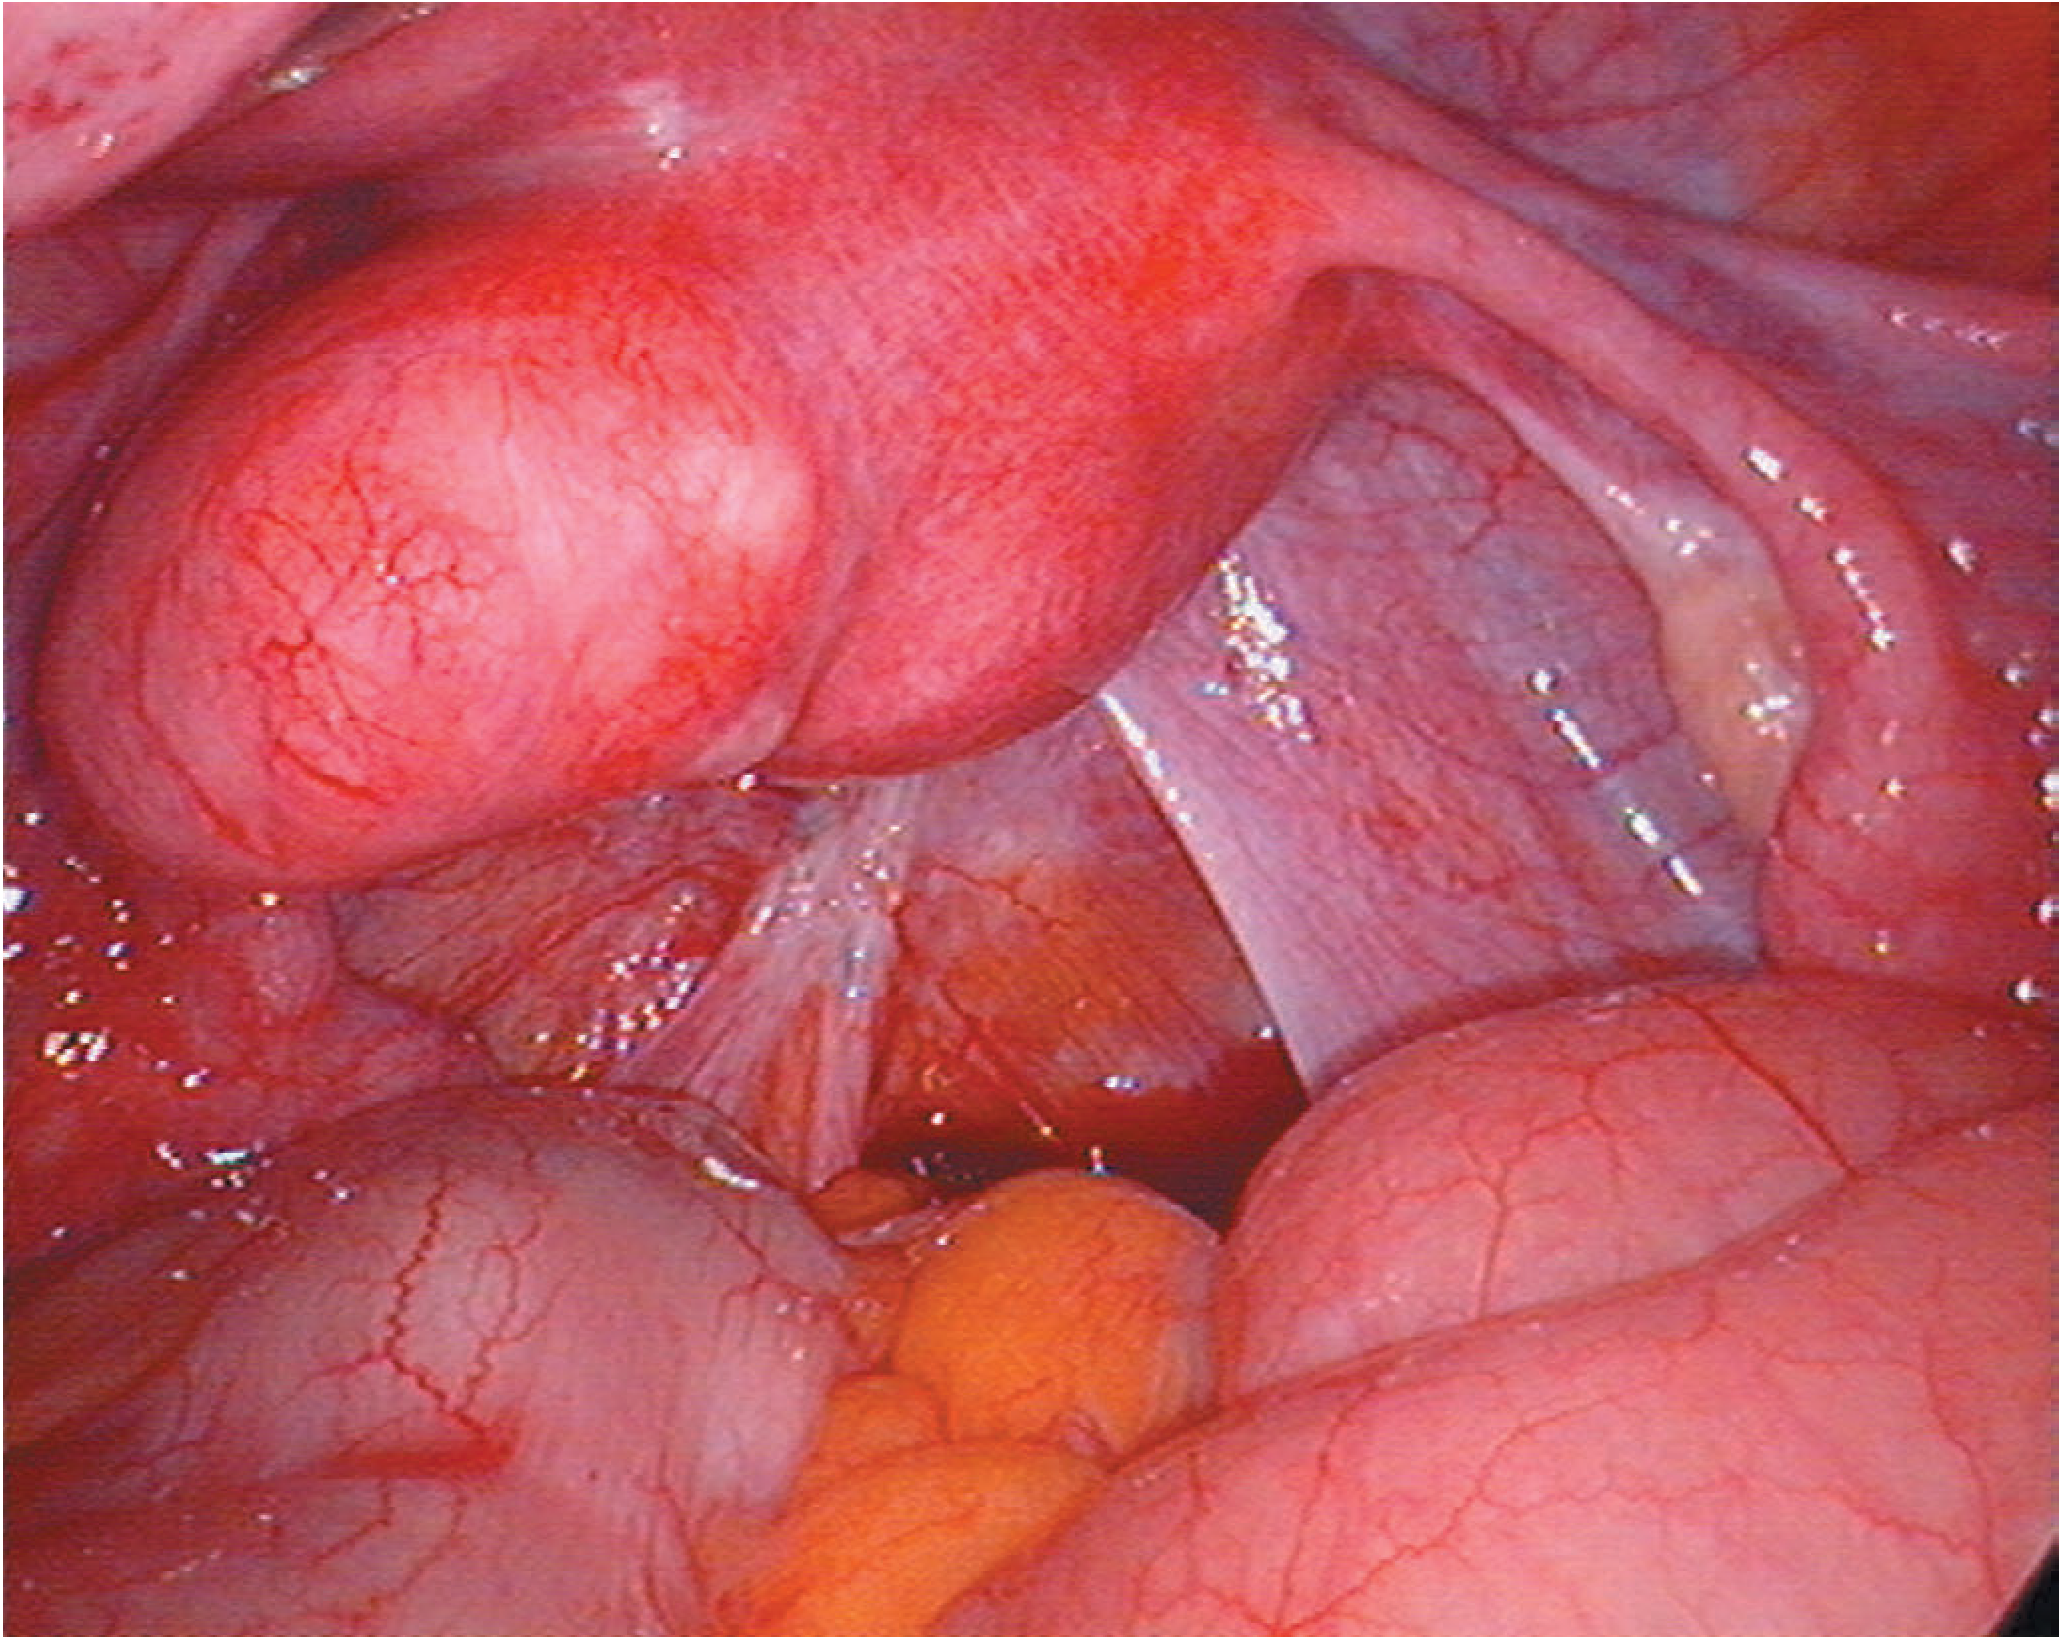
Intraoperative laparoscopic photograph showing a subserosal/fundal fibroid - the most common indication for laparoscopic (including total laparoscopic) hysterectomy.
Figure 87.21 - Diagram of Uterine Fibroid Locations
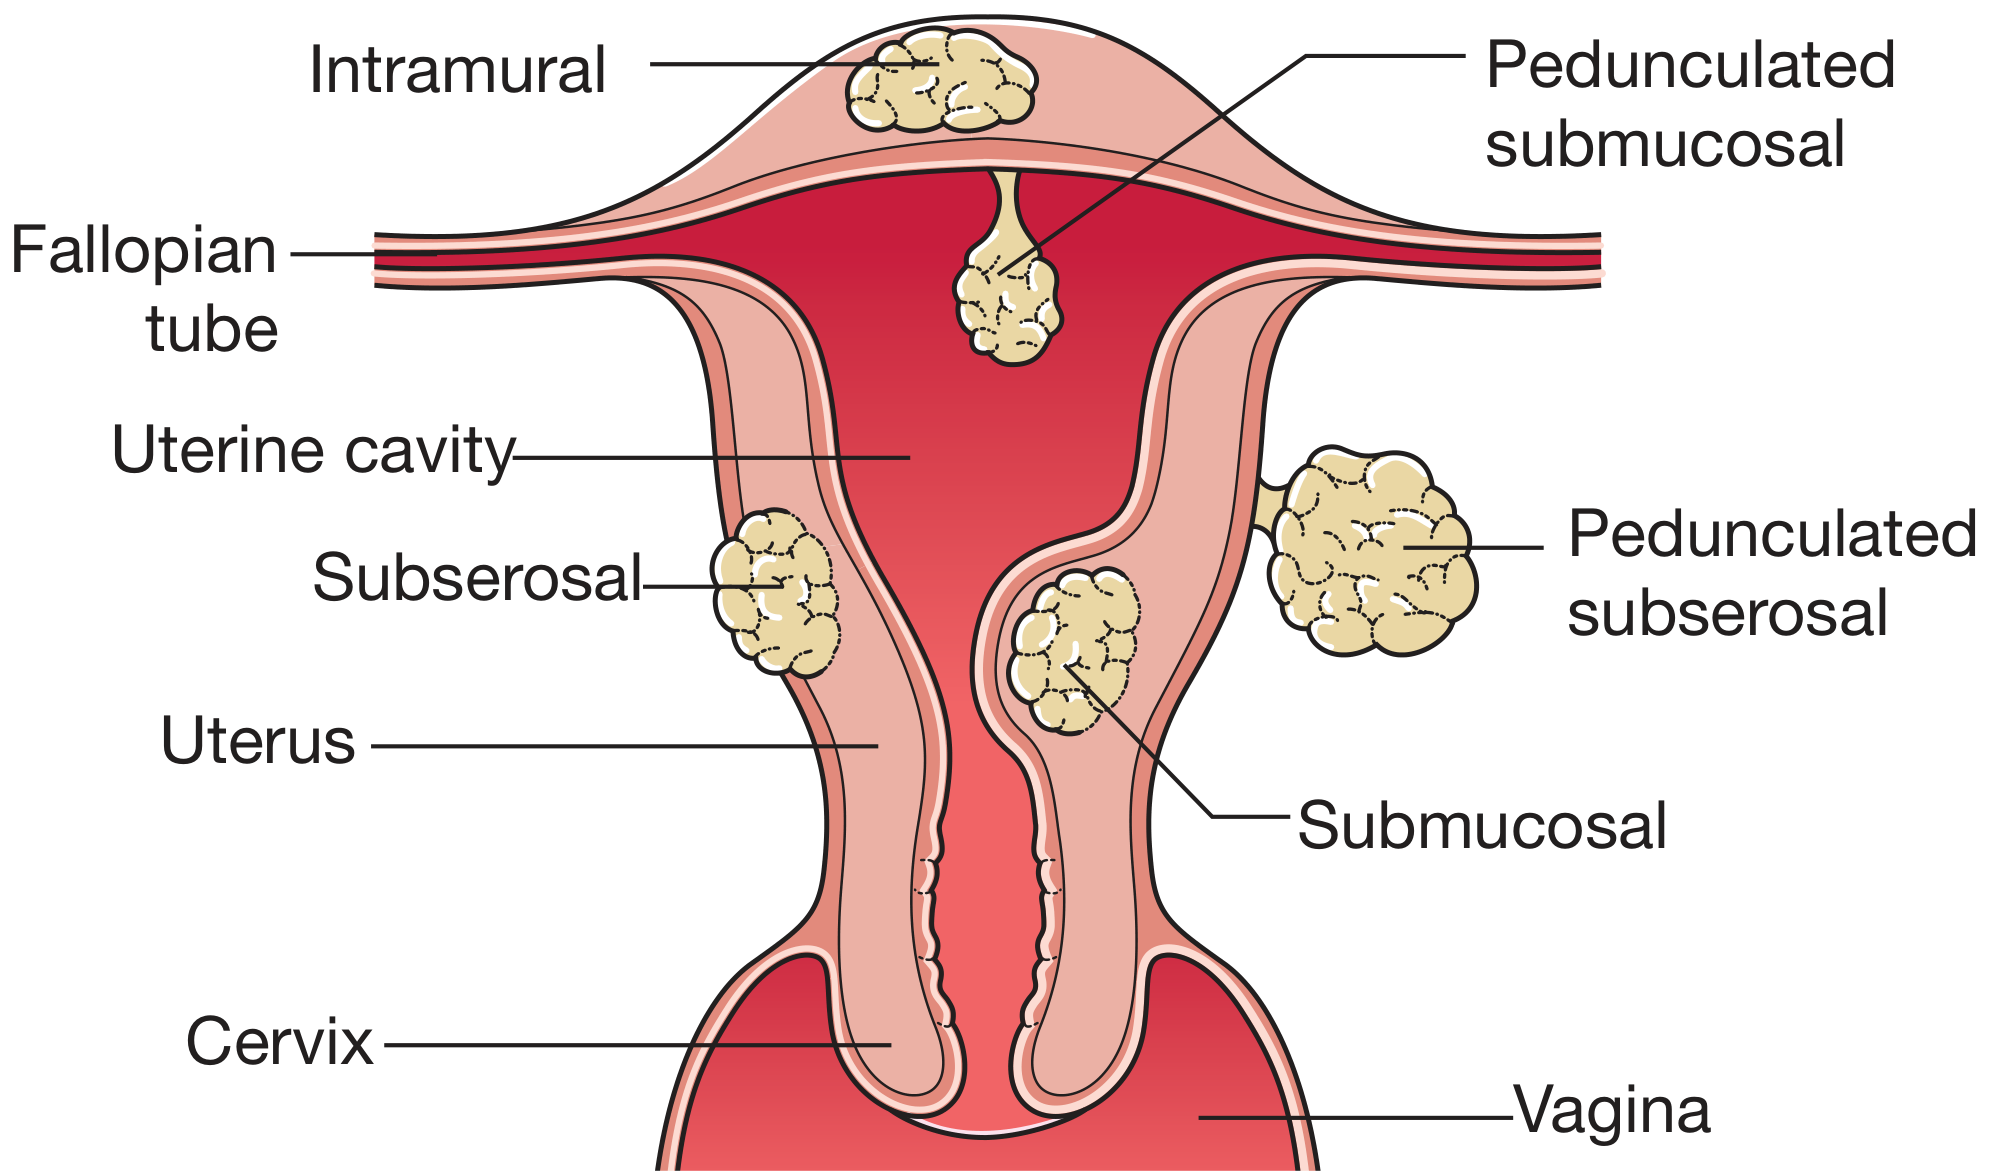
Anatomical diagram showing the uterus with fibroid positions: intramural, subserosal (pedunculated and sessile), and submucosal - key to understanding the surgical anatomy relevant to laparoscopic hysterectomy.
Figure 87.22 - MRI of Uterine Fibroids
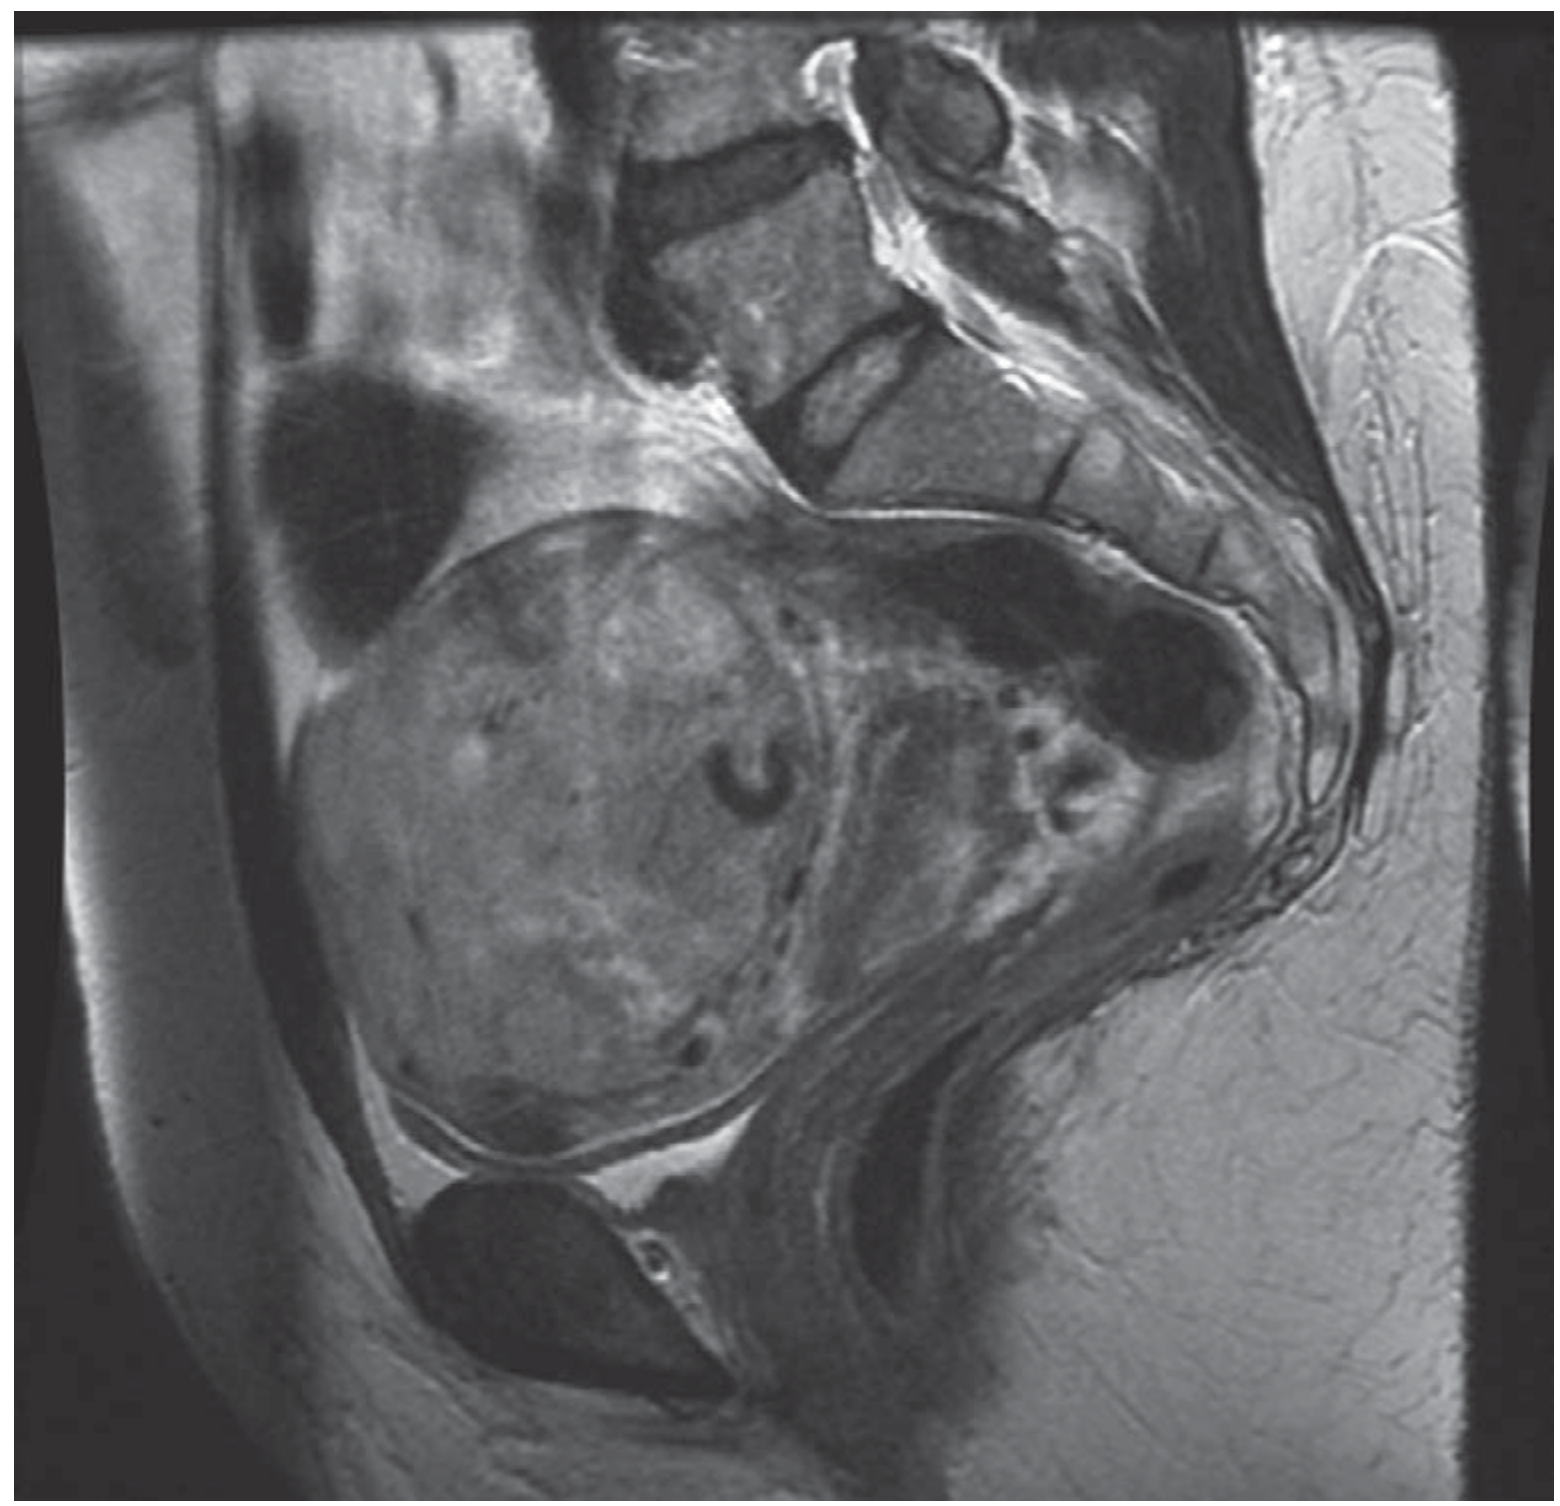
Sagittal MRI showing a markedly enlarged fibroid uterus. MRI is used preoperatively to plan the route of hysterectomy (vaginal, abdominal, or laparoscopic).
Figure 87.19 - Pre-embolisation Angiogram of Left Uterine Artery
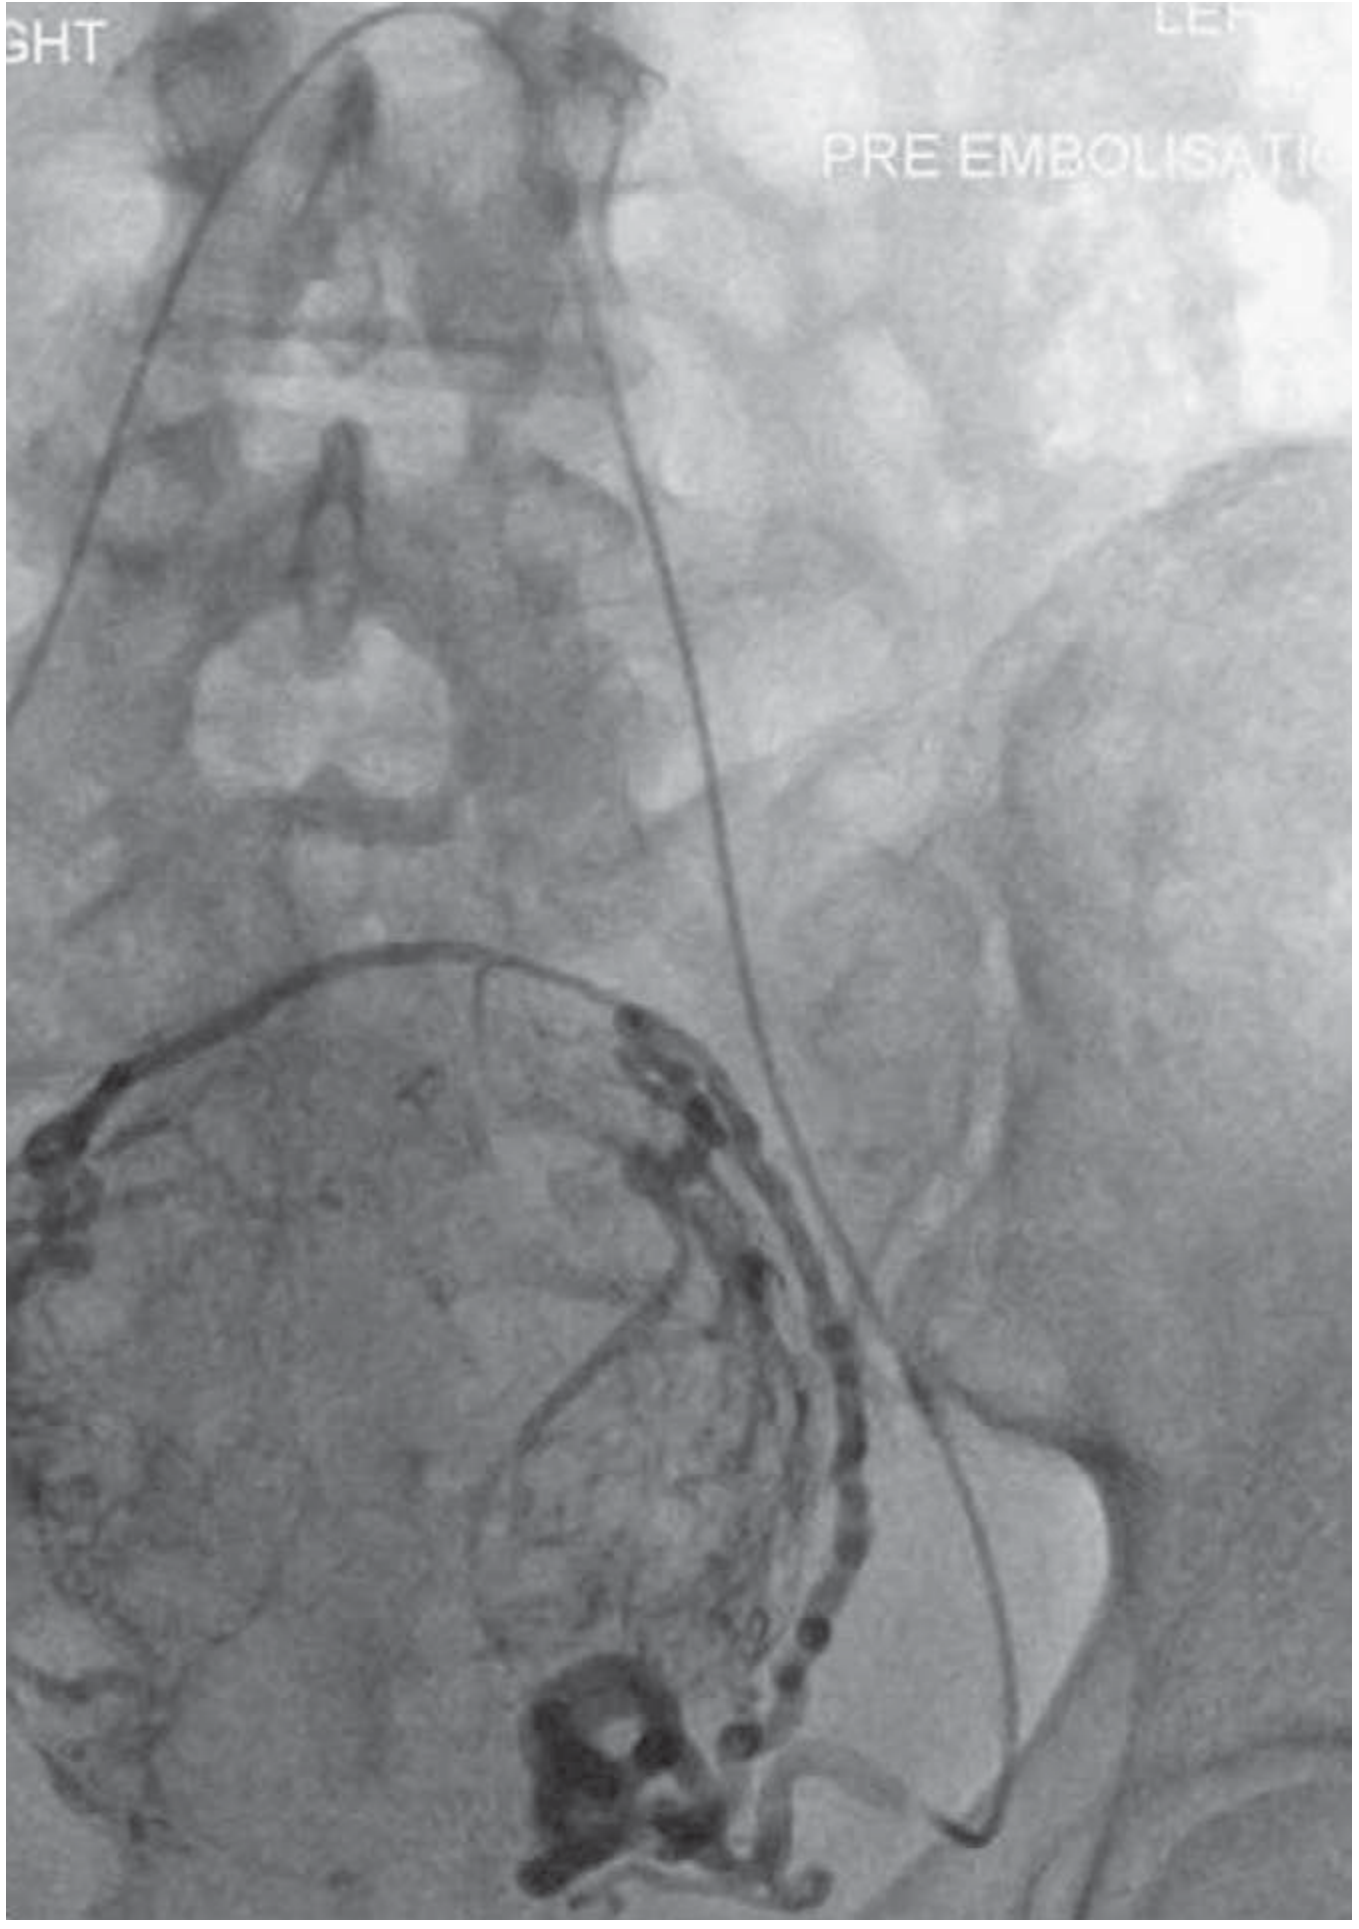
Pre-embolisation angiogram showing catheterisation of the left uterine artery and blood supply to a large fundal fibroid. Uterine artery anatomy is directly relevant to ligation of uterine arteries in TLH.
Summary: Bailey and Love's 28th Edition does not contain dedicated intraoperative step-by-step TLH photographs (the textbook covers the laparoscopic approach to hysterectomy mainly in the context of indications and technique principles). The images above are all the laparoscopic/gynaecological figures from Chapter 87 that relate to laparoscopic hysterectomy. For detailed operative step images of TLH, a dedicated gynaecology operative atlas (such as Berek & Novak's Gynecology, which is also in the library) would be a better source.
Shaw's Textbook of Gynaecology Te Linde's Operative Gynecology Sabiston — general laparoscopy For surgery i want steps for surgery
Finding Sources
Only Sabiston is in the library. Shaw's and Te Linde's are not available. Let me now search Sabiston for laparoscopic surgical steps and images, and also search the full library for TLH steps.
Finding Sources
Finding Sources
Finding Sources
Finding Sources
Excellent! Schwartz's has TLH content, and Berek & Novak's has a full "Surgical Technique of Laparoscopic Hysterectomy" section. Let me read both simultaneously.
Reading File
Reading File
Excellent content found in Berek & Novak's. Let me continue reading the surgical technique steps and look for images in both books:
Reading File
Reading File
I have the full surgical steps from Berek & Novak's and images from Schwartz's. Now let me fetch all the key images simultaneously:
Loading Image
Loading Image
Loading Image
Loading Image
Now let me fetch the remaining images from Berek & Novak's TLH section and read more of the surgical steps:
Reading File
I can see all the figure URLs. Let me fetch all the step-by-step surgical images from Berek & Novak's simultaneously:
Loading Image
Loading Image
Loading Image
Let me get the remaining images from Berek & Novak's (uterine artery ligation, colpotomy, vaginal cuff closure):
Reading File
Loading Image
Loading Image
I now have all the key images and surgical steps. Let me also get the uterine artery image that was referenced but not yet fetched:
Reading File
Library availability note: Shaw's Gynaecology and Te Linde's Operative Gynecology are not in the library. Only Sabiston is available - but Sabiston's chapter covers LAVH/TLH only briefly. The richest TLH operative content (with dedicated step-by-step surgical figures from the Cleveland Clinic) comes from Berek & Novak's Gynecology, which is in the library. Schwartz's Principles of Surgery also has a good hysterectomy steps figure. Both are presented in full below.
Total Laparoscopic Hysterectomy (TLH) - Surgical Steps & Images
Source: Berek & Novak's Gynecology (Chapter 27) + Schwartz's Principles of Surgery (Chapter 41)
PREOPERATIVE SETUP
Patient positioning: Dorsal lithotomy with legs in Allen/Yellowfin stirrups. Arms tucked. Egg-crate mattress to prevent sliding in Trendelenburg. No shoulder braces (brachial plexus injury risk).
Before first trocar:
- Examination under anesthesia
- Foley catheter inserted
- Uterine manipulator placed (e.g., Koh colpotomizer or VCare device)
- Oral/nasogastric tube inserted
STEP 1 - PORT PLACEMENT
Three lateral accessory ports + umbilical camera port. Ports placed ~8 cm from midline and ~8 cm above the pubic symphysis. The inferior epigastric vessels must be avoided - they run medial to the round ligament insertion at the deep inguinal ring and cannot be transilluminated.
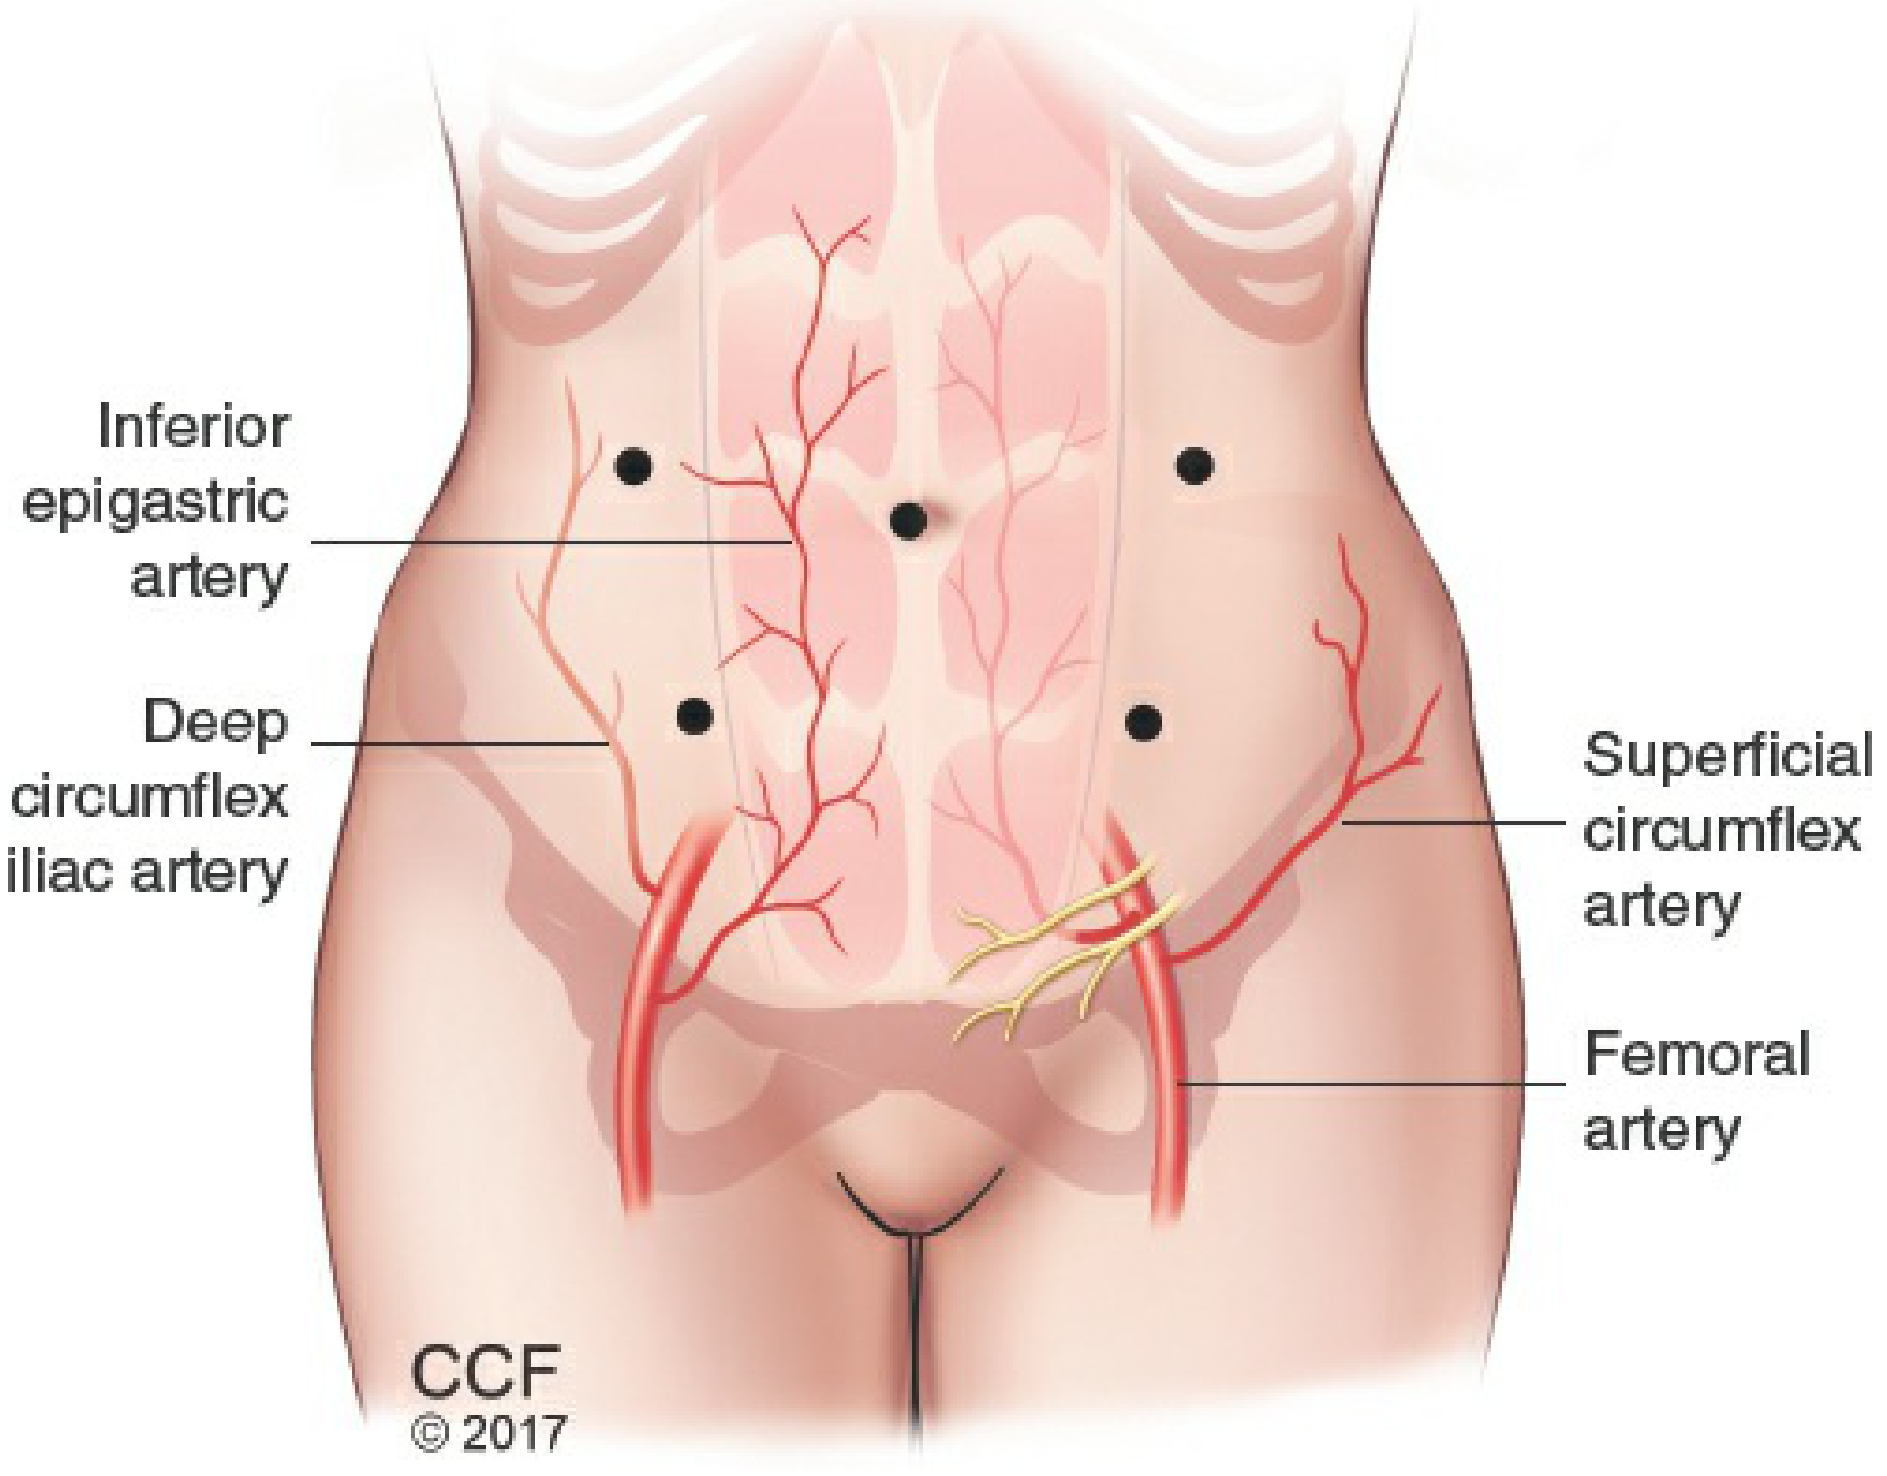
Port positions (dots) relative to inferior epigastric, deep circumflex iliac, and femoral arteries.
STEP 2 - MESOSALPINX & ROUND LIGAMENT DIVISION
If the fallopian tubes are removed: coagulate and transect the mesosalpinx first, then the round ligament. The incision is carried anteriorly to create a bladder peritoneal flap by sharp dissection of the loose cervicovesical areolar tissue.
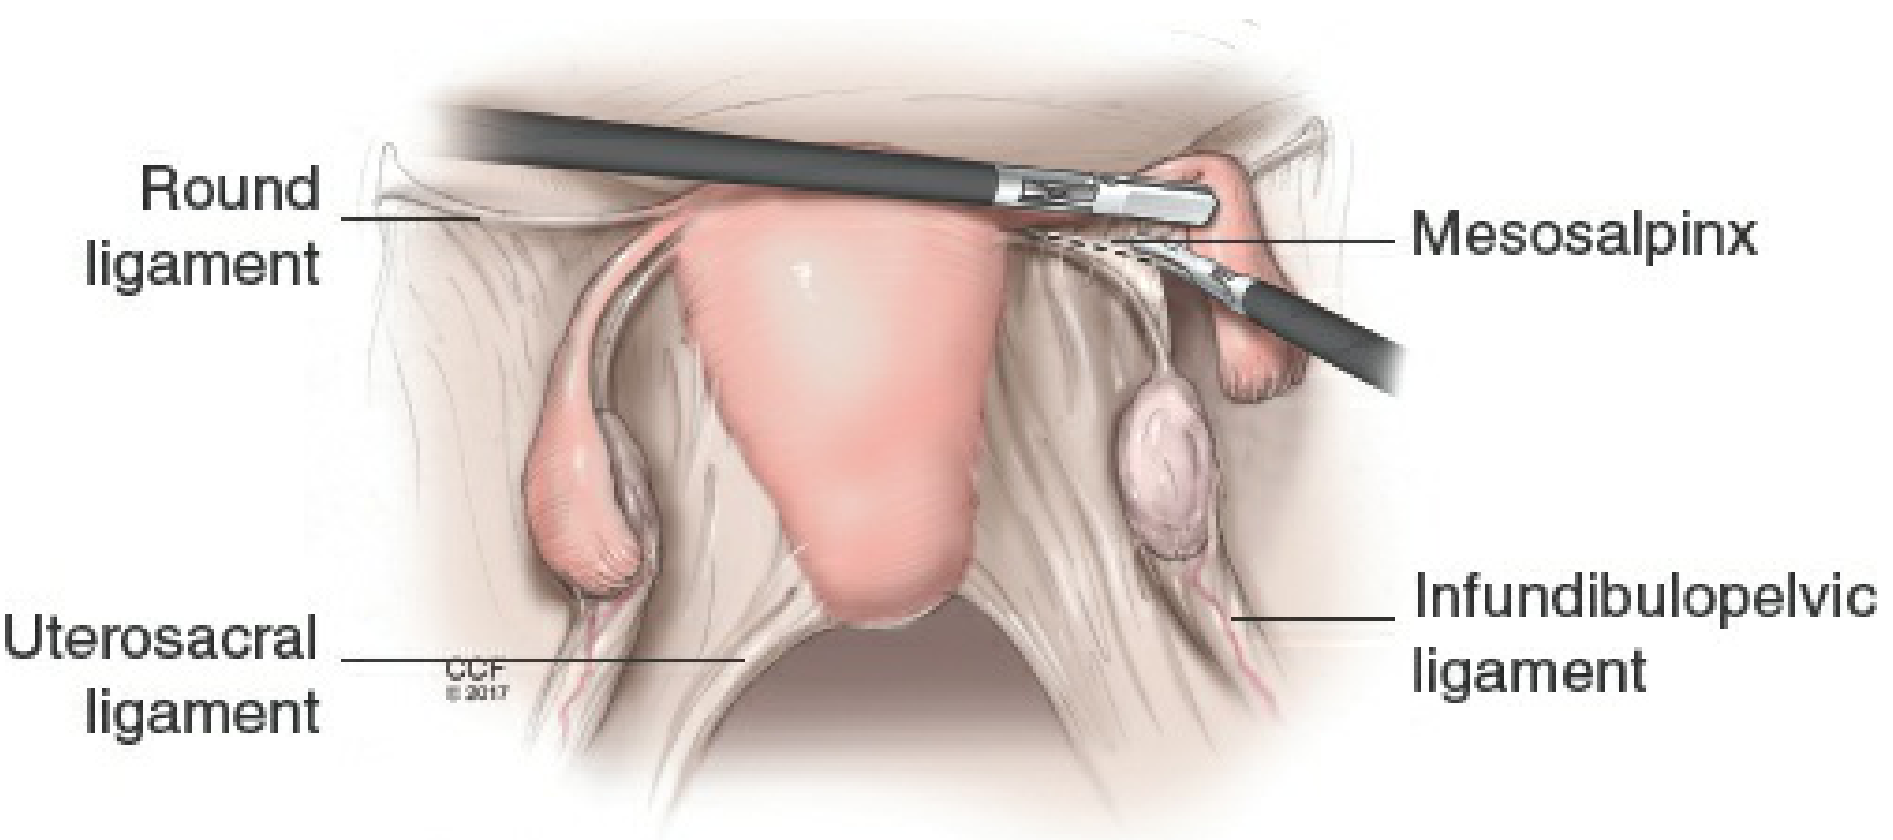
STEP 3 - BROAD LIGAMENT & RETROPERITONEAL SPACE
Transect the round ligament and open the posterior broad ligament toward the uterosacral ligament. Open the retroperitoneal space and identify the ureter on the medial leaf of the broad ligament. The utero-ovarian ligament is coagulated and transected (ovary conserved) or the infundibulopelvic ligament is divided (oophorectomy).
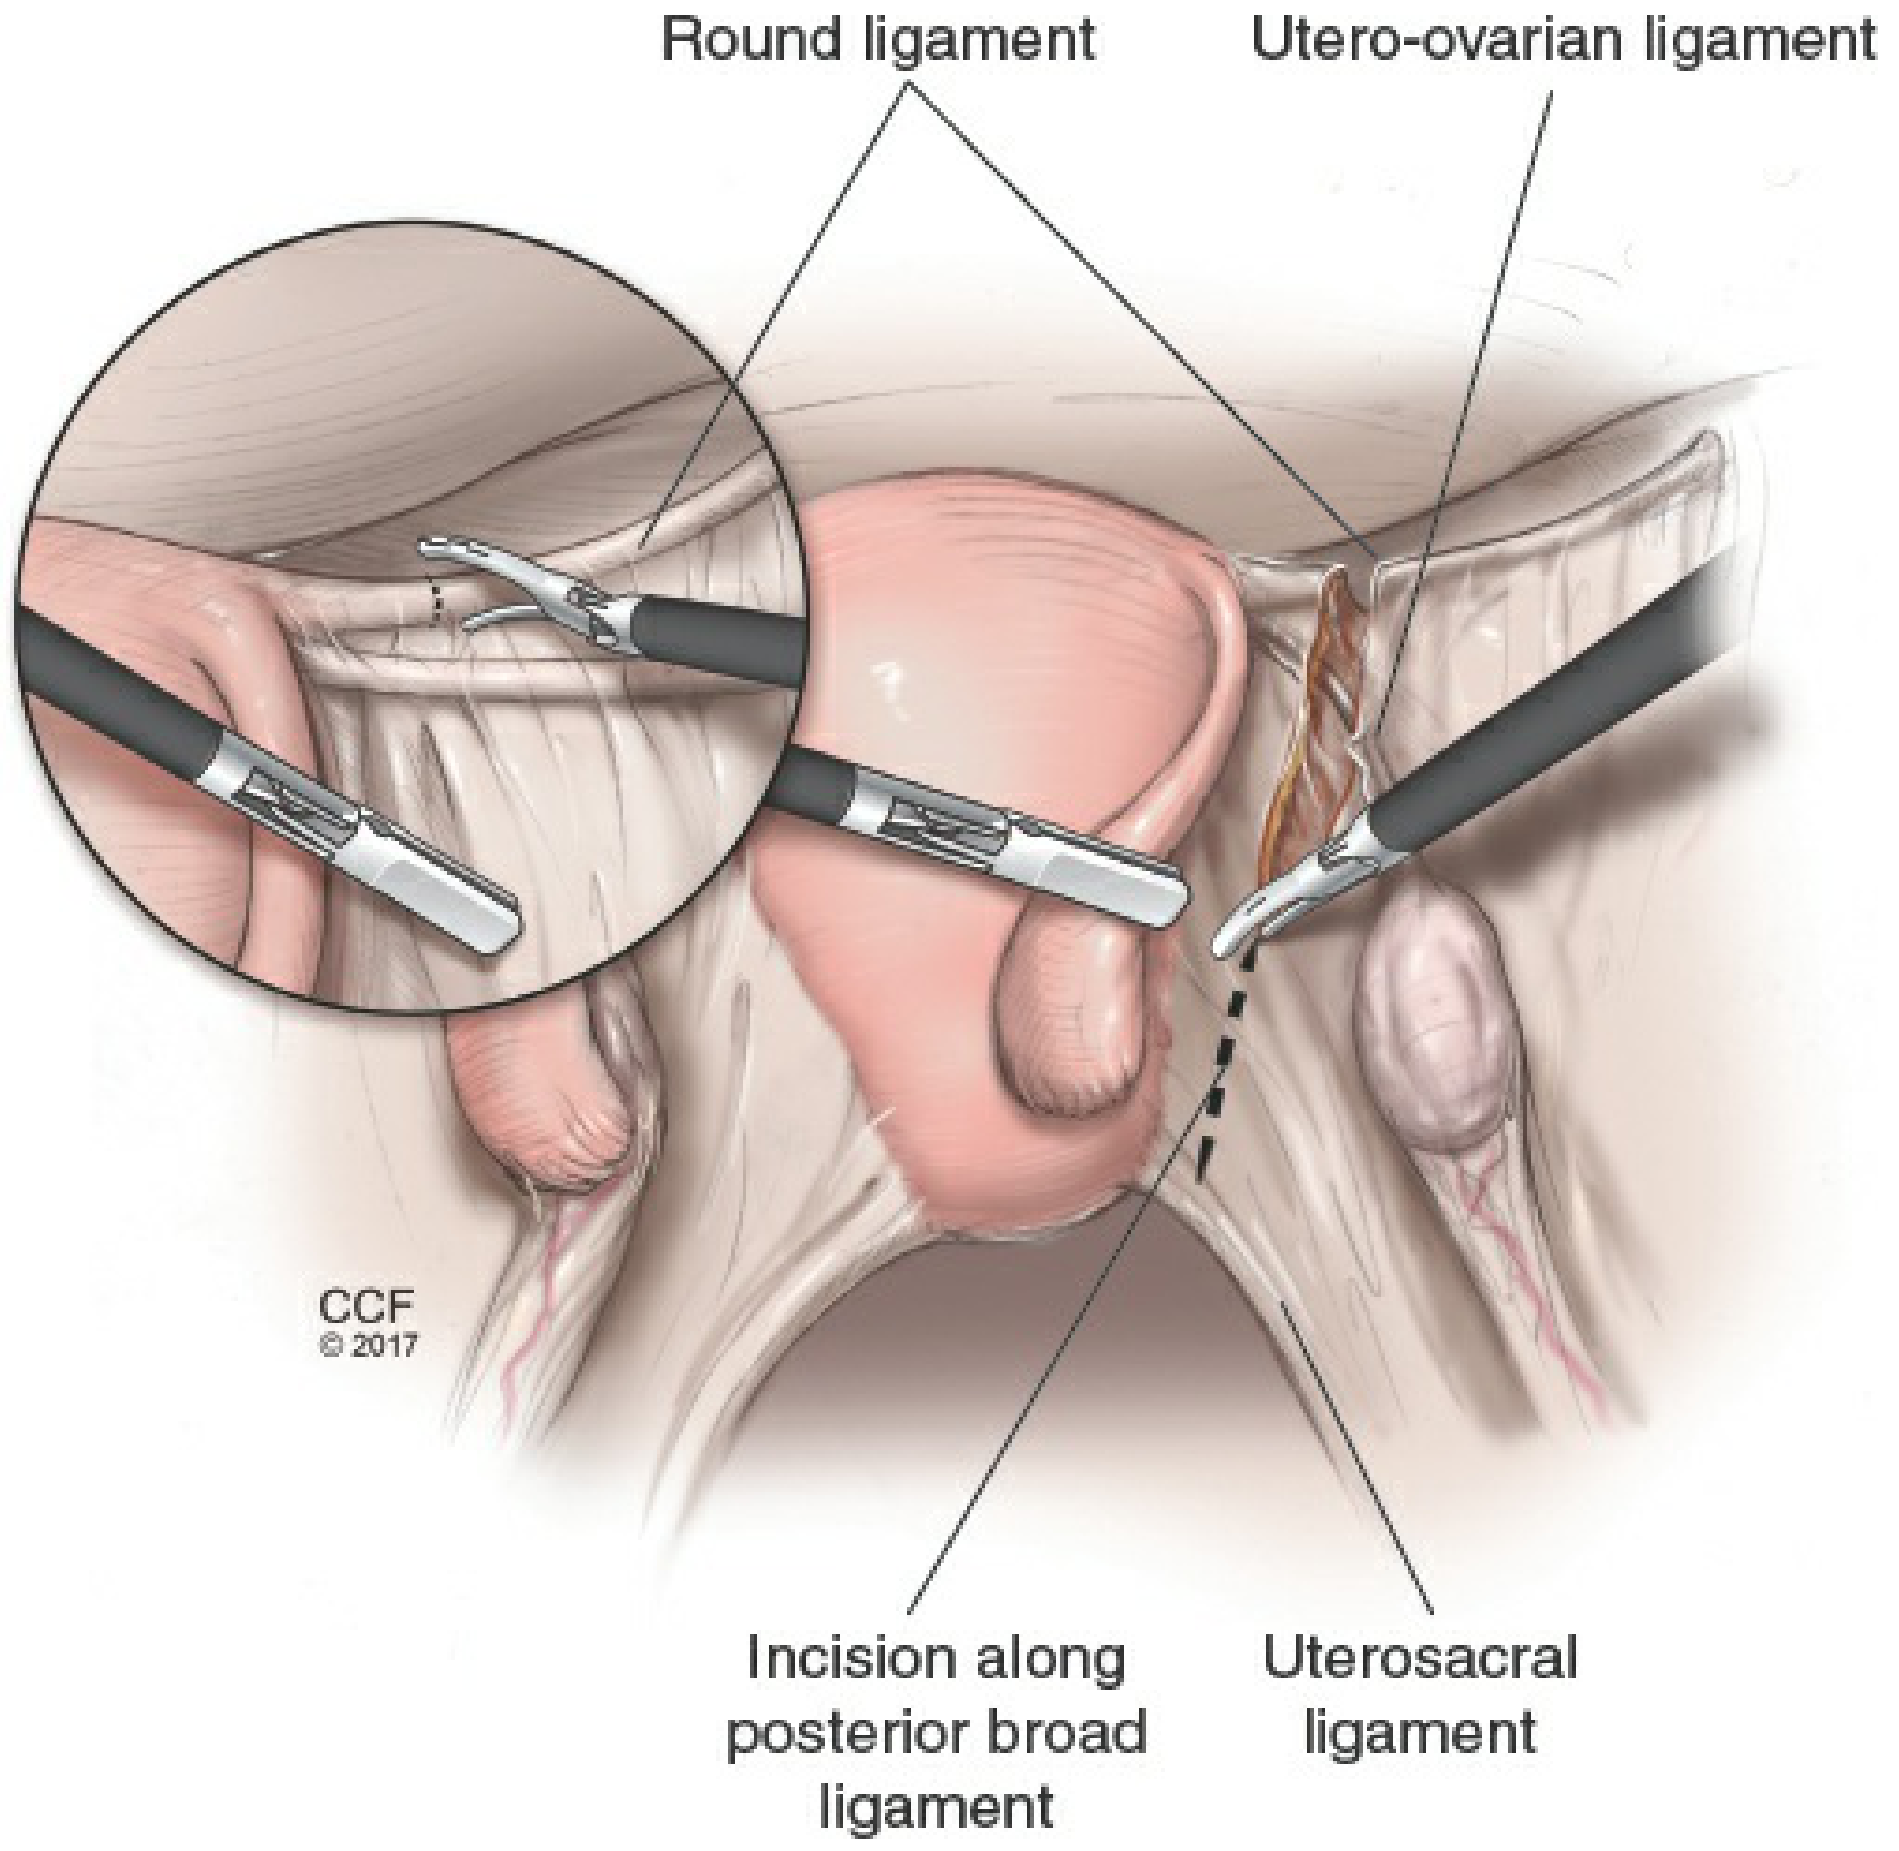
STEP 4 - UTERO-OVARIAN LIGAMENT DIVISION
With ovaries conserved: coagulate and transect the utero-ovarian ligament and its blood vessels. The posterior leaf of the broad ligament is now clearly visible.
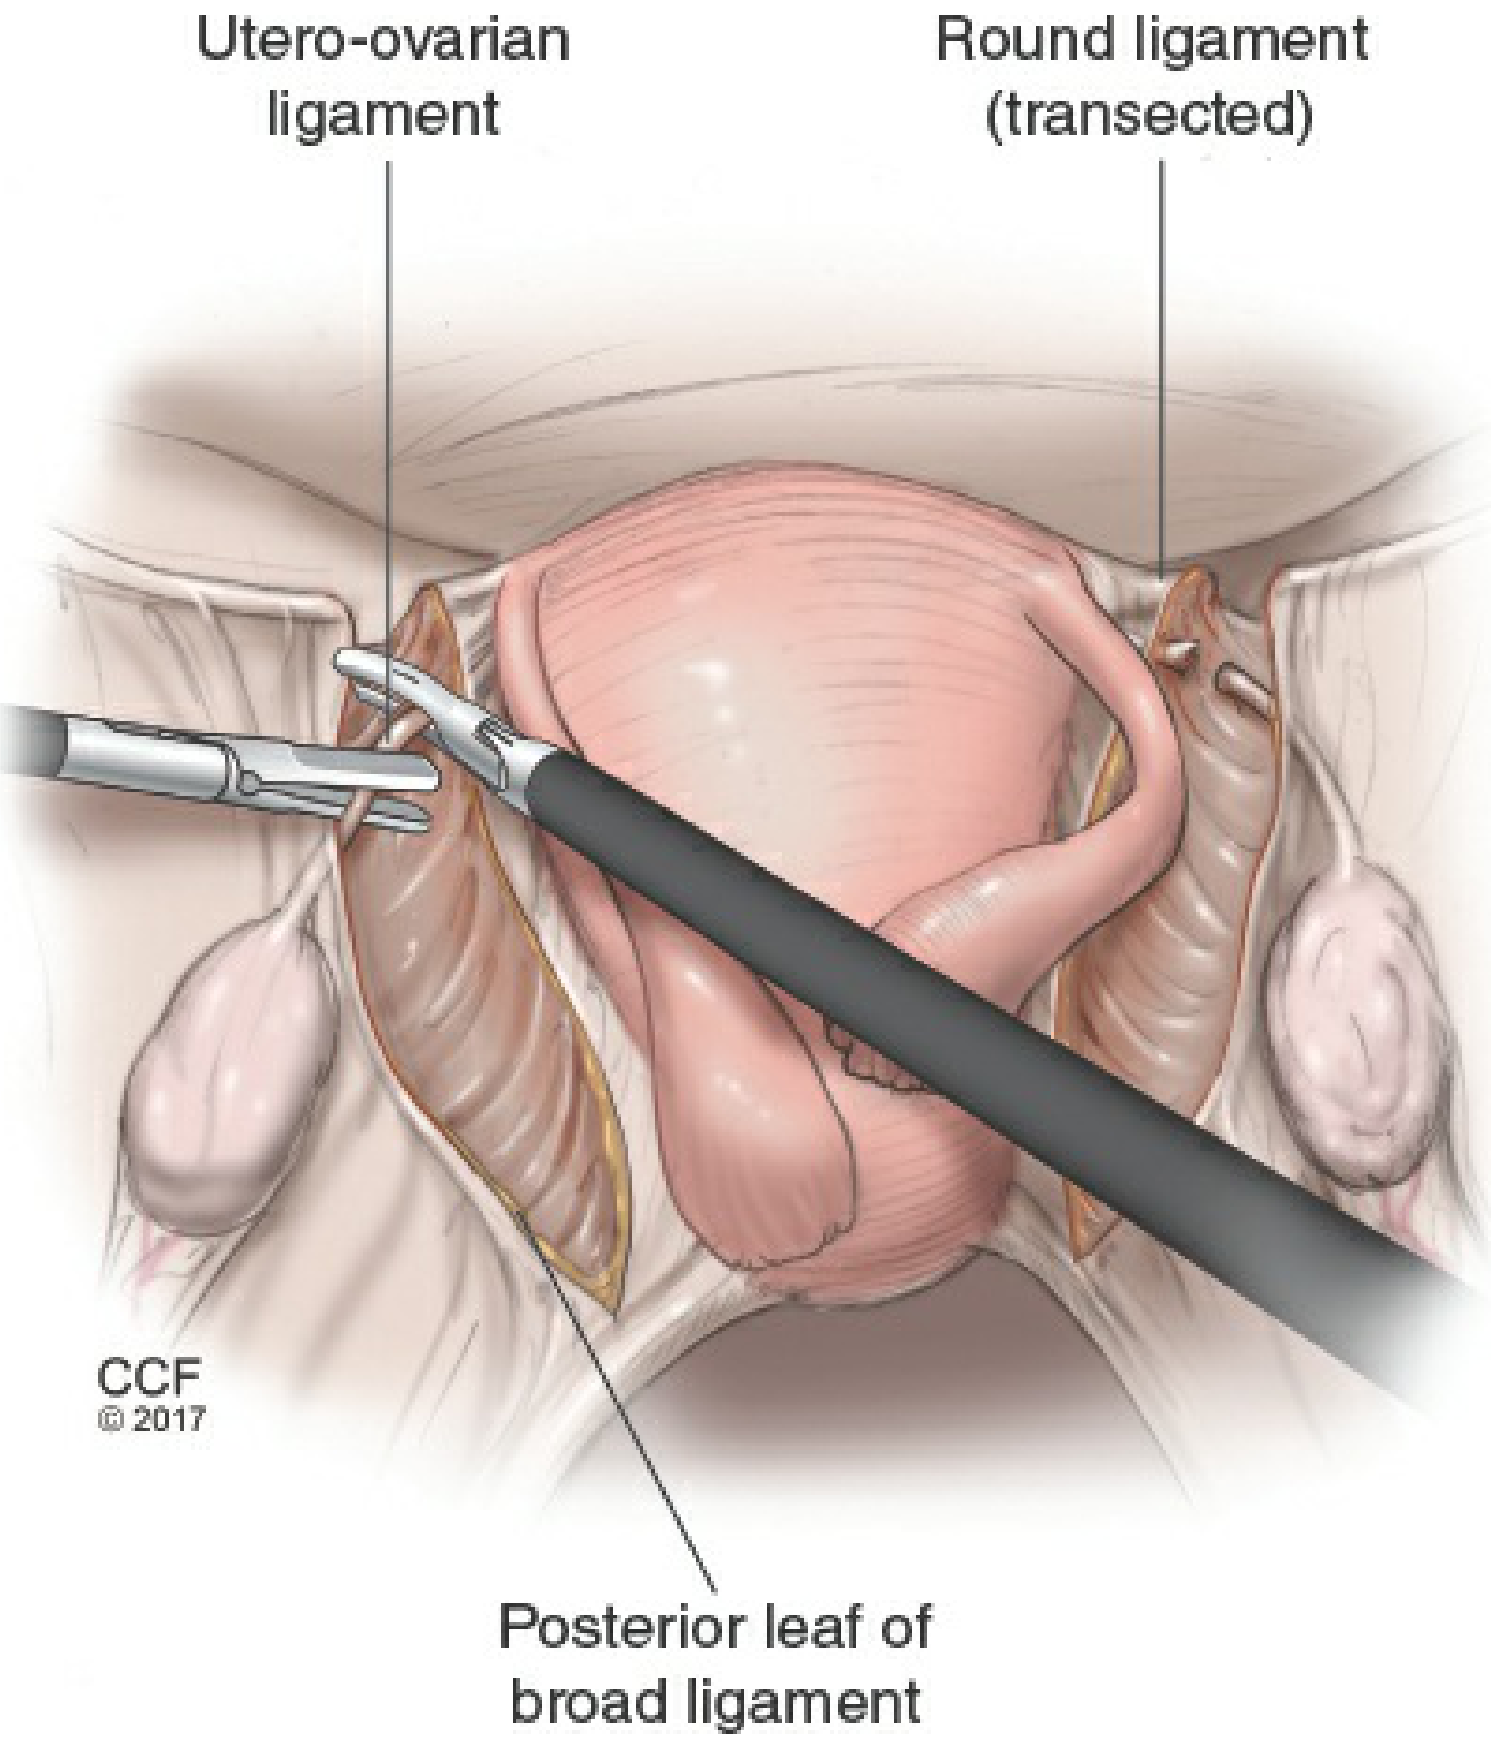
STEP 5 - UTERINE ARTERY LIGATION (Key Step)
The uterus is torqued away from the uterine artery to be occluded. The posterior peritoneum is cut up to the uterosacral ligament to skeletonize the uterine artery. With the ureter clearly in view, the uterine artery is coagulated and transected at the level of the internal os. Repeated on the contralateral side.
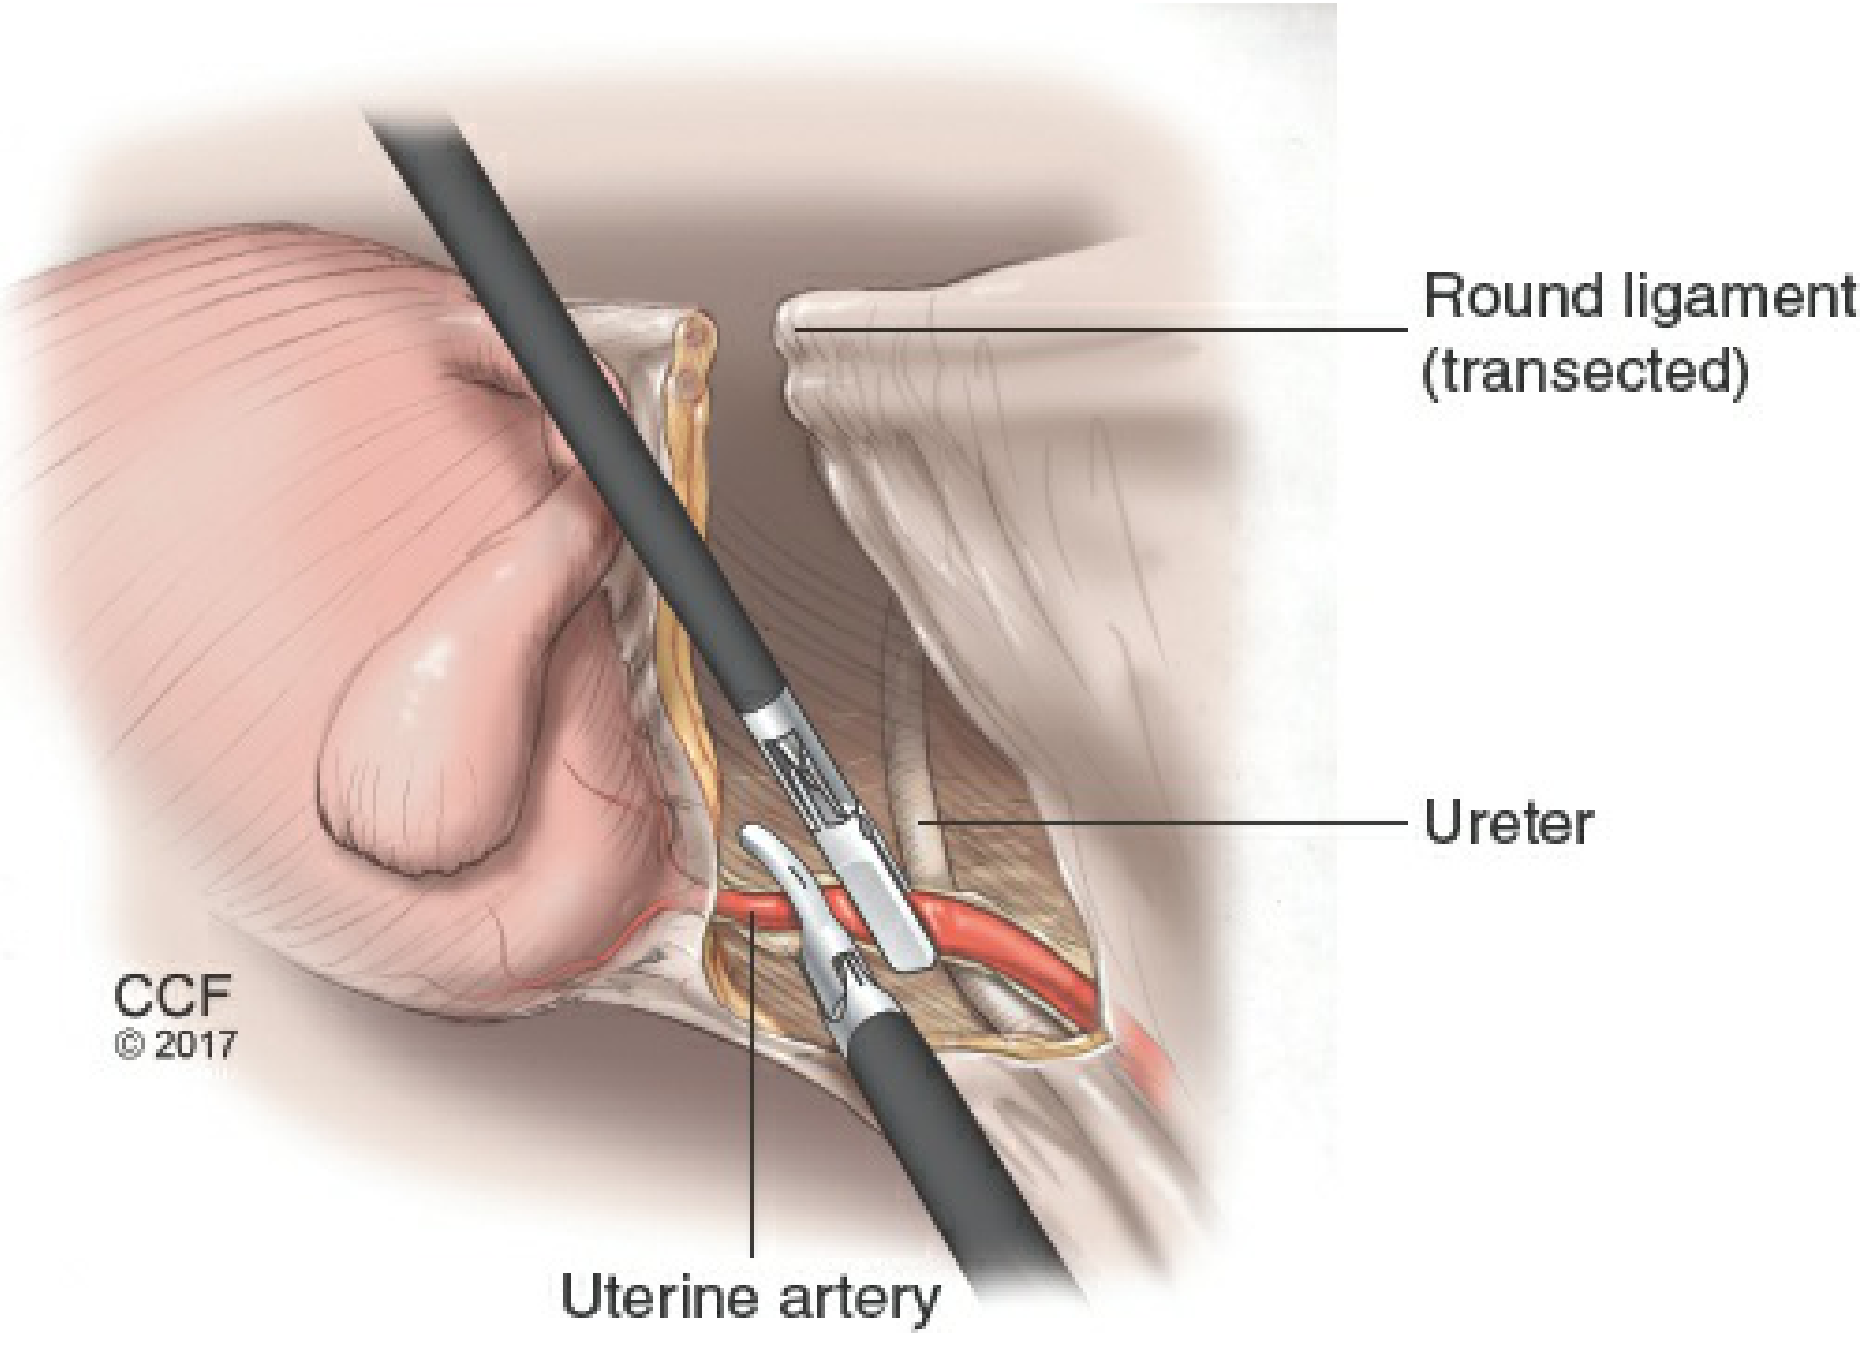
STEP 6 - COLPOTOMY (Distinguishes TLH from LAVH)
The anterior dissection is completed so the bladder is fully mobilised off the anterior fornix. Using the Koh colpotomizer (maintains pneumoperitoneum), monopolar cautery makes a circumferential colpotomy around the cervix. The uterus is then delivered vaginally or morcellated.
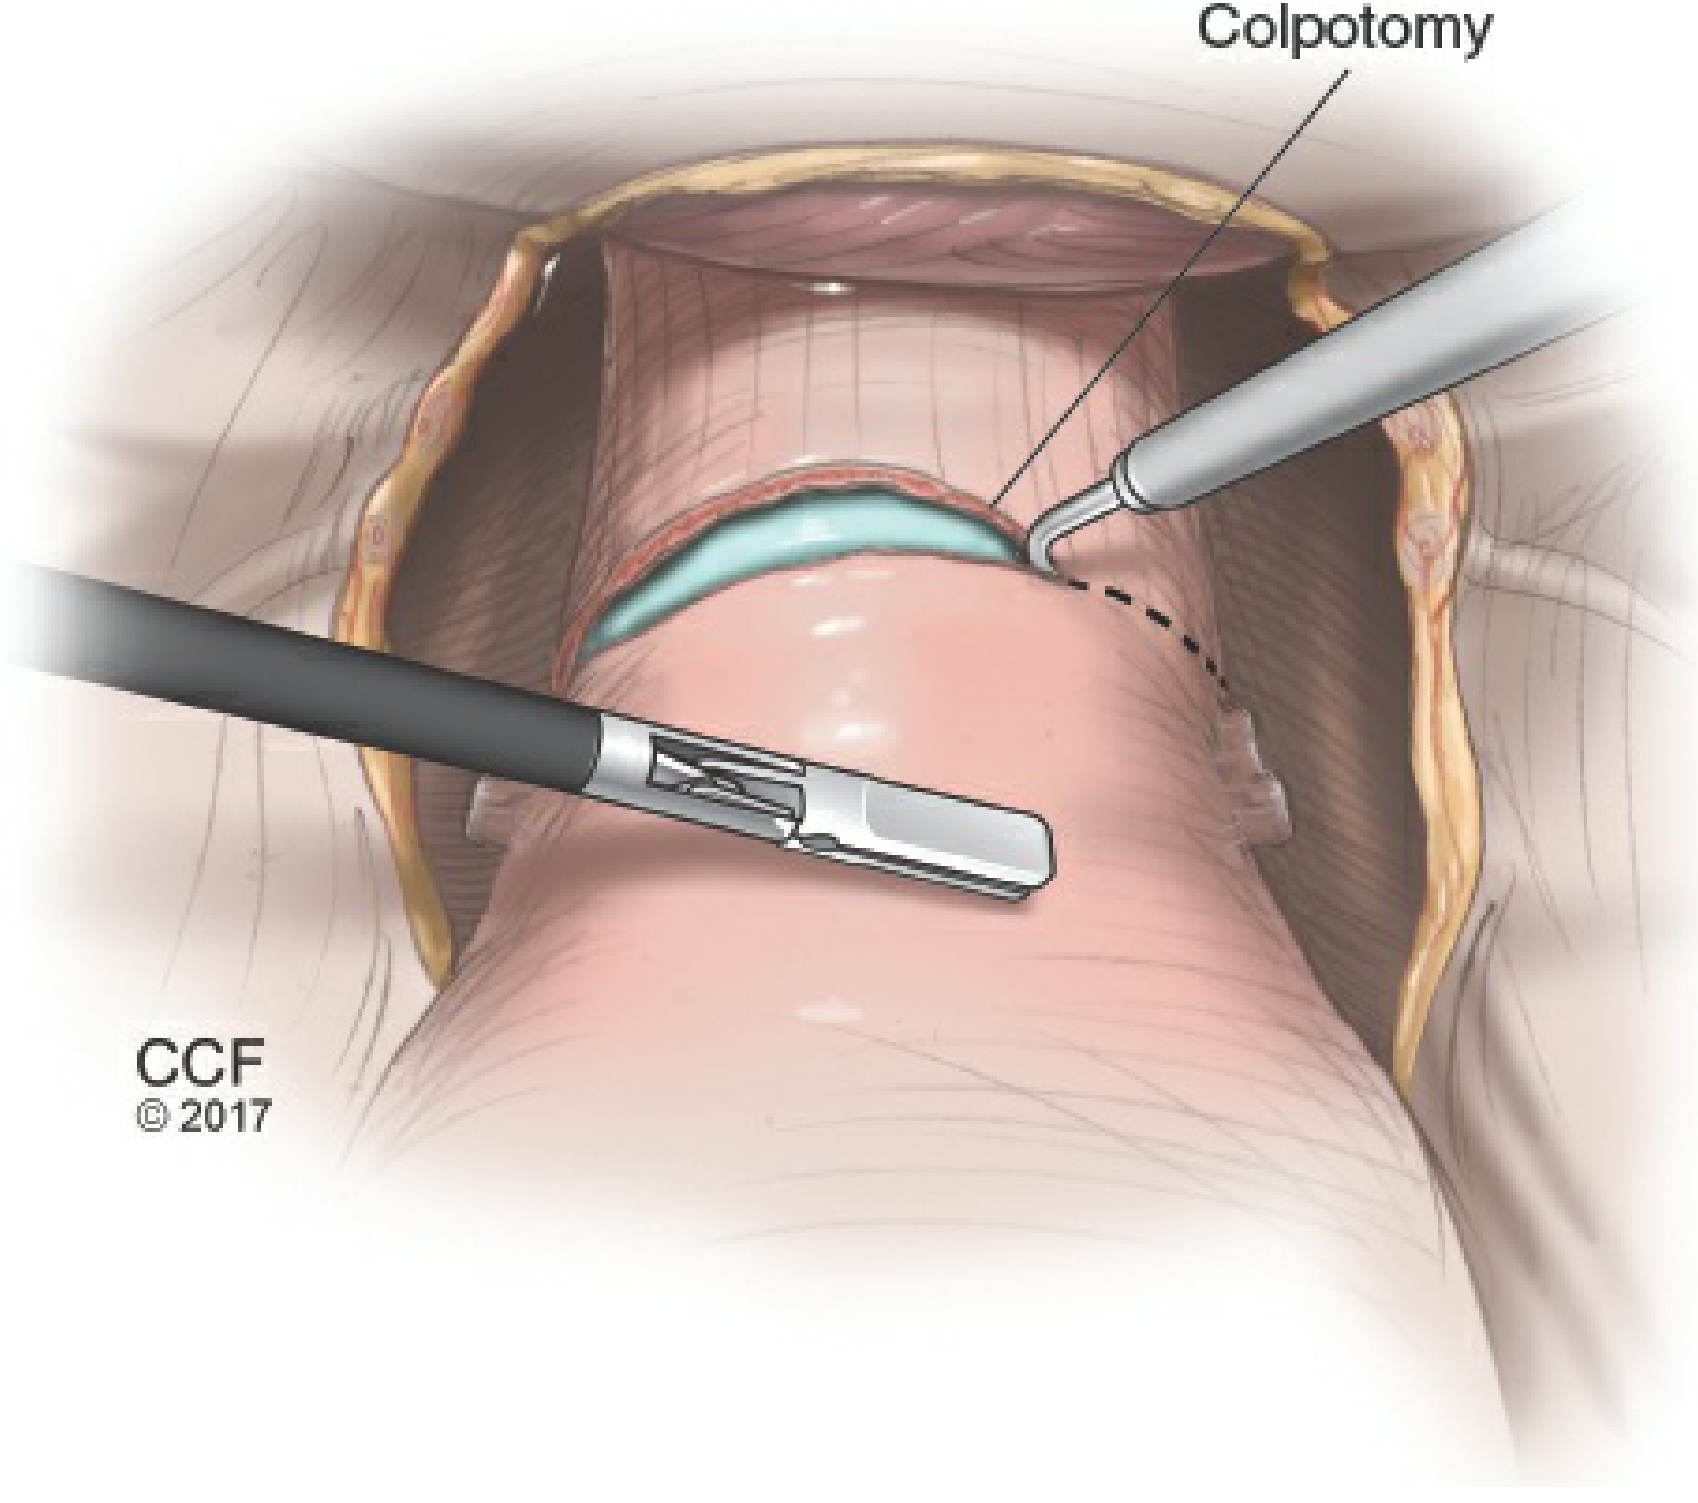
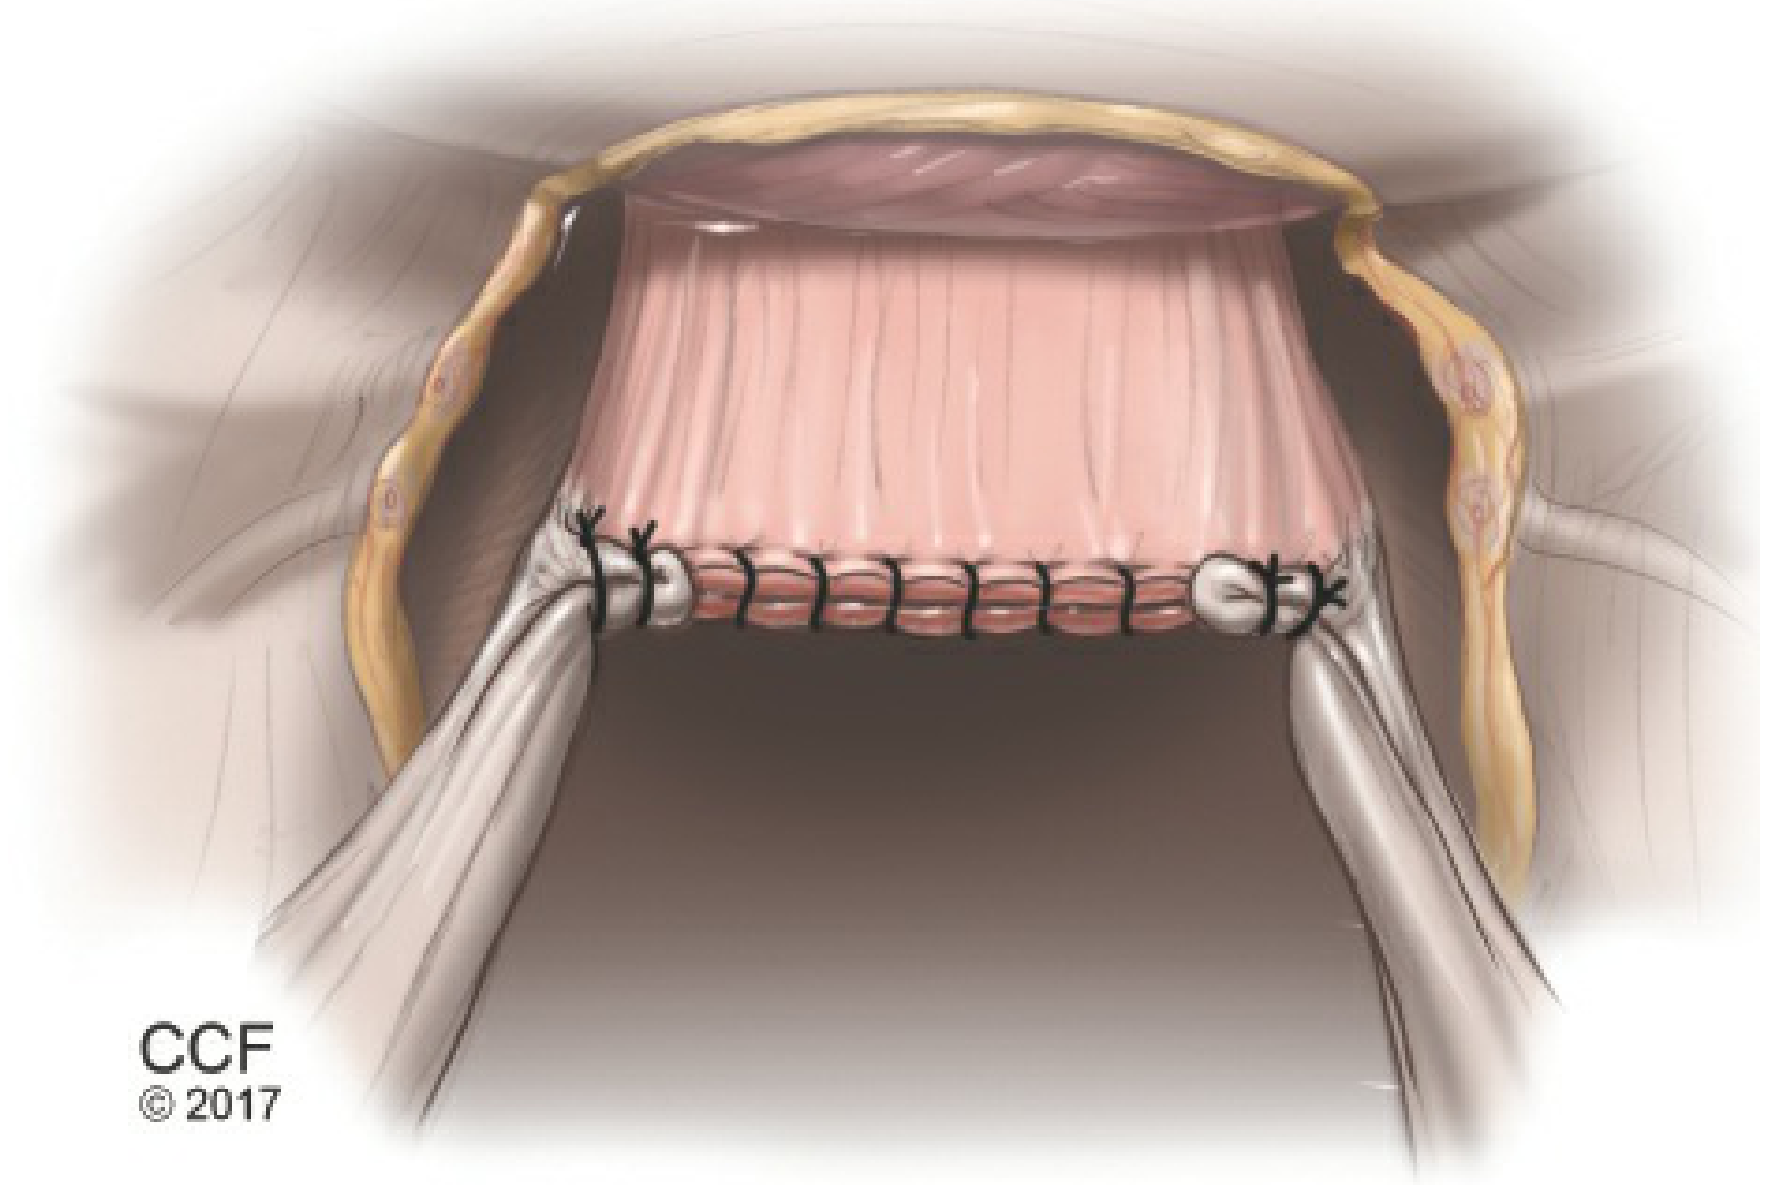
STEP 7 - VAGINAL CUFF CLOSURE
The vaginal cuff is closed laparoscopically (or vaginally) with interrupted or continuous delayed-absorbable suture. The uterosacral ligaments are incorporated into the vaginal angles (McCall culdoplasty) for apical support. Cystoscopy with IV fluorescein confirms ureteral integrity.
Schwartz's Principles of Surgery - Hysterectomy Steps Diagram (Figure 41-12)
A complete 8-panel operative sequence (A-H) showing the full hysterectomy from initial exposure through vaginal cuff closure:
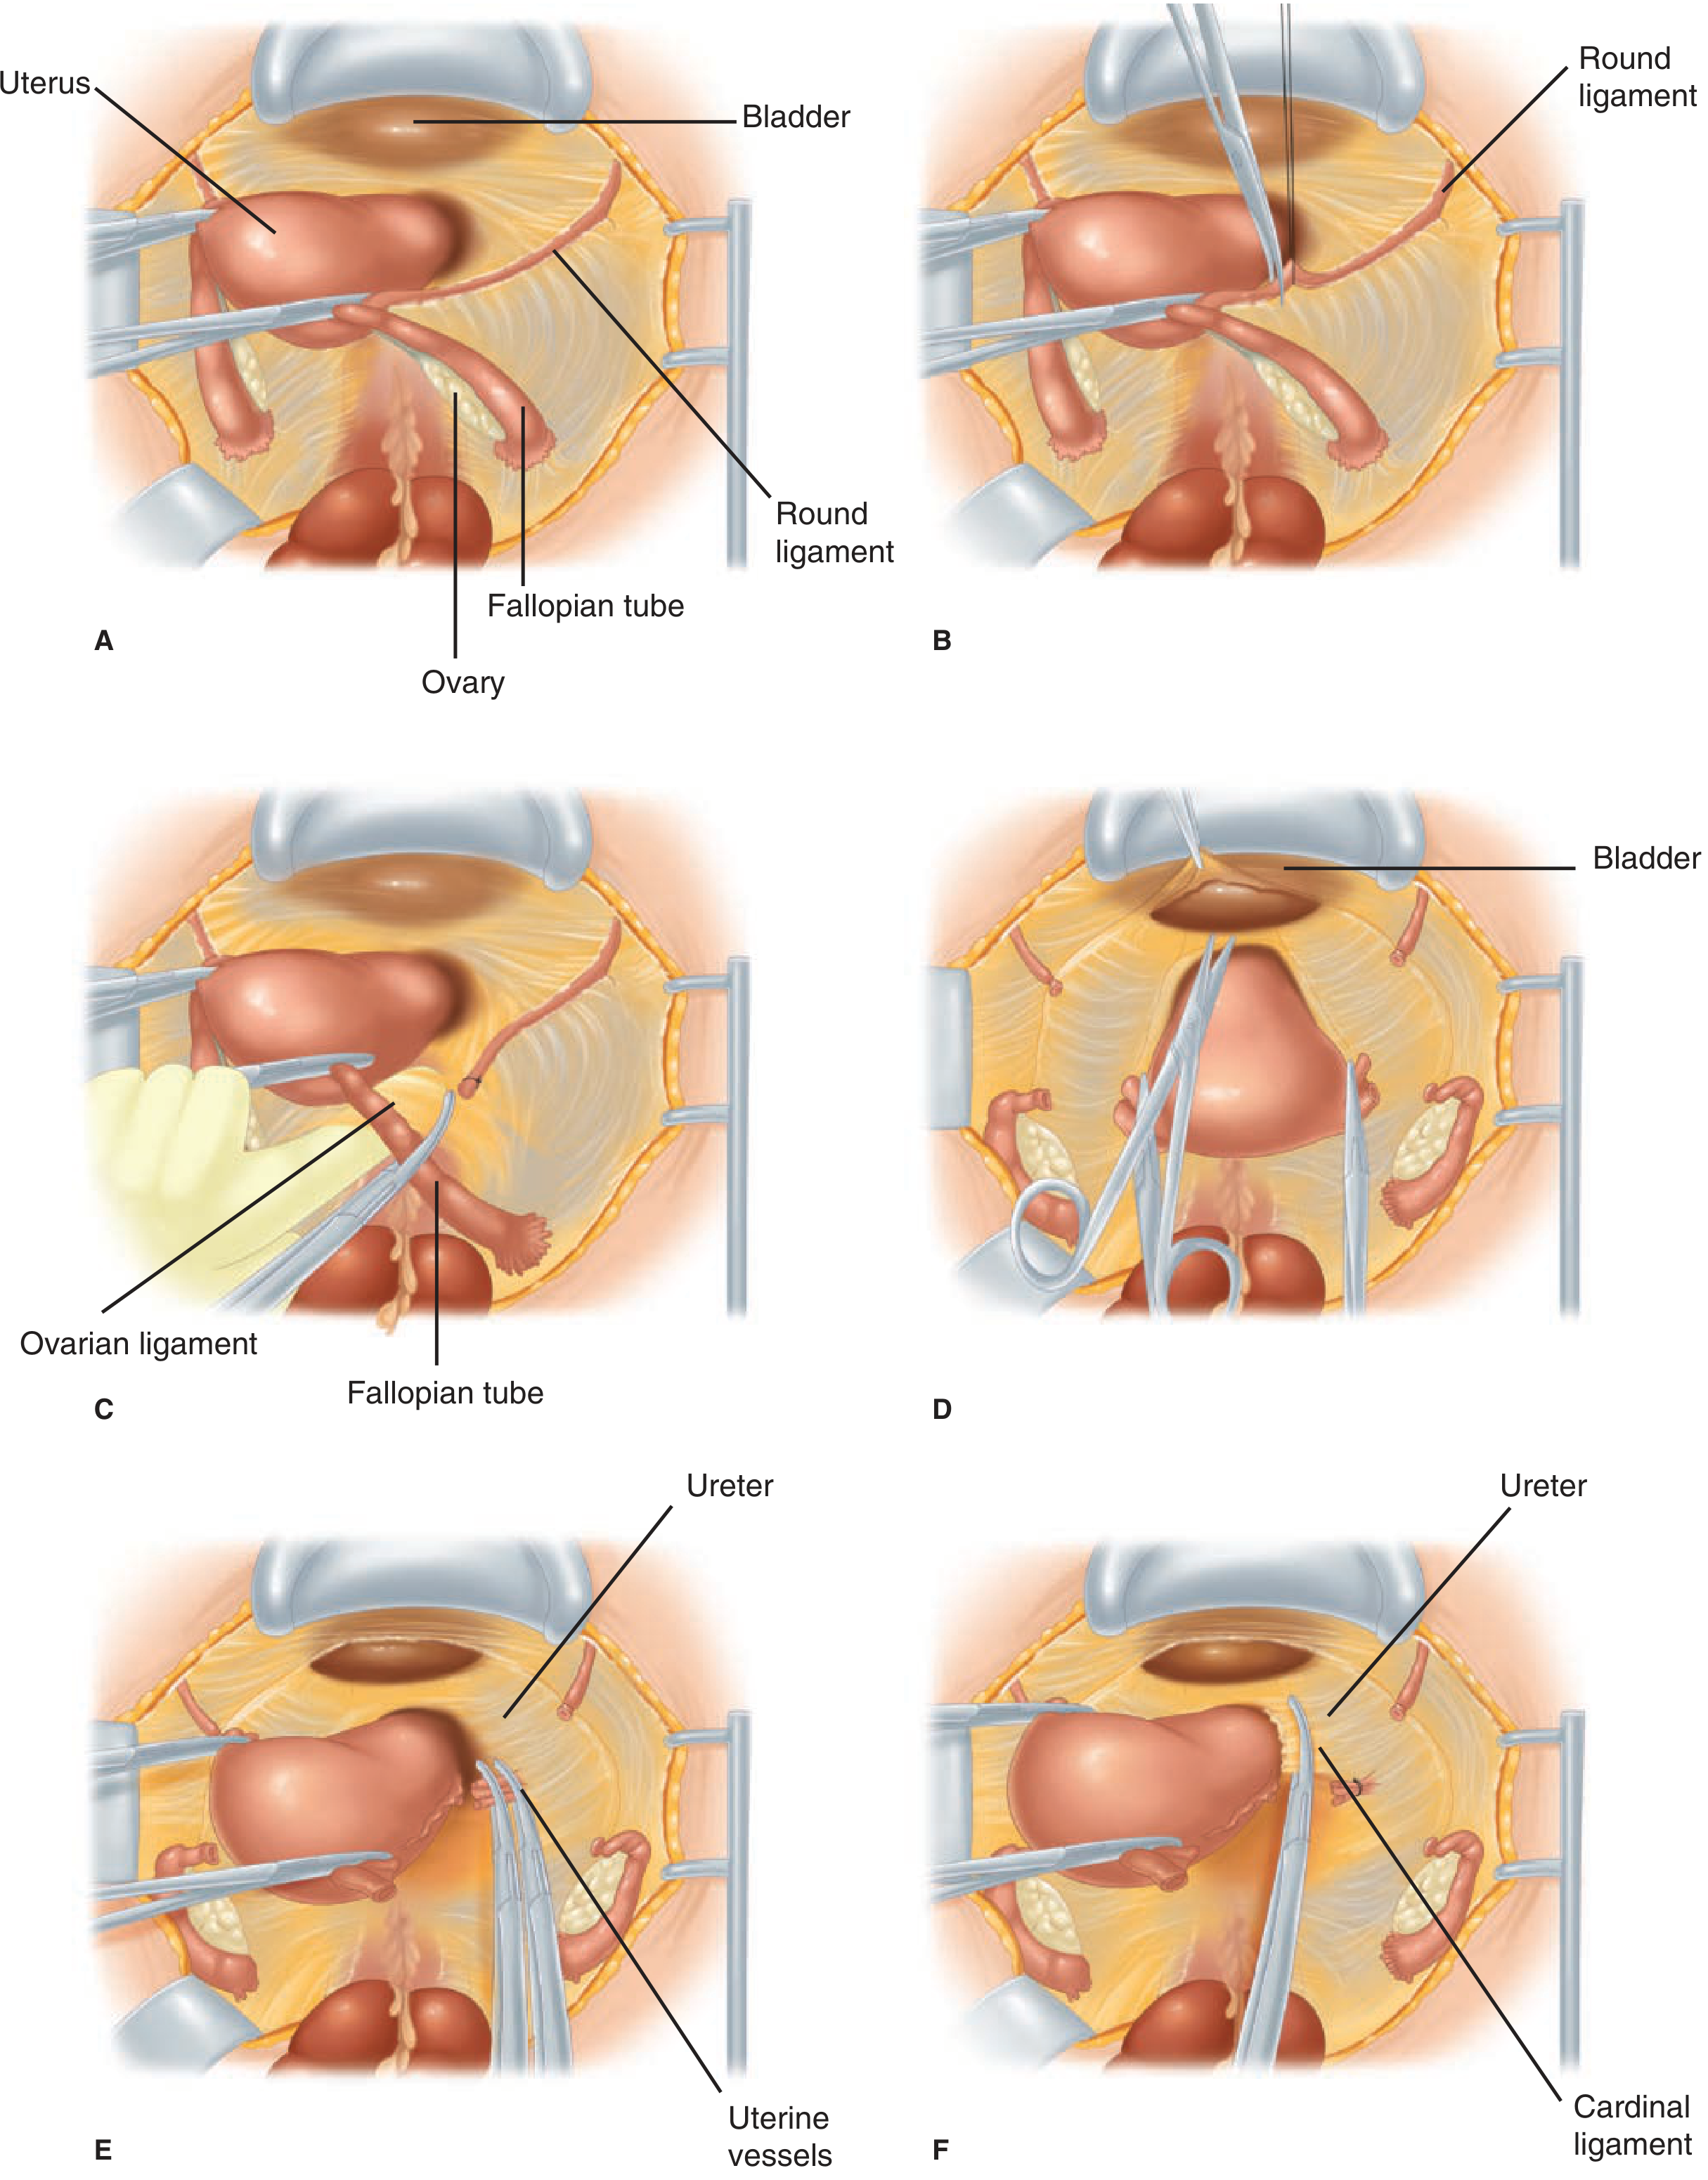
Panels A-F: Uterus + bladder anatomy → Round ligament clamped → Ovarian/fallopian ligament divided → Bladder reflected → Uterine vessels identified → Cardinal ligament.
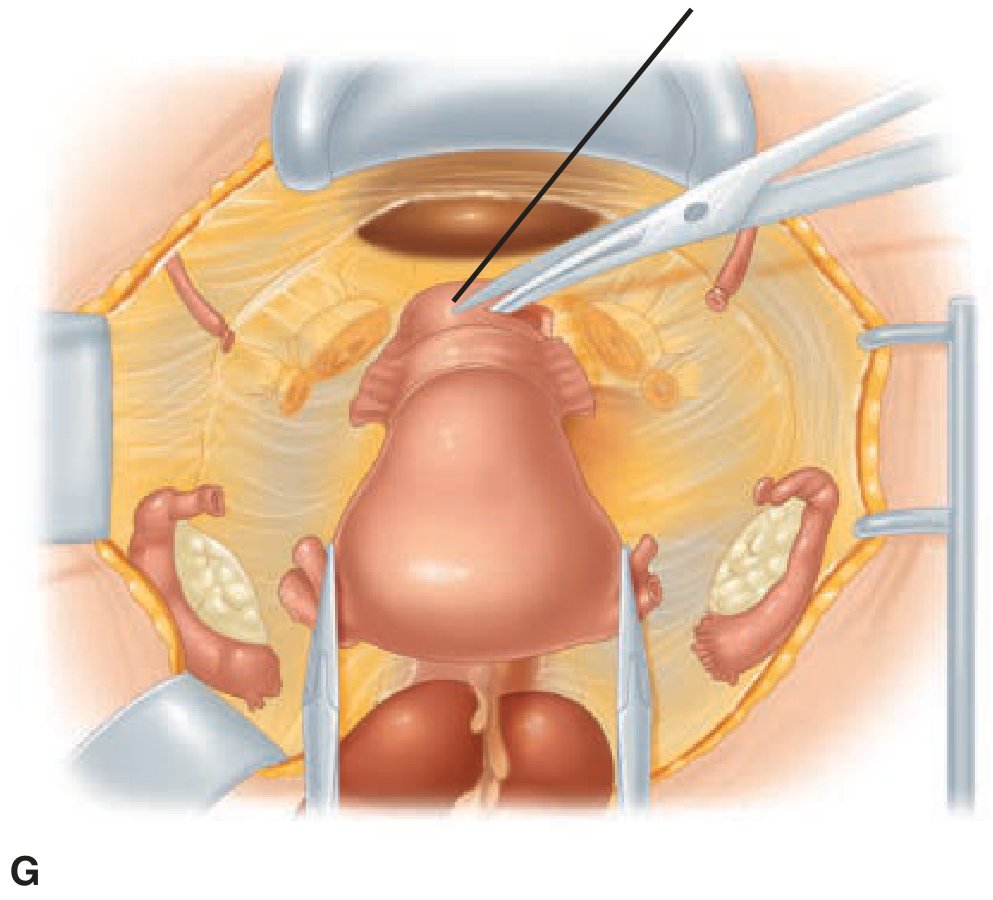
Panel G: Colpotomy - entry into the vaginal fornix.
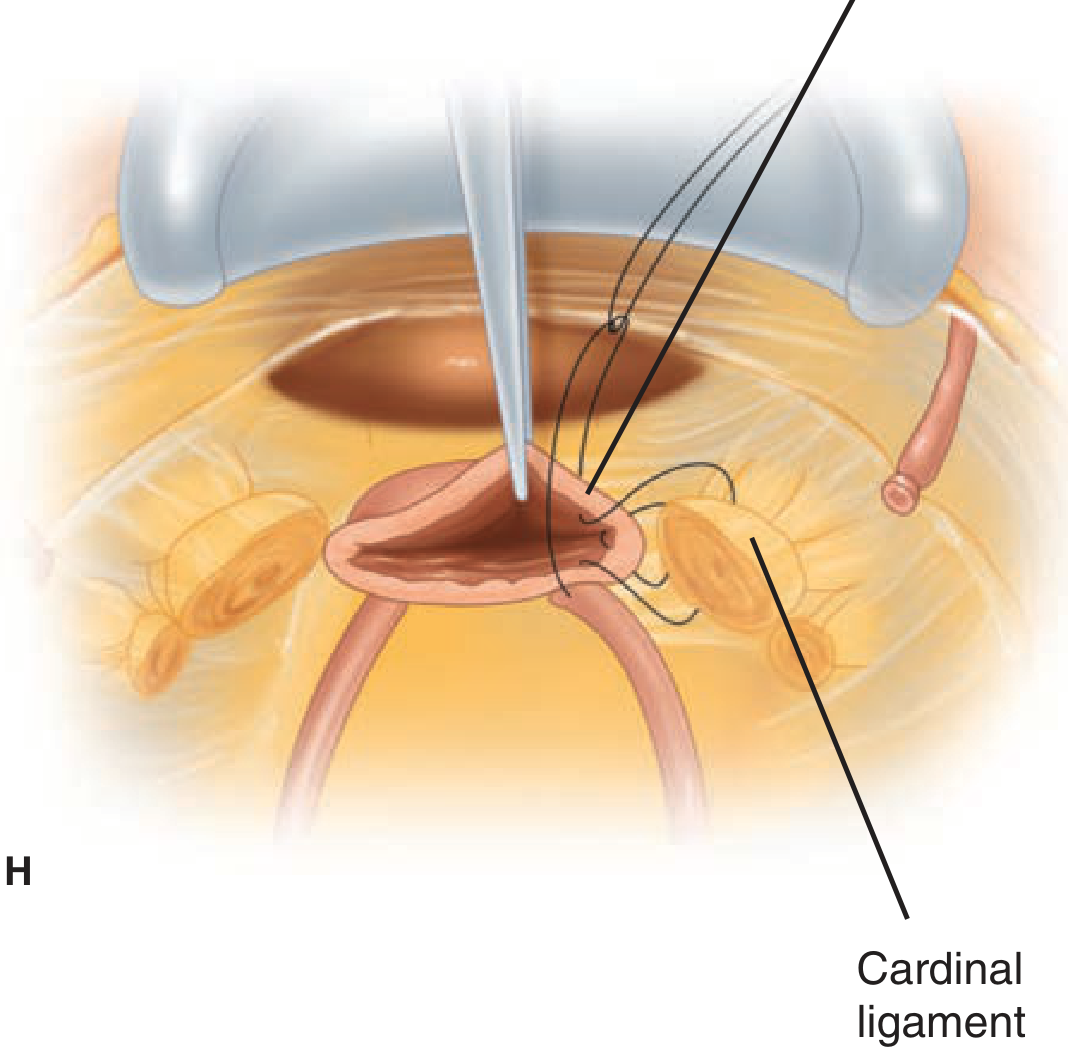
Panel H: Vaginal cuff closure incorporating cardinal ligament stumps.
Summary of TLH Steps
| Step | Action | Key Point |
|---|---|---|
| 1 | Patient positioning + instrumentation | Uterine manipulator is essential |
| 2 | Port placement | Avoid inferior epigastric vessels |
| 3 | Mesosalpinx + round ligament division | Creates bladder peritoneal flap |
| 4 | Retroperitoneal dissection + ureter ID | Ureter on medial leaf of broad ligament |
| 5 | Utero-ovarian or IP ligament division | Depends on oophorectomy decision |
| 6 | Uterine artery skeletonization + ligation | Ureter must be visualised first |
| 7 | Colpotomy (circumferential) | Distinguishes TLH from LAVH |
| 8 | Uterus removal (vaginal or morcellation) | |
| 9 | Vaginal cuff closure + McCall culdoplasty | Incorporate uterosacral ligaments |
| 10 | Cystoscopy | Confirm ureteral integrity |
Sources: Berek & Novak's Gynecology (Chapter 27, Figures 27-23 to 27-29) | Schwartz's Principles of Surgery 11th Ed (Chapter 41, Figure 41-12)
Shaw's Gynaecology and Te Linde's Operative Gynecology are not currently in the library and could not be retrieved. The steps above from Berek & Novak's represent the gold-standard operative gynecology reference available.
This is a shared conversation. Sign in to Orris to start your own chat.