

What will asses and provisional diagnosis
adhesive capsulitis frozen shoulder assessment clinical
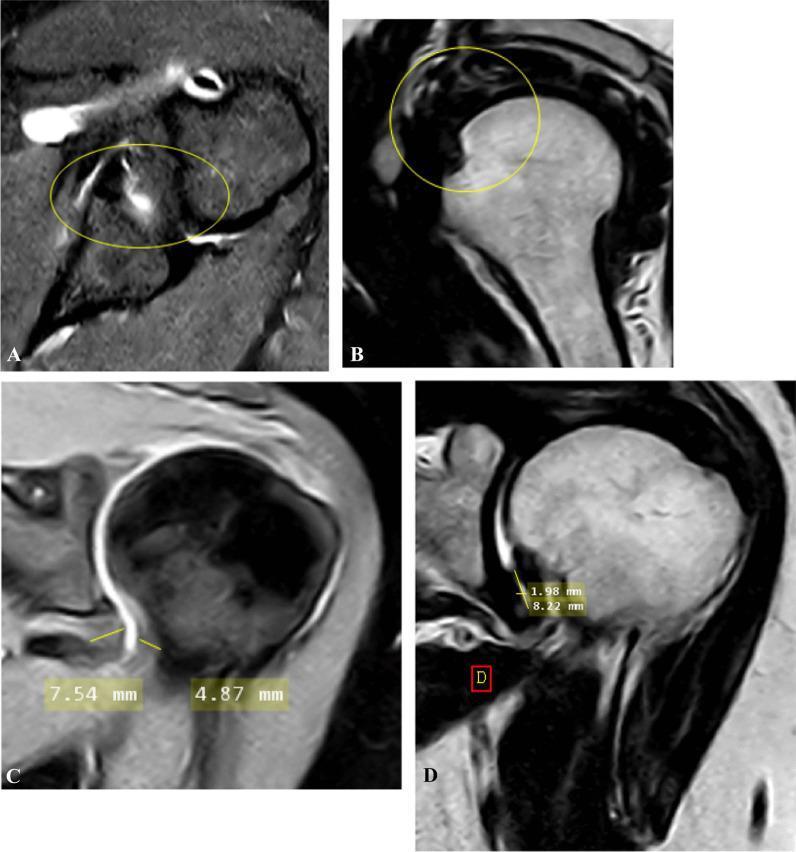
This composite of magnetic resonance imaging (MRI) scans illustrates diagnostic findings for adhesive capsulitis (frozen shoulder) across four planes. Panel A shows an oblique axial fat-suppressed proton density (PD)-weighted image demonstrating anterior and posterior extracapsular edema, indicated by hyperintense signals within the yellow circle. Panel B displays an oblique sagittal T2-weighted image showing partial obliteration of the subcoracoid fat triangle (encircled), a key indicator of proliferative soft tissue in the rotator interval. Panels C and D provide oblique coronal views used for quantitative assessment. Panel C (fat-suppressed PD) illustrates the measurement of the joint capsule's thickness at both the humeral and glenoid portions of the axillary recess (4.87 mm and 7.54 mm). Panel D (T2-weighted) shows the measurement of the axillary recess's maximal height and width (1.98 mm and 8.22 mm). These imaging modalities are critical for evaluating capsular thickening, edema, and recess volume loss in patients with clinical shoulder stiffness.
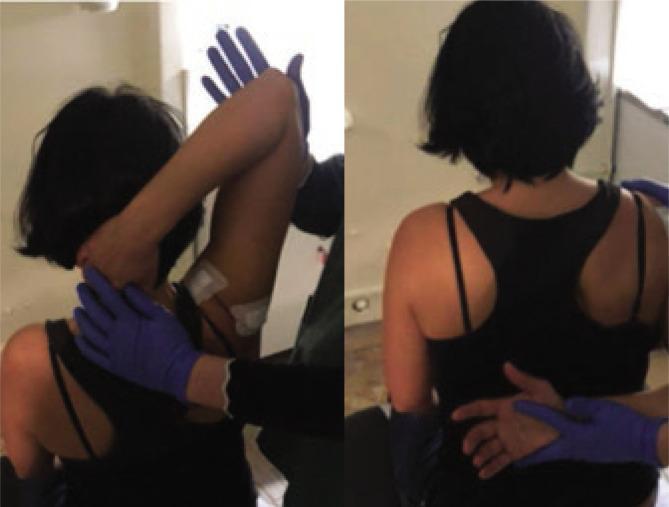
This clinical photograph consists of two panels illustrating post-procedural passive mobilization techniques for adhesive capsulitis (frozen shoulder) in a seated patient. The images demonstrate the application of physical therapy or orthopedic manipulation following glenohumeral joint hydrodistension. In the left panel, a practitioner wearing blue medical gloves performs passive abduction and external rotation; one hand supports the cervical-thoracic junction while the other guides the patient's flexed elbow and upper arm. Two white square adhesive patches, likely providing transcutaneous electrical nerve stimulation (TENS) or monitoring, are visible on the posterior-lateral deltoid region. In the right panel, the practitioner performs passive internal rotation by guiding the patient's arm into a 'hand-behind-back' position, emphasizing posterior capsule stretching. Both panels highlight the therapeutic range of motion exercises used to restore joint mobility and prevent adhesion recurrence in the shoulder complex. This clinical resource is relevant for physical medicine, rehabilitation, and orthopedic education regarding joint capsule pathologies.
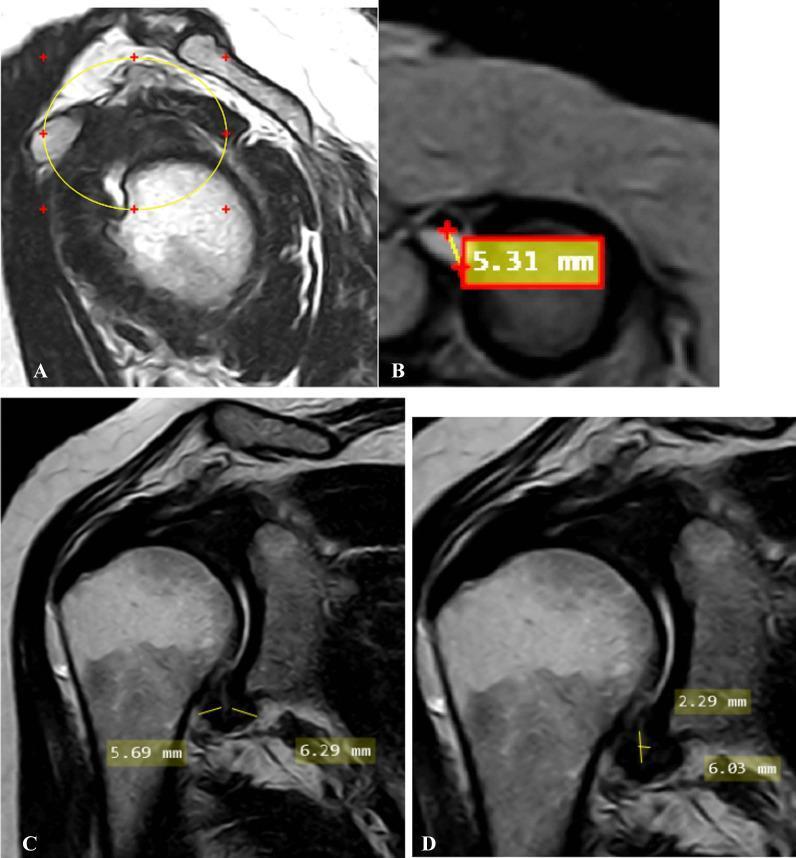
A multi-panel MRI study of the shoulder demonstrating radiological signs of adhesive capsulitis (frozen shoulder). Image A (oblique sagittal T2-weighted) shows the complete obliteration of the subcoracoid fat triangle within the rotator interval (encircled). Image B (oblique axial fat-suppressed PD-weighted) identifies a significant effusion (5.31 mm) within the long head of the biceps tendon sheath, exceeding the normal threshold. Images C and D (oblique coronal T2-weighted) focus on the axillary recess. Image C measures the pathological thickening of the joint capsule at the humeral (5.69 mm) and glenoid (6.29 mm) aspects. Image D provides measurements for the maximal height (2.29 mm) and width (6.03 mm) of the axillary recess space. This composite image illustrates key diagnostic criteria including rotator interval fat replacement, synovial effusion, and capsular thickening, which are critical for the radiological staging of adhesive capsulitis in a clinical setting.
Case 1 - Clinical Reasoning
Patient Summary
- 55-year-old female
- Known case of diabetes mellitus
- Shoulder pain - 4 months duration
- Difficulty combing hair (shoulder abduction + external rotation)
- Difficulty reaching behind back (internal rotation)
- Night pain present
Provisional Diagnosis
Adhesive Capsulitis (Frozen Shoulder)
| Feature | This Patient |
|---|---|
| Age & sex | 55-year-old female - most common demographic |
| Comorbidity | Diabetes mellitus - a well-known risk factor |
| Duration | 4 months - consistent with freezing/frozen phase |
| Pain pattern | Night pain - hallmark of capsulitis |
| Movement loss | Difficulty combing hair (restricted abduction/ER) and reaching behind back (restricted IR) - global restriction of glenohumeral motion |
Differential Diagnoses to Rule Out
- Rotator cuff tear - pain with specific arc, weakness on testing; passive ROM often preserved
- Calcific tendinitis - acute severe pain, calcification on X-ray
- Glenohumeral osteoarthritis - older age, X-ray shows joint space narrowing
- Subacromial impingement syndrome - painful arc (60-120°), passive ROM usually full
- Cervical radiculopathy - referred shoulder pain with neck involvement
Assessments to Perform
1. Subjective Assessment (History)
- Pain score - Visual Analogue Scale (VAS) or Numeric Pain Rating Scale (NPRS)
- Onset, nature, aggravating/relieving factors
- Functional limitations - ADLs (dressing, hygiene, work, sleep)
- Glycemic control (HbA1c history - poor control worsens prognosis)
- Hand dominance (affected side?)
- Previous shoulder treatment
2. Objective Assessment
Posture & Observation
- Shoulder height difference
- Muscle wasting (deltoid, supraspinatus, infraspinatus)
- Any swelling, redness (rules out septic arthritis)
Range of Motion (ROM) - Primary Assessment
| Movement | Normal | Expected Finding |
|---|---|---|
| Flexion | 180° | Reduced |
| Abduction | 180° | Reduced (typically <90°) |
| External rotation | 60-90° | Most restricted (pathognomonic) |
| Internal rotation | Thumb to T10 | Reduced (can't reach behind back) |
| Horizontal adduction | 45° | Reduced |
- Use a goniometer for precise measurement
- Compare active vs. passive ROM - both reduced in frozen shoulder (unlike impingement where passive is full)
Special Tests
| Test | Purpose |
|---|---|
| Apley scratch test | Screens ER + abduction (combing) and IR + extension (behind back) |
| Neer's impingement sign | Rules out subacromial impingement |
| Hawkins-Kennedy test | Rules out impingement |
| Empty can/Full can test | Assesses supraspinatus (rotator cuff) |
| Gerber's lift-off test | Assesses subscapularis |
| Speed's test / Yergason's | Rules out bicipital tendinopathy |
| Drop arm test | Rules out massive rotator cuff tear |
Palpation
- Subacromial bursa tenderness
- Bicipital groove (long head biceps)
- AC joint
- Glenohumeral joint line
Neurological Assessment
- Sensation in dermatomes C4-T1
- Reflexes (biceps C5, brachioradialis C6)
- Rules out cervical radiculopathy
3. Functional Outcome Measures
- DASH (Disabilities of the Arm, Shoulder and Hand) - gold standard for upper limb function
- SPADI (Shoulder Pain and Disability Index) - specific to shoulder
- Oxford Shoulder Score
- Constant-Murley Score - objective + subjective
4. Investigations to Request
- X-ray shoulder (AP + axillary) - to rule out OA, calcification, fracture
- Ultrasound - rotator cuff tears, bursitis
- MRI - capsular thickening, axillary recess obliteration (confirms adhesive capsulitis)
- Blood glucose / HbA1c - assess diabetic control
MRI Findings in Adhesive Capsulitis
Key Clinical Points
- Diabetes significantly prolongs the course (can last 3-5 years instead of 1-2 years in non-diabetics) - Bailey & Love's Surgery, 28th Ed.
- Night pain is a cardinal symptom of the freezing phase
- Both active and passive ROM are restricted - this distinguishes frozen shoulder from rotator cuff tears (where passive is preserved)
- External rotation loss is the most sensitive and specific sign
Capsular pattern
capsular pattern shoulder joint range of motion restriction diagram
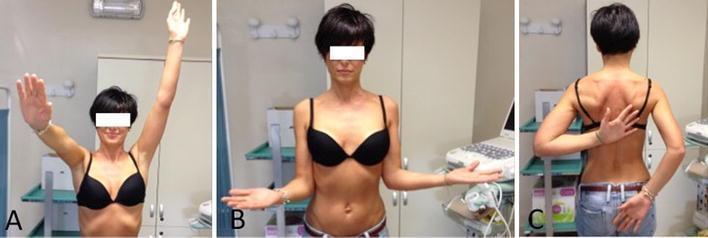
This clinical photograph series demonstrates the assessment of active range of motion (AROM) in a young female patient diagnosed with chronic calcifying tendinitis of the supraspinatus (SS) tendon and secondary shoulder stiffness (adhesive capsulitis). Panel A (anterior view) shows the patient attempting maximum shoulder elevation; the left arm is fully elevated while the right arm shows limited abduction to approximately 90 degrees with compensatory elbow flexion. Panel B (anterior view) illustrates bilateral external rotation with the elbows tucked at the sides, assessing for capsular restriction. Panel C (posterior view) demonstrates the 'Apley Scratch Test' or internal rotation assessment; the patient attempts to reach the dorsal midline of the back, highlighting significant asymmetry and restriction in the affected shoulder compared to the contralateral side. These views collectively visualize common clinical manifestations of a 'frozen shoulder' secondary to rotator cuff pathology, emphasizing the functional impact on elevation, abduction, and internal rotation.
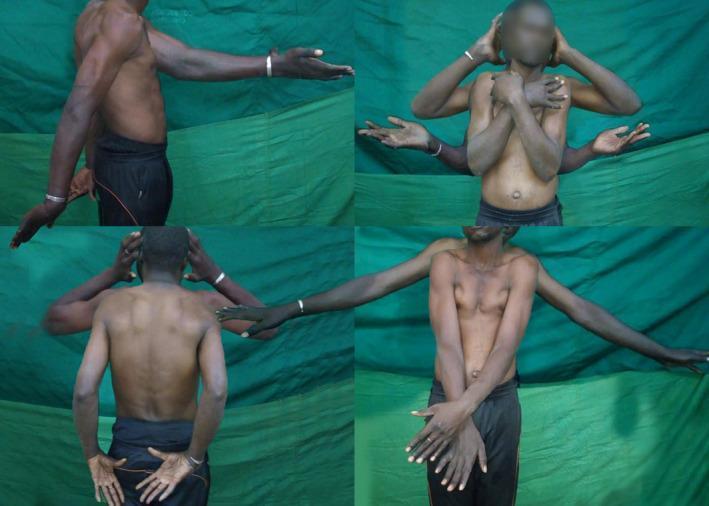
A composite of four clinical photographs demonstrating the range of motion (ROM) in a 26-year-old male with chronic (2-year) bilateral symmetric anterior shoulder dislocations. The images show a slender patient in various poses to assess joint function. Key visual features include: 1) A lateral view showing restricted shoulder extension and lateral abduction. 2) An anterior view with hands behind the head, indicating preserved but limited overhead reaching and external rotation. 3) A posterior view showing the patient attempting internal rotation with hands placed on the lower back (Hand-to-Sacrum test), demonstrating significant limitations in reaching the upper back. 4) A front view with arms crossed over the chest (cross-body adduction) and partial abduction. Visible signs include a flattening of the deltoid contour and subtle 'sulcus signs' indicative of glenohumeral instability. The images illustrate the functional adaptation to long-standing, unreduced dislocations, highlighting the discrepancy between the patient's ability to perform activities of daily living and the objective restriction in terminal ROM, particularly internal rotation and full abduction.
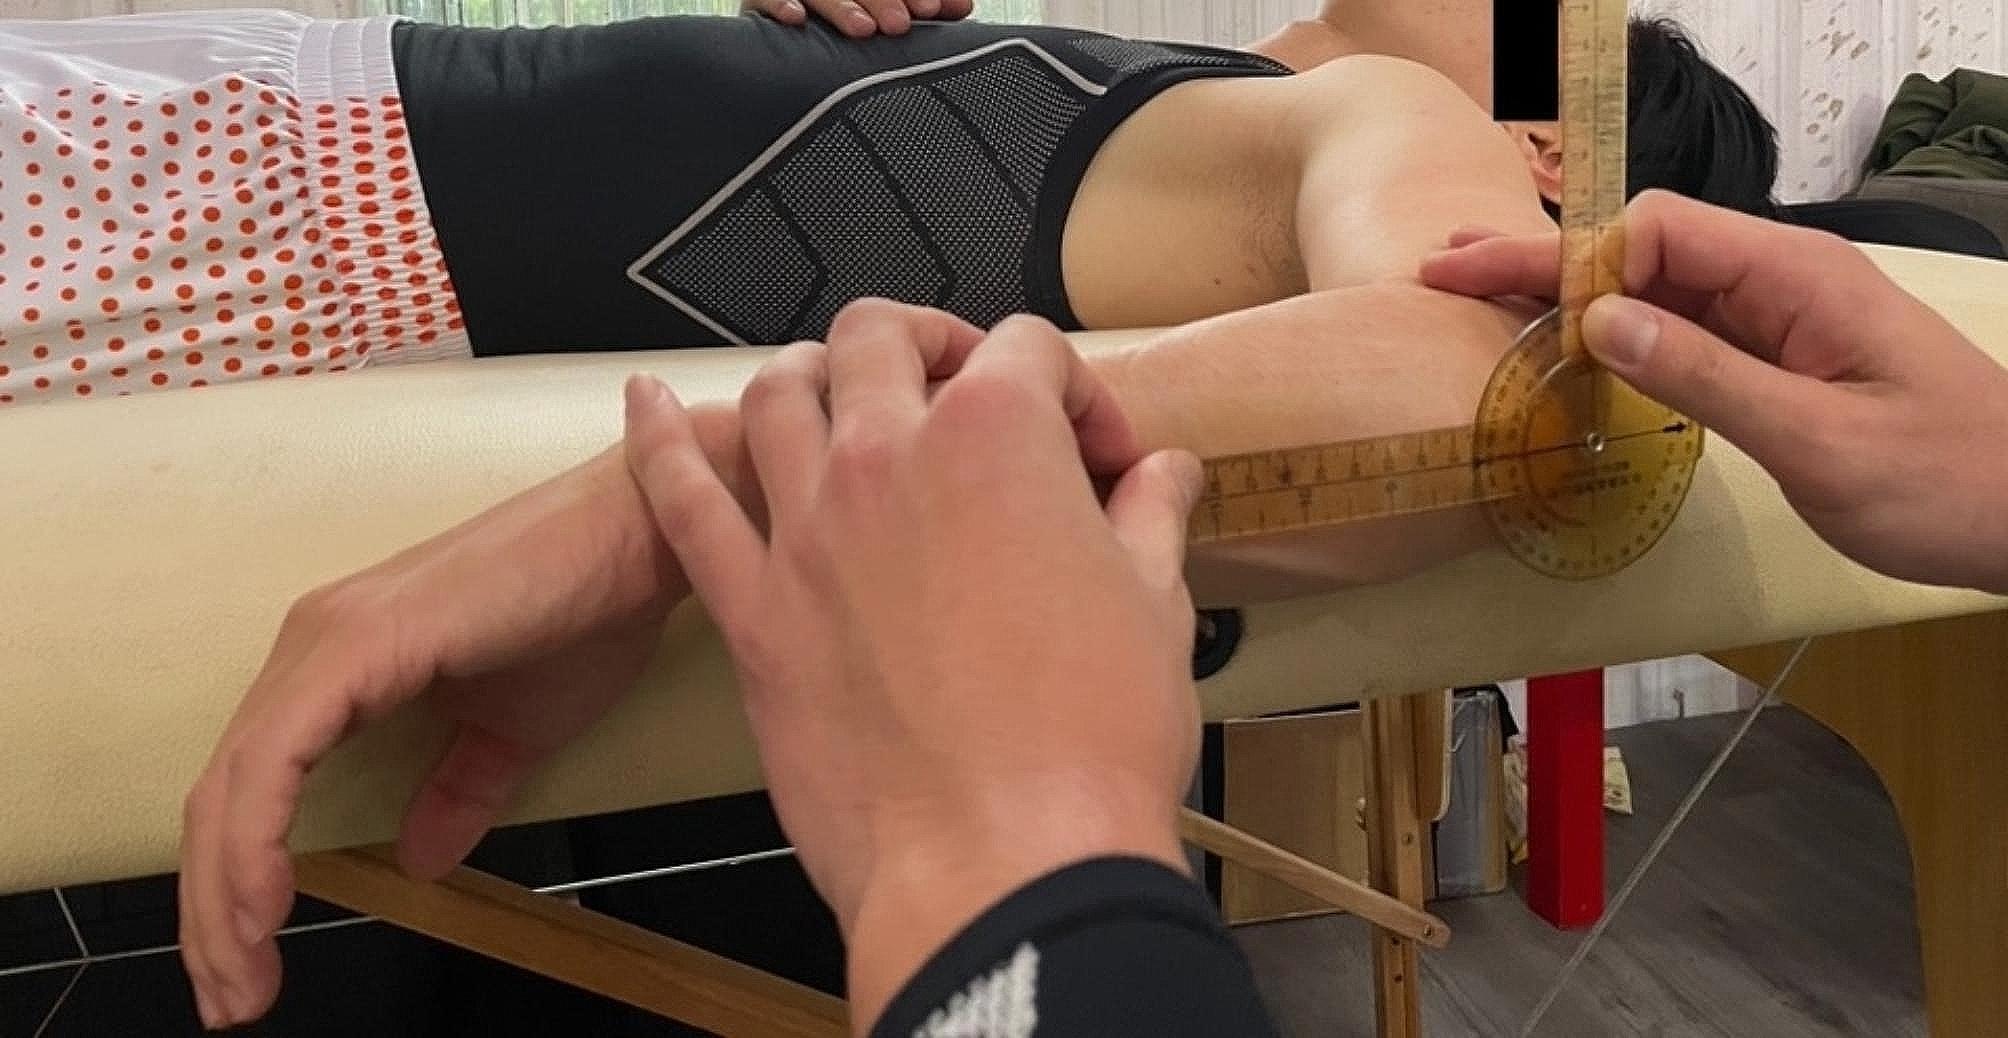
Clinical photograph demonstrating the assessment of passive shoulder range of motion (ROM) in a supine patient. The image shows the measurement of the internal rotational angle of the shoulder. The patient is lying supine on a medical examination table with the glenohumeral joint in 90 degrees of abduction and the elbow flexed to 90 degrees. A manual goniometer is employed for objective quantification; the fulcrum is centered over the lateral aspect of the elbow joint (olecranon process), with the stationary arm aligned vertically (perpendicular to the floor) and the moving arm aligned along the long axis of the ulna toward the ulnar styloid process. The clinician's hands are visible stabilizing the joint and guiding the forearm through the internal rotation arc. This visual illustrates a standard orthopedic physical examination technique used in sports medicine and rehabilitation to evaluate capsular flexibility and diagnose conditions such as Glenohumeral Internal Rotation Deficit (GIRD).
Capsular Pattern of the Shoulder (Glenohumeral Joint)
Definition
Capsular Pattern of the Glenohumeral Joint
External Rotation > Abduction > Internal Rotation
- External Rotation is the most restricted movement (greatest loss)
- Abduction is moderately restricted
- Internal Rotation is the least restricted (smallest loss)
| Movement | Normal ROM | Patient's ROM | Loss |
|---|---|---|---|
| External Rotation | 60-90° | ~10-20° | Severe (most affected) |
| Abduction | 180° | ~60-90° | Moderate |
| Internal Rotation | ~70° (thumb to T10) | Reduced | Least affected |
Why This Pattern Occurs
- The anterior capsule and rotator interval contract first and most severely
- These structures are the primary restraints to external rotation
- As the condition progresses, the inferior capsule/axillary pouch contracts, limiting abduction
- The posterior capsule is last to be affected, so internal rotation is relatively preserved
In This Patient (Case 1)
| Feature | Evidence |
|---|---|
| Difficulty combing hair | Restricted abduction + external rotation |
| Difficulty reaching behind back | Restricted internal rotation + extension |
| Night pain | Capsular inflammation (freezing phase) |
| Diabetes + 55-year-old female | High-risk group for adhesive capsulitis |
Capsular vs. Non-Capsular Pattern
| Feature | Capsular Pattern | Non-Capsular Pattern |
|---|---|---|
| Cause | Capsule itself (arthritis, adhesive capsulitis) | Ligament, bursa, muscle, bone |
| ROM loss | Proportional (ER > Abd > IR) | Selective / asymmetric |
| Example | Frozen shoulder, glenohumeral OA | Subacromial bursitis, rotator cuff tear |
| Both active & passive affected | Yes | Variable |
Capsular Patterns of Other Common Joints (for reference)
| Joint | Capsular Pattern |
|---|---|
| Glenohumeral (Shoulder) | ER > Abduction > IR |
| Hip | Flexion > IR > Abduction |
| Knee | Flexion > Extension |
| Elbow | Flexion > Extension |
| Cervical spine | Side flexion & rotation equally limited, extension |
Key Clinical Point
What's the physiotherapy management
frozen shoulder physiotherapy exercises mobilization techniques
This clinical photograph consists of two panels illustrating post-procedural passive mobilization techniques for adhesive capsulitis (frozen shoulder) in a seated patient. The images demonstrate the application of physical therapy or orthopedic manipulation following glenohumeral joint hydrodistension. In the left panel, a practitioner wearing blue medical gloves performs passive abduction and external rotation; one hand supports the cervical-thoracic junction while the other guides the patient's flexed elbow and upper arm. Two white square adhesive patches, likely providing transcutaneous electrical nerve stimulation (TENS) or monitoring, are visible on the posterior-lateral deltoid region. In the right panel, the practitioner performs passive internal rotation by guiding the patient's arm into a 'hand-behind-back' position, emphasizing posterior capsule stretching. Both panels highlight the therapeutic range of motion exercises used to restore joint mobility and prevent adhesion recurrence in the shoulder complex. This clinical resource is relevant for physical medicine, rehabilitation, and orthopedic education regarding joint capsule pathologies.
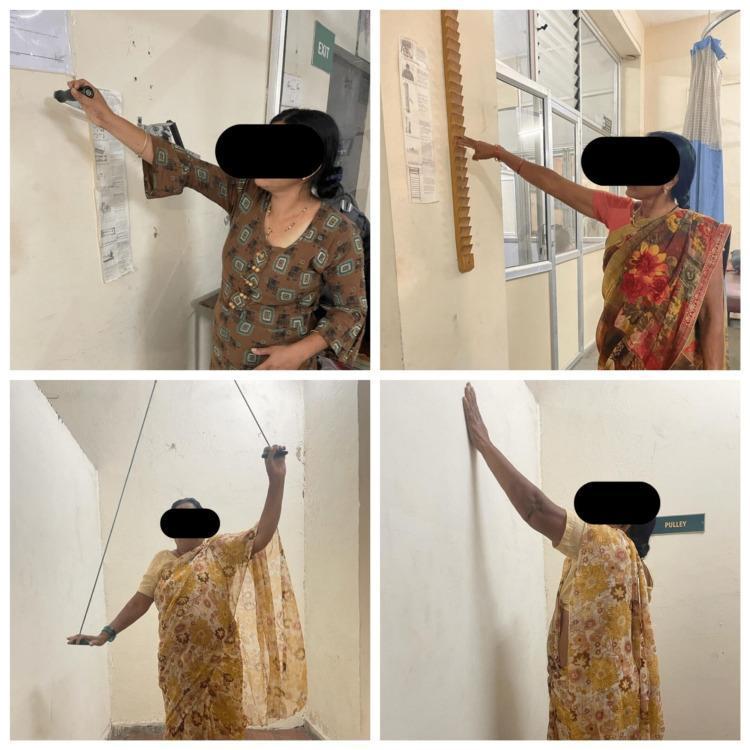
A composite of four clinical photographs demonstrating conventional physical therapy exercises for shoulder rehabilitation and range of motion (ROM) improvement. Top left: A patient performs 'wall washing' exercises, moving their hand in functional patterns against a wall surface to facilitate shoulder flexion and abduction. Top right: A patient uses a 'finger ladder' mounted on a wall, utilizing finger movements to incrementally increase shoulder elevation and abduction. Bottom left: A patient engages in shoulder pulley exercises using a suspended rope and handle system to perform assisted ROM activities, where the healthy arm helps lift the affected limb. Bottom right: A patient demonstrates a wall-climbing or stretching exercise to maximize vertical reach. These interventions are typically used in the management of adhesive capsulitis (frozen shoulder) or post-operative recovery to improve shoulder mobility, specifically targeting flexion, abduction, and rotation. The images represent standard physiotherapy protocols often compared with modern interventions like virtual reality-based therapy.
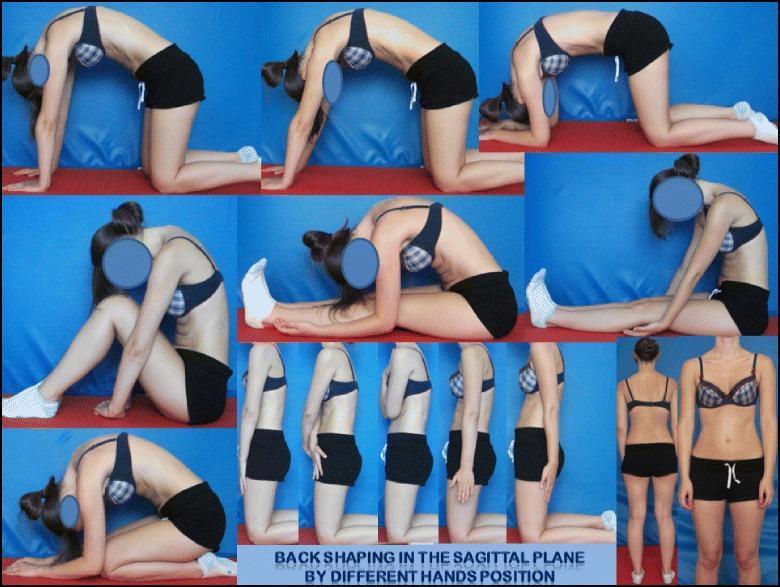
This composite educational patient photograph illustrates the 'back shaping' and symmetrical positioning techniques of the DoboMed method for scoliosis physiotherapy. The image demonstrates variations in sagittal plane spinal alignment across multiple postures, emphasizing active thoracic kyphotization and lumbar lordotization. The top row shows a patient in various quadruped (kneeling) positions; different hand and arm placements (flat hands, elbows on ground) are used to modulate thoracic convexity and vertebral mobilization. The middle sections depict sitting and long-sitting postures focusing on trunk elongation and sagittal correction. The bottom row showcases a sequence of kneeling and standing postures where subtle shifts in hand position and shoulder alignment are used to correct spinal deformity and improve postural awareness. The goal illustrated is 3D auto-correction to stabilize the primary curve and promote balanced trunk alignment. This resource is intended for physical therapists and medical students studying Conservative Treatment of Scoliosis (CTS) and Physiotherapeutic Specific Scoliosis Exercises (PSSE).
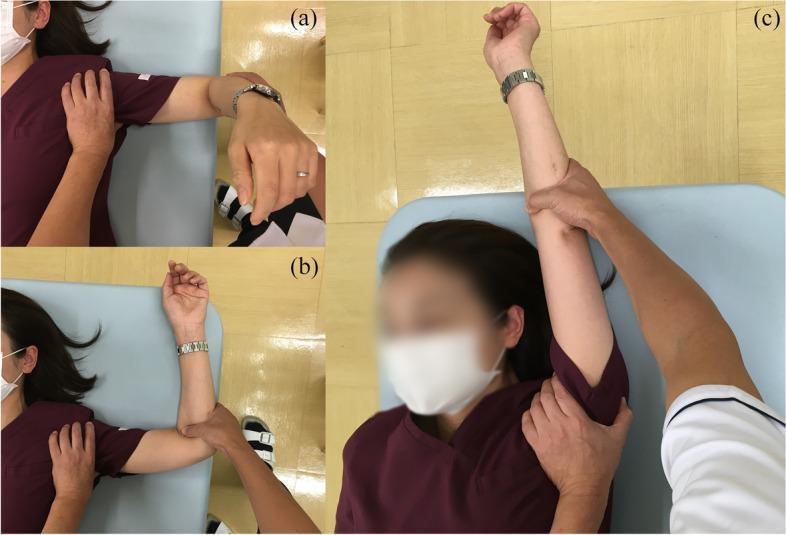
This composite of three clinical photographs (a, b, and c) demonstrates the manual manipulation stages of a glenohumeral joint mobilization procedure, typically performed for adhesive capsulitis or frozen shoulder. The patient is in a supine position. (a) Initial abduction: The right arm is abducted to approximately 90 degrees with the elbow flexed, while the clinician stabilizes the shoulder girdle with one hand to isolate movement. (b) External rotation: From the abducted position, the shoulder is externally rotated to 90 degrees, with the clinician providing support at the elbow and shoulder to prevent compensatory movements or humeral head anterior translation. (c) Maximal abduction: The arm is moved toward full abduction in the frontal plane, with the clinician carefully supporting the humerus and axilla. The sequence highlights clinical techniques used to increase range of motion (ROM) in the shoulder joint while protecting the humerus from excessive torsional forces. This visual is intended for orthopedic and physical medicine training, focusing on controlled passive mobilization and anatomical stabilization during joint manipulation.
adhesive capsulitis physiotherapy exercise mobilization
adhesive capsulitis physical therapy
PMID: 36861780
Physiotherapy Management - Adhesive Capsulitis
The 3 Phases of Frozen Shoulder
| Phase | Duration | Key Feature | PT Goal |
|---|---|---|---|
| Phase 1 - Freezing | 0-6 months | Severe pain, ROM starting to reduce | Pain control, maintain ROM |
| Phase 2 - Frozen | 4-12 months | Pain decreasing, stiffness dominant | Restore ROM, mobilisation |
| Phase 3 - Thawing | 12-24+ months | Spontaneous ROM recovery | Strengthen, restore function |
In diabetics, all phases last significantly longer - up to 3-5 years total.
Phase 1 - Freezing Phase (Current Phase for This Patient)
A. Pain Relief Modalities (Electrotherapy)
| Modality | Application | Purpose |
|---|---|---|
| TENS (Transcutaneous Electrical Nerve Stimulation) | Over shoulder girdle, 80-100 Hz conventional mode | Gate control pain relief |
| Ultrasound Therapy | 1 MHz, 1-1.5 W/cm², pulsed 1:4, 5-7 min over shoulder capsule | Deep heating, tissue extensibility |
| Hot pack / Moist heat | 15-20 min pre-exercise | Increase soft tissue extensibility |
| Ice/Cryotherapy | Post-exercise | Reduce post-exercise inflammation |
| SWD / MWD (Short/Microwave Diathermy) | Pulsed mode for acute phase | Deep tissue warming |
| Low Level Laser Therapy (LLLT) | 5-10 J/cm² over capsule | Anti-inflammatory, analgesia |
B. Exercise Therapy - Phase 1
- Pendulum (Codman's) exercises - gravity-assisted pendular shoulder movements
- Forward-backward, side-to-side, circles
- Relaxes the capsule gently
- Assisted ROM exercises - active-assisted using the uninvolved arm or pulley
- Wand/T-bar exercises - for ER, flexion
- Pain-free passive ROM - within comfortable range only
⚠️ Avoid aggressive stretching in this phase - it worsens inflammation and pain
Phase 2 - Frozen Phase (Stiffness Dominant)
A. Joint Mobilisation (Primary Treatment)
Maitland Concept
| Grade | Oscillation | Indication |
|---|---|---|
| Grade I | Small amplitude, start of range | Acute pain, initial contact |
| Grade II | Large amplitude, mid-range | Pain relief, early stiffness |
| Grade III | Large amplitude, into resistance | Stiffness, early limitation |
| Grade IV | Small amplitude, at end of range | Primary grade for frozen shoulder - breaks adhesions |
| Grade V | High velocity thrust (manipulation) | Only MUA (under anaesthesia) |
- Inferior glide - increases abduction
- Posterior glide - increases external rotation (most important)
- Anterior glide - increases internal rotation
- Long axis distraction - general capsule stretch, pain relief
Kaltenborn Technique
- Grade III sustained stretch - directly into tissue resistance to elongate the capsule
- More focused on end-range stretching vs. oscillatory Maitland
Mulligan's MWM (Mobilisation With Movement)
- Posterior glide of humeral head + active elevation by patient
- Shown to improve ROM immediately
- Apply sustained posterior-inferior glide while patient actively abducts
B. Stretching Programme
| Stretch | Target | Method |
|---|---|---|
| Cross-body stretch | Posterior capsule | Pull arm across chest, hold 30 sec |
| Sleeper stretch | Posterior capsule + IR | Lie on affected side, press forearm toward floor |
| ER stretch with cane | Anterior capsule | Use cane to gently push into ER |
| Door frame stretch | Anterior capsule | Stand in doorway, lean forward |
| Behind-back reach | IR + posterior capsule | Towel-assisted IR stretch |
| Wall climbing/Finger ladder | Flexion + abduction | Progressive elevation along wall |
- Hold each stretch 30-60 seconds, 3-5 repetitions
- Perform 3-4 times daily (frequency is key)
- Work just beyond the pain point (not into sharp pain)
- Always pre-heat before stretching
C. Strengthening (Begin when pain allows)
| Muscle Group | Exercise |
|---|---|
| Rotator cuff (ER) | Theraband external rotation at side |
| Rotator cuff (IR) | Theraband internal rotation |
| Supraspinatus | Empty can (side-lying or standing) |
| Deltoid | Isometric abduction against wall |
| Scapular stabilisers | Scapular retraction, serratus anterior activation |
| Periscapular muscles | Rows, prone Y-T-W exercises |
Phase 3 - Thawing Phase
- Full progressive ROM exercises - active and resisted
- Strengthening - progressive resistance (Theraband → dumbbells)
- Proprioception training - ball on wall, perturbation training
- Functional ADL retraining - combing hair, dressing, overhead reach
- Return to full activity
Physiotherapy Protocol Summary for This Patient
CURRENT PHASE: Freezing → Frozen transition (4 months duration)

IMMEDIATE PRIORITIES:
1. Pain control - TENS + Ultrasound + Moist heat
2. Maintain ROM - Codman's pendulum exercises daily
3. Education - explain phase, natural history, diabetes link

WITHIN 2-4 WEEKS (as pain reduces):
1. Maitland Grade III-IV posterior and inferior glides
2. Capsular stretching programme (4x/day)
3. Gentle rotator cuff strengthening
4. Mulligan MWM for abduction

ONGOING:
1. Progress stretching intensity weekly
2. Add functional retraining
3. Monitor HbA1c - liaise with physician
Manual Therapy Evidence (PubMed 2023)
Key Physiotherapy Images

Special Considerations for This Diabetic Patient
- Diabetes causes thicker, more fibrotic capsule - longer course, harder to stretch
- Ensure glycaemic control (HbA1c <7%) - poor control significantly slows recovery
- Pain threshold may be altered in diabetic neuropathy - monitor carefully
- Both shoulders are at risk - 40% bilateral involvement in diabetics
- May need hydrodistension injection before physiotherapy to improve capsular extensibility
- Surgical referral (MUA or arthroscopic release) if no improvement after 3-6 months of physiotherapy
For external rotation which glide we give
posterior glide glenohumeral joint external rotation mobilization technique

Clinical photograph illustrating a specific internal rotation support taping technique for the glenohumeral joint. The image consists of two views: a posterior view (left) and an anterior view (right). In the posterior view, the participant's arm is abducted to 90 degrees with the elbow flexed; beige elastic tape originates on the lateral aspect of the upper arm, proximal to the elbow, and travels superiorly and medially at an approximate 45-degree angle across the posterior deltoid. In the anterior view, the participant is in maximal internal rotation; the tape continues its spiral trajectory from the posterior shoulder, crossing over the acromioclavicular region and extending medially across the superior-medial chest (pectoralis major region). The technique is designed to provide mechanical support and facilitate internal rotation while restricting excessive external rotation. This is typically used in sports medicine and physical therapy for managing shoulder instability or overhead throwing mechanics.
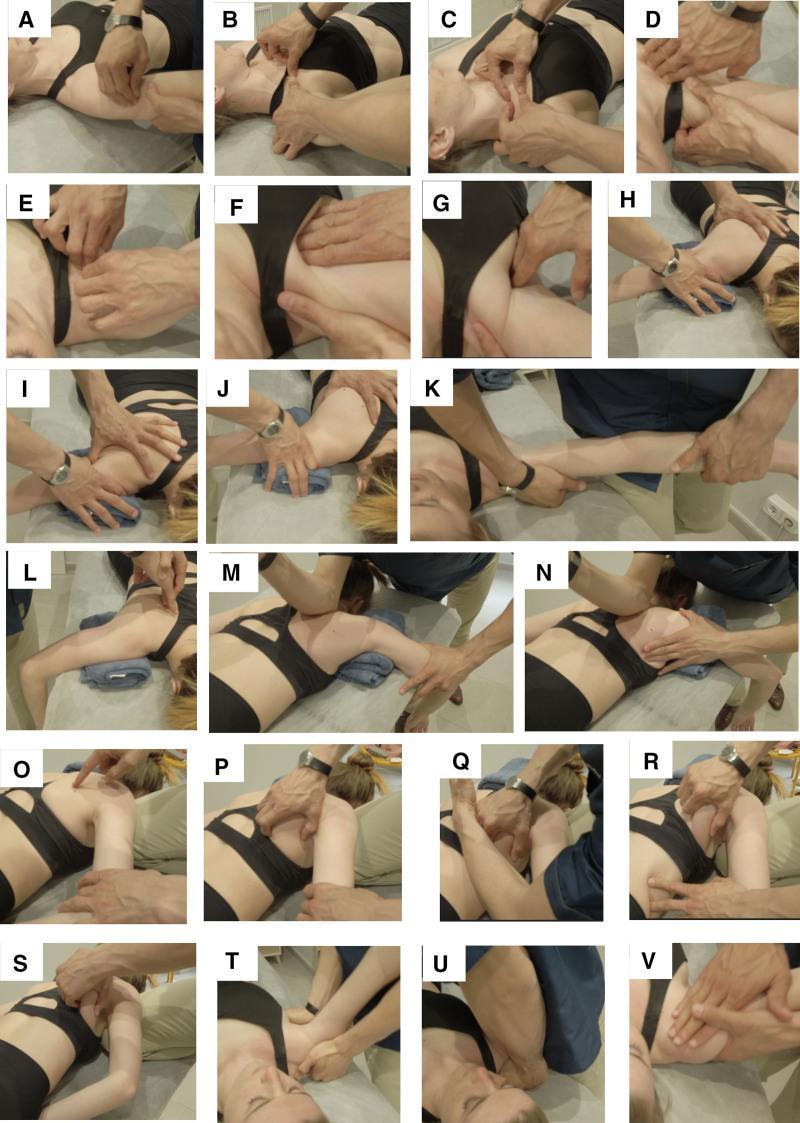
A comprehensive series of clinical photographs (labeled A–V) demonstrating a manual therapy protocol for Glenohumeral Internal Rotation Deficit (GIRD). The images illustrate a sequential progression of soft tissue and joint mobilization techniques. Initial steps (A–G) show the patient supine, focusing on anterior structures: digital glides of the deltoid fascia, anteroposterior and craniocaudal clavicular mobilizations, and myofascial release of the subclavian, pectoralis major/minor, and subscapularis muscles. Middle panels (H–K) transition to the patient in a prone position for external rotator myofascial release, glenohumeral decoaptation, and mobilization of the triangular space, quadrangular space, and triceps hiatus. Subsequent panels (L–S) depict scapular musculature release (rhomboids, trapezius) and scapulothoracic joint decoaptation. Final panels (T–V) show the patient returned to a supine position for posterior capsule mobilization at 90º flexion and adduction, followed by glenohumeral circumductions. This educational sequence highlights the integrated approach to treating shoulder mobility deficits through specific hand placement and patient positioning targeting various anatomical layers.
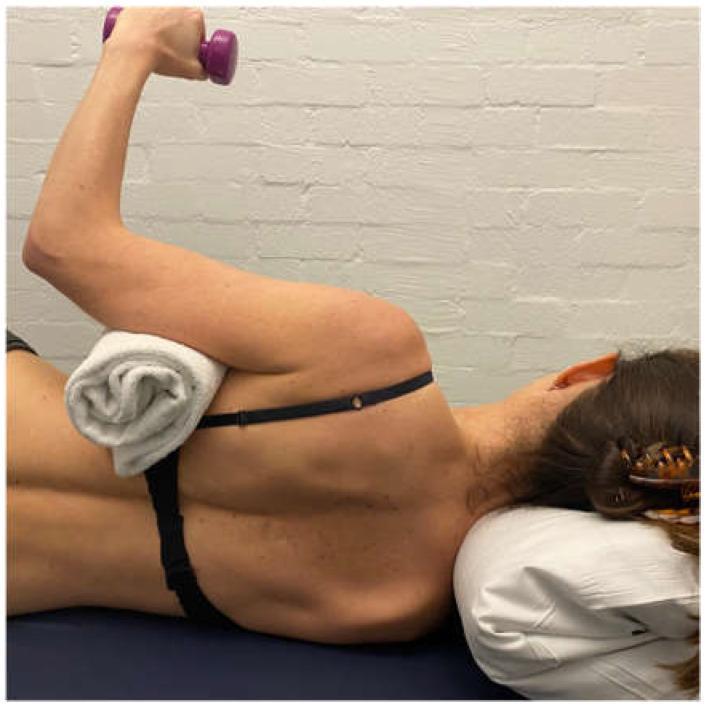
This clinical photograph demonstrates a side-lying external rotation (ER) exercise, a key rehabilitation technique for glenohumeral joint stabilization and rotator cuff strengthening. The patient is positioned in a side-lying posture with a pillow supporting the head. The superior arm is positioned in approximately 0 to 20 degrees of abduction, maintained by a rolled white towel bolster placed between the thorax and the medial aspect of the humerus to optimize subacromial space and rotator cuff recruitment. The elbow is flexed to 90 degrees, and the patient is performing active external rotation against gravity while holding a small purple dumbbell. A black elastic strap is visible across the mid-back, likely utilized for postural cues or scapular stabilization. This exercise is specifically indicated for patients with multidirectional instability (MDI) or posterior humeral head translation, as it aims to strengthen the posterior musculature (infraspinatus, teres minor, and posterior deltoid) and improve scapular motor control.
Glide for External Rotation - Glenohumeral Joint
Answer: POSTERIOR GLIDE of the Humeral Head
The Convex-Concave Rule (Kaltenborn)
| Joint Surface | Rule | Glide Direction |
|---|---|---|
| Convex on Concave (moving) | Glide is OPPOSITE to bone movement | Humeral head (convex) moves on Glenoid (concave) |
| Concave on Convex (moving) | Glide is SAME as bone movement | -- |
Glenohumeral Joint:
- Humeral head = CONVEX
- Glenoid fossa = CONCAVE
- Since the convex surface (humerus) moves on the fixed concave surface (glenoid), the glide is opposite to the direction of angular movement
Applying the Rule - All Movements
| Movement | Angular Direction | Glide Direction |
|---|---|---|
| External Rotation | Shaft moves anteriorly | Posterior Glide ← |
| Internal Rotation | Shaft moves posteriorly | Anterior Glide |
| Abduction | Shaft moves superiorly | Inferior Glide |
| Flexion | Shaft moves anteriorly | Posterior/Inferior Glide |
| Extension | Shaft moves posteriorly | Anterior/Superior Glide |
So for External Rotation (most restricted in capsular pattern) → apply POSTERIOR GLIDE
Technique: Posterior Glide for External Rotation
Patient Position:
- Supine lying
- Shoulder in resting position (55-60° abduction, 30° horizontal adduction, neutral rotation) - this is the loose-packed position of the GH joint (maximum capsular laxity)
- Elbow flexed to 90°
Therapist Position:
- Standing at the side of the patient
Hand Placement:
- Stabilising hand: Cradles the elbow/forearm or supports the distal humerus from below
- Mobilising hand: Placed over the anterior aspect of the humeral head (just below the acromion, in front)
Force Direction:
- Apply force posteriorly (from front to back) through the humeral head
- The humeral head slides/glides backward into the glenoid
Grades Used:
| Purpose | Grade |
|---|---|
| Pain relief (acute/freezing phase) | Maitland Grade I-II posterior glide |
| Stiffness/ROM gain (frozen phase) | Maitland Grade III-IV posterior glide |
| End-range capsular stretch | Sustained Grade III (Kaltenborn) |
Summary Memory Aid
To INCREASE External Rotation:
→ Posterior Glide of Humeral Head

"The humeral head is convex.
 It rolls and glides OPPOSITE to the arm movement.
 ER = arm goes forward → head goes BACK (posterior)"
In This Patient (Case 1)
- Start with Grade II posterior glide (pain is still present - freezing phase)
- Progress to Grade III-IV as stiffness becomes dominant
- Combine with Mulligan MWM - sustained posterior glide while the patient actively attempts external rotation
Asses fir sciatica
straight leg raise test sciatica dermatome L4 L5 S1 assessment
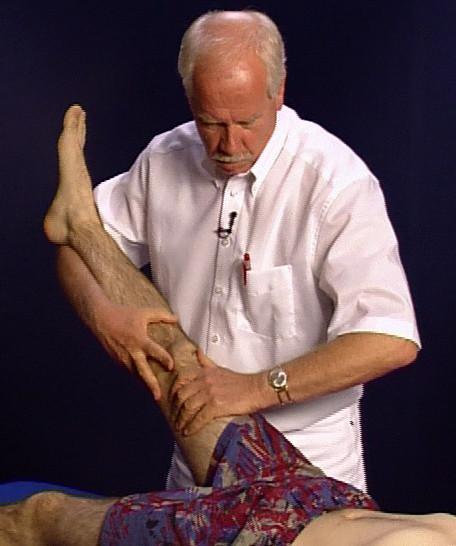
A clinical photograph demonstrating the performance of the Lasègue test, also known as the straight leg raise test. The image depicts a male examiner in a white short-sleeved shirt performing a passive physical examination on a supine patient. The examiner is positioned at the patient's side, using both hands to support and elevate the patient's right lower extremity while maintaining knee extension. One hand is placed on the distal thigh/suprapatellar region, and the other provides support under the calf/achilles area to facilitate gradual hip flexion. The patient's foot is in a neutral or slightly dorsiflexed position. This orthopedic and neurological assessment is clinically used to evaluate for lumbar radiculopathy, specifically irritation of the sciatic nerve or nerve roots (L4-S1), which may be caused by conditions such as intervertebral disc herniation. The test is considered positive if radicular pain is reproduced in the leg between 30 and 70 degrees of hip flexion. The educational focus is on the correct manual technique and patient positioning for identifying signs of nerve root compression or meningeal irritation.
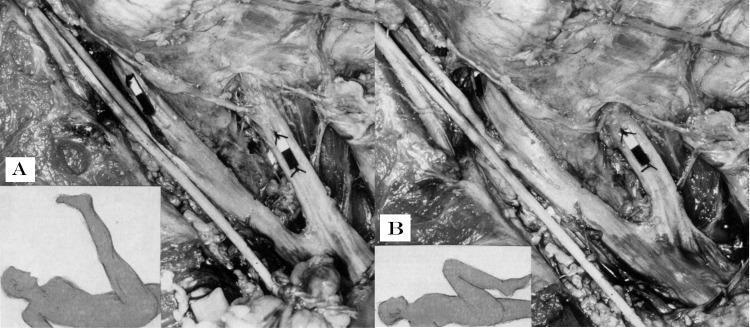
This comparison clinical photograph depicts a cadaveric dissection of the lumbosacral region, specifically focusing on the L5 and S1 nerve roots and their relationship to the neural foramina under different biomechanical stresses. The image is divided into two panels: Panel A illustrates a Straight Leg Raise (SLR) maneuver, showing the lower limb extended and hip flexed. Small paper markers sutured to the nerve root epineurium demonstrate significant distal displacement away from the foramina, indicating the transmission of tensile forces along the sciatic nerve. Panel B shows a 'Sham SLR' where the hip is flexed but the knee is also flexed. In this position, the paper markers remain proximal, with the L5 marker resting within the L4-5 foramen, indicating a lack of longitudinal tension and distal sliding. This visual serves to demonstrate the neurodynamic principles of neural gliding and the mechanical effects of limb positioning on spinal nerve root tension and excursion, which are foundational concepts in orthopedic physical examination and neurophysiology.
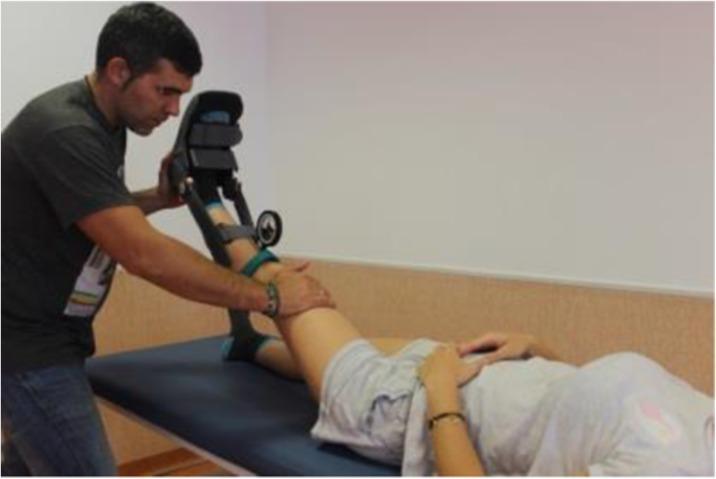
A clinical photograph demonstrating a modified Straight Leg Raise (SLR) test, a common physical examination maneuver used to assess lumbar nerve root irritation or hamstring flexibility. The image shows a patient in a supine position on a medical examination table with their hands resting on their abdomen. A clinician stands at the patient's left side, performing passive hip flexion with the knee extended. The patient's left leg is secured within a specialized mechanical orthosis or goniometric device, which is fastened with green adjustable straps and features an integrated circular dial or inclinometer to quantify the angle of elevation. The clinician's right hand is placed superior to the patient's patella to maintain knee extension during the procedure. This procedural image illustrates the clinical application of objective measurement tools in musculoskeletal assessment and physical therapy, focusing on diagnostic accuracy for conditions such as lumbar disc herniation or sciatica.
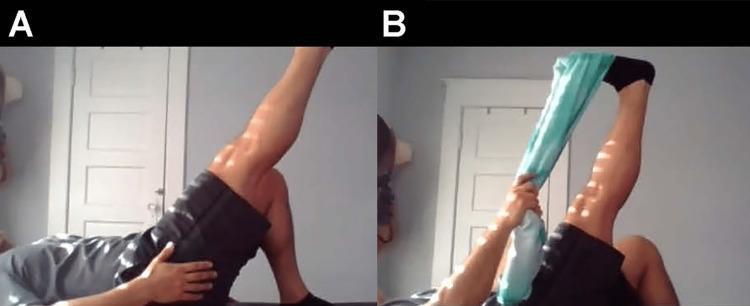
Two-panel clinical photograph demonstrating the self-administered Straight Leg Raise (SLR) test and the Bragard test, commonly used to assess for lumbar radiculopathy or disc pathology. Panel A shows a patient in the supine position with the right knee flexed and the left leg extended and elevated, simulating a modified straight leg raise. The patient’s hands are positioned on the hip and thigh for stabilization. Panel B illustrates the Bragard test modification, where the patient uses a teal-colored strap or cloth looped around the forefoot of the elevated leg to perform passive ankle dorsiflexion while maintaining the leg in an elevated position. This maneuver increases dural tension on the sciatic nerve and its roots. The images are likely from a telemedicine or home-based rehabilitation context, illustrating how orthopedic physical examination signs can be elicited by the patient. These tests are clinically relevant for diagnosing sciatica or lumbar nerve root irritation, where a positive result is defined by the reproduction of radicular pain.
lumbar dermatome myotome L4 L5 S1 nerve root sciatica diagram
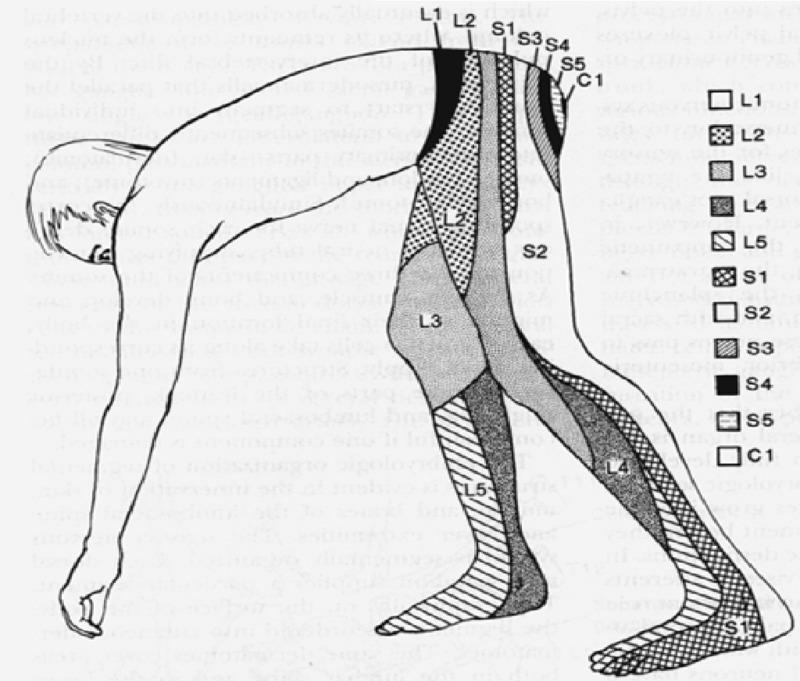
Anatomical diagram depicting a human dermatome map of the lumbosacral and coccygeal regions, shown from a lateral, bent-over perspective to highlight the sensory distribution along the lower extremities and posterior trunk. The illustration uses distinct shading patterns and alphanumeric labels to delineate specific cutaneous areas innervated by individual spinal nerve roots. Key segments include the lumbar dermatomes L1 through L5, sacral dermatomes S1 through S5, and the coccygeal dermatome C1. Visually, L1 covers the inguinal and hip region, L2-L3 transition down the anterior and lateral thigh, and L4-L5 extend down the lower leg to the dorsal foot. Sacral segments S1 and S2 cover the posterior leg and heel, while S3-S5 and C1 are concentrated in the perineal and gluteal regions. This medical illustration is a standard educational tool for neurological examinations, aiding in the localization of spinal nerve root compression or radiculopathy based on sensory loss patterns.
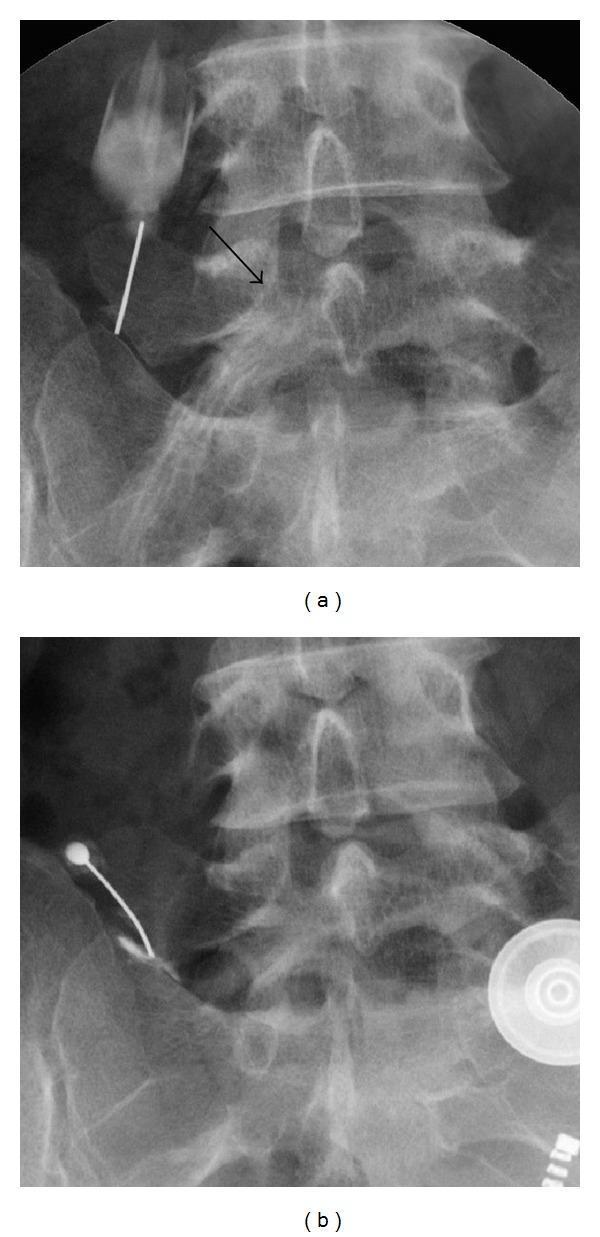
Two anteroposterior fluoroscopic radiographs (a and b) of the lumbar spine, focusing on the L5-S1 junction. Image (a) depicts a selective radiculograph of the left L5 nerve root. A radiopaque needle is positioned near the left transverse process. Contrast medium delineates the L5 nerve root pathway, with a black arrow indicating nerve root impingement at the lateral recess. The image demonstrates the diagnostic approach to sciatica in the context of possible Bertolotti's syndrome. Image (b) shows a local diagnostic injection into the pseudoarthrosis or gap between the enlarged left L5 transverse process and the sacral ala. A radiopaque needle and accumulated contrast are visible at the articulation site. The clinical focus is the identification of the source of low back pain versus radicular pain through targeted infiltration. These images are intended for intermediate to advanced medical learners studying spinal pathology, interventional pain management, and anatomical variations of the lumbosacral junction.
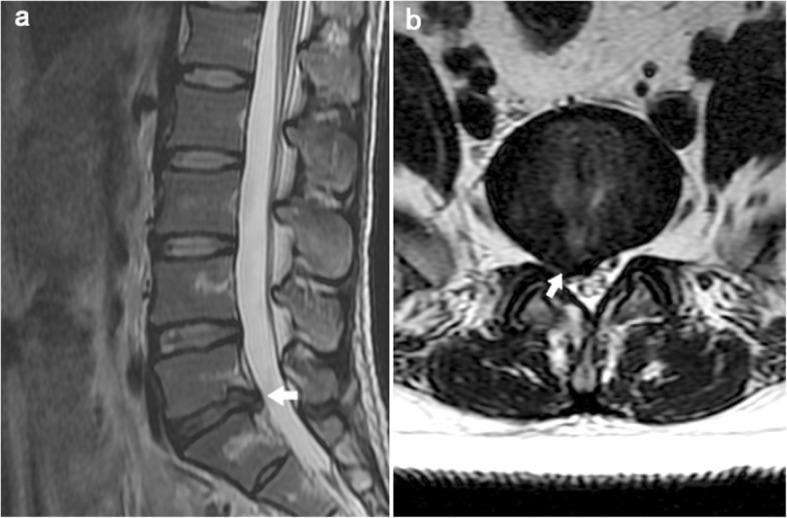
This diagnostic image consists of two T2-weighted magnetic resonance imaging (MRI) scans of the lumbar spine, demonstrating a lumbar disc herniation. Panel (a) is a sagittal view showing the lumbosacral spine. The intervertebral discs from L1 to L4 appear normal with high central signal intensity, while the L5-S1 disc exhibits decreased signal intensity (indicating dehydration/degeneration) and a posterior protrusion into the spinal canal (marked with a white arrow). Panel (b) provides an axial view at the L5-S1 level. It clearly illustrates a focal posterior disc herniation that is displacing and compressing the adjacent right-sided nerve root within the lateral recess. The thecal sac and posterior elements, including the lamina and facet joints, are visible. These findings are clinically relevant for diagnosing radiculopathy and sciatica. The image serves as an educational tool for identifying degenerative disc disease and neurovascular impingement in the lumbar region.
Assessment for Sciatica (Lumbar Radiculopathy)
What is Sciatica?
1. SUBJECTIVE ASSESSMENT (History)
Chief Complaint
- Location and radiation of pain - must follow a dermatomal pattern
- Character: shooting, burning, electric, pins & needles
- Onset - acute (lifting/bending) vs. gradual
Pain Behaviour
| Factor | Sciatica Feature |
|---|---|
| Aggravated by | Sitting, bending forward, coughing, sneezing, straining (increases intradiscal pressure) |
| Relieved by | Lying down, walking (sometimes), extension in some |
| Night pain | Present if inflammatory or space-occupying |
Functional Impact
- Walking distance
- Sitting tolerance
- Ability to dress, drive, work
Red Flag Screening (URGENT - Rule Out First)
| Red Flag | Possible Cause |
|---|---|
| Bilateral leg symptoms | Central disc protrusion / cauda equina |
| Bladder/bowel dysfunction (retention, incontinence) | Cauda Equina Syndrome - EMERGENCY |
| Saddle anaesthesia (perineum, inner thighs) | Cauda Equina Syndrome |
| Progressive neurological deficit | Cord compression |
| History of cancer | Spinal metastasis |
| Fever + back pain | Spinal infection / abscess |
| Significant trauma | Fracture |
| Unexplained weight loss | Malignancy |
⚠️ Any red flag = IMMEDIATE referral, no physiotherapy until ruled out
Outcome Measures
- VAS / NPRS - pain intensity
- Oswestry Disability Index (ODI) - gold standard for lumbar disability
- Roland-Morris Disability Questionnaire
- SF-36 - quality of life
2. OBJECTIVE ASSESSMENT
A. Observation / Posture
- Antalgic posture / lateral shift - patient leans away from painful side to decompress nerve root
- Loss of lumbar lordosis (muscle guarding)
- Gait pattern - steppage gait if foot drop (L4-L5)
- Muscle wasting in lower limb (chronic cases)
B. Lumbar Spine Range of Motion (ROM)
| Movement | Normal | Finding in Sciatica |
|---|---|---|
| Flexion | 80-90° | Painful, limited - increases disc pressure |
| Extension | 20-30° | May relieve or worsen depending on pathology |
| Side flexion (L & R) | 25-30° | Reduced on affected side |
| Rotation | 30-40° | May be limited |
- Use inclinometer or fingertip-to-floor distance for objective measurement
- Note which movements centralise vs. peripheralise symptoms (McKenzie principle)
C. Neurological Examination (Most Important)
| Test | L4 Nerve Root (L3-L4 disc) | L5 Nerve Root (L4-L5 disc) | S1 Nerve Root (L5-S1 disc) |
|---|---|---|---|
| Pain distribution | Anterior thigh → anteromedial calf to ankle | Lateral thigh → anterolateral calf → dorsum of foot, between 1st-2nd toes | Gluteal → posterior thigh → posterolateral calf → lateral foot, between 4th-5th toes |
| Weakness (Myotome) | Quadriceps (knee extension) | Foot dorsiflexion (tibialis anterior) - foot drop | Plantar flexion (calf raise) |
| Reflex affected | Knee jerk (patella) ↓ | No consistent reflex | Ankle jerk (Achilles) ↓ |
| Sensation loss | Medial calf, inner knee | Dorsum of foot, 1st webspace | Lateral foot, little toe |
- Power - grade 0-5 (MRC scale): dorsiflexion, plantarflexion, knee extension, hip flexion
- Sensation - light touch and pin-prick along each dermatome
- Reflexes - use tendon hammer, compare bilaterally
3. SPECIAL TESTS (Neurodynamic Tests)
A. Straight Leg Raise (SLR) / Lasègue's Test
| Step | Method |
|---|---|
| Position | Patient supine, knee fully extended |
| Action | Passively raise affected leg |
| Positive | Reproduction of sciatic pain below the knee between 30°-70° of hip flexion |
| Negative if | Only back pain, or pain >70° (hamstring tightness) |
| Sensitivity | High (~80%) |
| Specificity | Moderate (~40%) |
B. Bragard's Test (SLR + Dorsiflexion)
- Perform SLR to just below the pain angle
- Add passive ankle dorsiflexion (increases sciatic nerve tension)
- Positive = radiating pain reproduced or worsened
- More specific than SLR alone
C. Crossed SLR (Well Leg Raise)
- Raise the unaffected leg - reproduces pain in the affected leg
- Positive = highly specific for large central/paracentral disc herniation
- Better specificity than standard SLR (~90%)
D. Slump Test
| Step | Action |
|---|---|
| 1 | Patient sits on edge of table, slumps thoracic spine |
| 2 | Add neck flexion (chin to chest) |
| 3 | Extend knee on affected side |
| 4 | Add ankle dorsiflexion |
| Release | Release neck flexion - if symptoms reduce = positive (neural tension) |
- Positive = radicular symptoms reproduced, eased by neck extension
- More sensitive than SLR for upper lumbar and mild compressions
E. Femoral Nerve Stretch Test (FNST) / Reverse SLR
- For upper lumbar roots L2, L3, L4
- Patient prone, examiner passively flexes knee and extends hip
- Positive = anterior thigh/groin pain reproduced
F. Bowstring Sign
- Perform SLR to pain angle
- Flex knee slightly to reduce symptoms
- Then press on popliteal fossa (compresses tibial nerve)
- Positive = radicular pain returns - confirms sciatic nerve involvement
4. PALPATION
- Lumbar paraspinal muscles - spasm, tenderness at affected level
- Sciatic nerve trunk - tenderness in sciatic notch, posterior thigh
- Facet joint line - localised tenderness
- SI joint - differentiate from SIJ dysfunction
5. INVESTIGATIONS TO REQUEST
| Investigation | Purpose |
|---|---|
| X-ray Lumbar Spine (AP + Lateral) | Disc space narrowing, osteophytes, spondylolisthesis, fracture |
| MRI Lumbar Spine | Gold standard - disc herniation, nerve root compression, level identification |
| CT Scan | Bony detail, lateral recess stenosis |
| EMG/NCV | Nerve conduction, confirm radiculopathy level, chronic cases |
6. QUICK LEVEL IDENTIFICATION SUMMARY
L4 Root (L3-L4 disc):
  Pain → anterior thigh, medial calf
  Weakness → knee extension (quads)
  Reflex ↓ → knee jerk
  Sensation ↓ → medial calf

L5 Root (L4-L5 disc):  ← MOST COMMON
  Pain → lateral leg, dorsum of foot
  Weakness → foot dorsiflexion (foot drop)
  Reflex → none reliable
  Sensation ↓ → 1st webspace

S1 Root (L5-S1 disc):  ← 2nd MOST COMMON
  Pain → posterior leg, lateral foot
  Weakness → plantarflexion (can't tip-toe)
  Reflex ↓ → ankle jerk
  Sensation ↓ → lateral border of foot
- Morgan & Mikhail's Clinical Anesthesiology, 7th Ed., Table 47-9
- Rosen's Emergency Medicine, 10th Ed.
Physiotherapy management
McKenzie extension exercises lumbar disc sciatica physiotherapy neural mobilization
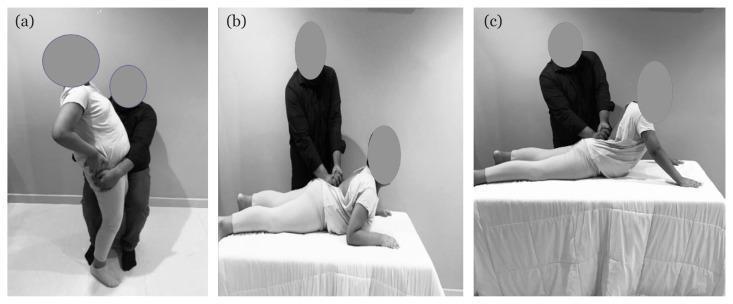
Clinical photograph illustrating three variations (A, B, and C) of physical therapy manual techniques for lumbar spine mobilization in a patient with low back pain. Panel A depicts a central posterior-anterior (CPA) mobilization during extension in a standing position, with a therapist providing manual stabilization at the patient's lumbosacral region. Panel B shows CPA mobilization in a prone lying position during partial extension, where the patient is propped on their elbows. Panel C demonstrates CPA mobilization in prone lying during full extension, with the patient's arms fully extended in a 'press-up' position. These images illustrate the integration of Maitland manual mobilization grades (I-IV) with McKenzie extension exercises for treating derangement syndrome. The educational focus is on the correct therapist hand placement over the lumbar spinous processes and the various patient postural loads (standing vs. prone) used to improve joint mobility and reduce pain through mechanical loading strategies.
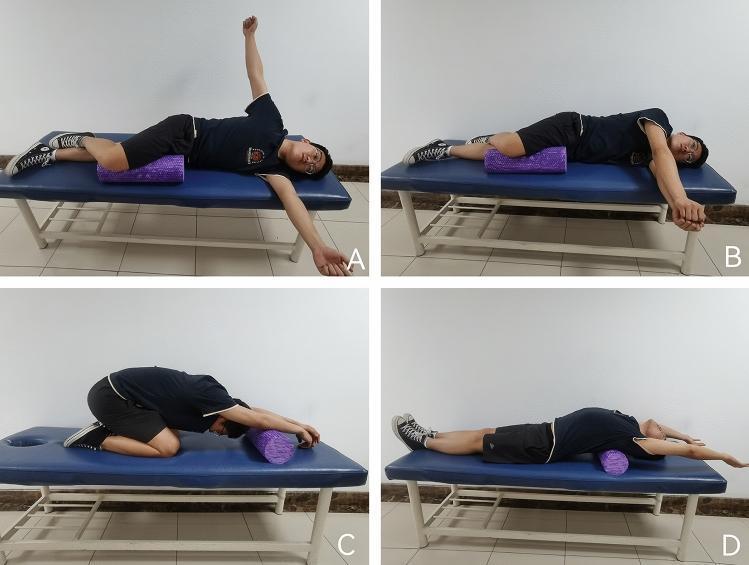
A series of four clinical photographs (labeled A–D) demonstrating cervicothoracic self-mobilization exercises using a foam roller on a treatment table. (A, B) Thoracic rotation range of motion (ROM) training: The subject is in a side-lying position with the top knee flexed over a purple foam roller to stabilize the lumbar spine. Movement involves alternating arm extension to facilitate thoracic spinal rotation. (C) Thoracic flexion ROM training: Often referred to as a 'prayer stretch,' the subject is kneeling with the buttocks on the heels, trunk flexed forward, and arms extended over the foam roller to sink the chest toward the ground. (D) Thoracic extension ROM training: The subject is supine with the foam roller placed horizontally under the upper thoracic spine (scapular level). The arms are extended overhead with the head tilted toward the ground to improve thoracic extension. These exercises are designed for physiotherapy interventions targeting thoracic mobility, flexibility, and musculoskeletal rehabilitation in the cervicothoracic region.
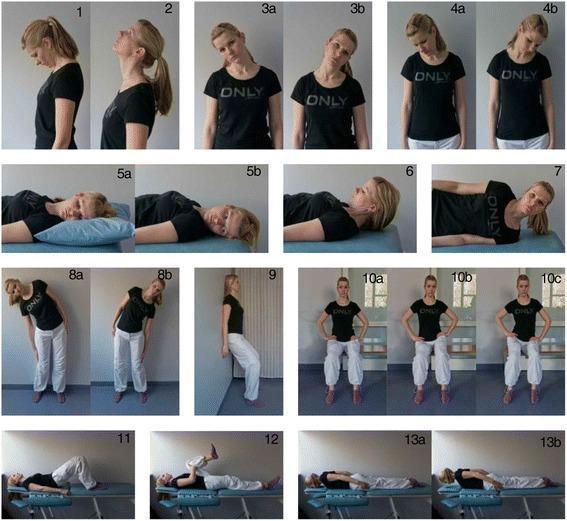
This clinical photograph set comprises 20 numbered panels illustrating a comprehensive home-exercise therapy program focused on cervical and lumbar spine rehabilitation. The images demonstrate stretching and strengthening protocols. Panels 1-4b feature standing cervical range-of-motion exercises, including flexion, extension, and lateral flexion. Panels 5a-7 show supine and side-lying cervical rotations and lateral tilts. Panels 8a-9 illustrate lumbar mobilization and core stability, including standing lateral trunk flexion and a wall-supported isometric squat. Panels 10a-10c show a progression of a standard squat for lower extremity strengthening. Panels 11-13b demonstrate supine exercises: pelvic bridging (11), single knee-to-chest stretch for the iliopsoas and lumbar fascia (12), and prone-positioned thoracic/lumbar extension with rotation (13a, 13b). The material is designed for physiotherapy education, illustrating low-cost, self-managed interventions for musculoskeletal strain, particularly for healthcare workers or individuals with sedentary occupational risks. The visual progression emphasizes correct anatomical alignment and segmental movement of the vertebral column.
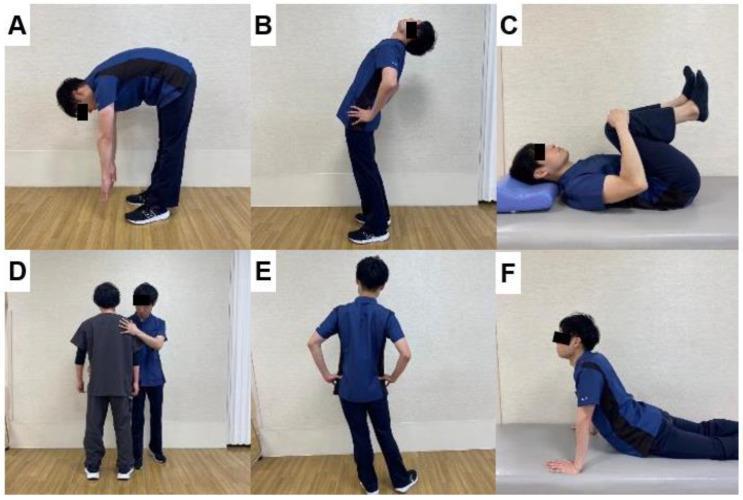
A composite of six clinical photographs (A-F) illustrating the McKenzie Method of Mechanical Diagnosis and Therapy (MDT) exercises for lower back pain rehabilitation. (A) Standing Flexion: The patient bends forward at the hips with straight knees, reaching toward the floor. (B) Standing Extension: The patient stands with hands on the lumbar region, arching the spine backward. (C) Supine Flexion: The patient lies on their back, drawing both knees toward the chest (knee-to-chest position). (D) Therapist-Assisted Side Glide: A clinician provides manual stabilization at the shoulder and lateral pressure at the pelvis to correct lateral shift. (E) Standing Side Glide (Self-correction): The patient performs a lateral pelvic shift against a wall or independently with hands on hips. (F) Lying Extension (Prone Press-up): The patient lies prone and uses their arms to push the upper body upward while keeping the pelvis in contact with the surface. These exercises are used for centralization of symptoms and improving spinal mobility in musculoskeletal physical therapy.
neural mobilization sciatic nerve flossing slider exercise lumbar
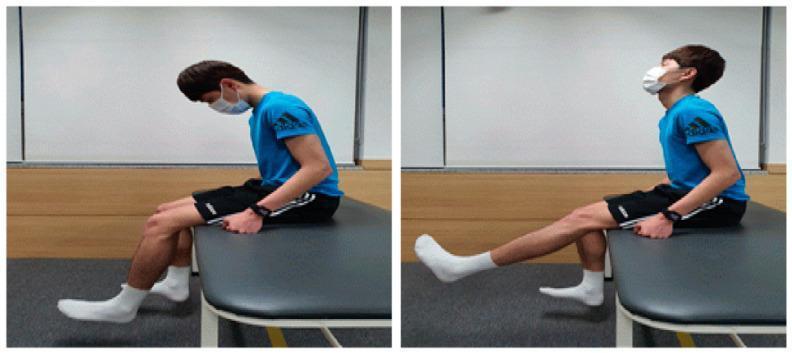
This clinical photograph consists of a two-panel side-by-side comparison illustrating a neurodynamic training exercise, specifically a sciatic nerve slider or flossing technique. The subject is a male seated on a treatment table. In the left panel (starting position), the patient exhibits cervical flexion (chin to chest) with the trunk upright and both knees flexed at 90 degrees, feet resting on the floor. In the right panel (mobilization phase), the patient demonstrates simultaneous cervical extension (looking upward) and active right knee extension, with the ankle in neutral to slight dorsiflexion. This coordinated movement is designed to mobilize the neural tissues of the lower extremity, such as the sciatic nerve and its branches, without excessive tension. The images serve as an educational guide for physical therapy interventions targeting mechanosensitivity and range of motion in patients with chronic lumbar pain or radiculopathy. The subject is wearing a blue t-shirt, black shorts, and a face mask.
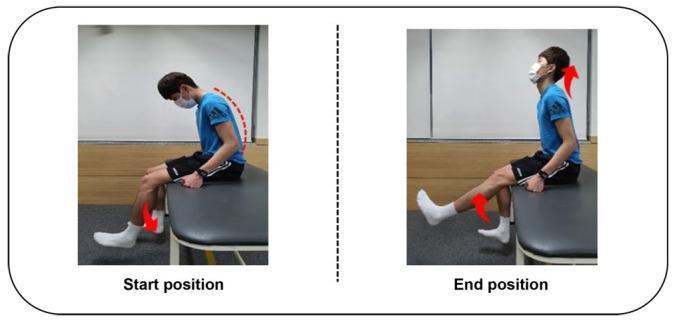
Clinical photograph demonstrating a neurodynamic sliding technique for the sciatic nerve in a side-by-side comparison of 'start' and 'end' positions. In the start position, the subject is seated in a slump posture characterized by thoracic spinal flexion (indicated by a red dashed line) and cervical flexion (neck bent forward), while the knee remains in a flexed, neutral position. In the end position, the subject demonstrates a coordinated neural slider movement: the cervical spine moves into extension (head tilted back, indicated by a red arrow) while the knee joint is simultaneously extended (lower leg lifted, indicated by a second red arrow). This synchronized movement is designed to facilitate longitudinal nerve excursion without excessive tension. The image serves as a physical therapy clinical guide for treating mechanosensitivity and improving nerve mobility in conditions like lumbar pain or sciatica. Target audience: physical therapists and sports medicine practitioners.
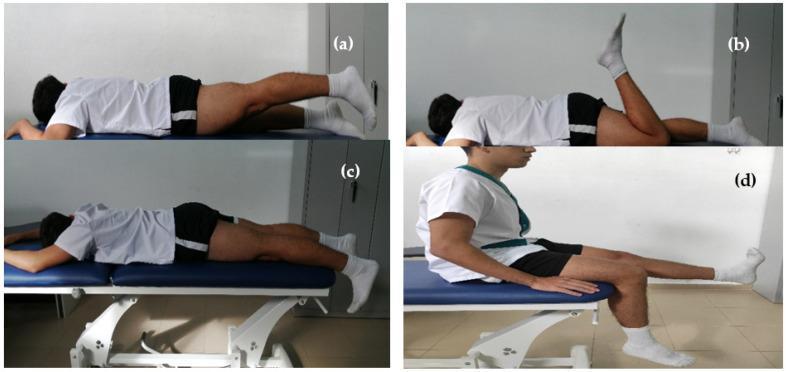
This clinical photograph displays a four-part series (a-d) of musculoskeletal exercises used in a physical therapy pre-activity routine for hamstring and sciatic nerve mobilization. The first three panels (a, b, c) show a subject in a prone position on a treatment table. Panel (a) demonstrates an isometric leg extension with the limb elevated. Panel (b) illustrates active mobilization via knee flexion and extension. Panel (c) depicts a neurodynamic tensioning technique involving ankle dorsiflexion in the prone position to target neural mechanosensitivity. Panel (d) shows the subject in a seated position performing a neurodynamic slider technique, characterized by active knee extension combined with ankle dorsiflexion. These exercises are designed for sports medicine applications to increase joint range of motion (RoM), reduce muscle injuries, and manage mechanosensitivity of the sciatic nerve. The imagery serves as an educational guide for clinicians and students focusing on orthopedic rehabilitation and neurodynamics.
Physiotherapy Management of Sciatica
Key Principle Before Treatment
- Centralisation = symptoms move from leg toward spine with a movement → that movement is your treatment direction (good sign)
- Peripheralisation = symptoms spread further down the leg → avoid that movement
In most disc herniations: Extension centralises, flexion peripheralises
PHASE 1 - ACUTE PHASE (0-2 weeks)
A. Patient Education (FIRST and MOST IMPORTANT)
- Explain the condition - disc, nerve, natural history (85% resolve in 6-12 weeks)
- Reassure - sciatica is NOT dangerous in most cases
- Posture advice:
- Avoid prolonged sitting, forward bending, twisting
- Sit with lumbar support (rolled towel behind lumbar spine)
- When rising from sitting - slide to edge, keep back straight
- Sleeping: side-lying with pillow between knees (reduces disc pressure)
- Lifting technique - bend knees, keep back straight, object close to body
- Avoid: heavy lifting, Valsalva (straining at toilet), prolonged flexed postures
B. Electrotherapy Modalities
| Modality | Parameters | Purpose |
|---|---|---|
| IFT (Interferential Therapy) | 4000 Hz carrier, 80-120 Hz beat, 15-20 min | Pain relief, muscle relaxation, deeper penetration |
| TENS | 80-100 Hz conventional, over lumbar + sciatic path | Gate control analgesia |
| Ultrasound | 1 MHz, 1-1.5 W/cm², pulsed 1:4, lumbar paraspinals | Deep tissue, anti-inflammatory |
| SWD / Moist heat | Pulsed mode acute, continuous in subacute | Reduce spasm, improve extensibility |
| LLLT | 5-10 J/cm² over nerve root levels | Anti-inflammatory, nerve healing |
| Traction | See below | Nerve root decompression |
C. Lumbar Traction
| Type | Parameters | Indication |
|---|---|---|
| Mechanical traction | 25-50% body weight, intermittent (30 sec on/10 sec off), 15-20 min | Disc herniation, nerve root compression |
| Manual traction | Therapist applies longitudinal distraction | Assess response before mechanical |
| Positional traction | Side-lying with pillows/wedges | Gentle, for acute severe cases |
| Auto-traction | Patient-controlled pull on overhead bars | L4-L5 level most responsive |
- Increases intervertebral disc space (reduces nerve root compression)
- Reduces intradiscal pressure
- Reduces muscle spasm
- Creates negative pressure (draws disc material back centrally)
⚠️ Contraindications to traction: cauda equina syndrome, cord compression, pregnancy, osteoporosis, severe osteoarthritis, acute inflammatory conditions
D. Positioning
- Prone lying with pillow under abdomen (neutral spine)
- Prone on elbows if tolerated (gentle passive extension)
- Avoid sitting for >20-30 minutes at a stretch
PHASE 2 - SUBACUTE PHASE (2-6 weeks)
A. McKenzie Method (MDT - Mechanical Diagnosis & Therapy)
- If patient leans to one side (antalgic posture), correct the shift first
- Self-correction: stand sideways to wall, push hips toward wall
- Therapist-assisted: manual lateral shift correction
| Exercise | Progression |
|---|---|
| 1. Prone lying (passive) | Just lie prone, no movement, 5 min |
| 2. Prone on elbows | Partial extension, hold 10-30 sec |
| 3. Press-ups (prone push-up) | Full arm extension, pelvis stays on table, 10 reps × 3 sets |
| 4. Standing extension | Hands on hips, arch backward, 10 reps |
- Perform every 2 hours throughout the day (frequent repetition is key)
- Always follow the direction that centralises symptoms
B. Neural Mobilisation (Neurodynamics)
- Seated or supine
- Simultaneously: neck flexion + knee extension + ankle dorsiflexion (tension)
- Then: neck extension + knee flexion (release)
- The nerve slides through tissues without sustained tension
- 10-15 repetitions, oscillatory rhythm
- Supine SLR position with sustained dorsiflexion
- Hold 10-15 seconds
- More aggressive - use only when acute symptoms have settled
C. Lumbar Joint Mobilisation (Maitland)
| Technique | Grade | Purpose |
|---|---|---|
| Central PA (spinous process) | Grade III-IV | Restore lumbar extension |
| Unilateral PA (transverse process) | Grade III | Facet joint mobility |
| Rotation mobilisation | Grade III | Restore rotation, reduce spasm |
| Lumbar manipulation (HVLA) | Grade V | Only if no contraindications, chronic cases |
PHASE 3 - REHABILITATION PHASE (6-12 weeks+)
A. Core Stabilisation Programme (Most Important for Prevention)
| Exercise | Progression |
|---|---|
| Transversus abdominis (TrA) activation | Draw-in manoeuvre (belly button in), hold 10 sec × 10 reps |
| Multifidus activation | Prone arm/leg raise (bird-dog), hold 10 sec |
| Dead bug | Supine, alternate arm/leg extension |
| Pelvic bridge / Glute bridge | Supine, lift hips off bed |
| Side-lying clamshell | Gluteus medius activation |
| Plank (prone) | 10-30 sec hold, progress duration |
| Side plank | Progress from knees to feet |
B. Flexibility / Stretching
| Muscle | Stretch | Why |
|---|---|---|
| Hamstrings | Supine single leg stretch, standing | Tight hamstrings increase posterior pelvic tilt |
| Hip flexors (iliopsoas) | Kneeling lunge stretch | Tight hip flexors increase lumbar lordosis |
| Piriformis | Supine figure-4 stretch | Piriformis can compress sciatic nerve |
| Lumbar extensors | Knee-to-chest stretch | Only if extension-biased patient is subacute |
| Calf/Gastroc | Standing calf stretch | Reduces neural tension in SLR |
C. Strengthening Programme
| Muscle Group | Exercise |
|---|---|
| Gluteus maximus | Bridges, hip thrusts |
| Gluteus medius | Side-lying abduction, clamshell |
| Quadriceps | Wall squats, mini squats, terminal knee extension |
| Tibialis anterior (foot drop L5) | Ankle dorsiflexion with Theraband |
| Calf/Gastrocnemius (S1 weakness) | Calf raises, resisted plantarflexion |
PHASE 4 - RETURN TO FUNCTION
- Functional ADL retraining (bending, lifting, carrying)
- Work hardening (if occupational injury)
- Sport-specific rehab
- Ergonomic assessment and correction
Complete Management Summary
ACUTE (0-2 weeks):
✓ Education + posture correction
✓ IFT / TENS / Moist heat
✓ Lumbar traction (intermittent mechanical)
✓ Prone positioning / McKenzie Stage 1
✓ Bed rest MAX 2 days only

SUBACUTE (2-6 weeks):
✓ McKenzie press-ups (extension preference)
✓ Lateral shift correction if present
✓ Sciatic nerve sliders (neurodynamics)
✓ Maitland PA mobilisations Grade III
✓ Begin core activation (TrA, multifidus)

CHRONIC/REHABILITATION (6+ weeks):
✓ Full core stabilisation programme
✓ Hamstring + hip flexor stretching
✓ Progressive strengthening (glutes, TA, calf)
✓ Neural tensioners
✓ Functional retraining + ergonomics
✓ Prevent recurrence
Surgical Referral Criteria
-
No improvement after 6 weeks of conservative physiotherapy
-
Progressive neurological deficit (worsening foot drop)
-
Cauda equina syndrome (EMERGENCY - immediate referral)
-
Severe, uncontrolled pain
-
Textbook of Family Medicine, 9th Ed.
-
Morgan & Mikhail's Clinical Anesthesiology, 7th Ed.