
Percutaneous dilatational tracheostomy - relevant anatomy, indications, technique, complications, advantages over surgical tracheostomy
Reading File
Now let me search the library in parallel for all major aspects of this topic.
Finding Sources
Finding Sources
Searching PubMed
"percutaneous dilatational tracheostomy"[MeSH Terms] AND "surgical tracheostomy"
Found a dedicated section. Let me read it fully, and also search for anatomy and complications sections in parallel.
Reading File
Finding Sources
Finding Sources
Searching PubMed
percutaneous tracheostomy AND complications
Excellent content found. Let me now read more of the PDT section (complications, comparison, technique) and the Sabiston/Fishman sections in parallel.
Reading File
Reading File
Reading File
Excellent. Now let me read the comparison section, and the anatomy/surgical tracheostomy section for the anatomy context, plus get the Ciaglia technique details.
Reading File
Finding Sources
Finding Sources
Let me now read the anatomy section from Fischer's, the surgical tracheostomy anatomy section from Current Surgical Therapy, and get the Ciaglia technique details.
Reading File
Reading File
Finding Sources
Now let me fetch the key procedural images and read the Cummings section on percutaneous tracheotomy technique and history.
Reading File
Reading File
Loading Image
Loading Image
Let me also read the anatomy section (the paragraph about structures anterior to the trachea) and get the remaining Cummings steps and comparison data.
Reading File
Reading File
Loading Image
I now have comprehensive information from multiple authoritative textbooks. Let me compile the complete answer.
Percutaneous Dilatational Tracheostomy (PDT)
Historical Background
Tracheostomy is one of the oldest surgical procedures, with the first open technique standardized by Chevalier Jackson in the early twentieth century. In the late 1960s, Toye and Weinstein used a Seldinger guidewire to introduce a cannula into the trachea. In 1985, Pasquale Ciaglia described the technique that became the modern standard for PDT - sequential serial dilation over a guidewire. This has since been refined into the single tapered dilator (Ciaglia Blue Rhino) technique that dominates current practice.
Relevant Anatomy
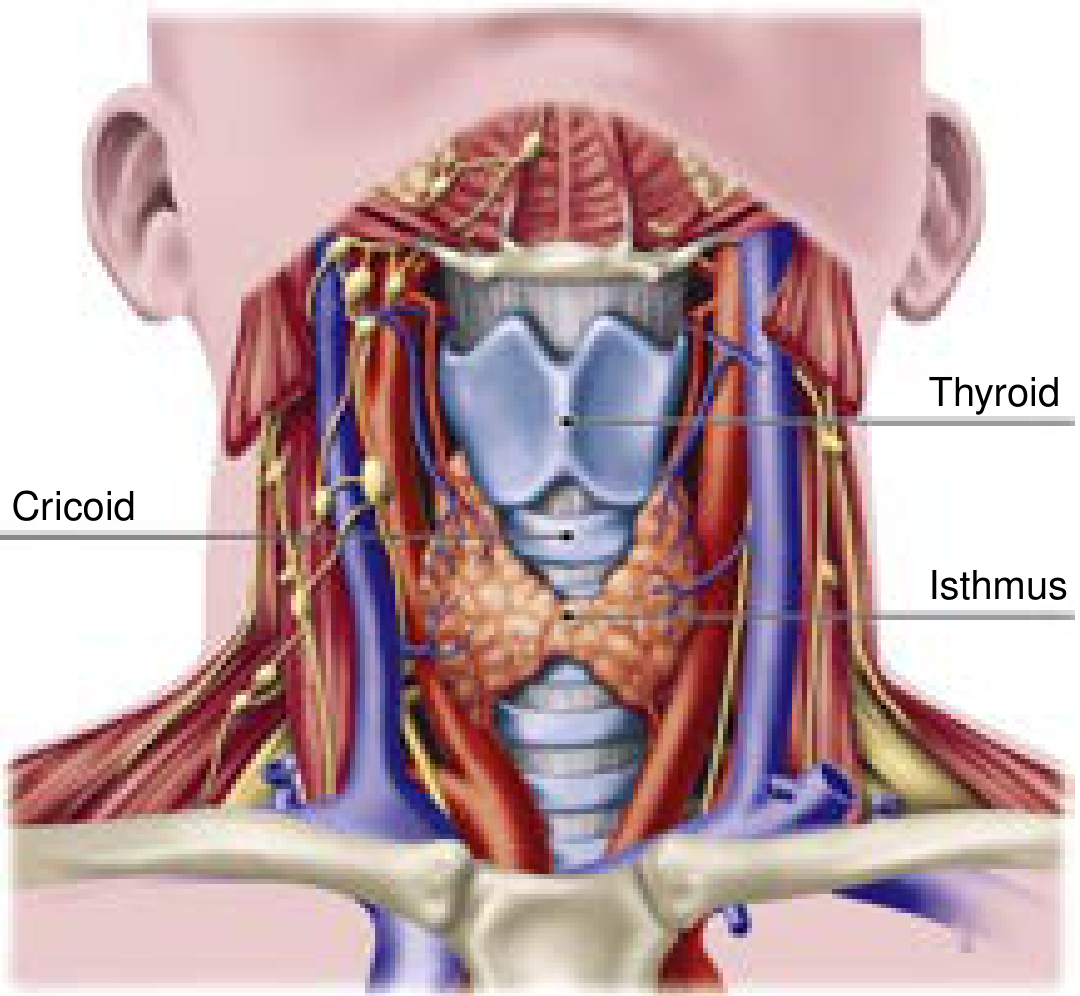
The Trachea
- A midline unpaired structure extending from the superficial neck posteriorly into the mediastinum
- Average length: 11 ± 1 cm in males, 10 ± 1 cm in females
- Contains 18-22 incomplete semicircular cartilaginous rings anteriorly
- The posterior wall (membranous trachea) is fibroelastic and abuts the anterolateral esophagus - this is the most vulnerable structure during PDT
- Tracheal diameter: 2.5-2.7 mm in men, 2.1-2.3 mm in women (relevant for tube size selection)
- The cricoid cartilage is the only complete cartilaginous ring, connecting inferiorly to the first tracheal ring and superiorly to the thyroid cartilage via the cricothyroid membrane
Palpable Surface Landmarks
- Thyroid cartilage - the most prominent anterior cervical landmark ("Adam's apple")
- Cricothyroid membrane - between thyroid and cricoid cartilages; site of emergency surgical airway
- Cricoid cartilage - inferior to thyroid cartilage; the last complete ring before the trachea
- Tracheal rings 1-3 - the target zone for tracheostomy
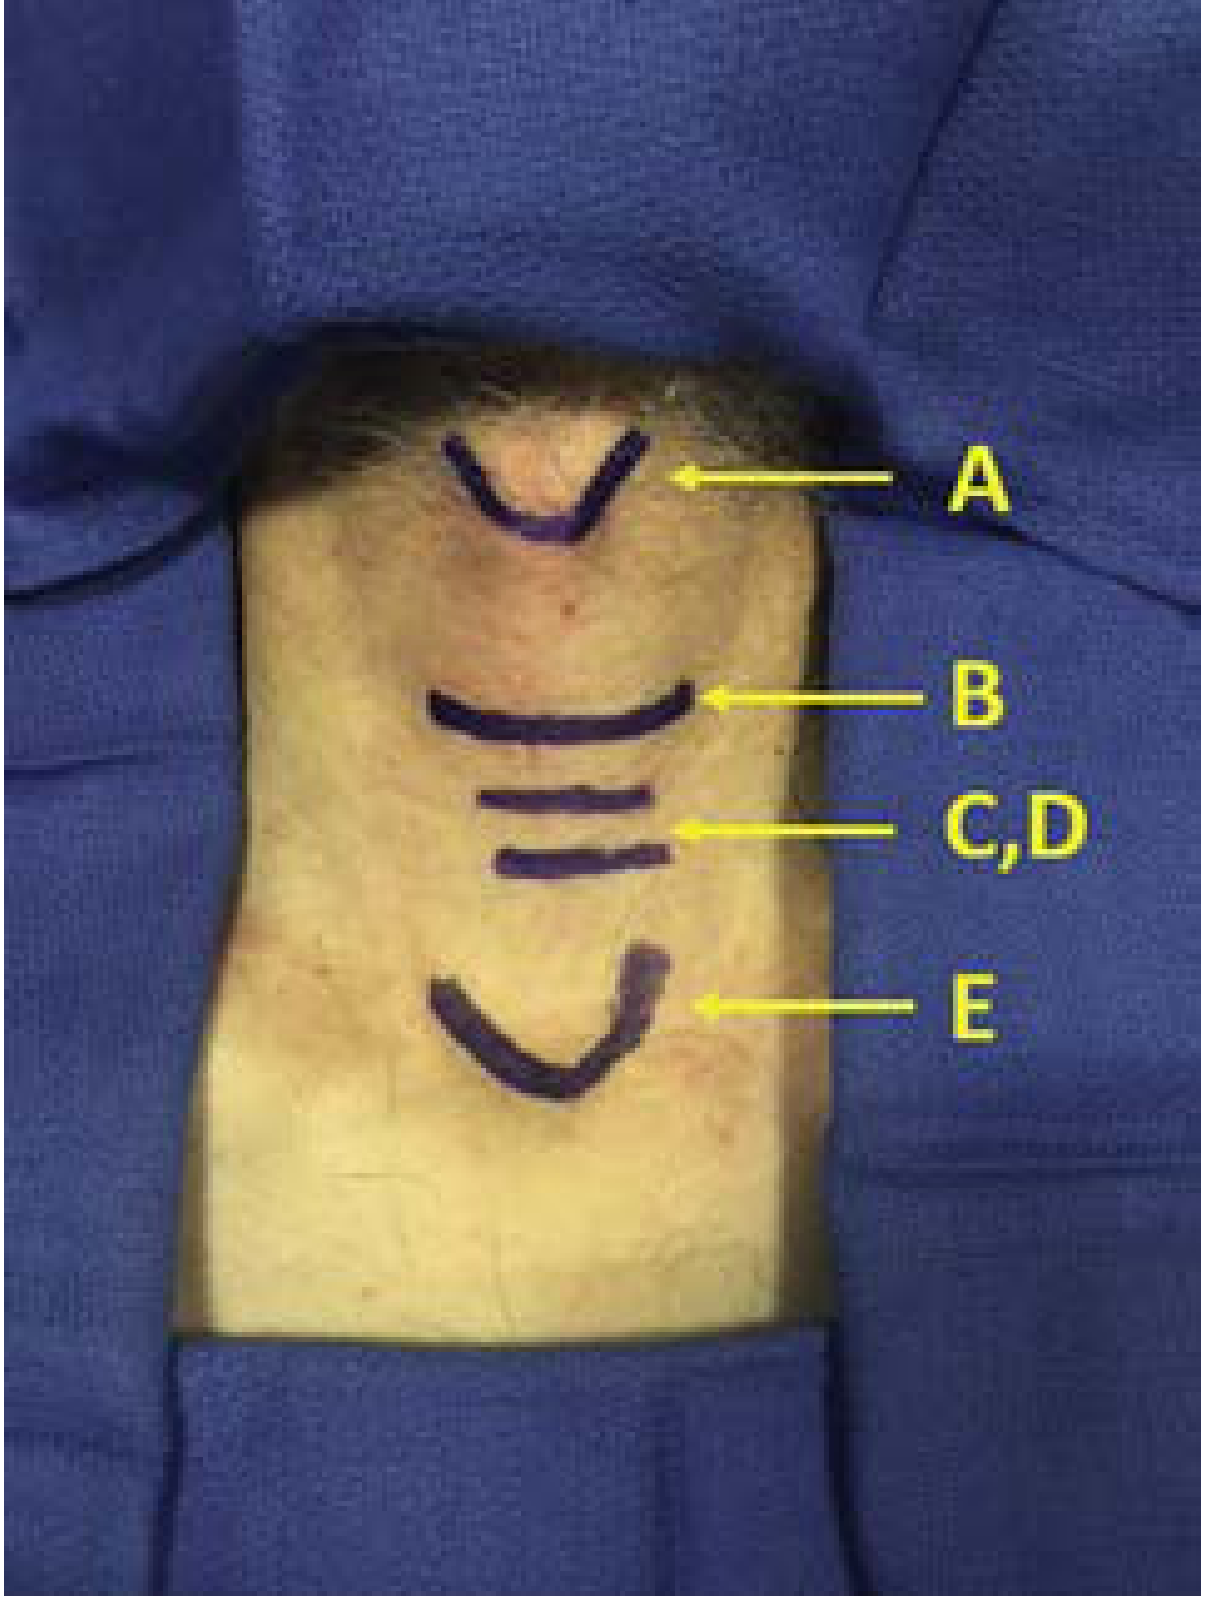
- Sternal notch - inferior landmark; incision is made approximately two fingerbreadths above this, over the 2nd-3rd tracheal rings
- Ideal entry point: between rings 1-2 or rings 2-3
Structures Anterior to the Trachea (at Risk)
- Thyroid isthmus - typically overlies the 2nd and 3rd tracheal rings; must be identified (retracted or divided in surgical tracheostomy, worked around in PDT)
- Innominate (brachiocephalic) artery - crosses the anterior trachea obliquely at about the level of the sternal notch, distal to the 3rd ring. A "high-riding" innominate artery is a key risk factor for tracheo-innominate fistula
- Inferior thyroidal artery and vein - may lie between skin and trachea
- Anterior jugular veins - superficial; can bleed on skin incision
- Strap muscles (sternohyoid and sternothyroid) - lie over the trachea and are retracted laterally in surgical tracheostomy
Unlike surgical tracheostomy, PDT does not provide direct visualization for haemostasis of these vessels - so preoperative assessment of vascular anatomy is essential.
Indications
General Tracheostomy Indications
- Prolonged mechanical ventilation - the most common indication; chronic hypoxic/hypercapnic respiratory failure from pulmonary, cardiac, or systemic disease
- Neurological airway protection - CVA, intracranial haemorrhage, TBI, debilitating neuromuscular diseases
- Upper airway obstruction - head and neck malignancy, subglottic/tracheal stenosis, angioedema, bilateral vocal cord paralysis, obstructive sleep apnea, post-radiation stricture, burn injury, trauma
- Facilitation of weaning - reduces dead space, decreases sedation requirements, improves secretion clearance, allows oral intake and phonation
- Emergency failed airway - when orotracheal/nasotracheal intubation is impossible
PDT-Specific Indications / Patient Selection
PDT is preferred in:
- ICU patients requiring prolonged ventilation in whom bedside procedure is advantageous
- Patients with favorable neck anatomy: easily palpable thyroid cartilage, cricoid, and tracheal rings 1-3; no overlying vessels
- Haemodynamically stable patients
- PT/PTT < 1.5 times control, platelets > 50,000/mm³ (correctable coagulopathy is a relative contraindication but uremic patients can undergo PDT with DDAVP pretreatment)
- PEEP ≤ 12 cmH₂O and adequate oxygenation on FiO₂ 1.0
Contraindications to PDT
Absolute:
- Cellulitis/deep infection at insertion site
- Operator inexperience
Relative (favour surgical tracheostomy instead):
- Inability to palpate tracheal landmarks (obesity, short neck, prior surgery/scarring)
- Overlying vessels (high-riding innominate artery, aberrant vasculature)
- Significant uncorrectable coagulopathy
- Worsening acute critical illness (septic shock, severe ARDS with PEEP > 12 cmH₂O)
- Emergency airway (direct visualization preferred)
- Cervical spine injury (uncontrolled neck movement with PDT)
- Children (anatomy too small; higher complication rate)
Technique (Ciaglia Blue Rhino Method)
This is the dominant technique, using a single tapered hydrophilic dilator over a Seldinger guidewire, usually with bronchoscopic guidance.
Pre-Procedure Setup
- Review: history, respiratory status, cross-sectional imaging (CT neck for vascular anatomy), labs (platelets, PT/PTT, BUN for uremia)
- Ultrasound assessment of the neck recommended to map vasculature in the needle path
- Staffing: anesthesiologist at head of bed to manage ETT and perform bronchoscopy; experienced nurse as circulator
- Positioning: supine, shoulder roll placed to extend the neck and improve landmark identification; head of bed slightly elevated (reverse Trendelenburg or hip flexion) to reduce cervical venous pressure
- Anesthesia: sedation + analgesia + short-acting paralysis to minimize coughing and movement
- FiO₂ increased to 1.0 before starting
Step-by-Step Procedure (Ciaglia Blue Rhino)
Step 1 - Landmark identification
Palpate and mark: thyroid cartilage, cricoid cartilage, tracheal rings 1-3, sternal notch. Ideal target: between rings 1-2 or 2-3.
Step 2 - Skin preparation and local anaesthesia
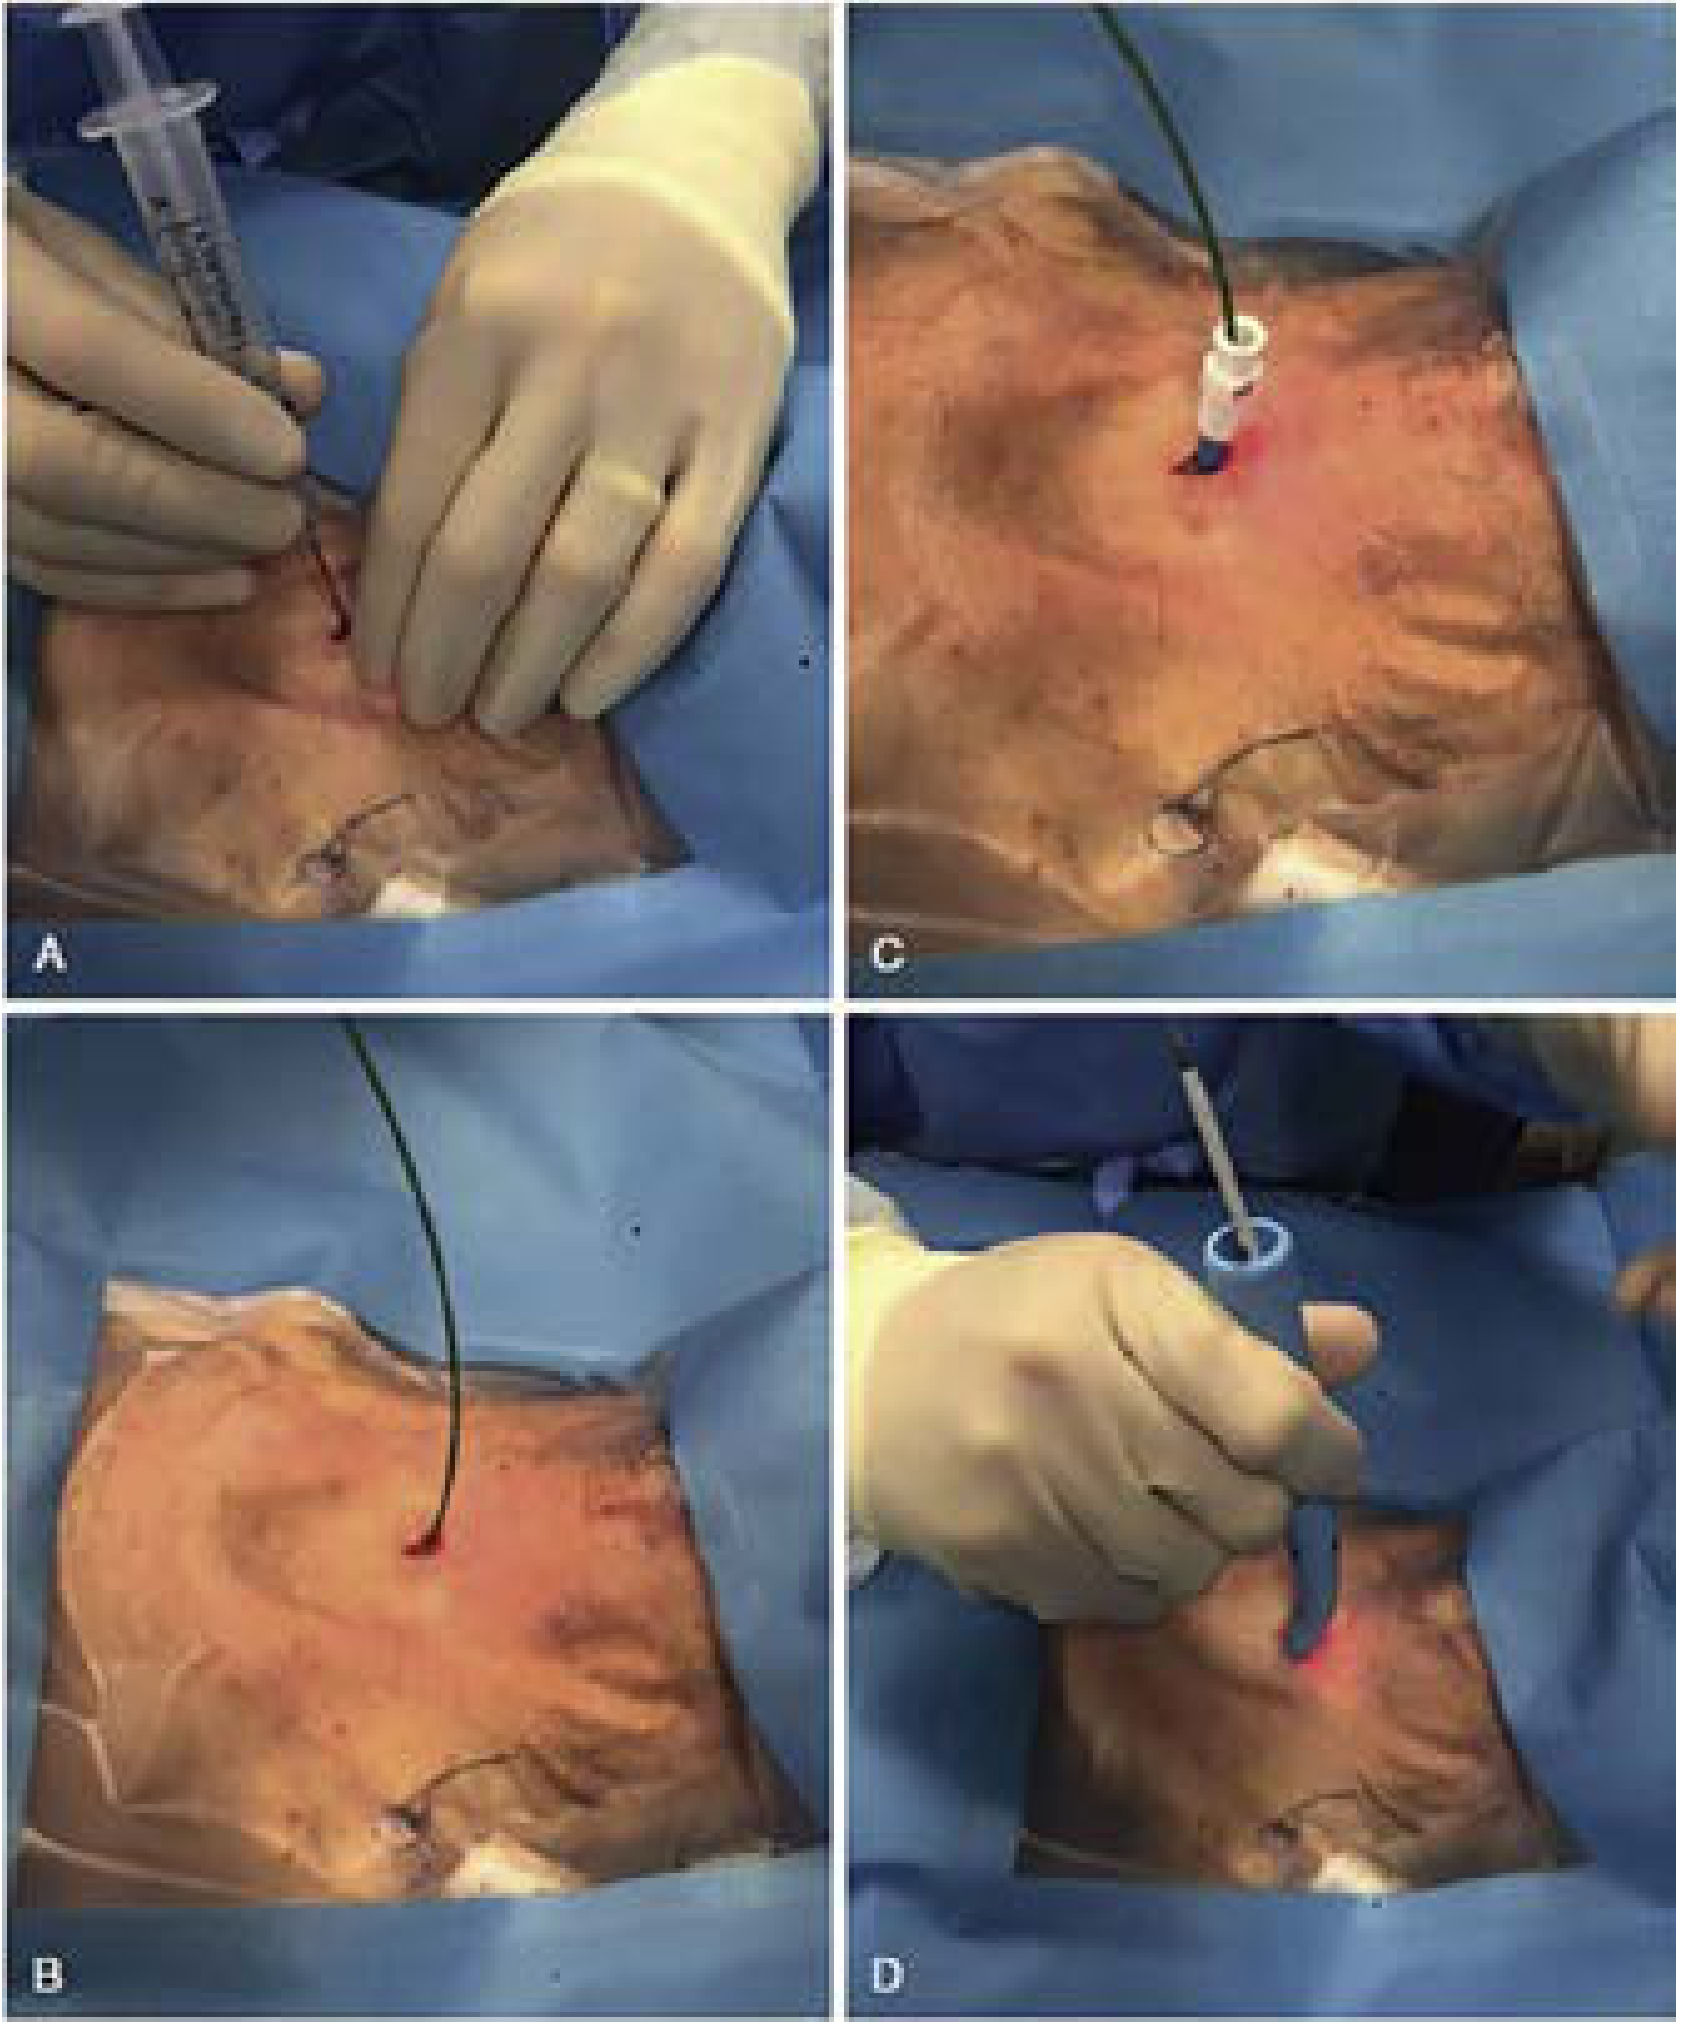
Prep and drape in sterile fashion. Infiltrate skin and subcutaneous tissue with up to 10 cc of 1.5% lidocaine with epinephrine (primarily for vasoconstrictive effect).
Step 3 - Skin incision and blunt dissection
Make a 1-1.5 cm horizontal or vertical incision through skin and subcutaneous fascia. Bluntly dissect soft tissue in the midline with a haemostat until tracheal rings are palpable.
Step 4 - Bronchoscopic positioning
The bronchoscopist advances the bronchoscope to the distal end of the ETT, then withdraws ETT to just above the vocal cords (cords should be visible). Transillumination through the anterior neck incision confirms ETT position and estimates depth from the tracheal lumen.
Step 5 - Needle entry
A 22-gauge seeker needle on a saline-filled syringe is inserted between tracheal rings 1-2 or 2-3, in the midline. Correct placement is confirmed by:
- Air aspiration through the syringe (negative pressure)
- Bronchoscopic visualization of the needle tip inside the trachea (should be between the 10 and 2 o'clock positions on the anterior wall)
Step 6 - Guidewire placement
The needle is withdrawn leaving the catheter in place. A J-tipped guidewire is passed through the catheter and advanced caudally into the trachea under bronchoscopic visualization.
Step 7 - Initial dilation
A 12-Fr introducer dilator is used over the guidewire to create the initial tract.
Step 8 - Definitive dilation (Blue Rhino)
The single tapered hydrophilic dilator (Ciaglia Blue Rhino) loaded over a guiding catheter is advanced over the guidewire, progressively dilating the stoma to the required size under bronchoscopic guidance. The hydrophilic coating allows smooth passage with less tracheal trauma compared to serial dilators.
Step 9 - Tracheostomy tube insertion
The appropriately-sized tracheostomy tube, loaded over the obturator on the dilator, is advanced over the guidewire into the trachea. The guidewire, guiding catheter, and obturator are then removed.
Step 10 - Confirmation and securing
The cuff is inflated and ventilation confirmed by auscultation, CO₂ detection, and return of adequate tidal volumes. The tube is secured with straps (one finger should fit between strap and skin) and the neck plate is sutured or stapled.
Alternative Percutaneous Techniques
| Technique | Description |
|---|---|
| Griggs (Portex) | Guidewire dilating forceps spread through anterior neck tissue and trachea |
| Fantoni Translaryngeal | Retrograde method; guidewire pulled out through the mouth, cannula pulled through the anterior tracheal wall from inside out |
| PercuTwist | Single screw-type dilator twisted clockwise to engage and dilate the tracheal wall |
Complications
Early Complications
| Complication | Notes |
|---|---|
| Bleeding | Most common; peristomal bleeding from anterior jugular veins or thyroid isthmus. Usually minor - managed with compression, vasoconstriction (subcut. epinephrine), or haemostatic agents (Surgicel, QuickClot). Major bleeding requiring surgery is rare (~1 event in 3,162 PDTs in one series) |
| Inadvertent decannulation | One operator must hold the tube throughout; if it occurs before tract maturation (7-10 days), reintubate orally - do NOT attempt blind tube reinsertion through immature stoma |
| Paratracheal insertion / false tract | Tube placed outside the tracheal lumen; risk higher without bronchoscopic guidance |
| Posterior tracheal wall injury | Laceration of the membranous posterior wall; potentially injures the oesophagus. Minimized by bronchoscopic guidance |
| Tracheal ring fracture | Much more common with PDT than surgical tracheostomy (where tube is placed under direct vision) |
| Pneumothorax | ~0.85%; manage conservatively unless expanding |
| Subcutaneous emphysema / pneumomediastinum | ~1.4%; usually conservative management |
| Airway fire | Rare in PDT (no electrocautery); more relevant to surgical tracheostomy |
| Loss of airway | Potentially catastrophic; prevented by keeping bronchoscopist at head throughout |
Late Complications
| Complication | Notes |
|---|---|
| Tracheal stenosis | Can occur at stomal site or at the cuff level; overall incidence has markedly decreased since introduction of high-volume, low-pressure cuffs. Clinically significant stenosis only when lumen reduces by >75% (diameter <5 mm = stridor). Meta-analysis of >3,000 PDT patients cites incidence as low as 0.16% |
| Tracheomalacia | Softening of tracheal cartilage from pressure necrosis |
| Tracheo-innominate artery fistula (TIF) | Rare (<1%) but potentially fatal (survival ~14.3%). Typically 7-14 days post-procedure. Prevented by: placing tube above the 3rd ring, keeping cuff pressure <25 mmHg, and not placing too inferiorly. Management: immediate haemorrhage control (finger pressure in stoma, inflate cuff distal to bleeding), emergent OR. If stable: CT angiography to define anatomy |
| Stomal closure failure | After prolonged cannulation |
| Infection / stomal cellulitis | Usually managed with antibiotics; rarely requires surgery unless paratracheal abscess forms |
The overall complication rate without bronchoscopic guidance is 16.8% vs. 8.3% with bronchoscopic guidance (Cummings Otolaryngology).
Advantages of PDT Over Surgical Tracheostomy
| Feature | PDT | Surgical Tracheostomy |
|---|---|---|
| Setting | Bedside in ICU | Usually OR (can be bedside) |
| Transport risk | Eliminated | Requires transport of critically ill patient |
| Speed | Generally faster | Slower (formal setup, draping, cautery) |
| Cost | Significantly lower (no OR time/staff) | Higher |
| Timing | Can be performed sooner by non-surgical intensivists/pulmonologists | Requires surgical team availability |
| Cosmesis | Comparable or better (smaller incision) | Comparable |
| Wound infection | Lower (smaller wound, no cautery) | Slightly higher |
| Airway fire risk | Essentially none (no electrocautery) | Yes (electrocautery used) |
| Haemostasis | Relies on compression; no cautery | Direct ligation and cautery possible |
| Posterior wall injury | Higher risk (blind placement without bronchoscopy) | Lower (direct vision) |
| Ring fracture | More common | Rare (direct vision) |
From Current Surgical Therapy 14e: "PDT offers advantages over a surgical approach as it is generally a quicker procedure and is performed sooner as the surgical/critical care team can perform the procedure at the bedside without the need to transport a critically ill patient to the operating room. PDT also eliminates the risk of contamination of the OR environment as well as the need for OR staff and OR time, resulting in a significant cost savings for the institution."
From Fishman's Pulmonary Diseases: "Percutaneous tracheostomy has rapidly become the method of choice in the intensive care unit... Its major benefit is elimination of the need to transport critically ill patients to the operating room."
Overall, complication rates between PDT and surgical tracheostomy are comparable when PDT is performed by experienced operators with bronchoscopic guidance. The specific advantages of PDT are logistical and economic rather than representing a major reduction in complications - though PDT avoids airway fire and may have slightly lower wound infection rates.
Key Points Summary
- PDT is the preferred method for elective tracheostomy in stable ICU patients
- The Ciaglia Blue Rhino single-tapered dilator over a Seldinger guidewire is the dominant technique
- Bronchoscopic guidance is strongly recommended (halves the complication rate)
- Ideal entry is between tracheal rings 1-2 or 2-3; above ring 3 to avoid tracheo-innominate fistula
- Pre-procedure ultrasound should be used to map vascular anatomy and guide needle placement - a 2025 meta-analysis (PMID 40281422) confirms ultrasound-guided PDT reduces complications versus landmark-guided technique
- Cuff pressure must be maintained < 25 mmHg to prevent ischemic necrosis and late stenosis/TIF
- After accidental decannulation in the first 7-10 days, always reintubate orally first - never blindly reinsert through an immature stoma
Sources: Current Surgical Therapy 14e (pp. 1591-1597), Cummings Otolaryngology Head and Neck Surgery, Sabiston Textbook of Surgery, Fishman's Pulmonary Diseases and Disorders, Fischer's Mastery of Surgery
Pre operative evaluation of a patient with temporomandibular joint ankylosis. Describe the methods of airway management for a patient with 5mm mouth opening scheduled for surgery
Reading File
This is a broad, complex clinical scenario. Let me run parallel searches across all relevant angles.
Finding Sources
Finding Sources
Finding Sources
Searching PubMed
temporomandibular joint ankylosis AND airway management
Good hits. Now search specifically for TMJ ankylosis in oral/maxillofacial surgery texts, and read the difficult airway and fiberoptic intubation sections in parallel.
Finding Sources
Reading File
Reading File
Excellent. Now let me search for preoperative evaluation of TMJ ankylosis (particularly in oral/maxillofacial texts), the Barash airway management table, and read the fiberoptic technique and ASA difficult airway algorithm sections.
Finding Sources
Reading File
Reading File
Now let me read the ASA difficult airway algorithm from Morgan & Mikhail, and search for the specific preoperative evaluation points for TMJ ankylosis surgery.
Reading File
Finding Sources
Finding Sources
Now let me read the maxillofacial trauma section (mouth opening restriction assessment) from Barash, the Morgan & Mikhail nerve blocks and topical anesthesia section, and the Tintinalli BNTI section.
Reading File
Reading File
Reading File
Now let me read the Morgan & Mikhail retrograde intubation passage plus the ASA difficult airway algorithm, and also search for preoperative anaesthetic assessment specific content.
Reading File
Finding Sources
Finding Sources
Let me now read the Miller's retrograde intubation section and the Cummings preoperative airway evaluation section.
Reading File
Reading File
I now have rich, comprehensive material from multiple authoritative sources. Let me compose the complete answer.
Preoperative Evaluation and Airway Management in TMJ Ankylosis
Background
Temporomandibular joint (TMJ) ankylosis is the fusion of the mandibular condyle to the glenoid fossa, resulting in restricted or absent mouth opening. It can be bony (true ankylosis) or fibrous (false ankylosis). A patient with only 5 mm of mouth opening presents one of the most challenging airway scenarios in anaesthetic practice - it is effectively a "known difficult airway" with high likelihood of impossible direct laryngoscopy and potentially impossible mask ventilation.
Part 1: Preoperative Evaluation
History
Airway-specific history:
- Duration and progression of mouth opening restriction
- Previous anaesthetic records - any previous intubation attempts, technique used, grade of laryngoscopy, complications. This is the single most important document.
- Prior surgeries or radiation to the head and neck (radiation causes fibrosis and further TMJ ankylosis, distorts tissue planes)
- Symptoms of obstructive sleep apnea (OSA) - chronic reduced mouth opening and micrognathia (especially in childhood-onset cases) predispose to OSA
- Stridor, positional breathing difficulty, snoring - suggest concurrent airway compromise
- History of neck pain, cervical spine disease, or instability (limits head positioning for laryngoscopy)
Cause of ankylosis:
- Traumatic - condylar fracture, particularly common in children after unrecognised condylar injury
- Infective/inflammatory - otitis media (in children), suppurative arthritis, rheumatoid arthritis, ankylosing spondylitis
- Post-radiation fibrosis
- Congenital/syndromic - Pierre Robin sequence, Treacher Collins syndrome, Goldenhar syndrome (these patients have additional craniofacial anomalies compounding airway difficulty)
- Neonatal forceps injury
Systemic history:
- Rheumatoid arthritis or ankylosing spondylitis: also affect cervical spine (atlanto-axial instability, limited neck extension) and arytenoid joints (cricoarytenoid arthritis - may cause fixed vocal cord, narrowed glottis)
- Nutritional status and general fitness (prolonged ankylosis in children leads to micrognathia, mandibular hypoplasia, and malocclusion)
- Aspiration history - chronic reduced oral intake, silent aspiration with recurrent chest infections
Important distinction: Is the restricted mouth opening due to:
- Pain (acute trauma, infection) - may improve with analgesia and muscle relaxation under GA
- Trismus (muscle spasm from infection, trauma) - usually overcomes with muscle relaxation under GA
- True mechanical ankylosis - will NOT improve with GA or muscle relaxation; airway must be secured before induction
"If a patient cannot open their mouth during the preoperative evaluation, one must ascertain if the restriction to mouth opening results from pain, trismus, mechanical problem, or some combination of the three." - Barash's Clinical Anaesthesia
In true bony TMJ ankylosis, the restriction is purely mechanical - relaxing the patient or inducing anaesthesia will make no difference to mouth opening.
Physical Examination
Head and neck examination:
| Parameter | What to Assess | Clinical Relevance |
|---|---|---|
| Mouth opening | Measured inter-incisal distance | <20 mm = severe restriction; 5 mm = cannot accommodate any laryngoscope blade |
| Mallampati class | Assess with maximum mouth opening | Near-impossible to assess at 5mm; document what is visible |
| Mandibular morphology | Micrognathia, retrognathia, mandibular hypoplasia | Common in long-standing childhood ankylosis; reduces oropharyngeal space |
| Neck range of motion | Flexion/extension/rotation | Neck extension <35° predicts difficult laryngoscopy |
| Sternomental distance | Head extended, mouth closed | <12.5 cm predicts difficult laryngoscopy |
| Thyromental distance | Chin to thyroid notch | <7 cm predicts difficult laryngoscopy |
| Tracheal position | Midline or deviated | Midline trachea vital for nasal fiberoptic approach |
| Neck veins, thyroid | Any masses displacing airway | Compound the difficulty |
| Dental state | Missing, carious, or crowded teeth | Affects nasal tube path and risk of dental injury |
| Nasal patency | Right vs. left naris | Larger naris for nasal approach; deviated septum may obstruct |
| Facial profile | Profile view - microgenia, bird face deformity | Indicator of mandibular hypoplasia from long-standing childhood ankylosis |
Signs of airway obstruction:
- Stridor (inspiratory = supraglottic, biphasic = glottic/subglottic)
- Chest retraction, accessory muscle use
- Agitation, restlessness (hypoxia)
- Abnormal voice, dysphonia
Investigations
Imaging:
- Orthopantomogram (OPG/panoramic X-ray): Assessment of condylar morphology, bony ankylosis vs. fibrous, extent of joint involvement
- CT scan of TMJ/face/neck (with 3D reconstruction): Gold standard. Defines:
- Nature and extent of ankylosis (unilateral vs. bilateral, fibrous vs. bony, extent of bony mass)
- Mandibular hypoplasia, micrognathia
- Relationship of bony mass to adjacent structures (middle cranial fossa, skull base)
- Airway dimensions (oropharyngeal, hypopharyngeal, tracheal calibre)
- Vascular anatomy of the neck (important if tracheostomy may be needed)
- MRI: Soft tissue detail - articular disc, surrounding muscles; particularly useful in fibrous ankylosis
- Cervical spine X-ray or CT: Especially if there is rheumatoid arthritis, ankylosing spondylitis, or a history suggesting instability (atlantoaxial subluxation)
- Lateral skull and chest X-ray: Chest for aspiration pneumonia, OSA-related changes
Sleep study (polysomnography): If OSA is clinically suspected (particularly in children with micrognathia from childhood-onset ankylosis)
Pulmonary function tests: If concurrent respiratory compromise or severe OSA
Routine labs: CBC, coagulation profile, blood group and crossmatch (surgery may involve significant blood loss); metabolic panel
Airway endoscopy (awake flexible nasendoscopy): Should be performed preoperatively if feasible - assesses:
- Nasal passages for polyps, deviation, obstruction
- Pharyngeal anatomy and dimensions
- Glottic appearance - vocal cord movement, subglottic/glottic narrowing
- Confirms fiberoptic nasal intubation is likely to be feasible
Anaesthetic Risk Stratification
This patient with 5 mm mouth opening should be classified as anticipated extremely difficult airway, with high probability of:
- Failed direct laryngoscopy (impossible to insert blade)
- Failed video laryngoscopy (cannot insert blade despite improved view)
- Potentially difficult mask ventilation (micrognathia, abnormal facial profile)
- Potentially difficult SGA placement (supraglottic airway devices need some mouth opening; most require ≥20 mm)
- Risk of "cannot intubate, cannot oxygenate" (CICO) scenario
The fundamental principle: secure the airway before inducing general anaesthesia.
Part 2: Methods of Airway Management for 5 mm Mouth Opening
The primary technique of choice is awake nasal fiberoptic intubation (FOI). All other methods should be planned as back-up and the team informed.
Preparation Before Any Technique
Multidisciplinary team:
- Senior/experienced anaesthesiologist
- ENT/maxillofacial surgeon scrubbed and available (for emergency surgical airway)
- Experienced anaesthesia nurse/assistant
- Neck prepped and draped for surgical airway at all times
Equipment at the bedside:
- Flexible fiberoptic bronchoscope (video-capable preferred)
- Video laryngoscopes of various types
- Supraglottic airways (LMA, intubating LMA)
- Jet ventilation equipment / transtracheal jet ventilator
- Emergency surgical airway kit (cricothyrotomy, percutaneous or surgical tracheostomy)
- Nasal and oral airways of various sizes
- Endotracheal tubes (assorted sizes including microlaryngoscopy tubes; typically 6.0-7.0 for nasal approach in adults)
- Exhaled CO₂ detector
1. Awake Nasal Fiberoptic Intubation (FOI) - TECHNIQUE OF CHOICE
Rationale: With only 5 mm of mouth opening, oral laryngoscopy and oral intubation are impossible. The nasal route bypasses the oral obstruction, and fiberoptic guidance navigates the anatomy safely under direct vision while the patient remains awake and breathing. This preserves muscle tone, maintains airway patency, and allows verification of tube position.
Step-by-step:
Psychological preparation:
- Detailed pre-procedure explanation; patient cooperation is key to success
- Patient should understand each step and their role (keeping still, breathing, clearing secretions on request)
Pharmacological preparation:
- Antisialagogue: Glycopyrrolate 0.2 mg IV, given 30 minutes before - reduces secretions, improves fiberoptic visibility. Preferred over atropine as it does not cross the blood-brain barrier and causes less tachycardia.
- Sedation (carefully titrated, minimal):
- IV midazolam (1-2 mg titrated) - anxiolysis while maintaining cooperation
- Dexmedetomidine infusion - excellent for awake intubation; provides sedation without respiratory depression, cooperative patient
- Remifentanil infusion (caution - respiratory depression)
- Ketamine (low dose) - preserves airway tone and respiratory drive
- No sedation in patients with already compromised airway
- Supplemental oxygen via nasal cannula throughout (high flow; can use HFNO during procedure)
Topical/regional anaesthesia - key to patient comfort and success:
The airway must be anaesthetised from nares to trachea:
| Level | Agent and Method |
|---|---|
| Nasal mucosa | 4% cocaine (or 4% lidocaine + 0.25% phenylephrine) on cotton-tipped applicators. Applied to both nares. Provides vasoconstriction (reduces bleeding) and anaesthesia. Alternatively 2% lidocaine-soaked ribbon gauze |
| Oropharynx | 10% lidocaine spray; or 4% lidocaine atomized and inhaled; or 2% lignocaine gargle and spit |
| Glossopharyngeal nerve block | Bilateral injection of 2 mL 2% lidocaine at the base of the palatoglossal arch (anterior tonsillar pillar) - blocks lingual/pharyngeal sensation. Particularly valuable with near-zero mouth opening: may require a narrow-gauge needle approach through the limited aperture |
| Superior laryngeal nerve (SLN) block | 3 mL of 2% lidocaine injected 1 cm below the greater cornu of the hyoid bone bilaterally, where the internal SLN branch penetrates the thyrohyoid membrane. Anaesthetizes epiglottis, aryepiglottic folds, and supraglottic larynx |
| Transtracheal block | Identify the cricothyroid membrane (CTM). After confirming intratracheal position by aspiration of air, inject 4 mL of 4% lidocaine at end expiration - cough distributes the agent throughout the trachea and subglottis |
| Alternatively | Nebulize 4-5 mL of 4% lidocaine via facemask for 10-15 minutes |
Maximum safe lidocaine dose for topical application: 4-9 mg/kg; monitor total dose carefully.
Procedure (nasal fiberoptic intubation):
- Patient sitting or semi-recumbent (head of bed 45°). Oxygen via nasal cannula.
- Select the larger naris. Vasoconstrict with oxymetazoline or cocaine.
- Lubricate a well-sized endotracheal tube (size 6.0-7.0 cuffed for adults; Ring-Adair-Elwyn (RAE) nasal tube or reinforced tube is used for oral surgery cases).
- Load the ETT onto the fiberoptic bronchoscope (scope passes through the ETT lumen, ETT rides on scope).
- Advance the bronchoscope along the nasal floor toward the occiput (not upward), past the inferior turbinate.
- Navigate through the nasopharynx, identify the epiglottis and glottis.
- Pass the scope through the vocal cords into the trachea - confirm by visualizing tracheal rings and carina.
- Advance the ETT over the scope into the trachea, then withdraw the scope.
- Confirm placement with CO₂ capnography, bilateral auscultation, and chest expansion.
- Only after the airway is confirmed secured - induce general anaesthesia.
Keys to success (from Cummings Otolaryngology):
- Expert bronchoscopist
- Functioning, high-quality videobronchoscope
- Meticulous airway preparation (topical anaesthesia)
- Adequate but not excessive sedation
- Patient cooperation
- Overall complication rate is 16.8% without bronchoscopic guidance vs. 8.3% with
"Awake FOI is often an ideal procedure for producing an airway of adequate size and dealing with other medical conditions that make visualization of the glottis difficult, such as marked obesity, a supraglottic/glottic mass, supraglottic/glottic edema, or trismus." - Cummings Otolaryngology
2. Awake Video Laryngoscopy
Considerations:
- Requires some mouth opening; most video laryngoscopes (GlideScope, C-MAC, McGrath) require at least 15-20 mm
- With only 5 mm mouth opening, standard video laryngoscopes cannot be inserted
- Some narrow-profile blades (e.g., C-MAC Pocket Monitor with size 3 blade) may pass through smaller apertures, but 5 mm is generally prohibitive
- May be used as an adjunct after surgical treatment increases mouth opening, or combined with the retrograde technique
3. Retrograde Intubation
A well-described technique for severe mouth opening restriction:
Technique:
- Identify and puncture the cricothyroid membrane with an 18-gauge needle, angled cephalad
- Confirm intratracheal position by aspiration of air
- Pass a J-tipped guidewire (or epidural catheter) through the needle, directed upward (cephalad) into the pharynx
- Retrieve the wire from the nose or mouth using Magill forceps or blind digital retrieval
- Pass the ETT over the wire (wire exits through the distal end or side port of the ETT) and advance into the trachea
- Hold the wire taut at the CTM entry point and advance ETT until resistance is felt at the CTM - indicating the tube is in the correct position
- Release the wire and advance the ETT further; confirm position
Combined retrograde + fiberoptic technique (Miller's Anesthesia):
- The retrieved guidewire is threaded through the suction/working channel of the fiberoptic scope (distal to proximal)
- The FOB follows the wire as a guide, maintaining visualization throughout
- This allows the ETT to negotiate the vocal cord angle under direct vision
- Eliminates the blind advancement problem and reduces dislodgement risk
Advantages: Does not require any mouth opening; confirms tracheal entry at the CTM level; guidewire provides a roadmap through the airway.
Limitations: Technically demanding; requires landmark palpability at CTM; risk of bleeding; cannot be used if CTM is impalpable or overlain by pathology.
4. Blind Nasotracheal Intubation (BNTI)
Principle: An ETT is passed through the nose and advanced blindly by listening to breath sounds transmitted through the tube, advancing at peak inspiration.
Technique:
- Patient positioned with head in neutral or slight extension ("sniffing")
- Lubricate and pass ETT along nasal floor, angling toward occiput
- As tube approaches glottis, maximum airflow is heard through the tube
- Advance swiftly at the start of inspiration; rotate medially 15-30° to enter trachea
- Depth: 28 cm at nares in men, 26 cm in women
- Confirm with CO₂, auscultation, fogging
Use in TMJ ankylosis: Largely superseded by fiberoptic techniques but useful when fiberoptic equipment is unavailable or the glottis cannot be visualised (e.g., blood, secretions obscuring the view). Requires a spontaneously breathing patient.
Limitations: Complication rate high with inexperienced operators; risk of epistaxis, oesophageal intubation, nasal trauma; success requires active respiration; cannot be used in apnoeic patients or when bleeding is significant.
5. Awake Surgical Tracheostomy Under Local Anaesthesia
Indication: When all non-surgical techniques have failed or are contraindicated, or in cases where:
- The anatomy is so distorted that fiberoptic access is impossible
- Severe bleeding/secretions obscure fiberoptic view
- Patient cannot cooperate with awake intubation
- Concurrent severe subglottic or glottic pathology precludes translaryngeal intubation
- In cases where surgery will be near the larynx or will displace the airway
Technique: Standard surgical tracheostomy performed with infiltration of local anaesthetic (lidocaine + epinephrine) in a sitting or semi-recumbent patient who is awake and breathing. Sedation can be cautiously added once the trachea is opened and the tube is partially inserted.
This is the definitive backup technique - it guarantees an airway regardless of the oral/pharyngeal anatomy.
6. Emergency Surgical Airway - Cricothyrotomy / Transtracheal Jet Ventilation (TTJV)
Reserved for CICO (Cannot Intubate, Cannot Oxygenate):
Needle cricothyrotomy + TTJV:
- 14-gauge cannula through CTM; connect to high-pressure oxygen source
- Provides oxygenation for 30-45 minutes (CO₂ accumulates)
- Bridging technique to definitive surgical airway
Surgical cricothyrotomy:
- Horizontal incision through CTM, dilation, insertion of cuffed tube (size 5-6)
- Rapid access; preferred over emergency tracheostomy
- Definitive technique; can be maintained until surgical tracheostomy is performed
Decision Algorithm for 5 mm Mouth Opening
Patient with 5 mm mouth opening (TMJ ankylosis) scheduled for surgery
                         |
        Preoperative assessment + MDT planning
                         |
              Is airway palpable/accessible?
                   /           \
                 YES             NO
                  |              |
     AWAKE NASAL FIBEROPTIC     Consider awake tracheostomy
     INTUBATION (1st choice)    under local anaesthesia
                  |
         Successful? → Induce GA → Surgery
                  |
           Failed (secretions/distorted anatomy)
                  |
     RETROGRADE INTUBATION (± combined FOB)
                  |
         Failed?
                  |
     AWAKE SURGICAL TRACHEOSTOMY UNDER LOCAL
                  |
         CICO emergency → Needle cricothyrotomy + TTJV
                  → Surgical cricothyrotomy
Special Considerations in TMJ Ankylosis Surgery
-
Intraoperative airway access: The surgeon will be working in and around the mandible and TMJ area. A nasal RAE tube or reinforced (armoured) nasotracheal tube is preferred to keep the oral cavity clear for the surgeon and to reduce accidental extubation during jaw manipulation.
-
Post-operative airway: After surgical release of ankylosis, the mouth opening may initially increase dramatically but post-operative oedema can reduce it again acutely. Plan for:
- Keep intubated until oedema subsides
- Extubation should be planned (ideally over an airway exchange catheter)
- Post-operative tracheostomy may be appropriate in complex cases
-
Steroids and dexamethasone: Reduce oedema and improve post-operative airway
-
Obstructive sleep apnea co-management: If confirmed, plan CPAP post-operatively
-
Children with childhood-onset ankylosis: Mandibular growth arrest from ankylosis produces progressively worsening micrognathia. The difficulty compounds with age. These children may require distraction osteogenesis at the same sitting, further complicating anaesthetic planning.
-
Paediatric considerations (Cummings): Flexible fiberoptic bronchoscopes of appropriate paediatric size (2.5-3.5 mm outer diameter) are required; nasal RAE tubes sized age-appropriately; have LMA as ventilation rescue device.
Summary Table
| Technique | Mouth Opening Required | Primary Use in TMJ Ankylosis | Key Limitation |
|---|---|---|---|
| Awake nasal FOI | None | First choice | Requires equipment + expertise |
| Retrograde intubation | None | Second choice | Technically demanding |
| BNTI (blind nasal) | None | Backup when FOI unavailable | High complication rate, blind |
| Awake video laryngoscopy | ≥15-20 mm | Not useful at 5 mm | Cannot insert blade |
| Direct laryngoscopy | ≥35 mm | Contraindicated | Impossible at 5 mm |
| Awake tracheostomy (LA) | None | If all else fails; severe cases | Invasive, scar, complications |
| Needle/surgical cricothyrotomy | None | Emergency CICO rescue | Last resort only |
The golden rule in TMJ ankylosis: never remove the patient's ability to breathe spontaneously until the airway is secured. Awake nasal fiberoptic intubation, performed by an expert with a well-prepared patient and appropriately anaesthetised airway, is the technique of choice.
Sources: Morgan & Mikhail's Clinical Anaesthesiology 7e, Cummings Otolaryngology Head and Neck Surgery, Barash's Clinical Anaesthesia 9e, Miller's Anaesthesia 10e, Tintinalli's Emergency Medicine, Miller's Anaesthesia (retrograde intubation)
This is a shared conversation. Sign in to Orris to start your own chat.