
Explain progesterone withdrawal , breakthrough , esteogen withdrawal breakthrough bleeding
Reading File
Now let me search the medical library for relevant content on these types of uterine bleeding.
Finding Sources
Finding Sources
Reading File
Finding Sources
Reading File
Reading File
Reading File
I now have very detailed, authoritative content from multiple textbooks. Let me also check the Family Medicine textbook's section on OCP breakthrough bleeding management to complete the picture.
Reading File
I now have excellent, comprehensive material from authoritative sources. Here is a thorough explanation:
Types of Abnormal Uterine Bleeding: Hormonal Mechanisms
Understanding these four patterns requires a clear grasp of how estrogen and progesterone control the endometrium in a normal cycle.
Normal Endometrial Physiology (the baseline)
In an ovulatory cycle:
- Estrogen (follicular phase) proliferates the endometrium - glands grow, stroma thickens, spiral arterioles develop.
- After ovulation, the corpus luteum secretes progesterone, which "ripens" or stabilizes the proliferated endometrium into a secretory state.
- When the corpus luteum degenerates, progesterone falls - this triggers orderly, synchronous shedding of the entire endometrium (menstruation).
As Swanson's Family Medicine Review explains: "When the uterine lining is sequentially proliferated by estrogen and then ripened with progesterone (secretory phase), the endometrium is structurally stable. Sloughing does not occur unless progesterone withdrawal takes place."
1. Progesterone Withdrawal Bleeding
Definition: Bleeding that occurs when a progesterone-primed (secretory) endometrium is suddenly deprived of progesterone support.
Mechanism:
- The endometrium must first be exposed to adequate estrogen (to proliferate) AND then to progesterone (to differentiate into secretory endometrium).
- When progesterone is abruptly withdrawn, spiral arterioles vasoconstrict, tissue breakdown is orderly and progressive, and the entire endometrium sloughs simultaneously.
- Bleeding is self-limited in both amount and duration because of coordinated arteriolar vasoconstriction.
Examples in clinical practice:
- Normal menstruation (corpus luteum regression)
- Stopping oral progesterone/progestin therapy after a course
- The "withdrawal bleed" seen in the pill-free interval of combined oral contraceptives (OCP)
- Progestin challenge test: administering medroxyprogesterone for 7-10 days then stopping - if withdrawal bleeding occurs, it confirms adequate estrogen priming and an intact outflow tract.
Key feature: Predictable, orderly, self-limited. This is essentially what normal menstruation is.
2. Progesterone Breakthrough Bleeding
Definition: Bleeding that occurs when progesterone is present in excess relative to estrogen - i.e., there is not enough estrogen to support the endometrium against the progestin effect.
Mechanism:
- High progestin / low estrogen ratio causes endometrial atrophy - the glands become thin, the stroma becomes decidualized and fragile.
- The atrophic, poorly supported endometrium breaks down and bleeds erratically.
- There is no coordinated shedding; bleeding is unpredictable and often light but persistent (spotting).
Examples in clinical practice:
- Progestin-only pills (mini-pill), especially with inconsistent use
- Depot medroxyprogesterone acetate (Depo-Provera) - well-known for irregular spotting
- Levonorgestrel IUD (Mirena) - causes endometrial atrophy leading to spotting, especially in the first 3-6 months
- Etonogestrel implant (Nexplanon)
- Long-term continuous combined OCP use
As Berek & Novak's Gynecology notes, breakthrough bleeding from progestins is "caused by hypoestrogenemia" and is usually correctable by short-term (7-day) supplemental estrogen administration.
Key feature: Irregular, light, unpredictable spotting in a progestin-dominant, low-estrogen environment.
3. Estrogen Withdrawal Bleeding
Definition: Bleeding that occurs when estrogen levels fall abruptly after estrogen has proliferated the endometrium (without progesterone priming).
Mechanism:
- Estrogen alone stimulates endometrial proliferation.
- When estrogen drops sharply, the unstabilized (non-secretory) endometrium sheds.
- Because there is no progesterone-induced spiral arteriolar vasoconstriction, the bleeding may be more prolonged and less well-controlled than progesterone withdrawal bleeding - but it is still relatively organized if the estrogen fall is abrupt.
Examples in clinical practice:
- Midcycle spotting (around ovulation), when the pre-ovulatory estrogen surge briefly drops before progesterone rises
- Bilateral oophorectomy
- Menopause-related bleeding if estrogen fluctuates
- Estrogen-only HRT therapy that is suddenly stopped
- Estrogen-only OCPs (rarely used): if estrogen is withdrawn, bleeding follows
- Bradley & Daroff's Neurology notes that perimenstrual estrogen withdrawal is also a well-established trigger for menstrual migraine
Key feature: Relatively predictable, follows the fall of estrogen; tends to be moderate and time-limited.
4. Estrogen Breakthrough Bleeding
Definition: Bleeding from an endometrium that has been chronically stimulated by estrogen ALONE, without progesterone, until it outgrows its blood supply and breaks down erratically.
Mechanism:
- Without ovulation, no corpus luteum forms, so no progesterone is produced.
- Estrogen continues to stimulate endometrial proliferation unopposed.
- The endometrium becomes abnormally thick and fragile; different regions outgrow their blood supply at different times.
- Random portions of the endometrium shed at random times from random sites.
- No spiral arteriolar vasoconstriction occurs (no progesterone), so bleeding is NOT self-limited.
Berek & Novak's Gynecology states: "Relatively low levels of estrogen stimulation will result in irregular and prolonged bleeding, whereas higher sustained levels result in episodes of amenorrhea followed by acute, heavy bleeding."
Examples in clinical practice:
- Chronic anovulation (PCOS, hypothalamic dysfunction, hyperprolactinemia, perimenopause)
- This is the most common cause of anovulatory/dysfunctional uterine bleeding - Goldman-Cecil Medicine states: "Most anovulatory bleeding is due to either estrogen withdrawal or estrogen breakthrough bleeding."
- Obesity (peripheral aromatization of androgens to estrogen)
- Estrogen-secreting ovarian tumors (granulosa cell tumor)
Key feature: Irregular, unpredictable, may be heavy, non-self-limiting. In an anovulatory cycle, "different sections of endometrium outgrow their blood supply at different times and bleed erratically" - Textbook of Family Medicine.
Summary Comparison Table
| Type | Hormonal Environment | Endometrial State | Bleeding Pattern |
|---|---|---|---|
| Progesterone withdrawal | Estrogen + progesterone, then progesterone falls | Secretory (stable) | Orderly, self-limited, predictable |
| Progesterone breakthrough | High progestin, low estrogen | Atrophic, fragile | Irregular spotting, light, persistent |
| Estrogen withdrawal | Estrogen alone, then estrogen falls sharply | Proliferative (unstabilized) | Moderate, follows estrogen drop |
| Estrogen breakthrough | Estrogen alone, sustained/rising, no progesterone | Over-proliferated, fragile, dyssynchronous | Heavy, irregular, unpredictable, non-self-limiting |
Clinical Relevance
- Progestin challenge test exploits progesterone withdrawal: a positive result (bleeding after stopping progestin) confirms adequate endogenous estrogen and patent outflow tract.
- OCP breakthrough bleeding management: Early-cycle bleeding (before ovulation) = needs more estrogen; late-cycle bleeding = needs more progestin; continuous throughout cycle = endometrium needs more estrogen overall. (Textbook of Family Medicine)
- Chronic anovulatory estrogen breakthrough bleeding carries risk of endometrial hyperplasia and carcinoma from prolonged unopposed estrogen - endometrial biopsy is mandatory in women >35 years or with prolonged anovulatory bleeding.
- Progestin breakthrough bleeding from DMPA or implants is treated by short-course supplemental estrogen to "rescue" the atrophic endometrium.
Sources: Goldman-Cecil Medicine; Berek & Novak's Gynecology; Swanson's Family Medicine Review; Textbook of Family Medicine 9e; Bradley & Daroff's Neurology in Clinical Practice; Rosen's Emergency Medicine
Dilation and curretage steps
Finding Sources
Reading File
Reading File
Reading File
The Pfenninger & Fowler "Procedures for Primary Care" textbook is the most detailed procedural reference. Let me read the full step-by-step technique section.
Reading File
Reading File
Reading File
Reading File
Reading File
I now have the complete, step-by-step procedure from the authoritative Pfenninger & Fowler textbook. Let me fetch the procedure instrument image for visual reference.
Loading Image
Loading Image
Here is the complete, step-by-step guide to Dilation and Curettage (D&C):
Dilation and Curettage (D&C) - Complete Procedural Guide
Indications
Diagnostic:
- Evaluation of abnormal uterine bleeding (AUB)
- Endometrial biopsy / screening for endometrial carcinoma
- Combined with hysteroscopy for global endometrial sampling
Therapeutic:
- Removal of retained products of conception (incomplete/missed abortion, postpartum)
- Removal of endometrial polyps
- Treatment of excessive uterine hemorrhage
- Elective termination of pregnancy (first trimester)
Note: Performing a D&C solely to resolve hormonally related AUB (anovulatory bleeding) has been found to be ineffective as a primary treatment.
Contraindications
| Absolute | Relative |
|---|---|
| Unstable comorbid conditions (renal failure, active cardiac compromise) | Active pelvic infection |
| Desired viable intrauterine pregnancy | Systemic coagulopathy / unknown anticoagulation status |
| Uncertain viability of intrauterine pregnancy | |
| Prior Asherman's syndrome (intrauterine synechiae) | |
| Patient preference to await spontaneous resolution |
Equipment
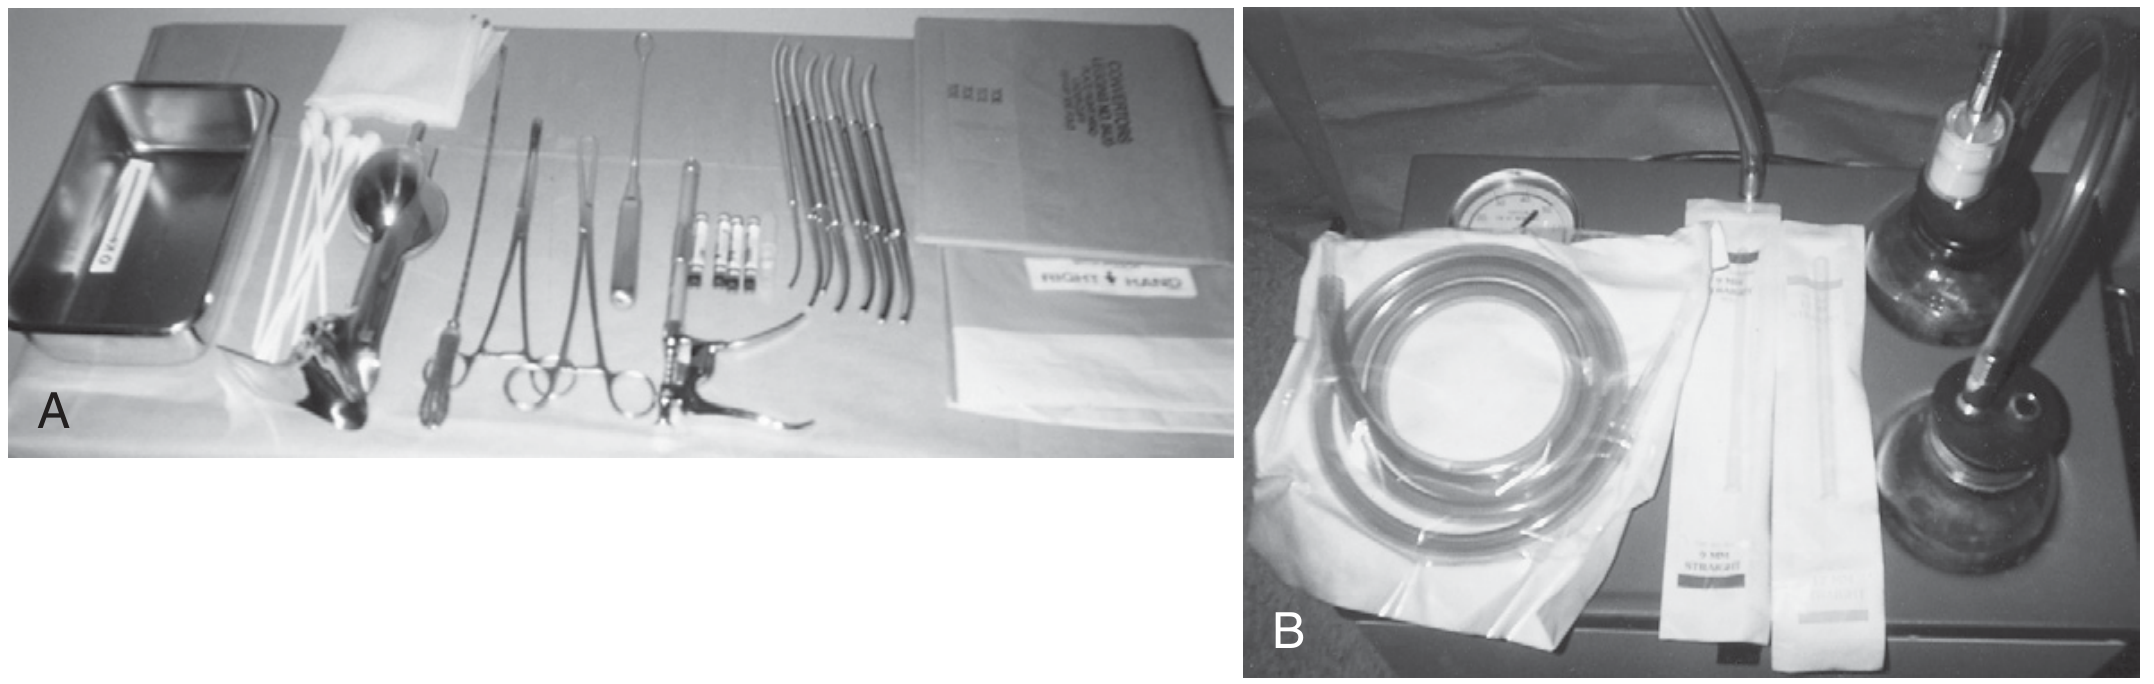
Left to right: sterile basin, gauze, ring forceps, weighted (Auvard) speculum, uterine sound, tenaculum, curettes, dilators, local anesthetic, suction device and tubing.
- Sterile gloves, gown, drapes
- Antiseptic solution (e.g., povidone-iodine)
- Graves or Auvard (weighted) speculum
- Single-tooth tenaculum
- Uterine sound
- Cervical dilators (Hegar or Pratt series)
- Kevorkian endocervical curette
- Sharp uterine curette
- Suction curette (8-12 mm) + suction machine with tissue trap
- Stone (polyp) forceps
- Ring forceps
- Formalin specimen bottles + Telfa pads / lens paper
- Local anesthetic: lidocaine 2% with epinephrine (paracervical/submucosal block)
- IV access, fluids, pulse oximeter (if IV sedation used)
Anesthesia & Analgesia
- NSAID (e.g., ibuprofen) 1 hour before the procedure reduces cramping
- Paracervical block (most common for office setting): injected at the cervicovaginal junction before tenaculum placement and dilation
- Submucosal cervical block: simpler alternative, generally sufficient
- Oral diazepam 10 mg 1 hour pre-procedure can be combined with local anesthesia
- IV sedation if needed (with monitoring and resuscitation equipment available)
- General or regional anesthesia if performed in the operating room
Pre-Procedure
- Obtain informed consent; answer all questions about procedure, risks, and alternatives.
- If pregnancy related: check hemoglobin/hematocrit, blood type, Rh, coagulation studies; obtain pregnancy test if status uncertain.
- Prophylactic antibiotics are not routinely indicated.
- Establish IV access if sedation will be used or if hemodynamic risk is present.
- Optional: misoprostol (prostaglandin) the night before or laminaria placed in the os the night before for cervical priming/dilation (especially useful in postmenopausal women with cervical stenosis).
Step-by-Step Technique
Step 1 - Patient Positioning
Place the patient in the dorsal lithotomy position.
Step 2 - Bimanual Examination
Determine the position (anteverted/anteflexed vs. retroverted/retroflexed) and size of the uterus by bimanual pelvic examination. Ultrasonographic guidance can be used in place of or in addition to this step.
Step 3 - Expose the Cervix
Insert a Graves or Auvard (weighted) speculum into the vagina. Cleanse the vagina, cervix, and posterior fornix with antiseptic solution. Apply sterile drapes around the perineum.
Step 4 - Empty Bladder
If the bladder is full, drain with an in-and-out catheter. Alternatively, have the patient void immediately before the procedure.
Step 5 - Paracervical Block
Administer a paracervical block using lidocaine at the cervicovaginal junction, or a submucosal cervical block. Wait for adequate anesthesia before proceeding.
Step 6 - Apply Tenaculum
Grasp the anterior lip of the cervix at the 12 o'clock position with a single-tooth tenaculum and apply gentle downward (inferior) traction to straighten the cervicouterine angle.
Step 7 - Endocervical Curettage (Fractional D&C)
Using a Kevorkian endocervical curette, scrape the endocervical canal with short, firm, in-and-out strokes from the internal os to the external os in a full 360-degree circle (repeat twice). This evaluates the endocervical canal separately from the uterine cavity - the "fractional" component. Collect tissue on Telfa pad/lens paper and place in a separate, labeled formalin container for pathology.
Skip this step if the problem is pregnancy-related or if an endocervical curettage was recently done during colposcopy.
Step 8 - Uterine Sounding
Insert a uterine sound gently through the internal os to:
- Confirm the axis/direction of the uterine cavity
- Measure the depth of the uterus
- Normal depth: < 10 cm in premenopausal; < 8 cm postmenopausal
- Depth > 10 cm in a postmenopausal woman is abnormal; consider perforation if the sound passes unexpectedly deep
Step 9 - Cervical Dilation
Using Hegar or Pratt dilators, serially dilate the cervical os from the smallest diameter upward until the os accepts an 8-12 mm curette. Advance each dilator gently in the direction of the uterine axis determined in Step 8. Do not force - cervical stenosis increases the risk of perforation.
Step 10 - Suction Curettage
- Insert the largest suction curette that passes easily through the dilated os.
- Connect to suction tubing (with tissue trap in-line).
- Position the curette at the uterine fundus.
- Turn on the suction machine (60 mmHg pressure minimum).
- Close the suction valve on the curette handle.
- Use a rotary, slightly in-and-out motion to sample the endometrium systematically on all walls.
- Do not withdraw the curette past the internal os (suction will be lost).
- Continue until no further tissue returns and increased resistance to rotation is felt (gritty sensation = bare myometrium).
- Turn off suction, then remove the curette.
- Use a curved curette for anteflexed/retroflexed uterus; straight curette for midposition.
Step 11 - Sharp Curettage (Additional Sampling)
Place a Telfa pad in the posterior vaginal vault. Insert a sharp uterine curette and lightly scrape all sides of the uterine cavity (anterior, posterior, lateral walls, and fundus) with a systematic to-and-fro motion. Collect tissue on the Telfa pad and send in a separate labeled container to pathology (this is the uterine specimen, separate from the endocervical specimen).
Step 12 - Polyp Search
Using Stone (polyp) forceps, systematically explore the uterine cavity by opening and closing the jaws while moving across the dome and anterior/posterior walls. Remove any grasped tissue with gentle pressure or twisting.
Step 13 - Final Suction Pass (Optional)
Reinsert the suction curette and suction out any remaining tissue fragments.
Step 14 - Remove Instruments
Remove the curette, release and remove the tenaculum, and remove the speculum. Inspect for cervical bleeding from the tenaculum site (usually minor).
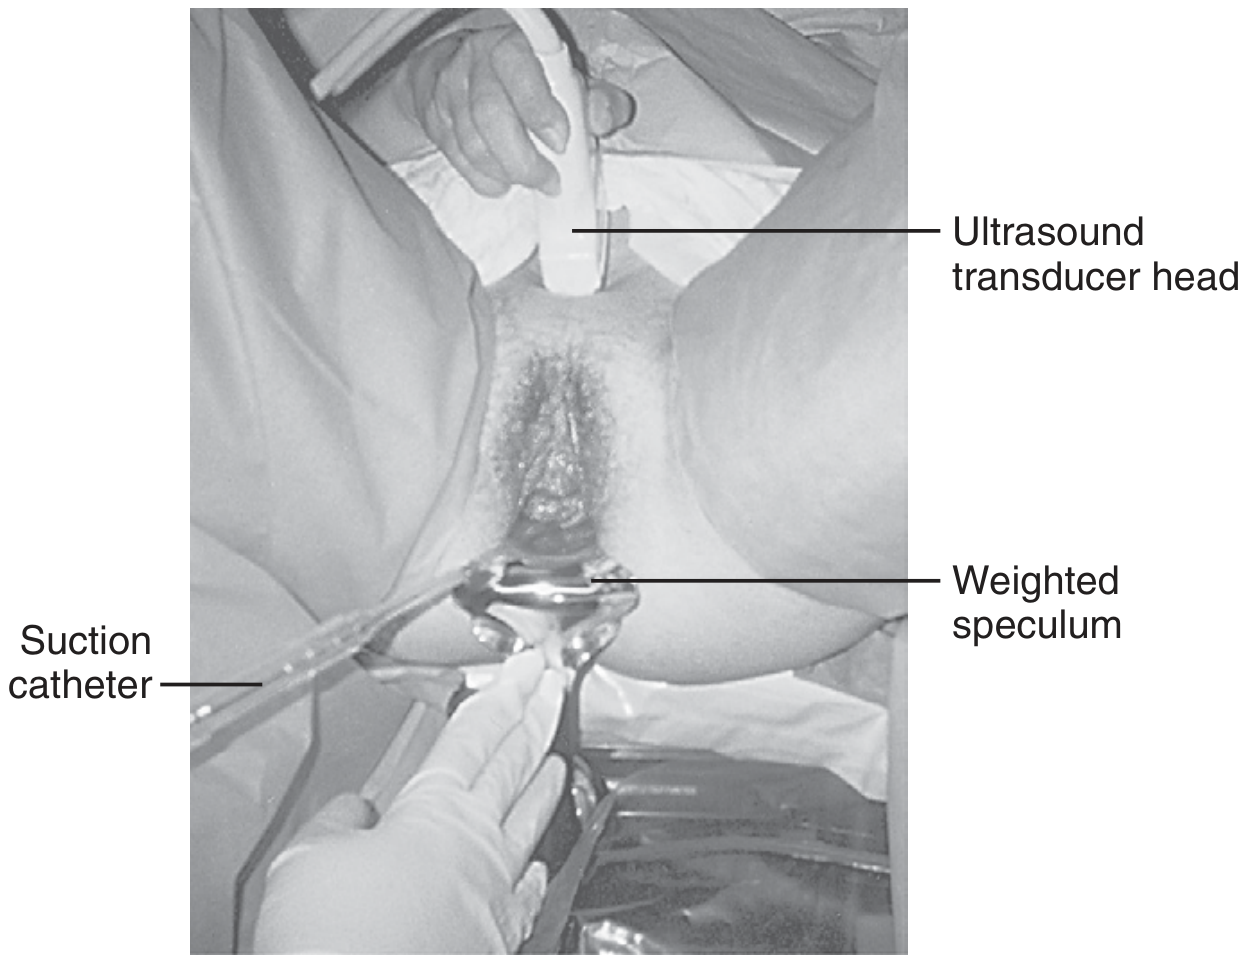
Ultrasonography can guide the procedure in real time to reduce the risk of perforation.
Complications
| Complication | Details |
|---|---|
| Hemorrhage | Rare (<1%); spotting for a few weeks postoperatively is normal. Give IV oxytocin + IM methylergonovine if persistent. |
| Uterine perforation | Higher risk with: cervical stenosis, postmenopausal atrophic uterus, uterine infection, unrecognized severe flexion, <8 weeks postpartum. Lateral perforation can injure the uterine artery. Stop procedure immediately if suspected. |
| Infection | Rare; treat with broad-spectrum antibiotics covering anaerobes. |
| Asherman's syndrome | Intrauterine adhesions causing secondary amenorrhea, infertility, or recurrent miscarriage. More common after D&C on the postpartum uterus. |
| Incomplete sampling | Even vigorous D&C only samples 50-60% of the endometrial cavity. If symptoms persist, repeat sampling or hysteroscopy is required. |
Post-Procedure Management
- Monitor vital signs until stable.
- Mild cramping and spotting are expected for 1-2 weeks.
- Advise patient to report: fever, increasing pelvic pain, heavy bleeding, or abnormal discharge.
- Send all specimens in clearly labeled, separate formalin containers.
- Rh-negative patients receiving a D&C for pregnancy-related indications should receive Rh immunoglobulin.
Source: Pfenninger and Fowler's Procedures for Primary Care, 3rd Edition; Sabiston Textbook of Surgery; Berek & Novak's Gynecology
How can tubal patency understood from fluid in pod
When fluid (saline or contrast) is instilled into the uterus and tubes, it passes through patent tubes and spills into the pouch of Douglas (POD/cul-de-sac). Detecting this free fluid in the POD on ultrasound confirms at least one tube is open. Let me get the full textbook details.
Searching sources...
Finding Sources
Finding Sources
Finding Sources
Finding Sources
Reading File
Reading File
Reading File
Now let me get details on chromopertubation (laparoscopy dye test) and hysterosalpingography images.
Finding Sources
Finding Sources
I now have rich, authoritative content from multiple textbooks. Here is the complete answer:
Assessing Tubal Patency via Fluid in the Pouch of Douglas (POD)
The Core Concept
The Pouch of Douglas (POD, also called the rectouterine pouch or cul-de-sac) is the lowest point of the female peritoneal cavity - it lies between the posterior uterus and the anterior rectum. The fallopian tubes open into the peritoneal cavity at their fimbriated ends. If the tubes are patent, any fluid instilled transcervically into the uterus will travel through the tubes and spill out of the fimbriae into the peritoneal cavity, where it pools in the most dependent location - the POD. Detecting this free fluid in the POD confirms that at least one tube is open.
Methods That Use This Principle
1. Hysterosalpingography (HSG) - Primary Radiological Method
- Performed during the follicular phase (Days 7-10 of cycle) to avoid disrupting an early pregnancy and to benefit from natural cervical mucus favorability.
- A radio-opaque contrast medium (water-based or oil-based) is injected transcervically through a cannula into the uterine cavity.
- X-ray / fluoroscopy images are taken sequentially.
- Patent tube: Contrast fills the uterine cavity, opacifies the fallopian tube along its entire length, and then spills freely from the fimbriated end into the peritoneal cavity (peritoneal spill sign). This contrast pools in the POD and is seen as a diffuse haziness around the tube ends on X-ray.
- Blocked tube: No peritoneal spill; contrast stops at the point of obstruction.
- Proximal occlusion (cornual block): contrast does not enter the tube at all.
- Distal occlusion / hydrosalpinx: tube fills and dilates but no spill from the ampullary end.
- Grainger & Allison's Diagnostic Radiology: "HSG is primarily involved in assessing tubal patency. A dilated fallopian tube with absence of spill of contrast agent from the ampulla is suggestive of a hydrosalpinx."
- The negative predictive value for tubal occlusion is high (if spill is seen, the tube is very likely truly patent). However, the positive predictive value is relatively low (apparent block may be due to tubal spasm, mucous plug, or technical factors).
Therapeutic benefit: Pregnancy rates are actually higher after HSG compared to no testing, and higher still when oil-based contrast is used (likely due to mechanical flushing of mucus plugs from the tube).
2. Sonosalpingography / Saline Infusion Sonography (SIS) - Ultrasound-Based Method
- Saline (plain or agitated/air-saline) is injected transcervically into the uterine cavity while performing transvaginal ultrasonography (TVS).
- Patent tube: Free fluid accumulates and can be seen in the POD on ultrasound - this is the direct sign of tubal patency.
- Harrison's Principles of Internal Medicine (2025): "Tubal patency is assessed by demonstrating passage of agitated saline contrast through the tubes or accumulation in the cul-de-sac as visualized by ultrasonography."
- Berek & Novak's Gynecology: "The use of agitated saline (air-saline) during sonohysterography provides good negative predictive value when compared to HSG or laparoscopy."
- Advantages over HSG: no ionizing radiation, can be done in a clinic, also evaluates the uterine cavity for polyps and fibroids, and simultaneously assesses ovarian morphology.
- Limitation: Standard 2D sonohysterography cannot define tubal architecture as well as HSG.
- Contrast-enhanced sonosalpingography (e.g., ExEm foam, SonoVue) gives better accuracy but contrast agents for this use are not available in all countries.
3. Laparoscopy with Chromopertubation - Gold Standard
- Considered the gold standard for diagnosing tubal and peritoneal disease.
- Under laparoscopic vision, indigo carmine or methylene blue dye is injected transcervically into the uterus.
- Patent tube: Dye is seen flowing through the tube and spilling from the fimbriated ends into the POD/peritoneal cavity (visible blue staining of the cul-de-sac fluid).
- Blocked tube: No dye exits the fimbriae; the dye may even distend the tube (hydrosalpinx pattern) without exit.
- Additional benefit: direct visualization of the external surfaces of the tubes, ovaries, and peritoneum - can simultaneously diagnose and treat endometriosis, adhesions, and peritubal/periovarian disease.
- Berek & Novak's: "Even laparoscopy has been reported to have a false positive rate of 11% for proximal tubal occlusion" when examined histologically (due to transient tubal spasm at the time of the procedure).
4. Falloscopy (Intratubal Endoscopy)
- A fiberoptic microendoscope is passed transcervically via hysteroscopy into the tubal ostia.
- Allows direct visualization of intratubal mucosa, identifying mucosal damage, debris, agglutination, or spasm.
- Limited by instrument availability and risk of tubal perforation; not in routine use.
Summary: How Fluid in the POD Confirms Tubal Patency
| Finding | Interpretation |
|---|---|
| Free fluid / contrast in POD | At least one fallopian tube is patent |
| No POD fluid / no peritoneal spill | Both tubes may be blocked (or spasm/technical failure) |
| Unilateral spill only | Contralateral tube may be occluded |
| Dilated tube + no spill | Hydrosalpinx (distal tubal occlusion) |
| No fill of tube at all | Proximal (cornual) occlusion |
Clinical Notes
- Apparent obstruction on HSG or SIS may be due to tubal spasm (not true blockage) - laparoscopic chromopertubation is used to confirm equivocal findings.
- Textbook of Family Medicine: "Assessment of fallopian tube patency is accomplished by HSG (first choice) or laparoscopy (if history strongly suggests prior tubal damage)."
- In cases of suspected prior damage (PID, previous ectopic, endometriosis), even a normal HSG showing POD spill may miss peritubal adhesions - positive Chlamydia serology with a normal HSG should prompt laparoscopy.
- Proximal tubal catheterization (guided by HSG or hysteroscopy) can restore patency in up to 85% of proximal obstructions identified on HSG.
Sources: Berek & Novak's Gynecology; Harrison's Principles of Internal Medicine 22e (2025); Grainger & Allison's Diagnostic Radiology; Textbook of Family Medicine 9e
This is a shared conversation. Sign in to Orris to start your own chat.