
Miph procedure notes in detail from fischer
Reading File
Reading File
Finding Sources
Searching PubMed
hemorrhoidopexy AND hemorrhoids
Searching the Web
Fischer Mastery of Surgery MIPH minimally invasive procedure hemorrhoids procedure notes
Finding Sources
Finding Sources
Finding Sources
Reading File
Finding Sources
Searching Images
stapled hemorrhoidopexy procedure circular stapler purse string diagram
Reading File
MIPH procedure notes - Stapled hemorrhoidopexy (PPH)
MIPH usually refers to minimally invasive procedure for hemorrhoids, commonly performed as stapled hemorrhoidopexy or the procedure for prolapse and hemorrhoids (PPH). It is not a true excisional hemorrhoidectomy.
Principle
A circular stapler excises a circumferential ring of rectal mucosa and submucosa, typically 2-4 cm above the dentate line. This:
- Lifts and repositions prolapsing internal hemorrhoidal cushions upward.
- Interrupts part of their arterial inflow.
- Creates a circular stapled mucosal anastomosis.
Because the operation is performed above the pain-sensitive anoderm, postoperative pain can be less than after conventional hemorrhoidectomy. It does not directly remove external skin tags.
Fischer's Mastery of Surgery, 8th ed., pp. 4285-4286.
Fischer's Mastery of Surgery, 8th ed., pp. 4285-4286.
Indications
Consider only in carefully selected patients with:
- Circumferential prolapsing internal hemorrhoids, commonly grade III.
- Mucosal prolapse associated with hemorrhoidal prolapse.
- Predominantly internal disease, with little or no bulky external component.
- A patient who understands the potential benefits and the uncommon but serious procedure-specific complications.
Relative contraindications / poor candidates
- Prominent external hemorrhoids or large symptomatic skin tags.
- Acute thrombosed external hemorrhoid.
- Suspected anorectal malignancy.
- Active anorectal sepsis, fistula, or inflammatory anorectal disease.
- Significant anal stenosis.
- Patients unable to give informed consent for a procedure that has a risk of rectal injury, bleeding, pelvic sepsis, persistent urgency, and recurrence.
Preoperative preparation
- Confirm that symptoms are attributable to hemorrhoidal and/or mucosal prolapse.
- Digital rectal examination and proctoscopy to exclude another anorectal lesion.
- Document degree of prolapse, external component, skin tags, fissure, fistula, and sphincter status.
- Bowel preparation according to local colorectal protocol.
- Prophylactic antibiotics according to institutional policy.
- Explain alternatives: conservative treatment, rubber-band ligation, Doppler-guided hemorrhoidal artery ligation with mucopexy, and excisional hemorrhoidectomy.
- Specific consent must include: bleeding, urinary retention, staple-line problems, recurrence, chronic pain/tenesmus, rectal perforation, pelvic sepsis, rectovaginal fistula, and possible reoperation.
Equipment
- Circular hemorrhoidal stapler set.
- Operating proctoscope with obturator.
- Purse-string suture material.
- Hooked suture retriever/probe.
- Light source and suction.
- Instruments and sutures for hemostasis.
- Proctosigmoidoscope for final rectal inspection.
Fischer describes an operating proctoscope that remains fixed during the procedure and facilitates placement of the purse-string suture.
Fischer's Mastery of Surgery, 8th ed., p. 4286.
Fischer's Mastery of Surgery, 8th ed., p. 4286.
Operative steps
1. Position and examination
- Place the patient in the surgeon's preferred anorectal operating position.
- Perform examination under anesthesia.
- Confirm the internal prolapse and identify any external component.
- In women, remain aware of the relationship of the anterior rectal wall to the rectovaginal septum.
2. Introduce and secure the operating proctoscope
- Insert the operating proctoscope with its obturator.
- Secure it so it remains stable throughout the procedure.
- The purpose is to expose rectal mucosa above the dentate line and protect adjacent tissues during the purse-string placement.
3. Place the purse-string suture
- Place a circumferential purse-string through rectal mucosa and submucosa only.
- The suture must be at an appropriate level above the dentate line and must not be placed too high.
- Do not take a deep bite that incorporates the muscular layer.
- Ensure the purse string is complete and even around the circumference.
This is a safety-critical step. Full-thickness bites or inclusion of muscle can predispose to severe pain, rectal injury, and other complications.
Fischer's Mastery of Surgery, 8th ed., p. 4286.
Fischer's Mastery of Surgery, 8th ed., p. 4286.
4. Insert and connect the circular stapler
- Introduce the open circular stapling device through the proctoscope.
- Bring the purse-string ends out and tie them securely around the stapler's central shaft.
- A hooked probe may help retrieve, tension, and secure the suture ends.
- Ensure even circumferential tissue capture and avoid excessive tissue incorporation, especially anteriorly.
5. Close and fire the stapler
- Gradually close the stapler while maintaining traction on the purse-string.
- Confirm that the purse string remains correctly positioned.
- Fire the stapler according to the device protocol.
- The stapler excises a circumferential mucosal-submucosal “doughnut” and creates the circular staple line, thereby elevating the prolapsing hemorrhoidal tissue.
Fischer emphasizes that after introduction of the stapler, the operative field is not directly visible until the device is fired and removed. This is why meticulous purse-string placement and consent are essential.
Fischer's Mastery of Surgery, 8th ed., p. 4286.
Fischer's Mastery of Surgery, 8th ed., p. 4286.
6. Remove and inspect the specimen
- Remove the stapler carefully.
- Inspect the mucosal ring or “doughnut.”
- It should be a complete circumferential cylinder.
- Send the specimen for histopathology, particularly to confirm that muscle has not been entrapped.
7. Inspect the staple line
- Reinsert the proctoscope.
- Inspect the complete staple line for:
- Active bleeding
- Staple-line dehiscence
- Incomplete mucosal resection
- Excessive tissue incorporation
- A low or irregular staple line
- Oversew bleeding points with absorbable sutures.
8. Confirm rectal and vaginal integrity
- Perform proctosigmoidoscopy to assess rectal integrity.
- In women, perform bimanual rectovaginal examination to ensure that the rectovaginal septum has not been incorporated or injured.
These final checks are specifically highlighted by Fischer.
Fischer's Mastery of Surgery, 8th ed., p. 4286.
Fischer's Mastery of Surgery, 8th ed., p. 4286.
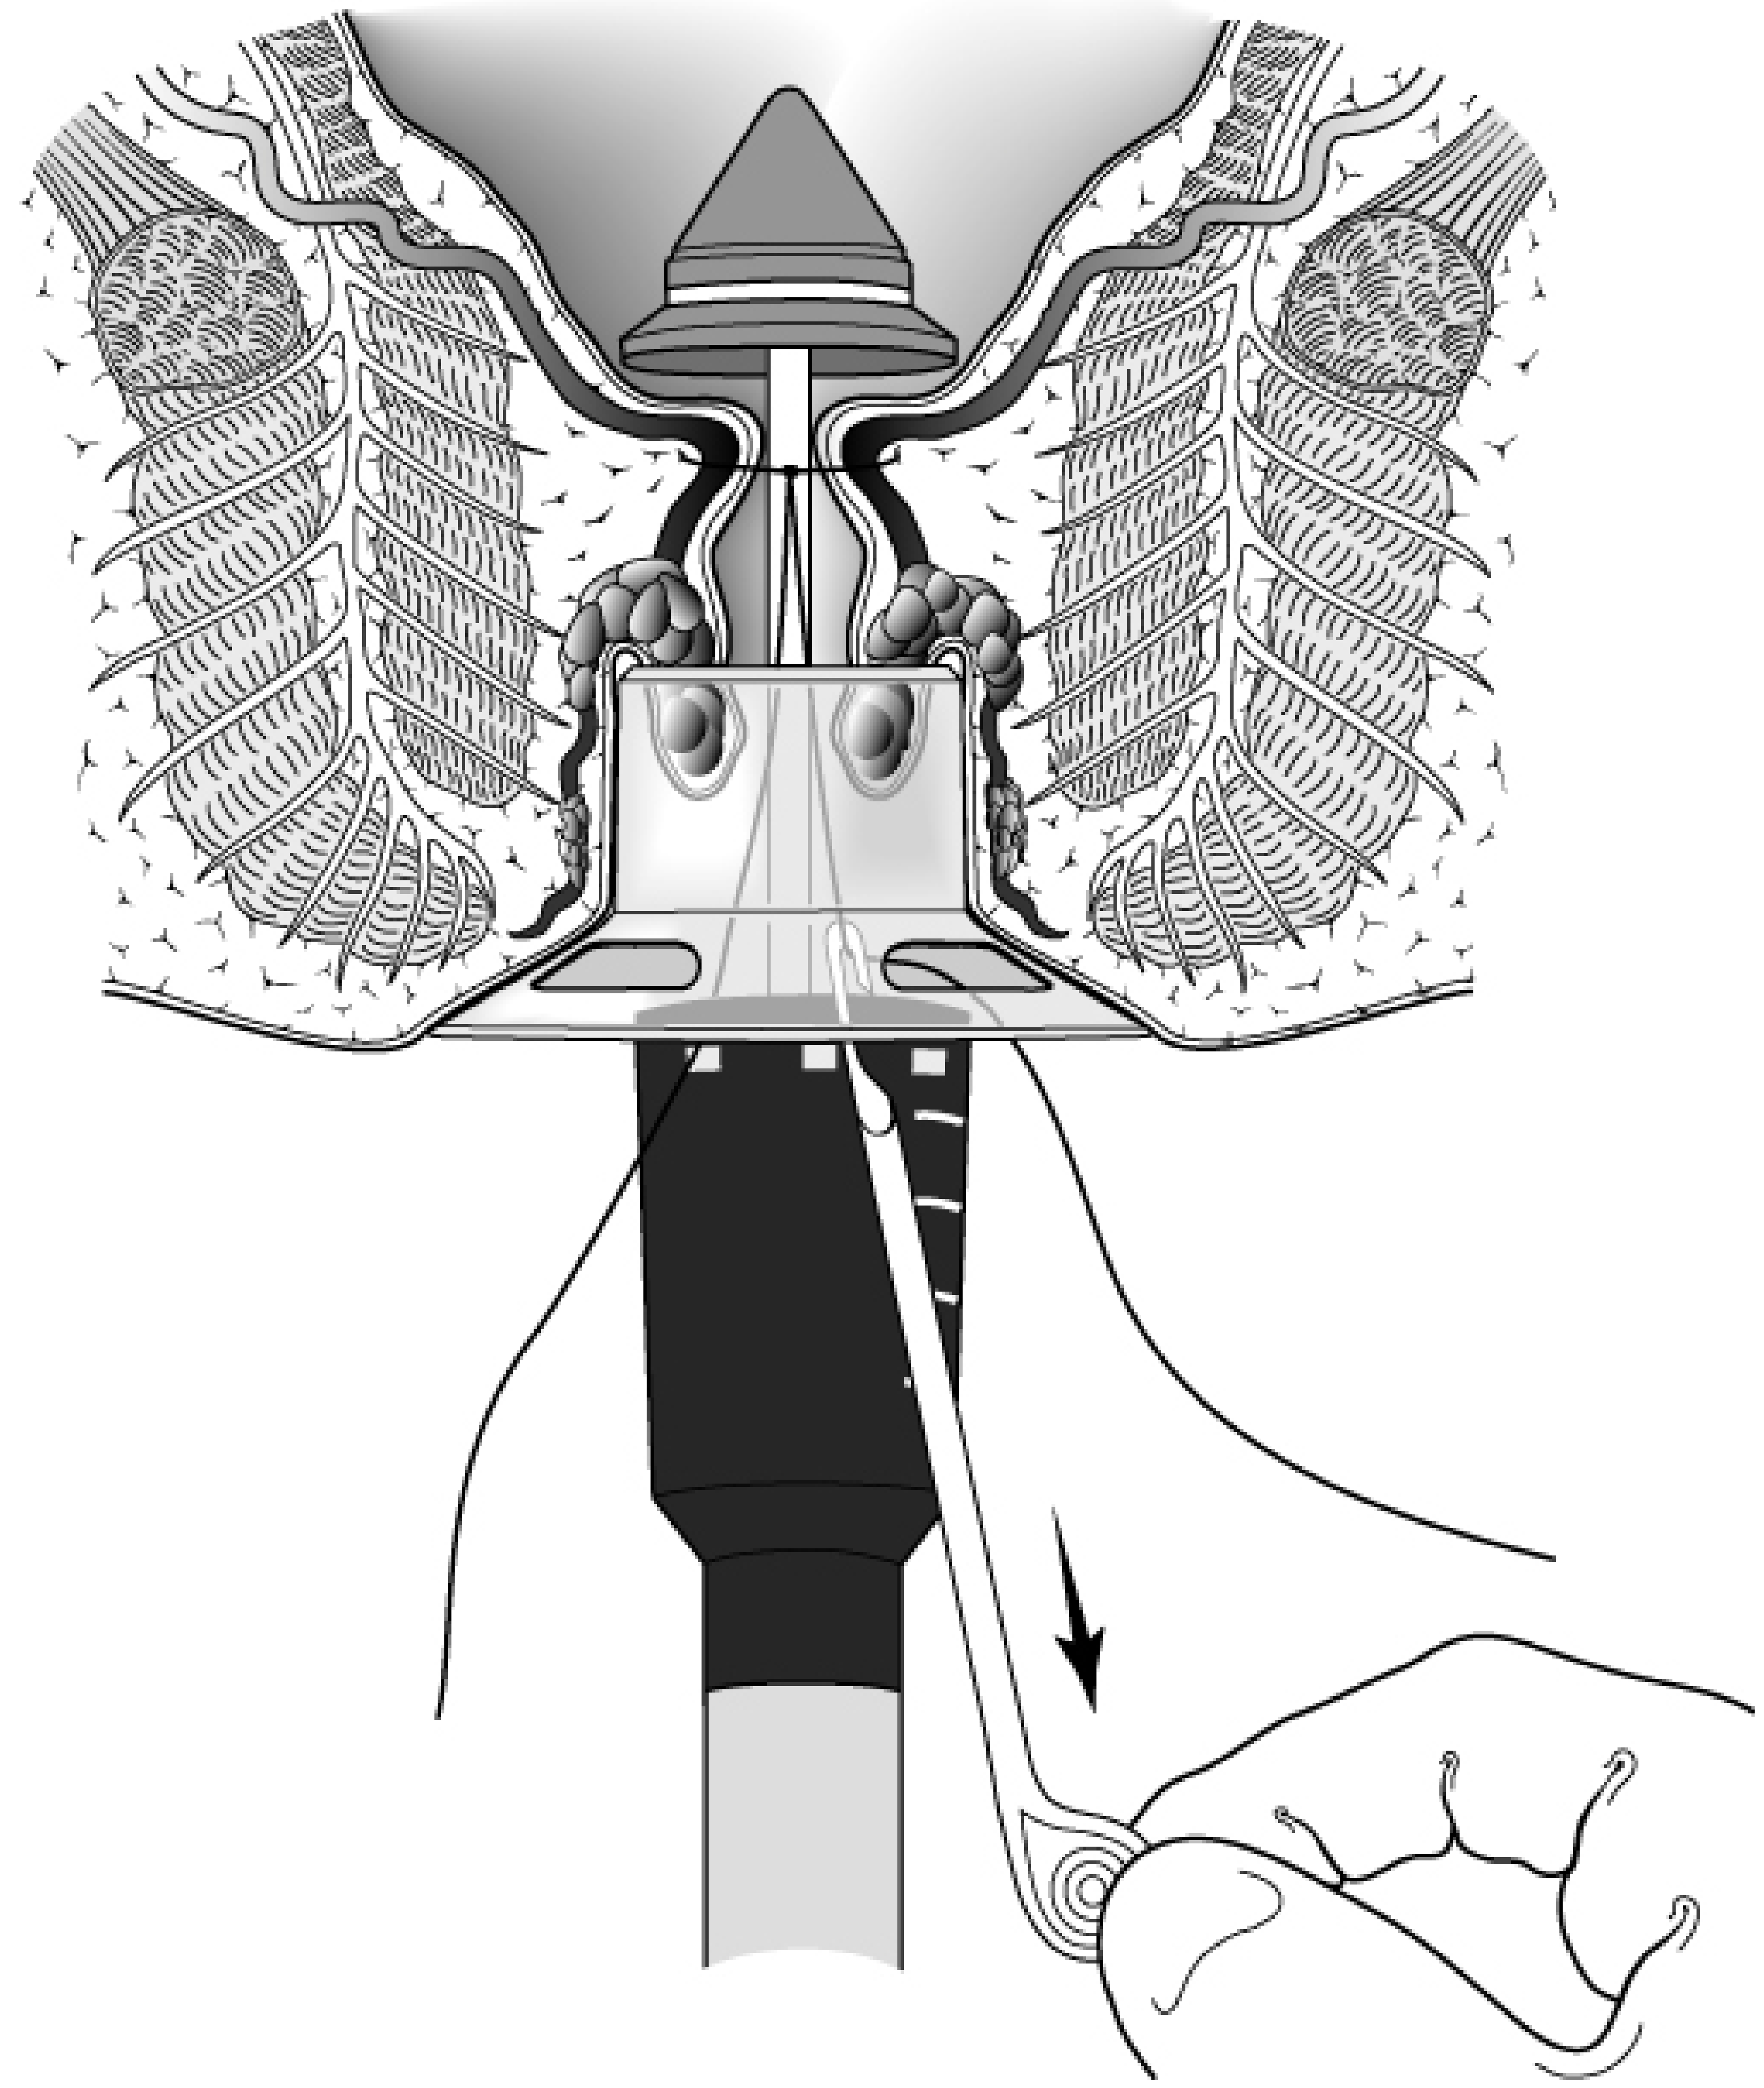
Fischer's Mastery of Surgery, 8th ed., Figure 156.24, p. 4287.
Postoperative care
- Monitor for pain, bleeding, urinary retention, fever, sepsis, and inability to pass stool or flatus.
- Use multimodal non-opioid analgesia where possible.
- Prescribe stool softener/laxative and advise adequate oral hydration.
- A small amount of rectal bleeding may occur, but persistent or heavy bleeding requires urgent review.
- Advise early return for severe pelvic or rectal pain, fever, tachycardia, urinary difficulty, worsening tenesmus, purulent discharge, or significant bleeding.
Complications
Early
- Bleeding from the staple line
- Severe pain, especially if the staple line is too low or muscle is incorporated
- Urinary retention
- Fecal urgency and tenesmus
- Rectal perforation
- Pelvic sepsis
- Rectovaginal injury/fistula
Late
- Persistent urgency, tenesmus, incomplete evacuation, and chronic pain, described by Fischer as symptoms resembling anterior resection syndrome
- Recurrent prolapse or recurrent hemorrhoidal symptoms
- Anal stenosis
- Fistula formation
Fischer reports that while many patients have excellent, low-pain recovery, 5%-10% may develop potentially serious complications or persistent anterior-resection-type symptoms.
Fischer's Mastery of Surgery, 8th ed., pp. 4284-4288.
Fischer's Mastery of Surgery, 8th ed., pp. 4284-4288.
Key viva points
- MIPH/PPH is a hemorrhoidopexy, not an excisional hemorrhoidectomy.
- The staple line is placed above the dentate line, generally 2-4 cm proximal to it.
- The excised tissue should be mucosa and submucosa, not muscularis.
- It improves prolapse by mucosal resection and upward fixation of the hemorrhoidal cushions.
- It does not reliably address large external hemorrhoids or skin tags.
- Always inspect the doughnut, secure hemostasis, perform proctoscopic assessment, and in women check the rectovaginal septum.
- Serious adverse events, although uncommon, can be life-threatening. The recent evidence base also continues to assess long-term recurrence and complications versus conventional hemorrhoidectomy, as summarized in a 2026 systematic review.
This is an educational operative outline from Fischer’s description and should be used only with supervised colorectal surgical training and the specific stapler manufacturer’s instructions.
Give in detail step by step from fischer
Reading File
Finding Sources
Searching PubMed
hemorrhoidopexy AND hemorrhoids
Searching the Web
stapled hemorrhoidopexy professional guideline patient selection complications 2025
MIPH / PPH: step-by-step technique from Fischer
MIPH is commonly used for stapled hemorrhoidopexy, also called PPH or the Longo procedure. Fischer describes it as removal of a circumferential cylinder of rectal mucosa and submucosa at the upper anal canal, about 2-4 cm above the dentate line. This elevates the prolapsing hemorrhoidal cushions and interrupts part of their vascular supply. It is not an excisional hemorrhoidectomy and does not directly treat skin tags.
Fischer’s Mastery of Surgery, 8th ed., pp. 4285-4286.
Fischer’s Mastery of Surgery, 8th ed., pp. 4285-4286.
This is a study note based on Fischer, not a substitute for supervised colorectal surgical training and the stapler manufacturer’s instructions.
1. Anaesthesia, position, and examination
- Give anaesthesia appropriate for an anorectal operation.
- Place the patient in the usual position for anal surgery.
- Perform a careful digital rectal examination and proctoscopic assessment under anaesthesia.
- Confirm that the disease is mainly internal circumferential hemorrhoidal prolapse/mucosal prolapse.
- Assess the extent of external component and skin tags. MIPH will not reliably remove these.
- In women, note the anterior rectal wall and rectovaginal septum because accidental anterior full-thickness capture may lead to rectovaginal injury.
2. Introduce and fix the operating proctoscope
- Introduce the dedicated operating proctoscope with its obturator into the anal canal.
- Position the proctoscope so the rectal mucosa above the dentate line is clearly exposed.
- Fix or secure the operating proctoscope in position. Fischer states that it remains sutured in place throughout the procedure.
- Remove the obturator when ready to insert the purse-string suture.
Purpose: The proctoscope provides exposure, protects the adjacent rectal wall during suturing, and facilitates a uniform circumferential purse-string.
3. Identify the level for the purse-string
- The mucosal purse-string must be placed in the lower rectum, above the dentate line.
- Fischer describes the resection level as approximately 2-4 cm above the dentate line.
- The purse-string should not be placed too high.
- The intended tissue bite is mucosa and submucosa only.
Key principle: Do not take deep bites into the muscular rectal wall. The excised ring should not contain muscle.
4. Place the circumferential purse-string suture
- Starting at one point, take a bite through rectal mucosa and submucosa.
- Continue around the circumference in a purse-string fashion.
- Keep the bites:
- Evenly spaced
- At the same level
- Superficial enough to avoid muscularis
- Circumferentially complete
- Ensure that the purse-string remains within the exposed field of the proctoscope.
- On the anterior wall, take particular care not to incorporate deep tissue. In women this precaution is important to avoid injury to the rectovaginal septum.
Fischer specifically states that the purse-string should include only submucosa from the circumference of the anorectum.
Fischer’s Mastery of Surgery, 8th ed., p. 4286.
Fischer’s Mastery of Surgery, 8th ed., p. 4286.
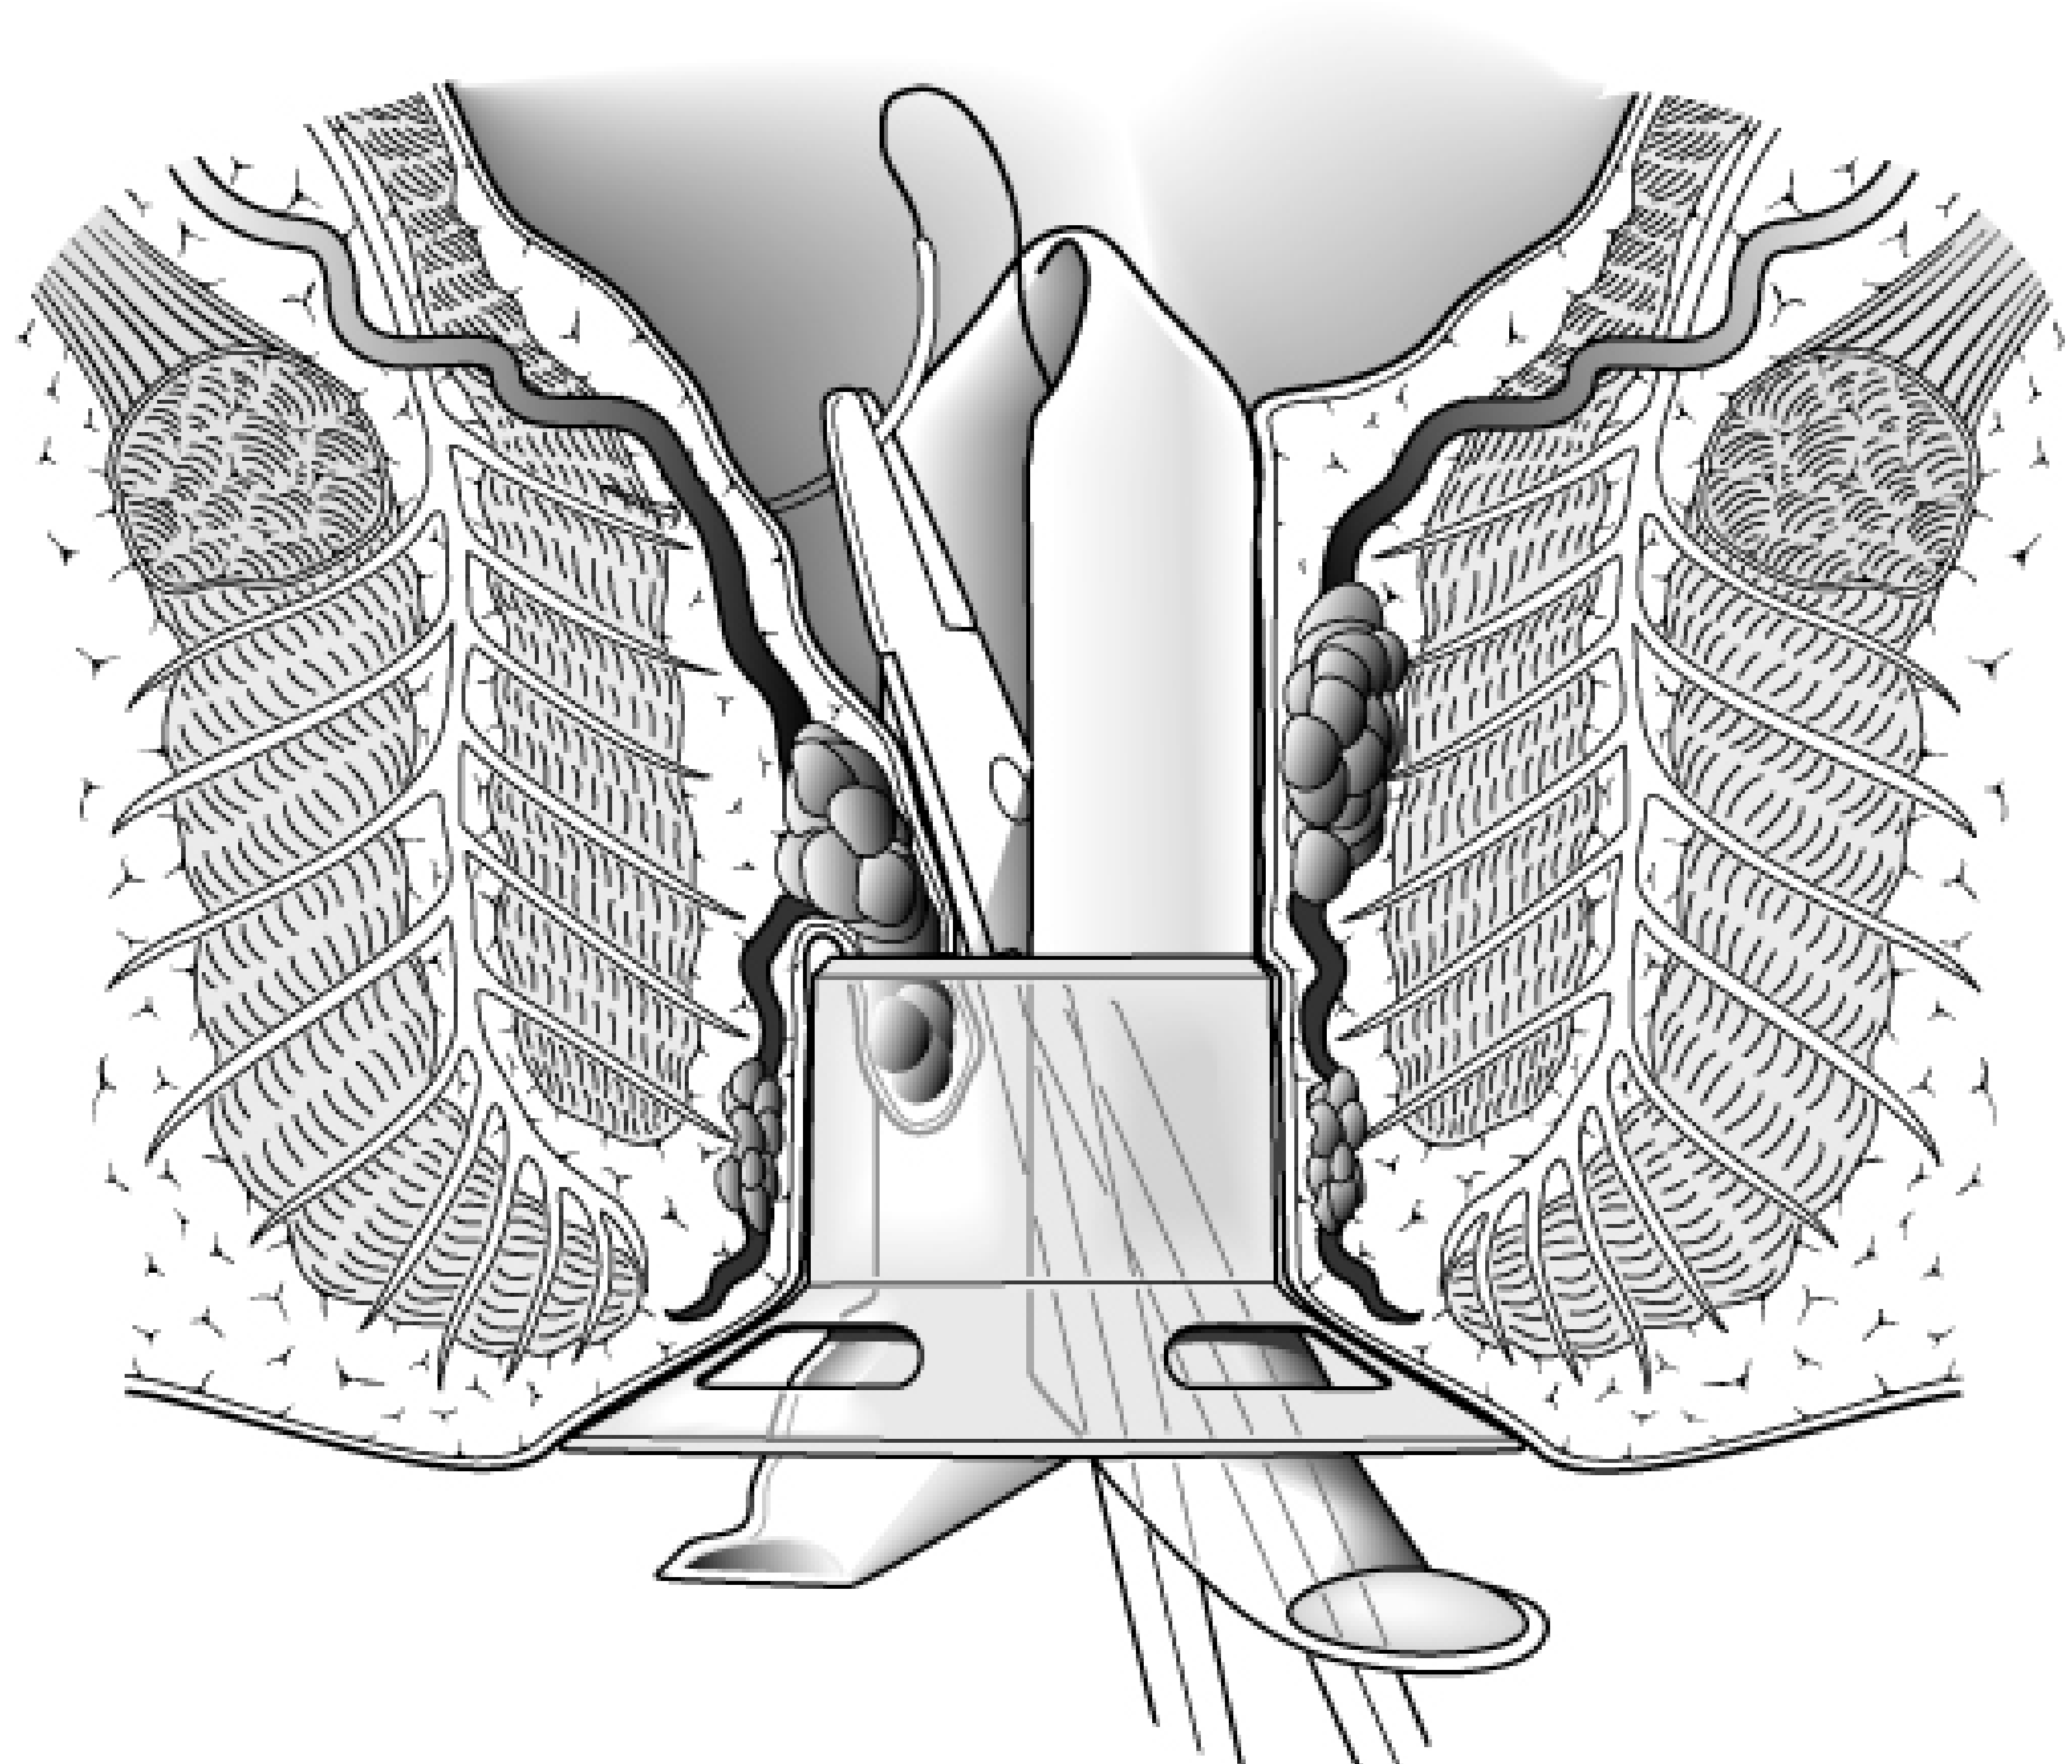
Figure 156.23, Fischer’s Mastery of Surgery, 8th ed., p. 4287.
5. Introduce the circular stapler
- Open the circular stapling device fully.
- Introduce it transanally through the operating proctoscope.
- Bring the two ends of the purse-string suture out through the proctoscope.
- Place and tie the suture ends around the stapler’s central spindle/shaft.
- Fischer notes that a hooked probe can facilitate retrieval, tightening, and tying of the purse-string ends.
- Apply even traction to draw the selected circumferential mucosa-submucosa into the stapler head.
Critical point from Fischer: Once the stapler is introduced, the procedure becomes relatively blind until the instrument is fired and withdrawn. Therefore, correct purse-string placement is the key safety step.
Fischer’s Mastery of Surgery, 8th ed., p. 4286.
Fischer’s Mastery of Surgery, 8th ed., p. 4286.
6. Close the stapler
- While maintaining the purse-string traction, slowly close the stapler.
- The tissue is drawn into the stapler housing.
- Ensure that the purse-string has not slipped and that the tissue is symmetrically captured.
- Avoid excessive closure or uncontrolled capture of adjacent rectal wall.
- Carefully assess the anterior aspect before firing, especially in female patients.
Figure 156.24, Fischer’s Mastery of Surgery, 8th ed., p. 4287.
7. Fire the stapler
- Fire the circular stapler according to the device-specific instructions.
- The device:
- Excises a circumferential ring of mucosa and submucosa.
- Creates a circular stapled mucosal anastomosis.
- Pulls the prolapsing hemorrhoidal tissue upward into the anal canal.
This step is the hemorrhoidopexy: it repositions rather than directly excises the hemorrhoidal cushions.
8. Remove the stapler and inspect the “doughnut”
- Withdraw the stapler gently.
- Open the stapler and retrieve the circular tissue ring, often called the doughnut.
- Inspect it for:
- An intact circumferential cylinder
- Completeness of the mucosal ring
- Unexpected muscular tissue
- Send the tissue ring for histopathology.
Fischer advises inspecting the ring to confirm it is an intact cylinder and sending it for histology, particularly to detect muscle entrapment.
Fischer’s Mastery of Surgery, 8th ed., p. 4286.
Fischer’s Mastery of Surgery, 8th ed., p. 4286.
9. Inspect the staple line
- Reintroduce the proctoscope.
- Inspect the entire circular staple line.
- Look specifically for:
- Active arterial or venous bleeding
- Staple-line gaps
- Mucosal tears
- An irregular or low staple line
- Evidence of excessive tissue capture
- If bleeding is found, control it with an absorbable oversewing suture.
Fischer explicitly states that all bleeding points should be oversewn.
Fischer’s Mastery of Surgery, 8th ed., p. 4286.
Fischer’s Mastery of Surgery, 8th ed., p. 4286.
10. Confirm rectal integrity
- Perform proctosigmoidoscopy after the stapling and hemostasis check.
- Ensure that the rectal lumen and staple line appear intact.
- In female patients, perform a bimanual rectovaginal examination.
- Confirm that the rectovaginal septum has not been caught in the staple line and is intact.
This final rectal and rectovaginal assessment is essential because Fischer highlights the risk of rectal and rectovaginal injury.
Fischer’s Mastery of Surgery, 8th ed., p. 4286.
Fischer’s Mastery of Surgery, 8th ed., p. 4286.
Fischer’s safety points to remember
- The procedure excises a mucosal-submucosal cylinder 2-4 cm above the dentate line.
- It is designed for prolapsing internal hemorrhoidal/mucosal disease, not bulky external disease.
- The purse-string must be circumferential, correctly positioned, and submucosal.
- Avoid muscular tissue capture.
- Examine the doughnut for completeness and possible muscle.
- Inspect and suture any bleeding point in the staple line.
- Check rectal integrity with proctosigmoidoscopy.
- In women, always check the rectovaginal septum by bimanual examination.
- The operation is relatively blind after stapler insertion and can cause severe complications if tissue is wrongly incorporated.
Important complications emphasized by Fischer
Fischer notes both excellent, low-pain results and rare severe complications, including:
- Rectal perforation
- Rectovaginal fistula
- Pelvic sepsis
- Bleeding
- Persistent rectal pain
- Tenesmus and feeling of incomplete evacuation
- Persistent symptoms similar to anterior resection syndrome
Fischer reports that serious complications or persistent anterior-resection-type symptoms may occur in approximately 5%-10% of patients.
Fischer’s Mastery of Surgery, 8th ed., pp. 4284-4288.
Fischer’s Mastery of Surgery, 8th ed., pp. 4284-4288.
Recent systematic-review evidence remains relevant because it evaluates long-term recurrence and complications relative to excisional surgery: 2026 review on long-term outcomes (PMID: 41535511).
The scope which we use is proctoscope or anoscpoe
Reading File
Finding Sources
Searching PubMed
stapled hemorrhoidopexy proctoscope anoscope
Searching the Web
stapled hemorrhoidopexy operating proctoscope anoscope device instructions
For MIPH / stapled hemorrhoidopexy, Fischer specifically calls it an operating proctoscope.
- Use the dedicated operating proctoscope supplied with the PPH/MIPH stapler set, with its obturator.
- It is secured in position and used to expose the rectal mucosa while placing the circumferential purse-string.
- Do not use an ordinary short diagnostic anoscope as the primary operative scope, since it does not provide the required exposure/protection for the purse-string placement.
In practice, the dedicated device may be labelled by different manufacturers as a PPH anoscope, purse-string anoscope, or operating proctoscope. For your exam and Fischer-based note, write:
“A dedicated operating proctoscope with obturator is introduced and fixed. Through it, a circumferential submucosal purse-string is placed.”
After firing and removing the stapler:
“The staple line and rectal integrity are assessed by proctosigmoidoscopy.”
So the concise answer is: operating proctoscope for the MIPH procedure; proctosigmoidoscope for the final check.
Fischer’s Mastery of Surgery, 8th ed., p. 4286.
Fischer’s Mastery of Surgery, 8th ed., p. 4286.
This is a shared conversation. Sign in to Orris to start your own chat.