
Instrumental delivery
Reading File
Now let me search the medical library for instrumental delivery content in parallel.
Finding Sources
Finding Sources
Finding Sources
Finding Sources
Reading File
Reading File
Reading File
Reading File
Finding Sources
Reading File
Finding Sources
Reading File
Reading File
Now let me fetch the key images and get prerequisites/complications data:
Reading File
Finding Sources
Loading Image
Loading Image
Loading Image
Searching PubMed
operative vaginal delivery forceps vacuum extractor outcomes
I now have comprehensive information to write a thorough answer. Here is the complete overview of instrumental delivery:
Instrumental (Operative Vaginal) Delivery
Instrumental delivery refers to the use of forceps or a vacuum extractor (ventouse) to assist vaginal delivery of the fetal head in the second stage of labor. Both instruments have the same general indications and share the same prerequisite checklist before use.
Instruments Used
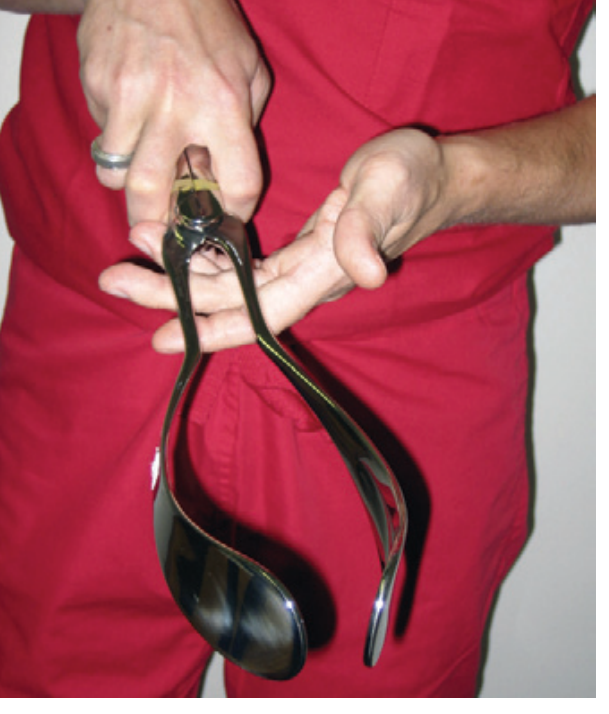
1. Obstetric Forceps
Forceps have been used since the 17th century (Chamberlen family) and were systematically taught by William Smellie. Each instrument has two sides - a right and a left - with a handle, shank, and blade. The Simpson forceps is most commonly used for low and outlet deliveries.
ACOG Classification of Forceps Deliveries (1988, updated 1991):
| Type | Criteria |
|---|---|
| Outlet forceps | Scalp visible at introitus without separating labia; skull has reached pelvic floor; sagittal suture in AP diameter or ROA/LOA/ROP/LOP; rotation ≤45° |
| Low forceps | Leading point at station +2 cm or lower, not on pelvic floor; rotation ≤45° or >45° |
| Mid-forceps | Station above +2 cm but head engaged |
High forceps (above station 0) are no longer practiced.
2. Vacuum Extractor (Ventouse)
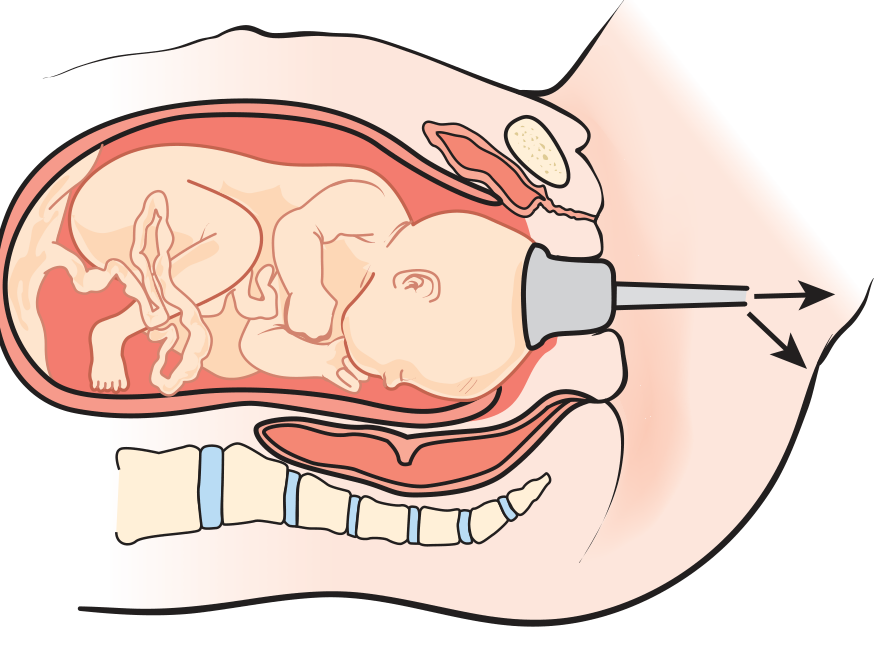
Introduced by Malmström in 1954, it has largely replaced forceps in Scandinavia and continental Europe and is increasingly used in the United States. A suction cup is applied to the fetal scalp and negative pressure is used to assist delivery.
- Rigid metal cups (Malmström/Bird): higher success rate but more maternal/fetal trauma
- Soft polyethylene/silicone cups: lower success rate but less trauma; preferred in current US residency training
Indications (same for both instruments)
- Arrest of labor in the second stage - failure to progress
- Maternal indication for shortening second stage - cardiovascular or cerebrovascular disease, maternal exhaustion
- Fetal distress (non-reassuring fetal heart rate pattern)
- Elective low-pelvic delivery
Prerequisites - The ABCDEF Checklist (ALSO Curriculum)
Before any instrumental delivery, the following must be confirmed:
- A - Adequate anesthesia (pudendal block, local, or regional); ask for help
- B - Bladder empty (straight catheterise if needed)
- C - Cervix completely dilated
- D - Determine position of fetal head (anterior fontanelle = cross; posterior fontanelle = Y; check ear direction); station must be ≥ +2 with vertex filling sacrum
- E - Equipment ready (suction bulb, cord clamp, instrument table)
- F/G/H/I/J - Instrument-specific steps for application, traction, halting between contractions, episiotomy if needed, and removal
Contraindications
| Condition | Applies to |
|---|---|
| Cephalopelvic disproportion (CPD) | Both |
| Face or brow presentation | Both |
| Breech presentation | Both |
| Unengaged fetal head | Both |
| Incompletely dilated cervix | Both |
| Premature infant (<34 weeks for vacuum) | Vacuum especially |
Vacuum Extractor Technique
- Clean vertex of blood/fluid; spread labia
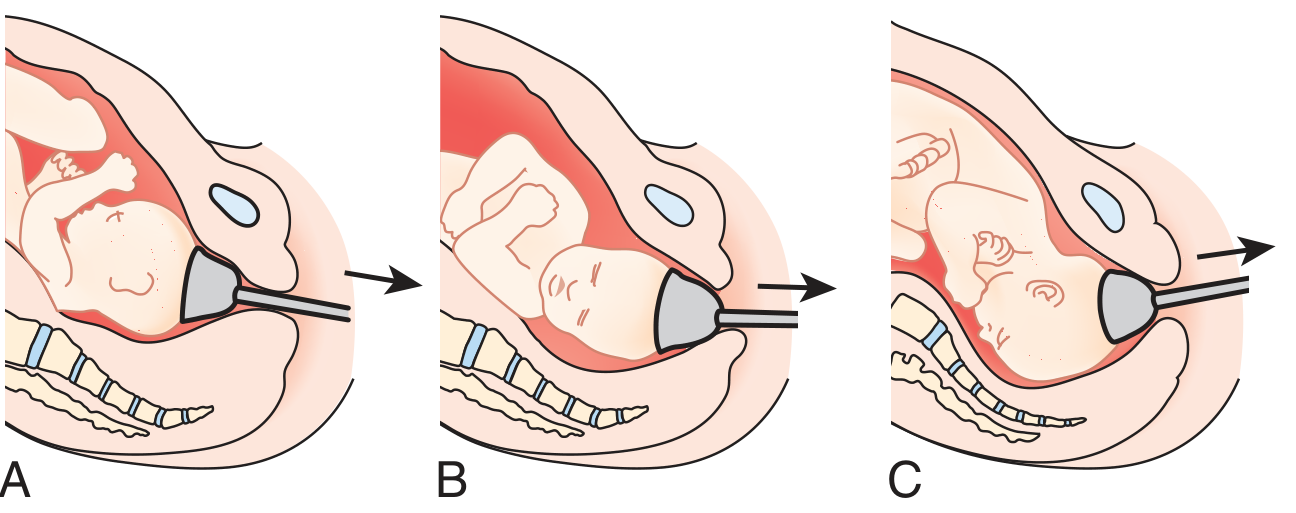
- Compress and insert cup; place over the posterior fontanelle (or up to 3 cm anterior to it toward the face, over the sagittal suture - this is the "flexion point")
- Sweep finger around cup to check no maternal tissue is trapped
- Set vacuum: 10 mmHg resting suction (yellow); 50 mmHg for traction during contractions (red)
- Apply traction at right angles to the plane of the cup surface; do not rock or torque
- As head descends around symphysis, handle rises from horizontal to near-vertical
- Halt traction between contractions; reduce vacuum to 10 mmHg
- Stop if: cup detaches >3 times, no progress after 3 pulls, or delivery not achieved within 20 minutes
Forceps Application (Key Steps)
- Articulate the forceps to verify fit; then disarticulate
- Take left handle in left hand; ease left blade along left side of fetal head (OA position); right hand protects maternal sidewalls
- Take right handle in right hand; insert right blade along right side, with left hand guiding
- Handles should lock easily if correctly applied
- Verify position: posterior fontanelle midway between shanks, 1 cm above shanks; fenestration barely palpable; sagittal suture perpendicular to shanks
Comparison: Forceps vs. Vacuum
| Feature | Forceps | Vacuum |
|---|---|---|
| Maternal trauma | More (cervical/vaginal lacerations) | Less |
| Delivery failure rate | Lower | Higher |
| Neonatal cephalhematoma | Less common | More common |
| Retinal hemorrhage | Less common | More common |
| Subgaleal hemorrhage | Less common | ~4% |
| Intracranial hemorrhage | Similar (~2.5%) | Similar |
| Anesthesia required | More | Less |
| Learning curve | Steeper | Easier |
| Rotation possible | Yes (rotational forceps) | Yes (OP rotation) |
| IQ / long-term outcome | No significant difference between methods |
A 2025 systematic review and meta-analysis (PMID 41341937) confirmed the comparative efficacy of both instruments.
Key evidence: A population study of 583,340 liveborn infants in California found no statistically significant difference in neonatal intracranial hemorrhage between vacuum, forceps, and cesarean delivery. Long-term IQ studies (Israeli Defense Forces cohort of >32,000 subjects) showed no difference in intelligence scores based on delivery method.
Sequential Instrument Use - AVOID
Switching from vacuum to forceps after failure is associated with dramatically worse outcomes:
- Intracranial hemorrhage rate 7.4x higher than spontaneous delivery
- 3.4x higher than vacuum alone
- ACOG guidelines specifically recommend against sequential use of both instruments
Complications
Maternal:
- Cervical, vaginal, or perineal lacerations
- Postpartum hemorrhage from lacerations
- Urinary retention
- Pelvic hematoma
- Maternal discomfort
Neonatal:
- Cephalhematoma
- Subgaleal hematoma (4% with vacuum)
- Intracranial hemorrhage (2.5%)
- Retinal hemorrhages (usually benign, self-limited)
- Facial nerve palsy (forceps)
- Scalp abrasions/lacerations
- Fractured clavicle
- Fetal cervical trauma
- Hyperbilirubinemia
- Shoulder dystocia
- Neonatal scalp emphysema
Common Errors to Avoid
- Starting too soon - head must be engaged and position confirmed
- Incorrect positioning - ensure proper placement before pulling
- Trapping vaginal tissue - always sweep finger around vacuum cup
- Persisting when failure is likely - stop after 20 minutes or 3 cup detachments; proceed to cesarean
Current Practice Trends
Forceps use has declined significantly since the 1970s, with Dildy (2016) describing the operation as "a species on the brink of extinction." The vacuum extractor is now often the first-choice instrument for operative vaginal delivery given its ease of application, lower anesthesia requirement, and easier learning curve. However, declining forceps training is a concern, as forceps carry advantages in certain clinical situations (e.g., when strict vacuum contraindications exist) and produce less morbidity in subsequent pregnancies compared with cesarean delivery.
Sources: Creasy & Resnik's Maternal-Fetal Medicine: Principles and Practice; Pfenninger and Fowler's Procedures for Primary Care, 3rd ed.
Active management of third stage labour
Finding Sources
Finding Sources
Finding Sources
Finding Sources
Reading File
Reading File
Reading File
Reading File
Finding Sources
Finding Sources
Reading File
Finding Sources
Searching PubMed
active management third stage labor oxytocin postpartum hemorrhage
Reading File
Loading Image
Reading File
I now have comprehensive material. Here is the full answer:
Active Management of the Third Stage of Labour (AMTSL)
Definition and Context
The third stage of labour spans from delivery of the infant to delivery of the placenta. It normally completes within 5-30 minutes. Beyond 18 minutes the risk of postpartum haemorrhage (PPH) increases, and by 30 minutes it is up to six times more likely than at normal completion.
Active management is the deliberate, protocol-driven approach to this stage, and is strongly preferred over expectant (physiological) management because it:
- Decreases duration of the third stage
- Reduces maternal blood loss
- Reduces the incidence and severity of PPH
- Reduces the need for blood transfusion
- Reduces the need for additional uterotonics
A 2025 systematic review (PMID 40340625) and a 2026 evidence summary (PMID 42422824) both confirm AMTSL as the global standard for PPH prevention.
The Three Components of AMTSL
1. Uterotonic Agent Administration
The uterotonic is given with or immediately after delivery of the anterior shoulder (before placental separation).
First-line: Oxytocin
- 20-40 units in 1 litre of IV fluid (isotonic), given over 8 hours
- Alternatively: 10 units IM
- Promotes uterine contraction, reduces atony, and hastens placental separation
- Preferred because it is effective, predictable, and well-tolerated
Important: Oxytocin should NOT be given as an IV bolus before placental delivery as this can trap placental fragments or mask an undetected twin.
Second-line uterotonics (if atony/bleeding persists after oxytocin):
| Drug | Dose/Route | Notes |
|---|---|---|
| Methylergonovine (methyergonovine) | 2 mg IM | Normotensive patients only - contraindicated in hypertension |
| Carboprost (15-methyl PGF₂α) | 250 μg IM | For refractory atony |
| Misoprostol (PGE₁) | Oral/sublingual | Useful where IV access not available |
| Dinoprostone (PGE₂) | Rectal/vaginal |
A 2025 meta-analysis comparing misoprostol vs oxytocin (PMID 40357798) found oxytocin remains superior for PPH prevention in hospital settings; misoprostol is an acceptable alternative where oxytocin is unavailable.
2. Controlled Cord Traction (CCT) - Brandt-Andrews Manoeuvre
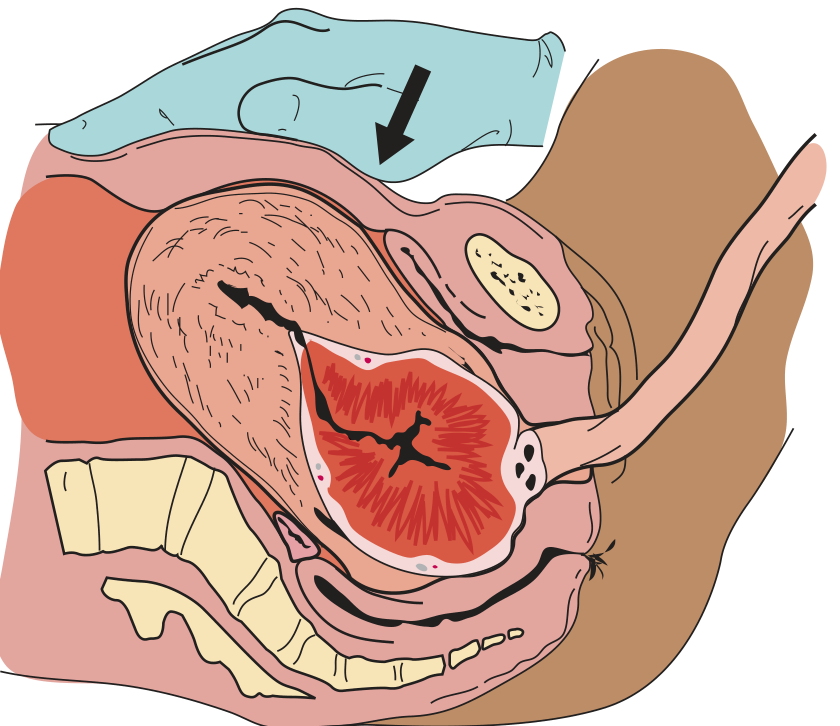
Signs of placental separation (wait for these before applying traction):
- Uterus becomes firmer and rises in the abdomen
- Umbilical cord lengthens 5-10 cm
- Sudden gush of blood from the vagina
Technique:
- Place one hand (guard hand) suprapubically on the lower uterine segment to stabilise and guard against uterine inversion
- Apply firm upward counter-pressure to hold the uterus in place
- Apply firm but gentle downward and backward traction on the clamped cord in the axis of the birth canal
- As the placenta descends to the perineum, lift the cord upward to deliver the placenta through the introitus
- Have the mother bear down gently - usually sufficient to expel the placenta
- Rotate the placenta gently as it emerges to help peel off membranes; use ring forceps to retrieve any adherent membranes
Warning: Avoid overaggressive traction - this may detach the cord from the placenta, cause haemorrhage, or precipitate uterine inversion.
3. Uterine Massage
- Begin immediately after placental delivery
- Place one hand on the uterine fundus transabdominally
- Massage firmly until the uterus is well contracted and hard
- Continue for at least 1 hour post-delivery with periodic re-checks
- Breastfeeding at this stage can be initiated to promote natural oxytocin release and uterine contraction
Cord Clamping and Cutting
- Clamp the cord with a plastic clamp 3-4 cm from the umbilicus; place a curved Kocher clamp 3-5 cm distally
- Cut between the clamps
- Release the clamp on the placental side and collect 7-10 mL of cord blood - verify 3 vessels (2 arteries + 1 vein); a 2-vessel cord occurs in 1:500 deliveries and is associated with fetal anomalies
- Allowing cord blood to drain actively shortens the third stage
- If cord blood gases are needed: apply two additional clamps 10-20 cm distally, cut again, collect arterial and venous samples in heparinised syringes on ice
Normal vs. Prolonged Third Stage
| Timepoint | Clinical significance |
|---|---|
| <5 minutes | Usual placental separation |
| Up to 30 minutes | Acceptable; monitor closely |
| >18 minutes | PPH risk begins to rise |
| >30 minutes | PPH risk up to 6x baseline; act |
If Placenta Not Delivered in 30 Minutes
The placenta may be trapped by a contracted cervical ring (especially if cord lengthening and blood gush already occurred but placenta hasn't passed through cervix).
Brandt Manoeuvre: Apply firm suprapubic pressure to hold uterus in place, then apply firm traction on cord.
If still undelivered - proceed to manual removal of placenta (required in ~3% of vaginal deliveries).
Manual Removal of the Placenta
Indications:
- Placenta not delivered within 30 minutes
- Significant haemorrhage with non-contracting uterus
Technique:
- Change gloves; enter vagina with dominant hand, palpating for lacerations
- Find the cervix; enter the uterus
- Using 2-3 fingers (then whole hand if needed), find the cleavage plane between placenta and uterine wall
- Gently develop this plane circumferentially to separate the placenta
- Grasp placenta with dominant hand; slowly withdraw hand with placenta
- If cleavage plane cannot be developed - suspect placenta accreta/increta/percreta; surgical consultation required
After manual removal: Always examine placenta for completeness; if a lobe is missing, re-enter to retrieve fragments. Administer IV oxytocin and perform uterine massage.
Placenta Examination
Every placenta must be examined after delivery:
- Completeness - missing lobule or membrane suggests retained products
- Cord vessel count - 2 arteries + 1 vein is normal; single umbilical artery = fetal anomaly risk
- Cord insertion - velamentous or marginal insertion noted
- Accessory lobes (succenturiate lobe)
- Clots on uterine surface - may indicate placental abruption
- Overall size/shape abnormalities
The "4 Ts" - Causes of PPH to Monitor For
Even with AMTSL, PPH can still occur. The four causes are:
| Cause | Frequency | Examples |
|---|---|---|
| Tone (uterine atony) | ~80% | Overdistended uterus (twins, polyhydramnios), prolonged labour, grand multiparity |
| Trauma | ~20% | Cervical, vaginal, perineal lacerations; uterine rupture; uterine inversion |
| Tissue | ~10% | Retained placenta/membranes; placenta accreta spectrum |
| Thrombin (coagulopathy) | <1% | DIC, pre-existing bleeding disorders |
PPH definition (ACOG): Cumulative blood loss ≥1000 mL with signs/symptoms of hypovolemia within 24 hours of delivery.
Three preventive strategies for PPH:
- AMTSL
- Spontaneous placental separation during caesarean delivery
- Prolonged postpartum oxytocin infusion
Complications Specific to AMTSL
| Complication | Notes |
|---|---|
| Nausea and vomiting | Side effect of uterotonics (especially ergometrine); acceptable trade-off |
| Uterine inversion | Risk with overaggressive cord traction; treat with uterine relaxants (MgSO₄/β-mimetics) then manual replacement |
| Retained products | If placenta incomplete; risk of endometritis and secondary PPH |
| Maternal hypertension | Contraindication to ergometrine/methylergonovine |
Fourth Stage of Labour
Monitoring continues for 1 hour after placental delivery (the "fourth stage"):
- Periodic uterine fundal massage and palpation for tone
- Inspect cervix and vaginal fornices for lacerations
- Repair episiotomy/lacerations
- Continue oxytocin infusion to maintain contraction
- Monitor for signs of PPH (bleeding, hypotension, tachycardia)
- Encourage breastfeeding
Sources: Pfenninger and Fowler's Procedures for Primary Care, 3rd ed.; Swanson's Family Medicine Review; Rosen's Emergency Medicine; Textbook of Family Medicine, 9th ed.; Creasy & Resnik's Maternal-Fetal Medicine
This is a shared conversation. Sign in to Orris to start your own chat.