
Elaborate describe each and every steps of patella fracture tbw plus encirclage aprroaches from hoppenfield textbook orthopaedics
Reading File
Now let me search the library for the Hoppenfield textbook on patella fracture TBW and encirclage.
Finding Sources
Finding Sources
Let me check if Hoppenfield's book is in the library, and also search for TBW/encirclage content:
Finding Sources
Finding Sources
Finding Sources
Finding Sources
Hoppenfield's book is not in the library. The best available sources are Campbell's Operative Orthopaedics and Rockwood & Green's Fractures. Let me read the detailed surgical steps from both:
Reading File
Reading File
Reading File
Reading File
Reading File
Reading File
Now let me read the detailed surgical steps from Rockwood & Green for TBW and cerclage, and also the approach section:
Reading File
Now I have enough detailed content. Let me also fetch the key TBW surgical image:
Loading Image
Reading File
I now have comprehensive information from both Campbell's Operative Orthopaedics and Rockwood & Green's. I have all the content I need to write a thorough, step-by-step response. Note that Hoppenfield's specific textbook ("Surgical Exposures in Orthopaedics") is not in the library - but the standard steps for TBW plus cerclage are described in detail in the two premier orthopaedic texts available. Let me now compile the full answer.
Note on Hoppenfield's textbook: "Surgical Exposures in Orthopaedics" by Hoppenfield & deBoer is not in the available textbook library. The following is a detailed, step-by-step description synthesized from Campbell's Operative Orthopaedics (15th ed., 2026) and Rockwood & Green's Fractures in Adults (10th ed., 2025) - the two most authoritative orthopaedic references available. The surgical steps are standard and align closely with what Hoppenfield's approach chapter describes.
Patella Fracture: TBW + Cerclage (Encirclage) - Complete Step-by-Step
Biomechanical Principle
The tension band principle converts tensile forces generated at the anterior cortex of the patella (from quadriceps pull) into compressive forces at the articular surface. As the knee flexes, the femoral condyles press against the posterior patella, increasing interfragmentary compression at the fracture site. This is why early active ROM is not just permitted - it is essential to make the construct work.
Cerclage (encirclage) wiring adds a circumferential loop around the patella equator, providing additional circumferential compression and supplementary stability, especially in comminuted or complex fracture patterns.
INDICATIONS
- Displaced transverse patella fractures (gap >2-3 mm or articular step >2 mm)
- Two-part fractures with good bone stock
- Cerclage is added for: comminuted fractures, supplemental stability, or when TBW alone is insufficient
PREOPERATIVE PLANNING
- Standard AP and lateral radiographs of the knee; CT scan for comminuted patterns
- Patient supine on radiolucent table
- Radiolucent tourniquet applied to thigh (inflated only if needed for bleeding control)
- Small bump under the ipsilateral hip to control limb rotation
- Movable small towel roll under knee/ankle for intraoperative position changes
- Equipment: 2x 2-mm K-wires, 18-gauge stainless-steel wire (or braided suture tape), wire tightener/twister, bone-holding forceps/towel clips, mini-fragment screws (optional)
PATIENT POSITIONING
- Patient supine on a radiolucent operating table.
- A small bump under the ipsilateral hip prevents excessive external rotation of the limb.
- A towel bump can be placed under the knee (for slight flexion during approach) or shifted under the heel/ankle (for extension during K-wire insertion and reduction confirmation).
- A pneumatic tourniquet is placed on the proximal thigh. Inflate only if bleeding obstructs visualization - many surgeons keep it deflated to allow assessment of vascularity.
- Prepare and drape the entire lower extremity to allow full knee range of motion intraoperatively.
SURGICAL APPROACH (Anterior Midline)
Skin Incision
- Make a midline longitudinal incision directly over the anterior surface of the patella, extending from approximately 3-4 cm proximal to the superior pole of the patella to 3-4 cm distal to the inferior pole (over the patellar tendon insertion at the tibial tuberosity).
- This extensile incision allows proximal and distal extension if needed, and preserves access for future knee arthroplasty.
Subcutaneous Dissection
- Incise the skin and subcutaneous fat in a single layer, raising full-thickness flaps to expose the retinaculum medially and laterally.
- The skin flaps are reflected just enough to see the full extent of the patella and the medial and lateral retinacular tears (almost always present in displaced fractures).
Deep Exposure
- Identify and assess the retinacular tears - in a displaced transverse fracture, both medial and lateral retinaculum are torn; the extent of tearing is assessed.
- Expose the fracture site - this can be done by:
- Working through the fracture gap itself (most common)
- Extending the retinacular rents medially or laterally for finger access to the articular surface
- If the retinaculum is intact (unusual), a lateral arthrotomy with patellar eversion may be used for direct articular visualization
- Thoroughly irrigate the knee joint with normal saline - significant hemarthrosis is invariably present. Remove all blood clots and small loose bone fragments from the joint.
- Inspect the trochlear groove and articular surface of the femoral condyles for chondral damage.
FRACTURE REDUCTION
- With a periosteal elevator or small curet, clean the fracture surfaces of all fibrin clot and small devitalized bone fragments.
- Using towel clips or bone-holding forceps, achieve anatomical reduction of the main fragments with particular attention to restoring a smooth articular surface - confirm by palpating the articular undersurface through the fracture line or a retinacular rent with a gloved finger.
- The reduction is provisionally maintained while K-wires are inserted.
TENSION BAND WIRING (TBW) - TECHNIQUE 59.17 (Campbell's)
K-Wire Insertion (Two Longitudinal Parallel Wires)
- Drill the first 2-mm K-wire from the inferior pole to the superior pole of the patella. Insert it in the sagittal plane approximately 5 mm deep to the anterior cortical surface. The wire should pass in the plane that divides the patella into medial, central, and lateral thirds (i.e., place one wire in the medial third and one in the lateral third).
- Drill the second 2-mm K-wire parallel to the first, on the opposite third of the patella. Both wires must be:
- Parallel to each other
- Oriented longitudinally (superior-inferior direction)
- About 5 mm posterior to the anterior cortex (not in the posterior third, to avoid articular penetration)
Technical tip - Retrograde insertion option: If it is difficult to drive wires through a reduced patella, insert them retrogradely. Tilt the proximal fragment anteriorly ~90 degrees, drive wires retrograde from the fracture surface into the proximal fragment until they exit the superior pole, then reduce the fracture and drive them forward into the distal fragment.
- Withdraw the wires until flush with the fracture surface, confirm perfect reduction under direct palpation, then drive the wires distally through the distal fragment until they protrude beyond the inferior pole and the patellar tendon attachment.
- Leave long protruding ends of both K-wires above (superiorly, through the quadriceps tendon) and below (inferiorly, through the patellar tendon).
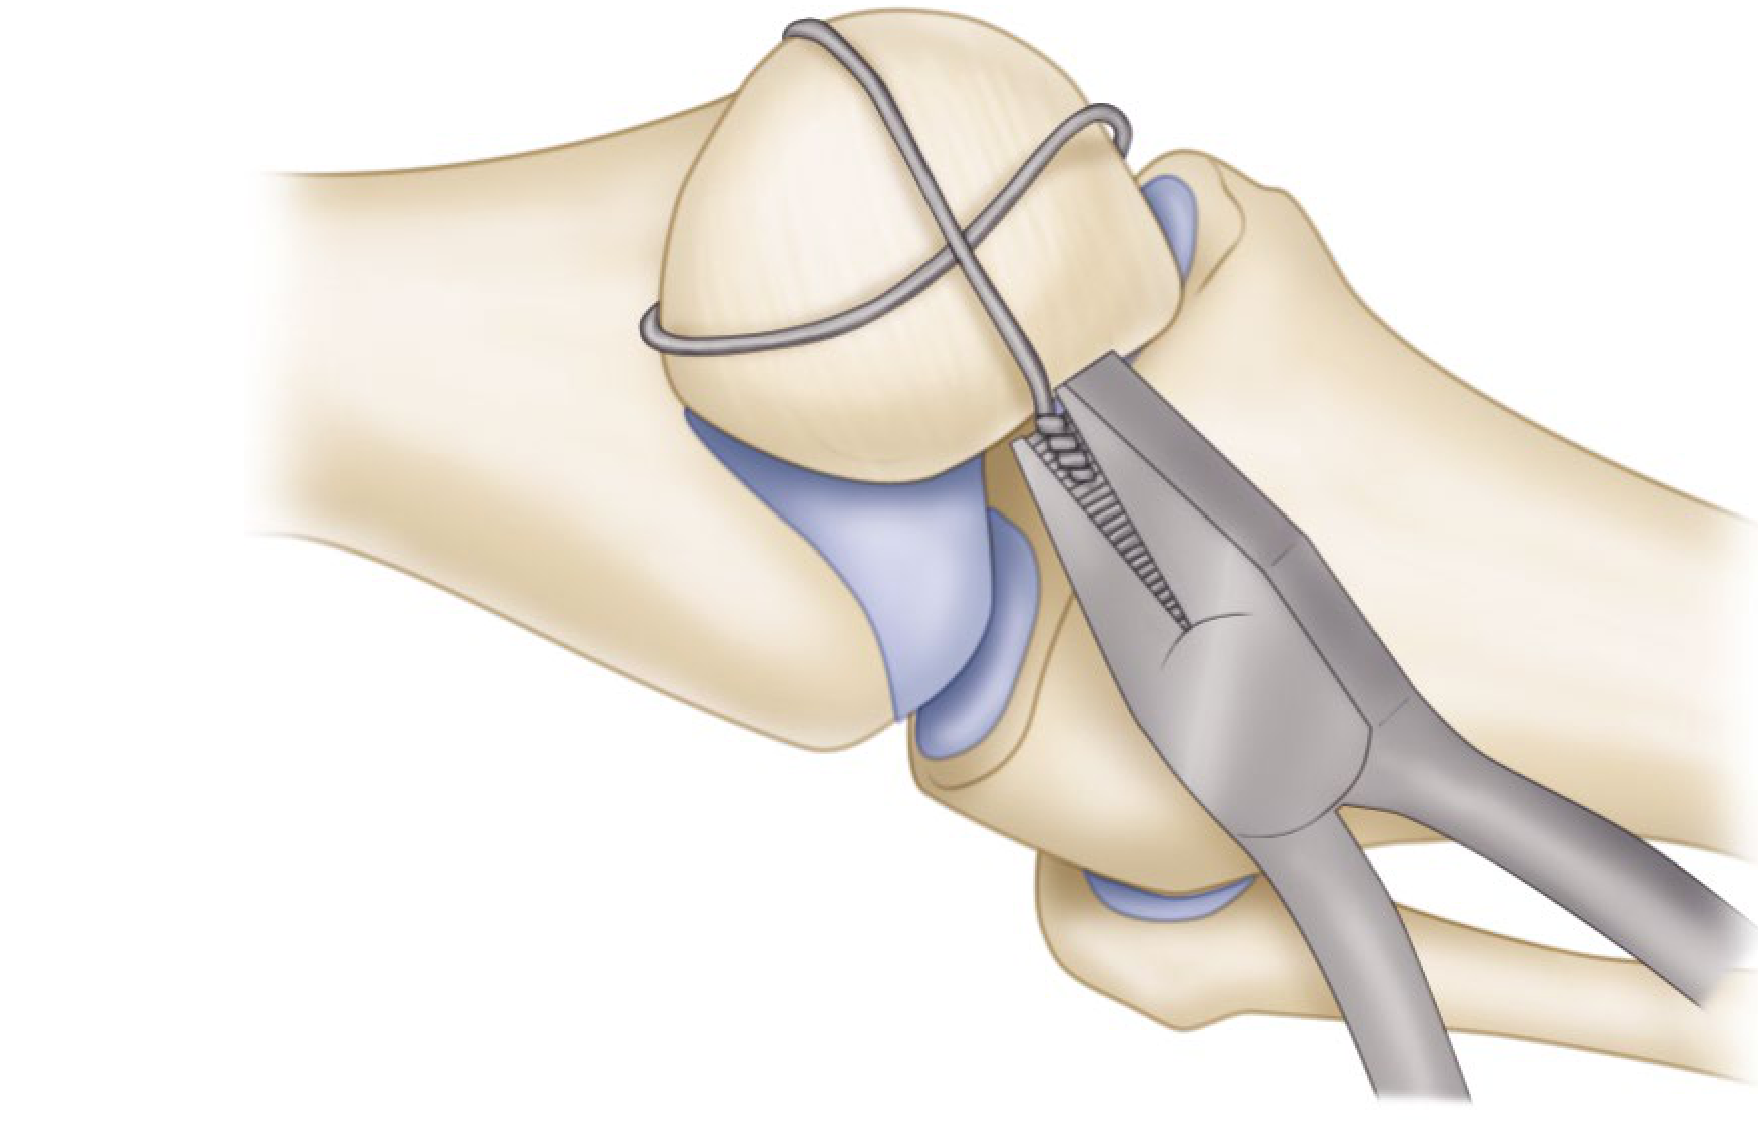
Figure-of-Eight Wire Placement (Anterior Tension Band)
- Pass an 18-gauge stainless-steel wire transversely through the quadriceps tendon attachment at the superior pole, as close to bone as possible, passing deep to the protruding proximal K-wire ends. Use a large Gallie needle or thread through an Intracath needle to facilitate passage.
- Bring both ends of the wire anteriorly over the patella surface.
- Pass the wire transversely through the patellar tendon at the inferior pole, again as close to bone as possible and deep to the distal K-wire ends.
- Cross the two wire ends in a figure-of-eight configuration over the anterior surface of the patella. The crossing point of the figure-of-eight lies at the fracture site.
Critical: The wire must pass close to the bone at both the superior and inferior poles. If placed through tendon tissue away from the bone, it will cut through soft tissue under tension and allow fracture gap.
- Maintain the fracture reduction with clamps, then tighten the wire using a wire-tightening instrument. Tighten both sides symmetrically. Twist the wire ends together firmly - tightening at two points (medial and lateral corners of the figure-of-eight) provides more symmetric and greater overall compression than a single twist.
- Confirm reduction by palpating the articular undersurface - the surfaces should be flush with no step.
Finishing K-Wire Ends
- Bend the superior ends of both K-wires acutely anteriorly (approximately 180 degrees), cut them short.
- Rotate the K-wires 180 degrees and impact the bent ends into the superior margin of the patella, posterior to the wire loops, using an impactor. This prevents proximal migration of the K-wires.
- Cut the inferior ends of the K-wires short, leaving minimal protrusion.
CERCLAGE (ENCIRCLAGE) WIRING - eTECHNIQUE 59.3 (Campbell's - Martin Technique)
Cerclage is added to the TBW construct for additional circumferential compression, especially in comminuted fractures or when supplementary stability is needed.
- Take a separate strand of No. 18 stainless-steel wire.
- Begin at the superolateral border of the patella. Pass the wire transversely through the quadriceps tendon immediately adjacent (next) to the superior pole of the patella - as close to bone as possible.
- Use a large Gallie needle or an Intracath needle to thread the wire through the tendinous tissue. Thread the No. 18 wire into the sharp end of the Intracath, then withdraw the needle - the wire is pulled along the needle track.
- Pass the medial end of the wire along the medial border of both fragments, midway between the anterior and posterior surfaces of the patella (equatorial plane). This centering is important - it prevents the fracture gap from opening either anteriorly or posteriorly when the wire is tightened.
- Continue passing the medial end of the wire transversely through the patellar tendon from medial to lateral around the distal border (inferior pole) of the patella.
- Bring the wire proximally along the lateral border of the patella back to the starting point at the superolateral border.
- The wire now forms a complete circumferential loop around the patella in the equatorial plane.
- Maintain fracture reduction with towel clip or bone-holding forceps.
- Draw both wire ends together and twist them tightly at the superolateral corner until the loop is fully taut and compressing all fragments circumferentially.
- Cut the twist end short and fold the sharp tip down against the bone.
Critical: The cerclage wire must be centered at the midpoint between anterior and posterior surfaces. If it is placed too anteriorly, the fracture will gap posteriorly at the articular surface; too posteriorly and the anterior cortex will gap.
RETINACULAR REPAIR
- Repair the medial and lateral retinacular tears with multiple interrupted absorbable sutures (No. 0 or No. 1 Vicryl). This is not merely cosmetic - retinacular repair significantly increases construct strength biomechanically and restores the extensor mechanism's soft tissue envelope.
- Ensure the repair is not so tight as to restrict ROM - test with passive knee flexion to 90 degrees on the table.
WOUND CLOSURE
- Close the subcutaneous layer with interrupted absorbable sutures.
- Close the skin with interrupted nylon sutures or staples.
- Apply a sterile compressive dressing and a posterior knee splint or knee immobilizer in full extension for the immediate postoperative period.
INTRAOPERATIVE ASSESSMENT
- Before closure, flex the knee passively on the table to 90 degrees to:
- Confirm stability of the construct
- Verify articular congruity (no gap or step-off)
- Ensure the tension band principle is functioning (compression increases with flexion)
- Confirm K-wire ends are not irritating soft tissues with motion
- Obtain intraoperative fluoroscopic AP and lateral views to confirm reduction, hardware position, and absence of articular step-off.
POSTOPERATIVE REHABILITATION
- Day 1-2: Quadriceps setting exercises, straight leg raises in the splint
- Week 1-2: Progressive active-assisted ROM; knee splint removed for exercises
- Week 2-6: Progressive flexion to 90+ degrees; partial weight-bearing with crutches
- Week 6-12: Full weight-bearing; strengthening program
- Implant removal: Symptomatic hardware (K-wire prominence is the most common complaint) may be removed after fracture union - typically 4-6 months. Reoperation rate for symptomatic implants is reported at approximately 33% with traditional K-wire TBW constructs
SUMMARY TABLE
| Step | Action | Key Detail |
|---|---|---|
| Positioning | Supine, bump under hip | Radiolucent table |
| Incision | Midline longitudinal over patella | Extensile |
| Deep exposure | Through fracture gap or retinacular rent | Irrigate joint |
| Reduction | Towel clip / bone forceps | Articular congruity by palpation |
| K-wires | Two 2-mm wires, parallel, longitudinal | 5 mm deep to anterior cortex |
| TBW wire | 18-gauge, figure-of-eight, anterior | Deep to K-wire ends, close to bone |
| Tighten | Two-point twist (medial + lateral) | Symmetric compression |
| K-wire ends | Bend, impact superiorly; cut inferiorly | Prevent migration |
| Cerclage | 18-gauge circumferential loop, equatorial | Midway ant-post; twist at superolateral |
| Retinaculum | Interrupted suture repair | Increases construct strength |
| Test | Flex knee 90 degrees + fluoroscopy | Confirm stability, articular reduction |
Sources:
- [Campbell's Operative Orthopaedics, 15th ed. 2026](Campbell's Operative Orthopaedics, Technique 59.17 and eTechnique 59.3, p. 3384-3386) - TBW and encirclage steps
- [Rockwood & Green's Fractures in Adults, 10th ed. 2025](Rockwood & Green's Fractures, Chapter 60, p. 3006-3011) - biomechanical principles, approaches, and surgical technique variations
This is a shared conversation. Sign in to Orris to start your own chat.