
Lower lumbar back pain radiates towards thigh not whole leg
lumbar nerve root dermatome L2 L3 L4 thigh pain diagram
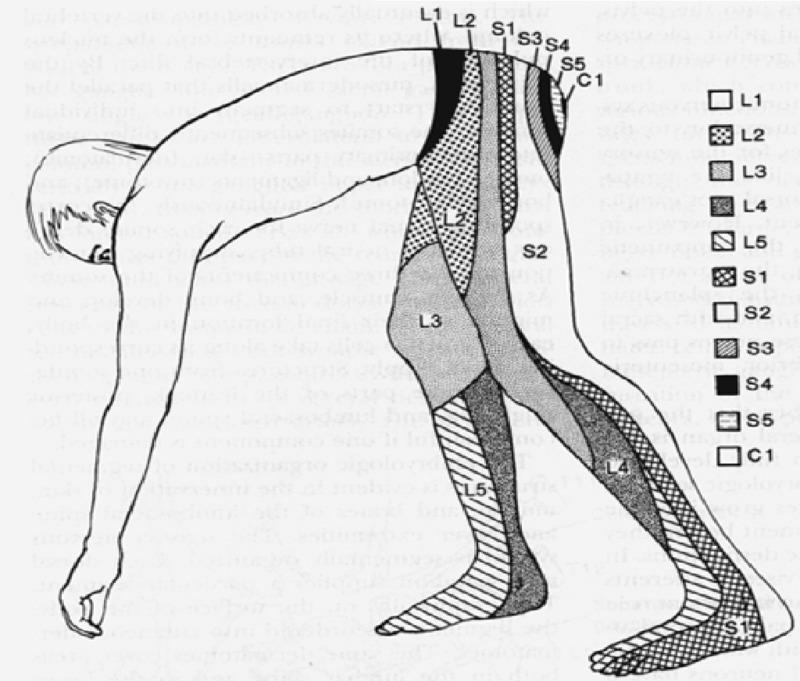
Anatomical diagram depicting a human dermatome map of the lumbosacral and coccygeal regions, shown from a lateral, bent-over perspective to highlight the sensory distribution along the lower extremities and posterior trunk. The illustration uses distinct shading patterns and alphanumeric labels to delineate specific cutaneous areas innervated by individual spinal nerve roots. Key segments include the lumbar dermatomes L1 through L5, sacral dermatomes S1 through S5, and the coccygeal dermatome C1. Visually, L1 covers the inguinal and hip region, L2-L3 transition down the anterior and lateral thigh, and L4-L5 extend down the lower leg to the dorsal foot. Sacral segments S1 and S2 cover the posterior leg and heel, while S3-S5 and C1 are concentrated in the perineal and gluteal regions. This medical illustration is a standard educational tool for neurological examinations, aiding in the localization of spinal nerve root compression or radiculopathy based on sensory loss patterns.
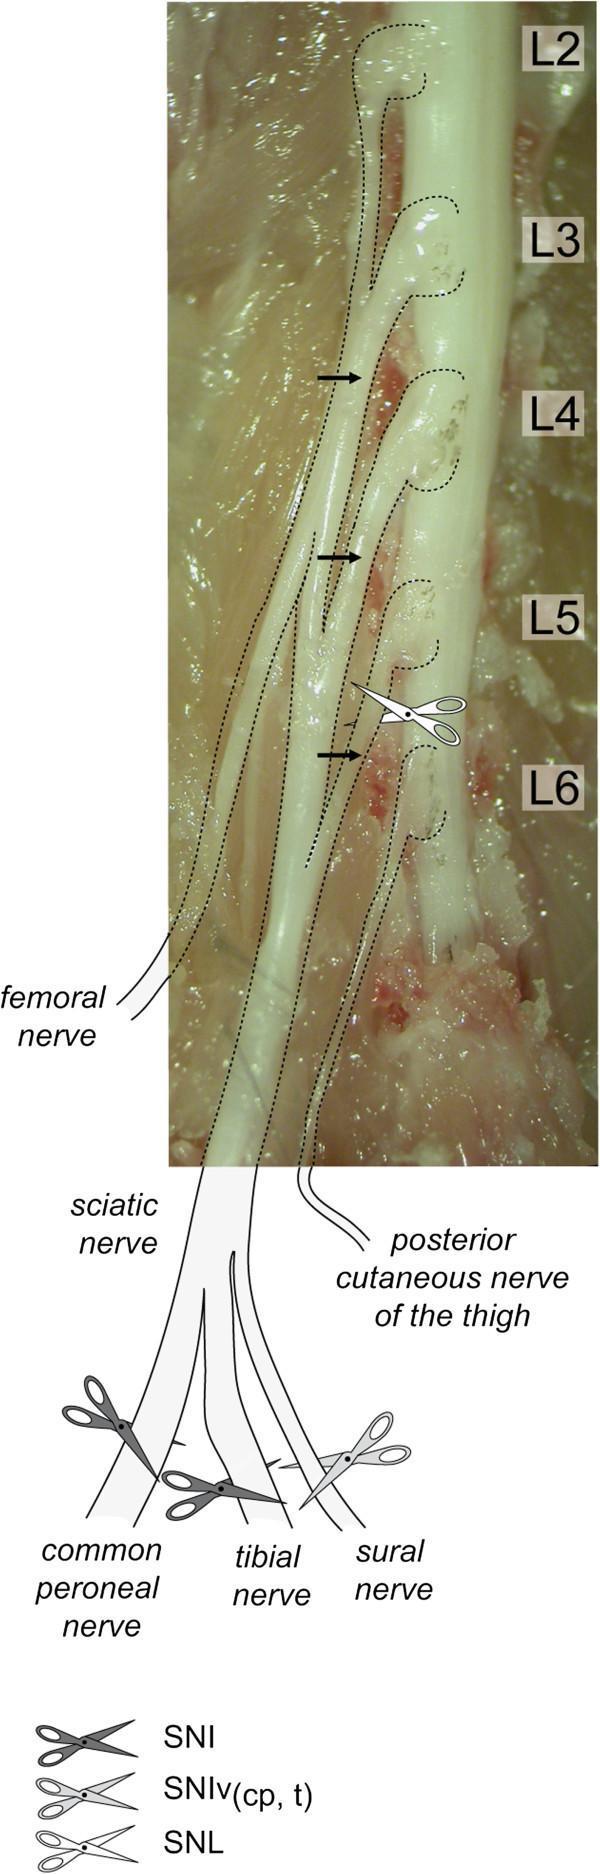
A clinical photograph and schematic anatomical diagram depicting a postero-lateral view of a mouse spinal dissection, specifically focused on the lumbar dorsal root ganglia (DRG) and the formation of the sciatic nerve. The image identifies spinal nerves L2 through L6 and their associated DRGs. Black arrows indicate that the L3, L4, and L5 spinal nerves are the primary contributors to the sciatic nerve, while L6 is shown not contributing. Adjacent to the photograph, a diagram illustrates the sciatic nerve's trifurcation into the common peroneal, tibial, and sural nerves, along with the posterior cutaneous nerve of the thigh. The figure serves as a surgical guide for nerve injury models, using scissor icons to designate specific lesion sites: Spared Nerve Injury (SNI) on the common peroneal and tibial branches, the SNI variant (SNIv) specifically targeting the sural nerve, and Spinal Nerve Ligation (SNL) performed proximally at the L5 spinal nerve level. This anatomical reference is crucial for translational research in neuropathic pain and neurophysiology.
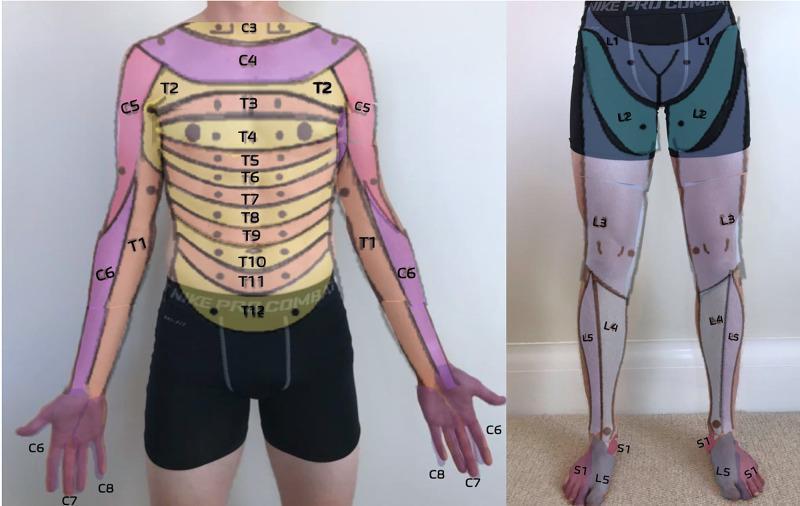
This clinical dermatome map, presented as an anatomical diagram overlaid on a human subject, illustrates the cutaneous sensory distribution of spinal nerves. The anterior trunk displays a sequential horizontal banding pattern representing thoracic dermatomes T2 through T12, with T4 roughly at the nipple line and T10 at the umbilicus. The upper extremities show cervical and upper thoracic distribution: C5 (lateral upper arm), C6 (lateral forearm and thumb), C7 (middle finger), C8 (medial hand and little finger), and T1 (medial forearm and arm). The lower extremity map details the lumbar and sacral levels: L1 (inguinal region), L2 (anterior mid-thigh), L3 (distal thigh and knee), L4 (medial lower leg), L5 (lateral lower leg and dorsal foot), and S1 (lateral foot and small toe). This resource is designed for primary care musculoskeletal medicine to assist in the neurological examination of sensory deficits, radiculopathy, or spinal cord injury level localization.
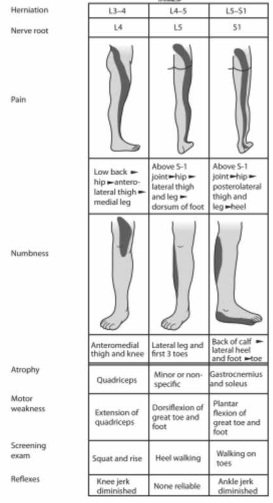
Summary : This figure is a comparative chart detailing the clinical features of lumbar disc herniation at three common levels (L3–4, L4–5, L5–S1), including affected nerve roots (L4, L5, S1), pain and numbness distribution, muscle atrophy, motor weakness, screening exams, and reflex changes. table/chart: # Herniation Levels and Nerve Roots : • L3–4 herniation affects L4 nerve root. • L4–5 herniation affects L5 nerve root. • L5–S1 herniation affects S1 nerve root. # Pain Distribution : • L3–4 (L4): Low back → hip → anterolateral thigh → medial leg. • L4–5 (L5): Above S-1 joint → hip → lateral thigh and leg → dorsum of foot. • L5–S1 (S1): Above S-1 joint → hip → posterolateral thigh and leg → heel. # Numbness Distribution : • L3–4 (L4): Anteromedial thigh and knee. • L4–5 (L5): Lateral leg and first 3 toes. • L5–S1 (S1): Back of calf, lateral heel, and foot/toe. # Muscle Atrophy : • L3–4 (L4): Quadriceps. • L4–5 (L5): Minor or nonspecific. • L5–S1 (S1): Gastrocnemius and soleus. # Motor Weakness : • L3–4 (L4): Extension of quadriceps. • L4–5 (L5): Dorsiflexion of great toe and foot. • L5–S1 (S1): Plantar flexion of great toe and foot. # Screening Exam : • L3–4 (L4): Squat and rise. • L4–5 (L5): Heel walking. • L5–S1 (S1): Walking on toes. # Reflex Changes : • L3–4 (L4): Knee jerk diminished. • L4–5 (L5): None reliable. • L5–S1 (S1): Ankle jerk diminished. # Visual Representation : • Each column includes a diagram showing the typical pain and numbness distribution for the affected nerve root. # Analysis : • The chart clearly distinguishes the clinical features of nerve root compression at different lumbar levels. • Pain and numbness patterns shift from anterolateral (L4) to lateral (L5) to posterolateral (S1) as the herniation level descends. • Reflex changes and motor weakness are specific to the affected root, aiding in clinical diagnosis. • Screening exams and muscle atrophy findings provide additional diagnostic clues for localization.
Lower Lumbar Back Pain Radiating to the Thigh (Not Full Leg)
Why It Stops at the Thigh: Anatomical Basis
- L1: inguinal/groin region
- L2: anterior mid-thigh
- L3: distal thigh and knee
- L4: medial lower leg (goes BELOW the knee)
Differential Diagnosis
1. Upper Lumbar Radiculopathy (L2/L3) - Most Likely
- Caused by disc herniation or stenosis at L1-2 or L2-3
- Pain radiates to groin or anterior thigh
- Associated with weakness of hip flexion (iliopsoas) and anterior thigh sensory changes
- The femoral stretch test (prone, knee flexion) is positive - it tensions L2, L3, L4 roots
- Less common than L4/L5/S1 radiculopathy, but increasingly recognized in older adults with spinal stenosis (Rosen's Emergency Medicine)
2. Facet Joint Syndrome (Referred Pain)
- Facet joint osteoarthritis at the lower lumbar levels produces somatic referred pain into the buttock and posterior thigh - it does NOT typically go below the knee
- Pain is worsened by lumbar extension and bending toward the affected side
- Relieved by forward flexion
- No true neurological deficits (no weakness, no reflex change)
- Prevalence: 25-40% of chronic LBP patients (Firestein & Kelley's Textbook of Rheumatology)
3. Lateral Femoral Cutaneous Nerve (L2-L3) - Meralgia Paresthetica
- Compression of the lateral femoral cutaneous nerve at the inguinal ligament
- Burning pain/numbness over the anterolateral thigh only
- No motor deficit, no reflex change
- Worsened by prolonged standing/walking
4. L3-L4 Disc Herniation (L4 Root)
- Pain pattern: low back → hip → anterolateral thigh → medial leg
- If the radiation stays mainly in the thigh and medial knee, this can mimic a thigh-only pattern early on
- Knee jerk reflex is diminished
- Quadriceps weakness (difficulty squatting/rising)
5. Lumbosacral Plexus Lesion
- Aorto-iliac aneurysm or retroperitoneal pathology can compress the lumbar plexus, causing pain radiating to hip and anterior thigh (Adams & Victor's Neurology)
- Consider if vascular risk factors are present
6. Hip Joint Pathology (Referred Pain)
- Hip osteoarthritis classically refers pain to the groin and anterior thigh
- Pain worsened by internal rotation of the hip
- Not truly "back" pain - but can co-exist and confuse the picture
Key Clinical Distinguishing Features
| Feature | Upper Lumbar Radiculopathy (L2/L3) | Facet Syndrome | Meralgia Paresthetica |
|---|---|---|---|
| Pain location | Groin/anterior thigh | Buttock/posterior thigh | Anterolateral thigh only |
| Neurological deficit | Yes (hip flexor weakness) | No | Sensory only |
| Reflex change | Knee jerk may be reduced | None | None |
| Provocative test | Femoral stretch test + | Extension of lumbar spine | Inguinal ligament pressure |
| Straight leg raise | Negative | Negative | Negative |
Red Flags to Exclude
- Cauda equina syndrome: bilateral symptoms, saddle anesthesia, bladder/bowel dysfunction - emergency
- Retroperitoneal pathology: AAA, psoas abscess, lymphoma - consider if no positional variation
- Vertebral metastasis: constant pain, worse at night, systemic symptoms
Investigations
- MRI lumbar spine - first choice; shows disc herniation, nerve root compression, stenosis, facet arthropathy
- X-ray - limited use, can show spondylolisthesis or degenerative changes
- EMG/NCS - helps confirm radiculopathy and which root is affected
- Femoral nerve stretch test (clinical): prone, hip extended, knee flexed - positive if anterior thigh pain reproduced