
Make a midline incision from the distal aspect of the femur to the tibial tuberosity. Perform a full-thickness skin n dissection over the patella to expose the medial and lateral aspects of the knee joint and the quadratus femoris muscle. n Release the vastus lateralis from its most proximal muscle origin in the quadratus femoris to the level of the joint. This may require release of the iliotibial band laterally to the intermuscular septum. n Because a midline surgical incision over the patella tends to heal with more proliferative scarring in children than in adults, Eilert suggested making the surgical incision over the anterolateral knee so that the scar is not under direct pressure against the patella. The incision must be long enough to expose a sufficient portion of the quadriceps muscle so that it can be realigned, and in an infant with congenital patellar dislocation, the incision may extend halfway up the thigh. n n Occasionally, the rectus femoris must be dissected and lengthened by a Z-plasty. Incise the vastus medialis obliquus from its origin proximally and distally from the patella, the medial capsule, and the patellar tendon. n Reduce the patella into the femoral groove. n Reattach laterally and distally the vastus medialis obliquus to the patellar tendon and medial retinaculum to secure the patella in the femoral groove. n When the initial suture has been placed distally, move the knee through a gentle range of motion to assess reduction and tracking of the patella in the femoral groove. If the tension is too tight on the vastus medialis obliquus, remove the suture and transfer the muscle slightly proximally. If the tension is too lax, attach the vastus medialis obliquus farther distally and laterally. n Occasionally, the patella is so unstable that the gracilis or semitendinosus tendon must be divided at the musculotendinous junction and transferred into the patella as a checkrein for added stability. The vastus medialis obliquus is sutured to the remaining retinaculum of the patella and the quadratus femoris. Continue the repair of the vastus medialis obliquus proximally and distally. Move the knee again through a range of motion to ensure reduction of the patella in the femoral groove and normal tracking during flexion and extension. n Deflate the tourniquet and obtain hemostasis with electrocautery. Insert a drain deep into the wound and close the subcutaneous tissue and skin. n Apply a long leg cast with the knee in 30 degrees of flexion.
Surgical Context
- Release contracted lateral structures (lateral capsule, iliotibial band, lateral quadriceps)
- Medial plication of the lax capsule to stabilize the reduced patella
- Advance/reattach the vastus medialis obliquus (VMO) to maintain reduction
Step-by-Step Technique
Step 1 - Incision and Exposure
Make a midline incision from the distal femur to the tibial tuberosity. Full-thickness skin dissection over the patella to expose medial and lateral aspects of the knee joint and the quadriceps femoris muscle.
Step 2 - Lateral Release
Release the vastus lateralis from its most proximal muscle origin in the quadriceps femoris to the level of the joint. This may require release of the iliotibial band laterally to the intermuscular septum.
Step 3 - Incision Placement Consideration (Eilert's Modification)
Because a midline incision over the patella tends to heal with more proliferative scarring in children than in adults, Eilert suggested an anterolateral incision...
Step 4 - Rectus Femoris Z-plasty (if needed)
Occasionally, the rectus femoris must be dissected and lengthened by a Z-plasty.
Step 5 - Medial Capsule and VMO Release/Mobilization
Incise the vastus medialis obliquus from its origin proximally and distally from the patella, the medial capsule, and the patellar tendon.
Step 6 - Patellar Reduction
Reduce the patella into the femoral groove.
Step 7 - VMO Reattachment (Medial Advancement)
Reattach laterally and distally the vastus medialis obliquus to the patellar tendon and medial retinaculum to secure the patella in the femoral groove.
Step 8 - Intraoperative Tracking Assessment
Move the knee through a gentle range of motion. Adjust VMO tension as needed - proximally if too tight, distally/laterally if too lax.
Step 9 - Checkrein Tendon Transfer (if needed)
If the patella is so unstable that additional stability is needed, the gracilis or semitendinosus tendon is divided at the musculotendinous junction and transferred into the patella as a checkrein.
Step 10 - Complete the VMO Repair
Continue the repair of the vastus medialis obliquus proximally and distally.
Step 11 - Final Tracking Check
Move the knee through range of motion again to ensure reduction and normal patellar tracking during flexion and extension.
Step 12 - Closure and Casting
Deflate tourniquet, hemostasis, drain placement, layered closure. Apply long leg cast with knee in 30 degrees of flexion.
Postoperative Care (Campbell's)
- If anterior skin is under excessive tension, the cast can be changed at 2 weeks under outpatient anesthesia
- Cast removed at 4-6 weeks, followed by active and passive exercises
- In older patients, continuous passive motion (CPM) may be used for the first 3-6 weeks
- A long leg brace is worn for 6-12 months to prevent knee hyperextension
Key Anatomical Principles
| Structure | Role in Deformity | Surgical Action |
|---|---|---|
| Vastus lateralis | Primary deforming/lateral vector | Released proximally to joint |
| Iliotibial band | Lateral tether of patella | Released to intermuscular septum |
| Rectus femoris | Tight in severe cases | Z-plasty lengthening if needed |
| Vastus medialis obliquus | Lax/ineffective medial vector | Mobilized and advanced distally/laterally |
| Medial retinaculum | Stretched lax capsule | Plicated/tightened via VMO reattachment |
| Gracilis/semitendinosus | Augmentation option | Checkrein tendon transfer if needed |
Make video of the same
- Illustrated poster/diagram - A visual step-by-step surgical diagram of the lateral release and medial plication technique, showing key anatomical structures and steps
- PowerPoint presentation - A multi-slide deck walking through each surgical step with labeled anatomy
- Illustrated PDF guide - A formatted document with surgical steps and anatomical diagrams
- The Campbell's Operative Orthopaedics companion videos (Video 31.8 is referenced directly in the textbook for this exact technique)
- Orthobullets or AO Surgery Reference for surgical technique videos
- JBJS Essential Surgical Techniques which often has narrated video walkthroughs
Make an illustrated step-by-step surgical poster of this procedure
A detailed medical surgical poster titled "Lateral Release & Medial Plication for Congenital Patellar Dislocation" showing 12 numbered illustrated steps in a clean grid layout. Medical illustration style, clean white background, anatomical accuracy. Each step has a small labeled diagram and short caption: Step 1: Midline incision from distal femur to tibial tuberosity, skin flaps raised, patella and knee joint exposed - diagram shows anterior knee with incision line marked Step 2: Vastus lateralis released from proximal origin down to joint level; iliotibial band released to intermuscular septum - diagram shows lateral structures being cut Step 3: Anterolateral incision option (Eilert modification) shown - scar placement away from patella for pediatric patients Step 4: Rectus femoris Z-plasty lengthening shown if contracted - diagram shows Z-shaped tendon cut and lengthening Step 5: VMO (vastus medialis obliquus) incised from patella, medial capsule and patellar tendon mobilized Step 6: Patella manually reduced into femoral trochlear groove - diagram shows patella being seated centrally Step 7: VMO reattached distally and laterally to patellar tendon and medial retinaculum - sutures shown Step 8: Knee moved through range of motion - patella tracking assessed, VMO tension adjusted Step 9: Optional gracilis or semitendinosus tendon transfer as checkrein into patella for severe instability Step 10: VMO repair completed proximally and distally along full length Step 11: Second range of motion check - patella confirmed tracking in femoral groove Step 12: Drain inserted, wound closed, long leg cast applied with knee at 30 degrees flexion Bottom of poster: anatomical legend showing patella, VMO, vastus lateralis, iliotibial band, patellar tendon, medial retinaculum. Color coded: lateral structures in red, medial structures in blue, bone in beige. Professional medical education poster style.
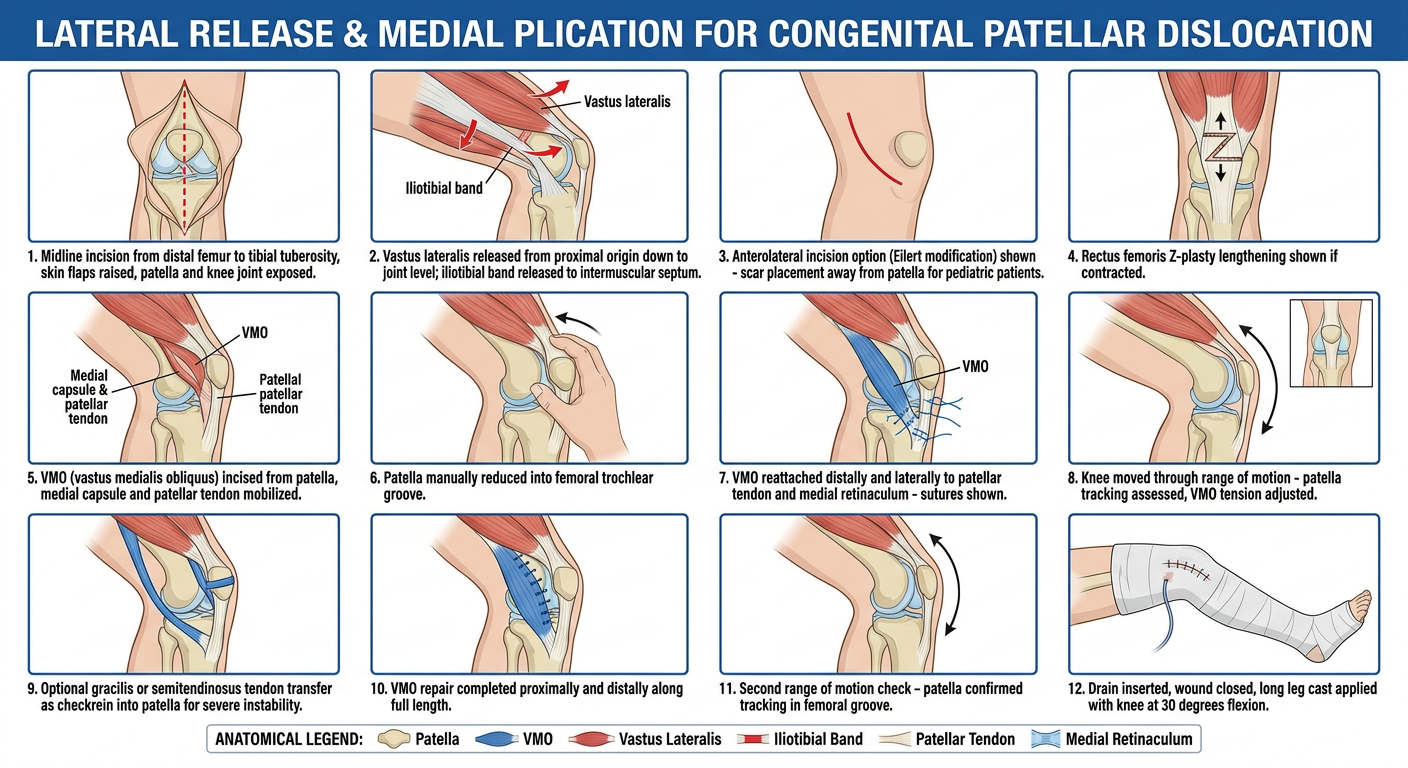
- All 12 operative steps with labeled anatomical diagrams
- Color coding: lateral structures (red), medial structures (blue), bone (beige)
- An anatomical legend at the bottom (patella, VMO, vastus lateralis, ITB, patellar tendon, medial retinaculum)
- The Eilert modification note for pediatric incision placement
- Optional steps (Z-plasty, gracilis/semitendinosus checkrein transfer)
- Final casting position (30° knee flexion)