icd insertion
Implantable Cardioverter-Defibrillator (ICD) Insertion
What Is an ICD?
- A power source (lithium-based battery, lasts 5-10 years; longevity depends on shock frequency)
- Electronic circuitry with storage/remote monitoring capability
- A transvenous lead system (right ventricular lead for sensing, pacing, and shock delivery)
Indications
Class I (Recommended)
- Survivors of cardiac arrest from VF or hemodynamically unstable sustained VT not due to reversible causes (with >1 year meaningful survival expected)
- Structural heart disease with spontaneous sustained VT (hemodynamically stable or unstable)
- Syncope of undetermined origin with inducible sustained VT/VF at electrophysiologic study
- LVEF <35% due to prior MI - at least 40 days post-MI, 90 days post-revascularization, NYHA class II or III
- Nonischemic dilated cardiomyopathy with LVEF <35% and NYHA class II or III
- LV dysfunction post-MI with LVEF <30%, NYHA class I (40 days post-MI, 90 days post-revascularization)
- Nonsustained VT with prior MI, LVEF <40%, inducible VF/VT at EP study
- Long QT syndrome with syncope and/or VT while on beta-blockers
- Catecholaminergic polymorphic VT with syncope/sustained VT on beta-blockers
- Spontaneous type 1 Brugada pattern with sustained VA or syncope from presumed VA
Class IIa (Reasonable)
- Unexplained syncope + significant LV dysfunction + nonischemic dilated cardiomyopathy
- Sustained VT with normal/near-normal ventricular function
- NYHA class IV patients as bridge to transplant or LVAD (>1 year survival expected)
- Nonischemic cardiomyopathy from Lamin A/C mutation with ≥2 risk factors
- Hypertrophic cardiomyopathy with ≥1 major SCD risk factor
- Arrhythmogenic RV dysplasia/cardiomyopathy with syncope
- Cardiac sarcoidosis, giant-cell myocarditis, or Chagas disease
Class IIb (May Be Considered)
- Nonischemic heart disease, LVEF <35%, NYHA class I
- Long QT syndrome with SCD risk factors
- Syncope + advanced structural heart disease with unexplained cause
- Familial cardiomyopathy associated with sudden death
- LV noncompaction
Class III (Not Indicated)
- Life expectancy <1 year or poor functional status
- Incessant VT/VF (insufficient arrhythmia control)
- Significant psychiatric illness that would preclude follow-up
- NYHA class IV drug-refractory heart failure without transplant/LVAD candidacy
- Syncope in patients with no inducible VT and no structural heart disease
Device Types
| Type | Description |
|---|---|
| Single-chamber ICD | RV lead only - sensing, pacing, shock |
| Dual-chamber ICD | RV + RA leads - added atrial sensing for SVT discrimination |
| CRT-D | Biventricular pacing + defibrillation - for LVEF <35% with wide QRS (LBBB) |
| S-ICD | Totally subcutaneous - no transvenous leads; no pacing capability |
The Procedure
Historical Context
- 1970s-80s: Required thoracotomy for epicardial patch placement under general anesthesia with one-lung ventilation
- Modern era: Percutaneous transvenous lead placement has replaced epicardial approaches
Technique
- Venous access - typically subclavian or cephalic vein (pneumothorax is a recognized complication of subclavian access)
- Lead placement - RV lead advanced under fluoroscopy to RV apex or septum; RA lead added if dual-chamber
- Pocket creation - generator placed in subcutaneous or submuscular infraclavicular pocket
- Device testing - VT/VF is induced; cardioversion/defibrillation thresholds (DFT) are tested; shock strength programmed above minimum required
- ATP programming - antitachycardia pacing set up for VT zones (interrupts reentry circuit without shock)
- VF management: device can deliver up to 5 additional shocks if the first shock fails
Anesthesia Options
- Local anesthesia + IV sedation (midazolam + fentanyl)
- Monitoring: pulse oximetry, 5-lead ECG, NIBP
- Deep sedation required for device testing (shocks are painful)
- Preferred in patients with: EF <30%, CHF, CAD, pulmonary hypertension, CKD, valvular disease, or those who cannot lie flat
- Additional monitoring: arterial line may be added
- External defibrillator pads required for all ICD placements (backup if implanted device fails)
- Must be vigilant for complications: MI, stroke, cardiac perforation/tamponade, pneumothorax
Preoperative Evaluation
- EP studies to characterize arrhythmia type
- Optimize CHF/hemodynamic status preoperatively
- Patients often present with EF <30% and may require vasopressors during procedure
- Electrophysiologic studies may define VT morphology and substrate
Complications of Implantation
- Infection (up to 11.7% with repeated instrumentation/device revisions)
- Pneumothorax (subclavian access)
- Cardiac perforation/tamponade
- Pocket hematoma
- Lead dislodgement
- Venous thrombosis
ICD Malfunction (Post-implant)
- Increase/change in shock frequency
- Inappropriate shocks (SVT sensed as VT, oversensing of T waves, noncardiac signals)
- Syncope, near-syncope, dizziness (undersensing of VT/VF)
- "Phantom shock" - sensation without device evidence (~10% of patients; associated with PTSD)
- Magnet application: temporarily disables ATP and defibrillation; switches pacemaker to asynchronous mode (AOO/VOO/DOO)
- Device interrogation to identify cause
Lead Extraction
- Lead fracture, venous/myocardial rupture, tamponade
- Small but real chance of requiring emergent cardiac surgery
Postoperative Care
- Continuous monitoring in PACU (especially in patients with EF <30%)
- Watch for early lead dislodgement and pocket complications
- Remote device monitoring available on most modern ICDs
- Patients should be counseled about activity restrictions and driving limitations per institutional/guideline protocols
inter costal drainage insertion
Intercostal Drain (ICD) Insertion
Overview
Indications
| Condition | Notes |
|---|---|
| Tension pneumothorax | Potentially lethal; requires urgent tube insertion after needle decompression |
| Simple/large pneumothorax | Spontaneous or traumatic |
| Hemothorax | Traumatic bleeding into pleural space |
| Hemopneumothorax | Combined blood and air |
| Pleural effusion | Symptomatic or diagnostic |
| Empyema | Infected pleural collection |
| Chylothorax | Lymphatic fluid |
| Post-operative | After thoracic, cardiac, or oesophageal surgery |
Key anatomy note: Insertion below the 5th intercostal space risks crossing the pleural recesses and injuring the liver (right side) or spleen (left side).
Anatomy and the "Triangle of Safety"
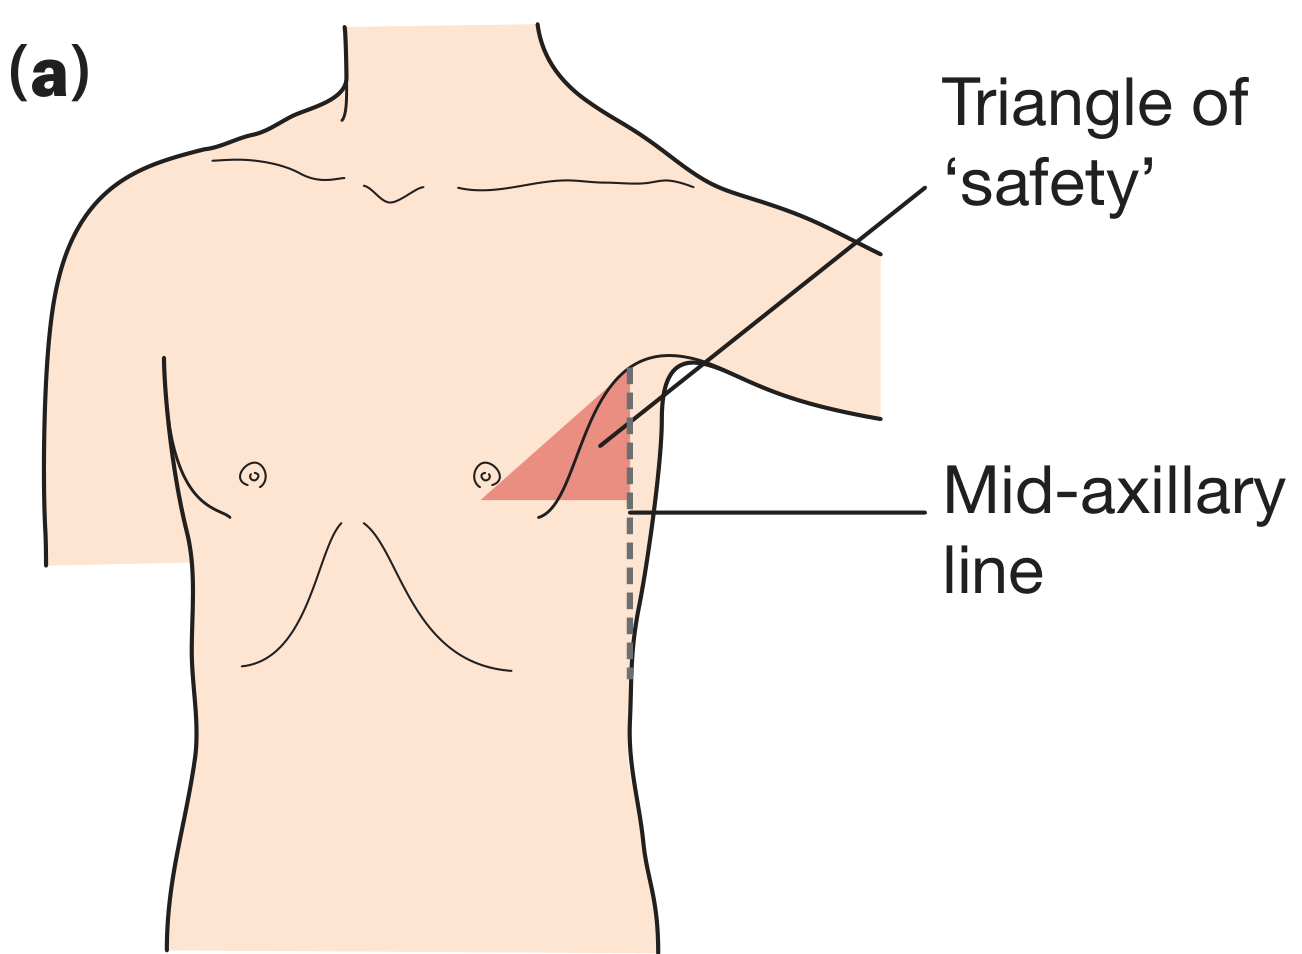
- Anterior - anterior axillary line / lateral border of pectoralis major
- Posterior - mid-axillary line
- Inferior - above the level of the nipple (5th intercostal space)
- Superior - apex of the axilla
- Avoids the breast tissue
- Avoids the internal mammary artery (which runs ~3 cm lateral to the sternal border)
- Minimizes damage to underlying muscle
- 4th or 5th intercostal space is the target - confirmed by palpating the sternal angle (angle of Louis = articulation of rib II), then counting inferiorly
Equipment
- Sterile drape, gown, gloves, mask
- Local anaesthetic (e.g., lidocaine 1-2%)
- Scalpel (size 15 or 11 blade)
- Large curved artery forceps (Kelly clamp) for blunt dissection
- Chest drain tube (see size guide below)
- Suture (0 or 1-0 silk) - retaining stitch + closing stitch
- Underwater seal drainage system
- Sterile dressing/tape
| Indication | Tube Size |
|---|---|
| Simple pneumothorax | Small bore 10-14 Fr (Seldinger) |
| Pleural effusion | Small-medium bore 10-24 Fr |
| Haemothorax | Large bore 28-36 Fr |
| Empyema | Medium-large bore 20-28 Fr |
| Trauma | Large bore 28-36 Fr |
Pre-procedure Preparation
- Patient position - Semi-recumbent, arm abducted and placed behind head to open the axillary space
- Consent - Explain procedure and risks
- Imaging - Confirm side and level (CXR; ultrasound guidance recommended, especially for effusion/empyema)
- IV access - Ensure patent; analgesia/sedation as needed
- Monitoring - SpO2, HR, BP
- Mark the site before cleaning and draping
Surgical (Blunt Dissection) Technique - Step by Step
1. Anaesthesia
- Infiltrate the skin, subcutaneous tissue, periosteum of the rib, and parietal pleura with local anaesthetic (e.g., 10-20 mL of 1% lidocaine)
- The rib periosteum is extremely sensitive - it must be adequately anaesthetized
- Aspirate as you advance to confirm pleural entry before incising
2. Skin Incision
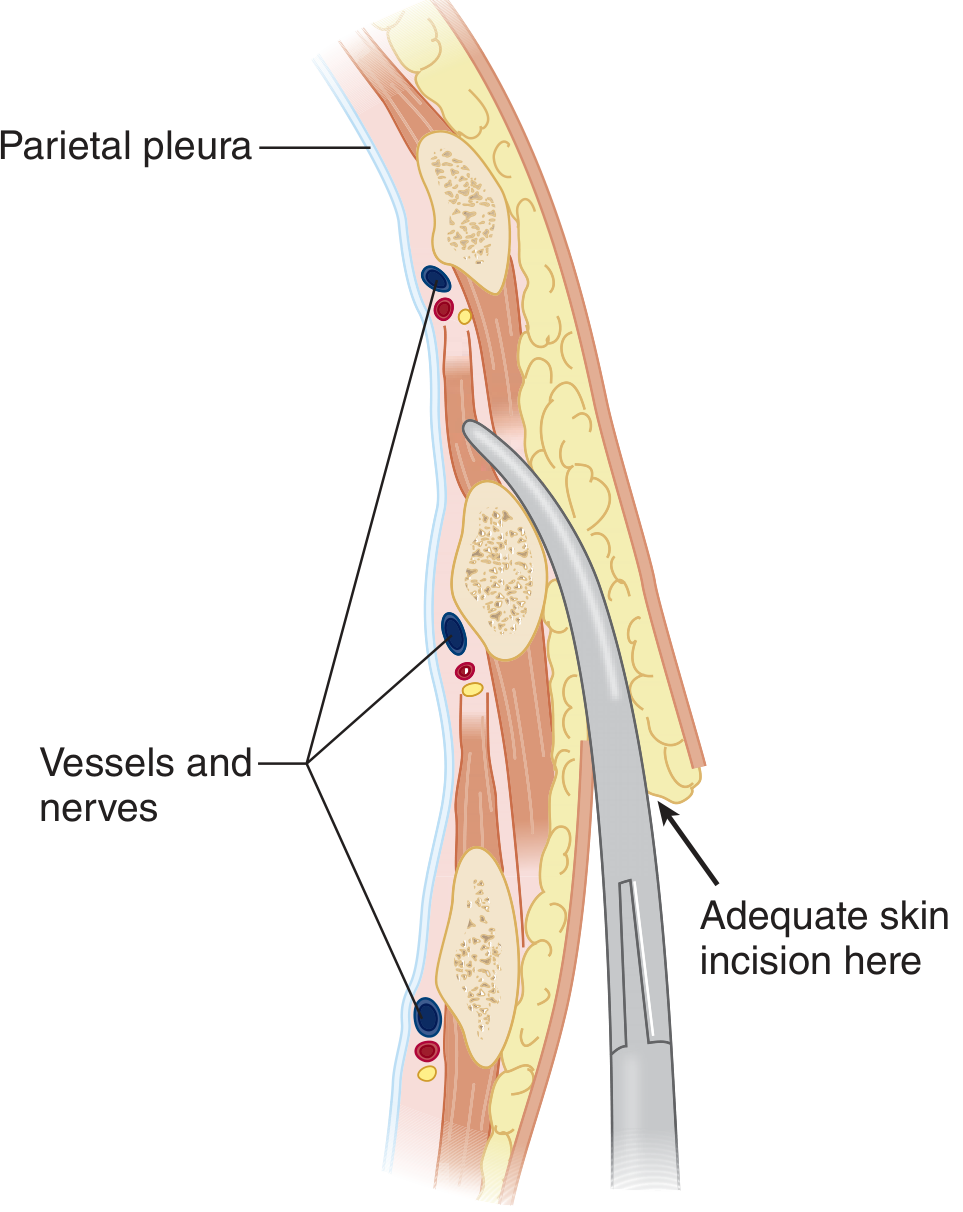
- Make a 2-3 cm horizontal incision in the chosen intercostal space, at the upper border of the rib below
- Cut only the skin with the scalpel; deeper dissection is blunt
3. Blunt Dissection
- Use a curved artery forceps (Kelly clamp) to blunt dissect through the subcutaneous tissue and muscle layers (serratus anterior and intercostals)
- Advance just over the top of the rib to avoid the neurovascular bundle
- Once through the internal intercostal fascia, open the clamp to enlarge the hole to at least 2 cm
4. Pleural Entry
- Insert a gloved finger through the tract to:
- Confirm you are in the pleural space
- Check the lung is not adherent to the chest wall (prevents lung puncture)
- Clear any clot or adhesions
5. Oblique Tract
- Create an oblique tract so that the skin incision and the pleural hole do not directly overlie each other - this reduces the risk of air entrainment around the tube
6. Tube Insertion
- Clamp the distal end of the chest tube to prevent spillage
- Guide the tube with a finger or over the artery forceps (not trocar, which is no longer recommended due to injury risk)
- Advance until all side holes are 2.5-5 cm inside the chest wall
- Direction of tube:
- Pneumothorax - aim toward the apex (anterosuperiorly)
- Haemothorax - aim posteriorly and laterally (dependently)
- Pleural effusion/empyema - toward the base
7. Secure the Drain
- Retaining stitch - a suture around the tube at the skin to secure it; must not obliterate the drain lumen
- Closing (mattress) suture - a vertical mattress suture inserted alongside for later wound closure:
- Include for pneumothorax management
- Omit for empyema (the tract should remain open for drainage, provided pleural adherence is present)
- Cover with an occlusive dressing
8. Connect to Underwater Seal
- Connect immediately to the underwater seal drainage bottle
- Confirm correct placement by:
- Swinging of fluid in the tubing with respiration (indicates patent connection to pleural space)
- Bubbling on expiration (if pneumothorax present)
- Confirm with chest X-ray
Seldinger (Small-Bore) Technique
- Needle and syringe to enter the pleural space (confirm with fluid/air aspiration)
- Pass a guidewire through the needle
- Remove the needle; dilate the tract with sequential dilators
- Advance the drain over the guidewire
- Remove the guidewire; connect to drainage system
Needle Decompression (Emergency Temporizing Measure)
- Insert a 14-gauge IV cannula into the 2nd intercostal space, midclavicular line, just above the 3rd rib
- Alternatively: 4th-5th intercostal space, anterior axillary line (shorter distance to pleura)
- Rush of air confirms the diagnosis
- Must be followed immediately by tube thoracostomy
- Avoids the internal mammary vessels (3 cm lateral to the sternal border)
Underwater Seal Drainage
- The bottle acts as a one-way valve - air and fluid exit but cannot re-enter
- The drain tube is submerged 2-3 cm below the water surface
- Suction: 20-30 cm H₂O may be applied if lung fails to re-expand
- Caution: inserting the drain - not the suction - is the life-saving manoeuvre
- Suction can worsen an air leak if the lung is fragile
- Suction can deviate the mediastinum if the lung is reluctant to expand
- Never clamp a bubbling drain - rapid lung collapse or tension pneumothorax can result
- Exception: immediate life-threatening hemorrhage on drain insertion (clamp and go to OR for emergency thoracotomy)
Post-Procedure Management
| Monitor | Frequency |
|---|---|
| CXR to confirm position | Immediately after insertion |
| Tube swinging and bubbling | Continuous observation |
| Volume and nature of drainage | Every nursing check |
| Signs of subcutaneous emphysema | Regular chest exam |
| Serial CXRs | As clinically indicated |
- Pneumothorax - when bubbling has stopped for 24 hours on suction (or water seal), lung fully expanded on CXR
- Haemothorax/effusion - when drainage is serous and <200 mL/24 hours
- Do not remove chest tubes from mechanically ventilated patients (risk of new pneumothorax)
- Ask the patient to take a deep breath in and hold (Valsalva/end-inspiration)
- Remove briskly while an assistant ties the closing mattress suture
- Apply an occlusive dressing
Complications
Insertion-Related
| Complication | Cause/Notes |
|---|---|
| Intercostal vessel injury / haemothorax | Inserting below rather than above the rib |
| Lung laceration | Failure to check for lung adhesions; trocar use |
| Liver/spleen injury | Insertion below 5th intercostal space |
| Subcutaneous emphysema | Side hole not fully within pleural space |
| Cardiac perforation | Medial insertion; rare |
| Diaphragmatic penetration | Low insertion |
Post-Insertion
| Complication | Notes |
|---|---|
| Infection/empyema | More common with traumatic or prolonged drains |
| Drain blockage | Do not irrigate; replace or insert second drain |
| Malposition | Tube kinked, coiled, or outside pleural space; confirm on CXR |
| Re-expansion pulmonary oedema | Rapid drainage of large effusion; limit drainage to 1-1.5 L at a time |
| Persistent air leak | Suggests bronchopleural fistula |
| Drain dislodgement | Secure adequately; cover with occlusive dressing if accidental removal |
Special Notes
- Infection risk is slightly higher than for pacemaker insertion; meticulous sterile technique throughout
- Autotransfusion: In massive haemothorax, collect blood in a heparinized autotransfusion device for reinfusion
- Blocked tube: Do not irrigate or use a Fogarty catheter - replace the tube or insert a second one
- Empyema drainage: Omit the closing stitch; the tract should lie open. Small-bore Seldinger drains are now preferred first-line for effusions/empyema alongside fibrinolytics
Generate a visual anatomy poster showing intercostal insertion sites
Medical anatomy education poster titled "Intercostal Drain Insertion Sites" showing: 1. A large frontal view of the human thorax (male, no shirt) with clear anatomical landmarks labeled: - The "Triangle of Safety" highlighted in green/teal shading in the left axillary region, bounded by: anterior axillary line, mid-axillary line, and horizontal line at the level of the nipple (5th intercostal space) - Ribs numbered 1-7 on the right side - Sternal angle (Angle of Louis) labeled at the 2nd rib articulation - 2nd intercostal space midclavicular line marked with a red dot labeled "Needle Decompression Site (Tension PTX)" - 4th-5th intercostal space anterior axillary line marked with an orange dot labeled "Alternative Needle Decompression" - 5th intercostal space mid-axillary line (within triangle of safety) marked with a large blue dot labeled "Chest Drain Insertion Site" 2. A close-up inset diagram (bottom left) showing a cross-section of the intercostal space: - Upper rib and lower rib visible - Neurovascular bundle (nerve, artery, vein - VAN) drawn on the INFERIOR surface of the upper rib - Drain tube shown entering ABOVE the lower rib (correct position) - Red X mark showing incorrect insertion below the rib (near neurovascular bundle) - Labels: "Intercostal vein", "Intercostal artery", "Intercostal nerve", "Insert ABOVE upper border of rib", "AVOID inferior margin" 3. A small inset (bottom right) showing patient positioning: - Patient semi-recumbent, arm raised behind head to expose axilla - Arrow indicating site of insertion 4. Color-coded legend: - Green triangle = Triangle of Safety - Red dot = Needle decompression (2nd ICS MCL) - Blue dot = Chest drain insertion (5th ICS MAL) 5. Footer text: "BTS Guidelines | Always insert ABOVE the rib | Ultrasound guidance recommended" Clean clinical white background, professional medical illustration style, bold clear labels, blue and white color scheme with green highlighted safe zone
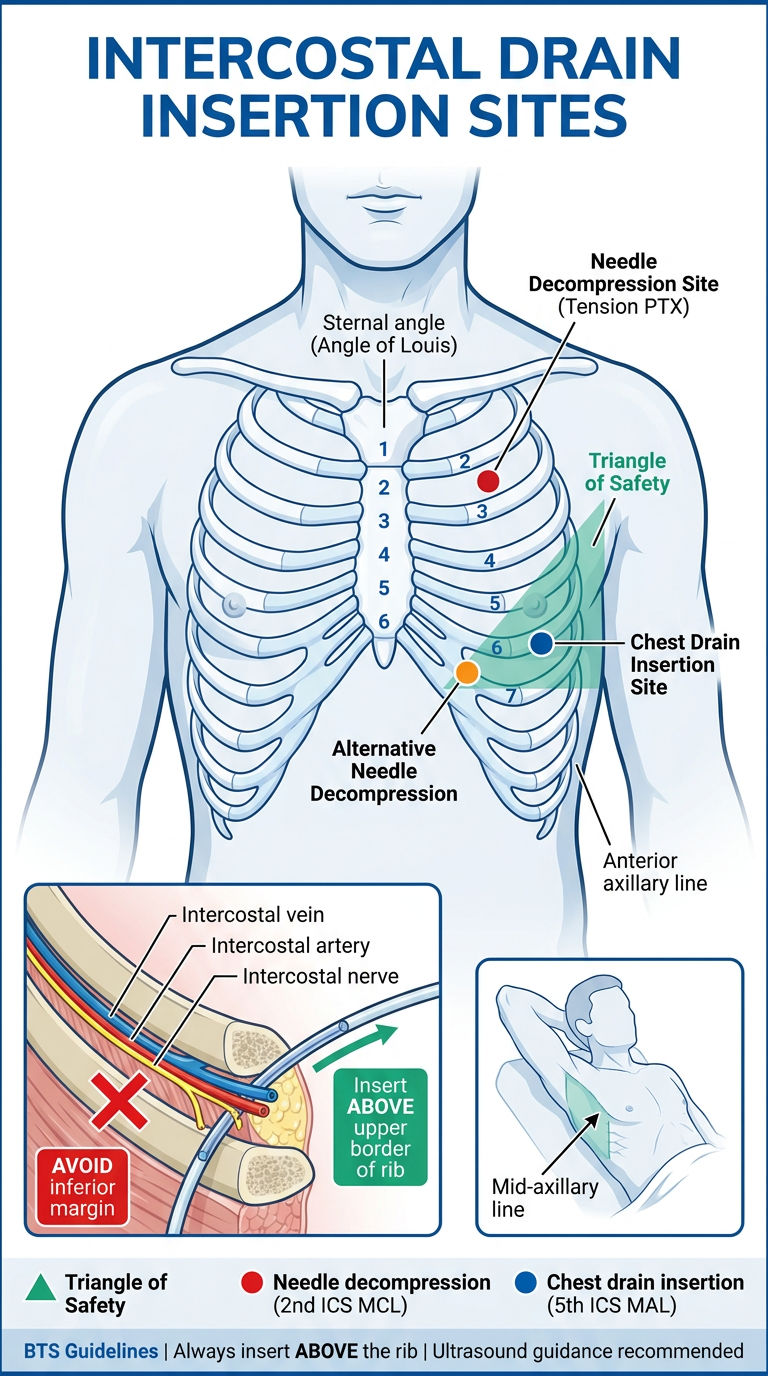
- Triangle of Safety (green zone) - the preferred site for all chest drain insertions; 5th ICS between the anterior and mid-axillary lines, above the nipple level
- Needle decompression site (red dot) - 2nd ICS midclavicular line, used for emergency tension pneumothorax decompression
- Alternative decompression site (orange) - 4th-5th ICS anterior axillary line, increasingly preferred as the chest wall is thinner here
- Intercostal cross-section inset - shows the neurovascular bundle (VAN - vein, artery, nerve) on the inferior surface of the rib with the correct insertion point just above the upper border of the rib below
- Patient positioning inset - arm raised behind the head to open the axillary space
Subcutaneous emphysema approach diagnosis treatment and management
Subcutaneous Emphysema (Surgical Emphysema)
Definition
Pathophysiology
- Lung parenchyma / tracheobronchial tree - air leaks through a breach in the parietal pleura and enters the chest wall directly
- Macklin effect (interstitial emphysema) - air from alveolar rupture dissects back along bronchovascular sheaths into the hilum, then into the mediastinum (pneumomediastinum), then into the extrapleural/subcutaneous spaces
- External source - gas-producing organisms, penetrating wounds, GI tract perforations, dental air drills
Causes
Thoracic Causes (most common)
| Cause | Notes |
|---|---|
| Pneumothorax | Most common - always presume underlying pneumothorax in any SE |
| Rib fractures | Fractured ends lacerate pleura |
| Tracheobronchial injury | Blunt trauma near carina or penetrating cervical tracheal injury; presents with PTX + SE + persistent air leak after ICD insertion |
| Barotrauma / mechanical ventilation | Alveolar overdistension, high PEEP; air tracks via Macklin effect |
| Chest drain malposition | Side hole of drain outside pleural space |
| Post-surgical | After thoracotomy, thoracoscopy, or VATS |
| Oesophageal perforation (Boerhaave) | SE + pneumomediastinum + left pleural effusion; crepitus in the neck |
Other Causes
| Cause | Notes |
|---|---|
| Penetrating neck/chest trauma | Pharyngeal/laryngeal/tracheal injury; SE worsens airway obstruction |
| Laparoscopic surgery | CO₂ insufflation tracking subcutaneously |
| Dental procedures | High-speed air drills forcing air into fascial planes |
| Spontaneous pneumomediastinum | Violent cough, asthma, childbirth, Valsalva |
| Gas-forming infection | Clostridium spp. (gas gangrene); crepitus with fever and systemic sepsis - a surgical emergency |
| Intra-abdominal sources | IBD, perirectal abscess, pancreatitis, colorectal perforation |
| Factitial | Air self-injection |
Clinical Features
Symptoms
- Neck/facial/chest swelling and tightness
- Voice change (hoarseness if laryngeal air)
- Dysphagia (if severe facial/neck SE)
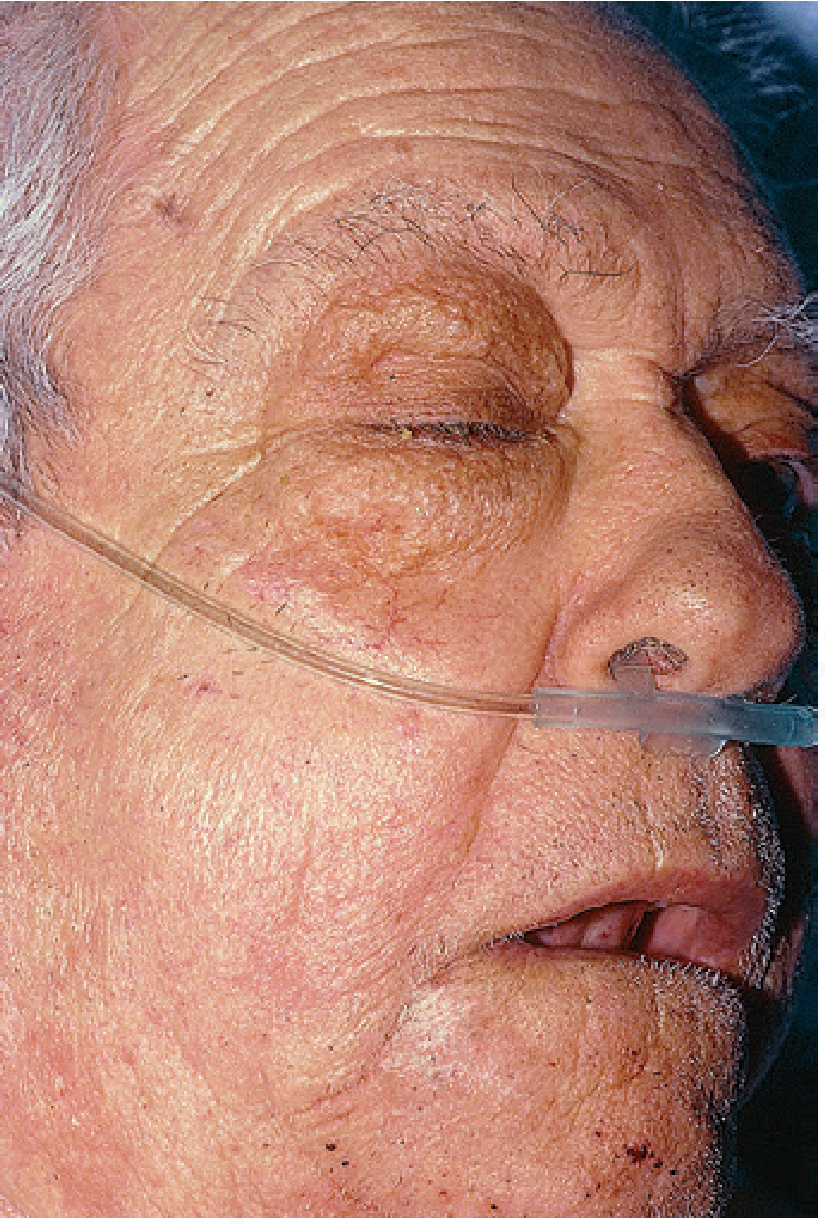
- Eye closure from periorbital swelling (alarming but benign)
- Rarely: dyspnoea, stridor (if SE contributes to airway compression)
Signs
- Crepitus - the hallmark; a characteristic crackling/crunching sensation on palpation ("snow crunching underfoot" or "Rice Krispies")
- Swelling that does not pit (unlike oedema)
- May extend from chest wall to neck, face, axillae, abdomen, scrotum
- Hamman's sign - mediastinal crunch heard on auscultation with each heartbeat (indicates pneumomediastinum)
- Signs of the underlying cause (absent breath sounds, tracheal deviation, etc.)
Diagnosis
Approach
Step 1: Clinical Assessment (ABCDE)
- Airway: Is there stridor, hoarseness, or difficulty swallowing? Is the airway at risk?
- Breathing: Respiratory rate, SpO₂, breath sounds, tracheal position
- Circulation: HR, BP (tension pneumothorax/haemothorax)
- History: Trauma, recent procedure, cough, vomiting, dental work, ventilator patient?
Step 2: Imaging
| Investigation | Finding | Notes |
|---|---|---|
| Chest X-ray | Linear transradiancies in soft tissues; may see pneumothorax, pneumomediastinum, rib fractures | SE can obscure/mimic pneumothorax; also causes linear artefacts that interfere with interpretation |
| CT chest | Gold standard - defines extent of SE, identifies source (PTX, pneumomediastinum, tracheobronchial injury, oesophageal perforation) | Recommended when CXR is equivocal or to exclude serious underlying injury |
| POCUS / Lung USS | More sensitive than CXR for detecting pneumothorax (absent lung sliding, barcode sign) | First-line in trauma (eFAST) |
| Bronchoscopy | Directly visualises tracheobronchial tears | Indicated if major bronchial injury suspected (massive SE + persistent air leak post-ICD) |
| CT oesophagram / contrast swallow | Confirms/excludes oesophageal perforation | If Boerhaave suspected |
Key rule from Tintinalli's: Always presume an underlying pneumothorax in any patient with SE - even if it is not visible on CXR. POCUS is more sensitive than CXR for detecting the pneumothorax.
Red Flags Requiring Urgent Investigation
| Feature | Likely underlying cause |
|---|---|
| SE + unilateral absent breath sounds + haemodynamic instability | Tension pneumothorax |
| SE + persistent air leak after ICD insertion | Tracheobronchial tear - bronchoscopy urgently |
| SE rapidly spreading to neck + fever + systemic sepsis | Gas gangrene (Clostridial) - surgical emergency |
| SE + chest pain + dysphagia post-vomiting | Boerhaave syndrome (oesophageal rupture) |
| SE + stridor/hoarseness after neck trauma | Laryngotracheal injury - secure airway urgently |
| SE in ventilated patient + deteriorating compliance | Barotrauma - consider reducing ventilator pressures |
Management
Immediate Priorities
-
Secure the airway if at risk (stridor, hoarseness, rapidly progressive neck SE)
- Intubation may become impossible if SE progresses - act early
- In neck trauma: fibreoptic intubation or surgical airway (tracheostomy) below the level of injury
- Tracheostomy is the definitive airway in laryngotracheal injury with SE
-
Identify and treat the underlying cause - SE itself is rarely immediately dangerous, but its cause often is
Treat the Underlying Cause
| Cause | Treatment |
|---|---|
| Pneumothorax | Intercostal drain (ICD) - mandatory if ventilated or tension PTX |
| Tension pneumothorax | Immediate needle decompression → ICD |
| ICD side hole outside pleural space | Reposition or replace the drain |
| Tracheobronchial tear | Definitive surgical repair (right posterolateral thoracotomy for right mainstem; left thoracotomy for left bronchus); minimise positive pressure ventilation - ECMO as bridge in severe cases |
| Barotrauma (ventilated patient) | Reduce tidal volumes, PEEP, and plateau pressures; lung-protective strategy; ICD if pneumothorax present |
| Boerhaave syndrome | Emergency surgical repair or endoscopic stenting + broad-spectrum antibiotics |
| Gas gangrene | Emergency wide surgical debridement + IV penicillin G + hyperbaric oxygen |
| Laparoscopic CO₂ SE | Usually self-limiting; high-flow O₂ accelerates resorption; rarely requires intervention |
Management of the SE Itself
- Observation - SE resorbs spontaneously over days to weeks as the underlying leak is controlled
- High-flow supplemental oxygen - accelerates resorption by replacing nitrogen with oxygen (which resorbs ~65x faster); use 100% O₂ via non-rebreather mask
- Reassure the patient - periorbital swelling is alarming but benign
- Airway compromise → surgical airway
- Severe discomfort / inability to close eyes
- Compartment syndrome
- Blowhole incisions - small bilateral infraclavicular incisions allowing air to escape
- Drain manipulation - if caused by misplaced ICD side hole, reposition or add suction
- Subcutaneous drains - fenestrated drains placed subcutaneously in severe cases
Specific Notes for Ventilated Patients
- Maintain ICD for the full duration of mechanical ventilation - never remove while ventilated
- If SE develops on the ventilator: place ICD on the affected side without waiting for CXR confirmation
- Reduce ventilator pressures (target Pplat <30 cmH₂O, TV 6 mL/kg IBW)
Summary Algorithm
Subcutaneous Emphysema Detected
        |
        ├── Airway threatened? (stridor, hoarse, neck SE) → SECURE AIRWAY FIRST
        |
        ├── Haemodynamically unstable?
        |       └── Tension PTX → Needle decompression → ICD
        |
        ├── Trauma patient?
        |       ├── POCUS / eFAST
        |       ├── CXR + CT chest
        |       └── PTX → ICD; if massive SE + persistent air leak → bronchoscopy
        |
        ├── Ventilated patient?
        |       ├── ICD on affected side
        |       └── Reduce ventilator pressures
        |
        ├── Post-vomiting + chest pain?
        |       └── Boerhaave → CT + contrast swallow → surgical/endoscopic repair
        |
        ├── Fever + systemic sepsis?
        |       └── Gas gangrene → urgent surgical debridement
        |
        └── SE only, cause treated, mild-moderate
                └── High-flow O₂ + observation → resolves spontaneously